SpringBoot 学习笔记
1 SpringBoot 简介

1.1 什么是微服务
-
以前的传统方式
-
一个应用中,很多模块组合在一起
-
若想要再实现一个类似功能的应用,需要将整个应用复制过去
-
然而里面很多功能或许在新的应用中根本用不到,无疑非常笨重
-
-
微服务架构
-
打破以前 all in one 的模式,将每个功能元素独立出来
-
在使用的时候,将每个功能进行动态组合
-
我需要什么功能,就去复制什么功能,然后进行组合,而不是去复制整个应用
-

1.2 什么是 SpringBoot
-
Spring Boot 可以轻松创建可以 “直接运行” 的独立的、生产级的基于 Spring 的应用程序
-
它的本质还是 Spring 框架,但是他帮助我们做了很多的整合,不用我们再去配置 Tomcat、DispatcherServlet 等等
-
对 Spring 平台和第三方库有很大的支持度,因此可以轻松上手
-
在 Spring Boot 的应用程序需要最少两的 Spring 配置即可
SpringBoot 的特性
-
SpringBoot 的核心就是 自动装配
-
创建独立的 Spring 应用程序,直接嵌入了 Tomcat、Jetty 等服务
-
提供自配置的 “启动器” 依赖项以简化构建配置
-
尽可能地自动配置 Spring 和第三方库
-
提供生产就绪功能,例如指标、健康检查和外部化配置
-
无需代码生成,无需 XML 配置
1.3 Hello World
- 新建项目,选择 Springboot 选项,下载源使用阿里的,比较快,然后 next

- 然后是项目相关的描述信息,然后点击 next

- 选择 web 模块中的 Spring web,点击 next

- 完善相关信息之后,点击 finish,等待项目相关依赖加载完成

- 完善项目结构,然后编写一个测试控制器 TestController

package com.jiuxiao.hello.controller;

import org.springframework.web.bind.annotation.RequestMapping;
import org.springframework.web.bind.annotation.RestController;

/**
 * 测试
 *
 * @author: WuDaoJiuXiao
 * @Date: 2022/05/17 17:36
 * @since: 1.0.0
 */
@RestController
public class TestController {

    @RequestMapping("/hello")
    public String hello(){
        return "Hello World!";
    }
}
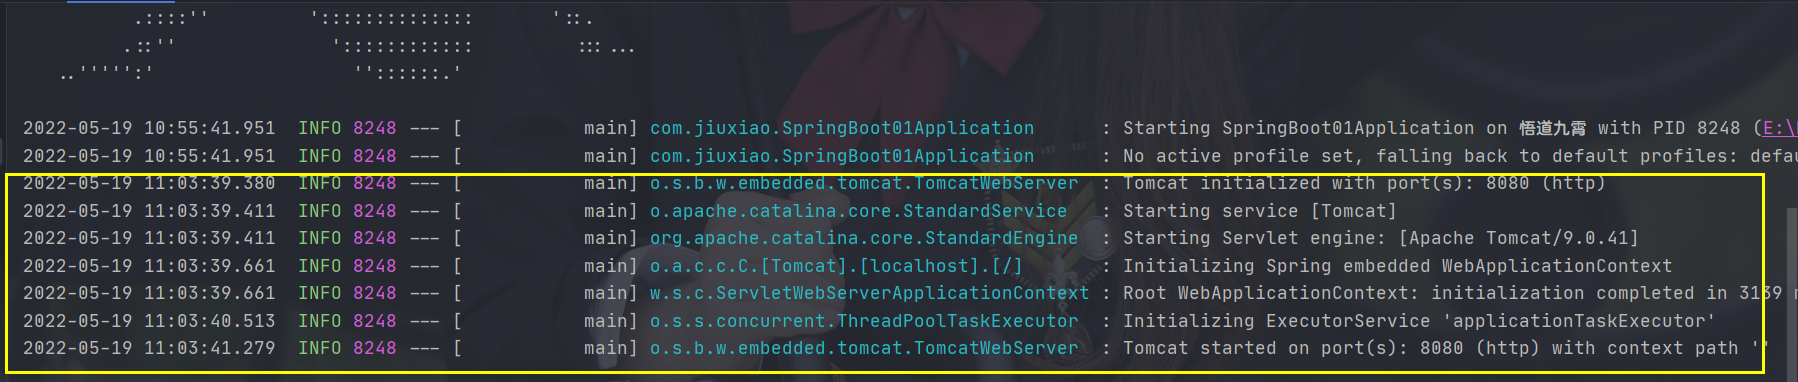
启动项目,访问 8080 端口(默认为 8080,可在 application.properties 中修改端口号),然后访问我们写的测试接口 /hello ,成功

2 自动装配原理初探
2.1 pom.xml
2.1.1 项目依赖管理
打开项目的配置文件 pom.xml,看起来和以前的 ssm 项目差不多,仔细观察发现,以前的依赖都是由 GAV 三部分构成
但是在 SpringBoot 中没有了 V(版本号),这是为什么?
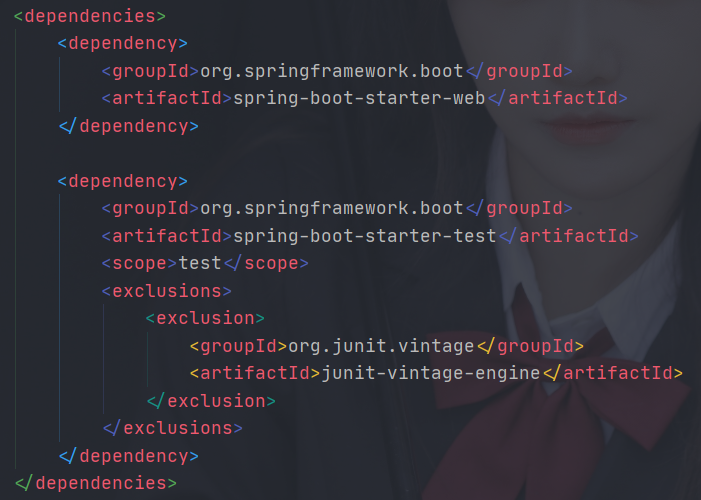
难道依赖没有版本号吗?显然不可能。继续往下找,发现有一个 <dependencyManagement> 的配置,看名字似乎是依赖管理器?
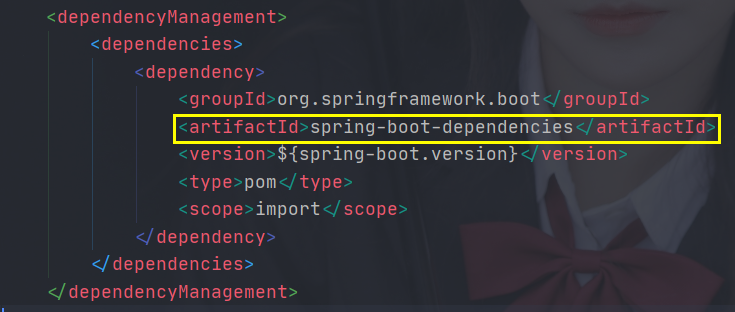
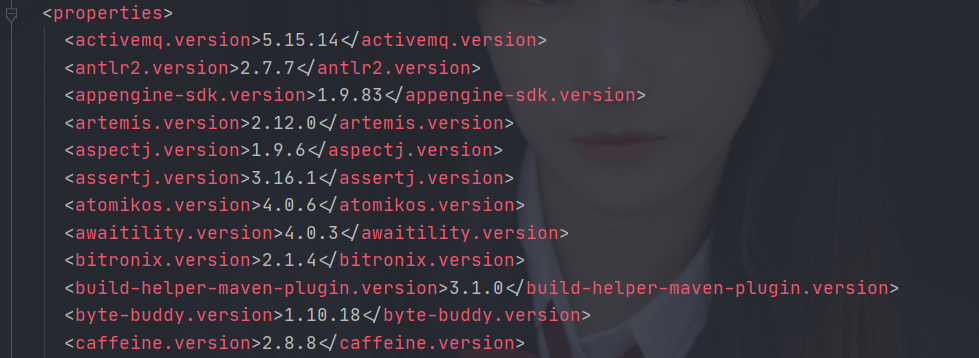
点击进入 spring-boot-dependencies ,我们发现,原来 SpringBoot 将版本号都在 spring-boot-dependencies-xxx.pom 文件里统一进行管理了
2.1.2 启动器
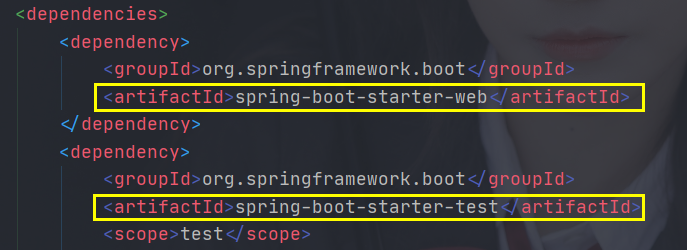
配置文件中,我们稍微仔细观察,会发现一个规律:好像所有的依赖都是以 spring-boot-starter 开头的?
这应该不是偶然,我们去 SpringBoot [官方文档](Developing with Spring Boot) ,官方这里有对于启动器的描述:
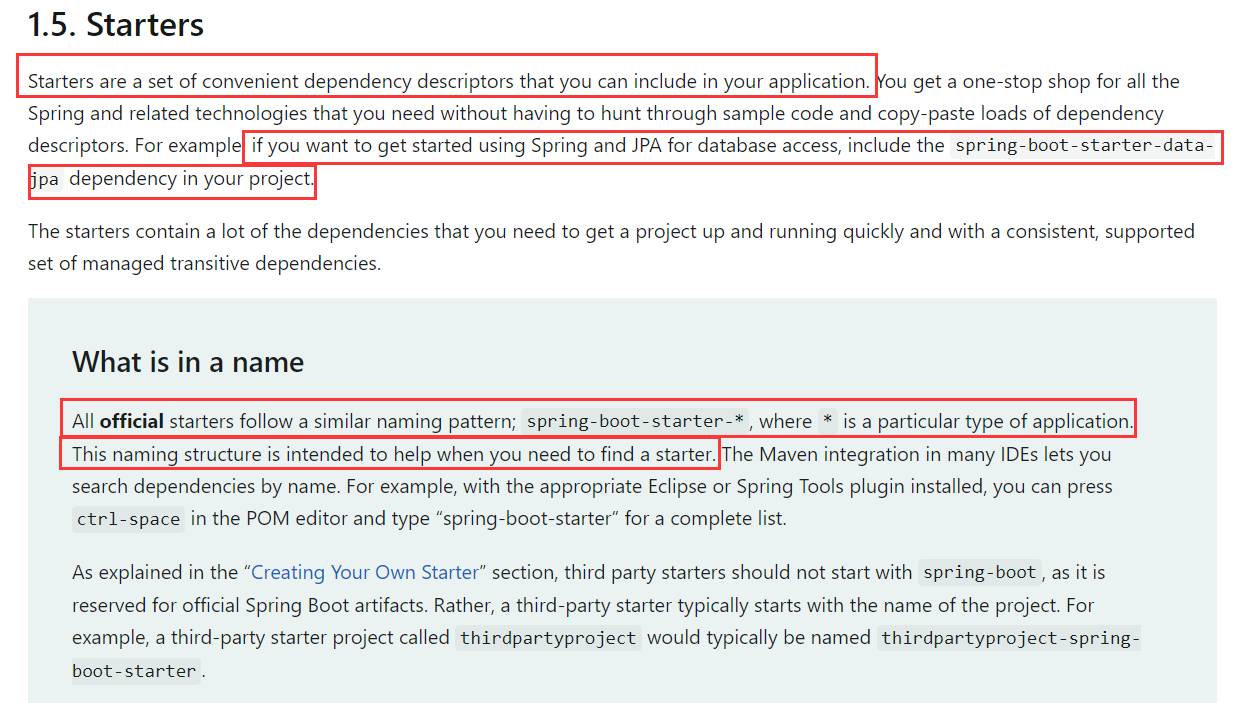
启动器是一个方便于我们在项目中引入依赖的集合
官方启动器的名字都是类似于 spring-boot-starter-* 的形式,这可以很方便的帮助我们快速引入项目所需要的环境以来
比如想要引入关于 aop 的依赖,只需要加上 aop 启动器,即 spring-boot-starter-aop 即可,需要什么功能,只需要加入对应的启动器
2.2 主启动类的注解
项目的主启动类只有寥寥几行代码,那为什么就能启动整个项目?
package com.jiuxiao;

import org.springframework.boot.SpringApplication;
import org.springframework.boot.autoconfigure.SpringBootApplication;

@SpringBootApplication
public class SpringBoot01Application {

    public static void main(String[] args) {
        SpringApplication.run(SpringBoot01Application.class, args);
    }
}
我们首先通过研究注解来探究 SpringBoot 自动装配的原理
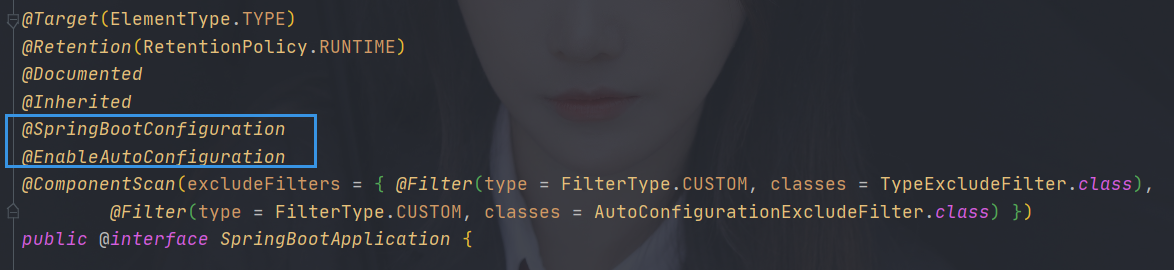
1 @SpringBootApplication
这个注解,顾名思义,表明它是一个 SpringBoot 应用,我们点进去该注解,发现有很多的注解,除过那几个无关紧要的元注解之外,值得我们注意的注解有 @SpringBootConfiguration 和 @EnableAutoConfiguration 这两个
2 @SpringBootConfiguration
该注解表明它是一个 SpringBoot 的配置,依次点进去该注解
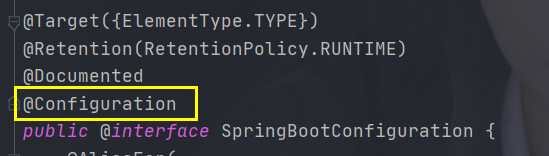
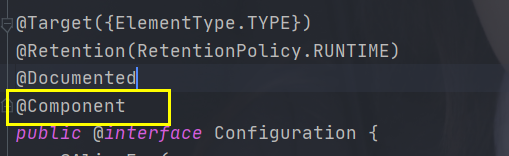
很清楚的可以看到,主启动类上的 @SpringBootConfiguration 注解,本质上是一个 Spring 的组件
3 @EnableAutoConfiguration
点进该注解,除过元注解外,有两个重要的注解

- 对于第一个注解,
@AutoConfigurationPackage,意思就是自动配置包,那么,它配置了什么东西?
再点进去该注解,发现它是导入了一个配置包选择器选择器,导入了什么选择器?

再往里进入,发现 AutoConfigurationPackages.Registrar 注册了一些 bean,然后导入了一些元数据,这些元数据估计与包扫描有关,这里先不深入

- 对于第二个注解,
@Import(AutoConfigurationImportSelector.class),它导入了一些选择器
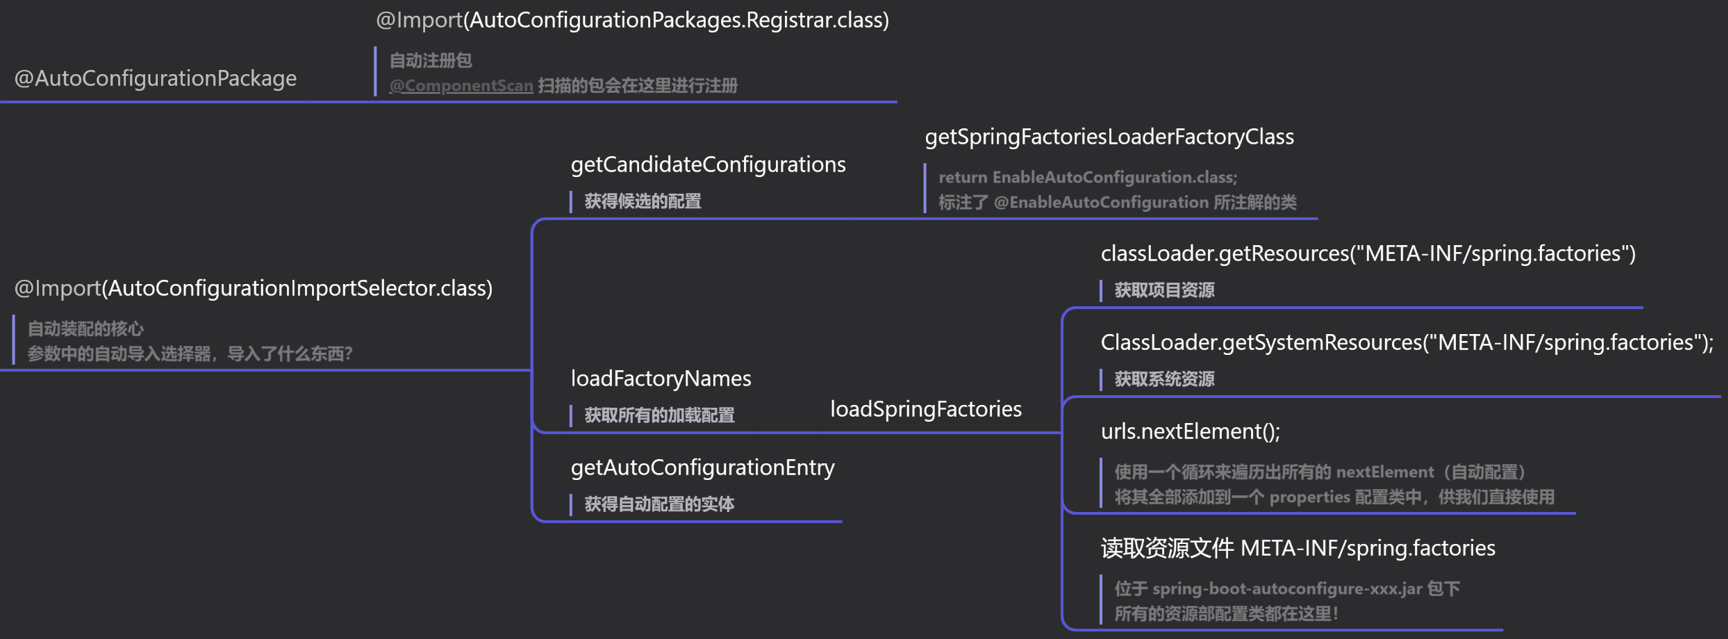
进入 AutoConfigurationImportSelector 选择器 ,里面有一个名为 getAutoConfigurationEntry 的方法,根据名称可以知道,该方法是自动获取配置项目
方法中有一句如下所示代码,它的作用是获取候选配置列表
List<String> configurations = getCandidateConfigurations(annotationMetadata, attributes);
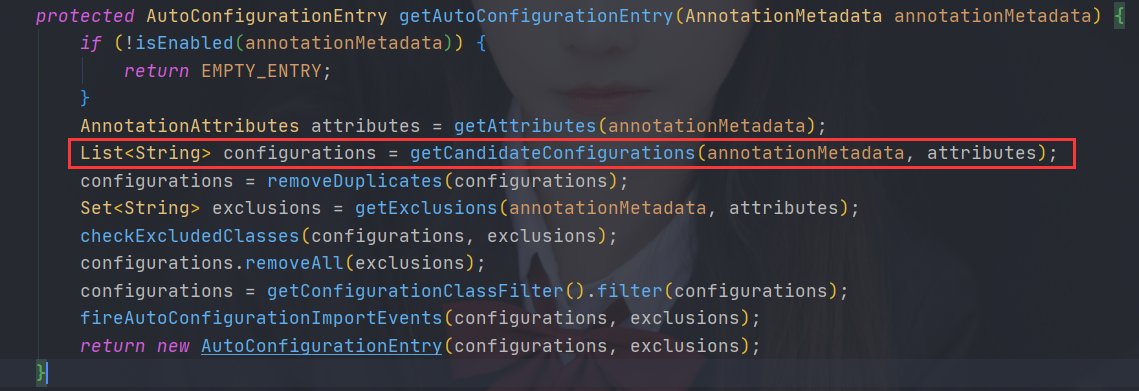
那么怎么获取候选配置列表?点进去 核心方法 getCandidateConfigurations() 方法

首先,看 getCandidateConfigurations() 方法的第一行代码
List<String> configurations = SpringFactoriesLoader.loadFactoryNames(
    getSpringFactoriesLoaderFactoryClass(),
	getBeanClassLoader()
);
一共传递了两个参数,第二个参数 getBeanClassLoader() 应该就是使用 bean 加载器加载进来了一些 bean,很好理解
第一个参数 getSpringFactoriesLoaderFactoryClass() 是一个方法,我们去看该方法,该方法只有一个返回值
就是返回了 EnableAutoConfiguration 的 class 文件,这个 EnableAutoConfiguration 有点似曾相识?不正是我们一直在研究的这个注解 @EnableAutoConfiguration 吗?
兜兜转转一圈,我们明白了,@EnableAutoConfiguration 注解作用之一就是为了导入启动类之下的所有资源!
然后再看 getCandidateConfigurations() 方法的第二行代码
Assert.notEmpty(configurations, "No auto configuration classes found in META-INF/spring.factories. If you ...");
它断言了一个配置文件 META-INF/spring.factories 非空,换个角度想想,是不是只要该配置文件非空,它就会被加载?那么我们就去找到该配置文件
我们在项目所有依赖的 jar 包中,找到一个名为 spring-boot-autoconfigure-xxxxx.jar 的包
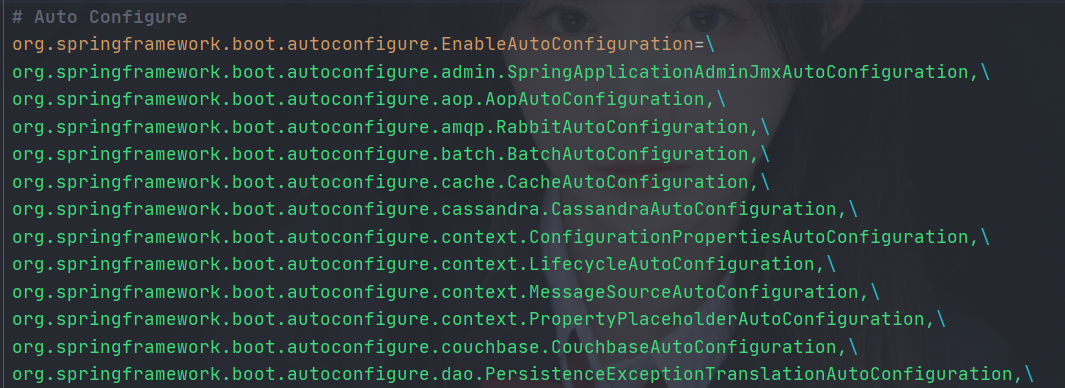
在它这个 jar 包里面,我们找到了断言处所提到的配置文件 spring.factories,那么不出意外的话,它应该就是自动配置的核心文件了

打开该文件,我们看看他到底都配置了什么东西?可以看到,配合了很多很多的配置,那么,为什么读取了这个文件后,他就能自动装配好?
我们以我们熟悉的 WebMvc 的配置为例来进行分析,点进去 WebMvcAutoConfiguration
org.springframework.boot.autoconfigure.web.servlet.WebMvcAutoConfiguration,
我们发现它是一个配置类,在里面我们找到了 ssm 框架中我们所熟悉的一些东西,比如静态资源过滤、视图解析器等等
//静态资源过滤
public void addResourceHandlers() {}
//资源配置链
private void configureResourceChain() {}
//视图解析器
private ResourceResolver getVersionResourceResolver() {}
至此,我们大致明白了,getCandidateConfigurations() 方法,它先通过 EnableAutoConfiguration 的 class 文件,利用反射机制来获取到当前启动类下的所有资源文件,然后再去读取核心配置文件 META-INF/spring.factories,利用该配置文件中的配置,去找到配置文件中所设计的所有配置类
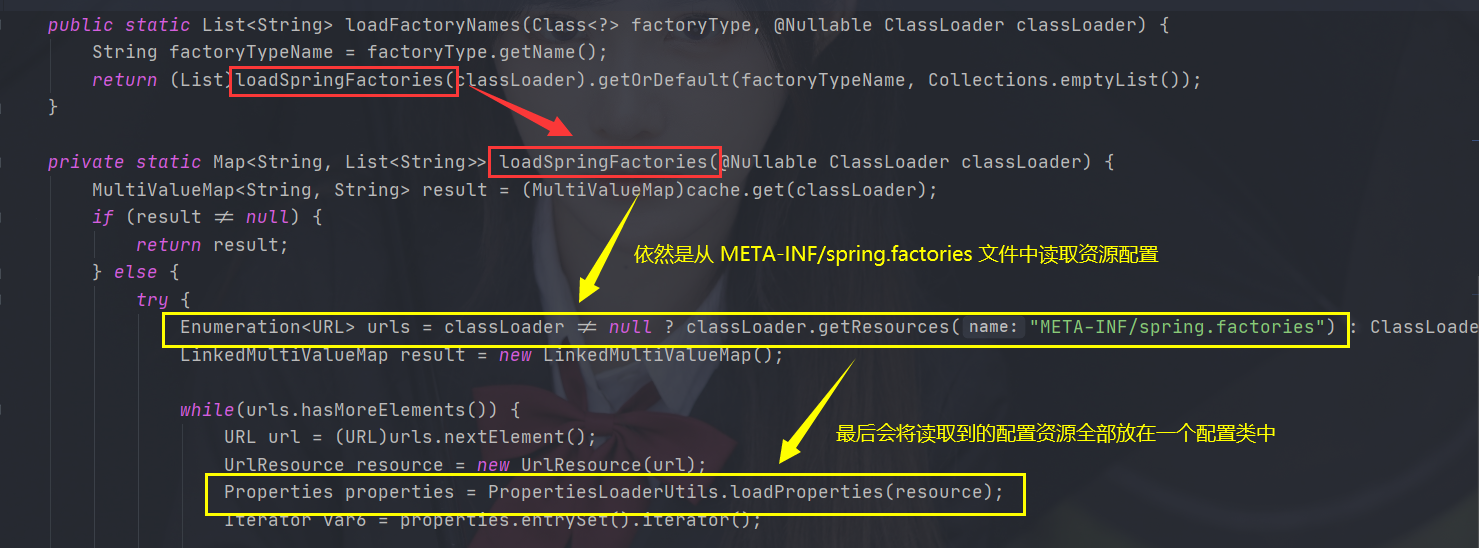
我们再去看 getCandidateConfigurations() 方法的第一行代码,方法 loadFactoryNames() 里面的两个参数我们刚刚在上面已经分析过,现在看方法本身
点进去 loadFactoryNames() 方法,该方法就做了一件事,调用 loadSpringFactories() 方法,依然去读取 META-INF/spring.factories 这个核心配置文件,然后将获取到的所有资源配置类全部放在一个名为 properties 的配置类中,所以该配置类 properties 就可以直接供我们使用!
以上重要注解的原理图大致如下:
@ComponentScan、@SpringBootConfiguration
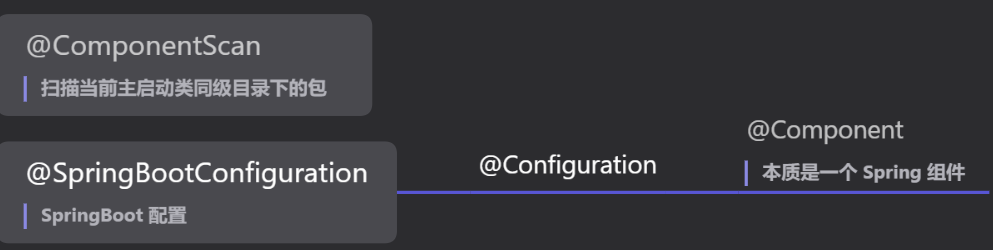
@EnableAutoConfiguration(核心注解)
思考:经过上面的分析,我们已经知道,SpringBoot 会将从
META-INF/spring.factories中读取并加载的所有配置类全部添加到一个名为properties的配置类中,供我们直接使用。那么,既然所有的配置类都被加载了,为什么很多都没有生效,需要我们去在 pom.xml 中导入对应的starter才会生效?
我们去 spring.factories 文件中,随意找一个我们没有使用的配置类,比如下面的 security.reactive.ReactiveSecurityAutoConfiguration 配置类
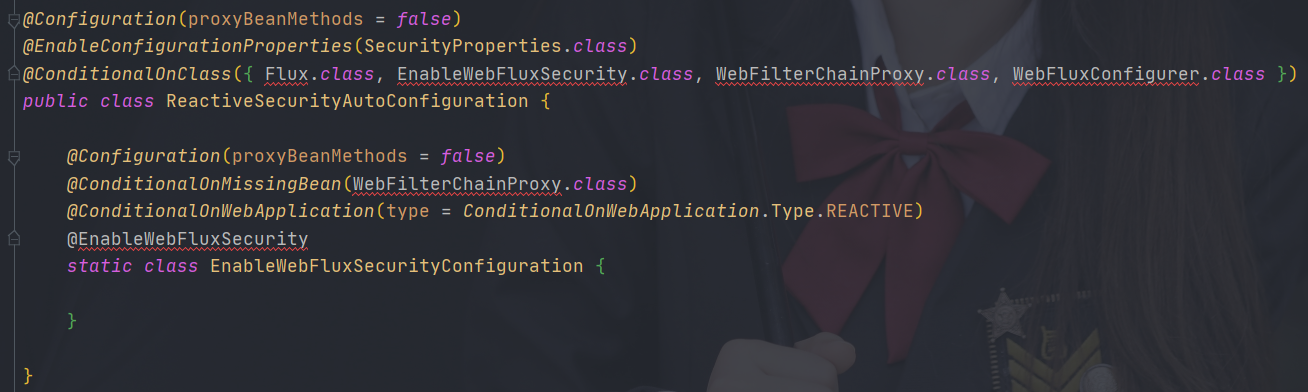
可以很清楚的看到,编译器中直接报红,这意味着我们这些包并没有进行导入
再看该类上面的 @ConditionalOnClass 注解,该注解的作用就是判断该配置类是否被用户在项目中使用 spring-boot-strater-xxx 的形式引入
如果没有使用 starter 的形式进行引入,则虽然被加载,但不会生效,这也就是为什么全部配置类都被导入了,但只有使用 starter 后才会生效的原因
2.3 注解小结
-
SpringBoot 在启动的时候,会直接从
/META-INF/spring.factories文件中来获取指定的配置类 -
获取到这些配置类的全限定名之后,就会将这些自动配置类导入 Spring 容器中,接下来 Spring 就会帮助我们进行自动配置
-
在 SpringBoot 项目中,自动装配的方案和配置,都在
spring-boot-autoconfigure-xxxx.jar这个 jar 包中 -
容器中会存在非常多的
xxxAutoConfiguration文件(本质仍然是一个个 bean),就是这些自动配置类,给 Spring 容器中导入了各种场景下所需要的组件,并进行了自动装配 -
有了这些自动配置类,就免去了我们自己去编写配置文件的流程
2.4 SpringApplication 类
SpringApplication 类主要做了以下几件事情:
-
推断应用的类型是普通 Java 项目还是 Web 项目
-
查找并初始化所有的可用初始化器,设置到 initlizers 属性中
-
找出所有应用程序的监听器,设置到 listeners 属性中
-
推断并设置 main 方法的定义类,找到运行的主类(通过传入的当前类的 class 文件来推断)
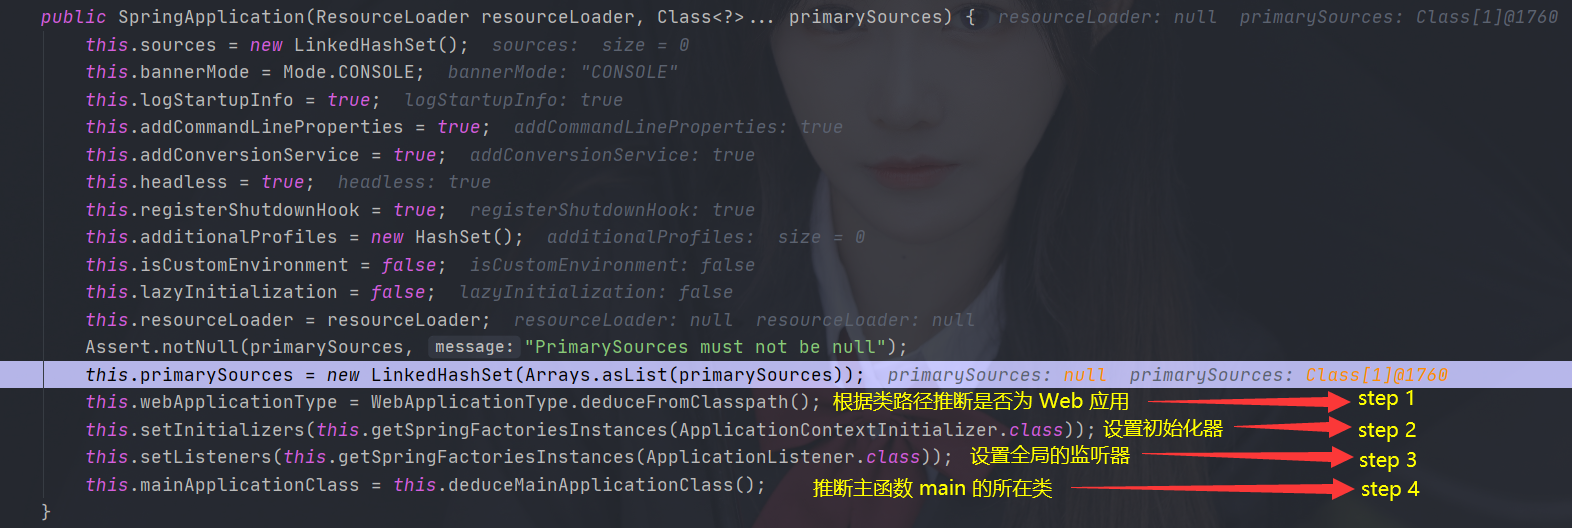
该类的构造器初始化了以下属性,比如资源、控制台日志、注册关机、自定义环境、资源部加载器、初始化器、监听器、主程序类等等
public SpringApplication(ResourceLoader resourceLoader, Class<?>... primarySources) {
    this.sources = new LinkedHashSet();
    this.bannerMode = Mode.CONSOLE;
    this.logStartupInfo = true;
    this.addCommandLineProperties = true;
    this.addConversionService = true;
    this.headless = true;
    this.registerShutdownHook = true;
    this.additionalProfiles = new HashSet();
    this.isCustomEnvironment = false;
    this.lazyInitialization = false;
    this.resourceLoader = resourceLoader;
    Assert.notNull(primarySources, "PrimarySources must not be null");
    this.primarySources = new LinkedHashSet(Arrays.asList(primarySources));
    this.webApplicationType = WebApplicationType.deduceFromClasspath();
    this.setInitializers(this.getSpringFactoriesInstances(ApplicationContextInitializer.class));
    this.setListeners(this.getSpringFactoriesInstances(ApplicationListener.class));
    this.mainApplicationClass = this.deduceMainApplicationClass();
}
2.5 run 方法流程
为了研究 run 方法到底干了什么事,才可以让整个项目启动,我们给 run 方法打上断点一步步进行调试
run 方法执行一共分为三个大阶段:准备启动阶段、正式启动阶段、启动结束阶段
- new SpringApplication()、init 加载初始化
当启动 SpringApplication 之后,首先创建了一个 SpringApplication 的实例
然后去执行 SpringApplication 的构造函数,使用构造函数进行 init() 初始化,一共做了以下四步操作:
-
根据类路径推断应用是否为 Web 项目
-
加载所有可用的初始化器
-
设置所有可用的程序监听器
-
推断并设置 main 方法的定义类
- 开始执行 run() 方法
然后 run() 方法开始准备执行,他首先会实例化一个监听器,这个监听器在启动之后会持续监听应用程序上下文

- step1 : headless 系统属性设置
该阶段中,程序开始设置 headless 相关的系统属性(下方流程图的 step 1)

- step 2 : 初始化监听器 getRunListener(args)
程序将前面实例化的监听器进行初始化设置(下方流程图的 step 2)

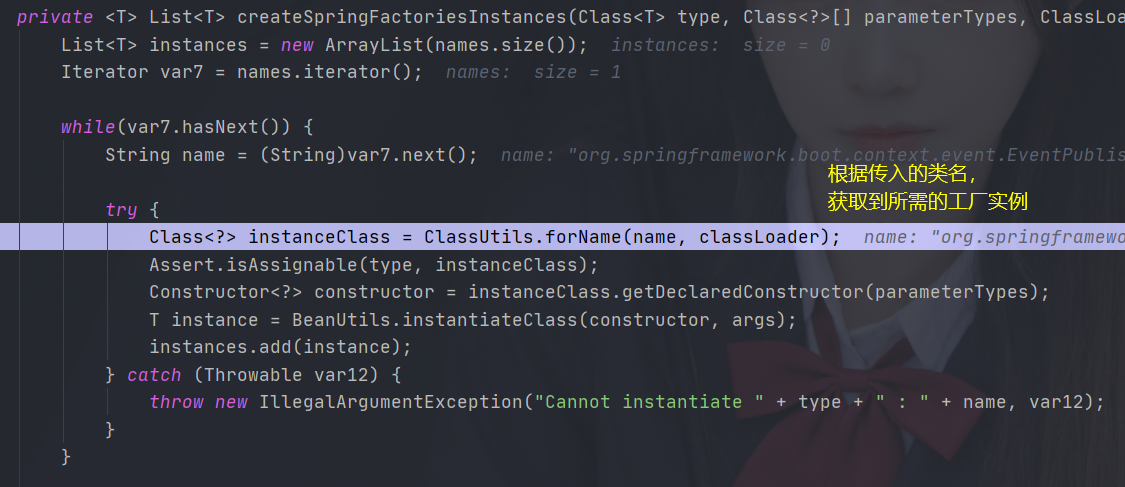
然后会使用 SpringFactoriesInstances 来根据传入的对象名来得到所需的工厂对象
这里的对象名,就是从 2.2 中提到的 spring-boot-autoconfigure-xxxx.jar 这个 jar 包下的 /META-INF/spring.factories 文件中所获取的
这个文件中配置了所有的自动配置对象的全限定名,工厂对象会根据该对象的 class 文件,使用反射机制得到该对象的构造犯法,最后生成一个工厂的实例对象并返回
- step 3 : 启动准备好的监听器
然后将初始化完成的监听器正式启动
这个监听器会持续监听上下文,直到上下文发布完成并返回之后,它才会停止监听(下方流程图的 step 3)

- step 4 : DefaultApplicationArguments
开始装配环境参数,创建了 web/standard 环境、 加载了属性源、加载了预监听集合
到此步骤为止,应用的 准备启动阶段 已经完成!(下方流程图的 step 4)


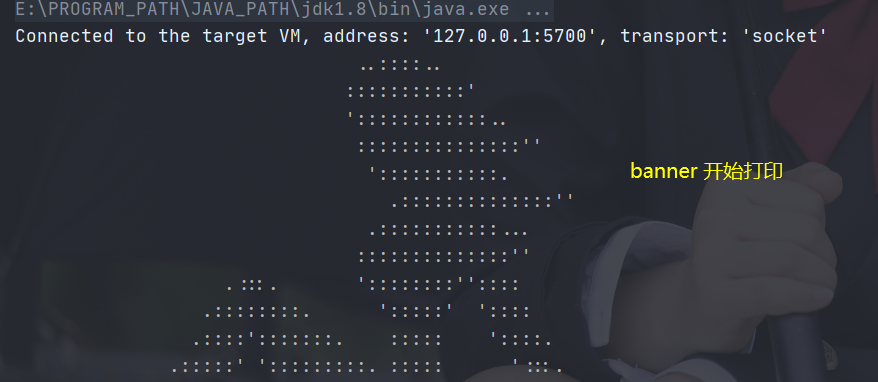
- step 5 : 打印 banner 图案
这一步开始,应用正式开始启动,首先会打印 banner 图案(下方流程图的 step 5)

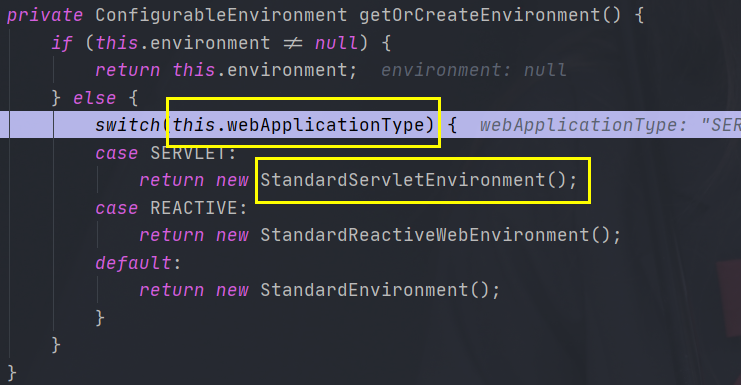
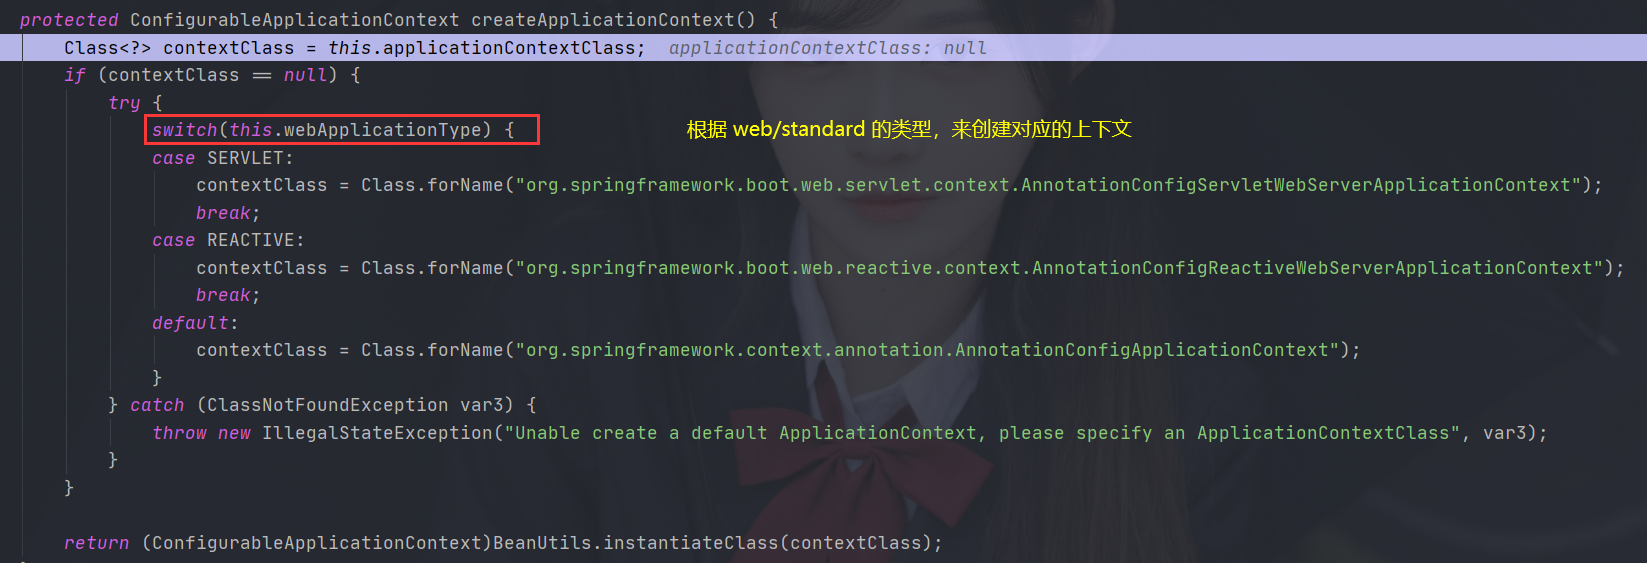
- step 6/6.1 : 上下文区域、根据类型创建上下文
到了这里就开始创建上下文区域
程序会根据 web/standard 的类型来创建与之对应的上下文(下方流程图的 step 6、step 6.1)
- step 7 : 准备上下文异常报告
这一步骤中,程序会根据 SpringFactoriesInstances 来创建对应的上下文异常报告(下方流程图的 step 7)

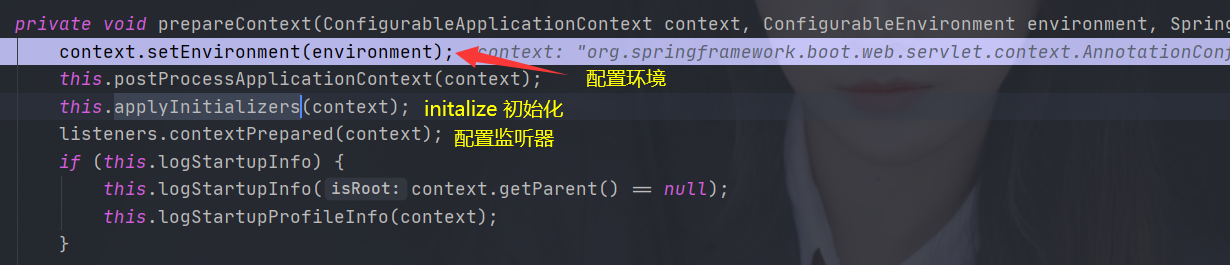
- step 8 : 上下文前置处理 prepareContext
该步骤会对上下文进行前置处理,包括监听器的配置、相关环境配置、初始化器设置、资源加载等操作
至此,上下文的前置准备工作结束(下方流程图的 step 8)
- step 9 : 上下文刷新 refreshContext
step 8 中上下文初始化完成之后,接下来就是给上下文中写入东西(刷新上下文)
在该步骤中,程序会加载 bean 工厂、生产所有的 bean、完成 bean 工厂的初始化,最后再次刷新生命周期(下方流程图的 step 9)

关于上下文的所有操作结束以后,程序启动阶段的所有环境均已经基本就绪
此时 Tomcat 相关的服务就会开始启动了
- step 10/11 : 上下文结束后处理 afterRefresh、发布上下文
这一步骤,就是应用启动阶段的最后一步,到这一步骤的时候,上下文已经被刷新、所有的 Bean 也已经被 bean 工厂生产完毕并写入进上下文,上下文相关的操作已经到尾声,接下来就是收尾工作,即上下文后处理、停止计时器、停止监听器的相关操作,处理完这些工作后就会正式发布上下文(下方流程图的 step 10、step 11)

- step 12/13 : 执行 Runner 运行器、上下文就绪并返回
接下来程序会调用 Runner() 运行器,并且发布应用上下文就绪的信号,然后返回
至此,正式启动阶段 结束(下方流程图的 step 12、step 13)


至此,SpringApplication 启动完成!(启动结束阶段)
run() 方法执行的大致的流程图如下所示:

3 yaml 配置文件
3.1 什么是 yaml
SpringBoot 使用一个全局的配置文件,并且配置文件的名称是固定的,有两种文件格式(官方文档 -> Appendices 栏目)
application.properties:官方不推荐此格式,语法为:key=valueapplication.yaml:官方推荐的格式(中间必须有空格),语法为key: value
yaml 配置文件对于空格的要求十分严格,用空格来区分父级与子级关系
server:
  compression:
    enabled: false
  port: 8082
  error:
    include-stacktrace: always

# 转换为 properties 文件,就相当于下方写法
# server.compression.enabled=false
# server.port=8082
# server.error.include-stacktrace=always
3.2 yaml 基本语法
# 配置普通的字符串、数值
person:
  name: Jack
  age: 18
  password: "012345"	# 如果字符串以 0 开头,必须加上双引号,否则读取配置文件会读到错误的值
  isHappy: false

# 配置 map
map: {key1: value, key2: value2}

# 配置数组,
list-one: [music, movie, code]
list-two:
  - music
  - movie
  - code

# 使用 EL 表达式
# 随机生成 uuid
person:
  id: ${random.uuid}

# 条件选择
# 配置了 cat.type 属性,他就会让 name = Jerry
cat:
  type: Jerry
  name: ${person.type:Tom}
# 没有配置 cat.type 属性,他就会让 name = Tom
cat:
  name: ${person.type:Tom}
与 properties 文件相比,yaml 的写法简洁并且层级关系明确,但是 yaml 文件的优势远远不止于此
3.3 yaml 给配置类赋值
建立配置类 MyBatisConfig
//这里的 prefix,不能使用大写
@ConfigurationProperties(prefix = "mybatis-config")
@Data
@AllArgsConstructor
@NoArgsConstructor
@Component
public class MyBatisConfig {
    private String driver;
    private String url;
    private String username;
    private String password;
}
然后去 yaml 文件中,给配置类进行赋值
mybatis-config:
  driver: com.mysql.cj.jdbc.Driver
  url: jdbc:mysql://localhost:3306/mybatis?useSSL=true&useUnicode=true&characterEncoding=utf-8
  username: root
  password: "0531"		# 这里加双引号是因为密码以 0 开头,不加的话会读取错误
赋值完成后要给配置类 MyBatisConfig 添加一个注解,与 yaml 中的配置进行绑定
@ConfigurationProperties 注解的作用是,将配置文件中的每一个属性的值,映射到该组件中
告诉 SpringBoot 将本类中的所有属性和配置文件中的相对应属性进行绑定
@ConfigurationProperties(prefix = "mybatisConfig")
public class MyBatisConfig {}
然后去测试类测试,看看是否配置成功
@SpringBootTest
class SpringBoot02ApplicationTests {

    @Autowired
    private MyBatisConfig myBatisConfig;

    @Test
    void contextLoads() {
        System.out.println(myBatisConfig);
    }
}
启动测试类,使用 yaml 文件成功对配置类进行了赋值

3.4 松散绑定
如果在 yaml 中使用的是中划线命名(例如:last-name),在配置类中属性名使用 lastName,两者其实是一致的(中划线后面的字母默认就是大写的)
建立测试类 Cat
@Component
@Data
@AllArgsConstructor
@NoArgsConstructor
@ConfigurationProperties(prefix = "cat")
public class Cat {
    private String lastName;
    private Integer catAge;
}
配置 yaml
cat:
  last-name: 旺财
  cat-age: 2
测试
@SpringBootTest
class SpringBoot02ApplicationTests {

    @Autowired
    private Cat cat;

    @Test
    void contextLoads() {
        System.out.println(cat);
    }
}

3.5 JSR303 数据校验
SpringBoot 中可以使用 @validated 来进行数据校验,如果数据不合法则会统一抛出异常,方面异常处理中心统一处理
假设我们要进行邮箱格式的校验,首先要去 pom.xml 中开启校验启动器
<dependency>
    <groupId>org.springframework.boot</groupId>
    <artifactId>spring-boot-starter-validation</artifactId>
</dependency>
然后建立测试类 User
@Component
@Data
@AllArgsConstructor
@NoArgsConstructor
@ConfigurationProperties(prefix = "user")
@Validated
public class User {
    @Email(message = "邮箱格式不合法!")
    private String email;
}
在 yaml 中配置一个不正确的邮箱格式
user:
  email: asdasd
测试该例子
@SpringBootTest
class SpringBoot02ApplicationTests {

    @Autowired
    private User user;

    @Test
    void contextLoads() {
        System.out.println(user);
    }
}

JSR303 数据校验常用的有以下几种
| 注解 | 作用描述 | 注释 | 作用描述 |
|---|---|---|---|
| 必须为邮箱格式 | @Length | 字符串长度必须在指定范围内 | |
| @NotEmpty | 字符串必须非空 | @Null | 元素值必须为 null |
| @NotNull | 元素值必须不为 null | @Size | 元素大小必须在指定范围内 |
| @Pattern | 必须为合法的正则表达式 | @Range | 元素之必须在指定范围内 |
| @Min | 必须为数字且值必须 >= 指定的最小值 | @Max | 必须为数字且值必须 <= 指定的最大值 |
| @AssertTrue | 该元素必须为 true | @AssertFalse | 该元素必须为 false |
| @DecimalMin | 必须为数字且值必须 >= 指定的最小值 | @DecmalMax | 必须为数字且值必须 <= 指定的最大值 |
| @Digits | 必须为数字且值必须合理 | @Past | 必须是一个过去的日期 |
| @Future | 必须是一个将来的的日期 |
3.6 多环境文件配置
application.yaml 配置文件一共可以在四个地方配置,优先级由高到低依次为:
//file:当前项目的根目录
//classpath:当前项目的 resources 目录
最高 : file:./config/
次高 : file:./
次低 : classpath:/config/
最低 : classpath:/
在一般的开发中,会设置多个环境进行项目的测试,比如生产环境、测试环境、开发环境等,那么怎么选择要使用的环境呢?
在有多个环境的情况下,每个环境对应的配置文件应当命名为 application-xxx.yaml 形式(其中 xxx 可以自定义名称)
在选择环境的时候,在 application.yaml 中直接使用每个环境的后缀名指定即可
# 要使用 application-hello.yaml 环境
spring:
  profiles:
    active: hello

# 要使用 application-dev.yaml 环境
spring:
  profiles:
    active: dev
那么,如果有几十个环境,岂不是要去创建几十个配置文件?稍显繁琐了,这时候就可以使用 yaml 的多文档模块的功能进行配置
# 每个不同的环境,使用 --- 分开
server:
  port: 8081

# 要使用哪个环境,激活它就行
spring:
  profiles:
    active: dev

---

# 测试环境
server:
  port: 8082
spring:
  profiles: test

---

# 开发环境
server:
  port: 8083
spring:
  profiles: dev
3.7 自动装配再研究
思考:在 yaml 配置文件中,我们到底都可以配置哪些东西?虽然官网讲的很详细,但是似乎全部记住没那么容易
所以,能否可以找到一种 yaml 配置文件与自动装配的核心文件 spring.factories 之间有的某些联系?
我们打开核心配置文件 spring.factories,在里面随表找一个自动配置类(这里以 HttpEncodingAutoConfiguration为例)
进入该配置类,我们发现他有一个名为启用配置属性的注解 @EnableConfigurationProperties
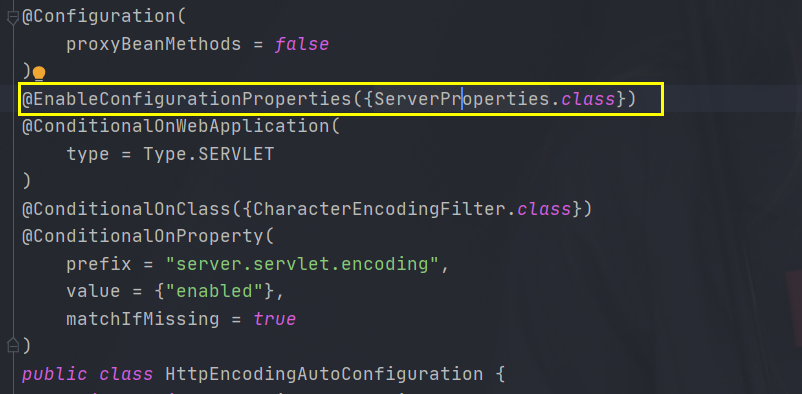
该注解有一个参数,是一个名为 ServerProperties 的配置类的 class 文件
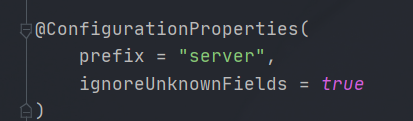
进入 ServerProperties 配置类,我们发现他有一个 @ConfigurationProperties 的注解,这个注解有点眼熟?
不正是 3.3 中提到的给配置类绑定配置文件的注解吗?那这里说明这个 ServerProperties 类应该是绑定了一个名为 server 的配置文件
我们回到 yaml 文件中,输入 server. ,IDEA 会提示可以配置的选项,仔细一瞅,又很眼熟?不就是 ServerProperties 这个类的属性吗?
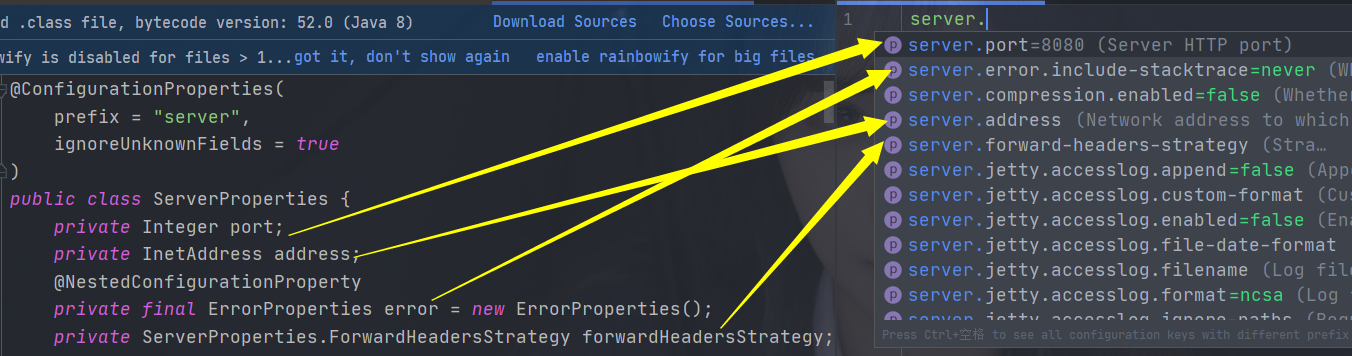
这是偶然吗?我们再去随机打开别的 Properties 配置类,发现都是如出一辙
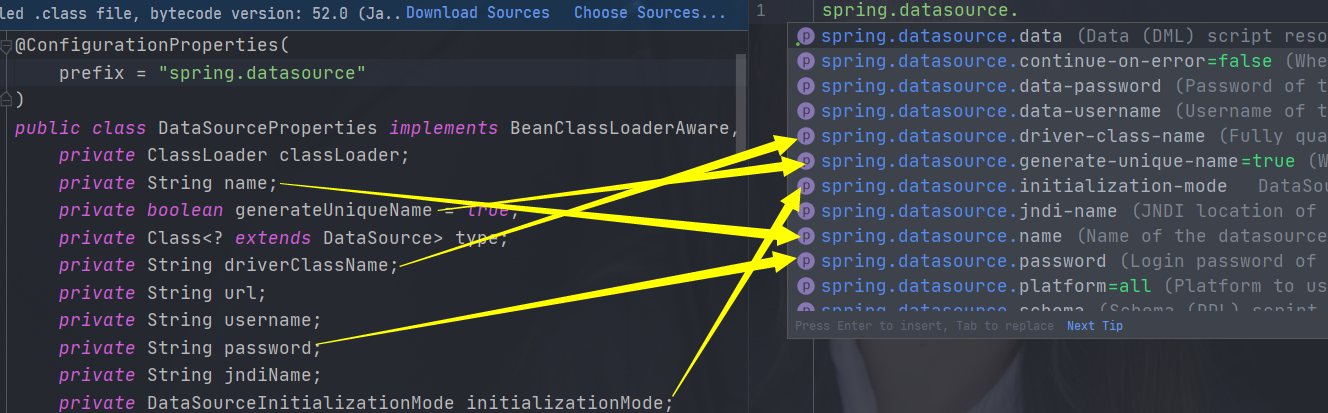
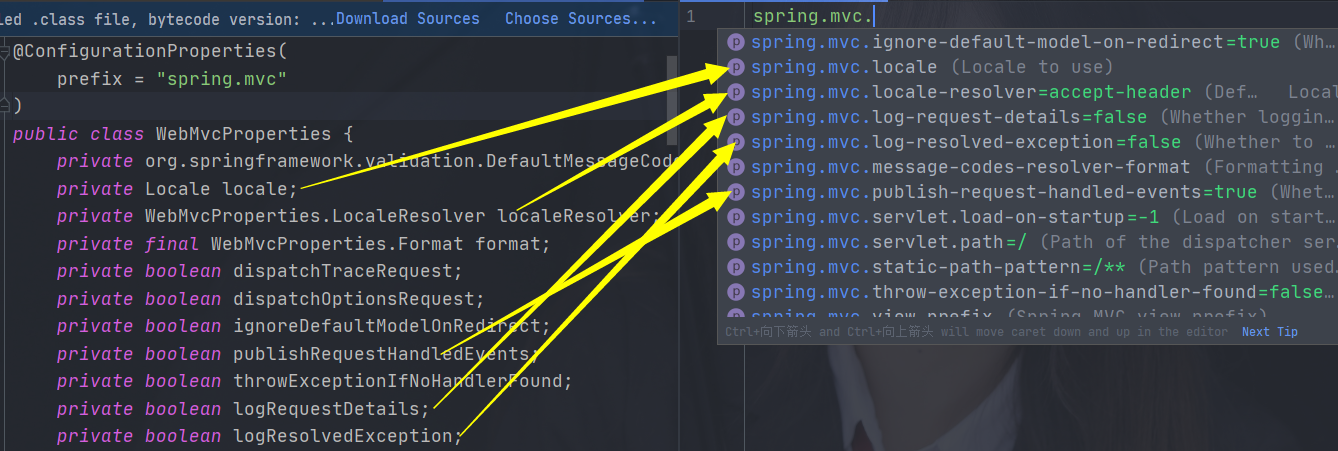
这应该绝非偶然,而且我们也发现了一个规律:
-
在 SpringBoot 的核心装配文件
spring.factories中,全是形如xxxAutoConfiguration的自动配置类 -
在该自动配置类中,都有着一个名为
@ConfigurationProperties的注解 -
并且该注解传入的参数均为形如
xxxProperties.class的配置类的 class 文件 -
而且这个
xxxProperties配置类中所有的属性,都可以在我们的配置文件yaml、properties中一一对应的找到
到此为止,自动装配的原理精髓被我们初步研究出来了:
-
SpringBoot 启动时会加载大量的自动配置类(
xxxAutoConfiguration) -
只要我们使用的组件已经在自动配置类
xxxProperties中被配置,就不需要我们再去手动配置了(比如创建新的 Springboot 项目之后,什么都不需要配置就可以启动,那是因为端口号、Tomcat 什么的都已经自动配置好了) -
在给容器中自动配置类添加组件的时候,会从
Properties类中获取某些属性,因此我们只需要在配置文件中指定这些属性的值即可
思考:自动配置类在所有的情况下都会生效吗?
- 我们去项目的配置文件中添加如下代码,开启调试功能
debug: true
- 然后启动主启动类,在打印出来的大量信息中,有两个东西引起了我们的注意:
Positive matches以及Negative matches,分别表示生效和未生效


-
既然有的配置类生效了,有的没有生效,那么是否生效是由什么东西控制的?
-
再次随便打开一个
xxxAutoConfiguration的自动配置类,我们注意到每个配置类上都有形如@Conditionalxxxxx的注解,这个注解就是用来控制配置类生效与否的,当该注解中所指定的配置类没有被我们手动以starter的形式开启时,它就不会被夹在,否则就会加载

- 综上所述,项目中自动配置类生效与否,由
@Conditionalxxxxx形式的注解进行控制
4 SpringBoot Web 开发
要开发一个 Web 应用,首先要解决以下几个大问题:
-
静态资源导入和展示
-
自定义首页
-
添加模板引擎
-
装配扩展 SpringMVC
-
配置拦截器
-
增删改查等等,那么这些步骤具体怎么实现?最快的方式就是去看源码
那么应该看哪个文件的源码?既然是 Web 项目,那么源码文件的命名就一定和 Web 相关,在 spring.factories 中直接搜索 Web
根据经验,很大概率就是 WebMvcAutoConfiguration 这个自动配置类了

4.1 静态资源导入和展示
Web 项目中的静态资源怎么导入?打开 WebMvcAutoConfiguration 自动配置类,注意到里面的这行代码

这意味着只要自己配置了资源路径,那么默认的就会失效!
那么默认的路径有哪些?在该类里面找到这行代码,进入 ResourceProperties 类

在该类中我们发现,默认有以下四个静态资源的路径配置
-
classpath:/META-INF/resources/:该路径与 webjars 有关,开发中不怎么常用,不做研究 -
classpath:/resources/:项目的 resources 目录下的 resources 目录 -
classpath:/static/:项目的 resources 目录下的 static 目录 -
classpath:/public/:项目的 resources 目录下的 public 目录
private static final String[] CLASSPATH_RESOURCE_LOCATIONS = new String[]{
    "classpath:/META-INF/resources/",
    "classpath:/resources/",
    "classpath:/static/",
    "classpath:/public/"
};
也就是说,项目开发中,在这三个目录下都可以存放静态资源文件,那么他们三个路径有没有优先级?我们做个测试
在三个目录下分别建立一个同名文件,启动项目后访问该文件进行测试
三个目录下都有文件时,显示的是 /resources/resources/ 路径下的资源,说明该路径下优先级最高

然后删除该目录下的文件,清空浏览器缓存,重启项目,测试剩下的两个路径,结果说明 /resources/static/ 优先级次之

我们得出结论:
-
classpath:/resources/resources/路径下优先级最高 -
classpath:/resources/static/路径下优先级次之(默认使用该路径) -
classpath:/resources/public/路径下优先级最低 -
上面三种路径下的资源,可以直接访问(即 http://localhost:8080/资源名称)
-
如果在 yaml 中配置了资源路径,那么默认的几个路径都会失效,一般不会这样做,用默认的就行
网站首页一般都是有图标或者图片资源的,那么这些东西又该怎么去添加?
图片也是静态资源,那么是不是上面一样,放在那三个默认路径就可以了呢?
测试一下,在 static 目录下建立一个 img 文件夹专门放图片,然后在该文件夹下添加一个图片,在首页中引入它
<!DOCTYPE html>
<html lang="en">
<head>
    <meta charset="UTF-8">
    <title>首页</title>
</head>
<body>
<h3>我是网站首页,我位于 /resources/static/ 目录下</h3>
<img src="img/1.png" alt="图标">
</body>
</html>
启动项目,图片显示正常,说明我们的猜想正确

扩展:怎么给自己的网页添加 title 栏的小图标呢?
只需要将一个 icon 格式的图标命名为 favicon ,把它放在 static 目录下,SpringBoot 就会自动识别该图标


4.2 自定义首页
创建一个新的 SpringBoot 项目之后,启动的默认主页 http://localhost:8080,默认首页一般都是这样的

实际开发必然不会使用它,那么怎么自定义首页?依然去 WebMvcAutoConfiguration 中去寻找与首页相关的源码
首页一般都是 index.html ,因此去找与 index 有关的方法,注意到以下三个方法

分析源码可得,首页应该是在 4.1 中所提到的三个静态资源路径下创建,并且命名为 index.html,我们去测试
在 static 目录下创建 index.html 文件,然后启动项目,访问 8080 端口,成功访问
<!DOCTYPE html>
<html lang="en">
<head>
    <meta charset="UTF-8">
    <title>首页</title>
</head>
<body>
<h3>我是网站首页,我位于 /resources/static/ 目录下</h3>
</body>
</html>

4.3 Thymeleaf 模板引擎
4.3.1 什么是 Thymeleaf
-
Thymeleaf 是一个现代的服务器端 Java 模板引擎
-
适用于 web 和独立环境,能够处理 HTML, XML, JavaScript, CSS,甚至纯文本
-
Thymeleaf 的主要目标是提供一种优雅的、高度可维护的创建模板的方式
4.3.2 导入并测试
- 首先使用 starter 的方式,让 Maven 自动导入 Thymeleaf 相关的依赖
<dependency>
    <groupId>org.springframework.boot</groupId>
    <artifactId>spring-boot-starter-thymeleaf</artifactId>
</dependency>
Maven 安装好相关依赖之后又,一般会有以下三个 jar 包

- 查看
ThtymeleafProperties配置类,从这里可以看出,模板应该是html文件,并且要放在项目的/resources/templates/目录下

- 编写控制器
@Controller
public class TestController {

    @RequestMapping("/t1")
    public String test01(){
        return "test01";
    }
}
- 在 templates 问价夹下新建一个测试页面 test01.html
<body>
	<h3>模板引擎测试</h3>
</body>
启动项目,访问 /t1 请求,成功跳转到测试页面,说明 Thymelaeaf 模板引擎导入成功

4.3.3 Thymeleaf 基本语法
- 要使用 Thymeleaf 的语法取值,就需要在 html 中绑定命名空间
<html lang="en" xmlns:th="http://www.thymeleaf.org">
- 只要是 HTML 元素,他都可以被 Thymeleaf 所接管,全部使用
th:元素名的形式
1 简单传值
@Controller
public class TestController {

    @RequestMapping("/t1")
    public String test01(Model model){
        model.addAttribute("msg", "Hello Thymeleaf!");
        return "test01";
    }
}
<body>
	<div th:text="${msg}"></div>
</body>

2 遍历数据
@Controller
public class TestController {

    @RequestMapping("/t1")
    public String test01(Model model){
        model.addAttribute("userList", Arrays.asList("荒天帝", "凌风", "君莫邪"));
        return "test01";
    }
}
<body>
	<div th:each="user:${userList}" th:text="${user}"></div>
</body>

3 传递对象
@Data
@AllArgsConstructor
@NoArgsConstructor
public class User {
    private String name;
    private int age;
    private List<String> hobbies;
}
@Controller
public class TestController {

    @RequestMapping("/t1")
    public String test01(Model model){
        User user = new User("荒天帝", 18, Arrays.asList("Code", "Girls"));
        model.addAttribute("user", user);
        return "test01";
    }
}
<body>
	<div th:text="${user.name}" ></div>
	<div th:text="${user.age}" ></div>
	<div th:each="hobby:${user.hobbies}" th:text="${hobby}"></div>
</body>

5 SpringSecurity
SpringSecurity 是一个高度可自定义的身份验证和授权控制框架,它是针对于安全功能所研发出的另一个项目,具有极其强大的 Web 安全控制功能

框架依赖导入
<dependency>
    <groupId>org.springframework.boot</groupId>
    <artifactId>spring-boot-starter-security</artifactId>
</dependency>
假设要实现网站的授权管理,普通用户只能访问首页,只有管理员才可以访问后台,下面使用 SperingSecurity 来实现该需
5.1 HTTP请求控制
首先模拟一个首页,首页只有两个超链接,分别是登录页面、后台管理页面,然后在 Controller 中添加基本的页面跳转控制器
@Controller
public class TestController {

    @RequestMapping("/")
    public String index(){
        return "index";
    }

    @RequestMapping("/toLogin")
    public String toLogin(){
        return "login";
    }

    @RequestMapping("/admin")
    public String backPage(){
        return "admin/backend";
    }
}
只需要在 Security 配置类中简单配置一下不同角色对应的权限即可实现上述功能
@EnableWebSecurity
public class SecurityConfig extends WebSecurityConfigurerAdapter {

    @Override
    protected void configure(HttpSecurity http) throws Exception {
        http.authorizeRequests()
            	// 首页和登录页所有人都可访问
                .antMatchers("/", "/toLogin").permitAll()
            	//后台管理页,只有 admin 角色可以访问
                .antMatchers("/admin").hasRole("admin");
    }
}
启动项目测试,点击登录链接,成功跳转

点击后台管理连接,发现显示的是没有权限,很简单就实现了浏览权限控制

5.2 身份验证控制
//权限控制
@Override
protected void configure(AuthenticationManagerBuilder auth) throws Exception {
    auth.inMemoryAuthentication()
        .passwordEncoder(new BCryptPasswordEncoder())
        .withUser("admin")
        .password(new BCryptPasswordEncoder().encode("123456"))
        .roles("admin");
}
现在我们再启动项目,然后在登录页面输入管理员密码,登录后才可以实现后台访问,这就是简单的身份验证控制
6 Shrio

6.1 Shiro 简介
-
Apache Shiro 是一个 Java 安全(权限)框架
-
Shiro 可以轻易开发出足够好的应用,可以再 JavaE 和 JavaSE 环境运行
-
Shiro 可以完成认证、授权、加密、会话管理、Web 集成、缓存等业务功能
Shiro 有三个最主要的对象:
-
Subject:代表当前用户 -
Shiro Security Manager:用来管理所有的Subject -
Realm:Shiro 直接从 Realm 中获取安全数据
6.2 Hello-Shiro
按照官网上的 quickStart ,配置以下依赖
- pom.xml
    <dependencies>
        <dependency>
            <groupId>org.apache.shiro</groupId>
            <artifactId>shiro-core</artifactId>
            <version>1.9.0</version>
        </dependency>
        <dependency>
            <groupId>org.slf4j</groupId>
            <artifactId>slf4j-log4j12</artifactId>
            <version>1.7.30</version>
        </dependency>
        <dependency>
            <groupId>org.slf4j</groupId>
            <artifactId>jcl-over-slf4j</artifactId>
            <version>1.7.30</version>
        </dependency>
        <dependency>
            <groupId>log4j</groupId>
            <artifactId>log4j</artifactId>
            <version>1.2.17</version>
        </dependency>
    </dependencies>
- log4j.properties
log4j.rootLogger=INFO, stdout

log4j.appender.stdout=org.apache.log4j.ConsoleAppender
log4j.appender.stdout.layout=org.apache.log4j.PatternLayout
log4j.appender.stdout.layout.ConversionPattern=%d %p [%c] -%m %n

log4j.logger.org.apache=WARN
log4j.logger.org.springframework=WARN
log4j.logger.org.apache.shiro=INFO

log4j.logger.org.apache.shiro.util.ThreadContext=WARN
log4j.logger.org.apache.shiro.cache.ehcache.Ehcache=WARN
- shiro.ini
[users]
root = secret, admin
guest = guest, guest
presidentskroob = 12345, president
darkhelmet = ludicrousspeed, darklord, schwartz
lonestarr = vespa, goodguy, schwartz

[roles]
admin = *
schwartz = lightsaber:*
goodguy = winnebago:drive:eagle5
- QuickStart.java
public class Quickstart {

    private static final transient Logger log = LoggerFactory.getLogger(Quickstart.class);

    public static void main(String[] args) {

        //固定写法,已经过时
        Factory factory = new IniSecurityManagerFactory("classpath:shiro.ini");
        SecurityManager securityManager = (SecurityManager) factory.getInstance();
        SecurityUtils.setSecurityManager(securityManager);

        //通过 SecurityUtils 得到 subject 对象
        Subject currentUser = SecurityUtils.getSubject();
        //获取用户的 session
        Session session = currentUser.getSession();

        session.setAttribute("someKey", "aValue");
        String value = (String) session.getAttribute("someKey");
        if (value.equals("aValue")) {
            log.info("Subject ==> Session [" + value + "]");
        }

        //判断当前用户是否被认证授权
        if (!currentUser.isAuthenticated()) {
            //Token令牌
            UsernamePasswordToken token = new UsernamePasswordToken("lonestarr", "vespa");
            token.setRememberMe(true);
            try {
                currentUser.login(token);
            } catch (UnknownAccountException uae) {
                log.info("There is no user with userrname of " + token.getPrincipal());
            } catch (IncorrectCredentialsException ice) {
                log.info("Password for account " + token.getPrincipal() + " was incorrect");
            } catch (LockedAccountException lae) {
                log.info("The account for username " + token.getPrincipal() + " is locked. "
                        + "Please coucat your adminitstrator to unlock it");
            } catch (AuthenticationException ae) {
                log.info(ae.getMessage());
            }
        }

        log.info("User [" + currentUser.getPrincipal() + "] logged in successfully");

        if (currentUser.hasRole("schwartz")) {
            log.info("May the Schwartz be with you");
        } else {
            log.info("Hello, mere motral");
        }

        //粗粒度
        if (currentUser.isPermitted("lightsaber:wield")) {
            log.info("You may use a lightsaber ring, Use it wisely");
        } else {
            log.info("Sorry, lightsaber rings are for schwartz masters only.");
        }

        //细粒度
        if (currentUser.isPermitted("winnebago:drive:eagle5")) {
            log.info("you are permitted to 'drive' the winnebago with license plate (id) 'eagle5'." +
                    "here are the keys - have fun!");
        } else {
            log.info("sorry, you aren't allowed to drive the 'eagle5' winnebago!");
        }

        currentUser.logout();

        System.exit(0);
    }
}

6.3 实现请求拦截
- 创建新的 SpringBoot 项目,导入 shiro 依赖
<!--整合shiro依赖-->
<dependency>
    <groupId>org.apache.shiro</groupId>
    <artifactId>shiro-spring</artifactId>
    <version>1.9.0</version>
</dependency>
- 自定义一个 Realm 对象
public class UserRealm extends AuthorizingRealm {

    //授权
    @Override
    protected AuthorizationInfo doGetAuthorizationInfo(PrincipalCollection principalCollection) {
        System.out.println("授权方法执行 AuthorizationInfo");
        return null;
    }

    //认证
    @Override
    protected AuthenticationInfo doGetAuthenticationInfo(AuthenticationToken authenticationToken) throws AuthenticationException {
        System.out.println("认证方法执行 AuthenticationInfo");
        return null;
    }
}
- 编写 shiro 配置类(固定的步骤,固定的代码)
@Configuration
public class ShiroConfig {

    //ShiroFilterFactoryBean
    @Bean
    public ShiroFilterFactoryBean shiroFilterFactoryBean(@Qualifier("securityManager") DefaultSecurityManager defaultSecurityManager){
        ShiroFilterFactoryBean bean = new ShiroFilterFactoryBean();
        bean.setSecurityManager(defaultSecurityManager);
        return bean;
    }

    //SecurityManager
    @Bean(name = "securityManager")
    public DefaultSecurityManager defaultSecurityManager(@Qualifier("userRealm") UserRealm userRealm){
        DefaultSecurityManager securityManager = new DefaultSecurityManager();
        securityManager.setRealm(userRealm);
        return securityManager;
    }

    //Realm
    @Bean
    public UserRealm userRealm(){
        return new UserRealm();
    }
}
-
接下来去测试一下页面拦截功能,先建立两个页面
add和update,添加页面跳转的 Cotroller -
现在还没有进行页面权限拦截,所以两个链接都进直接进入

接下来就要去配置页面授权和认证,来进行页面拦截
- 这里使用 Shiro 的内置过滤器去配置页面拦截信息
@Bean
public ShiroFilterFactoryBean shiroFilterFactoryBean(@Qualifier("securityManager") DefaultSecurityManager defaultSecurityManager){
    ShiroFilterFactoryBean bean = new ShiroFilterFactoryBean();
    bean.setSecurityManager(defaultSecurityManager);

    //Shiro 内置的过滤器
    //  anon : 无需认证便可以访问
    //  authc : 必须认证后才能访问
    //  user : 必须拥有记住我功能后,才能使用
    //  perms : 拥有对某个资源的权限之后才能使用
    //  role : 拥有某个角色权限时才能访问
    Map<String, String> filterMap = new LinkedHashMap<>();
    filterMap.put("/add", "authc");
    filterMap.put("/update", "authc");
    bean.setFilterChainDefinitionMap(filterMap);

    return bean;
}
- 配置了拦截之后,不经过认证,已经无法访问这两个页面了

可以看到,当点击要求授权才可以访问的页面之后,请求被拦截,自动重定向到了 login.jsp 请求,也就是登录页面
- 接下来我们要自定义一个登录页面,让未通过授权的请求都转发到登录页面来(因为 Shiro 和 SpringSecurity 不一样,SpringSecurity 自带登录页面, Shiro 则没有,因此需要自定义登录页)
<!DOCTYPE html>
<html lang="en" xmlns:th="http://www.thymeleaf.org">
<head>
    <meta charset="UTF-8">
    <title>登录</title>
</head>
<body>
<form th:action="@{/toLogin}" method="post">
    <input type="text" name="username" placeholder="用户名"><br>
    <input type="text" name="password" placeholder="密码"><br>
    <input type="submit" value="登录">
</form>
</body>
</html>
- 然后去 ShiroConfig 中将登录页面配置进去
//设置登录的请求
bean.setLoginUrl("/toLogin");
- 启动程序,点击未授权的页面后,会自动跳转到自定义的登录页

6.4 实现用户权限认证
要实现权限认证,就需要和用户打交道,那么在 Shiro 中,就是 Realm、subject 两大对象
@PostMapping("/login")
public String login(String username, String password, Model model){
    //获取用户对象
    Subject subject = SecurityUtils.getSubject();
    //封装用户的登录数据
    UsernamePasswordToken token = new UsernamePasswordToken(username, password);

    try { //尝试登录,登录成功就显示主页面
        subject.login(token);
        return "index";
    }catch (UnknownAccountException uae){
        model.addAttribute("msg", "用户名不存在");
        return "login";
    }catch (IncorrectCredentialsException ice){
        model.addAttribute("msg", "密码错误");
        return "login";
    }
}
然后去 UserRealm 类中进行认证
//认证,只要我们点击登录按钮,他就会进入该方法
@Override
protected AuthenticationInfo doGetAuthenticationInfo(AuthenticationToken token) throws AuthenticationException {
    System.out.println("认证方法执行 AuthenticationInfo");

    //账户名和密码,数据库中获取
    String username = "admin";
    String password = "123456";
    UsernamePasswordToken userToken = (UsernamePasswordToken) token;

    //用户名认证
    if (!userToken.getUsername().equals(username)){
        return null;    //这里 return,就代表抛出了一个异常,账户不存在的异常 UnknownAccountException
    }

    //密码认证,不需要我们实现,这个 Shiro 自动帮我们做了
    return new SimpleAuthenticationInfo("", password, "");
}
启动项目,首先数输入错误的用户名,点击登录,提示用户名不存在,这是我们自己做的


然后我们输入正确的用户名,错误的密码,他会提示密码错误,这是 Shiro 自动帮我们进行的密码校验


然后输入正确的用户名和密码,成功登录,并且可以访问 add 、update 两个需要登录才可以访问的请求


6.5 整合 MyBatis
首先导入依赖
<!--druid数据源-->
<dependency>
    <groupId>com.alibaba</groupId>
    <artifactId>druid</artifactId>
    <version>1.2.11</version>
</dependency>
<dependency>
    <groupId>com.alibaba</groupId>
    <artifactId>druid-spring-boot-starter</artifactId>
    <version>1.2.11</version>
</dependency>
<!--mysql依赖-->
<dependency>
    <groupId>mysql</groupId>
    <artifactId>mysql-connector-java</artifactId>
</dependency>
<!--log4j依赖-->
<dependency>
    <groupId>log4j</groupId>
    <artifactId>log4j</artifactId>
    <version>1.2.17</version>
</dependency>
<!--mybatis-spring依赖-->
<dependency>
    <groupId>org.mybatis.spring.boot</groupId>
    <artifactId>mybatis-spring-boot-starter</artifactId>
    <version>2.2.2</version>
</dependency>
然后就是 mybatis、druid 相关的配置
spring:
  datasource:
    type: com.alibaba.druid.pool.DruidDataSource
    url: jdbc:mysql://localhost:3306/mybatis?useUnicode=true&characterEncoding=utf8&serverTimezone=Asia/Shanghai
    password: '0531'
    username: root
    driver-class-name: com.mysql.cj.jdbc.Driver
    druid:
      # 基本配置
      initial-size: 5
      min-idle: 5
      max-active: 20
      max-wait: 60000
      time-between-eviction-runs-millis: 60000
      min-evictable-idle-time-millis: 300000
      validation-query: SELECT 1 FROM DUAL
      test-while-idle: true
      test-on-borrow: false
      test-on-return: false
      # 专有配置
      filters: stat,wall,log4j
      max-pool-prepared-statement-per-connection-size: 20
      use-global-data-source-stat: true
      connection-properties: druid.stat.mergeSql=true;druid.stat.slowSqlMillis=500
# mybatis 配置
mybatis:
  type-aliases-package: com.jiuxiao.pojo
  mapper-locations: classpath:mapper/*.xml
接下来就是走流程了,mapper、service 层依次完善,这里只有一个业务:根据名字查询用户,完善并且测试没问题与之后,我们就可以去修改 Realm 了
//认证,只要我们点击登录按钮,他就会进入该方法
@Override
protected AuthenticationInfo doGetAuthenticationInfo(AuthenticationToken token) throws AuthenticationException {
    System.out.println("认证方法执行 AuthenticationInfo");

    UsernamePasswordToken userToken = (UsernamePasswordToken) token;
    //查询真实的用户信息
    User user = userService.queryUserByUserName(userToken.getUsername());
    if (user == null){
        return null;
    }

    //密码认证,不需要我们实现,这个 Shiro 自动帮我们做了
    //这里一般要进行密码加密:md5加密、md5盐值加密等
    return new SimpleAuthenticationInfo("", user.getPwd(), "");
}
6.6 实现请求授权
既然要实现用户授权,那么对于未经授权的用户,我们应该跳转到未授权页面。因此先自定义一个未授权页面,然后在 Controller 层为他设置一个请求
@RequestMapping("/unAuth")
public String unAuth(){
    return "user/unAuth";
}
接下来去 ShiroConfig 中添加授权以及设置未授权页面,我们为 add 请求添加授权
//添加授权
filterMap.put("/add", "perms[user:add]");
//添加未授权跳转的请求,只有授权中添加了 user:add 字符串的请求才可以通过授权
bean.setUnauthorizedUrl("/unAuth");
启动项目,登陆之后点击 add 请求按钮,成功跳转到未授权页面

现在只是简单的实现了授权拦截,但是真实的情况是,我们应该给不同的用户赋予不同的权限,这个就需要在 Realm 中对不同用户进行授权赋予
//授权
@Override
protected AuthorizationInfo doGetAuthorizationInfo(PrincipalCollection collection) {
    System.out.println("授权方法执行 AuthorizationInfo");
    SimpleAuthorizationInfo info = new SimpleAuthorizationInfo();
    info.addStringPermission("user:add");
    return info;
}
启动项目,登录之后点击 add 请求,成功进入 add 请求

但现在有一个问题,不管我们登录哪一个用户,都会被授权 user:add,都可以进入 add 页面,这显然不正确
正常情况下,不用用户所对应的不同权限,应该在数据库中指定,因此修改一下数据库,为 user 表增加一个授权属性
现在,admin 用户拥有 add 权限,root 用户拥有 update 权限

我们现在可以直接从数据库中取值,然后设置每个用户所拥有的权限
public class UserRealm extends AuthorizingRealm {

    @Resource
    private UserService userService;

    //授权
    @Override
    protected AuthorizationInfo doGetAuthorizationInfo(PrincipalCollection collection) {
        System.out.println("授权方法执行 AuthorizationInfo");
        SimpleAuthorizationInfo info = new SimpleAuthorizationInfo();

        Subject subject = SecurityUtils.getSubject();
        User currentUser = (User) subject.getPrincipal();
        //该用户的权限,在数据库中拿到
        info.addStringPermission(currentUser.getPerms());

        return info;
    }

    //认证,只要我们点击登录按钮,他就会进入该方法
    @Override
    protected AuthenticationInfo doGetAuthenticationInfo(AuthenticationToken token) throws AuthenticationException {
        System.out.println("认证方法执行 AuthenticationInfo");

        UsernamePasswordToken userToken = (UsernamePasswordToken) token;
        //查询真实的用户信息
        User user = userService.queryUserByUserName(userToken.getUsername());
        if (user == null){
            return null;
        }

        //下方的第一个参数,将当前的 user 放进去,然后在上面的授权方法中就可以拿到
        return new SimpleAuthenticationInfo(user, user.getPwd(), "");
    }
}
启动项目测试,登录 admin 用户,只能进入 add 请求;登录 root 用户,只能进入 update 请求
6.7 整合 Thymeleaf
现在还有一个问题没解决,当我们登录不同的用户时,前端首页依旧会显示他们所没有的权限
比如登录 admin 用户,他只有 add 权限,但是登录后首页上,add 和 update 请求的链接都显示了,这是不被容许的,我们需要使用 Thymeleaf 来实现根据不同用户的权限,动态显示菜单的功能
首先导入 thymeleaf-shiro 依赖
<!--thymeleaf-shiro依赖:这里的版本如果为 2.1.0,会找到不到 ShiroDialect 类-->
<dependency>
    <groupId>com.github.theborakompanioni</groupId>
    <artifactId>thymeleaf-extras-shiro</artifactId>
    <version>2.0.0</version>
</dependency>
然后需要在 Shiro 配置类中,将 Thymeleaf 加入 Bean 中,被 Spring 托管
//thymeleaf-shiro Dialect
@Bean
public ShiroDialect shiroDialect(){
    return new ShiroDialect();
}
然后去前端添加 shiro 的标签,我们在首页只显示登录按钮,并且登录成功之后,登录按钮就要消失
我们先要将当前用户放到 session 中,然后前端才可以去取值
@Override
protected AuthenticationInfo doGetAuthenticationInfo(AuthenticationToken token) throws AuthenticationException {
    System.out.println("认证方法执行 AuthenticationInfo");

    UsernamePasswordToken userToken = (UsernamePasswordToken) token;
    //查询真实的用户信息
    User user = userService.queryUserByUserName(userToken.getUsername());
    if (user == null){
        return null;
    }

    //将当前登录的用户设置到 session
    Subject currentSubject = SecurityUtils.getSubject();
    Session session = currentSubject.getSession();
    session.setAttribute("loginUser", user);

    //下方的第一个参数,将当前的 user 放进去,然后在上面的授权方法中就可以拿到
    return new SimpleAuthenticationInfo(user, user.getPwd(), "");
}
<!DOCTYPE html>
<html lang="en" xmlns:th="http://www.thymeleaf.org"
                xmlns:shiro="http://www.thymeleaf.org/thymeleaf-extras-shiro">
<head>
    <meta charset="UTF-8">
    <title>首页</title>
</head>
<body>
<h2>首页</h2>
<div th:if="${session.loginUser == null}">
    <a th:href="@{/toLogin}">登录</a>
</div>
<div shiro:hasPermission="user:add">
    <a th:href="@{/add}">增加用户</a>
</div>
<div shiro:hasPermission="user:update">
    <a th:href="@{/update}">修改用户</a>
</div>
<p th:text="${msg}"></p>
</body>
</html>
启动项目,登录 admin 账户,只显示 add 请求,登录 root 账户,只显示 update 请求


7 Swagger

-
号称是世界上最流行的 Api 框架
-
实时更新和生成 api 文档,api 定义与文档同步更新
-
直接运行,可以在线测试 api 接口,且支持多种语言
7.1 集成 Swagger
Swagger-3.0.0 版本为分界线,其上与其下使用有不同之处
- 首先新建一个 SpringBoot Web 项目,测试环境成功后,项目中导入 Swagger 依赖
<!--Swagger 3.0.0 版本以下,需要导入下方两个依赖-->
<!--Swagger2依赖-->
<dependency>
    <groupId>io.springfox</groupId>
    <artifactId>springfox-swagger2</artifactId>
    <version>2.9.2</version>
</dependency>
<!--Swagger-Ui依赖-->
<dependency>
    <groupId>io.springfox</groupId>
    <artifactId>springfox-swagger-ui</artifactId>
    <version>2.9.2</version>
</dependency>


<!--Swagger 3.0.0 版本以上(包括3.0.0),只需要导入一个依赖-->
<dependency>
    <groupId>io.springfox</groupId>
    <artifactId>springfox-boot-starter</artifactId>
    <version>3.0.0</version>
</dependency>
- 然后建立一个 Swagger 的配置类,内容为空即可
//3.0.0 版本及其 上的,使用这两个注解
@Configuration
@EnableOpenApi
public class SwaggerConfig {
}


//3.0.0 版本之下的,使用这两个注解
@Configuration
@EnableSwagger2
public class SwaggerConfig {
}
- 启动项目,访问 Swagger 默认的页面
版本 3.0.0 及其之上的,默认页面为 http://localhost:8080/swagger-ui/index.html

版本 3.0.0 之下的,默认页面为 http://localhost:8080/swagger-ui.html

可以发现,两个版本的前端页面也不一样
7.2 配置 Swagger
阅读源码,很容易进行基本的配置
@Configuration
@EnableSwagger2
public class SwaggerConfig {

    //配置 Swagger 的 bean 实例
    @Bean
    public Docket docket(){
        return new Docket(DocumentationType.SWAGGER_2)
                .apiInfo(apiInfo());
    }

    //配置 ApiInfo 的默认的信息
    private ApiInfo apiInfo() {
        return new ApiInfo(
                "Swagger 测试文档",
                "万丈高楼平地起,勿在浮沙筑高台",
                "v-1.0",
                "http://www.xxxx.com",
                new Contact("悟道九霄", "http://www.xxxx.com", "1667191252@qq.com"),
                "Apache 2.0",
                "http://www.apache.org/licenses/LICENSE-2.0",
                new ArrayList<>());
    }
}

7.3 配置扫描的接口
7.3.1 扫描方式
-
basePackage:基于包路径扫描 -
any:扫描项目中全部接口 -
none:一个接口都不扫描 -
withClassAnnotation:扫描类上的注解,所需参数为一个注解的 class 对象 -
withMethodAnnoitation:扫描方法上的注解,所需参数为一个注解的 class 对象
@Bean
public Docket docket(){
    return new Docket(DocumentationType.SWAGGER_2)
        .apiInfo(apiInfo())
        .select()
        //扫描方式
        .apis(RequestHandlerSelectors.basePackage("com.jiuxiao.controller"))
        .build();
}
这里设置为包扫描,在 controller 中,我们只设置了一个 /hello 的请求,可以看到,下方只显示了一个请求的 api

7.3.2 路径过滤
-
regex:使用正则过滤路径 -
any:过滤所有路径 -
none:不过滤所有路径 -
ant:过滤指定路径
@Bean
public Docket docket(){
    return new Docket(DocumentationType.SWAGGER_2)
        .apiInfo(apiInfo())
        .select()
        .apis(RequestHandlerSelectors.basePackage("com.jiuxiao.controller"))
        //扫描过滤
        .paths(PathSelectors.ant("/jiuxiao/**"))
        .build();
}
因为此处设置的是项目的根路径下的所有包,所以都会被过滤,结果为空

7.4 配置是否启动
该配置很容易实现,浏览源码我们发现,使用一个布尔值就可以进行控制 Swagger 的启动与关闭(默认开启)

我们在配置中将它关闭
@Bean
public Docket docket(){
    return new Docket(DocumentationType.SWAGGER_2)
        .apiInfo(apiInfo())
        //关闭 Swagger
        .enable(false)
        .select()
        .apis(RequestHandlerSelectors.basePackage("com.jiuxiao.controller"))
        .build();
}
再次打开 Swagger 的默认页面,发现已经失效

7.5 配置文档分组
@Bean
public Docket docket(){
    return new Docket(DocumentationType.SWAGGER_2)
        .apiInfo(apiInfo())
		//配置文档分组
        .groupName("九霄")
        .select()
        .apis(RequestHandlerSelectors.basePackage("com.jiuxiao.controller"))
        .paths(PathSelectors.ant("/jiuxiao/**"))
        .build();
}

线上协同开发的时候,需要使用多个分组,怎么实现?只需要创建多个 Docket 对象即可
@Bean
public Docket docket01(){
    return new Docket(DocumentationType.SWAGGER_2).groupName("张三");
}

@Bean
public Docket docket02(){
    return new Docket(DocumentationType.SWAGGER_2).groupName("李四");
}

@Bean
public Docket docket03(){
    return new Docket(DocumentationType.SWAGGER_2).groupName("王五");
}

7.6 实体类注解
在 Swagger 文档主页面的下方,我们看到有一个 model 栏目,这里面显示的是实体类,那么应该怎么扫描到实体类?
首先创建一个 User 实体类
@Data
public class User {
    //此处的字段修饰符若为 public,Swagger 可以直接识别
    //如果修饰符为 private,则该实体类必须要有对应的 Getter、Setter 方法,否则 Swagger 无法访问
    private String username;
    private String password;
}
在 Controller 中,如果某一个请求的返回对象为实体类,那么该实体类就会自动被 Swagger 文档中的 Model 扫描到
@RestController
public class HelloController {

    @PostMapping("/user")
    public User user(){
        return new User();
    }
}

现在有一个问题,Swagger 文档显示的都是英文,如果实体类属性非常多,分辨起来很不容易,这时候就需要为实体类加上中文注解
@Data
@ApiModel("User实体类")
public class User {

    @ApiModelProperty("用户名")
    private String username;
    @ApiModelProperty("密码")
    private String password;
}

7.7 接口注解
@ApiOperation
给接口上添加的中文注释
@RestController
public class HelloController {

    @ApiOperation("Hello 接口")
    @GetMapping("/hello")
    public String hello(){
        return "Hello Swagger";
    }
}

@ApiParam
给接口的参数加上中文注释
@RestController
public class HelloController {

    @GetMapping("/test")
    public String test(@ApiParam("用户名") String username){
        return "Test";
    }
}

原生的 Swagger 文档框架界面并不怎么友好,所以很多情况下用的是第三方的UI库:swagger-bootstrap-ui

 浙公网安备 33010602011771号