
MyBatis之七:使用generator工具
可以将mybatis理解成一种半自动化orm框架,通过注解或者配置xml映射文件来手写相关sql语句,不能像我之前介绍orm的文章那样全对象化操作数据库增删改查。其实你会发现,手写配置xml映射文件是件很痛苦的事情,正因为如此,mybatis提供出了一个generator工具,只需要配置数据库连接字符串、对应数据库的驱动包,再执行固定格式的命令行语句即可轻松完事。generator的下载地址在:http://code.google.com/p/mybatis/wiki/Downloads?tm=2,需要FQ下载,这里会在文章结尾提供generator文件下载。
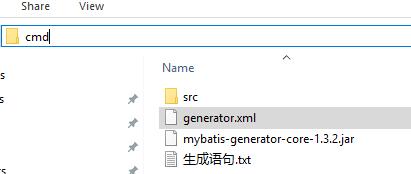
一、generator文件解压之后基本结构如图:

1、src文件夹是存放生成之后的dao、mapping、model文件
2、generator.xml 是配置文件
3、mybatis-generator-core-1.3.2.jar 是依赖的jar包
4、生成语句 是固定格式的命令行语句
二、配置generator.xml
需要修改的节点如下:
1、classPathEntry 数据库驱动包位置,物理绝对路径
2、context\jdbcConnection 数据库链接URL、用户名、密码
3、context\javaModelGenerator 的targetProject属性,指向generator.xml所在文件夹下面的src文件夹,该节点表示生成模型的包名和位置
4、context\sqlMapGenerator 的targetProject属性,指向generator.xml所在文件夹下面的src文件夹,该节点表示生成的映射文件包名和位置
5、context\javaClientGenerator 的targetProject属性,指向generator.xml所在文件夹下面的src文件夹,该节点表示生成DAO的包名和位置
6、context\table 的tableName与domainObjectName属性,具体对应数据库的表名与生成实体代码的名称。多个表就多个context\table节点
示例文件:
<?xml version="1.0" encoding="UTF-8"?>
<!DOCTYPE generatorConfiguration PUBLIC "-//mybatis.org//DTD MyBatis Generator Configuration 1.0//EN" "http://mybatis.org/dtd/mybatis-generator-config_1_0.dtd">
<generatorConfiguration>
    <!-- 数据库驱动包位置 -->
    <classPathEntry location="D:\94_JavaWorkbench\0_MavenRepository\com\microsoft\sqlserver\sqljdbc4\4.0\sqljdbc4-4.0.jar" />
    <context id="MyBatis3Generator" targetRuntime="MyBatis3">
        <commentGenerator>
            <property name="suppressAllComments" value="true" />
        </commentGenerator>
        <!-- 数据库链接URL、用户名、密码 -->
        <jdbcConnection driverClass="com.microsoft.sqlserver.jdbc.SQLServerDriver" connectionURL="jdbc:sqlserver://localhost:1433;databaseName=Northwind" userId="sa" password="">
        </jdbcConnection>
        <javaTypeResolver>
            <property name="forceBigDecimals" value="false" />
        </javaTypeResolver>
        <!-- 生成模型的包名和位置 -->
        <javaModelGenerator targetPackage="Northwind.model" targetProject="D:\94_JavaWorkbench\0_MyBatis_Generator\src">
            <property name="enableSubPackages" value="true" />
            <property name="trimStrings" value="true" />
        </javaModelGenerator>
        <!-- 生成的映射文件包名和位置 -->
        <sqlMapGenerator targetPackage="Northwind.mapping" targetProject="D:\94_JavaWorkbench\0_MyBatis_Generator\src">
            <property name="enableSubPackages" value="true" />
        </sqlMapGenerator>
        <!-- 生成DAO的包名和位置 -->
        <javaClientGenerator type="XMLMAPPER" targetPackage="Northwind.dao" targetProject="D:\94_JavaWorkbench\0_MyBatis_Generator\src">
            <property name="enableSubPackages" value="true" />
        </javaClientGenerator>
        <!-- 要生成那些表(更改tableName和domainObjectName就可以) -->
        <table tableName="Categories" domainObjectName="Categories" enableCountByExample="false" enableUpdateByExample="false" enableDeleteByExample="false" enableSelectByExample="false" selectByExampleQueryId="false" />
        <table tableName="Customers" domainObjectName="Customers" enableCountByExample="false" enableUpdateByExample="false" enableDeleteByExample="false" enableSelectByExample="false" selectByExampleQueryId="false" />

    </context>
</generatorConfiguration>
三、生成相关文件
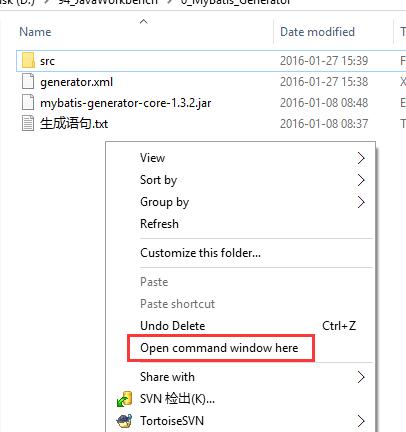
在当前文件夹下面进入dos,两种方法(d:\cd不做介绍),如下
1、路径框输入cmd
2、当前文件夹下 按下shift键 鼠标右键进入dos
出现dos窗口后再里面输入命令:java -jar mybatis-generator-core-1.3.2.jar -configfile generator.xml -overwrite

四、在src文件夹里面查看已生成的文件,可以拷贝到项目里面。
附generator文件下载:https://files.cnblogs.com/files/wucj/Generator.rar

 浙公网安备 33010602011771号