Strophe.js连接XMPP服务器Openfire、Tigase实现Web私聊、群聊(MUC)
XMPP(Extensible Messaging and Presence Protocol)是一种网络即时通讯协议,它基于XML,具有很强的扩展性,被广泛使用在即时通讯软件、网络游戏聊天、Web聊天及Web消息推送、移动设备的消息推送等场景,例如Google的GTalk、《英雄联盟LOL》游戏聊天模块。
由于在Web浏览器上的JavaScript不能直接处理TCP协议,所以XMPP服务器通常会提供BOSH(Bidirectional-streams Over Synchronous HTTP)接口,通过HTTP长轮训(long-polling)可以实现Web浏览器即时聊天。Strophe.js是一个通过BOSH连接Web浏览器和XMPP服务器的工具库。
XMPP协议简介:
XMPP服务器和客户端之间,是通过XML节(XML Stanza)来进行通讯。其中有三种非常重要的XML Stanza类型:<message>、<presence>、<iq>。
<message>:
聊天消息的发送和接收就是通过message节来实现。例如xxg1@host发送一条信息"你好"给xxg2@host,xxg1@host客户端会将下面的这段XML发送到XMPP服务器,服务器再推送给xxg2@host客户端。其中<message>的from属性是发送者,to属性是接收者,<body>子元素的内容就是聊天信息。
<message from="xxg1@host" to="xxg2@host" type="chat">
    <body>你好</body>
</message>
<presence>:
可用于表明用户的状态,例如用户状态改变成“Do not disturb”(“请勿打扰”),会向服务器发送:
<presence from="xxg@host">
    <status>Do not disturb</status>
    <priority>0</priority>
    <show>dnd</show>
</presence>
<iq>:
iq即Info/Query,采用“请求-响应”机制,类似于HTTP的机制。下面的例子是客户端通过<iq>请求获取联系人,XMPP服务器将结果返回:
客户端请求获取联系人:
<iq from='xxg@host' id='bv1bs71f' type='get'>
    <query xmlns='jabber:iq:roster'/>
</iq>
服务器结果返回:
<iq to='xxg@host' id='bv1bs71f' type='result'>
    <query xmlns='jabber:iq:roster'>
        <item jid='xxg2@host'/>
        <item jid='xxg3@host'/>
    </query>
</iq>
搭建XMPP服务器:
在实现Web浏览器聊天之前,首先要搭建一个XMPP服务器。例如Openfire、Tigase、Ejabberd是常用的XMPP服务器。其中Openfire、Tigase是基于Java实现,Ejabberd是Erlang实现。虽然实现的语言不同,但是都遵循XMPP协议,所以使用其中任意一个XMPP服务器即可。
下面以Openfire和Tigase为例。
Openfire可以自动化搭建很方便,本文不再介绍。Tigase的搭建可以参考我的另一篇博文:Linux搭建XMPP服务器Tigase(Spark客户端测试)。
XMPP服务器通常会实现BOSH扩展,下面是Openfire和Tigase的BOSH默认URL:
Openfire:http://host:7070/http-bind
Tigase:http://host:5280
在使用Strophe.js的时候,需要使用对应的HTTP地址才能连接上XMPP服务器。
如果使用Opnefire,还需要在管理后台配置一下:

Strophe.js:
下载:http://strophe.im/strophejs/
实现Web私聊:
私聊比较简单,聊天信息是通过上面介绍的<message>来进行传递交换。例如接收到一条别人发来的聊天信息,即接收一个<message>元素,发送给别人一条聊天信息,即发送一个<message>元素。
HTML:
<!DOCTYPE html>
<html>
<head>
    <script src='http://cdn.bootcss.com/jquery/1.9.1/jquery.min.js'></script>
    <script src='http://cdn.bootcss.com/strophe.js/1.1.3/strophe.min.js'></script>
    <script src='test.js'></script>
</head>
<body>
    JID:<input type="text" id="input-jid">
    <br>
    密码:<input type="password" id="input-pwd">
    <br>
    <button id="btn-login">登录</button>
    <div id="msg" style="height: 400px; width: 400px; overflow: scroll;"></div>
    联系人JID:
    <input type="text" id="input-contacts">
    <br>
    消息:
    <br>
    <textarea id="input-msg" cols="30" rows="4"></textarea>
    <br>
    <button id="btn-send">发送</button>
</body>
</html>
JavaScript(test.js):
// XMPP服务器BOSH地址
var BOSH_SERVICE = 'http://host:5280';

// XMPP连接
var connection = null;

// 当前状态是否连接
var connected = false;

// 当前登录的JID
var jid = "";

// 连接状态改变的事件
function onConnect(status) {
    console.log(status)
    if (status == Strophe.Status.CONNFAIL) {
        alert("连接失败!");
    } else if (status == Strophe.Status.AUTHFAIL) {
        alert("登录失败!");
    } else if (status == Strophe.Status.DISCONNECTED) {
        alert("连接断开!");
        connected = false;
    } else if (status == Strophe.Status.CONNECTED) {
        alert("连接成功,可以开始聊天了!");
        connected = true;

        // 当接收到<message>节,调用onMessage回调函数
        connection.addHandler(onMessage, null, 'message', null, null, null);

        // 首先要发送一个<presence>给服务器(initial presence)
        connection.send($pres().tree());
    }
}

// 接收到<message>
function onMessage(msg) {

    // 解析出<message>的from、type属性,以及body子元素
    var from = msg.getAttribute('from');
    var type = msg.getAttribute('type');
    var elems = msg.getElementsByTagName('body');

    if (type == "chat" && elems.length > 0) {
        var body = elems[0];
        $("#msg").append(from + ":<br>" + Strophe.getText(body) + "<br>")
    }
    return true;
}

$(document).ready(function() {

    // 通过BOSH连接XMPP服务器
    $('#btn-login').click(function() {
        if(!connected) {
            connection = new Strophe.Connection(BOSH_SERVICE);
            connection.connect($("#input-jid").val(), $("#input-pwd").val(), onConnect);
            jid = $("#input-jid").val();
        }
    });

    // 发送消息
    $("#btn-send").click(function() {
        if(connected) {
            if($("#input-contacts").val() == '') {
                alert("请输入联系人!");
                return;
            }

            // 创建一个<message>元素并发送
            var msg = $msg({
                to: $("#input-contacts").val(),
                from: jid,
                type: 'chat'
            }).c("body", null, $("#input-msg").val());
            connection.send(msg.tree());

            $("#msg").append(jid + ":<br>" + $("#input-msg").val() + "<br>");
            $("#input-msg").val('');
        } else {
            alert("请先登录!");
        }
    });
});
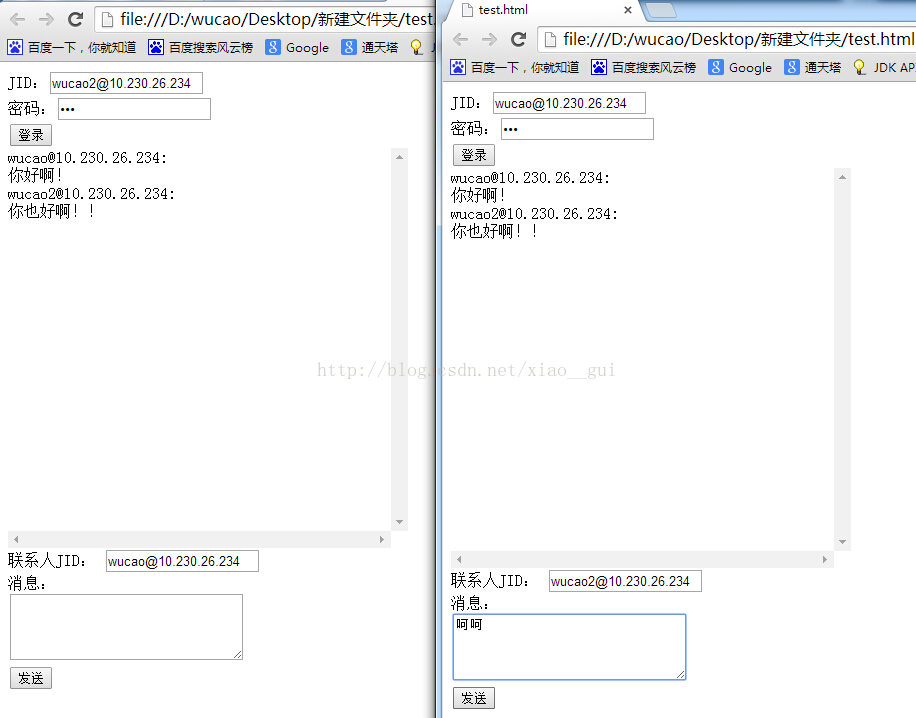
修改JavaScript代码中的BOSH_SERVICE,用浏览器打开HTML文件,登录后即可聊天:
实现Web群聊:
XMPP群聊通过XMPP协议的MUC(Multi-User Chat)扩展实现。
Openfire默认支持MUC,但是Tigase服务器默认不支持MUC,需要在init.properties文件中加入以下粗体部分的配置项:
config-type=--gen-config-def
--admins=admin@host
--virt-hosts = host
--debug=server
--user-db=mysql
--user-db-uri = jdbc:mysql://localhost:3306/tigasedb?user=root&password=xxx
--comp-name-1 = muc
--comp-class-1 = tigase.muc.MUCComponent
--external = muc.devel.tigase.org:muc-pass:connect:5270:devel.tigase.org:accept
创建房间:
创建房间实际上可以写在代码中,但是本文为了方便,就使用XMPP客户端Spark或者其他工具来创建。
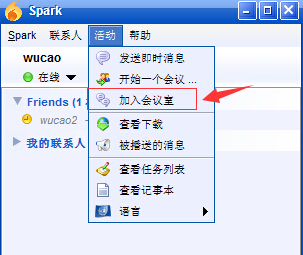
首先使用Spark任意登录一个用户,下图是Spark创建房间的步骤:

如果使用的是Tigase,默认创建的房间是加锁的,别的用户无法进入,需要对房间解锁。Spark进入房间后,点击下面的设置按钮,然后不用更改任何设置,直接更新即可解锁房间(虽然没有修改任何配置,但是更新时会发送一个<iq>给服务器,这个<iq>解锁了房间,参考http://xmpp.org/extensions/xep-0045.html#createroom-instant):

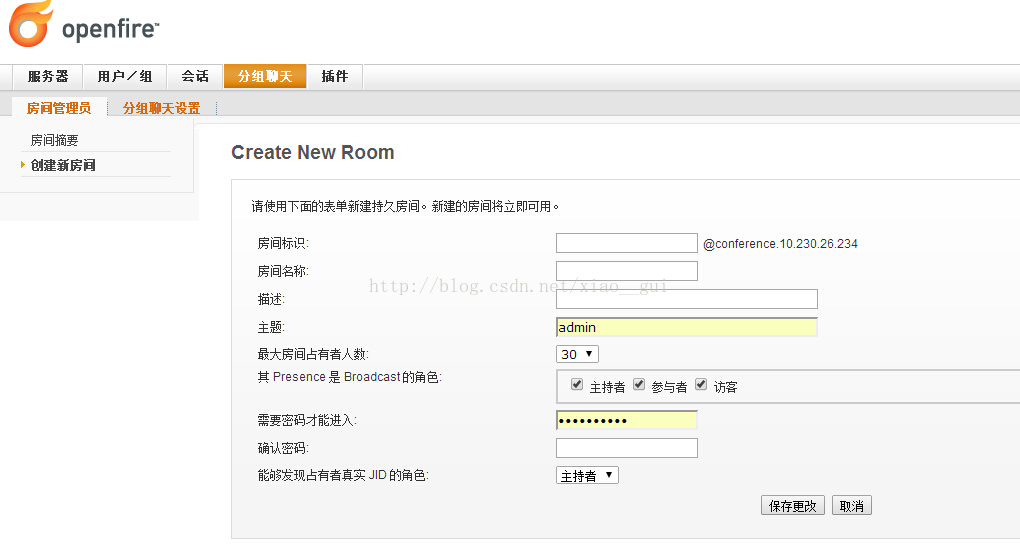
另外,如果使用Openfire可以直接使用管理后台来创建:
加入房间:
房间创建好了之后,就有有对应的房间JID:

加入房间可以通过发送一个<presence>来实现(实际上如果房间不存在下面的这条<presence>也会创建房间,但是创建的房间默认加锁,还需要发送一条<iq>解锁,所以本文就直接用Spark创建房间):
<presence from='xxg@host' to='xxgroom@muc.host/xxg'>
    <x xmlns='http://jabber.org/protocol/muc'/>
</presence>
属性to='xxgroom@muc.host/xxg'中,xxgroom@muc.host表示房间JID,xxg表示在房间的昵称。
聊天:
和私聊一样,群聊也是通过<message>来实现,不同的是<message>的type属性,私聊是"chat",而群聊是"groupchat",另外,to属性即为房间JID,这样一条聊天消息就会发送给房间中的所有人。
<message from='xxg@host' to='myroom@muc.host' type='groupchat'>
  <body>大家好!</body>
</message>
实现:
HTML:
<!DOCTYPE html>
<html>
<head>
    <script src='http://cdn.bootcss.com/jquery/1.9.1/jquery.min.js'></script>
    <script src='http://cdn.bootcss.com/strophe.js/1.1.3/strophe.min.js'></script>
    <script src='test2.js'></script>
</head>
<body>
    JID:<input type="text" id="input-jid">
    <br>
    密码:<input type="password" id="input-pwd">
    <br>
    <button id="btn-login">登录</button>
    <div id="msg" style="height: 400px; width: 400px; overflow: scroll;"></div>
    <br>
    消息:
    <br>
    <textarea id="input-msg" cols="30" rows="4"></textarea>
    <br>
    <button id="btn-send">发送</button>
</body>
</html>
JavaScript(test2.js):
// XMPP服务器BOSH地址
var BOSH_SERVICE = 'http://host:5280';

// 房间JID
var ROOM_JID = 'xxgroom@muc.host';

// XMPP连接
var connection = null;

// 当前状态是否连接
var connected = false;

// 当前登录的JID
var jid = "";

// 连接状态改变的事件
function onConnect(status) {
    if (status == Strophe.Status.CONNFAIL) {
        alert("连接失败!");
    } else if (status == Strophe.Status.AUTHFAIL) {
        alert("登录失败!");
    } else if (status == Strophe.Status.DISCONNECTED) {
        alert("连接断开!");
        connected = false;
    } else if (status == Strophe.Status.CONNECTED) {
        alert("连接成功,可以开始聊天了!");
        connected = true;

        // 当接收到<message>节,调用onMessage回调函数
        connection.addHandler(onMessage, null, 'message', null, null, null);

        // 首先要发送一个<presence>给服务器(initial presence)
        connection.send($pres().tree());

        // 发送<presence>元素,加入房间
        connection.send($pres({
            from: jid,
            to: ROOM_JID + "/" + jid.substring(0,jid.indexOf("@"))
        }).c('x',{xmlns: 'http://jabber.org/protocol/muc'}).tree());
    }
}

// 接收到<message>
function onMessage(msg) {

    console.log(msg);
    // 解析出<message>的from、type属性,以及body子元素
    var from = msg.getAttribute('from');
    var type = msg.getAttribute('type');
    var elems = msg.getElementsByTagName('body');

    if (type == "groupchat" && elems.length > 0) {
        var body = elems[0];
        $("#msg").append(from.substring(from.indexOf('/') + 1) + ":<br>" + Strophe.getText(body) + "<br>")
    }
    return true;
}

$(document).ready(function() {

    // 通过BOSH连接XMPP服务器
    $('#btn-login').click(function() {
        if(!connected) {
            connection = new Strophe.Connection(BOSH_SERVICE);
            connection.connect($("#input-jid").val(), $("#input-pwd").val(), onConnect);
            jid = $("#input-jid").val();
        }
    });

    // 发送消息
    $("#btn-send").click(function() {
        if(connected) {

            // 创建一个<message>元素并发送
            var msg = $msg({
                to: ROOM_JID,
                from: jid,
                type: 'groupchat'
            }).c("body", null, $("#input-msg").val());
            connection.send(msg.tree());

            $("#input-msg").val('');
        } else {
            alert("请先登录!");
        }
    });
});
创建好房间,修改JavaScript代码中的BOSH_SERVICE和ROOM_JID,用浏览器打开HTML文件,登录后即可群聊:

另外,Strophe.js还有一个专门的MUC插件,有兴趣的同学可以自己研究下:https://github.com/strophe/strophejs-plugins/tree/master/muc。

 浙公网安备 33010602011771号