【Android】学习笔记
准备
开发软件&配置:Android Studio, API34
打开软件,新建一个空项目Empty Activity
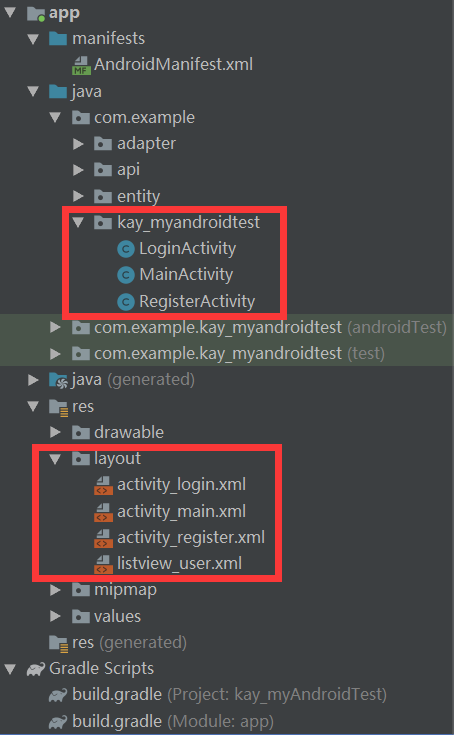
如图所示:目录结构
app
   | - manifests
       AndroidManifest.xml APP配置信息
   | - java 写代码的主目录
       | - com.example.kay_myandroidtest
           MainActivity.java
   | - res
       | - layout
           activity_main.xml 项目主界面
界面:view控件
点击展开activity_login.xml代码
<?xml version="1.0" encoding="utf-8"?>
<androidx.constraintlayout.widget.ConstraintLayout xmlns:android="http://schemas.android.com/apk/res/android"
    xmlns:app="http://schemas.android.com/apk/res-auto"
    xmlns:tools="http://schemas.android.com/tools"
    android:layout_width="match_parent"
    android:layout_height="match_parent"
    tools:context=".LoginActivity">

    <TextView
        android:id="@+id/tv_username"
        android:layout_width="wrap_content"
        android:layout_height="wrap_content"
        android:text="账号:"
        app:layout_constraintBottom_toBottomOf="parent"
        app:layout_constraintEnd_toEndOf="parent"
        app:layout_constraintHorizontal_bias="0.167"
        app:layout_constraintStart_toStartOf="parent"
        app:layout_constraintTop_toTopOf="parent"
        app:layout_constraintVertical_bias="0.148" />

    <TextView
        android:id="@+id/tv_password"
        android:layout_width="wrap_content"
        android:layout_height="wrap_content"
        android:text="密码:"
        app:layout_constraintBottom_toBottomOf="parent"
        app:layout_constraintEnd_toEndOf="parent"
        app:layout_constraintHorizontal_bias="0.168"
        app:layout_constraintStart_toStartOf="parent"
        app:layout_constraintTop_toTopOf="parent"
        app:layout_constraintVertical_bias="0.28" />

    <EditText
        android:id="@+id/et_username"
        android:layout_width="wrap_content"
        android:layout_height="wrap_content"
        android:ems="10"
        android:hint="请输入有效的手机号"
        android:inputType="textPersonName"
        android:text=""
        app:layout_constraintBottom_toBottomOf="parent"
        app:layout_constraintEnd_toEndOf="parent"
        app:layout_constraintHorizontal_bias="0.696"
        app:layout_constraintStart_toStartOf="parent"
        app:layout_constraintTop_toTopOf="parent"
        app:layout_constraintVertical_bias="0.107" />

    <EditText
        android:id="@+id/et_password"
        android:layout_width="wrap_content"
        android:layout_height="wrap_content"
        android:ems="10"
        android:hint="请输入6-20个数字"
        android:inputType="textPassword"
        app:layout_constraintBottom_toBottomOf="parent"
        app:layout_constraintEnd_toEndOf="parent"
        app:layout_constraintHorizontal_bias="0.696"
        app:layout_constraintStart_toStartOf="parent"
        app:layout_constraintTop_toTopOf="parent"
        app:layout_constraintVertical_bias="0.245" />

    <Button
        android:id="@+id/btn_toMain"
        android:layout_width="wrap_content"
        android:layout_height="wrap_content"
        android:text="返回首页"
        app:layout_constraintBottom_toBottomOf="parent"
        app:layout_constraintEnd_toEndOf="parent"
        app:layout_constraintHorizontal_bias="0.269"
        app:layout_constraintStart_toStartOf="parent"
        app:layout_constraintTop_toTopOf="parent"
        app:layout_constraintVertical_bias="0.398" />

    <Button
        android:id="@+id/btn_login"
        android:layout_width="wrap_content"
        android:layout_height="wrap_content"
        android:text="确认登录"
        app:layout_constraintBottom_toBottomOf="parent"
        app:layout_constraintEnd_toEndOf="parent"
        app:layout_constraintHorizontal_bias="0.814"
        app:layout_constraintStart_toStartOf="parent"
        app:layout_constraintTop_toTopOf="parent"
        app:layout_constraintVertical_bias="0.396" />

    <TextView
        android:id="@+id/textView"
        android:layout_width="wrap_content"
        android:layout_height="wrap_content"
        android:text="用户登录"
        app:layout_constraintHorizontal_bias="0.5"
        app:layout_constraintVertical_bias="0.027"
        app:layout_constraintBottom_toBottomOf="parent"
        app:layout_constraintEnd_toEndOf="parent"
        app:layout_constraintStart_toStartOf="parent"
        app:layout_constraintTop_toTopOf="parent"/>
</androidx.constraintlayout.widget.ConstraintLayout>
TextView:纯展示文本
EditText:输入框
Button:按钮
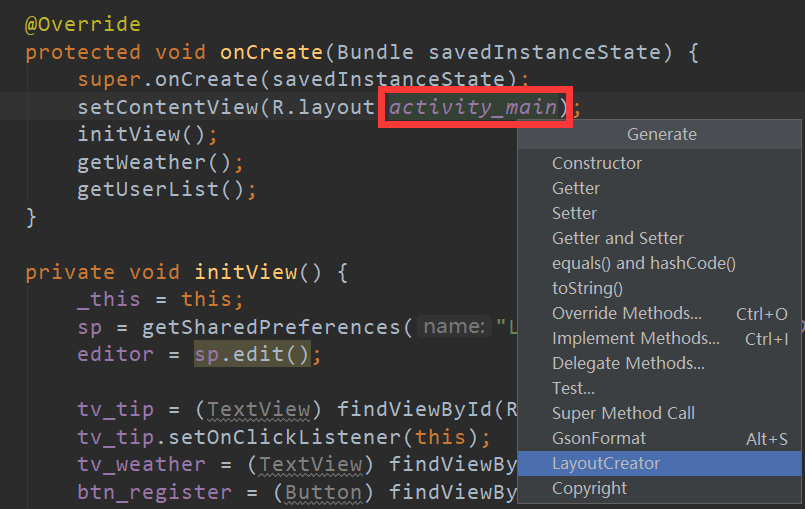
LayoutCreator
需要安装插件GsonFormat和LayoutCreator
安装好插件之后,回到MainActivity.java上
将鼠标放在OnCreate方法的activity_main上,按下Alt+Insert,选择倒数第二个LayoutCreator,选择要导入的控件。
事件监听OnClickListener
当前的Activity需要implementsView.OnClickListener,然后重写onClick方法
用LayoutCreator生成代码的时候,如果有按钮,会自动实现onClick方法
    @Override
    public void onClick(View v) {
        switch (v.getId()) {
            case R.id.btn_register:
                toRegPage();
                break;
            case R.id.btn_login:
                toLoginPage();
                break;
        }
    }
也可以在initView的时候,来写(不推荐)
btn_login.setOnClickListener(new View.OnClickListener() {
     @Override
     public void onClick(View view) {

     }
});
转跳页面Intent
这个转跳属于显示转跳,还有隐式转跳,不太实用,不赘述。
Intent intent = new Intent(this, XXX.class);
startActivity(intent);
this:当前页面
XXX.class:将要转跳的页面
startActivity(): 这个方法属于Context类,也就是当前页面。写完整的话,应该这样写this.startActivity(intent);
Intent传递数据
发送数据
例如:从Main页面传递参数到Login页面
Intent intent = new Intent(this,LoginActivity.class);
intent.putExtra("key","value");
startActivity(intent);
接受数据
在loginActicity接受数据
Intent intent = this.getIntent();
cateCode=intent.getStringExtra("cateCode");
Toast和AlertDialog
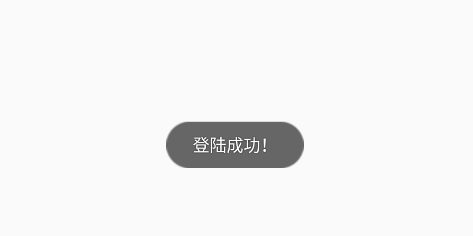
Toast
Toast.makeText(this,"登陆成功!",Toast.LENGTH_SHORT).show();
第一个参数:当前活动 this
第二个参数:提示的消息内容
第三个参数:显示时间长短,Toast.LENGTH_SHORT或Toast.LENGTH_LONG
调整位置
Toast myToast=Toast.makeText(this,"登陆成功!",Toast.LENGTH_SHORT);
myToast.setGravity(Gravity.CENTER,0,0);
//第一个参数:起始位置;
//第二个参数:x轴偏移量;
//第三个参数:y轴偏移量
myToast.show();
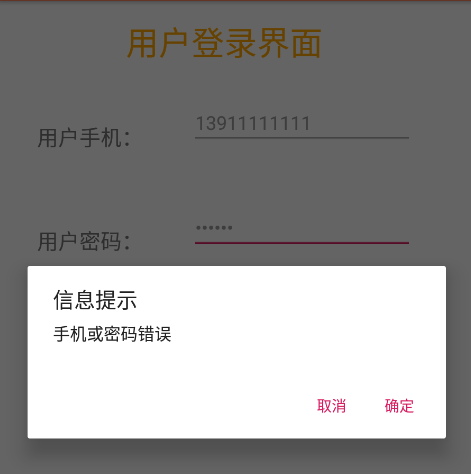
AlertDialog
基本用法
AlertDialog.Builder dialog = new AlertDialog.Builder(this);//当前活动
dialog.setIcon(R.mipmap.ic_launcher);//图标
dialog.setTitle("信息提示");//标题
dialog.setMessage("xxx");//内容(弹窗中间)
dialog.setCancelable(true/false);//点击弹窗外部是否关闭
dialog.setPositiveButton("确定", new DialogInterface.OnClickListener() {//按钮文字及点击事件
	@Override
	public void onClick(DialogInterface dialog, int which) {
		//code
	}
});
dialog.setNegativeButton("取消",null);//无点击事件
dialog.show();
Gson使用
一、概述
Gson 是 Google 提供的用来在 Java 对象和 JSON 数据之间进行映射的 Java 类库。可以将一个 JSON 数据转成一个 Java 对象,或者反过来。
JSON数据有两种类型:
(1)一种是对象,object -> {key:value,key:value,...} 。
(2)另一种是数组,array -> [value,value,...] 。【这里的value又是一个个对象】
GSON在解析json的时候,大体上有2种类型:
(1)一种是直接在内存中生成object或array,通过手工指定key来获取值;
(2)另一种是借助javabean(即自定义类)来进行映射获取值。
二、导入Gson依赖包
在“File”菜单下的“project structure”中的“Dependencies”下的当前Module中去添加“Library Dependency”中的搜索功能搜索得到(com.google.code.gson)。
在build.gradle中添加依赖
implementation 'com.google.code.gson:gson:2.8.5'
三、Gson类基本使用
1.直接解析,不使用javabean(不推荐)
2.借助javabean类,生成对应javabean对象来解析数据(推荐)
(1)json数据是对象类型
Gson gson = new Gson();
自定义类 bean = gson.fromJson(json数据, 自定义类.class);
特别说明:
①如果自定义类中的属性和json数据中的键名不一致,可以在自定义类中通过@SerializedName(别名1,别名2)这样的方式来设定别名与键名对应。
②如果自定义类中的某个属性不参与序列化和反序列化,可以在自定义类中通过@Expose(serialize=false,deserialize=false)这样的方式来限制。
③如果json数据的value是数组或者对象,那么对应自定义类中该属性的类型分别应该是List
(2)json数据是数组类型
一般我们需要将数组类型的json数据反序列化为List
Gson gson = new Gson();
Type type=new TypeToken<List<T>>(){}.getType();
List<T> fruitList = gson2.fromJson(json数据, type);
这里的重点就是type的获取。
OKhttp3的基本使用
OkHttp官网地址:http://square.github.io/okhttp/
OkHttp GitHub地址:https://github.com/square/okhttp
在build.gradle中添加依赖
implementation 'com.squareup.okhttp3:okhttp:3.12.1'
提示:该插件多数用于网络应用,所以必须在项目中添加internet的访问权限
在AndroidManifest.xml中添加给用户网络权限
<uses-permission android:name="android.permission.INTERNET" />
post方法
点击展开post代码
OkHttpClient client = new OkHttpClient();
FormBody formBody = new FormBody.Builder()
        .add("userPhone", phoneString)
        .add("userPwd", pwdString)
        .add("userName", nicknameString)
        .add("userNickName", nicknameString)
        .add("token",UrlConfig.TOKEN)
        .build();
Request request = new Request.Builder()
        .url("http://kjxycode.zisu.edu.cn/interfaceCommonForUser/CheckUserLogin")
        .post(formBody)
        .build();
Call call = client.newCall(request);
call.enqueue(new Callback() {
    @Override
    public void onFailure(Call call, IOException e) {
        Log.d("bug","Error");
    }

    @Override
    public void onResponse(Call call, Response response) throws IOException {
        String res = response.body().string();
        runOnUiThread(new Runnable() {//强制指定是在UI主线程上运行
            @Override
            public void run() {
                 //修改主线程view
                 Toast.makeText(_this, "注册成功", Toast.LENGTH_SHORT).show();
            }
        });
        toLoginPage();
    }
});
get方法
和post方法大同小异,只是少了formBody来传参
点击展开get代码
OkHttpClient client = new OkHttpClient();
final Request request = new Request.Builder()
        .url(UrlConfig.GetUserList + "?token=" + UrlConfig.TOKEN)
        .get().build();
Call call = client.newCall(request);
call.enqueue(new Callback() {
        @Override
        public void onFailure(Call call, IOException e) {
            Log.d("mainBug-getUserList", "onFailure: " + e);
        }

        @Override
        public void onResponse(Call call, Response response) throws IOException {
            Log.d("mainBug", "userList: " + resp);
        }
});
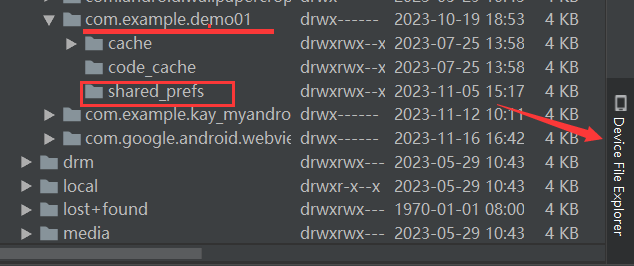
轻量级存储SharedPreference
SharedPreferences是用xml文件来存放数据,文件存放在/data/data/<package name>/shared_prefs目录下。
界面右下角
//读取数据
sp = getSharedPreferences("LoginInfo", Context.MODE_PRIVATE);
String username = sp.getString("username", "");

//写入数据
SharedPreferences sp = getSharedPreferences("LoginInfo", Context.MODE_PRIVATE);
SharedPreferences.Editor edit = sp.edit();
edit.putString("phone",phoneString);
edit.commit();
ListView基本使用
一、概述
ListView是Android中最常用的控件之一,主要用来呈现列表形式的内容。该列表控件上数据的显示主要通过数据动态绑定这一方式来进行。
不过现在该控件被归到了“Legacy”组中,所以可以考虑后续用的越来越少了吧。替代的控件可以用RecyclerView
二、添加控件
在工具箱中找到“Legacy”组,然后将ListView控件拖入布局文件中,并设置好约束或其他形式的布局。
三、将数据绑定到控件
1、SimpleAdapter
点击展开SimpleAdapter绑定代码
List<Map<String,String>> userList = new ArrayList<>();
for (int i=0;i<9;i++) {
    Map<String,String> map=new HashMap<>();
    map.put("userName", "userName"+i);
    map.put("userPhone","userName"+i);
    userList.add(map);
}

simpleAdapter = new SimpleAdapter(
        _this,//当前页面
        userList,//数据
        R.layout.listview_user,//自定义布局
        new String[]{"userName","userPhone"},//每一行的单元格内容在Map中对应索引名
        new int[]{R.id.tvName,R.id.tvPhone});//每一行的单元格对应视图的id号
lvUser.setAdapter(simpleAdapter);
2、较复杂的数据绑定
(1)定义复杂的数据源List<T>
这里的数据源可以使用复杂类型对象的数组或者存放复杂数据类型对象的List(ArrayList)列表对象。
private List<GetUserRespBean.UserListBean> getUserList;
里面的数据来自于利用OkHttp请求远程服务器接口所获取到的返回数据。
(2)定义显示布局Layout listview_user.xml
创建一个布局文件,类似前面的Activity布局。但是要注意的是这里的布局是用来显示ListView列表中的单独一项的内容。
例如,可以新建一个水平线性布局,然后水平放置三个控件:复选框、文本、按钮。
(3)定义适配器UserListAdapter.java
此时的适配器我们需要自定义一个继承自BaseAdapter的类UserListAdapter,然后实现基类的以下几个方法,主要是getView()方法,获取当前的布局对象:LayoutInflater.from(_this).inflate(R.layout.listview_user,null);
点击展开UserListAdapter代码
public class UserListAdapter extends BaseAdapter {

    private List<GetUserRespBean.UserListBean> getUserList;

    private Context _this;

    public UserListAdapter(List<GetUserRespBean.UserListBean> getUserList, Context _this) {
        this.getUserList = getUserList;
        this._this = _this;
    }

    @Override
    public int getCount() {
        return getUserList.size();
    }

    @Override
    public Object getItem(int i) {
        return getUserList.get(i);
    }

    @Override
    public long getItemId(int i) {
        return getUserList.get(i).getId();
    }

    @Override
    public View getView(int i, View view, ViewGroup viewGroup) {
        view = LayoutInflater.from(_this).inflate(R.layout.listview_user,null);
        TextView tvName=view.findViewById(R.id.tvName);
        TextView tvPhone=view.findViewById(R.id.tvPhone);
        tvName.setText(getUserList.get(i).getUserName());
        tvPhone.setText(getUserList.get(i).getUserPhone());
        Button btnDel=view.findViewById(R.id.btn_update);
        btnDel.setOnClickListener(...);
    }

}
(3)例如需要在MainActivity页面用到ListView
请求获得数据后,new UserListAdapter,然后给lvUser.setAdapter(adapter);
@Override
public void onResponse(Call call, Response response) throws IOException {
    String resp = response.body().string();
    Gson gson = new Gson();
    GetUserRespBean userInfo = gson.fromJson(resp, GetUserRespBean.class);
    adapter = new UserListAdapter(userInfo.getUserList(), _this);
    runOnUiThread(new Runnable() {
        @Override
        public void run() {
            lvUser.setAdapter(adapter);
        }
    });
}
3、ListView的事件监听
注意:item和item里的button同时绑定事件监听,会产生冲突,那么谁优先就是个问题。ListView作为容器有个属性:
descendantFocusability来处理这个问题。
该属性有三个给定值:
beforeDescendants:viewgroup会优先其子类控件而获取到焦点
afterDescendants:viewgroup只有当其子类控件不需要获取焦点时才获取焦点
blocksDescendants:viewgroup会覆盖子类控件而直接获得焦点
1、自身的事件监听
主要就是项点击事件的监听:OnItemClickListener
点击查看代码
lvUser = findViewById(R.id.lvUser);
lvUser.setOnItemClickListener(new AdapterView.OnItemClickListener() {
    @Override
    public void onItemClick(AdapterView<?> adapterView, View view, int i, long l) {
        //...相关操作
    }
});
2、列表项中控件的事件监听
主要是在自定义适配器类中的getView方法中实现列表项控件的事件监听。
例如:之前在UserListAdapter中的代码,btn_del的OnClickListener
代码之前有,不再展示
写于 2023-11-16 18:11:31 星期四

 浙公网安备 33010602011771号