Shiro入门
参考文档:https://jinnianshilongnian.iteye.com/blog/2049092;https://www.cnblogs.com/fancongcong/p/8093258.html
参考视频:https://www.bilibili.com/video/av29862843/?p=13
一:什么是Shiro
Apache Shiro是一个强大且易用的Java安全框架,执行身份验证、授权、密码和会话管理。使用Shiro的易于理解的API,您可以快速、轻松地获得任何应用程序,从最小的移动应用程序到最大的网络和企业应用程序。
1 Shiro核心功能

Authentication:身份认证/登录,验证用户是不是拥有相应的身份;
Authorization:授权,即权限验证,验证某个已认证的用户是否拥有某个权限;即判断用户是否能做事情,常见的如:验证某个用户是否拥有某个角色。或者细粒度的验证某个用户对某个资源是否具有某个权限;
Session Manager:会话管理,即用户登录后就是一次会话,在没有退出之前,它的所有信息都在会话中;会话可以是普通JavaSE环境的,也可以是如Web环境的;
Cryptography:加密,保护数据的安全性,如密码加密存储到数据库,而不是明文存储;
Web Support:Web支持,可以非常容易的集成到Web环境;
Caching:缓存,比如用户登录后,其用户信息、拥有的角色/权限不必每次去查,这样可以提高效率;
Concurrency:shiro支持多线程应用的并发验证,即如在一个线程中开启另一个线程,能把权限自动传播过去;
Testing:提供测试支持;
Run As:允许一个用户假装为另一个用户(如果他们允许)的身份进行访问;
Remember Me:记住我,这个是非常常见的功能,即一次登录后,下次再来的话不用登录了。
2 Shiro的工作流程

Subject:主体,代表了当前“用户”,这个用户不一定是一个具体的人,与当前应用交互的任何东西都是Subject,如网络爬虫,机器人等;即一个抽象概念;所有Subject都绑定到SecurityManager,与Subject的所有交互都会委托给SecurityManager;可以把Subject认为是一个门面;SecurityManager才是实际的执行者;
SecurityManager:安全管理器;即所有与安全有关的操作都会与SecurityManager交互;且它管理着所有Subject;可以看出它是Shiro的核心,它负责与后边介绍的其他组件进行交互,如果学习过SpringMVC,你可以把它看成DispatcherServlet前端控制器;
Realm:域,Shiro从从Realm获取安全数据(如用户、角色、权限),就是说SecurityManager要验证用户身份,那么它需要从Realm获取相应的用户进行比较以确定用户身份是否合法;也需要从Realm得到用户相应的角色/权限进行验证用户是否能进行操作;可以把Realm看成DataSource,即安全数据源。
二:Shiro的HelloWorld
实例代码:
 1 package main.java.com.shiro.test;
 2
 3 import org.apache.shiro.SecurityUtils;
 4 import org.apache.shiro.authc.AuthenticationException;
 5 import org.apache.shiro.authc.UsernamePasswordToken;
 6 import org.apache.shiro.config.IniSecurityManagerFactory;
 7 import org.apache.shiro.mgt.SecurityManager;
 8 import org.apache.shiro.subject.Subject;
 9 import org.junit.Assert;
10 import org.junit.Test;
11
12 public class ShiroTest_1 {
13     @Test
14     public void shiroHelloWorld(){
15         //1、获取SecurityManager工厂
16          IniSecurityManagerFactory iniSecurityManagerFactory = new IniSecurityManagerFactory("classpath:shiro-realm.ini");
17          //2,获取SecurityManager,安全管理中心,并帮顶给SecurityUtils
18          SecurityManager securityManager = iniSecurityManagerFactory.getInstance();
19          SecurityUtils.setSecurityManager(securityManager);
20          //3,获取subject(用户主体)并根据用户名和密码得到登录令牌
21          Subject subject = SecurityUtils.getSubject();
22          UsernamePasswordToken token = new UsernamePasswordToken("zhang","123");
23          //4,登录,及身份验证
24          try {
25             subject.login(token);
26         } catch (AuthenticationException e) {
27             // 登录失败
28             e.printStackTrace();
29         }
30          //断言用户已经登录
31          Assert.assertEquals(true,subject.isAuthenticated());
32          //5,退出登录
33          subject.logout();
34     }
35 }
主要API:
SecurityUtils.getSubject() 获取主体
Subject.login() 登入
Subject.logout() 登出
三:Shiro整合Spring
3.1导入Spring相关的jar包或依赖

 <dependencies>
    <dependency>
      <groupId>junit</groupId>
      <artifactId>junit</artifactId>
      <version>4.11</version>
      <scope>test</scope>
    </dependency>

      <!-- https://mvnrepository.com/artifact/org.springframework/spring-aop -->
      <dependency>
        <groupId>org.springframework</groupId>
        <artifactId>spring-aop</artifactId>
        <version>5.0.6.RELEASE</version>
      </dependency>

      <!-- https://mvnrepository.com/artifact/org.springframework/spring-aspects -->
      <dependency>
        <groupId>org.springframework</groupId>
        <artifactId>spring-aspects</artifactId>
        <version>5.0.6.RELEASE</version>
      </dependency>
      <!-- https://mvnrepository.com/artifact/org.springframework/spring-beans -->
      <dependency>
        <groupId>org.springframework</groupId>
        <artifactId>spring-beans</artifactId>
        <version>5.0.6.RELEASE</version>
      </dependency>
      <!-- https://mvnrepository.com/artifact/org.springframework/spring-context -->
      <dependency>
        <groupId>org.springframework</groupId>
        <artifactId>spring-context</artifactId>
        <version>5.0.6.RELEASE</version>
      </dependency>
      <!-- https://mvnrepository.com/artifact/org.springframework/spring-core -->
      <dependency>
        <groupId>org.springframework</groupId>
        <artifactId>spring-core</artifactId>
        <version>5.0.6.RELEASE</version>
      </dependency>
      <!-- https://mvnrepository.com/artifact/org.springframework/spring-expression -->
      <dependency>
        <groupId>org.springframework</groupId>
        <artifactId>spring-expression</artifactId>
        <version>5.0.6.RELEASE</version>
      </dependency>
      <!-- https://mvnrepository.com/artifact/org.springframework/spring-jdbc -->
      <dependency>
        <groupId>org.springframework</groupId>
        <artifactId>spring-jdbc</artifactId>
        <version>5.0.6.RELEASE</version>
      </dependency>
      <!-- https://mvnrepository.com/artifact/org.springframework/spring-orm -->
      <dependency>
        <groupId>org.springframework</groupId>
        <artifactId>spring-orm</artifactId>
        <version>5.0.6.RELEASE</version>
      </dependency>
      <!-- https://mvnrepository.com/artifact/org.springframework/spring-tx -->
      <dependency>
        <groupId>org.springframework</groupId>
        <artifactId>spring-tx</artifactId>
        <version>5.0.6.RELEASE</version>
      </dependency>
      <!-- https://mvnrepository.com/artifact/org.springframework/spring-web -->
      <dependency>
        <groupId>org.springframework</groupId>
        <artifactId>spring-web</artifactId>
        <version>5.0.6.RELEASE</version>
      </dependency>
      <!-- https://mvnrepository.com/artifact/org.springframework/spring-webmvc -->
      <dependency>
        <groupId>org.springframework</groupId>
        <artifactId>spring-webmvc</artifactId>
        <version>5.0.6.RELEASE</version>
      </dependency>
      <!--servlet相关的Jar包-->
      <dependency>
        <groupId>javax.servlet</groupId>
        <artifactId>javax.servlet-api</artifactId>
        <version>3.1.0</version>
        <scope>provided</scope>
      </dependency>

      <dependency>
        <groupId>javax.servlet</groupId>
        <artifactId>jstl</artifactId>
        <version>1.2</version>
      </dependency>

      <dependency>
        <groupId>taglibs</groupId>
        <artifactId>standard</artifactId>
        <version>1.1.2</version>
      </dependency>

    <!--shiro-->
    <dependency>
      <groupId>org.apache.shiro</groupId>
      <artifactId>shiro-all</artifactId>
      <version>1.3.2</version>
    </dependency>

    <!--log4j日志-->
    <dependency>
      <groupId>log4j</groupId>
      <artifactId>log4j</artifactId>
      <version>1.2.15</version>
    </dependency>
    <dependency>
      <groupId>org.slf4j</groupId>
      <artifactId>slf4j-api</artifactId>
      <version>1.6.1</version>
    </dependency>
    <dependency>
      <groupId>org.slf4j</groupId>
      <artifactId>slf4j-log4j12</artifactId>
      <version>1.6.1</version>
    </dependency>

    <!--ehcache-->
    <dependency>
      <groupId>net.sf.ehcache</groupId>
      <artifactId>ehcache</artifactId>
      <version>2.4.3</version>
    </dependency>

  </dependencies>
3.2配置相关文件

 1 <?xml version="1.0" encoding="UTF-8"?>
 2 <beans xmlns="http://www.springframework.org/schema/beans"
 3     xmlns:xsi="http://www.w3.org/2001/XMLSchema-instance"
 4     xmlns:p="http://www.springframework.org/schema/p"
 5     xmlns:aop="http://www.springframework.org/schema/aop"
 6     xmlns:context="http://www.springframework.org/schema/context"
 7     xmlns:jee="http://www.springframework.org/schema/jee"
 8     xmlns:tx="http://www.springframework.org/schema/tx"
 9     xmlns:mvc="http://www.springframework.org/schema/mvc"
10     xsi:schemaLocation="
11         http://www.springframework.org/schema/aop http://www.springframework.org/schema/aop/spring-aop-4.0.xsd
12         http://www.springframework.org/schema/beans http://www.springframework.org/schema/beans/spring-beans-4.0.xsd
13         http://www.springframework.org/schema/mvc   http://www.springframework.org/schema/mvc/spring-mvc.xsd
14         http://www.springframework.org/schema/context http://www.springframework.org/schema/context/spring-context-4.0.xsd
15         http://www.springframework.org/schema/jee http://www.springframework.org/schema/jee/spring-jee-4.0.xsd
16         http://www.springframework.org/schema/tx http://www.springframework.org/schema/tx/spring-tx-4.0.xsd">
17
18     <!-- 使用注解的包,包括子集 -->
19     <context:component-scan base-package="com.wu.shiro" />
20
21     <!-- 加载自定义配置文件 -->
22     <!-- <context:property-placeholder location="classpath:application.properties"/> -->
23
24     <!-- 配置注解驱动,相当于配置了最新的处理器映射器和处理器解析器 -->
25     <mvc:annotation-driven/>
26
27     <!-- 静态资源过滤 -->
28     <mvc:default-servlet-handler/>
29
30     <!-- 视图解析器 -->
31     <bean id="viewResolver"    class="org.springframework.web.servlet.view.InternalResourceViewResolver">
32         <property name="prefix" value="/" />
33         <property name="suffix" value=".jsp"></property>
34     </bean>
35
36 </beans>
 1 <?xml version="1.0" encoding="UTF-8"?>
 2 <beans xmlns="http://www.springframework.org/schema/beans"
 3     xmlns:xsi="http://www.w3.org/2001/XMLSchema-instance"
 4     xmlns:p="http://www.springframework.org/schema/p"
 5     xmlns:aop="http://www.springframework.org/schema/aop"
 6     xmlns:context="http://www.springframework.org/schema/context"
 7     xmlns:jee="http://www.springframework.org/schema/jee"
 8     xmlns:tx="http://www.springframework.org/schema/tx"
 9     xsi:schemaLocation="
10         http://www.springframework.org/schema/aop http://www.springframework.org/schema/aop/spring-aop-4.0.xsd
11         http://www.springframework.org/schema/beans http://www.springframework.org/schema/beans/spring-beans-4.0.xsd
12         http://www.springframework.org/schema/context http://www.springframework.org/schema/context/spring-context-4.0.xsd
13         http://www.springframework.org/schema/jee http://www.springframework.org/schema/jee/spring-jee-4.0.xsd
14         http://www.springframework.org/schema/tx http://www.springframework.org/schema/tx/spring-tx-4.0.xsd">
15
16     <!-- shiro核心组件配置 -->
17
18     <!--1: shiro权限管理器配置 -->
19     <bean id="securityManager" class="org.apache.shiro.web.mgt.DefaultWebSecurityManager">
20         <property name="cacheManager" ref="cacheManager"/>
21         <property name="realm" ref="jdbcRealm"/>
22     </bean>
23
24       <!--2: 缓存管理器配置 -->
25       <!-- 添加ehcache的包和配置ehcache配置文件 -->
26     <bean id="cacheManager" class="org.apache.shiro.cache.ehcache.EhCacheManager">
27         <!-- Set a net.sf.ehcache.CacheManager instance here if you already have one.  If not, a new one
28              will be creaed with a default config:
29              <property name="cacheManager" ref="ehCacheManager"/> -->
30         <!-- If you don't have a pre-built net.sf.ehcache.CacheManager instance to inject, but you want
31              a specific Ehcache configuration to be used, specify that here.  If you don't, a default
32              will be used.: -->
33         <property name="cacheManagerConfigFile" value="classpath:ehcache.xml"/>
34     </bean>
35
36     <!--3: 自定义Reaml实现org.apache.shiro.realm.Realm接口 -->
37     <!-- Used by the SecurityManager to access security data (users, roles, etc).
38          Many other realm implementations can be used too (PropertiesRealm,
39          LdapRealm, etc. -->
40     <bean id="jdbcRealm" class="com.wu.shiro.realms.ShiroRealm">
41
42     </bean>
43
44     <!-- =========================================================
45          Shiro Spring-specific integration
46          ========================================================= -->
47     <!-- Post processor that automatically invokes init() and destroy() methods
48          for Spring-configured Shiro objects so you don't have to
49          1) specify an init-method and destroy-method attributes for every bean
50             definition and
51          2) even know which Shiro objects require these methods to be
52             called. -->
53      <!-- 4: 配置LifecycleBeanPostProcessor,自定义配置在Spring IOC容器中的shiro bean的生命周期 -->
54     <bean id="lifecycleBeanPostProcessor" class="org.apache.shiro.spring.LifecycleBeanPostProcessor"/>
55
56     <!-- Enable Shiro Annotations for Spring-configured beans.  Only run after
57          the lifecycleBeanProcessor has run: -->
58      <!-- 5:启用Shiro注解,必须在配置了LifecycleBeanPostProcessor后 -->
59     <bean class="org.springframework.aop.framework.autoproxy.DefaultAdvisorAutoProxyCreator"
60           depends-on="lifecycleBeanPostProcessor"/>
61     <bean class="org.apache.shiro.spring.security.interceptor.AuthorizationAttributeSourceAdvisor">
62         <property name="securityManager" ref="securityManager"/>
63     </bean>
64
65     <!--
66         6:配置ShiroFilter
67         6.1:bean id 需要与web.xml中的ShiroFilter的filterName一致
68      -->
69     <!-- Define the Shiro Filter here (as a FactoryBean) instead of directly in web.xml -
70          web.xml uses the DelegatingFilterProxy to access this bean.  This allows us
71          to wire things with more control as well utilize nice Spring things such as
72          PropertiesPlaceholderConfigurer and abstract beans or anything else we might need: -->
73     <bean id="shiroFilter" class="org.apache.shiro.spring.web.ShiroFilterFactoryBean">
74         <property name="securityManager" ref="securityManager"/>
75         <property name="loginUrl" value="/login.jsp"/>
76         <property name="successUrl" value="/success.jsp"/>
77         <property name="unauthorizedUrl" value="unauthorized.jsp"/>
78
79         <!--
80             配置哪些页面需要保护以及访问这些页面需要的权限
81             anon,指哪些页面可以直接访问,匿名访问
82             authc,指哪些页面时受保护的,需要登陆后访问
83          -->
84         <property name="filterChainDefinitions">
85             <value>
86                 /login.jsp = anon
87                   /** = authc
88             </value>
89         </property>
90     </bean>
91
92 </beans>
93
 1 <?xml version="1.0" encoding="UTF-8"?>
 2 <web-app xmlns:xsi="http://www.w3.org/2001/XMLSchema-instance" xmlns="http://java.sun.com/xml/ns/javaee" xsi:schemaLocation="http://java.sun.com/xml/ns/javaee http://java.sun.com/xml/ns/javaee/web-app_2_5.xsd" id="WebApp_ID" version="2.5">
 3   <display-name>Spring_Shiro</display-name>
 4   <welcome-file-list>
 5     <welcome-file>index.html</welcome-file>
 6     <welcome-file>index.htm</welcome-file>
 7     <welcome-file>index.jsp</welcome-file>
 8     <welcome-file>default.html</welcome-file>
 9     <welcome-file>default.htm</welcome-file>
10     <welcome-file>default.jsp</welcome-file>
11   </welcome-file-list>
12   <!-- 加载Spring配置文件 -->
13     <context-param>
14         <param-name>contextConfigLocation</param-name>
15         <param-value>classpath:applicationContext.xml</param-value>
16     </context-param>
17
18     <!-- 配置Spring监听器 -->
19     <listener>
20         <listener-class>org.springframework.web.context.ContextLoaderListener</listener-class>
21     </listener>
22
23     <!-- springmvc前端控制器 -->
24     <servlet>
25         <servlet-name>springMVC</servlet-name>
26         <servlet-class>org.springframework.web.servlet.DispatcherServlet</servlet-class>
27         <load-on-startup>1</load-on-startup>
28     </servlet>
29     <servlet-mapping>
30         <servlet-name>springMVC</servlet-name>
31         <url-pattern>/</url-pattern>
32     </servlet-mapping>
33
34     <!-- shiro过滤器定义 -->
35     <filter>
36         <filter-name>shiroFilter</filter-name>
37         <filter-class>org.springframework.web.filter.DelegatingFilterProxy</filter-class>
38         <init-param>
39             <!-- 该值缺省为false,表示生命周期由SpringApplicationContext管理,设置为true则表示由ServletContainer管理 -->
40             <param-name>targetFilterLifecycle</param-name>
41             <param-value>true</param-value>
42         </init-param>
43     </filter>
44     <filter-mapping>
45         <filter-name>shiroFilter</filter-name>
46         <url-pattern>/*</url-pattern>
47     </filter-mapping>
48 </web-app>
 1 <?xml version="1.0" encoding="UTF-8"?>
 2 <ehcache>
 3     <!-- 指定一个文件目录,当EhCache把数据写到硬盘上时,将把数据写到这个文件目录下 -->
 4     <diskStore path="java.io.tmpdir"/>
 5
 6     <!-- 设定缓存的默认数据过期策略 -->
 7     <defaultCache
 8             maxElementsInMemory="10000"
 9             eternal="false"
10             overflowToDisk="true"
11             timeToIdleSeconds="10"
12             timeToLiveSeconds="20"
13             diskPersistent="false"
14             diskExpiryThreadIntervalSeconds="120"/>
15
16     <cache name="cacheTest"
17            maxElementsInMemory="1000"
18            eternal="false"
19            overflowToDisk="true"
20            timeToIdleSeconds="10"
21            timeToLiveSeconds="20"/>
22
23 </ehcache>
实现效果:访问受保护的页面时自动跳转到匿名即可访问的页面
3.3 URL的配置:
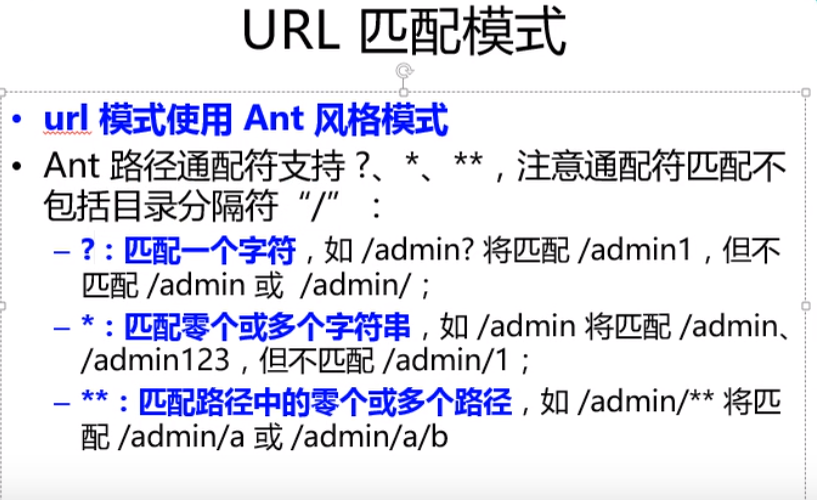
URL配置中常用到的拦截器:
anon:可以匿名使用/登陆
authc: 需要认证后使用
louout: 注销
详情请看下图:
| 过滤器名称 | 过滤器类 | 描述 |
| anon | org.apache.shiro.web.filter.authc.AnonymousFilter | 匿名过滤器 |
| authc | org.apache.shiro.web.filter.authc.FormAuthenticationFilter | 如果继续操作,需要做对应的表单验证否则不能通过 |
| authcBasic | org.apache.shiro.web.filter.authc.BasicHttpAuthenticationFilter | 基本http验证过滤,如果不通过,跳转屋登录页面 |
| logout | org.apache.shiro.web.filter.authc.LogoutFilter | 登录退出过滤器 |
| noSessionCreation | org.apache.shiro.web.filter.session.NoSessionCreationFilter | 没有session创建过滤器 |
| perms | org.apache.shiro.web.filter.authz.PermissionsAuthorizationFilter | 权限过滤器 |
| port | org.apache.shiro.web.filter.authz.PortFilter | 端口过滤器,可以设置是否是指定端口如果不是跳转到登录页面 |
| rest | org.apache.shiro.web.filter.authz.HttpMethodPermissionFilter | http方法过滤器,可以指定如post不能进行访问等 |
| roles | org.apache.shiro.web.filter.authz.RolesAuthorizationFilter | 角色过滤器,判断当前用户是否指定角色 |
| ssl | org.apache.shiro.web.filter.authz.SslFilter | 请求需要通过ssl,如果不是跳转回登录页 |
| user | org.apache.shiro.web.filter.authc.UserFilter | 如果访问一个已知用户,比如记住我功能,走这个过滤器 |
url的匹配模式:
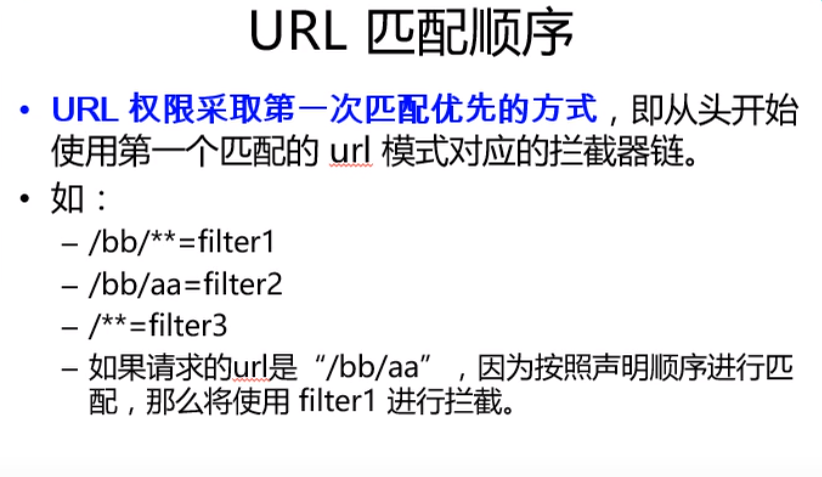
url的匹配顺序:
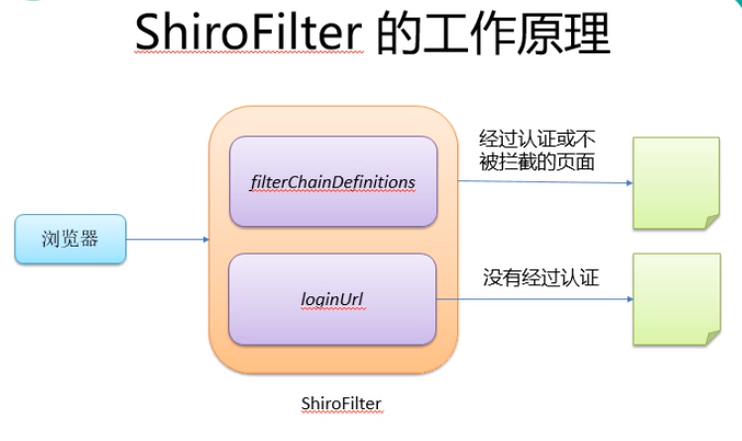
url登陆的流程:
3.4Shiro登录流程
1,获取当前的Subject,调用 SecurityUtils.getSubject()
2,测试当前于用户是否已经认证,Subject.isAuthenticated()
3, 若没有被认证,将用户名和密码封装到UsernamePasswordToken()
1)创建一个表单,提交用户名和密码到SpringMvc的handler
2)获取用户名和密码
4,执行登录,调用Subject.login(Token)
5,自定义认证Realm方法,从数据库中获取数据并返回信息交给Shiro比对
1)继承AuthenticatingRealm类
2)实现doGetAuthenticationInfo(AuthenticationToken)方法
3)返回Info到Shiro
6, 由Shiro比对密码
1)由AuthenticatingRealm的CredentialsMathcer属性比对
相关的实例代码:
1 <form action="shiro/login" method="post">
2     username:<input type="text" name="username"><br>
3     password:<input type="text" name="password"><br>
4     <input type="submit" value="登录">
5 </form>
 1 package com.wu.shiro.controller;
 2
 3 import org.apache.shiro.SecurityUtils;
 4 import org.apache.shiro.authc.AuthenticationException;
 5 import org.apache.shiro.authc.UsernamePasswordToken;
 6 import org.apache.shiro.subject.Subject;
 7 import org.springframework.stereotype.Controller;
 8 import org.springframework.web.bind.annotation.RequestMapping;
 9 import org.springframework.web.bind.annotation.RequestParam;
10
11 @Controller
12 public class ShiroLogin {
13     @RequestMapping("/shiro/login")
14     public String login(@RequestParam("username")String username,@RequestParam("password")String password){
15         //1,获取Subject
16          Subject subject = SecurityUtils.getSubject();
17          //2,判断是当前用户是否验证
18          if(!subject.isAuthenticated()){
19              //3,将用户名和密码封装到相关Token
20              UsernamePasswordToken token = new UsernamePasswordToken(username,password);
21              System.out.println(token.hashCode()+"+++++++++++++++++++");
22              token.setRememberMe(true);
23              //4,登录
24              try {
25                 subject.login(token);
26             } catch (AuthenticationException e) {
27                 System.out.println("登录失败!");
28                 e.printStackTrace();
29             }
30          }
31          return "redirect:/success.jsp";
32     }
33 }
 1 package com.wu.shiro.realms;
 2
 3 import org.apache.shiro.authc.AuthenticationException;
 4 import org.apache.shiro.authc.AuthenticationInfo;
 5 import org.apache.shiro.authc.AuthenticationToken;
 6 import org.apache.shiro.authc.SimpleAuthenticationInfo;
 7 import org.apache.shiro.authc.UnknownAccountException;
 8 import org.apache.shiro.authc.UsernamePasswordToken;
 9 import org.apache.shiro.realm.AuthenticatingRealm;
10 import org.apache.shiro.realm.Realm;
11
12 public class ShiroRealm extends AuthenticatingRealm{
13
14     @Override
15     protected AuthenticationInfo doGetAuthenticationInfo(AuthenticationToken token) throws AuthenticationException {
16         //1,把AuthenticationToken强转成UsernamePasswordToken
17         UsernamePasswordToken upToken =(UsernamePasswordToken) token;
18         //2,从UsernamePasswordToken中获取username
19         String username = upToken.getUsername();
20         //3,查询数据库,从数据库中查询用户信息
21         System.out.println("从数据库中查询到的用户为:"+username);
22         //4,根据用户信息,抛出异常
23         if("unKnow".equals(username)){
24             throw new UnknownAccountException("用户不存在!");
25         }
26         //6根据用户情况,构建AuthenticationInfo对象并返回,通常使用SimpleAuthenticationInfo
27         Object principal=username;
28         //密码从数据库中获取,交给Shiro去比对
29         Object credentials="123";
30         String realmName=getName();
31         SimpleAuthenticationInfo info=new SimpleAuthenticationInfo(principal, credentials, realmName);
32         return info;
33     }
34
35 }
3.5密码MD5无盐加密:
将AuthenticatingRealm的CredentialsMathcer属性替换成HashedCredentialsMathcer(在applicationContext.xml中配置)
如:
1 <bean id="jdbcRealm" class="com.wu.shiro.realms.ShiroRealm">
2         <property name="credentialsMatcher">
3             <bean class="org.apache.shiro.authc.credential.HashedCredentialsMatcher">
4                 <property name="hashAlgorithmName" value="MD5"></property>
5                 <!-- 加密次数 -->
6                 <property name="hashIterations" value="110"></property>
7             </bean>
8         </property>
9     </bean>
其实就是执行:new SimpleHash(hashAlgorithmName,credentials,salt,hashIterators); 属性分别为加密方式:"MD5" ,要加密的密码,salt值,加密次数
3.6MD5有盐加密:
在doGetAuthenticationInfo方法的返回值,即创建SimpleAuthenticationInfo对象时采用带盐的构造方法
如:
1 SimpleAuthenticationInfo info=new SimpleAuthenticationInfo(principal, hashedCredentials, credentialsSalt, realmName);
一般是把用户名当做盐加密
1 ByteSource credentialsSalt=ByteSource.Util.bytes(username);
1 SimpleHash result = new SimpleHash(hashAlgorithmName,credentials,salt,hashIterators);
3.7多Realm验证
编写第二个Realm类
跟第一个Realm差不多,这里把加密算法改为SHA1
配置第二个Realm类
1 <bean id="SecondRealm" class="com.wu.shiro.realms.SecondRealm">
2         <property name="credentialsMatcher">
3             <bean class="org.apache.shiro.authc.credential.HashedCredentialsMatcher">
4                 <property name="hashAlgorithmName" value="SHA1"></property>
5                 <!-- 加密次数 -->
6                 <property name="hashIterations" value="110"></property>
7             </bean>
8         </property>
9     </bean>
如果有多个Realm需要验证,会执行ModularRealmAuthenticator这个类,需要在ioc容器中配置并引入之前的两个Realm(也需要在shiro权限管理器中引入)
 1 <!--1: shiro权限管理器配置 -->
 2     <bean id="securityManager" class="org.apache.shiro.web.mgt.DefaultWebSecurityManager">
 3         <property name="cacheManager" ref="cacheManager"/>
 4 <!--引入多Realm配置-->
 5         <property name="authenticator" ref="authenticator"/>
 6     </bean>
 7
 8 <!-- 多Realm配置 -->
 9     <bean id="authenticator" class="org.apache.shiro.authc.pam.ModularRealmAuthenticator">
10            <property name="realms">
11                <list>
12                    <ref bean="jdbcRealm"/>
13                    <ref bean="SecondRealm"/>
14                </list>
15            </property>
16     </bean>
认证策略(调用AuthenticationStrategy接口,默认使用的是AtLeastOneSuccessfulStrategy)
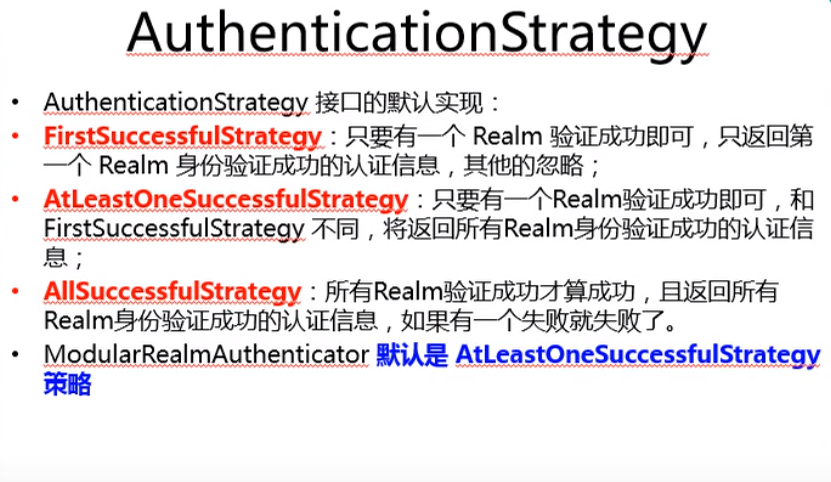
可以在ModularRealmAuthenticator类的配置中更改策略,如下:
 1 <!-- 多Realm配置 -->
 2     <bean id="authenticator" class="org.apache.shiro.authc.pam.ModularRealmAuthenticator">
 3            <property name="realms">
 4                <list>
 5                    <ref bean="jdbcRealm"/>
 6                    <ref bean="SecondRealm"/>
 7                </list>
 8            </property>
 9
10            <!-- 更改認證策略 -->
11            <property name="authenticationStrategy">
12                <!-- 多Realm需要全部認證成功 -->
13                <bean class="org.apache.shiro.authc.pam.AllSuccessfulStrategy"/>
14            </property>
15     </bean>
3.8小插曲
前戏:可以将Realm的配置直接引入到org.apache.shiro.web.mgt.DefaultWebSecurityManager, 将原来引入到ModularRealmAuthenticator类的转移,依然可以正常运行
如:
 1 <!--1: shiro权限管理器配置 -->
 2     <bean id="securityManager" class="org.apache.shiro.web.mgt.DefaultWebSecurityManager">
 3         <property name="cacheManager" ref="cacheManager"/>
 4         <property name="authenticator" ref="authenticator"/>
 5         <!-- 配置realms -->
 6         <property name="realms">
 7                <list>
 8                    <ref bean="jdbcRealm"/>
 9                    <ref bean="SecondRealm"/>
10                </list>
11            </property>
12     </bean>
原因:若是多个Realm,则会在Shiro初始化时将DefaultWebSecurityManager中realms属性的值赋值给ModularRealmAuthenticator类中realms属性
3.9 授权
3.9.1授权 :
也叫访问控制,即控制谁访问哪些资源,有几个关键对象:主体(Subject); 资源(Resource); 权限(Permission); 角色(Role)
Subject:一般代表用户
Resource:可以访问的URL
Permission:能不能访问该资源
Role:权限的集合,一般赋予用户相应的角色而不是单个权限,易于管理
3.9.2授权方式:
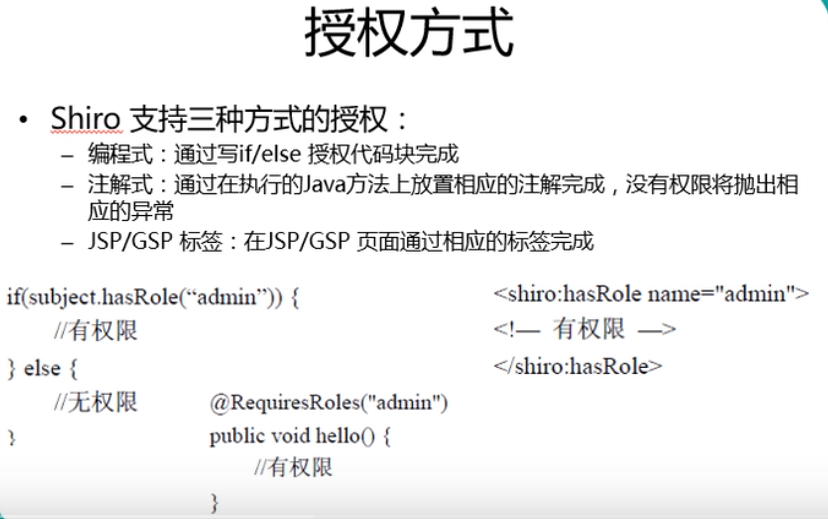
3.9.3相关的过滤器:
前面已经列过一些过滤器,这里展示其中一些
roles: 角色过滤器 ,简单配置如下:(但此时还没有实现授权)
 1 <bean id="myShiroFilter" class="org.apache.shiro.spring.web.ShiroFilterFactoryBean">
 2         <property name="securityManager" ref="securityManager"/>
 3         <property name="loginUrl" value="/login.jsp"/>
 4         <property name="successUrl" value="/success.jsp"/>
 5         <property name="unauthorizedUrl" value="unauthorized.jsp"/>
 6
 7         <!--
 8             配置哪些页面需要保护以及访问这些页面需要的权限
 9             anon,指哪些页面可以直接访问,匿名访问
10             authc,指哪些页面时受保护的,需要登陆后访问
11          -->
12         <property name="filterChainDefinitions">
13             <value>
14                 /login.jsp = anon
15                 /shiro/login = anon
16                 /logout = logout
17                 /user=roles[user]
18                 /admin=roles[admin]
19                   /** = authc
20             </value>
21         </property>
22     </bean>
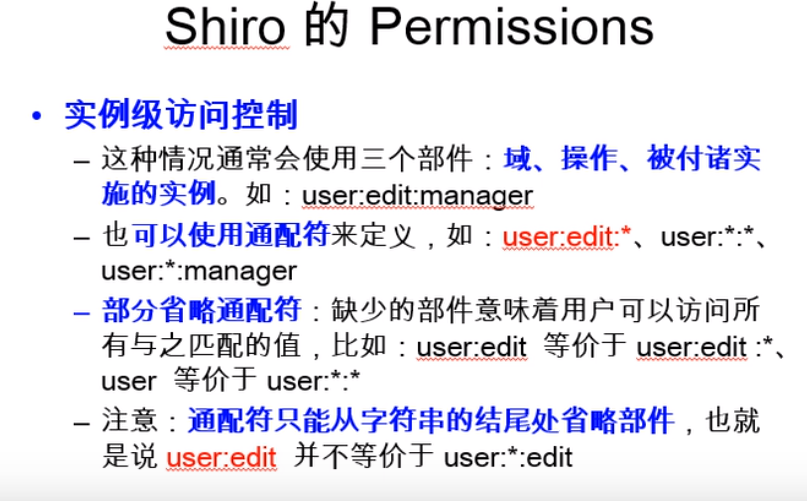
3.9.4相关的Permissions:
3.9.5实现授权Realm:
需要继承AuthorizingRealm类,并实现抽象方法doGetAuthorizationInfo
注意:AuthorizingRealm继承了AuthenticatingRealm类,但是没有实现该类中的抽象方法doGetAuthenticationInfo(AuthenticationToken),因此:只用继承
AuthorizingRealm类并重写连个抽象方法(doGetAuthorizationInfo,doGetAuthenticationInfo),就可以构造认证和授权的Realm类
如下:
 1 package com.wu.shiro.realms;
 2
 3 import org.apache.shiro.authc.AuthenticationException;
 4 import org.apache.shiro.authc.AuthenticationInfo;
 5 import org.apache.shiro.authc.AuthenticationToken;
 6 import org.apache.shiro.authz.AuthorizationInfo;
 7 import org.apache.shiro.realm.AuthorizingRealm;
 8 import org.apache.shiro.subject.PrincipalCollection;
 9
10 public class ThirdRealm extends AuthorizingRealm {
11     //授权方法
12     @Override
13     protected AuthorizationInfo doGetAuthorizationInfo(PrincipalCollection arg0) {
14         return null;
15     }
16     //认证方法
17     @Override
18     protected AuthenticationInfo doGetAuthenticationInfo(AuthenticationToken arg0) throws AuthenticationException {
19         return null;
20     }
21
22 }
3.9.6多Realm验证,多角色授权:
如果是多个角色需要授权的话,会执行ModularRealmAuthorizer类(该类其实还是会跳转到AuthorizingRealm类执行hasRole()方法,并最终执行doGetAuthorizationInfo()),其中只要有一个Realm成立,即授权成功
3.9.7小测试:
结合之前写的roles配置,并在已经继承了AuthorizingRealm的Realm类中重写doGetAuthorizationInfo(),如下:
1 //授权调用的方法
2     @Override
3     protected AuthorizationInfo doGetAuthorizationInfo(PrincipalCollection arg0) {
4         System.out.println("调用授权方法!");
5         return null;
6     }
当再用相应的角色登录时,看到控制台输出的语句,则表明测试成功(滑稽)![]()
编写授权方法(此处给出了整个Realm类作为参考):
 1 package com.wu.shiro.realms;
 2
 3 import java.util.HashSet;
 4 import java.util.Set;
 5
 6 import org.apache.shiro.authc.AuthenticationException;
 7 import org.apache.shiro.authc.AuthenticationInfo;
 8 import org.apache.shiro.authc.AuthenticationToken;
 9 import org.apache.shiro.authc.SimpleAuthenticationInfo;
10 import org.apache.shiro.authc.UnknownAccountException;
11 import org.apache.shiro.authc.UsernamePasswordToken;
12 import org.apache.shiro.authz.AuthorizationInfo;
13 import org.apache.shiro.authz.SimpleAuthorizationInfo;
14 import org.apache.shiro.crypto.hash.SimpleHash;
15 import org.apache.shiro.realm.AuthenticatingRealm;
16 import org.apache.shiro.realm.AuthorizingRealm;
17 import org.apache.shiro.realm.Realm;
18 import org.apache.shiro.subject.PrincipalCollection;
19 import org.apache.shiro.util.ByteSource;
20 import com.atomikos.icatch.admin.imp.AdminToolResourceBundle;
21
22 public class ShiroRealm extends AuthorizingRealm{
23     //验证方法
24     @Override
25     protected AuthenticationInfo doGetAuthenticationInfo(AuthenticationToken token) throws AuthenticationException {
26         //1,把AuthenticationToken强转成UsernamePasswordToken
27         UsernamePasswordToken upToken =(UsernamePasswordToken) token;
28         //2,从UsernamePasswordToken中获取username
29         String username = upToken.getUsername();
30         //3,查询数据库,从数据库中查询用户信息
31         System.out.println("从数据库中查询到的用户为:"+username);
32         //4,根据用户信息,抛出异常
33         Object hashedCredentials=null;
34         if("user".equals(username)){
35             hashedCredentials="65a2aced19f8721acba6bd1c21372b45";
36         }else if ("admin".equals(username)) {
37             hashedCredentials="a66abb5684c45962d887564f08346e8d";
38         }
39         //6根据用户情况,构建AuthenticationInfo对象并返回,通常使用SimpleAuthenticationInfo
40         Object principal=username;
41         //密码从数据库中获取,交给Shiro去比对
42         ByteSource credentialsSalt=ByteSource.Util.bytes(username);
43         String realmName=getName();
44         SimpleAuthenticationInfo info=new SimpleAuthenticationInfo(principal, hashedCredentials, credentialsSalt, realmName);
45         return info;
46     }
47
48     //授权调用的方法
49         @Override
50         protected AuthorizationInfo doGetAuthorizationInfo(PrincipalCollection principals) {
51             //1,从PrincipalCollection获取相应的用户信息
52             Object principal = principals.getPrimaryPrincipal();
53             //2,根据登录的用户信息来赋予相应的权限
54             Set<String> roles =new HashSet<>();
55             roles.add("user");
56             if("admin".equals(principal)){
57                 roles.add("admin");
58             }
59             //3,创建SimpleAuthorizationInfo,并设置roles属性(roles中包含哪些角色,则当前用户具有哪些权限)
60             SimpleAuthorizationInfo info=new SimpleAuthorizationInfo(roles);
61             //4,返回信息给shiro授权
62             return info;
63         }
64
65     public static void main(String[] args){
66         String hashAlgorithmName="MD5";
67         String credentials="123456";
68         Object salt=ByteSource.Util.bytes("user");
69         int hashIterators=110;
70         SimpleHash result = new SimpleHash(hashAlgorithmName,credentials,salt);
71         System.out.println(result+"++++++++++++++++++++++");
72     }
73
74
75 }
再次测试,即发现用admin登录时,user可以访问的admin也可以访问,但是user用户不能访问到admin可以访问到的页面,即实现了对不同角色简单的授权
3.9.8 Shiro标签(简单了解一下)
使用时在需要的jsp页面引入shiro标签库即可,如:
1 <%@taglib prefix="shiro" uri="http://shiro.apache.org/tags" %>
 1 <shiro:guest>
 2     游客访问 <a href = "login.jsp"></a>
 3 </shiro:guest>
 4
 5 user 标签:用户已经通过认证\记住我 登录后显示响应的内容
 6 <shiro:user>
 7     欢迎[<shiro:principal/>]登录 <a href = "logout">退出</a>
 8 </shiro:user>
 9
10 authenticated标签:用户身份验证通过,即 Subjec.login 登录成功 不是记住我登录的
11 <shiro:authenticted>
12     用户[<shiro:principal/>] 已身份验证通过
13 </shiro:authenticted>
14
15 notAuthenticated标签:用户未进行身份验证,即没有调用Subject.login进行登录,包括"记住我"也属于未进行身份验证
16 <shiro:notAuthenticated>
17     未身份验证(包括"记住我")
18 </shiro:notAuthenticated>
19
20
21 principal 标签:显示用户身份信息,默认调用
22 Subjec.getPrincipal()获取,即Primary Principal
23 <shiro:principal property = "username"/>
24
25 hasRole标签:如果当前Subject有角色将显示body体内的内容
26 <shiro:hashRole name = "admin">
27     用户[<shiro:principal/>]拥有角色admin
28 </shiro:hashRole>
29
30 hasAnyRoles标签:如果Subject有任意一个角色(或的关系)将显示body体里的内容
31 <shiro:hasAnyRoles name = "admin,user">
32     用户[<shiro:pricipal/>]拥有角色admin 或者 user
33 </shiro:hasAnyRoles>
34
35 lacksRole:如果当前 Subjec没有角色将显示body体内的内容
36 <shiro:lacksRole name = "admin">
37     用户[<shiro:pricipal/>]没有角色admin
38 </shiro:lacksRole>
39
40 hashPermission:如果当前Subject有权限将显示body体内容
41 <shiro:hashPermission name = "user:create">
42     用户[<shiro:pricipal/>] 拥有权限user:create
43 </shiro:hashPermission>
44
45 lacksPermission:如果当前Subject没有权限将显示body体内容
46 <shiro:lacksPermission name = "org:create">
47     用户[<shiro:pricipal/>] 没有权限org:create
48 </shiro:lacksPermission>
3.9.9权限注解(常用)
1 @RequiresAuthenthentication:表示当前Subject已经通过login进行身份验证;即 Subjec.isAuthenticated()返回 true
2
3 @RequiresUser:表示当前Subject已经身份验证或者通过记住我登录的,
4
5 @RequiresGuest:表示当前Subject没有身份验证或者通过记住我登录过,即是游客身份
6
7 @RequiresRoles(value = {"admin","user"},logical = Logical.AND):表示当前Subject需要角色admin和user
8
9 @RequiresPermissions(value = {"user:delete","user:b"},logical = Logical.OR):表示当前Subject需要权限user:delete或者user:b
注意: 一般注解都是加在Controller层,若是加在Service层(由于Service层都有事务,再加Shiro注解,会报类型转换异常)
3.9.10 从数据表中初始化资源和权限(而不是写死在配置文件里)
方法:在org.apache.shiro.spring.web.ShiroFilterFactoryBean中配置filterChainDefinitionMap 属性,然后通过构建实例工厂类引入Map;如:
applicationContext.xml中相关配置如下:
 1 <beanView Code id="myShiroFilter" class="org.apache.shiro.spring.web.ShiroFilterFactoryBean">
 2             <property name="securityManager" ref="securityManager"/>
 3             <property name="loginUrl" value="/login.jsp"/>
 4             <property name="successUrl" value="/success.jsp"/>
 5             <property name="unauthorizedUrl" value="unauthorized.jsp"/>
 6             <!-- 配置权限Map -->
 7             <property name="filterChainDefinitionMap" ref="filterChainDefinitionMap"/>
 8         </bean>
 9
10         <!-- 配置filterChainDefinitionMap -->
11         <bean id="filterChainDefinitionMap" factory-bean="FilterChainDefinitionMapBuilder" factory-method="buildFilterChainDefinitionMap" />
12         <!-- 配置实例工厂类 -->
13         <bean id="FilterChainDefinitionMapBuilder" class="com.wu.shiro.factory.FilterChainDefinitionMapBuilder"/>
简单的实例工厂类如下(数据可改为从数据库中获取并返回Map)
 1 package com.wu.shiro.factory;
 2
 3 import java.util.LinkedHashMap;
 4
 5 public class FilterChainDefinitionMapBuilder {
 6     public LinkedHashMap<String, String> buildFilterChainDefinitionMap(){
 7         LinkedHashMap<String,String> map=new LinkedHashMap<>();
 8         map.put("/user.jsp", "roles[user]");
 9         map.put("/admin.jsp","roles[admin]");
10         map.put("/login.jsp","anon");
11         map.put("/shiro/login","anon");
12         map.put("/logout","logout");
13         map.put("/**","authc");
14         return map;
15     }
16 }
4 Shiro的会话管理
4.1 相关介绍
4.2 会话相关API
4.3 会话监听器(SessionListener接口)
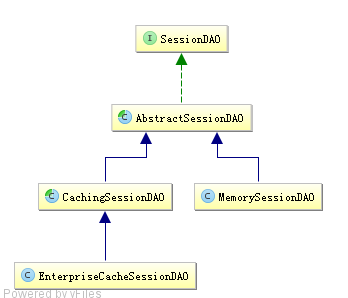
4.4 SessionDao
对Session提供CRUD操作
具体参考
5:缓存
Shiro支持在2个地方定义缓存管理器,既可以在SecurityManager中定义,也可以在Realm中定义
在SecurityManager中设置的CacheManager组中都会给Realm使用,即:真正使用CacheManager的组件是Realm。
具体参考
6:RememberMe

记住我和验证只能选其一
前台提供记住我的按钮,如果点记住我,即在后台设置为true,否者为false
在Controller层设置
1 //设置记录我
2 token.setRememberMe(true);
设置cookie的保存时间
 1 <bean id="securityManager" class="org.apache.shiro.web.mgt.DefaultWebSecurityManager">
 2         <property name="cacheManager" ref="cacheManager"/>
 3         <property name="authenticator" ref="authenticator"/>
 4         <!-- 配置realms -->
 5         <property name="realms">
 6                <list>
 7                    <ref bean="jdbcRealm"/>
 8                    <ref bean="SecondRealm"/>
 9                </list>
10            </property>
11            <!-- 设置cookie的保存时间 -->
12            <property name="rememberMeManager.cookie.maxAge" value="10"/>
13     </bean>
对需要的页面设置记住我
1 map.put("/success.jsp","user");

 浙公网安备 33010602011771号