
作业八
作业八
离完成101系列已经过了好几周了,中间的笔记也只写到光栅化之前,马上考完试打算把搁下来的笔记和作业实现细节给写一写,打算从作业八开始从后往前记录,笔记也相同,顺便复习一下快忘掉的知识。
环境搭建
由于虚拟机很卡,而且不知道怎么复制,不方便记录,因此我在作业五之后便舍弃虚拟机,使用vs编写。环境的搭建是跟着这位大佬配置的ShenLu-jd/Games101Work8: Games101作业8实现(环境:win10、VS2019) (github.com),遇到的问题在里面都有解答。
连接绳子的约束
第一步便是在节点的构造函数完成绳子的构造,也是多个弹簧振子模型的链接。
代码如下:
Rope::Rope(Vector2D start, Vector2D end, int num_nodes, float node_mass, float k, vector<int> pinned_nodes)
{
    // TODO (Part 1): Create a rope starting at `start`, ending at `end`, and containing 	`num_nodes` nodes.
    Vector2D dir = end - start;

    for (int i = 0; i < num_nodes; ++i) {
        masses.push_back(new Mass(start + dir * i / num_nodes, node_mass, false));
        if (i != 0) {
            springs.push_back(new Spring(masses[i - 1], masses[i], k));
        }
    }

    //  Comment-in this part when you implement the constructor
    for (auto& i : pinned_nodes) {
        masses[i]->pinned = true;
    }
}
其中dir是整个绳子的方向,第一个for循环是在start和end之间依次构造节点,从第二个节点开始每个新的节点masses[i]又会和前一个节点masses[i - 1]形成弹簧,其中pos是根据传入的节点个数平均分配的节点位置。注意构造节点时Mass::pinned表示该节点是否固定,因此全部为false。
在第二个循环中会将要固定的节点的pinned改为true,在application.cpp中改变最后一个变量即可固定特定的节点:
固定第一个和最后一个节点就可以得到中间鬼畜的绳子:
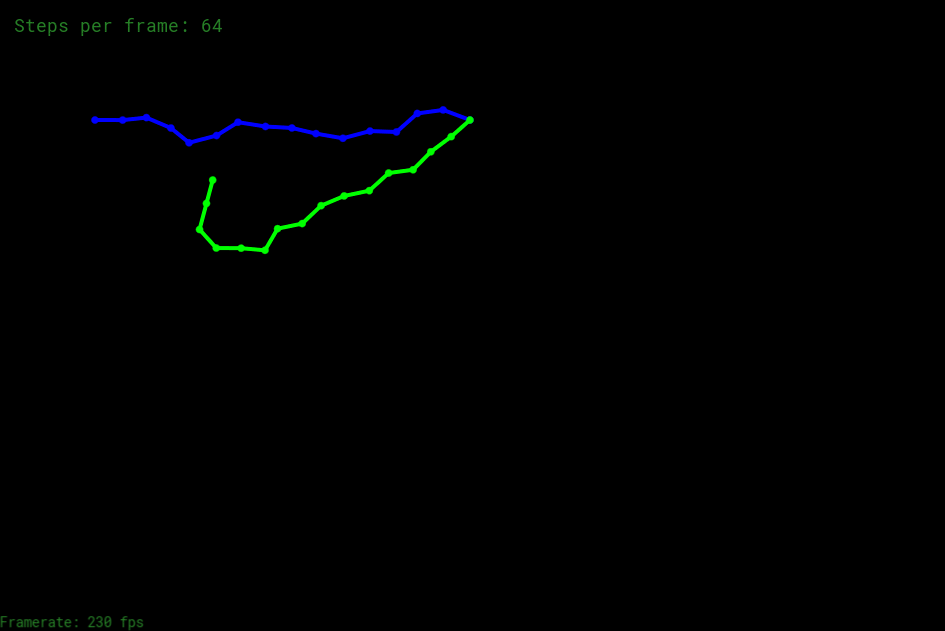
最后会得到如下效果:
显式/半隐式欧拉法
绳子间作用力
首先是使用胡克定律模拟绳子中每个弹簧的作用力,对于单个弹簧,a节点会对b点形成由b指向a的力,b也如此:
fb→a = −ks b−a ||b−a||(||b − a|| − l)
for (auto& s : springs) {	a-----b
	Vector2D ab = s->m2->position - s->m1->position; // a指向b的向量
	Vector2D fab = s->k * ab / ab.norm() * (ab.norm() - s->rest_length);    // b对a施加的力
	s->m1->forces += fab;   // 累加前面节点对a节点的作用力
	s->m2->forces += -fab;   // b节点的作用力
}
虽然作业中没有要求,但其实可以为弹簧加上内部的阻力,该阻力使用了Lecture21的如下公式:

其中红框内的为ab两点的相对速度在ab向量之间的投影。
// 添加弹簧内部阻力,即相对速度在ab方向上的投影
float kd = 0.01;
Vector2D vab = s->m1->velocity - s->m2->velocity;   // ab的相对速度
Vector2D fa = kd * -ab / ab.norm() * vab * -ab / ab.norm();    // a的阻力
Vector2D fb = kd * ab / ab.norm() * -vab * ab / ab.norm(); // b的阻力
s->m1->forces += fa;
s->m2->forces += fb;
仿真
            m->forces += m->mass * gravity; // 添加重力

            Vector2D accelerate = m->forces / m->mass;
#define EXPLICIT 0
#if EXPLICIT
            // 显式欧拉法
            Vector2D nextV = m->velocity + accelerate * delta_t;
            m->position += m->velocity * delta_t;
            m->velocity = nextV;
#else
            // 使用隐式欧拉法
            m->velocity += accelerate * delta_t;
            m->position += m->velocity * delta_t;
#endif // EXPLICIT

            // TODO (Part 2): Add global damping
            float damping_factor = 0.000005;
            m->position *= 1 - damping_factor;
隐式与显式的区别便是显式计算这一时刻的位置时使用的时上一时刻的速度,而隐式使用的是这一时刻的速度。
显式 Verlet
该方法不是基于物理的方法,实现如下:
    void Rope::simulateVerlet(float delta_t, Vector2D gravity)
    {
        for (auto& s : springs)
        {
            // TODO (Part 3): Simulate one timestep of the rope using explicit Verlet 				(solving constraints)
            Vector2D ab = s->m2->position - s->m1->position; // a指向b的向量
            Vector2D fab = s->k * ab / ab.norm() * (ab.norm() - s->rest_length);    // b对				a施加的力
            s->m1->forces += fab;   // 累加前面节点对a节点的作用力
            s->m2->forces += -fab;   // b节点的作用力
        }

        for (auto& m : masses)
        {
            if (!m->pinned)
            {
                Vector2D temp_position = m->position;
                // TODO (Part 3.1): Set the new position of the rope mass
                m->forces += m->mass * gravity; // 添加重力
                Vector2D accelerate = m->forces / m->mass;

                float damping_factor = 0.000005;
                m->position += (1 - damping_factor) * (m->position - m->last_position) + 					accelerate * pow(delta_t, 2);

                m->last_position = temp_position;
            }
            m->forces = Vector2D(0, 0);
        }
    }
}

 浙公网安备 33010602011771号