
实现页面动效的几种方式
本文列举五种页面加载动效的方式
1.使用transition组件实现页面动效
2.创建观察器IntersectionObserver结合animation实现动态效果
3.创建观察器IntersectionObserver结合指令实现懒加载动态效果
4.使用css伪元素结合css3动画实现动态效果
5.监听滚动事件结合animation实现动态效果
一、使用transition组件实现页面动效
<Transition> 是一个内置组件,这意味着它在任意别的组件中都可以被使用,无需注册。它可以将进入和离开动画应用到通过默认插槽传递给它的元素或组件上。进入或离开可以由以下的条件之一触发:
- 由
v-if所触发的切换 - 由
v-show所触发的切换 - 由特殊元素
<component>切换的动态组件 - 改变特殊的
key属性
基本用法:
1 <button @click="show = !show">Toggle</button>
2 <Transition>
3   <p v-if="show">hello</p>
4 </Transition>
1 .v-enter-active,
2 .v-leave-active {
3   transition: opacity 0.5s ease;
4 }
5
6 .v-enter-from,
7 .v-leave-to {
8   opacity: 0;
9 }
一共有 6 个应用于进入与离开过渡效果的 CSS 过渡class
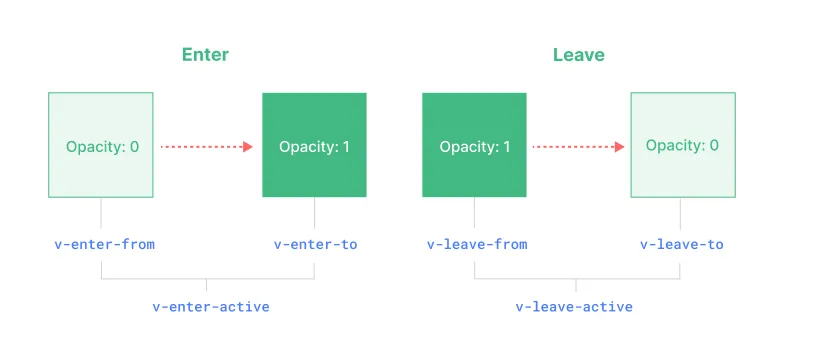
<Transition> 组件传一个 name prop 来声明一个过渡效果名,对于一个有名字的过渡效果,对它起作用的过渡 class 会以其名字而不是 v 作为前缀。JavaScript 钩子:在过渡过程中挂上钩子函数
 1 <Transition
 2   @before-enter="onBeforeEnter"
 3   @enter="onEnter"
 4   @after-enter="onAfterEnter"
 5   @enter-cancelled="onEnterCancelled"
 6   @before-leave="onBeforeLeave"
 7   @leave="onLeave"
 8   @after-leave="onAfterLeave"
 9   @leave-cancelled="onLeaveCancelled"
10 >
11   <!-- ... -->
12 </Transition>
二、创建观察器IntersectionObserver结合animation实现动态效果
IntersectionObserver API 提供了一种创建IntersectionObserver 对象的方法,对象用于监测目标元素与视窗(viewport)的交叉状态,并在交叉状态变化时执行回调函数,回调函数可以接收到元素与视窗交叉的具体数据。


// 右侧滑入
export function addEventlistenerFromRight(id) {
    const connectFormBox = document.getElementById(id);

    const animationClass = 'common-slide-right';
    // 创建监听
    const interObserver = new IntersectionObserver((entries, self) => {
        // console.log('entries~~~~~~~', entries);
        entries.forEach(entry => {
            if (entry.intersectionRatio > 0) {
                if(entry.target.id == id) addAnimationClass(entry.target, animationClass);
                else addAnimationClass(entry.target, animationClass);
                // 停止观察
                self.unobserve(entry.target);
                // 关闭观察器
                self.disconnect();
            } else {
                if(entry.target.id == id) removeAnimationClass(entry.target, animationClass);
                else removeAnimationClass(entry.target, animationClass);

            }
        })
    });
    // 开启监听
    interObserver.observe(connectFormBox);
}
.common-slide-right {
    animation: pcSlideRight 1.2s ease-out;
}

@keyframes pcSlideRight {
    from {
        transform: translate3d(100%, 0, 0);
    }

    to {
        visibility: hidden;
        transform: none;
    }
}
三、创建观察器IntersectionObserver结合指令实现懒加载动态效果
本示例在nuxt项目上使用,Nuxt.js 是一个基于 Vue.js 的轻量级应用框架,代码基本通用,思路基本一致。首先所有元素默认 opacity 为 0,并且有向下的位移,当元素移动到视口内即添加标签设置为可见,并恢复位置,当然也可以配合 filter blur 等实现模糊渐显的效果。
在nuxt插件中写入指令
// 导出一个 Nuxt 插件
export default defineNuxtPlugin((nuxtApp) => {
    // 定义一个自定义指令 'scroll-spring'
    nuxtApp.vueApp.directive('scroll-spring', {
        // 当元素被挂载到 DOM 中时调用的钩子
        mounted(el) {
            // 设置 Intersection Observer 的选项
            const options = {
                root: null, // 使用浏览器视口作为根元素
                rootMargin: '0px', // 根元素的边距
                threshold: 0.1 // 交叉的阈值,当 10% 的目标元素在视口内时触发回调
            };

            // 观察者回调函数
            const callback = (entries) => {
                entries.forEach(entry => {
                    // 如果目标元素与视口相交
                    if (entry.isIntersecting) {
                        // 添加动画类
                        el.classList.add('scroll-in');
                    } else {
                        // 移出视口时移除动画类
                        el.classList.remove('scroll-in');
                    }
                });
            };

            // 创建一个 Intersection Observer 实例,并传入回调函数和选项
            const observer = new IntersectionObserver(callback, options);
            // 开始观察当前元素
            observer.observe(el);
        },
        // 当元素从 DOM 中卸载时调用的钩子
        unmounted(el) {
            // 创建一个空的 Intersection Observer 实例
            const observer = new IntersectionObserver(() => {});
            // 停止观察当前元素
            observer.unobserve(el);
        }
    });
});
css样式
/* 初始状态,元素处于下方且不可见,并带有模糊效果 */
.scroll-item {
  opacity: 0;
  filter: blur(10px); /* 元素模糊 25px */
  transform: translateY(20px); /* 元素初始位移 20px */
  transition: transform 0.5s ease-out, opacity 0.5s ease-out, filter 0.5s ease-out; /* 为 filter 添加动画 */
}

/* 当元素进入视口时,透明度变为 1,模糊度变为 0,且上移回原位 */
.scroll-in {
  opacity: 1;
  filter: blur(0); /* 模糊效果消失 */
  transform: translateY(0); /* 元素回到原始位置 */
  transition: transform 0.5s ease-out, opacity 0.5s ease-out, filter 0.5s ease-out; /* 确保 filter 也有动画 */
}
接下来我们只要在对应的元素引入就可以啦!
注意 scroll-item 和 v-scroll-spring 缺一不可,前者负责决定开始状态,后者是动画和结束效果。
 <div class="slogan font-jb-mono scroll-item" v-scroll-spring>
          <p>Coding,</p>
          <p>build a better world</p>
          <p>together!</p>
</div>
<span class="slogan-cn scroll-item" v-scroll-spring>{{ 'slogan.cn' }}</span>
<br/>
<div class="button-container scroll-item" v-scroll-spring>
          <div class="btn-item1 ">
            {{ 'buttons.github' }}
          </div>
          <div class="btn-item2 scroll-item" v-scroll-spring>
             111333
          </div>
          <div class="btn-item3 scroll-item" v-scroll-spring>
            {{'buttons.resume' }}
          </div>
</div>
四、使用css伪元素结合css3动画实现动态效果
实现底部边框悬浮加载css样式
/******
    底部边框动效
    需要在引入文件补充
    &::after {
        height: 2px;  // 动效高度
        background-color: var(--el-color-primary); // 动效颜色
    }
******/
.border-width-transition {
    position: relative;
    &::after {
        content: '';
        position: absolute;
        bottom: 0;
        left: 0;
        width: 0;
        transition: width 0.3s ease; /* 过渡动画效果 */
    }
    &:hover::after {
        width: 100%;
    }
}
页面中引入
<span class="name border-width-transition">{{
     $t(`${item.name}`)
}}</span>

.name {
   display: inline-block;
   &::after {
      height: 1px;
      background-color: #00adff;
   }
}
五.监听滚动事件结合animation实现动态效果
通过添加监听滚动事件addEventListener,到指定区域添加动态样式(不是特别推荐)
以下实现滚动到指定区域顺序加载动效。
const isElementNotInViewport = function(el) {
    if (el) {
        let rect = el.getBoundingClientRect();
        return (
            rect.top + 600 >=
                (window.innerHeight || document.documentElement.clientHeight)
            // || rect.bottom <= 0
        );
    }
};

export function addEventlistenerForOriginalCertification() {
    // 监听滚动事件
    const publicbgImg = document.getElementById('publicbgImg');
    const publicTitle = document.getElementById('publicTitle');
    const publicAreaContent = document.getElementById('publicAreaContent');
    function ss() {
        // var scrollTop = window.scrollY;
        // 获取当前滚动的垂直高度
        var showElement = isElementNotInViewport(publicbgImg)
        // console.log(showElement, publicbgImg, publicbgImg.className);
        if(showElement){
            addAnimationClass(publicbgImg, 'common-move-up')
            addAnimationClass(publicTitle, 'common-move-up2')
            addAnimationClass(publicAreaContent, 'common-move-up3')
            // 离开路由移除滚动事件
            window.removeEventListener('scroll', ss);
        }

        // console.log('滚动高度:', scrollTop);
    }
    window.addEventListener('scroll', ss);
}
css样式
.common-move-up {
    animation: slideInUp 1s ease-out;
}
.common-move-up2 {
    animation: slideInUp 1.2s ease-out;
}
.common-move-up3 {
    animation: slideInUp 1.4s ease-out;
}

@keyframes slideInUp {
    0% {
        opacity: 0;
        transform: translate3d(0, 100%, 0);
    }
    100% {
        opacity: 1;
        transform: none;
    }
}

 浙公网安备 33010602011771号