easy-table-vue+VueJs、SpringBoot+Mybatis实现MVVM模型前后台数据交互
该项目分为前端展示部分和后台服务部分。
前端部分
使用的技术是:NodeJs、Webpack、VueJs
使用的组件库是:IVIEW、easy-table-vue
使用的开发工具是:WebStorm 链接:https://pan.baidu.com/s/1UBmLnRXM-IDcAiw72IESJw 提取码:cuf0
项目地址:https://gitee.com/wlovet/table-project
后台部分
使用的技术是:Maven、SpringBoot、Mybatis
使用的开发工具是:IDea 链接:https://pan.baidu.com/s/1wFeT50WYvNDNg6OQgs54qw 提取码:64nr
项目地址:https://gitee.com/wlovet/table-server
交互的技术是 :axios
开发模式是:MVVM模式
该案例的目的是教大家从零搭建与编写一个完整的并且可以交互的项目!希望大家喜欢!
第一步:搭建前端服务器与环境
①安装node.js,下载相应版本的node.js,下载地址:https://nodejs.org/en/download/,下载完双击安装,点击下一步直到安装完成
②安装完成后,附件里选择命令提示符(或者在开始的搜索框里输入cmd回车调出命令面板)输入:node -v回车,出现相应版本证明安装成功,
node环境已经安装完成,由于有些npm有些资源被屏蔽或者是国外资源的原因,经常会导致用npm安装依赖包的时候失败,所有我还需要npm的
国内镜像---cnpm。在命令行中输入:npm install -g cnpm –registry=https://registry.npm.taobao.org回车,大约需要3分钟,
如果报错或没反应,则卸掉node.js重新安装
③安装全局vue-cli脚手架,用于帮助搭建所需的模板框架。输入命令:cnpm install -g vue-cli回车等待完成。
④创建项目,首先我们要选定目录,然后再命令行中把目录转到选定的目录,假如我们打算把项目新建在e盘下的vue文件夹中则输入下面的命令:
e:回车,然后cd vue,然后输入命令:vue init webpack 项目文件夹名称,回车,运行初始化命令的时候会让用户输入几个基本的选项,
如项目名称,描述,作者等信息,如果不想填直接回车默认就好。(一顿回车+N键就完成了)
⑤安装项目所需的依赖包,首先输入:cd 项目名回车,然后输入:cnpm install回车等待安装,安装完成之后,会在我们的项目目录firstVue
文件夹中多出一个node_modules文件夹,这里边就是我们项目需要的依赖包资源。安装完依赖包之后,就可以运行整个项目了。
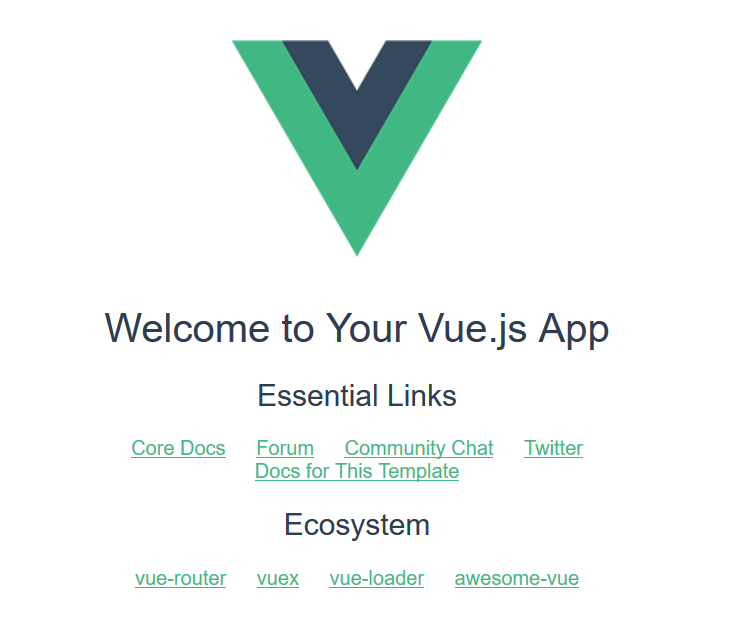
⑥测试环境是否搭建成功,在cmd里输入:cnpm run dev回车,项目运行成功后,浏览器会自动打开localhost:8080(如果浏览器没有自动打开
,可以手动输入)。运行成功后,会看到Welcome to Your Vue.js App页面。

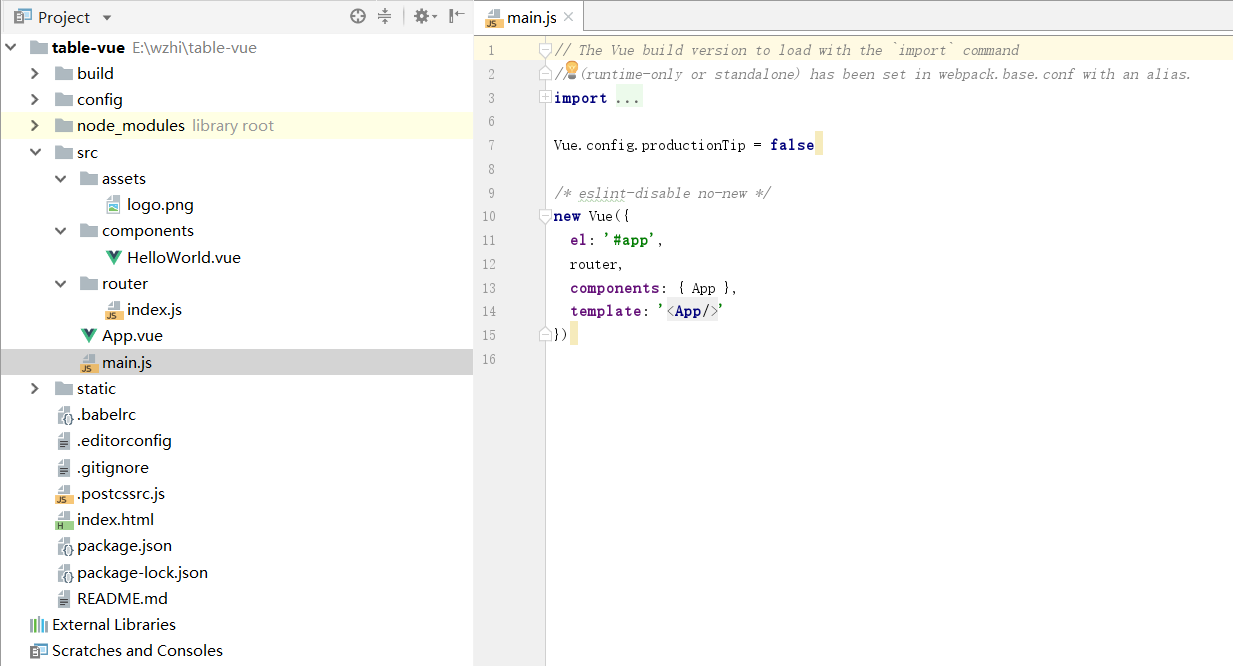
第二步:使用WebStorm打开easy-table-vue
结构图如下:
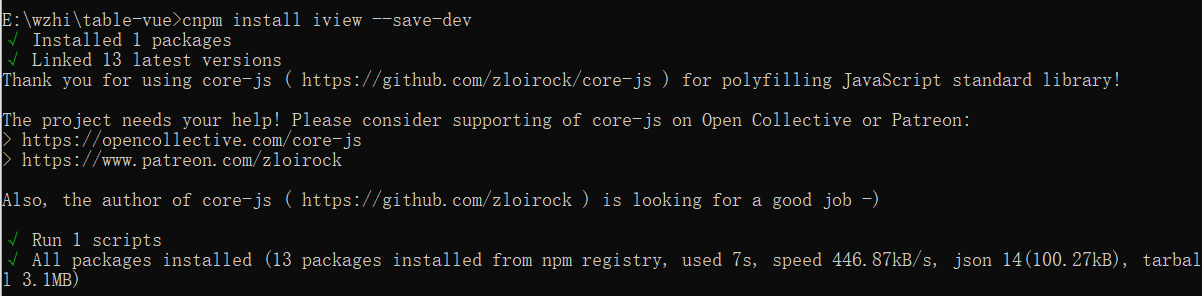
1、引入IVIEW组件和easy-table-vue组件,在当前项目的cmd窗口输入
cnpm install iview --save-dev
cnpm install vue-easytable --save-dev

2、打开main.js文件,使用这些组件
// The Vue build version to load with the `import` command
// (runtime-only or standalone) has been set in webpack.base.conf with an alias.
import Vue from 'vue'
import App from './App'
import router from './router'
//引入IVIEW组件
import iView from 'iview';
import 'iview/dist/styles/iview.css';
Vue.use(iView);
//引入vue-easytable
import 'vue-easytable/libs/themes-base/index.css'
import {VTable,VPagination} from 'vue-easytable'
Vue.component(VTable.name, VTable)
Vue.component(VPagination.name, VPagination)

Vue.config.productionTip = false

/* eslint-disable no-new */
new Vue({
  el: '#app',
  router,
  components: { App },
  template: '<App/>'
})
3、在src/components文件夹下新建文件TableMain.vue文件,添加代码如下:
<template> <div class="layout"> <Layout> <Header> <Menu mode="horizontal" theme="dark" active-name="1"> <div class="layout-logo">IVIEW布局</div> <div class="layout-nav"> <MenuItem name="1"> <Icon type="ios-navigate"></Icon> Item 1 </MenuItem> <MenuItem name="2"> <Icon type="ios-keypad"></Icon> Item 2 </MenuItem> <MenuItem name="3"> <Icon type="ios-analytics"></Icon> Item 3 </MenuItem> <MenuItem name="4"> <Icon type="ios-paper"></Icon> Item 4 </MenuItem> </div> </Menu> </Header> <Content :style="{padding: '0 50px'}"> <Breadcrumb :style="{margin: '20px 0'}"> <BreadcrumbItem>Home</BreadcrumbItem> <BreadcrumbItem>Components</BreadcrumbItem> <BreadcrumbItem>Layout</BreadcrumbItem> </Breadcrumb> <Card> <div style="min-height: 200px;"> <v-table is-horizontal-resize style="width:100%" :columns="columns" :table-data="tableData" row-hover-color="#eee" row-click-color="#edf7ff" ></v-table> </div> </Card> </Content> <Footer class="layout-footer-center"> © 作者:不若为止</Footer> </Layout> </div> </template> <script> export default { name: "table-main", data() { return { tableData: [ {"name":"赵伟","tel":"156*****1987","hobby":"钢琴、书法、唱歌","address":"上海市黄浦区金陵东路569号17楼"}, {"name":"李伟","tel":"182*****1538","hobby":"钢琴、书法、唱歌","address":"上海市奉贤区南桥镇立新路12号2楼"}, {"name":"孙伟","tel":"161*****0097","hobby":"钢琴、书法、唱歌","address":"上海市崇明县城桥镇八一路739号"}, {"name":"周伟","tel":"197*****1123","hobby":"钢琴、书法、唱歌","address":"上海市青浦区青浦镇章浜路24号"}, {"name":"吴伟","tel":"183*****6678","hobby":"钢琴、书法、唱歌","address":"上海市松江区乐都西路867-871号"}, {"name":"赵伟","tel":"156*****1987","hobby":"钢琴、书法、唱歌","address":"上海市黄浦区金陵东路569号17楼"}, {"name":"李伟","tel":"182*****1538","hobby":"钢琴、书法、唱歌","address":"上海市奉贤区南桥镇立新路12号2楼"}, {"name":"孙伟","tel":"161*****0097","hobby":"钢琴、书法、唱歌","address":"上海市崇明县城桥镇八一路739号"}, {"name":"周伟","tel":"197*****1123","hobby":"钢琴、书法、唱歌","address":"上海市青浦区青浦镇章浜路24号"}, {"name":"吴伟","tel":"183*****6678","hobby":"钢琴、书法、唱歌","address":"上海市松江区乐都西路867-871号"} ], columns: [ {field: 'name', title: '姓名', width: 80, titleAlign: 'center', columnAlign: 'center',isResize:true}, {field: 'tel', title: '手机号码', width: 150, titleAlign: 'center', columnAlign: 'center',isResize:true}, {field: 'hobby', title: '爱好', width: 150, titleAlign: 'center', columnAlign: 'center',isResize:true}, {field: 'address', title: '地址', width: 280, titleAlign: 'center', columnAlign: 'left',isResize:true} ] } } } </script> <style scoped> .layout{ border: 1px solid #d7dde4; background: #f5f7f9; position: relative; border-radius: 4px; overflow: hidden; height: 100%; } .layout-logo{ width: 100px; height: 30px; background: #5b6270; border-radius: 3px; float: left; position: relative; top: 15px; left: 20px; font-weight: bold; text-align: center; color: #49ffcc; } .layout-nav{ width: 420px; margin: 0 auto; margin-right: 20px; } .layout-footer-center{ text-align: center; } </style>
4、修改src/router文件夹下的index.js,代码如下:
import Vue from 'vue'
import Router from 'vue-router'
import HelloWorld from '@/components/HelloWorld'
import TableMain from '@/components/TableMain'

Vue.use(Router)

export default new Router({
  routes: [
    {
      path: '/',
      name: 'Table',
      component: TableMain
    }
  ]
})
此时页面展示如下:

现在界面的数据都是定死的,还不能做到与后台交互。
第三步:执行下面的SQL脚本,将数据导入数据库
CREATE TABLE persons
(id  integer,
create_datetime datetime,
email varchar(255),
phone varchar(255),
sex varchar(255),
username varchar(255),
zone blob,
primary key (id));
INSERT INTO persons (create_datetime, email, phone, sex, username, zone) VALUES (now(), 'gubaoer@hotmail.com', 08613000001111, 'male', 'gubaoer', 'HongKou District');
INSERT INTO persons (create_datetime, email, phone, sex, username, zone) VALUES (now(), 'boyle.gu@hotmail.com', 08613000001112, 'male', 'baoer.gu', 'JingAn District');
INSERT INTO persons (create_datetime, email, phone, sex, username, zone) VALUES (now(), 'yoyo.wu@gmail.com', 08613000001113, 'female', 'yoyo.wu', 'JingAn District');
INSERT INTO persons (create_datetime, email, phone, sex, username, zone) VALUES (now(), 'stacy.gao@126.com', 08613000001114, 'female', 'stacy.gao', 'MinHang District');
INSERT INTO persons (create_datetime, email, phone, sex, username, zone) VALUES (now(), 'yomiko.zhu@qq.com', 08613000001115, 'female', 'yomiko.zhu', 'PuDong District');
INSERT INTO persons (create_datetime, email, phone, sex, username, zone) VALUES (now(), 'hong.zhu@163.com', 08613000001116, 'male', 'hong.zhu', 'YangPu District');
INSERT INTO persons (create_datetime, email, phone, sex, username, zone) VALUES (now(), 'leon.lai@qq.com', 08613000001117, 'male', 'leon.lai', 'JinShan District');
INSERT INTO persons (create_datetime, email, phone, sex, username, zone) VALUES (now(), 'mark.lei@sohu.com', 08613000001118, 'male', 'mark.lei', 'HuangPu District');
INSERT INTO persons (create_datetime, email, phone, sex, username, zone) VALUES (now(), 'wen.liu@360.com', 08613000001119, 'male', 'wen.liu', 'ChongMing District');
INSERT INTO persons (create_datetime, email, phone, sex, username, zone) VALUES (now(), 'cai.lu@baidu.com', 08613000001120, 'female', 'cai.lu', 'BaoShan District');
INSERT INTO persons (create_datetime, email, phone, sex, username, zone) VALUES (now(), 'alex.li@icee.com', 08613000001121, 'male', 'alex.li', 'ChangNing District');
INSERT INTO persons (create_datetime, email, phone, sex, username, zone) VALUES (now(), 'sofia.xu@qq.com', 08613000001122, 'female', 'sofia.xu', 'ZhaBei District');
INSERT INTO persons (create_datetime, email, phone, sex, username, zone) VALUES (now(), 'cora.zhang@qq.com', 08613000001123, 'female', 'cora.zhang', 'XuHui District');
INSERT INTO persons (create_datetime, email, phone, sex, username, zone) VALUES (now(), 'tom.gao@hotmail.com', 08613000001124, 'female', 'tom.gao', 'HuangPu District');
第四步:使用IDea创建一个SpringBoot项目
此处教大家一个快速创建SpringBoot项目的办法,这样可以省去编写pom.xml的步骤,记得连上网络
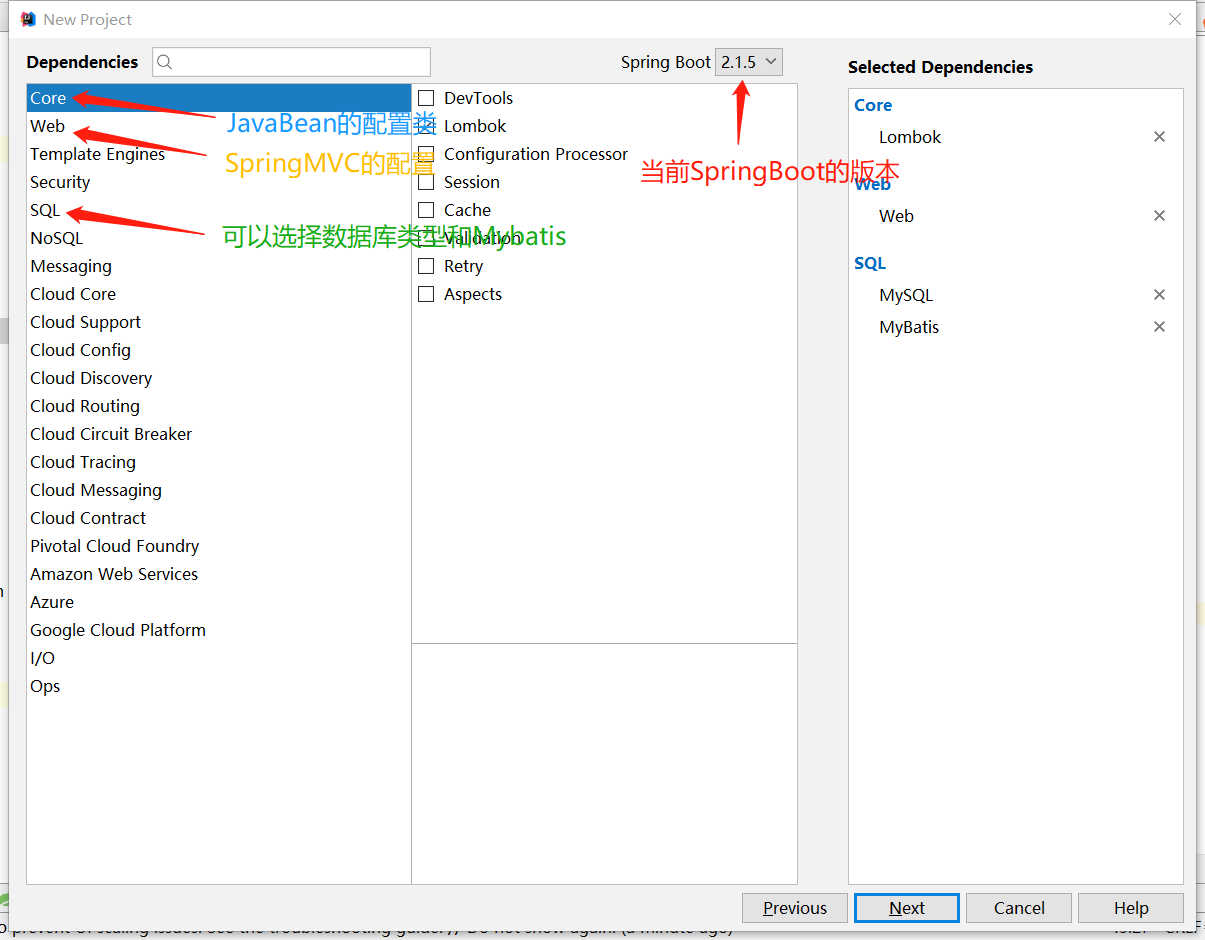
1、点击New Project,选择Spring Initializr,点击

2、输入包名和项目名,点击next

3、这里的操作就是在pom.xml配置你所需要的环境,配置好之后,点击next,然后Finnish就创建好了一个项目啦
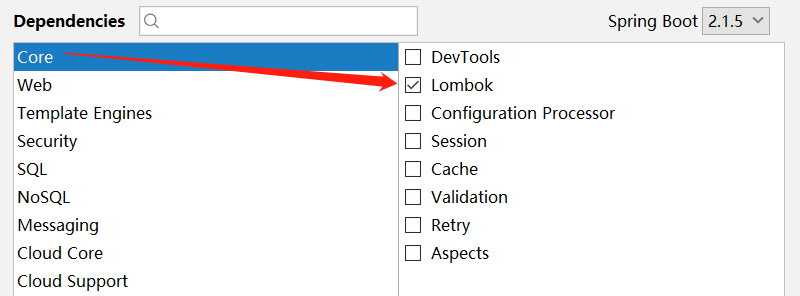
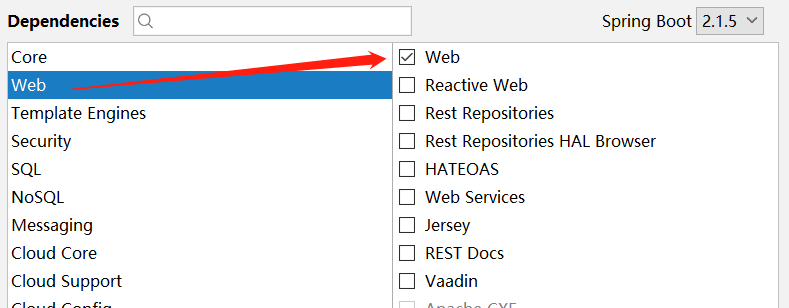

使用Eclipse或者MyEclipse的小伙伴,可以创建一个Maven项目,把我的pom.xml文件的内容复制一下:
<?xml version="1.0" encoding="UTF-8"?>
<project xmlns="http://maven.apache.org/POM/4.0.0" xmlns:xsi="http://www.w3.org/2001/XMLSchema-instance"
    xsi:schemaLocation="http://maven.apache.org/POM/4.0.0 http://maven.apache.org/xsd/maven-4.0.0.xsd">
    <modelVersion>4.0.0</modelVersion>
    <parent>
        <groupId>org.springframework.boot</groupId>
        <artifactId>spring-boot-starter-parent</artifactId>
        <version>2.1.5.RELEASE</version>
        <relativePath/> <!-- lookup parent from repository -->
    </parent>
    <groupId>com.wzhi</groupId>
    <artifactId>tableserver</artifactId>
    <version>0.0.1-SNAPSHOT</version>
    <name>tableserver</name>
    <description>实现数据表格的前后台交互</description>

    <properties>
        <java.version>1.8</java.version>
    </properties>

    <dependencies>
        <dependency>
            <groupId>org.springframework.boot</groupId>
            <artifactId>spring-boot-starter-web</artifactId>
        </dependency>
        <dependency>
            <groupId>org.mybatis.spring.boot</groupId>
            <artifactId>mybatis-spring-boot-starter</artifactId>
            <version>2.0.1</version>
        </dependency>

        <dependency>
            <groupId>mysql</groupId>
            <artifactId>mysql-connector-java</artifactId>
            <scope>runtime</scope>
        </dependency>
        <dependency>
            <groupId>org.projectlombok</groupId>
            <artifactId>lombok</artifactId>
            <optional>true</optional>
        </dependency>
        <dependency>
            <groupId>org.springframework.boot</groupId>
            <artifactId>spring-boot-starter-test</artifactId>
            <scope>test</scope>
        </dependency>
    </dependencies>

    <build>
        <plugins>
            <plugin>
                <groupId>org.springframework.boot</groupId>
                <artifactId>spring-boot-maven-plugin</artifactId>
            </plugin>
        </plugins>
    </build>

</project>
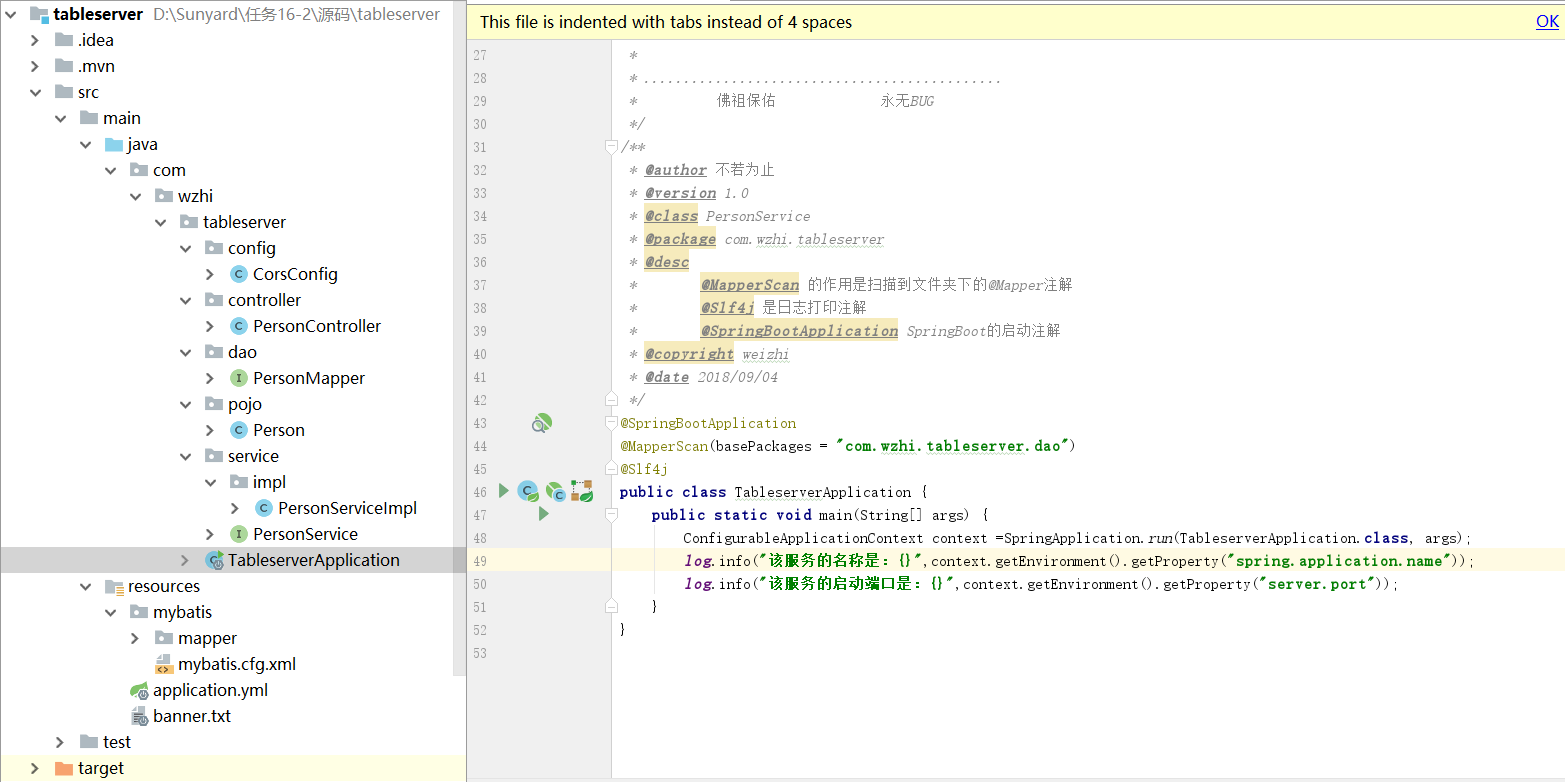
第五步:编写后台交互的业务代码
完整的项目结构图如下:
1、修改application.yml,添加配置内容如下:
mybatis:
    config-location: classpath:mybatis/mybatis.cfg.xml
    mapper-locations: classpath:mybatis/mapper/*.xml
    type-aliases-package: com.wzhi.tableserver.pojo
server:
    port: 8888
spring:
    application:
        name: table-server
    datasource:
        driver-class-name: com.mysql.cj.jdbc.Driver
        password: 123456
        url: jdbc:mysql://XXX.XXX.XXX.XXX:3306/test?characterEncoding=utf8&useUnicode=true&useJDBCCompliantTimezoneShift=true&useLegacyDatetimeCode=false&serverTimezone=UTC
        username: root
2、修改TableserverApplication.java,代码如下:
/**
 * @author 不若为止
 * @version 1.0
 * @class PersonService
 * @package com.wzhi.tableserver
 * @desc
 *           @MapperScan 的作用是扫描到文件夹下的@Mapper注解
 *           @Slf4j 是日志打印注解
 *           @SpringBootApplication SpringBoot的启动注解
 * @copyright weizhi
 * @date 2018/09/04
 */
@SpringBootApplication
@MapperScan(basePackages = "com.wzhi.tableserver.dao")
@Slf4j
public class TableserverApplication {
    public static void main(String[] args) {
        ConfigurableApplicationContext context =SpringApplication.run(TableserverApplication.class, args);
        log.info("该服务的名称是:{}",context.getEnvironment().getProperty("spring.application.name"));
        log.info("该服务的启动端口是:{}",context.getEnvironment().getProperty("server.port"));
    }
}
3、在config目录下新建CorsConfig.java,解决axios的跨域问题,代码如下:
package com.wzhi.tableserver.config;

import org.springframework.context.annotation.Bean;
import org.springframework.context.annotation.Configuration;
import org.springframework.web.cors.CorsConfiguration;
import org.springframework.web.cors.UrlBasedCorsConfigurationSource;
import org.springframework.web.filter.CorsFilter;
/**
 * @author 不若为止
 * @version 1.0
 * @class CorsConfig
 * @package com.wzhi.tableserver.config
 * @desc 因为Vue使用的是axios进行后台交互,所以需要配置一个过滤
 * @copyright weizhi
 * @date 2018/09/04
 */
@Configuration
public class CorsConfig {
    private CorsConfiguration buildConfig(){
        CorsConfiguration corsConfiguration =new CorsConfiguration();
        corsConfiguration.addAllowedOrigin("*");
        corsConfiguration.addAllowedHeader("*");
        corsConfiguration.addAllowedMethod("*");
        return corsConfiguration;
    }

    @Bean
    public CorsFilter corsFilter(){
        //System.out.println("进入跨域处理");
        UrlBasedCorsConfigurationSource source=new UrlBasedCorsConfigurationSource();
        source.registerCorsConfiguration("/**",buildConfig());
        return new CorsFilter(source);
    }
}
4、新建Person.java实体类,代码如下:
package com.wzhi.tableserver.pojo;

import lombok.Data;
import lombok.experimental.Accessors;

/**
 * @author 不若为止
 * @version 1.0
 * @class Person
 * @package com.wzhi.tableserver.pojo
 * @desc 个人信息实体类
 * @copyright weizhi
 * @date 2018/09/04
 */
@Data
@Accessors(chain = true)
public class Person {
    private Integer id;
    private String userName;
    private String zone;
    private String email;
    private String sex;
    private String phone;
    private String createTime;
}
5、新建PersonMapper.java文件,代码如下:
package com.wzhi.tableserver.dao;

import com.wzhi.tableserver.pojo.Person;
import org.apache.ibatis.annotations.Mapper;

import java.util.List;

/**
 * @author 不若为止
 * @version 1.0
 * @class PersonMapper
 * @package com.wzhi.tableserver.dao
 * @desc 个人信息Mapper,此处的Mapper注解会被启动类的@MapperScan扫描到
 * @copyright weizhi
 * @date 2018/09/04
 */
@Mapper
public interface PersonMapper {
    /**
     * @desc 查询所有的用户
     * @return
     */
    List<Person> findAll();
}
6、新建mybatis.cfg.xml和PersonMapping.xml文件
<?xml version="1.0" encoding="UTF-8" ?>
<!DOCTYPE configuration
        PUBLIC "-//mybatis.org//DTD Config 3.0//EN"
        "http://mybatis.org/dtd/mybatis-3-config.dtd">
<!-- 全局参数 -->
<configuration>
    <settings>
        <!-- 使全局的映射器启用或禁用缓存。 -->
        <setting name="cacheEnabled" value="true" />
        <!-- 全局启用或禁用延迟加载。当禁用时,所有关联对象都会即时加载。 -->
        <setting name="lazyLoadingEnabled" value="true" />
        <!-- 当启用时,有延迟加载属性的对象在被调用时将会完全加载任意属性。否则,每种属性将会按需要加载。 -->
        <setting name="aggressiveLazyLoading" value="true" />
        <!-- 是否允许单条sql 返回多个数据集 (取决于驱动的兼容性) default:true -->
        <setting name="multipleResultSetsEnabled" value="true" />
        <!-- 是否可以使用列的别名 (取决于驱动的兼容性) default:true -->
        <setting name="useColumnLabel" value="true" />
        <!-- 允许JDBC 生成主键。需要驱动器支持。如果设为了true,这个设置将强制使用被生成的主键,有一些驱动器不兼容不过仍然可以执行。 default:false -->
        <setting name="useGeneratedKeys" value="true" />
        <!-- 指定 MyBatis 如何自动映射 数据基表的列 NONE:不隐射 PARTIAL:部分 FULL:全部 -->
        <setting name="autoMappingBehavior" value="PARTIAL" />
        <!-- 这是默认的执行类型 (SIMPLE: 简单; REUSE: 执行器可能重复使用prepared statements语句;BATCH:
            执行器可以重复执行语句和批量更新) -->
        <setting name="defaultExecutorType" value="SIMPLE" />
        <!-- 使用驼峰命名法转换字段。 -->
        <setting name="mapUnderscoreToCamelCase" value="true" />
        <!-- 设置本地缓存范围 session:就会有数据的共享 statement:语句范围 (这样就不会有数据的共享 ) defalut:session -->
        <setting name="localCacheScope" value="SESSION" />
        <!-- 设置但JDBC类型为空时,某些驱动程序 要指定值,default:OTHER,插入空值时不需要指定类型 -->
        <setting name="jdbcTypeForNull" value="NULL" />
    </settings>
</configuration>
<?xml version="1.0" encoding="UTF-8"?>
<!DOCTYPE mapper PUBLIC "-//mybatis.org/DTD Mapper 3.0" "http://mybatis.org/dtd/mybatis-3-mapper.dtd">
<mapper namespace="com.wzhi.tableserver.dao.PersonMapper">
    <resultMap type="com.wzhi.tableserver.pojo.Person" id="person">
        <result column="id" jdbcType="INTEGER" property="id"/>
        <result column="create_datetime" jdbcType="VARCHAR" property="createTime"/>
        <result column="email" jdbcType="VARCHAR" property="email"/>
        <result column="phone" jdbcType="VARCHAR" property="phone"/>
        <result column="sex" jdbcType="VARCHAR" property="sex"/>
        <result column="username" jdbcType="INTEGER" property="username"/>
        <result column="zone" jdbcType="VARCHAR" property="zone"/>
    </resultMap>
    <sql id="personColnum">
       id,create_datetime,email,phone,sex,username,zone
    </sql>
    <select id="findAll" resultMap="person">
        SELECT <include refid="personColnum"/>
        FROM persons
    </select>
</mapper>
7、新建PersonService.java和PersonServiceImpl.java
package com.wzhi.tableserver.service;

import com.wzhi.tableserver.pojo.Person;
import java.util.List;
/**
 * @author 不若为止
 * @version 1.0
 * @class PersonService
 * @package com.wzhi.tableserver.service
 * @desc 个人信息Service
 * @copyright weizhi
 * @date 2018/09/04
 */
public interface PersonService {
    /**
     * @desc 查询所有的用户
     * @return
     */
    List<Person> findAll();
}
package com.wzhi.tableserver.service.impl;

import com.wzhi.tableserver.dao.PersonMapper;
import com.wzhi.tableserver.pojo.Person;
import com.wzhi.tableserver.service.PersonService;
import lombok.extern.slf4j.Slf4j;
import org.springframework.beans.factory.annotation.Autowired;
import org.springframework.stereotype.Service;

import java.util.List;
@Slf4j
@Service
public class PersonServiceImpl implements PersonService {
    @Autowired
    private PersonMapper mapper;
    @Override
    public List<Person> findAll() {
        return mapper.findAll();
    }
}
8、新建PersonController.java,代码如下:
package com.wzhi.tableserver.controller;

import com.wzhi.tableserver.pojo.Person;
import com.wzhi.tableserver.service.PersonService;
import lombok.extern.slf4j.Slf4j;
import org.springframework.beans.factory.annotation.Autowired;
import org.springframework.web.bind.annotation.GetMapping;
import org.springframework.web.bind.annotation.RestController;

import java.util.List;

/**
 * @author 不若为止
 * @version 1.0
 * @class PersonController
 * @package com.wzhi.tableserver.controller
 * @desc 个人信息交互
 * @copyright weizhi
 * @date 2018/09/04
 */
@RestController
@Slf4j
public class PersonController {
    @Autowired
    private PersonService service;

    @GetMapping(value = "findAll")
    public List<Person> findAll(){
        log.info("查询所有的角色信息");
        return service.findAll();
    }
}
第六步:实现前后台的数据交互
1、在前端项目中引入axios,执行命令cnpm install axios --save-dev,修改在main.js为:
// The Vue build version to load with the `import` command
// (runtime-only or standalone) has been set in webpack.base.conf with an alias.
import Vue from 'vue'
import App from './App'
import router from './router'
//引入IVIEW组件
import iView from 'iview';
import 'iview/dist/styles/iview.css';
Vue.use(iView);
//引入vue-easytable
import 'vue-easytable/libs/themes-base/index.css'
import {VTable,VPagination} from 'vue-easytable'
Vue.component(VTable.name, VTable)
Vue.component(VPagination.name, VPagination)
//引入axios
import axios from 'axios'
Vue.prototype.$ajax = axios
Vue.config.productionTip = false

/* eslint-disable no-new */
new Vue({
  el: '#app',
  router,
  components: { App },
  template: '<App/>'
})
2、修改TableMain.vue文件,修改数据从后台服务获取,代码如下:
<template> <div class="layout"> <Layout> <Header> <Menu mode="horizontal" theme="dark" active-name="1"> <div class="layout-logo">IVIEW布局</div> <div class="layout-nav"> <MenuItem name="1"> <Icon type="ios-navigate"></Icon> Item 1 </MenuItem> <MenuItem name="2"> <Icon type="ios-keypad"></Icon> Item 2 </MenuItem> <MenuItem name="3"> <Icon type="ios-analytics"></Icon> Item 3 </MenuItem> <MenuItem name="4"> <Icon type="ios-paper"></Icon> Item 4 </MenuItem> </div> </Menu> </Header> <Content :style="{padding: '0 50px'}"> <Breadcrumb :style="{margin: '20px 0'}"> <BreadcrumbItem>Home</BreadcrumbItem> <BreadcrumbItem>Components</BreadcrumbItem> <BreadcrumbItem>Layout</BreadcrumbItem> </Breadcrumb> <Card> <div style="min-height: 200px;"> <v-table is-horizontal-resize style="width:100%" :columns="columns" :table-data="tableData" row-hover-color="#eee" row-click-color="#edf7ff" ></v-table> </div> </Card> </Content> <Footer class="layout-footer-center"> © 作者:不若为止</Footer> </Layout> </div> </template> <script> export default { name: "table-main", data() { return { tableData: [], columns: [ {field: 'userName', title: '姓名', width: 80, titleAlign: 'center', columnAlign: 'center', isResize: true}, {field: 'phone', title: '手机号码', width: 150, titleAlign: 'center', columnAlign: 'center', isResize: true}, {field: 'sex', title: '性别', width: 150, titleAlign: 'center', columnAlign: 'center', isResize: true}, {field: 'email', title: '电子邮箱', width: 280, titleAlign: 'center', columnAlign: 'left', isResize: true}, {field: 'createTime', title: 'createTime', width: 150, titleAlign: 'center', columnAlign: 'center', isResize: true}, {field: 'zone', title: 'zone', width: 150, titleAlign: 'center', columnAlign: 'center', isResize: true}, ] } }, created() { //在created函数中使用axios的get请求向后台获取用户信息数据 this.$ajax('http://localhost:8888/findAll').then(res => { this.tableData = res.data }).catch(function (error) { console.log(error); }); } } </script> <style scoped> .layout { border: 1px solid #d7dde4; background: #f5f7f9; position: relative; border-radius: 4px; overflow: hidden; height: 100%; } .layout-logo { width: 100px; height: 30px; background: #5b6270; border-radius: 3px; float: left; position: relative; top: 15px; left: 20px; font-weight: bold; text-align: center; color: #49ffcc; } .layout-nav { width: 420px; margin: 0 auto; margin-right: 20px; } .layout-footer-center { text-align: center; } </style>
3、启动TableServerApplication,刷新界面,从后台查询到数据如下:

编辑过程中会遇的问题
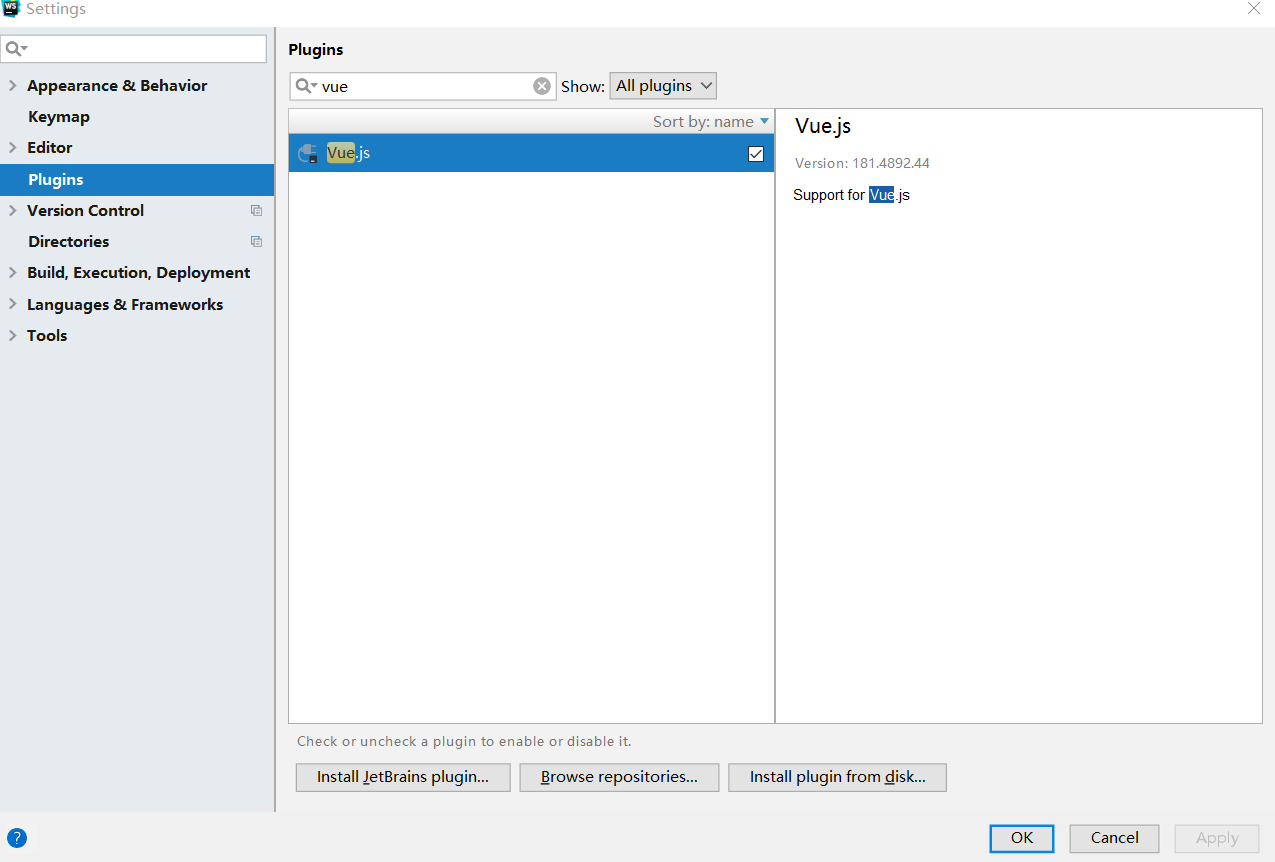
1、使用WebStorm打开Vue项目没有 这样的图表
这样的图表
解决办法:点击File->Settings->Plugins,搜索Vue,下载点击Apply重启即可
2、有很多人会遇到CORS跨域请求的问题,一种解决办法是在后台编写配置类MyCorsConfig.java
@Configuration
public class MyCorsConfig {
    @Bean
    public WebMvcConfigurer corsConfigurer(){
     return new WebMvcConfigurerAdapter() {
            @Override
            public void addCorsMappings(CorsRegistry registry) {
                // 限制了路径和域名的访问
                /*registry.addMapping("/api*").allowedOrigins("http://localhost:8081");*/
              registry.addMapping("/**")
                .allowedOrigins(ALL)
                .allowedMethods(ALL)
                .allowedHeaders(ALL)
                .allowCredentials(true);
            }
        };
    }
}
也可以在某个接口加上@CrossOrigin(origins = “http://ip:port”)注解
本文来自博客园,作者:sum墨,转载请注明原文链接:https://www.cnblogs.com/wlovet/p/10980579.html

 浙公网安备 33010602011771号