maven搭建webservice apache cxf实现
用 web方式发布 webService 服务端、客户端
一、服务器端搭建
1.首先创建 一个web工程(增加Maven依赖)
2.增加Maven依赖包,如下:
<project xmlns="http://maven.apache.org/POM/4.0.0" xmlns:xsi="http://www.w3.org/2001/XMLSchema-instance" xsi:schemaLocation="http://maven.apache.org/POM/4.0.0 http://maven.apache.org/xsd/maven-4.0.0.xsd">
  <modelVersion>4.0.0</modelVersion>
  <groupId>com.jlm</groupId>
  <artifactId>WebserviceTest</artifactId>
  <version>0.0.1-SNAPSHOT</version>
  <packaging>war</packaging>

  <dependencies>
      <!-- spring core -->
        <dependency>
            <groupId>org.springframework</groupId>
            <artifactId>spring-core</artifactId>
            <version>2.5.5</version>
        </dependency>

        <!-- spring beans -->
        <dependency>
            <groupId>org.springframework</groupId>
            <artifactId>spring-beans</artifactId>
            <version>2.5.5</version>
        </dependency>

        <!-- spring context -->
        <dependency>
            <groupId>org.springframework</groupId>
            <artifactId>spring-context</artifactId>
            <version>2.5.5</version>
        </dependency>

        <!-- spring web -->
        <dependency>
            <groupId>org.springframework</groupId>
            <artifactId>spring-web</artifactId>
            <version>2.5.5</version>
        </dependency>

        <dependency>
            <groupId>commons-logging</groupId>
            <artifactId>commons-logging</artifactId>
            <version>1.1</version>
        </dependency>

        <dependency>
            <groupId>javax.xml</groupId>
            <artifactId>jaxb-api</artifactId>
            <version>2.1</version>
            <type>pom</type>
        </dependency>

        <dependency>
            <groupId>javax.xml</groupId>
            <artifactId>jaxb-impl</artifactId>
            <version>2.1</version>
        </dependency>

        <dependency>
            <groupId>xfire</groupId>
            <artifactId>saaj-api</artifactId>
            <version>1.3</version>
        </dependency>

        <dependency>
            <groupId>xfire</groupId>
            <artifactId>saaj-impl</artifactId>
            <version>1.3</version>
        </dependency>

        <dependency>
            <groupId>wsdl4j</groupId>
            <artifactId>wsdl4j</artifactId>
            <version>1.6.2</version>
        </dependency>

        <dependency>
            <groupId>org.apache.cxf</groupId>
            <artifactId>cxf-rt-frontend-jaxws</artifactId>
            <version>2.2.3</version>
        </dependency>
        <dependency>
            <groupId>org.apache.cxf</groupId>
            <artifactId>cxf-rt-transports-http</artifactId>
            <version>2.2.3</version>
        </dependency>
        <dependency>
            <groupId>org.apache.cxf</groupId>
            <artifactId>cxf-rt-transports-http-jetty</artifactId>
            <version>2.2.3</version>
        </dependency>
  </dependencies>
</project>
3. 编写HelloWorld 接口类 代码如下:
package net.cc.service;

import javax.jws.WebParam;
import javax.jws.WebService;


@WebService
public interface HelloWorld {

    String sayHello(@WebParam(name = "userName") String userName);

}
说明:
@webService 说明这是一个webService
@webParam 说明参数名称
4. 编写实现类如下:
package net.cc.service;

import javax.jws.WebParam;
import javax.jws.WebService;


@WebService(serviceName = "HelloWorld")
public class HelloWorldImpl implements HelloWorld {

	@Override
	public String sayHello(@WebParam(name = "userName") String userName) {
        // TODO Auto-generated method stub
        System.out.println("客户端提交信息: " + userName);
        return "say Hello " + userName;
    }
}
说明:
@webService(serviceName = “HelloWorld”) 让Apache cxf知道是哪个接口来创建的WSDL
5. 编写spring xml文件 如下:
<?xml version="1.0" encoding="UTF-8"?>
<beans xmlns="http://www.springframework.org/schema/beans"
    xmlns:xsi="http://www.w3.org/2001/XMLSchema-instance" xmlns:jaxws="http://cxf.apache.org/jaxws"
    xsi:schemaLocation="http://www.springframework.org/schema/beans
        http://www.springframework.org/schema/beans/spring-beans.xsd
        http://cxf.apache.org/jaxws
        http://cxf.apache.org/schemas/jaxws.xsd">

    <jaxws:endpoint id="ProjectManager" implementor="net.cc.service.HelloWorldImpl"
        address="http://127.0.0.1:7890/HelloWorld" />

</beans>
说明:
implementor 表示 实现类 路径
address 表示需要发布的wsdl地址
6.编写 myListener 类 如下:
package net.cc.servlet;

import javax.servlet.ServletContextEvent;
import javax.servlet.ServletContextListener;

import org.springframework.context.support.ClassPathXmlApplicationContext;

public class myListener implements ServletContextListener {

	@Override
    public void contextDestroyed(ServletContextEvent arg0) {
        // TODO Auto-generated method stub

    }

    @Override
    public void contextInitialized(ServletContextEvent arg0) {
        // TODO Auto-generated method stub
        System.out.println("启动Tomcat...");
        ClassPathXmlApplicationContext act = new ClassPathXmlApplicationContext("spring/applicationContext.xml");

    }


}
说明:
实现 ServletContextListener 目的是为了在Tomcat启动时自动加载
使用 ClassPathXmlApplicationContext 去加载刚才写的 spring-beans.xml 文件
7. 在当前项目中web.xml文件 增加如下代码:
<?xml version="1.0" encoding="UTF-8"?>
<web-app xmlns:xsi="http://www.w3.org/2001/XMLSchema-instance" xmlns="http://java.sun.com/xml/ns/javaee" xsi:schemaLocation="http://java.sun.com/xml/ns/javaee http://java.sun.com/xml/ns/javaee/web-app_2_5.xsd" version="2.5">
  <display-name>WebserviceTest</display-name>
  <welcome-file-list>
    <welcome-file>index.html</welcome-file>
    <welcome-file>index.htm</welcome-file>
    <welcome-file>index.jsp</welcome-file>
    <welcome-file>default.html</welcome-file>
    <welcome-file>default.htm</welcome-file>
    <welcome-file>default.jsp</welcome-file>
  </welcome-file-list>

  <listener>
     <listener-class>net.cc.servlet.myListener</listener-class>
  </listener>
</web-app>
说明:
实现 ServletContextListener 接口的类路径
8 tomcat 启动截图:

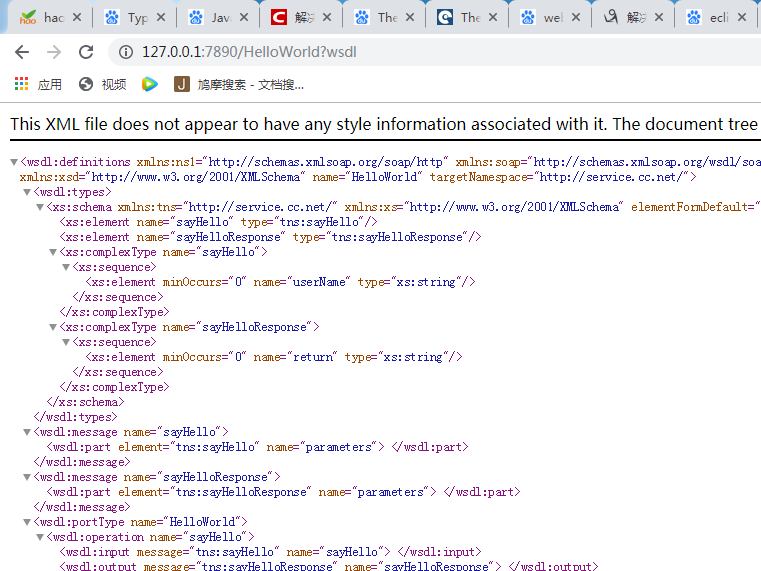
9 访问web界面 截图:
二、客户端搭建
JDK提供的生成客户端的命令。
1、在cmd命令中输入:wsimport -s 指定代码生成目录 -p 包名 -keep webservice访问地址url
示例:wsimport -s E:\\AllWorkSpace\\MyWork\\TheClient\\src -p com.eastcom.ws.client -keep http://localhost:8080/Dom4j_AxisDemo/service/hello?wsdl
同样注意中间的空格!!!
目录地址中不能含有空格,发布地址不要忘了?wsdl
完成后如下图: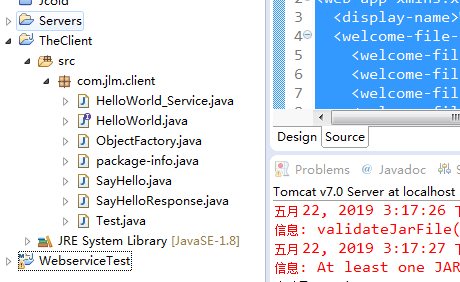
2、编写测试代码
package com.jlm.client;

public class Test {

	public static void main(String[] args) {

		HelloWorld hw = new HelloWorld_Service().getHelloWorldImplPort();
		hw.sayHello("你好!!!");

	}
}
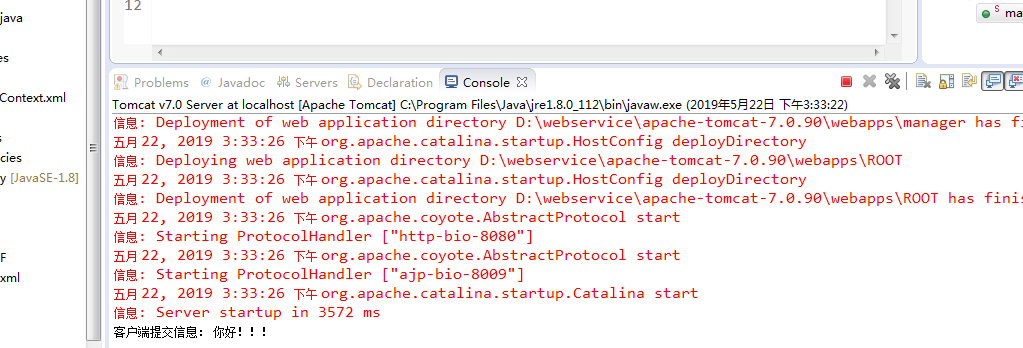
3、测试结果截图

 浙公网安备 33010602011771号