haproxy 1.8.1安装配置及测试http 模式下轮询负载代理
一、服务器环境及IP规划
haproxy:192.168.0.110 haproxy CentOS 7.5.1804  3.10.0-862.3.2.el7.x86_64
web1:192.168.0.112 web1 CentOS 7.5.1804  3.10.0-862.3.2.el7.x86_64
web2:192.168.0.113 web2  CentOS 7.5.1804  3.10.0-862.3.2.el7.x86_64
二、下载安装配置haproxy
2.1下载解压进入haproxy
# cd /usr/local/src
# wget https://src.fedoraproject.org/repo/pkgs/haproxy/haproxy-1.8.1.tar.gz/sha512/c59bbd144afae01a3802065bf507dc1ca70f09e7112a9f502474ec6758d3ccab084550372562d2906f1e0b9509464e316ca6f95e3575d7273aba49f350791caa/haproxy-1.8.1.tar.gz
# tar zxf haproxy-1.8.1.tar.gz
# cd haproxy-1.8.1
2.2 编译haproxy
# uname -r
3.10.0-862.3.2.el7.x86_64
#查看系统内核
#make TARGET=linux2628 ARCH=x86_64 PREFIX=/usr/local/haproxy
#编译
说明:
TARGET=linux2628  ;这个是从解压的目录下的README 里面看到的,使用uname -r 查看你本机的内核,然后对比下面:
  - linux22     for Linux 2.2
  - linux24     for Linux 2.4 and above (default)
  - linux24e    for Linux 2.4 with support for a working epoll (> 0.21)
  - linux26     for Linux 2.6 and above
  - linux2628   for Linux 2.6.28, 3.x, and above (enables splice and tproxy)
  - solaris     for Solaris 8 or 10 (others untested)
  - freebsd     for FreeBSD 5 to 10 (others untested)
  - netbsd      for NetBSD
  - osx         for Mac OS/X
  - openbsd     for OpenBSD 5.7 and above
  - aix51       for AIX 5.1
  - aix52       for AIX 5.2
  - cygwin      for Cygwin
  - haiku       for Haiku
  - generic     for any other OS or version.
  - custom      to manually adjust every setting

ARCH=x86_64   ;是代表你服务器是哪个平台,64 还是 32,也可以用uname -r 查看;
PREFIX=/usr/local/haproxy   ;指定安装路径
2.2 安装haproxy
# make install PREFIX=/usr/local/haproxy
install -d "/usr/local/haproxy/sbin"
install haproxy  "/usr/local/haproxy/sbin"
install -d "/usr/local/haproxy/share/man"/man1
install -m 644 doc/haproxy.1 "/usr/local/haproxy/share/man"/man1
install -d "/usr/local/haproxy/doc/haproxy"
for x in configuration management architecture peers-v2.0 cookie-options lua WURFL-device-detection proxy-protocol linux-syn-cookies network-namespaces DeviceAtlas-device-detection 51Degrees-device-detection netscaler-client-ip-insertion-protocol peers close-options SPOE intro; do \
        install -m 644 doc/$x.txt "/usr/local/haproxy/doc/haproxy" ; \
done
2.3在/usr/local/haproxy 目录下创建 etc 目录,然后在该目录下创建haproxy.cfg 文件,内容为:
# cd /usr/local/haproxy/
# mkdir etc
# vi etc/haproxy.cfg
#加入以下内容:
#全局配置
global

#日志配置,配置在本地,通过local0 输出
    log         127.0.0.1 local0
#定义日志级别【error warning info debug】
    log         127.0.0.1 local1 debug
#运行路径
    chroot      /usr/local/haproxy
    #PID 文件存放路径
    pidfile     /var/run/haproxy.pid
        #最大连接数
    maxconn     4000
        #运行haproxy 用户
    user        haproxy
        #运行haproxy 用户组
    group       haproxy
        #以后台形式运行haproxy
    daemon
        #设置进程数量
    nbproc      1
        #ulimit 的数量限制
        #ulimit-n 819200
        #haproxy 调试级别,建议只在开启单进程的时候调试
        #debug
    #quiet
    stats socket /usr/local/haproxy/stats

#默认配置
defaults
    #默认的模式 【tcp:4层; http:7层; health:只返回OK】
    mode                    http
        #采用全局的日志定义输出
    log                     global
        #日志类别,采用httplog
        #option httplog
        #如果后端服务器需要获得客户端真实ip需要配置的参数,可以从Http Header中获得客户端ip
        #option forwardfor
        #每次请求完毕后主动关闭http通道,haproxy不支持keep-alive,只能模拟这种模式的实现
        option httpclose
    #不记录健康检查日志信息
    option                  dontlognull
        #当serverID对应的服务器挂掉后,强制定向到其它健康服务器
    option                  redispatch
        #当服务器负载很高的时候,自动结束掉当前队列处理比较久的链接
        option abortonclose
        #三次连接失败就人为服务器不可用,也可以在后面定义负载服务器中设置
    retries                 3
        #默认http请求超时时间
    timeout http-request    10s
        #默认队列超时时间
    timeout queue           1m
        #连接超时
    timeout connect         10s
        #客户端超时
    timeout client          1m
        #服务器超时
    timeout server          1m
        #默认持久连接超时时间
    timeout http-keep-alive 10s
        #心跳检测超时
    timeout check           10s
        #默认的最大连接数
    maxconn                 600
        #设置默认负载均衡方式,类似于nginx的ip_hash
        #balance source
        #设置默认负载均衡方式,最小连接数
    #balnace leastconn

#统计页面配置
listen stats
    #采用http 模式,7层
    mode http
        #访问统计页面的端口
    bind :6677
        #默认的最大连接数
        maxconn 10
        #采用http日志格式
        option httplog
        #开启统计
    stats enable
        #隐藏版本信息
    stats hide-version
        #每30s 刷新依次
    stats refresh 30s
        #访问统计页面的url
    stats uri /stats
        #统计页面密码框上提示文本
    stats realm XingCloud\ Haproxy
        #设置监控页面的用户和密码:admin,可以设置多个用户名
    stats auth admin:admin
        #设置手工启动/禁用,后端服务器
    stats admin if TRUE

#设置haproxy 错误页面#####
    #errorfile 403 /home/haproxy/haproxy/errorfiles/403.http
    #errorfile 500 /home/haproxy/haproxy/errorfiles/500.http
    #errorfile 502 /home/haproxy/haproxy/errorfiles/502.http
    #errorfile 503 /home/haproxy/haproxy/errorfiles/503.http
    #errorfile 504 /home/haproxy/haproxy/errorfiles/504.http

#frontend前端配置
frontend main
    #这里建议使用bind *:80的方式,要不然做集群高可用的时候有问题,vip切换到其他机器就不能访问了。
    bind *:80
        #acl后面是规则名称,-i为忽略大小写,后面跟的是要访问的域名,如果访问www.apache.com这个域名,就触发apacheserver规则,。
    acl apacheserver hdr_beg(host) -i www.apa.com
        #如果访问www.nginx.com这个域名,就触发nginxserver 规则
    acl nginxserver hdr_beg(host) -i www.nginx.com
        #如果上面定义的apacheserver规则被触发,即访问www.apa.com,就将请求分发到apcser这个作用域。
    use_backend  apcser if apacheserver
        #如果上面定义的nginxserver规则被触发,即访问www.ngx.com,就将请求分发到ngxser 这个作用域。
    use_backend  ngxser if nginxserver
    #default_backend apcser

#backend后端配置,apcser 作用域
backend apcser
    mode http
        #balance roundrobin 负载轮询,balance source 保存session值,支持static-rr,leastconn,first,uri等参数
    balance roundrobin
        #健康检查, 检测文件,如果分发到后台index.html访问不到就不再分发给它
    #option  httpchk /index.html HTTP/1.0
    server  apc1 192.168.0.112:80 cookie 1 weight 5 check port 80 rise 2 fall 3
    server  apc2 192.168.0.113:80 cookie 2 weight 5 check port 80 rise 2 fall 3
    #cookie 1表示serverid为1,check inter 1500 是检测心跳频率,check port 81 是检测后端服务器端口健康状态
    #rise 2是2次正确认为服务器可用,fall 3是3次失败认为服务器不可用,weight代表权重
backend ngxser
    mode http
    balance roundrobin
   # option httpchk /index.html
    server  ngx01 192.168.0.112:82 cookie 1 weight 5 check inter 2000 rise 2 fall 3
    server  ngx02 192.168.0.113:82 cookie 2 weight 5 check inter 2000 rise 2 fall 3
2.4启动haproxy
#useradd haproxy
#创建用户名和组
#/usr/local/haproxy/sbin/haproxy -f /usr/local/haproxy/etc/haproxy.cfg
查看后端看监听的端口及监听的进程:
# ps aux|grep haproxy
haproxy    3157  0.0  0.3  16932  1536 ?        Ss   21:50   0:00 /usr/local/haproxy/sbin/haproxy -f /usr/local/haproxy/etc/haproxy.cfg
haproxy    3163  0.0  0.3  16924  1524 ?        Ss   21:51   0:00 /usr/local/haproxy/sbin/haproxy -f /usr/local/haproxy/etc/haproxy.cfg
root       3167  0.0  0.2 112724   984 pts/0    R+   21:51   0:00 grep --color=auto hapr
查看启动端口:
# netstat -lntp|grep haproxy
tcp        0      0 0.0.0.0:6677            0.0.0.0:*               LISTEN      3163/haproxy
2.5 在后端两台服务器上都使用yum 安装上 httpd 和nginx:
[root@web1 ~]# yum install -y epel-release
[root@web1 ~]# yum install -y httpd nginx
[root@web2 ~]# yum install -y epel-release
[root@web2 ~]# yum install -y httpd nginx
2.6 安装完成后,编辑两台服务器上两个服务的配置文件,将apache 的监听端口默认使用80,将nginx 的监听端口都修改为82:
#Nginx:
egrep -i '82' /etc/nginx/nginx.conf
        listen       82 default_server;
        listen       [::]:82 default_server;
2.7 启动服务
[root@web1 ~]# systemctl start httpd && systemctl start nginx
[root@web2 ~]# systemctl start httpd && systemctl start nginx
2.8 为了区分,我们在两台服务器上重写apache 和nginx 的index 文件,如下:
web1:
[root@web1 ~]#echo 112-centos-apache > /var/www/html/index.html
[root@web1 ~]#echo 113-centos-nginx > /usr/share/nginx/html/index.html
web2:
[root@web2 ~]#echo 112-centos-apache > /var/www/html/index.html
[root@web2 ~]#echo 113-centos-nginx > /usr/share/nginx/html/index.html
2.9 在浏览器访问haproxy 统计页面,用配置文件中的账号密码登录:
网址:http://192.168.0.110:6677/stats 用户名/密码 admin/admin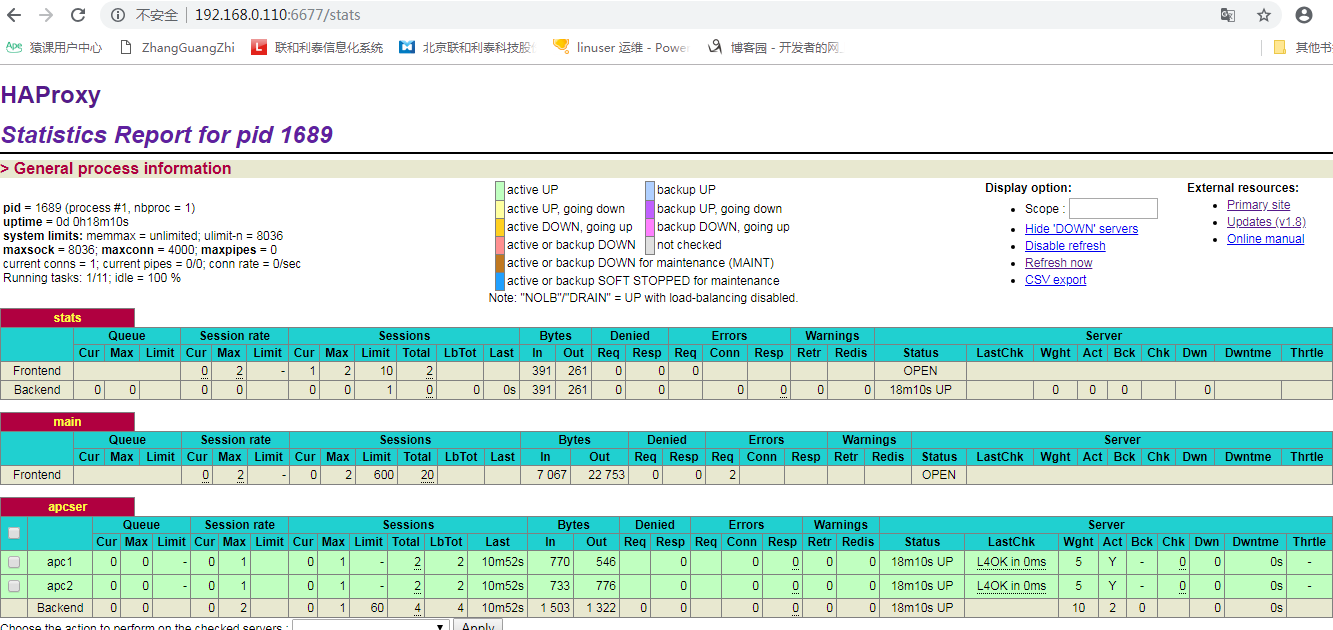
页面详细参数解释:
Cur: current queued requests //当前的队列请求数量
Max:max queued requests     //最大的队列请求数量
Limit:           //队列限制数量
Session rate(每秒的连接回话)列表:
scur: current sessions        //每秒的当前回话的限制数量
smax: max sessions           //每秒的新的最大的回话量
slim: sessions limit           //每秒的新回话的限制数量
Sessions

Total:            //总共回话量
Cur:             //当前的回话
Max: //最大回话
Limit: //回话限制
Lbtot: total number of times a server was selected //选中一台服务器所用的总时间
Bytes

In: //网络的字节数输入总量
Out: //网络的字节数输出总量
Denied

Req: denied requests//拒绝请求量
Resp:denied responses //拒绝回应
Errors

Req:request errors             //错误请求
Conn:connection errors          //错误的连接
Resp: response errors (among which srv_abrt)  ///错误的回应
Warnings
Retr: retries (warning)                      //重新尝试
Redis:redispatches (warning)               //再次发送
Server列表:
Status:状态,包括up(后端机活动)和down(后端机挂掉)两种状态
LastChk:    持续检查后端服务器的时间
Wght: (weight) : 权重
Act: server is active (server), number of active servers (backend) //活动链接数量
Bck: server is backup (server), number of backup servers (backend) //backup:备份的服务器数量
Down:          //后端服务器连接后都是down的数量
Downtime: downtime: total downtime (in seconds)    //总的downtime 时间
Throttle: warm up status                          //设备变热状态
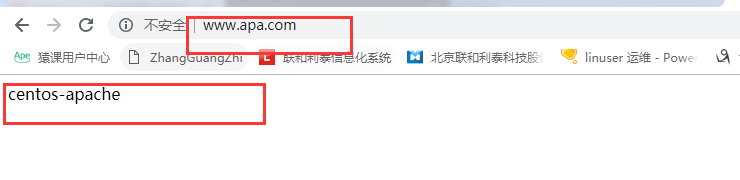
3.0 客户端电脑(windows)电脑使用haproxy 定义的两个域名访问(前提是做本地解析),如下:
# Copyright (c) 1993-2009 Microsoft Corp.
#
# This is a sample HOSTS file used by Microsoft TCP/IP for Windows.
#
# This file contains the mappings of IP addresses to host names. Each
# entry should be kept on an individual line. The IP address should
# be placed in the first column followed by the corresponding host name.
# The IP address and the host name should be separated by at least one
# space.
#
# Additionally, comments (such as these) may be inserted on individual
# lines or following the machine name denoted by a '#' symbol.
#
# For example:
#
#      102.54.94.97     rhino.acme.com          # source server
#       38.25.63.10     x.acme.com              # x client host

# localhost name resolution is handled within DNS itself.
#	127.0.0.1       localhost
#	::1             localhost
192.168.0.110 node1
192.168.0.111 node2
192.168.0.112 node3
192.168.0.113 node4
192.168.0.110 www.apa.com www.ngx.com
3.1 测试


 浙公网安备 33010602011771号