
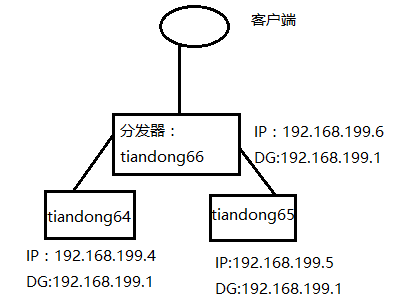
使用haproxy实现负载均衡集群
拓扑图:
haproxy下载地址:https://src.fedoraproject.org/repo/pkgs/haproxy/
实战:
1、安装依赖包:
[root@tiandong66 ~]# yum -y install make gcc gcc-c++ openssl-devel
2、安装haproxy
[root@tiandong66 ~]# tar zxvf haproxy-1.7.9.tar.gz -C /usr/local/src/
[root@tiandong66 ~]# cd /usr/local/src/haproxy-1.7.9/
[root@tiandong66 haproxy-1.7.9]# uname -r 查看内核版本
3.10.0-693.el7.x86_64
[root@tiandong66 haproxy-1.7.9]# make TARGET=linux2628 PREFIX=/usr/local/haproxy
[root@tiandong66 haproxy-1.7.9]# make install PREFIX=/usr/loacl/haproxy
[root@tiandong66 haproxy-1.7.9]# cd /usr/local/haproxy/
[root@tiandong66 haproxy]# ll
总用量 0
drwxr-xr-x. 3 root root 21 12月 24 19:30 doc
drwxr-xr-x. 2 root root 21 12月 24 19:30 sbin
drwxr-xr-x. 3 root root 17 12月 24 19:30 share
3、没有配置文件,自己写一个haproxy的配置文件
[root@tiandong66 ~]# mkdir /usr/local/haproxy/etc
[root@tiandong66 ~]# vim /usr/local/haproxy/etc/haproxy.cfg
globallog 127.0.0.1 local0#log 127.0.0.1 local1 notice#log loghost local0 infomaxconn 4096chroot /usr/local/haproxyuid 99 #所属运行的用户uidgid 99 #所属运行的用户组daemon #以后台形式运行haproxynbproc 1 #启动1个haproxy实例。# #工作进程数量(CPU数量) ,实际工作中,应该设置成和CPU核心数一样。 这样可以发挥出最大的性能。pidfile /usr/local/haproxy/run/haproxy.pid #将所有进程写入pid文件#debug #调试错误时用#quiet #安静defaultslog globallog 127.0.0.1 local3 #日志文件的输出定向。产生的日志级别为local3. 系统中local1-7,用户自己定义mode http #工作模式,所处理的类别,默认采用http模式,可配置成tcp作4层消息转发option httplog #日志类别,记载http日志option httpclose #每次请求完毕后主动关闭http通道,haproxy不支持keep-alive,只能模拟这种模式的实现option dontlognull #不记录空连接,产生的日志option forwardfor #如果后端服务器需要获得客户端真实ip需要配置的参数,可以从Http Header中获得客户端ipoption redispatch #当serverid对应的服务器挂掉后,强制定向到其他健康服务器retries 2 #2次连接失败就认为服务器不可用,主要通过后面的check检查maxconn 2000 #最大连接数balance roundrobin #负载均衡算法stats uri /haproxy-stats #haproxy 监控页面的访问地址 # 可通过 http://localhost:80/haproxy-stats 访问timeout connect 5000 #连接超时时间。 单位:ms 毫秒timeout client 50000 #客户端连接超时时间timeout server 50000 #服务器端连接超时时间mode httpoption httpchk GET /index.html #健康检测#注意实际工作中测试时,应该下载某一个页面来进行测试,因此这个页面应该是个小页面,而不要用首页面。这里是每隔一秒检查一次页面。frontend http #前端配置,http名称可自定义bind 0.0.0.0:80 #发起http请求80端口,会被转发到设置的ip及端口default_backend http_back #转发到后端 写上后端名称backend http_back #后端配置,名称上下关联server s1 192.168.1.62:80 weight 3 check #后端的主机 IP &权衡server s2 192.168.1.64:80 weight 3 check #后端的主机 IP &权衡#server node1 192.168.179.131:8081 check inter 2000 rise 3 fall 3 weight 30 # inter 2000 健康检查时间间隔2秒 # rise 3 检测多少次才认为是正常的 # fall 3 失败多少次才认为是不可用的# weight 30 权重4、设置haproxy启动脚本
[root@tiandong66 ~]# cp /usr/local/src/haproxy-1.7.9/examples/haproxy.init /etc/init.d/haproxy
[root@tiandong66 ~]# chmod +x /etc/init.d/haproxy
[root@tiandong66 ~]# cp /usr/local/haproxy/sbin/haproxy /usr/sbin/ 因为上面的haproxy.init启动脚本默认会去/usr/sbin下找
[root@tiandong66 ~]# mkdir -p /usr/local/haproxy/run 创建目录
[root@tiandong66 ~]# chown nobody /usr/local/haproxy/ -R 设置权限
[root@tiandong66 ~]# vim /etc/rsyslog.conf 配置日志收集
15 $ModLoad imudp 取消注释
16 $UDPServerRun 514 取消注释
74 local3.* /var/log/haproxy.log
75 local0.* /var/log/haproxy.log 增加两行
[root@tiandong66 ~]# systemctl restart rsyslog
5、启动停止haproxy服务
[root@tiandong66 ~]# haproxy -f /usr/local/haproxy/etc/haproxy.cfg 启动haproxy
也可以使用 /etc/init.d/haproxy restart或者systemctl restart haproxy
[root@tiandong66 ~]# ps -aux |grep haproxy
nobody 10640 0.0 0.0 12272 824 ? Ss 22:09 0:00 haproxy -f /usr/local/haproxy/etc/haproxy.cfg
root 10642 0.0 0.0 112724 980 pts/1 S+ 22:09 0:00 grep --color=auto haproxy
[root@tiandong66 ~]# killall haproxy
[root@tiandong66 ~]# ps -aux |grep haproxy
root 10687 0.0 0.0 112724 980 pts/1 S+ 22:12 0:00 grep --color=auto haproxy
6、配置后端服务器
[root@tiandong64 ~]# yum install php httpd -y
[root@tiandong65 ~]# yum -y install php httpd -y
[root@tiandong64 ~]# cd /var/www/html/
[root@tiandong64 html]# more index.html
192.168.199.4
[root@tiandong64 html]# more test.php
192.168.199.4
<?php
phpinfo();
?>
[root@tiandong64 html]#
[root@tiandong64 html]# ll
total 12
-rw-r--r-- 1 root root 14 Mar 20 00:24 index.html
-rw-r--r-- 1 root root 790 Dec 24 2018 pic.PNG
-rw-r--r-- 1 root root 35 Mar 20 00:25 test.php
重启Apache服务:
[root@tiandong64 ~]# /etc/init.d/httpd restart
[root@tiandong65 ~]# /etc/init.d/httpd restart
7、测试反向代理功能
[root@tiandong63 ~]# curl 192.168.199.6
192.168.199.5
[root@tiandong63 ~]# curl 192.168.199.6
192.168.199.4
[root@tiandong63 ~]# curl 192.168.199.6
192.168.199.5
[root@tiandong63 ~]# curl 192.168.199.6
192.168.199.4
查看haproxy的监控页面: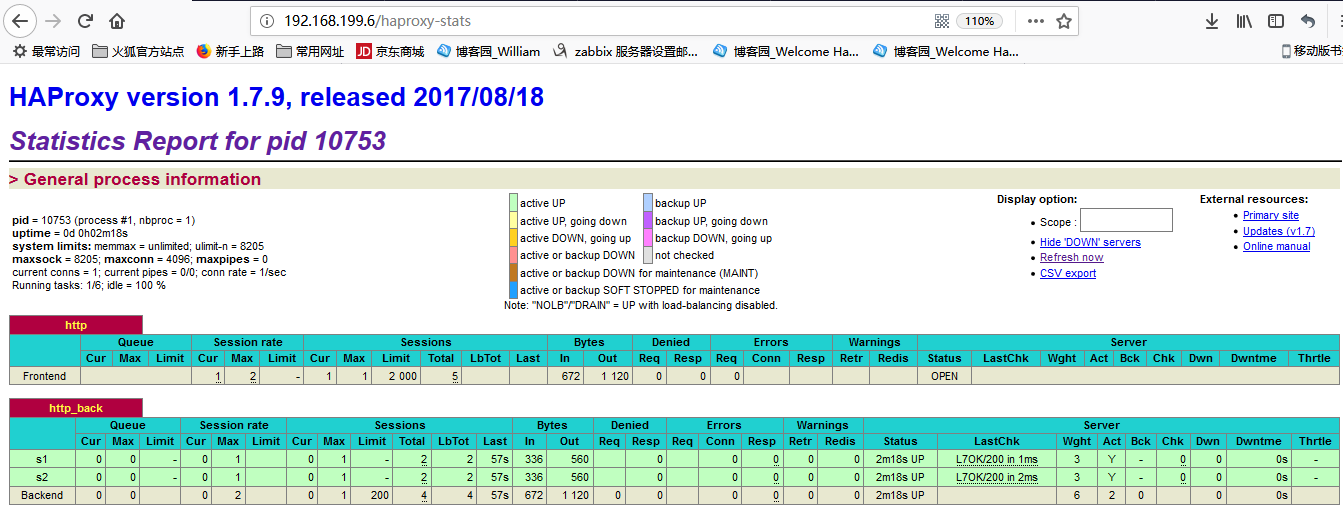
8、故障模拟
[root@tiandong64 ~]# /etc/init.d/httpd stop 一台服务器的Apache服务关闭了
Stopping httpd: [ OK ]
[root@tiandong64 ~]#
[root@tiandong63 ~]# curl 192.168.199.6 一直访问的是另外一台服务器
192.168.199.5
[root@tiandong63 ~]# curl 192.168.199.6
192.168.199.5
[root@tiandong63 ~]# curl 192.168.199.6
192.168.199.5
[root@tiandong63 ~]#
查看一下haproxy的监控页面(一台显示已经宕机了):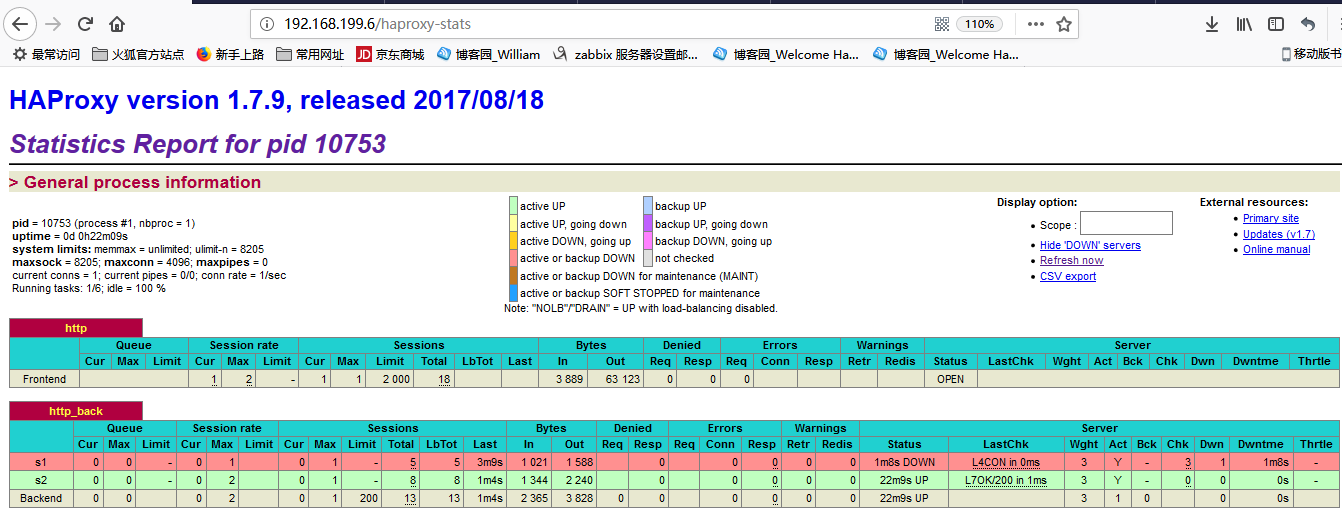
服务恢复
[root@tiandong64 ~]# /etc/init.d/httpd start 服务恢复
[root@tiandong63 ~]# curl 192.168.199.6
192.168.199.5
[root@tiandong63 ~]# curl 192.168.199.6
192.168.199.4
[root@tiandong63 ~]# curl 192.168.199.6
192.168.199.5
[root@tiandong63 ~]# curl 192.168.199.6
192.168.199.4
[root@tiandong63 ~]#
再次查看监控页面(恢复正常了):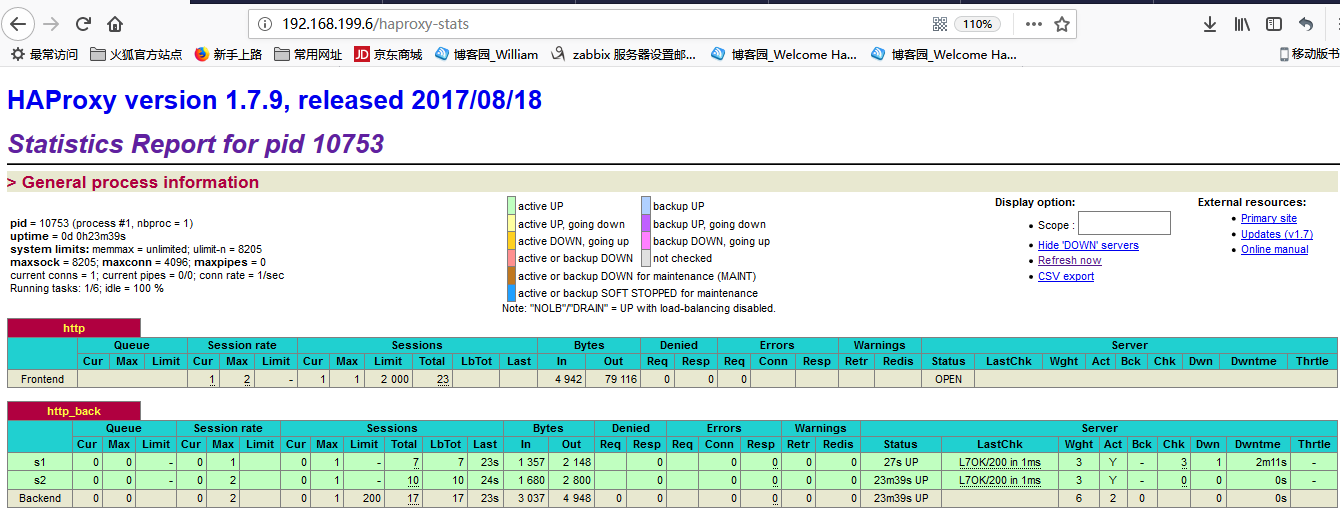
注:配置文件和启动脚本可以从这个目录下获得:
/usr/local/src/haproxy-1.7.9/examples/
OK!!!!!

 浙公网安备 33010602011771号