nexus book
nexus官网下载地址
nexus安装
nexus依赖jdk, 2.6版以上的要用 jdk1.7 , 3.0以上要求jdk1.8
两种安装方式
Nexus的安装有两种实现方式:
1)war包安装方式
下载地址:https://sonatype-download.global.ssl.fastly.net/nexus/oss/nexus-2.14.2-01.war
直接将war包放在tomcat的根目录下,启动tomcat就可以用了
2)源码安装方式
官方下载地址:https://www.sonatype.com/download-oss-sonatype , 基本下不动
百度云链接:https://pan.baidu.com/s/1gMsMmInyPY1iCTmyMHSW6w
提取码:cvi0
[root@master-node ~]# cd /usr/local/src/
[root@master-node src]# wget https://sonatype-download.global.ssl.fastly.net/nexus/3/nexus-3.2.0-01-unix.tar.gz
[root@master-node src]# tar -zvxf nexus-3.2.0-01-unix.tar.gz
[root@master-node src]# mv nexus-3.2.0-01 /usr/local/nexus
参考: Linux 部署 Nexus (下载、安装、使用)==>https://blog.csdn.net/weixin_42585386/article/details/122108563
启动
本处只讲源码安装,执行在nexus的bin目录下执行./nexus start 启动nexus,显示warning
WARNING: ************************************************************
WARNING: Detected execution as "root" user. This is NOT recommended!
WARNING: ************************************************************
Usage: /usr/local/nexus/bin/nexus {start|stop|run|run-redirect|status|restart|force-reload}

[root@master-node src]# /usr/local/nexus/bin/nexus start
WARNING: ************************************************************
WARNING: Detected execution as "root" user. This is NOT recommended!
WARNING: ************************************************************
Starting nexus
去掉warnning
[root@master-node src]# vim /etc/profile
#最后一行添加
export RUN_AS_USER=root
#重载配置文件
[root@master-node src]# source /etc/profile
再次执行 ./nexus start 启动, 不再有warning 。
开放8081端口
另外由于nexus默认8081端口,需要开放端口访问权限
[root@master-node src]# vim /etc/sysconfig/iptables
#第一行添加8081允许访问权限
-A INPUT -p tcp -m state --state NEW -m tcp --dport 8081 -j ACCEPT
管理页面
nexus3 在第一次启动后需要访问类似于 /data/nexus3/sonatype-work/nexus3/admin.password 的 admin.password的文件去获取,比如我的为3777abcd-abce-abcd-abcd-12345678abcd
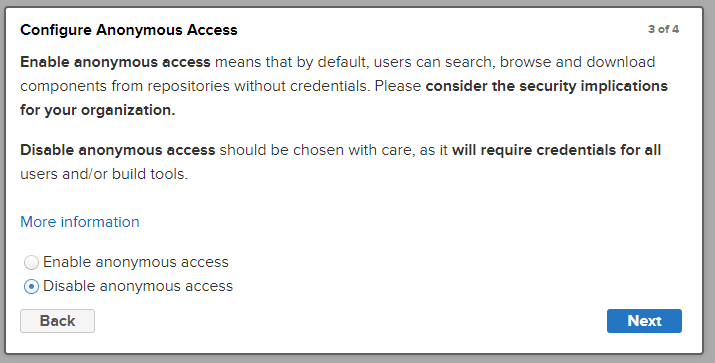
nexus3在初次使用时会弹窗提示录入 admin.password 中的密码, 之后会弹窗提示修改密码, 修改完密码后 , 会弹窗提示是否允许匿名用户访问(当然选不允许 Disable anonymous access)
nexus2 使用 访问http://youTargetIP:port:8081/nexus , 成功进入开始页。点击右上角login, 以admin/admin123(帐号/密码)登录 , 再点击Repositories , 进入以下界面

左边的这个Ordered Group Repositories (排好序的仓库)实际上是生效的仓库名称 , 而右边的 Avaliable Repositories(可用仓库)是未生效的.
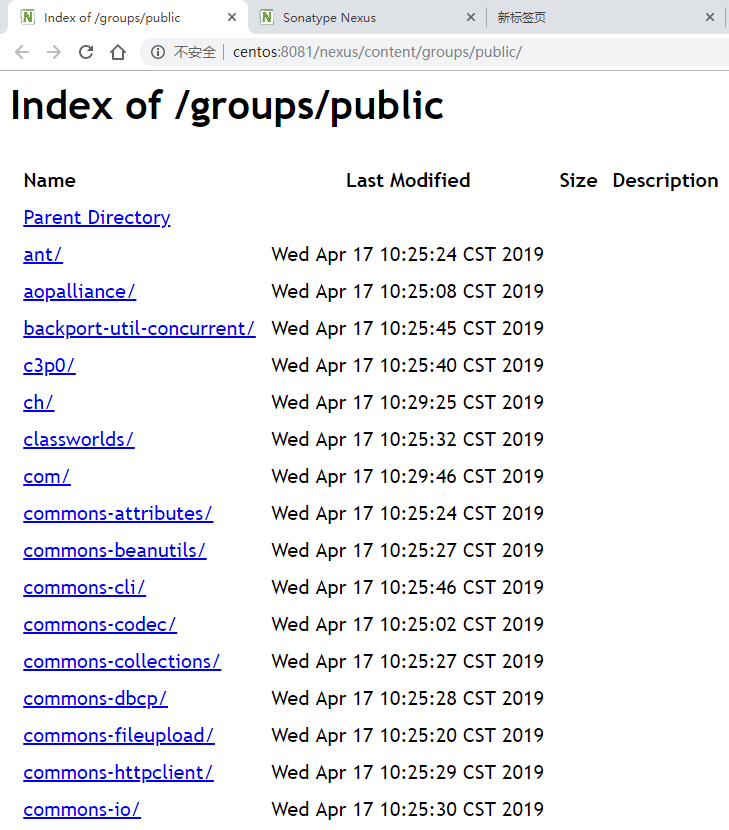
默认刚安装完后的maven setting.xml中使用的地址为http://centos:8081/nexus/content/groups/public/

直接浏览器打开看的效果如下
nexus3仓库说明
默认存储位置3.x的默认存储变了,不再以.jar格式存储的,而是以.bytes格式存储的。 存储位置在目录\sonatype-work\nexus3\blobs
.bytes格式是jar包,.properties格式是jar包信息。 里面存储有下载时间,从哪个中心库下载,下载用户,用户地址,jar包名称,大小等信息。
注意下面几点说明:
本小节源自: https://www.cnblogs.com/huaxingtianxia/p/6846801.html
1.component name的一些说明:
1)maven-central:maven中央库,默认从https://repo1.maven.org/maven2/拉取jar
2)maven-releases:私库发行版jar
3)maven-snapshots:私库快照(调试版本)jar
4)maven-public:仓库分组,把上面三个仓库组合在一起对外提供服务,在本地maven基础配置settings.xml中使用。
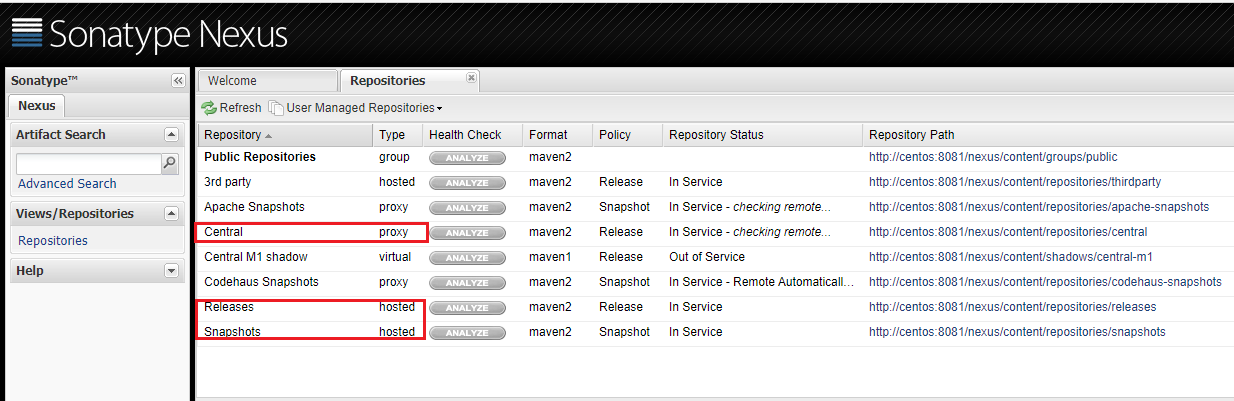
2.Nexus默认的仓库类型有以下四种:
1)group(仓库组类型):又叫组仓库,用于方便开发人员自己设定的仓库;
2)hosted(宿主类型):内部项目的发布仓库(内部开发人员,发布上去存放的仓库);
3)proxy(代理类型):从远程中央仓库中寻找数据的仓库(可以点击对应的仓库的Configuration页签下Remote Storage Location属性的值即被代理的远程仓库的路径);
4)virtual(虚拟类型):虚拟仓库(这个基本用不到,重点关注上面三个仓库的使用);
3.Policy(策略):表示该仓库为发布(Release)版本仓库还是快照(Snapshot)版本仓库;
4.Public Repositories下的仓库
1)3rd party: 无法从公共仓库获得的第三方发布版本的构件仓库,即第三方依赖的仓库,这个数据通常是由内部人员自行下载之后发布上去;
2)Apache Snapshots: 用了代理ApacheMaven仓库快照版本的构件仓库
3)Central: 用来代理maven中央仓库中发布版本构件的仓库
4)Central M1 shadow: 用于提供中央仓库中M1格式的发布版本的构件镜像仓库
5)Codehaus Snapshots: 用来代理CodehausMaven 仓库的快照版本构件的仓库
6)Releases: 内部的模块中release模块的发布仓库,用来部署管理内部的发布版本构件的宿主类型仓库;release是发布版本;
7)Snapshots: 发布内部的SNAPSHOT模块的仓库,用来部署管理内部的快照版本构件的宿主类型仓库;snapshots是快照版本,也就是不稳定版本
所以自定义构建的仓库组代理仓库的顺序为:Releases,Snapshots,3rd party,Central。也可以使用oschina放到Central前面,下载包会更快。
5.Nexus默认的端口是8081,可以在etc/nexus-default.properties配置中修改。
6.Nexus默认的用户名密码是admin/admin123
7.当遇到奇怪问题时,重启nexus,重启后web界面要1分钟左右后才能访问。
8.Nexus的工作目录是sonatype-work(路径一般在nexus同级目录下)
Nexus仓库分类:
1)Maven可直接从宿主仓库下载构件,也可以从代理仓库下载构件,而代理仓库间接的从远程仓库下载并缓存构件
2)为了方便,Maven可以从仓库组下载构件,而仓库组并没有时间的内容(下图中用虚线表示,它会转向包含的宿主仓库或者代理仓库获得实际构件的内容).
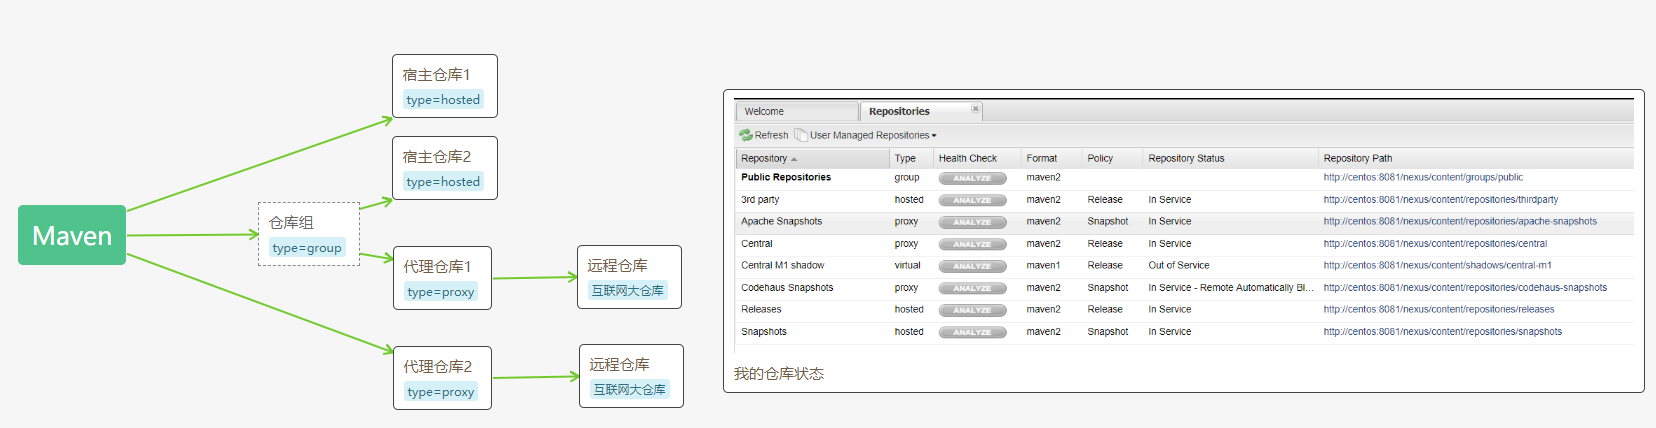
原图地址: https://www.processon.com/view/link/5cb6b223e4b06bcc137f76e1
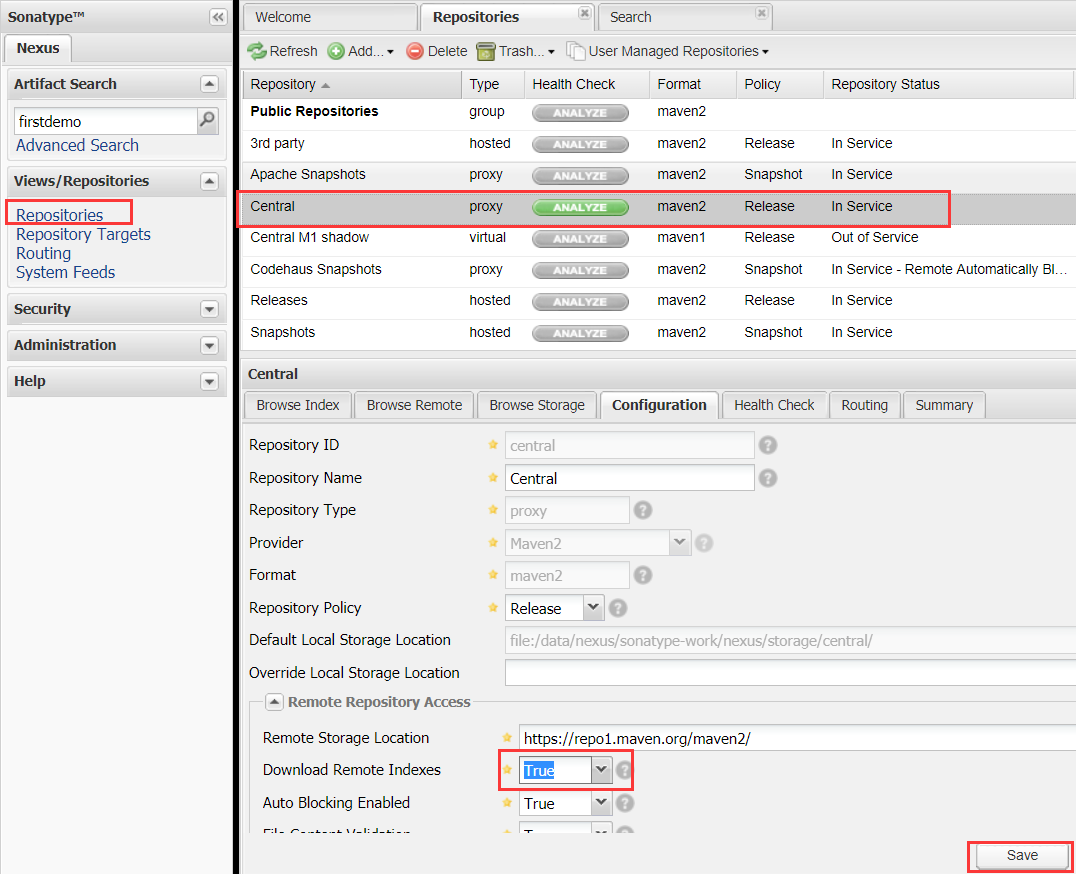
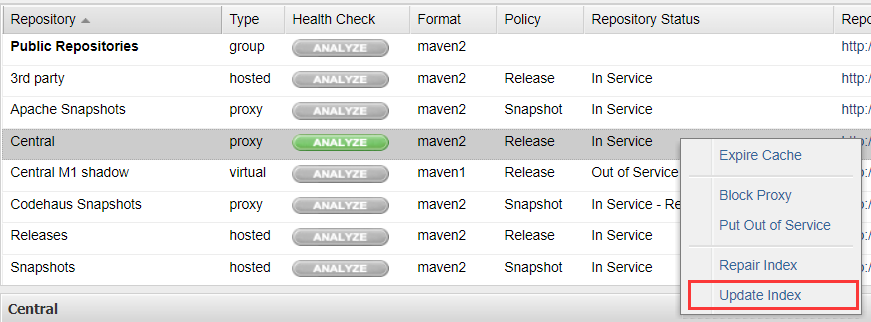
开启搜索功能
Repositories-->Central仓库Configuration --> Download Remote Indexes项设为True , 开启nexus的下载远程索引的功能, 可在nexus中使用artifact search的功能 (该操作本人还没发现在哪)
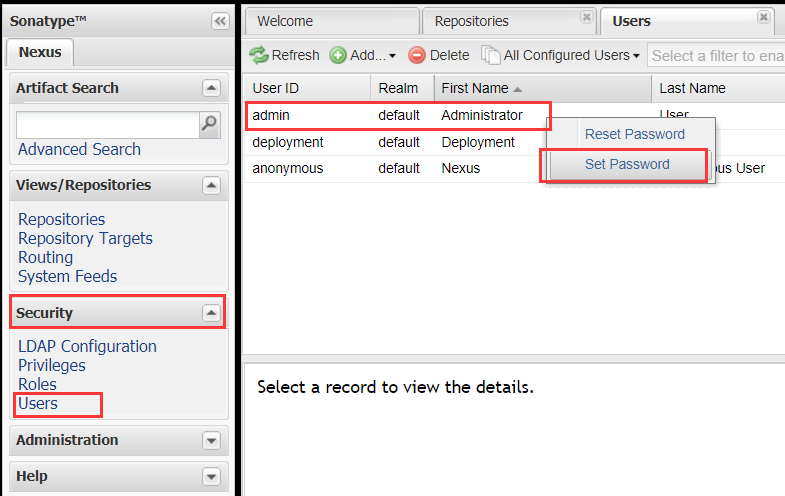
修改密码
修改web界面登录密码
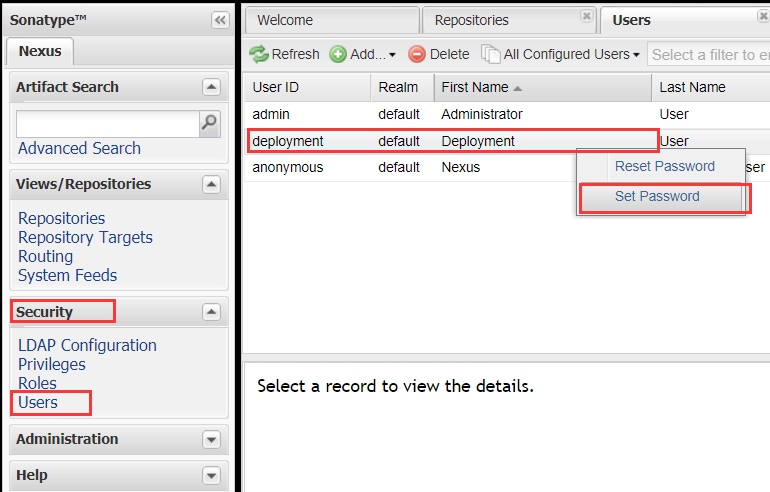
修改发布时的密码
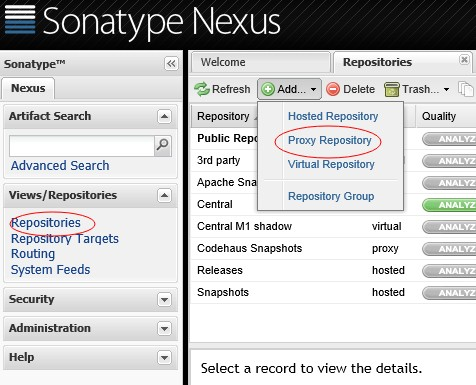
添加代理资源库
参考: maven学习(中)- 私服nexus搭建==>http://www.cnblogs.com/yjmyzz/p/3519373.html
点击左侧的Repositories,然后再点击右侧的Add,会弹出下拉菜单,选择Proxy Repository
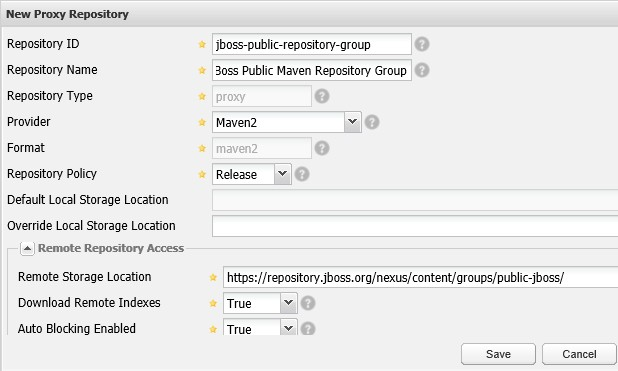
Respository ID这里填写:jboss-public-repository-group (可以自已改名字)
Respository Name这里填写:JBoss Public Maven Repository Group (可以自已改名字)
其它项保持默认
Remote Storage Location这里填写:https://repository.jboss.org/nexus/content/groups/public-jboss/ (这是jboss公布的公开资源库)
然后解压到指定目录,建议放在 %nexus_home%\sonatype-work\nexus\storage\ 下
然后add一个hosted repository,参考下图: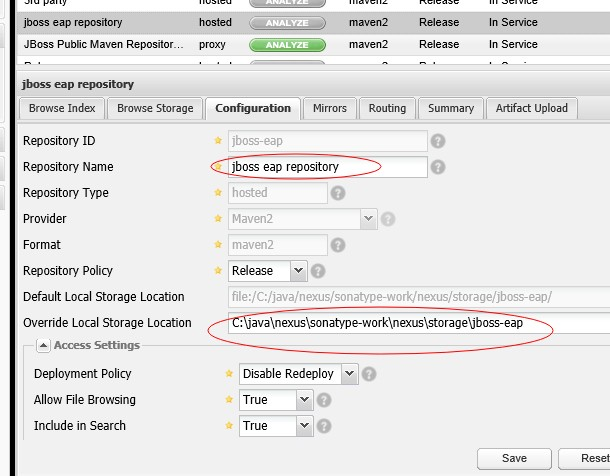
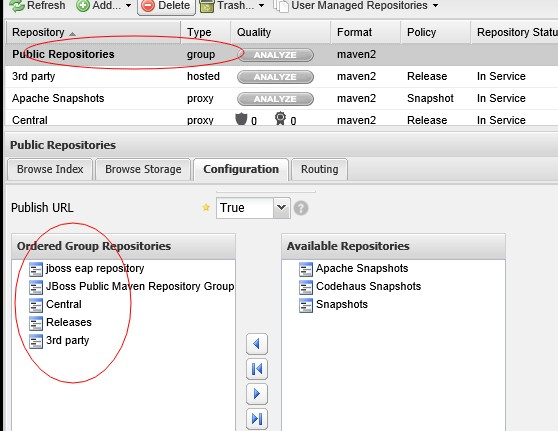
2.4 把刚才添加的二个respoitory添加到Public Repositories组
刚才我们添加了2个新的资源库,检查一下是否包括在默认的Public Repositories组里
添加宿主仓库
点击Repositories,然后再点击右侧的Add,会弹出下拉菜单,选择Hosted Repository
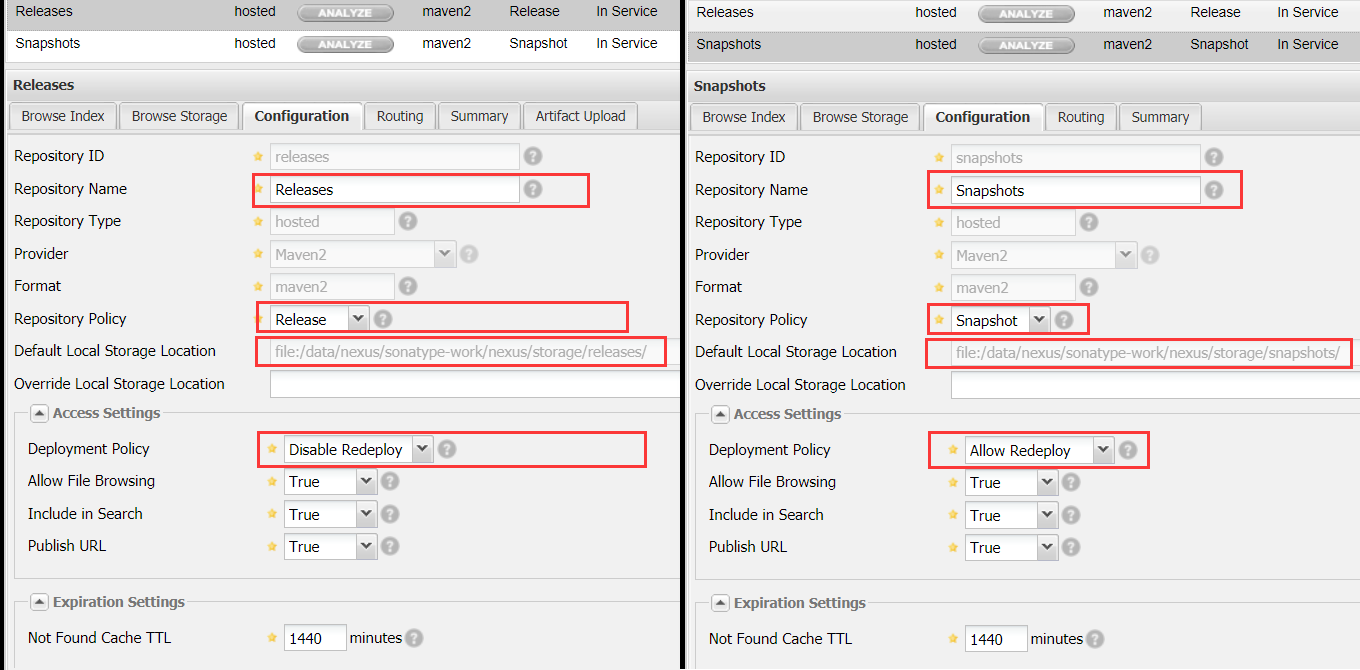
最后修改新建的宿主仓库的Configuration . 以下为release和snapshot 最容易遗忘的差异点,其它看下图 ,
- Releases和3rd party设置为Disable Redeploy
- Snapshot中的Deployment Policy这个选项设置为Allow Redeploy
最后不要忘了添加到Public Repositories中
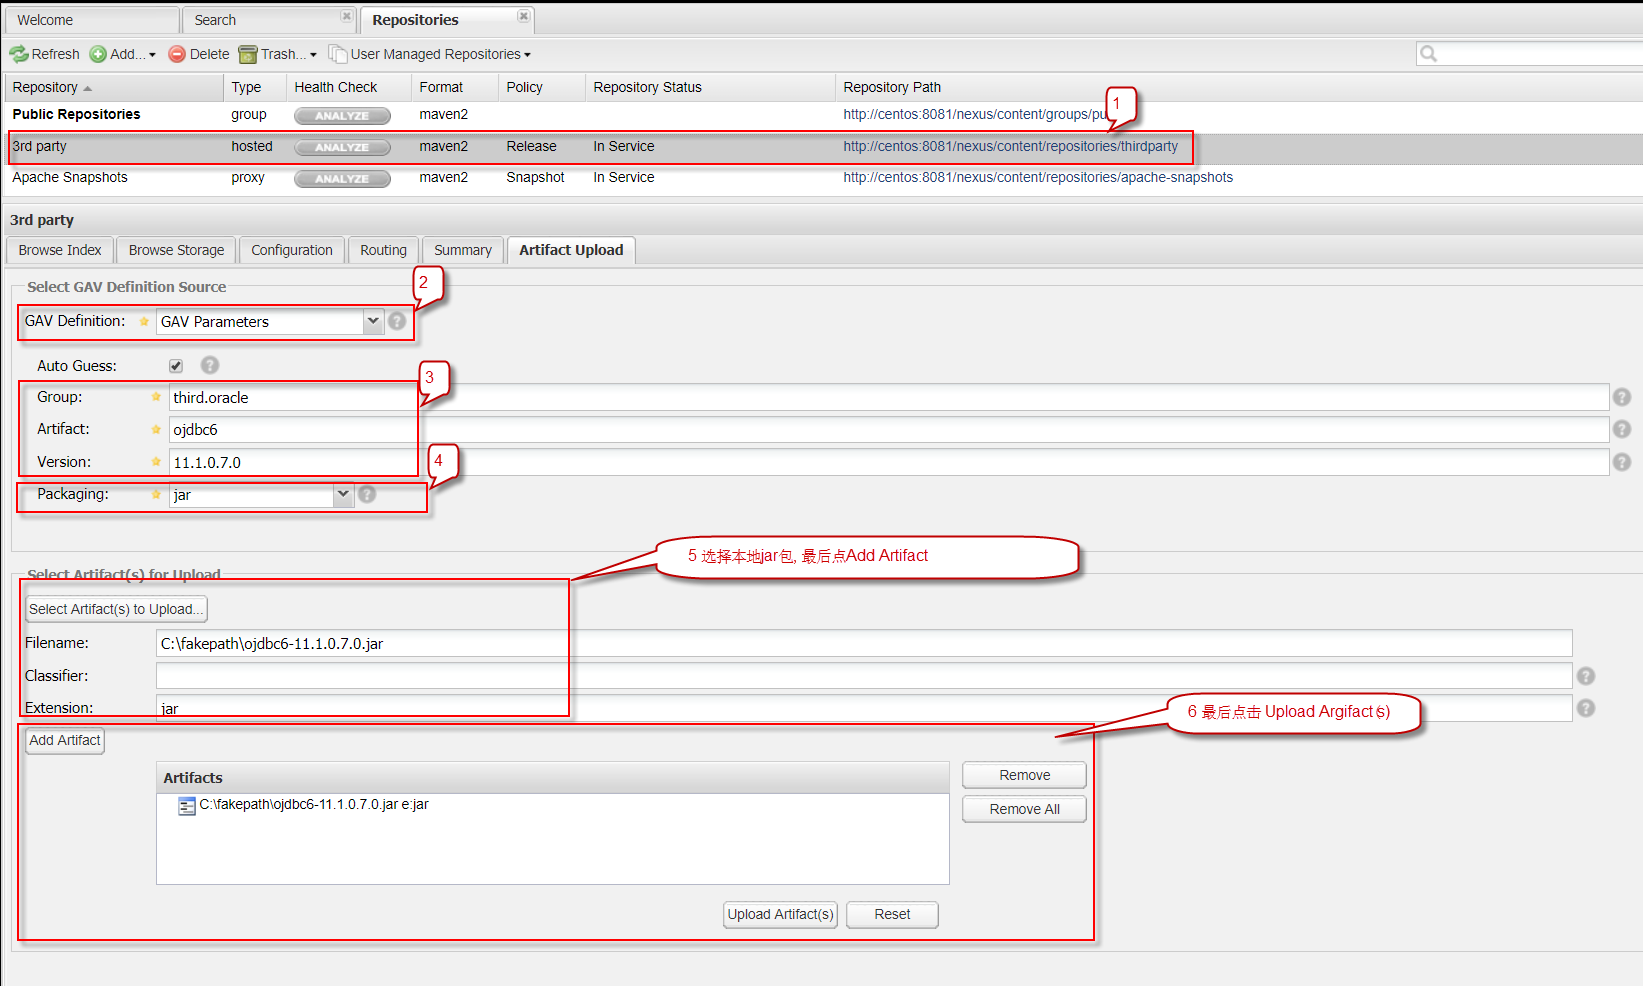
添加第三方jar包
添加第三方jar包界面方式
上传第三方的jar包,选择3rd party-->Artifact Upload--> 选择GAV方式-->填好构建参数-->增加jar包-->上传,在Browse Storeage查看
添加第三方jar包命令方式
第一步 : 在maven的配置文件settings.xml里加上, 需要布署的远程仓库server
<servers>
    <server>
        <id>thirdparty</id>
        <username>用户名</username>
        <password>密码</password>
    </server>
</servers>
第二步: 在windows CMD中直接执行布署语句
mvn deploy:deploy-file -s "K:\myprogram\maven\apache-maven-3.3.9\conf\settings_using.xml" -DgroupId="com.test.temp" -DartifactId="temp" -Dversion="0.0.1" -Dpackaging=jar -Dfile="D:\temp\20210421\bobo.jar" -Durl=http://nexus.king.com:18081/nexus/content/repositories/thirdparty -DrepositoryId=thirdparty
以上参数含意如下:
-S: 指定配置文件地址
-DgroupId: 指定组名
-DartifactId: 指定包名
-Dversion: 指定版本号
-Dfile: 指定需要布署到远程仓库的jar包
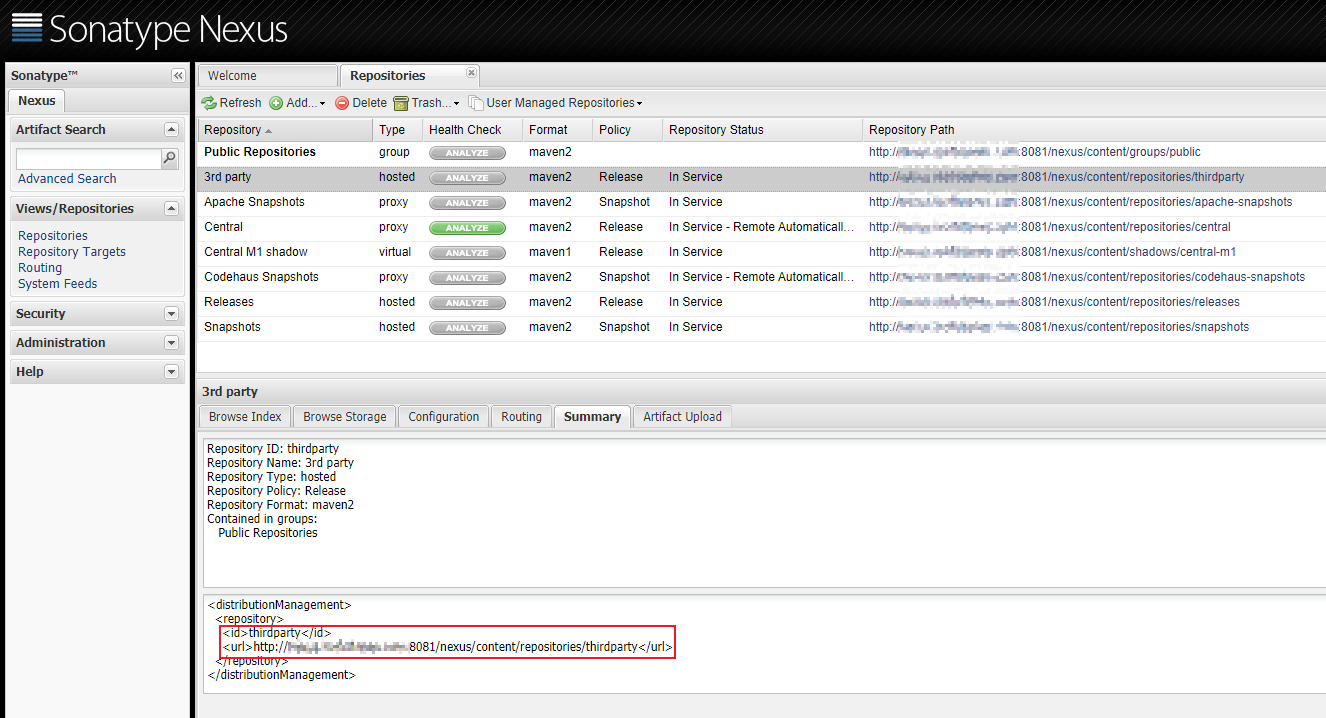
-Durl: 指定需要布署到远程仓库的仓库地址(见下图<url>)
-DrepositoryId: 指定需要布署到远程仓库的仓库编号(见下图<id>)
maven配置阿里云仓库镜像
默认的,如果本地仓库找不到依赖的构件,这时需要东西时先到Nexus上找,如果发现Nexus服务关闭后,会自动到中央仓库找。
如果我们想覆盖中央仓库的默认地址,强制依赖的东西都到Nexus中去找,即使Nexus关闭也不会到中央工厂去下载:
修改Maven的Settings文件:
<settings>
...
    <mirrors>
        <mirror>
            <id>alimaven</id>
            <name>aliyun maven</name>
            <url>http://maven.aliyun.com/nexus/content/groups/public/</url>
            <!--  mirrorOf的值也可以为*,代表所有的请求都到该仓库地址中去找 -->
            <mirrorOf>nexus,central</mirrorOf>
        </mirror>
    </mirrors>
...
</settings>
如何配置才能把jar包布署到nexus上
在maven的setting.xml中配置<servers>列表节点 , 在项目的pom.xml中配置<distributionManagement>列表节点 , 具体文本参见最后配置样例 , id关联如下
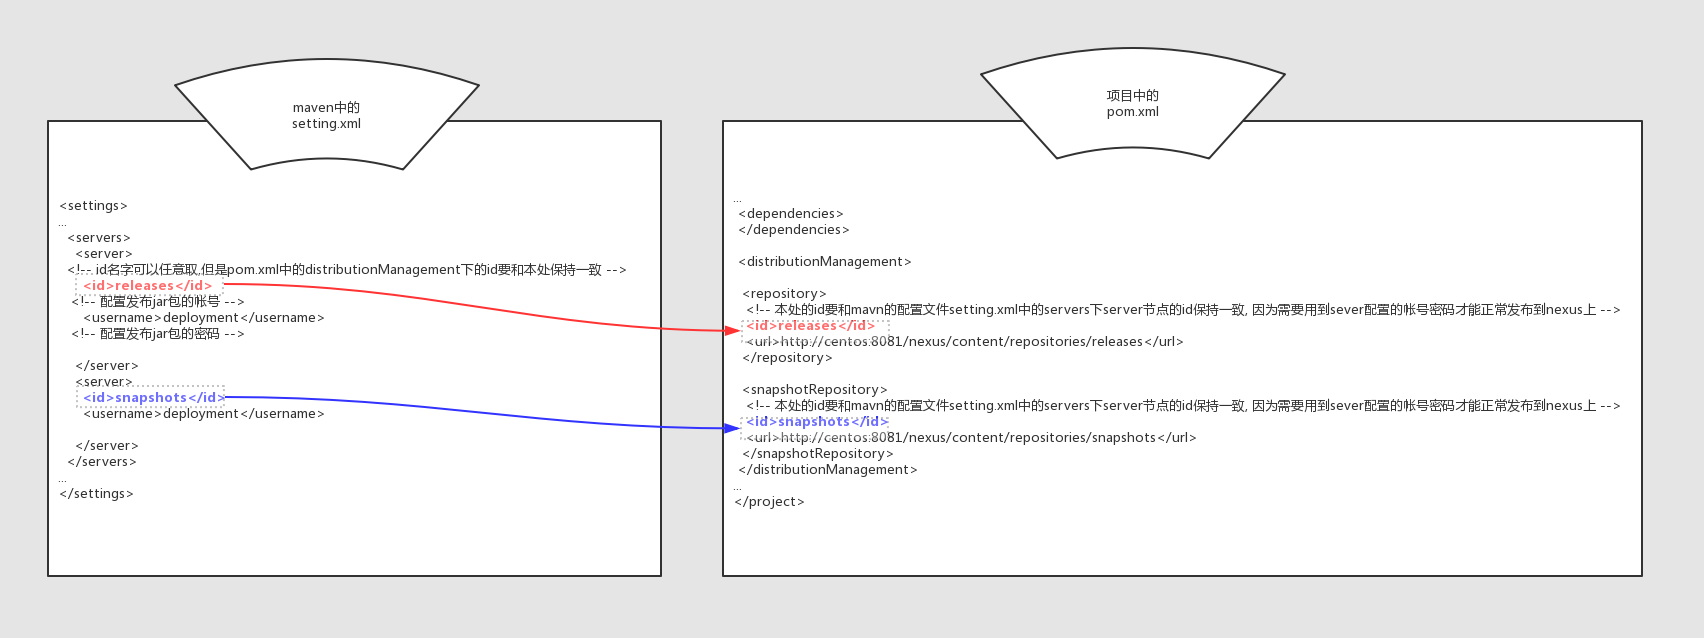
原图地址: https://www.processon.com/view/link/5cb6e3b7e4b08b66b9aee473
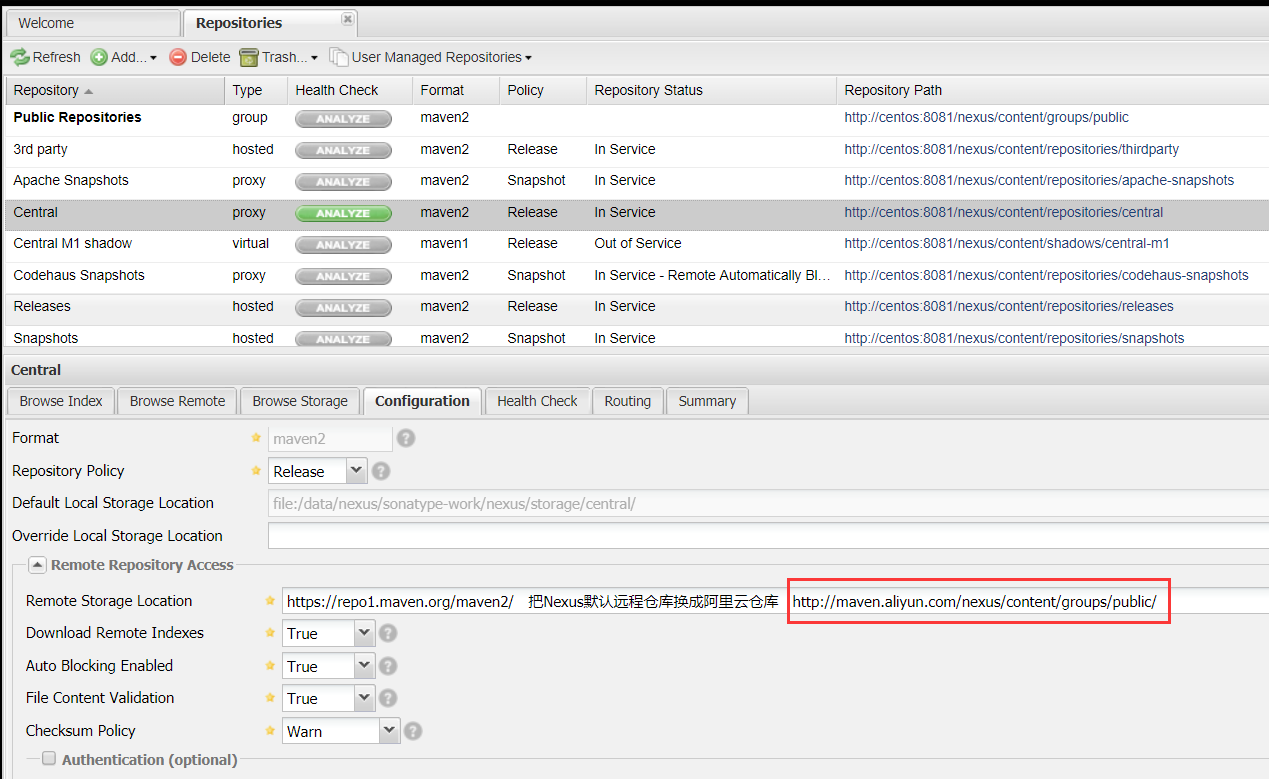
修改nexus指向的远程仓库
Nexus默认远程仓库为https://repo1.maven.org/maven2/ ,特别慢, 可以考虑换成阿里云的 http://maven.aliyun.com/nexus/content/groups/public/
参考地址: https://www.cnblogs.com/whatlonelytear/p/10725625.html
如何在eclipse中发布
pom.xml文件中右击,run As – Maven build … 输入deploy -e

让每个项目不用配置settings.xml就能正常下载依赖
在pom.xml的<project>节点下配置<repositories>节点发下
<project>
...
<!-- 下载专用 , 不依赖任何其它配置-->
  <repositories>
          <repository>
              <id>nexus-releases</id>
              <name>local private nexus</name>
              <url>http://centos:8081/nexus/content/groups/public</url>
              <releases>
                  <enabled>true</enabled>
              </releases>
              <snapshots>
                  <enabled>false</enabled>
              </snapshots>
          </repository>
          <repository>
              <id>nexus-snapshots</id>
              <name>local private nexus</name>
              <url>http://centos:8081/nexus/content/groups/public</url>
              <releases>
                  <enabled>false</enabled>
              </releases>
              <snapshots>
                  <enabled>true</enabled>
              </snapshots>
          </repository>
        </repositories>
...
</project>
当然一般情况下我们还是喜欢把repositories的配置移到setting.xml的<profile>节点中,因为每个项目都配置这个<repositories>的地址的话会比较烦索, 但是各有各好好处。
- pom.xml中配置可以让项目随处可用.
- setting.xml中配置可以让项目地址变动时,不用改变每个项目
nexus权限管理
给匿名用户移除查看权限
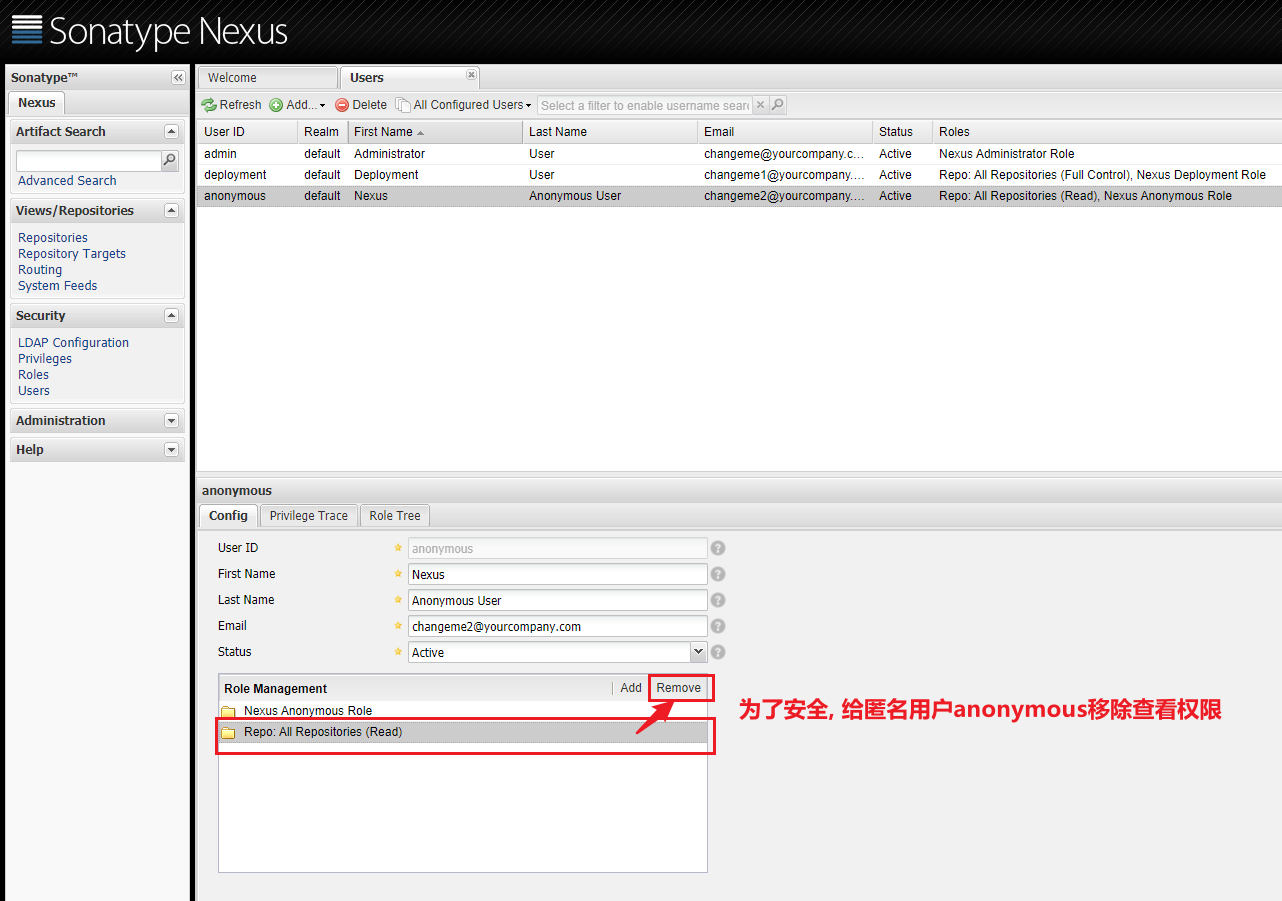
但是去掉后又发现 其它用户下载jar包时无法下载的问题: Could not transfer artifact com.nexmo:nexmo-sdk:pom:1.4 from/to nexus-releases (http://47.96.181.192:8081/nexus/content/groups/public): Not authorized , ReasonPhrase:Unauthorized. (20210520待解决的权限问题 , 在更高版本的nexus中好像优化了权限的配置, 会比较方便控制权限)
参考 Maven 私服 Nexus 权限控制【转】==》https://www.cnblogs.com/whatlonelytear/p/14849027.html
我的maven 的setting.xml配置样例
<?xml version="1.0" encoding="UTF-8"?>

<settings xmlns="http://maven.apache.org/SETTINGS/1.0.0"
          xmlns:xsi="http://www.w3.org/2001/XMLSchema-instance"
          xsi:schemaLocation="http://maven.apache.org/SETTINGS/1.0.0 http://maven.apache.org/xsd/settings-1.0.0.xsd">

  <localRepository>D:/maven/repo_centos</localRepository>

  <pluginGroups>
  </pluginGroups>

  <proxies>
  </proxies>

  <servers>
    <server>
     <!-- id名字可以任意取,但是pom.xml中的distributionManagement下的id要和本处保持一致 -->
      <id>releases</id>
      <!-- 配置发布jar包的帐号 -->
      <username>deployment</username>
      <!-- 配置发布jar包的密码 -->
      <password>deployment</password>
    </server>
    <server>
      <id>snapshots</id>
      <username>deployment</username>
      <password>deployment</password>
    </server>
  </servers>

  <mirrors>
  </mirrors>

  <profiles>

    <profile>
        <!-- id名字可以任意取,但是下面的activeProfile节点的id要和本处保持一致 -->
        <id>nexus</id>
        <repositories>
          <repository>
              <id>nexus</id>
              <name>private nexus</name>
              <!-- 统一取public暴露的地址 -->
              <url>http://centos:8081/nexus/content/groups/public</url>
              <!-- 允许releases模式下载 -->
              <releases>
                  <enabled>true</enabled>
              </releases>
              <!-- 禁止snapshots模式下载 -->
              <snapshots>
                  <enabled>false</enabled>
              </snapshots>
          </repository>
          <repository>
              <id>nexus-snapshots</id>
              <name>private nexus</name>
              <!-- 统一取public暴露的地址,如果release和snapshots要分组那就独立配置 -->
              <url>http://centos:8081/nexus/content/groups/public</url>
              <releases>
                  <enabled>false</enabled>
              </releases>
              <snapshots>
                  <enabled>true</enabled>
              </snapshots>
          </repository>
        </repositories>
        <pluginRepositories>
          <pluginRepository>
              <!-- 本处的id名字,最好和repositories的repository的id保持一致 -->
              <id>nexus</id>
              <name>private nexus</name>
              <url>http://centos:8081/nexus/content/groups/public</url>
              <releases>
                    <enabled>true</enabled>
              </releases>
              <snapshots>
                    <enabled>false</enabled>
              </snapshots>
          </pluginRepository>
          <pluginRepository>
              <!-- 本处的id名字,最好和repositories的repository的id保持一致 -->
              <id>nexus-snapshots</id>
              <name>private nexus</name>
              <url>http://centos:8081/nexus/content/groups/public</url>
              <releases>
                  <enabled>false</enabled>
              </releases>
              <snapshots>
                  <enabled>true</enabled>
              </snapshots>
          </pluginRepository>
         </pluginRepositories>
      </profile>
  </profiles>

  <activeProfiles>
    <activeProfile>nexus</activeProfile>
  </activeProfiles>
</settings>
我的项目中pom.xml配置样例
<project xmlns="http://maven.apache.org/POM/4.0.0" xmlns:xsi="http://www.w3.org/2001/XMLSchema-instance"
    xsi:schemaLocation="http://maven.apache.org/POM/4.0.0 http://maven.apache.org/xsd/maven-4.0.0.xsd">
    <modelVersion>4.0.0</modelVersion>

    <groupId>demo</groupId>
    <artifactId>firstdemo</artifactId>
    <version>0.0.3-SNAPSHOT</version>
    <packaging>jar</packaging>

    <name>firstdemo</name>
    <url>http://maven.apache.org</url>

    <properties>
        <project.build.sourceEncoding>UTF-8</project.build.sourceEncoding>
    </properties>

    <dependencies>
        <dependency>
            <groupId>junit</groupId>
            <artifactId>junit</artifactId>
            <version>3.8.1</version>
            <scope>test</scope>
        </dependency>

        <dependency>
            <groupId>third.oracle</groupId>
            <artifactId>ojdbc6</artifactId>
            <version>11.1.0.7.0</version>
        </dependency>

    </dependencies>

    <distributionManagement>

        <repository>
            <!-- 本处的id要和mavn的配置文件setting.xml中的servers下server节点的id保持一致, 因为需要用到sever配置的帐号密码才能正常发布到nexus上 -->
            <id>releases</id>
            <url>http://centos:8081/nexus/content/repositories/releases</url>
        </repository>

        <snapshotRepository>
            <!-- 本处的id要和mavn的配置文件setting.xml中的servers下server节点的id保持一致, 因为需要用到sever配置的帐号密码才能正常发布到nexus上 -->
            <id>snapshots</id>
            <url>http://centos:8081/nexus/content/repositories/snapshots</url>
        </snapshotRepository>
    </distributionManagement>
</project>
这里配置了distributionManagement元素,其中的id属性的值nexus-snapshots与前面说的settings.xml中的servers元素中的配置必须一致。
配置这个的目的,是当执行maven deploy时,才知道要将生成的构件部署到哪个远程仓库上,注意这里的URL填的就不是public group的地址,
而是snapshots的地址: http://centos:8081/nexus/content/repositories/snapshots
但是在nexus中,snapshots也是聚合到public group里的,所以开发人员A提交到snapshots的构件,开发人员B也可以从public group里获取到。

nexus优化
在Nexus中增加了”remote.storage.outbound”的debug级别日志,检查了一下私服的所有对外流量,发现每个私有构件都要先到中央仓库下载,并且是20s后超时,重试3次放弃。原本基本确定了。
修改方法: 到Central仓库的Configuration中,修改HTTP Request Settings,修改Request Timeout为1s,并将Request Retry Attempts修改为0。这样可以大大降低重试的时间。
阿里云nexus仓库
https://maven.aliyun.com/mvn/view
迁移
nexus2迁移
如果nexus服务器是刚建的, 那么最好把仓库的jar包先从其它maven或其它nexus迁移过去,一般放到sonatype-work\nexus\storage\central 目录,再登录nexus管理界面手动更新索引,就行了
nexus3迁移
nexus3安装 nexus2升级到nexus3 数据迁移==>https://blog.csdn.net/weixin_44637646/article/details/122717404
maven私库nexus2.11.4迁移升级到nexus3.12.0==>t.zoukankan.com/liangyou666-p-9439755.html
上面几篇文章都没有提取2.x需要最新稳定版,部分旧版是没有Upgrade:Agent选项的
不过升级过程遇到几个小坑,废了点时间去解决
- 需要先把2.x版本升级到2.x的最新稳定版,否则在Administration->Capabilities->New的页面中是没有Upgrade:Agent的选项。这个说法跟官方说明文档一致,为的是保证所有fix已经applied
- 做repository迁移的时候nexus2挂了,原因是out of memory,解决方式设置更大的内存上限,譬如从默认的七百多M提高到2G,在/bin/jsw/conf/wrapper.conf里设置
- 由于新旧nexus的repository路径有变,按照nexus 2.X版本升级 3.X版本的方法设置了nginx,把旧的路径重写为新的路径。可是有个Jenkins项目上传一个war包失败了,错误码是403, Request Entity Too Large。原因:nexus服务使用了nginx做反向代理,jar包的大小超过了nginx所允许的范围。解决方法:修改nginx.conf配置,将client_max_body_size设置为一个较大的值:
server {
  client_max_body_size 100M;
  listen 8081;
  server_name localhost;
.....
}
————————————————
版权声明:本小段文字描述为CSDN博主「PatrickYung」的原创文章,遵循CC 4.0 BY-SA版权协议,转载请附上原文出处链接及本声明。
原文链接:https://blog.csdn.net/u011170540/article/details/81639779
参考
使用Nexus创建私服==>https://www.cnblogs.com/helong/articles/2254446.html (有不少web页面配置仓库的操作)
maven学习(中)- 私服nexus搭建==>http://www.cnblogs.com/yjmyzz/p/3519373.html
Nexus私服搭建、配置、上传snapshot==>https://www.cnblogs.com/pc-boke/articles/9506522.html
Maven入门:使用Nexus搭建Maven私服及上传下载jar包==>http://www.cnblogs.com/tyhj-zxp/p/7605879.html
$Maven 本地仓库,远程仓库,中央仓库,Nexus私服,镜像 详解==>https://www.cnblogs.com/molashaonian/p/7242010.html
Ubuntu 用Nexus3安装配置Maven私服及常见错误==>https://blog.csdn.net/mole/article/details/120737114
Maven配置Nexus==>https://www.cnblogs.com/Mr-Wei/p/15741157.html (加密访问,未细看)


 浙公网安备 33010602011771号