


Compilation and Deployment in ASP.NET 2.0
By Rick Strahl
Last Update: September 28, 2006
Compilation and deployment in ASP.NET 2.0 has brought some of the biggest changes to the ASP.NET development model. As developers we use page compilation all day long and deployment is something we all have to worry about sooner or later. A lot has changed in both areas and they can affect how you build and deploy your applications so understanding how the model works is crucial. In this article I’ll provide a detailed discussion of how compilation and deployment works. I’ll also talk about the new Web Deployment Projects and Web Application Projects add-ins that Microsoft is providing to ease some of the pain points of the stock functionality shipped with ASP.NET 2.0 and Visual Studio 2005.
What's covered:
- The new Project Model in ASP.NET 2.0
- How things work in ASP.NET 1.x
- Page Compilation in ASP.NET 2.0
- Page Parsing
- The CodeBeside Model
- Referencing other Pages and Controls
- Deployment with 2.0 Stock Projects
- Web Deployment Projects
- Web Application Projects
Comments or Discussion
of this article:
http://west-wind.com/WebLog/posts/3009.aspx
ASP.NET 2.0's release has brought many welcome changes and additions to the ASP.NET model of Web Development. One of the key areas of change is the compilation and deployment aspect of ASP.NET 2.0 which changes quite drastically in the new version and represents some of the more controversial changes in the 2.0 release. In this article I’ll look at the stock project model and show how the different compilation models work. We’ll look at the project system, the page parsing mechanism and compilation of pages and how applications are deployed. Because there have been a number of concerns raised with stock projects, Microsoft recently released a couple of add-ins for Visual Studio that address some of the shortcomings and complaints from the developer community. The tools are Web Deployment Projects and Web Application Projects and I’ll look at these two tools and explain how they complement or replace stock projects.
The New Project Model in ASP.NET 2.0
The new project model in ASP.NET 2.0 is tightly linked with the new compilation and deployment features. Microsoft completely overhauled the way that page compilation is accomplished in the new version without breaking the way that original compilation worked in ASP.NET 1.1.
Making things easier
The motivation behind these changes in the model was to make it easier to use ASP.NET and Visual Studio for Web development. In Visual Studio 2003, creating a new project - or even worse trying to open an existing project moved from another machine - was a fairly involved process that required creating a virtual directory, ensuring the FrontPage extensions were installed and making sure that the project file was configured correctly to point at the virtual directory before you could even start to look at the project. It’s much easier to perform these tasks in Visual Studio 2005.
The changes in the new project model are geared to
make it quicker and easier to get a new project up and running or to
open an existing project. You can now open a project simply by pointing
at a directory and ASP.NET and Visual Studio both can figure out from
the directory structure how display, compile and run that project
without any manual configuration or an explicit compilation step. As
shown in Figure 1 to open an existing Web Project you can simply point
at a directory in the file system and open it as a Web site.
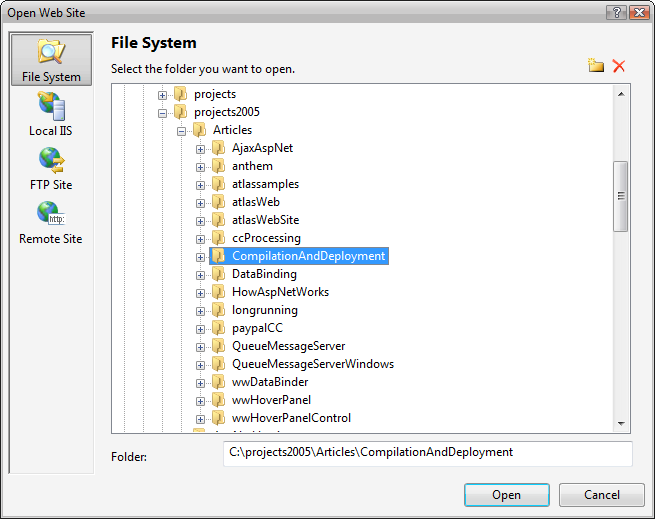
Figure 1 – Opening and creating of projects is much easier in Visual Studio 2005 by simply selecting a directory in the file system. Once opened the directory acts as the project, providing the file content for the project – there’s no explicit project file in Web Projects.
The new project system allows you to open projects from a directory, from a local IIS, an FTP site and a Remote Site. Local IIS uses the IIS metabase to find the directory on the local machine. Other than that there not a whole lot of difference from a file based project. FTP Site opens a renite site through an FTP connection and it uses FTP to figure out the project structure in much the same way as a file based project does., so everything gets pulled into the project.
You can also open a Remote Site, which like VS2003 requires the FrontPage extensions installed on the remote or local server (accessed through HTTP). The Remote Site configuration is more rigid in that you have to explicitly add files to the project as it doesn’t auto-detect content. This project opening format is useful if you want to remotely connect to another machine, but it’s also useful for local project that have lots of static content you don’t want to automatically be part of your project. For example, if you have a root Web site that has subdirectories that are in turn virtual directories a Remote Site prevents importing all the child virtual directories, which is not the case with file projects.
The file system project is the easiest and most common way to open a project. Add to that the new built-in Web Server that ships with Visual Studio and you can be up and running a new or existing Web application instantly without having to configure anything. Open the directory as a File Web Project in Visual Studio, click View in Browser and your page runs. It’s very easy and this is surely what the ASP.NET designers were shooting for: Making ASP.NET less daunting when first setting up to create or run an existing application.
Easy on the Surface – Complex underneath
But while the overall operation gets easier, the underlying model used to provide this simplicity is actually very complex and requires a lot of help from ASP.NET internals to make it happen. Compared with the ASP.NET 1.1 CodeBehind model which was purely based on simple inheritance, this new model uses runtime control and event generation, partial classes, inferred referencing of assemblies, delayed runtime compilation and single page assembly compilation along with a lot of help of the ASP.NET runtime and Visual Studio to make it all work both at runtime and during design time inside of Visual Studio 2005.
There is a lot of magic that happens inside the ASP.NET runtime to allow features such as individual page compilation, ensuring proper linking of ‘reference’ assemblies and making sure that the development environment can display accurate Intellisense information on all of this inferred type information that logistically wouldn’t be available until runtime. What this means is that you don’t plainly see all there is to see at design time in terms of code and you’re relying on Visual Studio to do its magic to provide you a rich design time experience with Intellisense.
Most of the time you don’t need to worry about these internals as they are encapsulated in the ASP.NET core engine, but once you step beyond the simple scenarios, you as the developer have to actually understand all of the intricacies of this complex model in order to make the model work for you. Depending on the type of applications this will affect some developers more than others. I think developers building and working reusable and extensible Web frameworks with lots of generic code in particular will hit the limitations of the new project model soonest.
Deployment
Compilation in ASP.NET 2.0 is accomplished by running the new ASPNET_COMPILER.EXE against a Web application. The compiler has many options to compile your projects which include in-place compilation which requires source code distribution, pre-compiled compilation into all binary code, and partial compilation which compiles your user code, but lets you distribute and modify the ASPX markup pages. There are at least 20 different compilation combinations and none of them are likely to be exactly what you probably would hope for - most combinations produce non-repeatable installs and none of the stock combinations create a single deployable assembly that most developers would expect from a pre-compiled application.
Deployment with stock projects only is complicated unless you do an in-place deployment. In-place deployment is simple to understand – you simply copy your entire development environment including source code to the server. All the other options require multiple steps of deleting of files and then re-copying files which disrupts application uptime on the server and requires a fairly strict deployment regimen to work reliably.
To address some of the shortcomings with compilation, Microsoft released Web Deployment Projects (WDP) which provides a mechanism to post-process the output from the ASPNET_COMPILER.EXE and create single assembly. This add-in is now available from the Microsoft Web site. I’ll talk more about deployment later in the article.
How things work in ASP.NET 1.x
If you’re like me, you probably come from an ASP.NET 1.x background and you’re familiar with that model. To put things in perspective let’s first review how things work in ASP.NET 1.x and VS2003.
In ASP.NET 1.1 the model is based primarily on inheritance. When using the default CodeBehind model that Visual Studio 2003 promotes, you have a CodeBehind class that acts as the base class for the final ASPX page class that ASP.NET 1.x generates at runtime. So there are two classes – one that contains your user code and the control definitions as well as event hookups and a class that ASP.NET generates that contains the page parse tree and a code representation of all of the HTML markup and control syntax that lives in the ASPX page.
The CodeBehind base class includes control definitions, event hookups and of course your page specific code which handles the various page level events like Page_Load and your event triggers like button clicks or change events. The control definitions and event hookup are generated by Visual Studio at design time, which has been a sore point in VS2003 since it does from time to time mangle the event hookups, mysteriously loosing events you had previously mapped to page handlers. When you run the application, ASP.NET dynamically creates a new class that contains the page control tree, which is responsible for turning the HTML markup, script tags and control definitions on the page into executable code. Basically each control is parsed into a method that assigns the control attributes to properties. Containers call child methods to set up controls so this is why it’s called a parse tree – it can be potentially many levels deep depending on the page control hierarchy. This generated class inherits from your CodeBehind class and your control definitions and event handling code is accessible to this class. The additional code generated then is responsible for rendering the page.
Compilation of all the CodeBehind code in ASP.NET 1.x is handled explicitly by Visual Studio (or the command line compilers) which creates a single assembly from all of your CodeBehind code of all pages, controls and classes defined in the project. Any markup pages (ASXP/ASCX/ASHX etc.) on the other hand are always parsed and compiled at runtime. ASP.NET dynamically creates this page class and compiles it into an individual assembly in the Temporary ASP.NET Files folder, one assembly per page. This assembly in turn imports a reference to the CodeBehind assembly, so all the CodeBehind page and control classes and support types are always accessible to the generated page class. Although each page and control compiles into a single individual assembly, each page or control has a dependency on the single CodeBehind assembly that contains the user code for all of the pages and controls in the project. It’s a relatively simple, yet elegant model and it has worked well for ASP.NET 1.x.
In addition to the CodeBehind model ASP.NET 1.x also supports single page, inline markup pages. In this model the ASPX page (or ASCX control) contains both the HTML markup along with all the required script code placed inside of <% %> or <script runat="server"> tags. In this page model all compilation occurs at runtime and ASP.NET parses the single page into a the control tree class directly inherited from System.Web.UI.Page. The class contains embedded user code inside of script tags, which is parsed into the appropriate class areas. Server <script> tags become class members, so event handler methods, custom methods and property definitions are created inside of server <script> tags. You can also use Inline code snippets which use <% %> (for code blocks) or <%= %> (expressions). The <% %> are parsed inline to the rendering code.
Like the CodeBehind model, this class is then compiled into a single assembly stored in the Temporary ASP.NET files folder. The single page model is very simple and there is no explicit compilation. Unfortunately, VS2003 did not support the single page model very well, and so it was rarely used, and maybe for good reason, as using the CodeBehind model encourages separating your Markup and code. This single page model has carried over to ASP.NET 2.0 and changed very little in the process, but VS2005 now fully supports creating single Inline pages.
Page Compilation in ASP.NET 2.0
At the core of the changes in ASP.NET 2.0 is the new way that page compilation works in ASP.NET 2.0. The key difference is that ASP.NET itself takes over much more control when compiling your Web application. By doing so the ASP.NET compiler is more self contained and can produce more modular output than ASP.NET 1.x was able to accomplish. This feature makes it possible for Visual Studio to provide an easy model for creating or changing an ASP.NET page or control and immediately being able to run that page or control without first having to recompile it. The new compilation model is used both at runtime as well as by Visual Studio which uses it to dynamically compile pages and provide Intellisense information about the pages and controls you’re working on.
The ASP.NET Compiler
The key feature in compilation is the new ASP.NET pre-compiler that is used to compile Web applications. This pre-compiler is used instead of any explicit compilation using the C# or VB.NET compilers. The compiler is made up of a set of internal APIs in the System.Web assembly as well as a new command line utility called ASPNET_COMPILER.EXE.
The ASP.NET compiler manages the compilation process of pages and controls dynamically, and decides how to compile them individually. It parses the content of the site and passes off the compilation of each page/control to the appropriate C# or VB.NET compiler. In fact, in ASP.NET 2.0 it’s possible to mix .NET languages in a single Web project so you can create pages and controls in either C# or VB.NET in the same directory. ASP.NET is smart enough to figure out which language is used and create separate assembly for the C# and VB pages/controls.
The ASP.NET 2.0 compiler is much more thorough in compiling pages as it can pick up related resources – specifically the CodeBeside classes (using the CodeFile= attribute discussed a little later) that contain your user code as well as the traditional markup that is stored inside of the ASPX, ASCX, ASHX or MASTER page. This makes it possible for the ASP.NET compile all code at runtime - or more accurately at pre-compile time - without requiring an explicit compilation step by Visual Studio or other development environment. Remember that in ASP.NET 1.x with CodeBehind you had to explicitly compile your CodeBehind classes; in ASP.NET 2.0 this explicit compilation step is no longer necessary as the ASP.NET compiler compiles everything related to the Web project on its own.
Your application specific code can go inline of the ASPX page or control, it can go into a CodeBeside partial class, or you can create completely autonomous classes in the APP_CODE folder. The APP_CODE folder is a special folder in an ASP.NET 2.0 project and any non-page or control related source code must go into this folder. The content of APP_CODE is treated like a library project and is compiled into a separate assembly. This assembly is then referenced by all of the page or directory level assemblies that ASP.NET creates from your ASPX/ASCX pages that use any of the classes defined in APP_CODE.
By default ASP.NET compiles pages and controls on a per directory level. The compiler takes all pages and controls and master pages of a given language (C# or VB.NET) in a directory and compiles them into a single assembly that contains everything that the page or control requires. If you have multiple directories you will have one assembly for each. By default each directory is compiled into a separate assembly, but the compiler can also create one assembly per page/control. When running in Visual Studio directory level compilation is used and every time a change is made in a page or control the directory level assembly gets recompiled. The APP_CODE folder is a special folder into which you can stick any non page/control code and all classes in the APP_CODE folder are essentially compiled into a single APP_CODE assembly. If a change is made in any files in the APP_CODE folder, the APP_CODE assembly is also recompiled.
The APP_CODE assembly is referenced by each of the directory/page assemblies, as are any explicit references that are added to the page via the @Reference, @Import and @Register directives and any external assembly references that are stored in the BIN directory. Because your entire Web application is no longer contained in a single assembly, these explicit directives are often required in order to make content from other directories available to the a page in the current directory. This has a number of implications in terms of being able to reference other pages and controls from a page, which we’ll discuss a little later.
As a result of this more full featured and more complex approach of compilation, the compiler can completely handle site compilation on its own. If you take all of your ASP.NET ASPX/ASCX/MASTER Pages and .cs or vb.net files and copy them to the server, ASP.NET 2.0 will compile everything completely at runtime on the server and execute the site. This was not possible in ASP.NET 1.x except when you were using inline code in ASPX pages.
This is a very nice feature for development time that makes it very easy to share applications with others and test applications in new installations. However, for real-live deployment scenarios this all-code deployment method is less than optimal and ASP.NET also supports pre-compiling of your Web site including of pre-compilation of the ASPX pages. Pre-compilation is a separate step that creates a copy of your Web site or development Web site and compiles the site into a ready-to-deploy installation. The scope of pre-compilation depends on the options chosen which can range from no pre-compilation to pre-compiling both code and ASPX pages using the ASPNET_COMPILER.EXE command line utility. There are many different compilation options and we’ll come back to this later in the article when we talk specifically about deployment.
At this point you have a high level view of how the compilation process works, so let’s dig a little
deeper into the actual page compilation mechanisms available.
Page Parsing
The first step in ASP.NET ‘compilation’ really comes down to page parsing where the ASP.NET compiler takes your ASPX page (or user control or master page) and parses it into code that can be compiled and then executed. At a very high level ASP.NET turns the ASPX page with its HTML markup, control definitions and script content into a class that can be executed. This process varies depending on the mechanism used to set up your Web pages, using either Inline ASPX page code or the CodeBeside model.
The simplest model of compilation for ASP.NET has always been the Inline compilation mode. The idea of this model is that everything – code and markup – are contained in the single ASPX/ASCX/MASTER page with no external code anywhere. In the CodeBeside model your user code can be stored in an external partial class which allows cleaner separation of the presentation and application logic. I’ll come back to CodeBeside a little later as it is a specialization of the general ASP.NET compilation model.
The inline model takes the content of an ASPX markup page and creates a single class out of this page at compile time. Inline pages don’t use any special inheritance mechanism. Instead ASP.NET only creates a single page class derived from System.Web.UI.Page, that contains both the page parse tree and your user code.
The page parsing mechanism used for inline pages also applies to CodeBeside pages with the main difference being where user code is applied. In the CodeBehind and CodeBeside model ASP.NET uses a base class that is created from your user code. Inline pages on the other hand inherit directly from System.Web.UI.Page and have ALL code generated directly into this single class.
Let’s look at a very simple Inline ASPX page shown in Listing 1 which consists of a page with a couple of controls, a single event handler for a button click and a custom property.
Listing 1: A simple inline ASPX page
<%@
Page
Language="C#"
%>
<script
runat="server">
protected
string
CustomProperty =
"Very
custom";
protected
void
btnSayIt_Click(object
sender,
EventArgs
e)
{
this.lblMessage.Text
=
"Hello, " +
this.txtName.Text
+ ".
" +
DateTime.Now.ToString();
}
</script>
<html>
<head
runat="server" id="hdHtmlHeader">
<title>Inline
Compilation</title>
<link
href="WestWind.css"
rel="stylesheet" type="text/css"
/>
</head>
<body>
<form
id="Form1"
runat="server">
<div>
<h1>Inline
Compilation</h1>
<div
style="margin:25px">
What's your name:
<asp:TextBox
runat="server" ID="txtName"></asp:TextBox>
<asp:Button
runat="server" ID="btnSayIt"
Text="Say"
OnClick="btnSayIt_Click"/>
<hr
/>
<asp:Label
runat="server" ID="lblMessage"></asp:Label>
</div>
</div>
</form>
</body>
</html>
Figure 2 shows the layout of the generated class in .NET Reflector, which is a decompiler that lets you see the class structure and decompiled code for a class and its implementation.

Figure 2 – The class layout for an Inline ASPX page generated by ASP.NET shows properties for each of the controls, your custom event methods and custom properties and generated methods for building the parse tree. Note that an Inline page inherits directly from System.Page.
When ASP.NET parses this inline ASPX page it creates a class that consists of the control declarations as fields. It also adds any methods that you declare (such as the btnSayIt_Click event handler) to handle control or page level events as well as any custom properties or methods you define in your code. In addition the class generates code to create the page parse tree, which consists of a bunch of __Build methods that are responsible for constructing the control definitions and adding them to each naming container’s Controls collection.
You can check out the generated class if you run your Web application in debug mode (<compilation debug="true" /> in web.config) by looking in your Tempoary ASP.NET Files folder in the .NET Framework directory. On my machine the path looks something like this:
C:\Windows\Microsoft.NET\Framework\v2.0.50727\Temporary ASP.NET Files\compilationanddeployment\fc448eb9\60feb83a
The directory names below the virtual name will vary for your machine and there may be multiple directories – you have to find the right one by looking at timestamps or simply looking at the content of files to find the right directory and files. In this directory you will find the compiled DLLs for the APP_CODE assembly as well as any directory level page and control assemblies that you can inspect with Reflector as shown in Figure 2. Also in this directory will be a set of .cs or .vb files that contain the generated ASP.NET classes that ASP.NET uses to compile the assemblies. The names for these assemblies and source files are random based on a hashcode so you have open them individually to find the one you’re are interested in. (Note the source files are available only when you run the site in debug mode)
If you look at the .cs file for the above class you will find a class that inherits from System.Web.UI.Page. The class contains a bunch of __BuildXXX methods that build the page parse tree. Listing 2 shows an excerpt of these methods that demonstrate how the page control tree gets constructed.
Listing 2 – Excerpt of the ASP.NET generated code to build the Page Parse Tree
protected
override
void
FrameworkInitialize()
{
base.FrameworkInitialize();
this.__BuildControlTree(this);
base.AddWrappedFileDependencies(inlinecompilation_aspx.__fileDependencies);
base.Request.ValidateInput();
}
private
void
__BuildControlTree(inlinecompilation_aspx __ctrl)
{
this.InitializeCulture();
IParserAccessor accessor1 = __ctrl;
accessor1.AddParsedSubObject(
new
LiteralControl("\r\n<html>\r\n"));
HtmlHead
head1 =
this.__BuildControlhdHtmlHeader();
accessor1.AddParsedSubObject(head1);
accessor1.AddParsedSubObject(
new
LiteralControl("\r\n<body>\r\n"));
HtmlForm
form1 =
this.__BuildControlForm1();
accessor1.AddParsedSubObject(form1);
accessor1.AddParsedSubObject(
new
LiteralControl("\r\n</body>\r\n</html>"));
}
private
HtmlForm
__BuildControlForm1()
{
HtmlForm
form1 =
new
HtmlForm();
this.Form1
= form1;
form1.ID =
"Form1";
IParserAccessor accessor1 = form1;
accessor1.AddParsedSubObject(new
LiteralControl("<div>\r\n<h1>Inline
Compilation</h1>\r\n
\r\n
<div style=\"margin:25px\">\r\n
What's your name:
"));
TextBox
box1 =
this.__BuildControltxtName();
accessor1.AddParsedSubObject(box1);
Button
button1 =
this.__BuildControlbtnSayIt();
accessor1.AddParsedSubObject(button1);
accessor1.AddParsedSubObject(new
LiteralControl("\r\n
<hr />\r\n
"));
Label
label1 =
this.__BuildControllblMessage();
accessor1.AddParsedSubObject(label1);
accessor1.AddParsedSubObject(new
LiteralControl("\r\n
</div>\r\n
</div>\r\n
"));
return
form1;
}
private
Button
__BuildControlbtnSayIt()
{
Button
button1 =
new
Button();
this.btnSayIt
= button1;
button1.ApplyStyleSheetSkin(this);
button1.ID =
"btnSayIt";
button1.Text =
"Say";
button1.Click
+= new
EventHandler(this.btnSayIt_Click);
return
button1;
}
At the highest level is the FrameworkInitialize method which is called when the page class is instantiated. This method handles ‘housekeeping’ functionality for the page, such as managing file dependencies which determines what related pages/control references are pulled in for compilation and assembly referencing. It also handles validating the safety of request input (unless ValidateRequest="false"). But most importantly it fires of the control tree creation by calling the __BuildControlTree method, which corresponds to the top level node of the parse tree which is the Page object.
The Page object is the top level naming container
of an ASP.NET page and it in turn contains other controls.
__BuildControlTree sets up any custom properties of the Page object and
then proceeds to add the top level controls.
The Page object typically consists of a several literal sections
that are static HTML text. This static text is turned into Literal
controls which are added to the control tree. Individual __BuildXXX
methods for each server control return an instance of a fully configured
child control, which are then added to the container’s
Controls collection via the
AddParsedSubObject method. For the page it’s the Literal controls from
the static HTML and typically the Html Header and Form controls which
are the top level containers.
The same logic is then applied to each of the containers. Each container in turn contains literal content and controls which are also parsed and added to the control tree. __BuildControlForm1 is an example of what a generated container method looks like. This method references the child control __Build methods for each of the controls defined in the form, so the TextBox, Button and Label controls are added by referencing their respective __Build methods.
You can also define class level code inside of <script runat="server">tags of the markup. Any code that is coded inside of the <script> tag is placed at the top of the class and essentially adds to the classes prototype. Using this mechanism you can add fields, properties, events and methods – anything that you would normally do to add members to a class. Typically your event handling methods are defined in this <script> block as are any custom field/property definitions as shown in Listing 1. <script runat="server"> is most common in Inline pages, but it works for any ASP.NET markup to add code to the generated class.
<%= %> and <% %> Script Tags complicate matters
Like <script runat="server">the <% %> tags allow you inject code into the generated page class that ASP.NET creates as part of the compilation process. The server <script> tag is a class level insertion point, while the <% %> tags are a Render method insertion point. <% %> tags are executed by ASP.NET at Render time so special consideration needs to be given to any script tags embedded into the page. Script code also can be fairly complicated as it can intermix with static and control code of the page. Take this example:
<asp:Panel
runat="Server"
id="panelScript">
<%
for (int x = 0; x <
10;x++ )
{
%>
<asp:Label
runat="server"
ID="lblMessage"
Text="Counting: "
/>
<%=
x.ToString() %><br
/>
<%} %>
</asp:Panel>
In this code a script expression spans a literal control, a server
control and an embedded expression and could span even a whole bunch of
controls all wrapped around a structured program statement. And it’s
perfectly legal in ASP.NET.
To make code like this work ASP.NET needs to override the Rendering of the particular container in which any script code is hosted. It does so by using SetRenderMethodDelegate on the container and creating a custom rendering method that handles this code scenario as shown in Listing 3.
Listing 3 – Generated code for containers with <% %> script code uses custom rendering
private
Panel
__BuildControlpanelScript()
{
Panel
panel1 =
new
Panel();
this.panelScript
= panel1;
panel1.ApplyStyleSheetSkin(this);
panel1.ID =
"panelScript";
Label
label1 =
this.__BuildControllblMessage();
panel1.AddParsedSubObject(label1);
panel1.SetRenderMethodDelegate(new
RenderMethod(this.__RenderpanelScript));
return
panel1;
}
private
void
__RenderpanelScript(HtmlTextWriter
__w,
Control
parameterContainer)
{
__w.Write("\r\nWhat's going on here:\r\n");
for (int
num1 = 0; num1 < 10; num1++)
{
parameterContainer.Controls[0].RenderControl(__w);
__w.Write("\r\n
");
__w.Write(num1.ToString());
__w.Write("<br
/>\r\n");
}
}
Rather than building up the control tree literal controls, ASP.NET only adds any server controls to the control tree. To handle the literal content and the script markup a custom rendering method is generated. This method then explicitly writes out any static HTML content and any script expressions using an HTML TextWriter. Any script code (<% %>) is generated as raw code of the method itself.
Because of this hard coded mechanism, ASP.NET does not allow adding any controls to the container if any <% %> tags are assigned to the container. If you’ve ever received this error:
The Controls
collection cannot be modified because the control contains code blocks
(i.e. <% ... %>).
you now know the reason. Because the method that renders the container with the script tags is hard coded and uses hard coded indexes to any controls referenced, adding any new controls would not work correctly as the indexes of any added controls would only throw off the hardcoded index used by the generated method.
The CodeBeside Model
The Inline page parsing described above parses a single ASPX/ASCX/MASTER markup file into a single class and creates a single assembly from it. The CodeBeside model is a specialization of the Inline model which breaks out delegation of page or control operation into two distinct classes. Rather than the single class that Inline pages use, CodeBeside has two classes: One class that contains your user code and the ASP.NET control definitions known as the CodeBeside class, and the generated class that contains the control tree generation code that inherits from this class. Figure 3 shows an overall view of how the CodeBeside model works.

Figure 3 – The CodeBeside model uses a partial class to implement user code which is merged with a generated partial class that contains control declarations. The combined class then becomes the base class that the generated ASP.NET control tree class inherits from.
The advantage of this two class model is that you can separate your user interface (the markup in the ASPX) and your application logic (your .cs or .vb file) into separate files that are edited separately. For example this makes it easier to hand off ASPX pages or controls to designers who should see as little as possible of the server code that drives the page.
The base CodeBeside class is actually made up of two partial classes: One contains your user code, the other is generated by ASP.NET at compile time and contains the control property definitions. The ASP.NET compiler creates the control definitions partial class and compiles it together with your user code class to create the CodeBeside base class.
ASP.NET then creates the control tree class as described earlier with the difference that the generated class doesn’t create the control property definitions. Instead it inherits them from the CodeBeside class. In this scenario the controls are defined in the base CodeBeside class, but all the assignments for property values and event hookups are done as part of the control tree class in the various control __Build methods. Both classes are tightly coupled together. ASP.NET then compiles both classes into the same assembly.
Pages created for CodeBeside use the CodeFile= attribute on the @Page element to tell ASP.NET that it has to find and compile a CodeBeside class. The syntax for this looks like this:
<%@
Page
Language="C#"
CodeFile="DataEntry.aspx.cs"
Inherits="DataEntry"
%>
You need to specify the path to the CodeBeside file and the fully qualified class name. For demonstration purposes let’s use the simple ASPX page code defined in Listing 4 as an example.
Listing 4 – A sample CodeBeside Page that splits Html and user code
<%@
Page
Language="C#"
AutoEventWireup="true"
CodeFile="DataEntry.aspx.cs"
Inherits="DataEntry"
EnableTheming="false"%>
<%@
Register
Assembly="westwind.web.controls"
Namespace="Westwind.Web.Controls"
TagPrefix="ww"
%>
<%@
Register
Namespace="CustomControl"
TagPrefix="Custom"
%>
<html>
<head
runat="server"
id="Header">
<title>Sample
CodeBeside Page</title>
<link
href="WestWind.css"
rel="stylesheet"
type="text/css"
/>
</head>
<body>
<form
id="form1"
runat="server">
<div>
<h1>
Data Entry Form</h1>
<br
/>
<ww:wwErrorDisplay
runat="server"
id="ErrorDisplay"
DisplayTimeout="5000" />
<br
/>
Enter your Name:
<asp:TextBox
ID="txtName"
runat="server"></asp:TextBox>
<asp:Button
ID="btnSayHello"
runat="server"
OnClick="btnSayHello_Click"
Text="Go"
/>
<br
/>
<hr
/>
<Custom:CustomControl
runat="server"
ID="customHello"
/>
</div>
</form>
</body>
</html>
The page is super simple but I’ve added a couple custom controls to it. One is a control that is defined in this project (CustomControl) and one is an external control in a separate assembly (Westwind.Web.Controls).
The DataEntry.aspx.cs CodeBeside class for the markup shown in Listing 3 is defined as follows:
public
partial
class
DataEntry
: System.Web.UI.Page
{
protected void
Page_Load(object
sender,
EventArgs
e)
{
}
protected void
btnSayHello_Click(object
sender,
EventArgs e)
{
this.ErrorDisplay.ShowMessage("Hello
" +
this.txtName.Text);
}
}
Note that there are no control definitions and none of the InitializeComponent code that ASP.NET 1.x used. Instead you have a simple, clean class that only shows you your specific user code. Intellisense works in this code while you’re typing in Visual Studio even though there’s no second partial class anywhere in your project.
So where is this the other half of this partial
class coming from? ASP.NET generates it at compile time. What’s
interesting is that Intellisense works in Visual Studio, which means
that Visual Studio is quietly compiling your ASP.NET page in the
background and putting the pieces together at design time to provide you
with Intellisense. If we open up the assembly created from the
DataEntry page shown above in Temporary ASP.NET Files with Reflector
we’ll see something like Figure 4.

Figure 4 – A CodeBeside ASP.NET 2.0 page is made up of a user code class and a generated class that contains the page parse tree logic. The user class is the base class inherited by the ASP.NET generated class.
Notice that the DataEntry base class contains the control definitions which come courtesy of the generated partial class that ASP.NET created and combined with your CodeBeside user code class. This class is the base class.
The dataentry_aspx class is the ASP.NET generated
parse tree class and you can see that it inherits from DataEntry. This
class consists purely of the parse tree logic code you can see in the
various __Build methods for each of the controls and containers on the
form. This code is identical to the code we saw in the Inline page
processing routines except that the control property definitions are
coming from the base class. It sets control properties and hooks up the
event handlers. Note that in this model the control property definitions
and the control initialization code is split up across the two classes.
The page above contains a custom control that is defined in the APP_CODE directory. Recall that the APP_CODE directory is the place where any non-page or control code must live, so the custom server control is created as a separate class in this folder. Notice the References section in the DataEntry class and the APP_CODE.xxxxx reference which has been added to the assembly and so makes any code from the APP_CODE directory available to the page and any pages or controls in this assembly. Along the same lines the Westwind.Web.Controls assembly has been imported to support the wwErrorDisplay custom control used to display messages. This is driven by the @Register directive in the HTML markup for the page.
The DataEntry base class inherits from System.Web.UI.Page in this example, but you can override the base class in the partial class definition by inheriting from any other Page derived class. For example, you can create a common base page class for your application and store it in the APP_CODE folder and have any number of pages in the Web application inherit from this class. Keep in mind that if you do this, this page base class will not have strongly typed access to any controls on the page since the controls are defined and assigned higher up in the hierarchy, even if you define the control properties in this base class. ASP.NET creates the control definitions in the generated CodeBeside partial class with the new keyword so any existing definitions are ignored.
There’s a partial workaround for this problem using the CodeFileBaseClass attribute on the @Page directive. When set to a class name, ASP.NET will not override any pre-existing properties on the specified base class. For example:
<%@
Page
Language="C#"
AutoEventWireup="true"
CodeFile="DataEntry.aspx.cs"
Inherits="DataEntry"
CodeFileBaseClass="PageBaseClass"%>
In this case any control properties defined on PageBaseClass will be used instead of new properties generated in the DataEntry class and so PageBaseClass will be able to reference the control properties it defines.
Unfortunately this only works if you have a CodeFile attribute in your page directive. If you want to inherit a page directly from a base class in APP_CODE or an external assembly you can’t use CodeFileBaseClass and ASP.NET will continue to blithely generate control definitions in the generated partial class. This means the following will not work to use existing control properties in the wwMessageDisplay class:
<%@
Page
Language="C#"
Inherits="Westwind.WebStore.MessageDisplay"
CodeFileBaseClass="Web.Controls.wwMessageDisplay"
%>
The only workaround to get the wwMessageDisplay page receive control assignments is to use FindControl() which is slow and cumbersome.
Referencing other Pages and Controls
Remember that page and control compilation happens on a per directory basis! So referencing other pages and controls becomes a little more tricky for ASP.NET 2.0, because you can no longer assume that a CodeBeside class from another page or control is available in the current assembly. At best all pages and controls in the same directory end up in the same assembly, at worst each page or control gets its own assembly and they know nothing about each other.
If you need to reference another page from a control or another page you need to explicitly import it with the @Reference directive. Again this is different than ASP.NET 1.1 where all CodeBehind classes were immediately available to your entire Web application. In ASP.NET 2.0 an explicit assembly reference is required to load it.
Assume for a minute that you have the DataEntry.aspx page I showed earlier and you want to create a second page that uses the same CodeBeside class so you can reuse the page logic, but change the page layout in DataEntry2.aspx by changing a few colors and moving around the controls of the page. In essence you want to have two ASPX pages reference the same CodeBeside file. Here’s how to do this:
<%@
Reference
Page="~/DataEntry.aspx"
%>
<%@
Page
Language="C#"
AutoEventWireup="true"
Inherits="DataEntry"
%>
I’m leaving out the CodeFile attribute reference the CodeBeside class of the DataEntry page, and add the @Reference tag to the page to force the CodeBeside class to be imported.
The same is true with any User Control definitions. To import a user control you need to use the @Register tag, which imports the assembly that the control lives in. ASP.NET is smart during compilation and figures out exactly where related assemblies live based on how the project is compiled. If the control or page lives in the same assembly no reference is actually added. But if it is external – in another directory for example, then the assembly reference is added.
Referencing problems
If you can explicitly reference other pages and controls in your markup pages, then all works well and as expected. But if you dynamically load controls or reference pages dynamically in your code, things get a lot more complicated.
The most common problem I run into is dynamic loading of controls. In ASP.NET 1.x you might have run code like this for dynamically loading controls into a page:
public
partial
class
DynamicControlLoading : System.Web.UI.Page
{
protected
CustomUserControl MessageDisplay =
null;
protected
void
Page_Load(object
sender,
EventArgs
e)
{
MessageDisplay =
this.LoadControl(
"~/UserControls/CustomUserControl.ascx")
as CustomUserControl;
this.Controls.Add(MessageDisplay);
}
protected
void
btnSay_Click(object
sender,
EventArgs
e)
{
this.MessageDisplay.ShowMessage(this.txtMessage.Text);
}
}
CustomUserControl in this case is a simple User Control that lives in another directory and is loaded dynamically at runtime. Further assume that you truly dynamically want to load this control so you may have a choice of several controls, or the end-user might even create a custom control that gets dropped into place instead.
If you run the code above in ASP.NET 2.0 it will likely fail. I say likely because there are some inconsistencies that will sometimes pick up control references automatically, for example if the user control lives in the same directory and gets compiled into the same assembly as the page, or if another page has the control referenced.
It should and usually will fail. Why? Because ASP.NET compiles on a directory level and the CustomUserControl lives in a separate directory and so goes into a separate assembly. It’s not visible to page class to get a strongly typed reference. Intellisense will show a big, fat and red exclamation point or nothing at all for the MessageDisplay control. When you run the page it will bomb.
You can reference the control as the Control type of course, but if you need to access any custom properties on the user control beyond Control properties you can’t unless you resort to Reflection. As far as I know there’s no way to add a reference to another user control or page programmatically because the reference needs to be available way earlier at compile time before your code ever runs.
Alternatives are to not load controls dynamically or at least provide some mechanism to load up any user controls beforehand on a page with the appropriate @Register tags. But that’s not always possible. The other option is to create a user control base class in APP_CODE and expose the public interface there. The main problem with this is that this base class will not have access to any internal controls of the user control and so the base class would have to use FindControl to reference any embedded controls. So this is inefficient as hell, and cumbersome to boot.
I’ve run into similar situations with inheritance scenarios. For example, inheriting one master page off another’s CodeBeside class. All works well, but the ASP.NET compiler complains that the Profile object is being overridden illegally (a compiler warning). Running with the inherited master page works, but there are quirks. User Controls added to the master page often fail with type conflicts as ASP.NET treats the user control added to the base page as a different type than the user control added to the second page.
It’s inconsistencies like these that deal with referencing other types that have made me waste an incredible amount of time, thinking I had something fixed only to find out later that it didn’t actually work consistently when I changed a completely different page. Worse you have to really understand the model to get your head around what might be wrong.
Bottom line: The overall ASP.NET 2.0 compilation model is internally complex. Most of the time you don’t need to understand it, but when you run into these boundary scenarios, you really DO have to understand what goes on behind the scenes to be able to work around the quirks.
Deployment with ASP.NET 2.0 Stock Projects
Once you’ve created your ASP.NET application and have it running inside of the development environment for testing, the next big step is to deploy the application. When it comes to moving your Web application online there are a number of deployment models available:
·
InPlace Deployment
Requires no compilation, but requires that all files, including
source files are deployed on the Web Server. This includes code in the
APP_CODE directory and any CodeBeside class source files. Relies on
ASP.NET to compile the entire site at runtime. Updates require updating
any files that have changed.
·
Full Pre-Compilation
At the other end of the extreme is full pre-compilation with the
ASPNET_COMPILER.EXE. In this scenario all ASPX/ASCX/MASTER etc. pages,
their CodeBeside classes and all code in APP_CODE are compiled. The
compiler creates a distribution of your Web site in a separate
deployment directory which you can then move to a Web server (or ASP.NET
can send it for you). Since
everything is compiled it’s possible to deploy only the files in the BIN
directory plus a few marker files.
·
Partial Compilation
Partial compilation lies somewhere between the other two models and
uses the ASPNET_COMPILER to compile only the CodeBeside classes at
compile time. The ASPX/ASCX/MASTER are left editable, which allows the
markup pages to be modified on
the server.
All 3 models have their strengths and weaknesses. Let’s take a closer look.
InPlace Deployment
Inplace deployment is the simplest way to get a Web site online, but it’s also the most insecure. With Inplace compilation you essentially copy your exact development configuration to the Web server, including ASPX/ASCX/MASTER markup pages, and CodeBehind pages, all the code contained in APP_CODE and any static content like images, themes, stylesheets etc. There’s no pre-compilation involved with this model and the copy process is truly one to one between your development environment and the Web server. The site is completely compiled by ASP.NET 2.0 at runtime. The inplace model is also what ASP.NET uses when you’re running inside of Visual Studio.
Although the simplest format conceptually it has a few serious
shortcomings. First and foremost you have to deploy your source files,
which is a security issue both for source code protection as well as for
security concerns. If the source code is put on the server, the code is
potentially accessible to anybody with physical access to the box. The
code can be looked over and even changed on the server. That’s good if
you need to make changes, bad if somebody unauthorized, or worse a
hacker makes those changes. Though unlikely the potential for damage,
should somebody gain access to the machine, can be huge.
If you have a vertical application you probably don’t want to ship your source code to your customers, so InPlace compilation also doesn’t work well from a perspective of keeping the source code from prying eyes.
Actual deployment to the server involves simply moving the files from development directory directly to the server moving the entire directory structure. But it also means that anytime you make a change you have to remember which files to update on the server unless you redeploy the entire site. Visual Studio also includes a Copy Web Site tool from the Solution Explorer that lets you copy files from an InPlace Web site to a server using a two-way file comparing interface. It’s kind of a hokey tool – but it works in simple scenarios. I personally prefer using a real FTP client to do this which is more reliable and flexible. The tool also works only with Inplace Webs – it’s useless for any of the precompiled Webs discussed next.
Full Pre-Compilation
The most common deployment scenario is likely to be full pre-compilation. In this model you use the ASPNET_COMPILER utility or the Web Site Publish feature inside of Visual Studio. This mode pre-compiles all markup pages (ASPX/ASCX/MASTER), and CodeBeside classes and all code in the APP_CODE directory. The compiler takes the existing Web site and ‘publishes’ the site to a new directory copying all files that relate the Web sites including static files like images and CSS files. The compiler essentially creates a complete copy of your Web site and creating a large number of compiled files in the BIN directory.
Pre-Compilation comes in many different flavors. You can choose to compile pages into one assembly per page or compile all pages/controls in a directory into a single assembly. You can compile with debug mode on or off. You can compile a physical path or an IIS virtual directory, you can choose to make the ASPX page updateable or force the ASPX code to precompile as well. I’m not going to go through all of the options here because there are at least 20 different combinations. I’ve provided a tool (shown in Figure 6) you can use to experiment for yourself and check out the result of the generated precompiled Webs. I’ll run through a few common scenarios that have I’ve used to deploy my applications that have worked better than others.
The first example compiles the entire site with directory level assemblies which is as close to a default compilation as it comes:
aspnet_compiler.exe -f -v "/CompilationAndDeployment" "c:\temp\deploy\CompilationAndDeployment"
This takes the Virtual Directory (-v
"CompilationAndDeployment") to be compiled into the output path
(c:\temp\deploy\CompilationAndDeployment) forcing the directory to be
recreated (-f). Figures 4 and 5 show the Visual Studio Solution and the
output of the BIN directory created by this compiler command line.

Figure 5 – The sample Web Project in the Solution Explorer. It’s a small project with a few folders containing pages and controls.

Figure 6 – The output generated by a ‘stock’ ASPNET_COMPILER run. Output from the simple solution generates a BIN directory that contains one assembly per directory, plus assemblies for APP_CODE, each theme and a separate assembly for the VB.NET class in the C# project. Notice the .compiled marker files.
The compiler recreated the entire directory structure in the output path and copied all of the files to this directory. The root directory still contains .ASPX/.ASCX pages, but these pages are merely marker files that contain:
This is a marker file generated by the precompilation tool, and should not
be deleted!
The ASPX code of the file is actually compiled and contained in one of the assemblies in the BIN directory. You’ll recall that an ASPX page is basically parsed into a class by ASP.NET and by precompiling you can optionally take that class and compile it with the pre-compiler so it doesn’t have to be parsed and compiled at runtime. This is slightly more efficient (but not much really) than leaving the ASPX pages with the markup and code intact.
When you compile this way ASP.NET leaves only the marker file and it’s maintained for one reason only: To support Windows Authentication. If you need to set specific Windows file rights on a directory or specific file, an actual file must exist in order for Windows Authentication to work. If you don’t use Windows Authentication in your Web application, these marker files can be removed and you can run entirely off the files in the BIN directory.
The BIN directory itself contains a number of assemblies. You’ll notice the App_Web assemblies which are compiled page and control classes one for each directory and for each language (remember I had one VB.NET page which compiles into a separate assembly). There’s also the App_Code assembly which contains all the code from the App_Code directory. If you have a global.asax file that will also use another separate assembly, as will each ASP.NET Theme used. Any resource file and each locale in a resource scheme will also get its own assembly if you use local or global resources. The theme classes provide ASP.NET with the location of the theme directory and any of the linked stylesheets used with theme.
One nasty gotcha with compiled Themes is that you can’t set the default theme in web.config once you precompile. This is because ASP.NET generates the default theme into the generated Page class and it doesn’t read this value from web.config but rather it’s hard coded. If you need to dynamically set the theme you’ll need to implement the OnPreInit() method in a page class. This behavior is different from an InPlace web which reads the value at runtime because pages are actually compiled at runtime.
You’ll also notice a large number of .Compiled files in the BIN folder. The .Compiled file is a marker file for each page and control in the Web site and identifies the class used inside of the assembly. These files are not optional as they map the ASPX pages to the appropriate precompiled classes in the precompiled assemblies. If you remove the .Compiled file, the page that it maps will not be able to execute and you get a nasty execution error.
One really annoying aspect of directory level compilation is that each assembly generated for a directory creates new unique name on each build. In Figure 5 you can see the generated hash-like names and the names change each time you build. In other words, you cannot create a repeatable build! For deployment to a Web site this means that you need to completely redeploy all files in the BIN directory every time if you choose to use full pre-compilation.
The above mode is just one of about 20 compilation combinations available. Another mode is Fixed Names mode, in which you can create assemblies with fixed names which means that each page/control is created in its own assembly. The command line to do this looks like this:
aspnet_compiler.exe -f -fixednames -v "/CompilationAndDeployment" "c:\temp\deploy\CompilationAndDeployment"
In this mode there’s one assembly and one .compiled file for each page and control. App_Code still gets compiled into a single assembly as does each Theme and Resources. The one advantage of this approach is that it does produce a repeatable install, but the file names still include a randomly generated hashcode. The advantage is that in this scenario you can possibly update just files that have changed, although you have to track this yourself as the timestamps of files are meaningless as all files get generated with the compile time, not the original file timestamp. It’s possible but not very user accessible because there are tons of files to track – one per page/control – and if you have multiple default.aspx pages for example in different directories it’s going to be hard to figure out which one is which. Another problem: Copying these assemblies to a live server will cause your online application to become unstable (and likely fail) as files are updated on at a time, so you pretty much have to put your server on hold while updating the bin directory.
If you’re thinking: Yuk, that’s a lot of files, I agree! Neither of these two approaches offers a really clean deployment scenario as a lot to files need to be copied. Compared with ASP.NET 1.x’s CodeBehind deployment scenario this new deployment mode is a nightmare.
Partial Compilation
Another option is partial compilation which compiles only the CodeBeside classes but leaves the ASPX pages to be compiled at runtime on the server. The ASP.NET Compiler calls this an ‘Updateable’ site, but this is only partially correct. You still have to run the ASPNET_COMPILER but include the –u flag to make the site updateable
aspnet_compiler.exe -f -fixednames -u -v "/CompilationAndDeployment" "c:\temp\deploy\CompilationAndDeployment"
When compiled with the –u option the ASPX pages remain intact. In turn the .Compiled files are no longer needed since ASP.NET can parse the ASPX pages to figure out what classes and dependencies are required to execute to the page. So the BIN directory looks a bit cleaner with this approach.
However, now you need to make sure you to deploy your ASPX pages and keep them in sync with the server. It’s important to understand that although the ASPX pages can be edited on the server, the pages have been modified from your original development pages:
<%@
page
language="C#"
autoeventwireup="true"
inherits="DataEntry,
App_Web_9kasz7w7"
%>
Note that the inherits tag includes the dynamically generated assembly name. This means you can modify the page on the server directly, but it also means you can’t simply make a change to the page in Visual Studio and directly upload your page back to the server as it will not have the dynamic assembly name embedded in the inherits attribute. Things are made even more complicated by the fact that unless you use Fixed Names compilation the assembly name will change on every build so you still have to update the page along with the assemblies if you do the default directory level compiles.
This pretty much renders this updateable approach useless because any changes made now require you to upload new files in the BIN directory as well as the ASPX pages which now have changed assembly names.
As you can see there are a lot of different compilation options and I’ve only shown three of many more combinations of these switches available. To facilitate the process I built a small ASP.NET Compiler Utility that provides a graphical front end to the ASP.NET compiler for the most common options. The utility shown in Figure 7 allows you to play with the various compiler combinations and quickly see the results in the output folder. It can also generate a batch file for your current options and lets you jump directly to an FTP client you can configure to upload the result to your Web server. The tool also supports merging compiled output into a single assembly by installing Web Deployment projects which is discussed next.
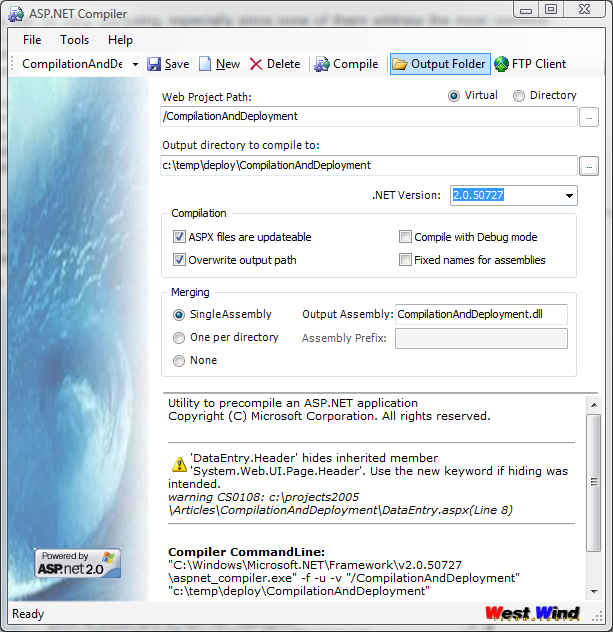
Figure 7 – My ASP.NET compiler utility provides a graphical front end to the ASPNET_COMPILER command line utility that lets you experiment with the different compiler options.
As you can see there are lots of problems with the stock project deployment options. I spent long hours trying to come up with a reasonable deployment scenario that didn’t involve copying massive amounts of files to the server. I think that there are no sensible deployment options with stock projects. It’s a pain primarily because you can’t create a single deployable assembly and because you can’t create a repeatable install. With the stock facilities available the best you can hope to do is to do a full re-deploy of your BIN directory with potentially a lot of files and the inherent disruption of your Web site while files are being uploaded.
Web Deployment Projects to the Rescue
Even before ASP.NET 2.0 shipped Microsoft got an earful from developers about the new deployment scenarios and they quickly responded by creating a tool called Web Deployment Projects (WDP) as an Add-in for Visual Studio.
Web Deployment projects essentially is a Visual Studio Add-in and command line merge utility that takes the output from the ASP.NET compiler and combines the generated assemblies into one or more assemblies with consistent names.
Web Deployment projects add to Visual Studio as a
new project type and to create this project you can just right click in
a stock Web Project and choose the “Add Web Deployment Project”. This
adds a WDP project to your VS.NET solution (shown in Figure 8).

Figure 8 – Web Deployment Projects add as a separate project that ties to the Web project in the solution. The tool provides the ability to compile the entire Web site into a single assembly.
WDP is a separate MSBUILD compatible project and it’s administered through it Project Property Pages interface show in Figure 8. The most important feature is that WDP can create a single assembly from the mess of files that the ASP.NET compiler creates from stock projects. There are a actually several other options for compilation including creation of directory level assemblies or page level assemblies, but WDP adds support for fixed names for each of these options so the compilation of these assemblies is repeatable.
WDP can be run directly from inside of Visual Studio by clicking on the Build option for the project which compiles the main Web Project and then runs the ASP.NET Merge utility against it.
You can configure WDP by specifying an output path, and how you would like to ‘merge’ your Web project output. WDP takes over the ASP.NET pre-compilation process, by first creating a standard ASP.NET compilation of your site and then merging the resulting assembly output into either a single assembly, one per directory or one per page. In all cases repeatable names are used for the assemblies created. The main configuration form for WDP is shown in Figure 8.
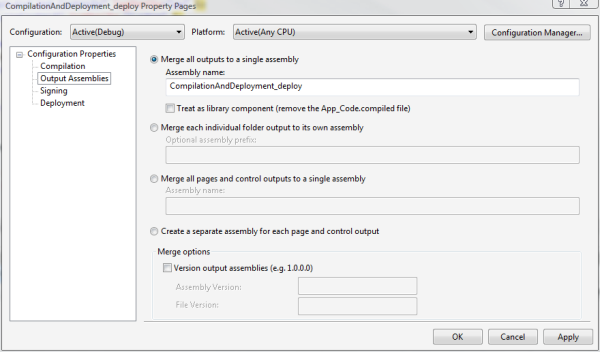
Figure 9 – The key feature of Web Deployment projects is the ability to create a single assembly from your Web site.
The tool includes other options such as signing and versioning the resulting assemblies, as well as the ability to create a virtual directory in the output folder. It even has the facility to change the content of your web.config file by overriding specified sections with content from an XML file which is a great feature if you have different settings between development and deployment servers (and who hasn’t).
Because WDP is a VS.NET project type, it is also an MSBUILD script that can be automated for build automation which is another feature missing from stock projects. And while WDP is integrated with Visual Studio as a new project type the tool also provides a new ASPNET_MERGE.EXE command line utility which can be found in:
C:\Program
Files\MSBuild\Microsoft\WebDeployment
This utility can be run against a compiled ASP.NET project and produce the desired assembly merging. The command line utility is nice and I utilized it to integrate the merge functionality into the ASP.NET compiler tool I mentioned earlier and is shown in Figure 6.
The output from the merge utilitity can combine all markup and CodeBeside code into a single assembly, but you will still end up with the .compiled files which are required for ASP.NET to associate the page requests with a specific class contained in the assembly. However, because the file names generated are fixed you don’t need to update these files unless you add or remove pages. In effect this means that in most situations you can simply update the single assembly to update your Web.
If you use stock projects with Visual Studio 2005, WDP is a no-brainer as it produces much more manageable deployment output. It’s also a completely unobtrusive add-in – you don’t change anything about the way you work in development mode. You only use WDP for final compilation for deployment and the output generated works the same as a normally compiled project.
WDP addresses nearly all of the concerns I mentioned in the last section. My main complaint left is that there still are a large number of .compiled files that need to be deployed, but at least these files are not binary files that have to be updated on every update. I can live with that…

Web Application Projects
ASP.NET’s 2.0 project model, compilation and deployment model has come under some criticism from many developers early on for some of its inconsistencies and complexities when dealing with inheritance and dynamic loading scenarios, and its complicated deployment options. Add to that that stock projects are housed in a project format that is not like other standard Visual Studio projects and you have a recipe for grumbling developers who are used to a fairly straight forward compilation, project and deployment model from previous versions of Visual Studio.
Again Microsoft listened and heard the community feedback early on and created yet another tool called Web Application Projects (WAP). WAP brings back a more structured project style in Visual Studio that is in many ways more similar to Visual Studio 2003 project, but at the same time embraces all of the new ASP.NET 2.0 features.
First and foremost WAP is a new Visual Studio Project type called a Web Application which shows up as a standard Visual Studio project type you can create. To create a new WAP project you use the New Project Dialog as you do with any other project in the VS IDE. The project that is created doesn’t automatically pick up files off disk like stock projects but relies on you to add files explicitly. Because the project is a standard VS.NET project, it automatically has built-in support for Xml comments, compiler directives, assembly versioning as well MSBuild support, pre and post build events etc. and can be automated with MSBUILD. In short all those things that you take for granted in all VS.NET projects but are missing in stock projects.
More importantly though, WAP does away with the
CodeBeside model and instead returns to a modified version of the
CodeBehind model that ASP.NET 1.x used with Visual Studio
Because WAP brings back a true Visual Studio project, it is more strict than stock projects. You can’t mix C# and VB.NET code in the same project any longer and with WAP you have to explicitly compile your code in Visual Studio everytime you make a change to any of the CodeBehind classes. This also means that when you’re debugging code and you make a change to a CodeBehind class, you’ll need to stop debugging, recompile and start debugging again.
However, compilation is fast once again with WAP. I have one project with roughly 80 page and control classes and it compiles in a couple of seconds. With stock projects a full compile took a painful 25-30 seconds. Using WAP you’ll get used once again to the Ctrl-Shift-B three finger salute (or F6) for building your projects for every code change you make. It’s a small price to pay for the simpler model that WAP provides in my opinion.
WAP also supports Edit and Continue, but only if and only if you use the built-in Web server for debugging your applications. The built-in Web server is required because Visual Studio needs to be in control of the parent process it is debugging when Edit and Continue is used. This is not possible when you’re debugging against IIS which attaches the debugger to a running instance of a worker process.
The single assembly compilation for all CodeBehind code does away with a lot of the problems regarding inheritance and control and page referencing I mentioned for stock projects, because every page and control of the Web project is guaranteed to have access to every other control and page of the project, since they all end up in the same assembly. The page parse tree classes are still separate, but all the base classes exist in a single assembly, that defines both the control properties and custom method interface from your user code. The class interface is no longer split across two classes as is the case in the CodeBeside model and which is the root of many of the problems I discussed earlier.
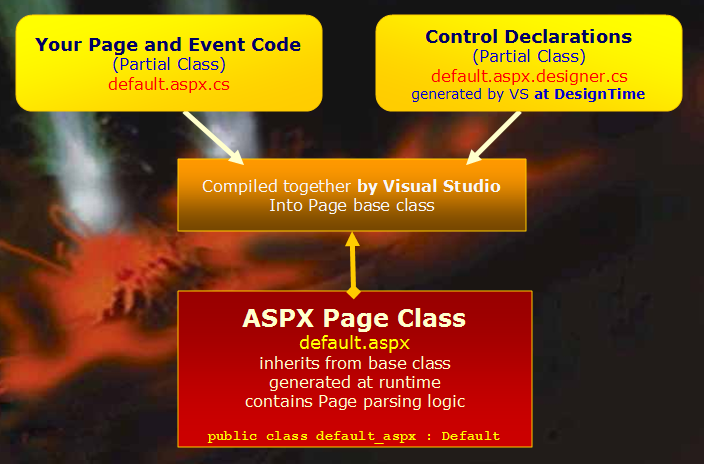
Figure 10 – Web Application Projects use designer generated partial class code to create the page base class for ASP.NET pages and compiles all project code into a single assembly.
The model is essentially similar to the CodeBehind model in VS2003, but
WAP projects handle the CodeBehind classes a bit differently. It uses
partial classes to separate out the user code and the designer generated
control definitions. So a WAP page consists of three different files:
- Default.aspx – the markup page
- Default.aspx.cs – the CodeBehind class of your user code
- Default.aspx.cs.designer – the control property definitions
Listing 6 shows the page and class headers for these three classes.
Listing 6 – A WAP page with the ASPX page, CodeBehind Class and Designer Class
<%@
Page
Language="C#"
AutoEventWireup="true"
CodeBehind="ShowPost.aspx.cs"
Inherits="WebLog.ShowPost"
%>
public partial class
ShowPost
: WebLogBaseForm
{
protected
busEntry
Entry = null;
protected
busComment Comment = null;
protected void
Page_Load(object sender,
EventArgs
e)
{
…
}
}
public partial class
ShowPost
{
protected
System.Web.UI.WebControls.Panel
FeedbackPanel;
protected
Westwind.Web.Controls.wwWebTextBox
txtTitle;
protected
Westwind.Web.Controls.wwWebTextBox
txtAuthor;
protected
Westwind.Web.Controls.wwWebTextBox
txtUrl;
protected
Westwind.Web.Controls.wwWebTextBox
txtBody;
…
}
If you’re familiar with Windows Forms
The other big benefit of WAP is that it makes deployment much easier than stock projects – easier even that stock project with WDP. When you compile a WAP project a single assembly is created in the BIN directory. You can now deploy your BIN directory, plus any ASPX/ASCX/MASTER files and any static files.
If after deploying you find a bug and need to make a quick change you can make the change, recompile the project and simply upload the CodeBehind assembly back to the server and you’re done. This is vastly easier than the stock project approach of first recompiling and then copying the entire barrage of files to the server.
Combining with Web Deployment Projects
WAP by itself does not compile the ASPX/ASCX/MASTER pages of the project, so by default you still have to deploy those files to the Web site and sync them up with your development or staging site. Because WAP doesn’t compile markup pages it also doesn’t catch errors in these pages directly. However, you can combine WAP and Web Deployment Projects and let WDP compile the entire site for a binary only installation as described earlier. The WDP compile will catch markup page errors and you can pre-compile the ASPX pages and so remove the requirement to deploy any of the markup files. You won’t end up with quite as clean of an install as WDP will create then .Compiled for the markup files but it’s still a lot cleaner than what you would end up with in stock projects.
Upgrading from Stock Projects
Upgrading a stock project to WAP involves creating a new WAP project and then copying the old site’s files into the WAP project. The easiest way is to use Explorer and drag and drop the files from the old project directly into the WAP project in Solution Explorer. The APP_CODE folder needs to be renamed as it’s not supported in WAP but you can just give a new name and WAP will do the right thing when compiling.
All markup pages that have any CodeBeside code need to be converted. Once you have copied the files to the new project you can use the Convert to Web Application option on the project menu to convert a single file, a folder or the entire project to a WAP project. The conversion goes through each of the stock project pages and fixes up the @Page directive, converting the CodeFile attribute to a CodeBehind Attribute and creating the .Designer file that holds the control definitions.
It’s a fairly smooth process, although you may run into a page here or there that doesn’t want to convert. Before you move files over for conversion make sure your project compiles properly in stock projects as the conversion relies on resolving references and dependencies to figure out how to upgrade them. I ran into a problem in a couple of projects and it took some tweaking to get the pages to compile without getting much information on what was failing which is frustrating.
Scott Guthrie has a thorough walk-through for the conversion process that I’d recommend if you’re doing the conversion. The article has a step by step guide as well as some trouble shooting tips. At this site you can also find a walk through that shows how to upgrade a Visual Studio 2003 project directly to WAP. WAP is a closer match for VS 2003 projects than stock projects so this is a natural step.
Both WAP and WDP currently are downloadable add-ins for Visual Studio 2005. But Microsoft has stated that in the future both of these tools will be natively rolled into Visual Studio starting with SP1 of Visual Studio 2005. Please not that neither of these tools works with Visual Web Developer – they only work with Visual Studio .NET 2005.
Compiling a Summary
Any way you look at it, compilation in ASP.NET is a complex process and I hope this article has given you some deeper insight into the compilation and deployment process. ASP.NET 2.0 has brought some improvements and some steps back in this area, but most of all it’s brought a lot of different options you have to choose from. Usually options are good, but I think in this case the choices can be overwhelming. This is made even worse by the fact that the stock project model feels easy and doesn’t show some of its problems until later in a typical Web development process, as a site is refactored and getting ready to hit deployment. So watch out for the gotchas and start thinking about these issues early on in the project.
I personally have chosen to use Web Application Projects whenever I can for any serious work. I’ve worked with stock projects for over year now and I’ve just hit too many dead ends in this model to feel comfortable with it. Although a little bit more rigid than stock projects in configuration and explicit compilation, I take the more logical and quick compilation, simple inheritance model and single assembly output of WAP any day over the somewhat unpredictable stock project model.
But that doesn’t mean that WAP is for everybody. If you’re working with
stock projects and you’re not running into any problems and you can live
with the deployment issues, then there’s no need to switch to WAP. The
file based model using its Edit and Go model of running applications is
appealing make stock projects more easy going and more productive. And
even if you use stock projects and run into a dead end you can
relatively easily switch to WAP. I will continue to use stock projects
for demos and samples and it really can’t be beat for that because of
its portability. Even if you
are perfectly happy with stock projects, I would still recommend you
check out Web Deployment Projects to simplify deployment – it’s a no
brainer to use this tool unless your applications are very small.
Reference
Web
Application Projects
http://msdn.microsoft.com/asp.net/reference/infrastructure/wap/default.aspx
Scott
Guthrie’s Web Application Projects Walk Throughs
http://webproject.scottgu.com/
Web
Deployment Projects
http://msdn.microsoft.com/asp.net/reference/infrastructure/wdp/
ASP.NET
Compiler GUI Front End
http://www.west-wind.com/tools/aspnetcompiler.asp
Comments or Discussion
of this article:

 浙公网安备 33010602011771号