
一、Swagger的历史背景
Swagger最初是一种简单的设计规范,用于2010年设计Restful API。后来由规范和开源工具组成的Swagger项目非常受欢迎,形成了一个庞大的社区工具生态系统。2015年Swagger被SmartBear收购,并被捐赠给Linux基金会。
二、Swagger的作用
说到Swagger的作用,就必须说到开发现状:现在项目的开发基本都实现了前后端分离,后端控制数据的修改以及功能逻辑构建,前端做操作UI控制和页面渲染,后端与前端进行接口对接的时候都会使用到接口文档。一般我们选择一些接口文档管理工具,例如:RAP、DOClever、Apizza……
Swagger也属于一种接口文档管理工具,支持整个API的生命周期(设计和文档到测试和部署),号称是“世界上最流行的API框架”。
三、Swagger的使用
1.创建Springboot项目

2.导入依赖
<!-- https://mvnrepository.com/artifact/io.springfox/springfox-swagger2 -->
<dependency>
    <groupId>io.springfox</groupId>
    <artifactId>springfox-swagger2</artifactId>
    <version>2.9.2</version>
</dependency>

<!-- https://mvnrepository.com/artifact/io.springfox/springfox-swagger-ui -->
<dependency>
    <groupId>io.springfox</groupId>
    <artifactId>springfox-swagger-ui</artifactId>
    <version>2.9.2</version>
</dependency>
3.编写Swagger配置文件

package org.magic.swagger.config;

import java.util.ArrayList;
import org.springframework.context.annotation.Bean;
import org.springframework.context.annotation.Configuration;
import org.springframework.core.env.Environment;
import org.springframework.core.env.Profiles;
import springfox.documentation.builders.RequestHandlerSelectors;
import springfox.documentation.service.ApiInfo;
import springfox.documentation.service.Contact;
import springfox.documentation.spi.DocumentationType;
import springfox.documentation.spring.web.plugins.Docket;
import springfox.documentation.swagger2.annotations.EnableSwagger2;

@Configuration
//开启Swagger
@EnableSwagger2
public class SwaggerConfig {

  @Bean
  public Docket docket(Environment environment) {

    //设置要显示的Swagger环境(开发环境和测试环境会显示swagger,上线之后不显示swagger)
    Profiles profiles=Profiles.of("dev","test");
    boolean flag = environment.acceptsProfiles(profiles);

    return new Docket(DocumentationType.SWAGGER_2)
        .groupName("无关痛痒")
        .apiInfo(apiInfo())
        //是否开启swagger,如果为false则Swagger在浏览器中无法访问
        .enable(true)
        .select()
        //扫描该包下面的注解
        .apis(RequestHandlerSelectors.basePackage("org.magic.swagger.controller"))
        .build();
  }

  //配置Swagger信息
  private ApiInfo apiInfo() {
    //作者信息
    Contact contact = new Contact("无关痛痒", "https://blog.csdn.net/qq_43655835", "304897438@qq.com");
    return new ApiInfo("Swagger API文档",
        "以下接口属于新项目---点餐系统",
        "1.0",
        "https://blog.csdn.net/qq_43655835",
        contact,
        "Apache 2.0",
        "http://www.apache.org/licenses/LICENSE-2.0",
        new ArrayList());
  }
4. Swagger分组
在上面的配置中有一个.groupName(”无关痛痒“),在Swagger-ui中所显示的位置在右上角:

当团队中有多人进行协同开发的时候,每个人所写的接口文档不一样,所以我们可以使用swagger进行分组,还是在SwaggerConfig配置类中进行配置:
package org.magic.swagger.config;

import java.util.ArrayList;
import org.springframework.context.annotation.Bean;
import org.springframework.context.annotation.Configuration;
import org.springframework.core.env.Environment;
import org.springframework.core.env.Profiles;
import springfox.documentation.builders.RequestHandlerSelectors;
import springfox.documentation.service.ApiInfo;
import springfox.documentation.service.Contact;
import springfox.documentation.spi.DocumentationType;
import springfox.documentation.spring.web.plugins.Docket;
import springfox.documentation.swagger2.annotations.EnableSwagger2;

@Configuration
//开启Swagger
@EnableSwagger2
public class SwaggerConfig {

  @Bean
  public Docket docket(Environment environment) {

    //设置要显示的Swagger环境(开发环境和测试环境会显示swagger,上线之后不显示swagger)
    Profiles profiles=Profiles.of("dev","test");
    boolean flag = environment.acceptsProfiles(profiles);

    return new Docket(DocumentationType.SWAGGER_2)
        .groupName("无关痛痒")
        .apiInfo(apiInfo())
        //是否开启swagger,如果为false则Swagger在浏览器中无法访问
        .enable(true)
        .select()
        //扫描该包下面的注解
        .apis(RequestHandlerSelectors.basePackage("org.magic.swagger.controller"))
        .build();
  }

  //配置Swagger信息
  private ApiInfo apiInfo() {
    //作者信息
    Contact contact = new Contact("无关痛痒", "https://blog.csdn.net/qq_43655835", "304897438@qq.com");
    return new ApiInfo("Swagger API文档",
        "以下接口属于新项目---点餐系统",
        "1.0",
        "https://blog.csdn.net/qq_43655835",
        contact,
        "Apache 2.0",
        "http://www.apache.org/licenses/LICENSE-2.0",
        new ArrayList());
  }

  /**
   * Swagger文档分组,多人协同开发
   */
  @Bean
  public Docket docket_zhang(){
    return  new Docket(DocumentationType.SWAGGER_2).groupName("张三");
  }

  @Bean
  public Docket docket_li(){
    return  new Docket(DocumentationType.SWAGGER_2).groupName("李四");
  }
}
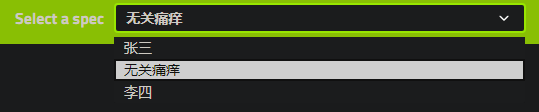
比如现在还有张三和李四都是一个开发小组的,那直接在SwaggerConfig配置文件中继续new一个新的Docket并进行配置就行了(类似一个下拉菜单):
5.常用的注解
| 注解 | 描述 |
|---|---|
| @ApiModel(String description) | 用于实体类上,对实体类进行描述 |
| @ApiModelProperty(String description) | 用于实体类属性上,对实体类属性进行描述 |
package org.magic.swagger.entiy;

import io.swagger.annotations.ApiModel;
import io.swagger.annotations.ApiModelProperty;

@ApiModel("书籍实体类")
public class Book {

  @ApiModelProperty("书名")
  public String bookName;

  @ApiModelProperty("作者")
  private String author;

  public String getBookName() {
    return bookName;
  }

  public void setBookName(String bookName) {
    this.bookName = bookName;
  }

  public String getAuthor() {
    return author;
  }

  public void setAuthor(String author) {
    this.author = author;
  }
}
| 注解 | 描述 |
|---|---|
| @ApiOperation(String description) | 用于controller中的方法上,对方法进行描述 |
| @ApiParam(String description) | 用于描述入参 |
| @Api(tags="") | 用于描述类信息 |
package org.magic.swagger.controller;

import io.swagger.annotations.Api;
import io.swagger.annotations.ApiOperation;
import io.swagger.annotations.ApiParam;
import java.util.ArrayList;
import java.util.List;
import org.magic.swagger.entiy.Book;
import org.springframework.web.bind.annotation.DeleteMapping;
import org.springframework.web.bind.annotation.GetMapping;
import org.springframework.web.bind.annotation.PathVariable;
import org.springframework.web.bind.annotation.PostMapping;
import org.springframework.web.bind.annotation.PutMapping;
import org.springframework.web.bind.annotation.RestController;

@RestController
@Api("书籍模块")
public class BookController {

  private static List<Book> bookList = new ArrayList<>();

  @PostMapping("/insertBook")
  @ApiOperation("插入书籍信息")
  public Object insertBook(@ApiParam("书籍信息") Book book) {
    bookList.add(book);
    return bookList;
  }

  @GetMapping("/queryBooks")
  @ApiOperation("查询书籍list")
  public Object queryBookByAuthor() {
    return bookList;
  }

  @PutMapping("/updateBookByAuthor/{author}/{bookName}")
  @ApiOperation("根据作者名称修改书籍信息")
  public Object updateBookByAuthor(@ApiParam("作者名称") @PathVariable String author,
                                    @ApiParam("修改后的书籍名称") @PathVariable String bookName) {

    for (Book book : bookList) {
      if (book.getAuthor().equals(author)) {
          book.setBookName(bookName);
          return book;
      }
    }
    return null;
  }


  @DeleteMapping("/removeBook/{author}")
  @ApiOperation("根据作者删除书籍")
  public Object removeBookByAuthor(@ApiParam("作者名称") @PathVariable String author) {
    for (Book book : bookList) {
      if (book.getAuthor().equals(author)) {
        bookList.remove(book);
        return "删除成功";
      }
    }
    return "没有删除任何数据";
  }


}
6. 使用Swagger测试
查看Swagger-ui(http://localhost:8082/swagger-ui.html)

在Swagger-ui中打开需要测试的接口:点击Try it out,输入测试入参:

然后查看响应结果:


 浙公网安备 33010602011771号