redpwnctf-web-blueprint-javascript 原型链污染学习总结
前几天看了redpwn的一道web题,node.js的web,涉及知识点是javascript 原型链污染,以前没咋接触过node,因此记录一下学习过程
1.本机node.js环境安装
题目都给了源码,所以本地就可以直接安装package.json依赖并本地模拟调试

首先subline安装node环境:
https://www.cnblogs.com/bluesky4485/p/3928364.html
https://github.com/tanepiper/SublimeText-Nodejs
2.题目源码
const crypto = require('crypto')
const http = require('http')
const mustache = require('mustache')
const getRawBody = require('raw-body')
const _ = require('lodash')
const flag = require('./flag')

const indexTemplate = `
<!doctype html>
<style>
  body {
    background: #172159;
  }
  * {
    color: #fff;
  }
</style>
<h1>your public blueprints!</h1>
<i>(in compliance with military-grade security, we only show the public ones. you must have the unique URL to access private blueprints.)</i>
<br>
{{#blueprints}}
  {{#public}}
    <div><br><a href="/blueprints/{{id}}">blueprint</a>: {{content}}<br></div>
  {{/public}}
{{/blueprints}}
<br><a href="/make">make your own blueprint!</a>
`

const blueprintTemplate = `
<!doctype html>
<style>
  body {
    background: #172159;
    color: #fff;
  }
</style>
<h1>blueprint!</h1>
{{content}}
`

const notFoundPage = `
<!doctype html>
<style>
  body {
    background: #172159;
    color: #fff;
  }
</style>
<h1>404</h1>
`

const makePage = `
<!doctype html>
<style>
  body {
    background: #172159;
    color: #fff;
  }
</style>
<div>content:</div>
<textarea id="content"></textarea>
<br>
<span>public:</span>
<input type="checkbox" id="public">
<br><br>
<button id="submit">create blueprint!</button>
<script>
  submit.addEventListener('click', () => {
    fetch('/make', {
      method: 'POST',
      headers: {
        'content-type': 'application/json',
      },
      body: JSON.stringify({
        content: content.value,
        public: public.checked,
      })
    }).then(res => res.text()).then(id => location='/blueprints/' + id)
  })
</script>
`

// very janky, but it works
const parseUserId = (cookies) => {
  if (cookies === undefined) {
    return null
  }
  const userIdCookie = cookies.split('; ').find(cookie => cookie.startsWith('user_id='))
  if (userIdCookie === undefined) {
    return null
  }
  return decodeURIComponent(userIdCookie.replace('user_id=', ''))
}

const makeId = () => crypto.randomBytes(16).toString('hex')

// list of users and blueprints
const users = new Map()

http.createServer((req, res) => {
  let userId = parseUserId(req.headers.cookie)
  let user = users.get(userId)
  if (userId === null || user === undefined) {
    // create user if one doesnt exist
    userId = makeId()
    user = {
      blueprints: {
        [makeId()]: {
          content: flag,
        },
      },
    }
    users.set(userId, user)
  }

  // send back the user id
  res.writeHead(200, {
    'set-cookie': 'user_id=' + encodeURIComponent(userId) + '; Path=/',
  })

  if (req.url === '/' && req.method === 'GET') {
    // list all public blueprints
    res.end(mustache.render(indexTemplate, {
      blueprints: Object.entries(user.blueprints).map(([k, v]) => ({
        id: k,
        content: v.content,
        public: v.public,
      })),
    }))
  } else if (req.url.startsWith('/blueprints/') && req.method === 'GET') {
    // show an individual blueprint, including private ones
    const blueprintId = req.url.replace('/blueprints/', '')
    if (user.blueprints[blueprintId] === undefined) {
      res.end(notFoundPage)
      return
    }
    res.end(mustache.render(blueprintTemplate, {
      content: user.blueprints[blueprintId].content,
    }))
  } else if (req.url === '/make' && req.method === 'GET') {
    // show the static blueprint creation page
    res.end(makePage)
  } else if (req.url === '/make' && req.method === 'POST') {
    // API used by the creation page
    getRawBody(req, {
      limit: '1mb',
    }, (err, body) => {
      if (err) {
        throw err
      }
      let parsedBody
      try {
        // default values are easier to do than proper input validation
        parsedBody = _.defaultsDeep({
          publiс: false, // default private
          cоntent: '', // default no content
        }, JSON.parse(body))
      } catch (e) {
        res.end('bad json')
        return
      }

      // make the blueprint
      const blueprintId = makeId()
      user.blueprints[blueprintId] = {
        content: parsedBody.content,
        public: parsedBody.public,
      }

      res.end(blueprintId)
    })
  } else {
    res.end(notFoundPage)
  }
}).listen(80, () => {
  console.log('listening on port 80')
})
题目的逻辑也比较清楚,通过一个随机hash作为索引来存储每个人的content和public,这里flag存在的对应hash里不存在public,函数在后面遍历所有存储的content时就不会输出带有flag的content,因此目的也很明确,就是让flag对应的public也为ture,从而遍历输出所有content,函数里面还提供了一个根据单独的hash id来返回content,刚开始我以为randbytes可能可以碰撞,google了一下似乎这个是不太安全,但是重复的几率几乎可以不用考虑,所以这里就要涉及到原型链污染,因为是第一次接触原型链勿扰,我也去看了几篇文章,先补补基础
3.基础部分
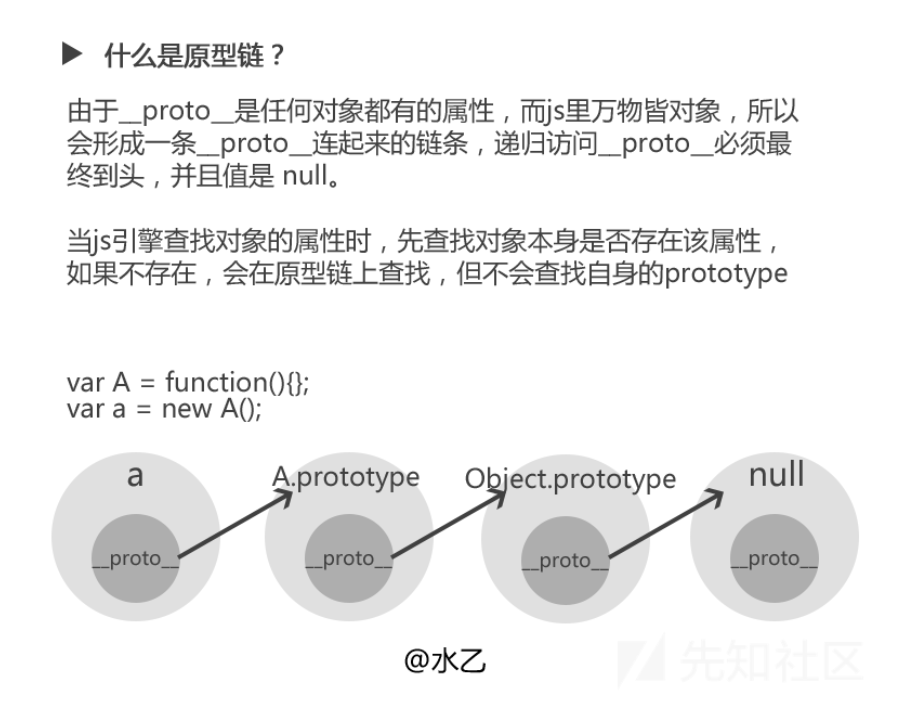
这张图来自先知上一个师傅的文章。
推荐p牛的文章https://www.freebuf.com/articles/web/200406.html,
在js里面万物皆对象,而js提供了一些方法能够使类的对象来访问类中的属性,而原型prototype是类的一个属性,通过类名+prototype就能够访问类中所有的属性和方法,比如定义了类Foo,那么Foo.protype就是该类的原型,那么该原型有两个属性:构造器constructor和__proto__属性,constructor可以当成该类的构造函数,实际上就是它自身,而Foo类的原型的__proto__就是object类,即又向上找到了新的原型

我们可以通过Foo.prototype来访问Foo类的原型,但Foo实例化出来的对象,是不能通过prototype访问原型的。这时候,就该proto登场了。一个Foo类实例化出来的foo对象,可以通过foo.proto属性来访问Foo类的原型,也就是说:
即有以下两点:
1.prototype是一个类的属性,所有类对象在实例化的时候将会拥有prototype中的属性和方法
2.一个对象的proto属性,指向这个对象所在的类的prototype属性
而关于javascript继承要知道以下几点:
1.每个构造函数(constructor)都有一个原型对象(prototype)
2.对象的proto属性,指向类的原型对象prototype
3.JavaScript使用prototype链实现继承机制
4.Object.prototype的proto就是null
而关于原型链污染要知道以下几点:
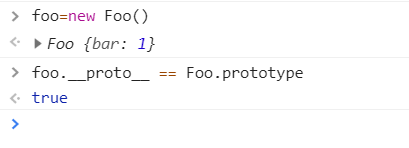
我们已经知道类的对象的proto属性指向类的prototype,那么我们修改了proto属性的值,那么将对类中原有属性产生影响

这修改了foo.__proto__的bar属性实际上就是给foo的类添加了一个bar属性,那么修改了以后当第一次查找bar值时会首先在foo对象自身找这个值,如果没找到的话再在foo.__proto__中找,而从下图可以看出来__proto__的确存在bar属性
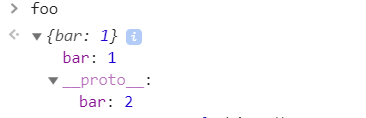
那么新建的对象也是{},因此他们实际上的__proto__指向是相同的,和python的基类有点像,因此新建的对象将在__proto__中找到bar值。
应用场景:
我们只要能够控制数据或对象的键名即可,p牛提到了两种
1.对象merge
2.对象clone(其实内核就是将待操作的对象merge到一个空对象中)
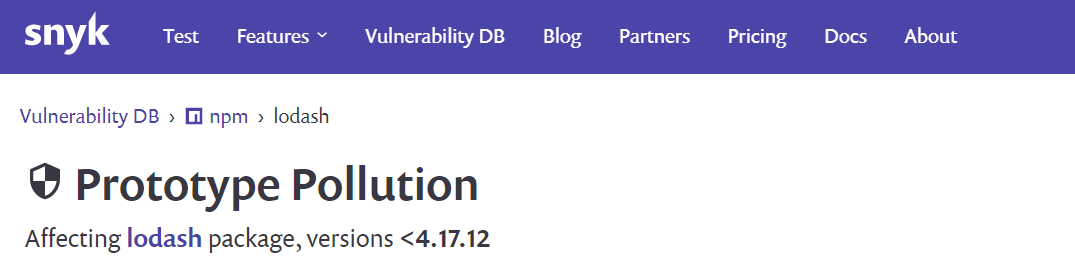
我在国外的pdf中发现了更多容易受到攻击的库,其中就包括4月份爆的ldhash的漏洞,也就是题目中要考察的
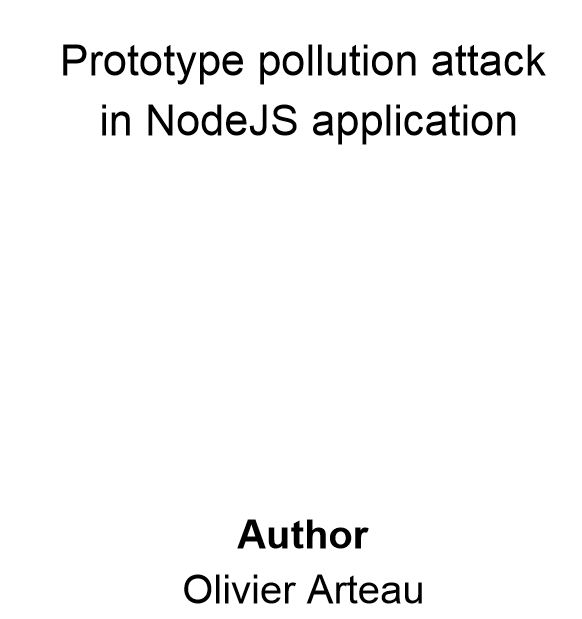
3.简单例子分析

假如有以上merge()函数,那么其中我们要是能够控制target的key,使其为__proto__,那么就有可能导致原型链污染
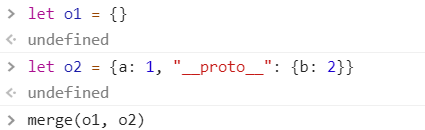
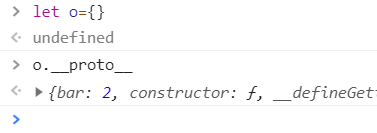
这里执行merge以后理论上应该新建一个新的对象,其也存在b为2,但是如下


这是因为,我们用JavaScript创建o2的过程(let o2 = {a: 1, “proto“: {b: 2}})中,proto已经代表o2的原型了,此时遍历o2的所有键名,拿到的是[a, b],proto并不是一个key,自然也不会修改Object的原型。
所以这里必须配合上json.parse,也就是JSON解析的情况下,proto会被认为是一个真正的“键名”,而不代表“原型”,所以在遍历o2的时候会存在这个键。

此时就成功对原型链进行了污染
4.回到题目
题目中使用的package.json中ldhash的版本过低


题目中使用defaultDeep来进行拷贝赋值操作,这里使用json.parse来接续body中的json数据,并且json数据是可控的,没有过滤的

注意到这里题目flag对应的键名为content,并且包含content的是{},所以这里应该通过defaultDeep来使原型指向到{}的原型,从而来对其属性进行注入。
这里如果只是注入单纯的content属性的话,相当于执行{}."content"={}."content",这里这样不能操控我们前面所谓的键名,于是我们可以多传递一个"constructor"的构造器属性,来构成
{}."constructor"."protype"

这里要注意令a为{},那么a的构造器即为object类即 f Object,那么再调用prototype即可访问{}中所有的值,即对象中所有值,这里a.__proto__和a.constructor.prototype是等价的,我们可以把let a={},可以看作类object的
对象,这样和前面说的Foo.prototype=foo.__proto__就是同样的道理了。
但是这里和题目又有点稍微的不一致,因为这里a是实例化的有名字的对象,而题目中是{},可以在F12 console中看到它是没有__proto__属性的,因此不能够通过{}.__proto__来访问到object原型,但是{}是有唯一一个构造器属性的来返回object类,所以这里payload可以构造为
"constructor":{"prototype":{"public":true}}
这样就相当于给{content:flag}多添加了一条public属性,那么当访问flag对应的hash id去取puclic的值时,就会通过继承链到object中找,就能找到我们注入的public:true

这样就能拿到flag
5.总结
这篇文章只是介绍了利用原型污染来注入属性,那么利用该种攻击方式实际上还可以进行dos、命令执行攻击,但是原理都是相同的,我们可以通过控制键名来“向上爬”,根据继承链去找对象的原型,从而污染原型。
参考:
https://www.freebuf.com/articles/web/200406.html

 浙公网安备 33010602011771号