w8 NFS服务器部署与实时复制备份
nfs网络文件服务器,用于存储网站,或用户的数据。
在分布式架构中,利用NFS共享文件服务器,将图片,静态文件,共有的数据,进行无缝访问。
NFS服务介绍
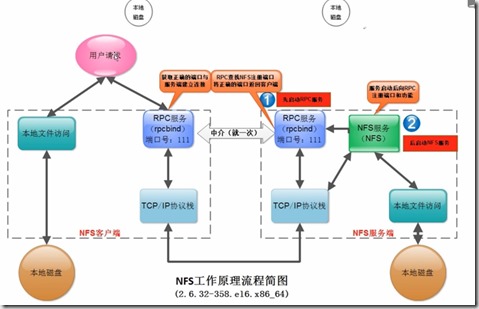
NFS工作流程
步骤1.先启动RPC服务
步骤2.启动NFS服务
步骤3.客户请求NFS服务
步骤4.返回端口到租客
步骤5.拿着地址端口请求传输数据

nfs 服务器端配置

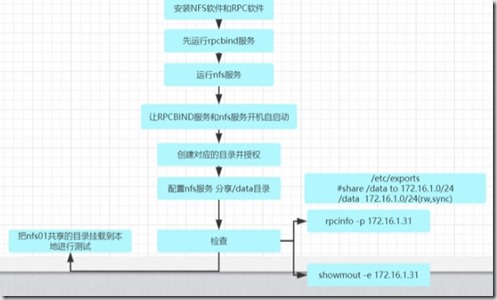
1.安装软件
yum install nfs-utils rpcbind -y

[root@nfs01 ~]# rpm -qa nfs-utils rpcbind
rpcbind-0.2.0-13.el6_9.1.x86_64
nfs-utils-1.2.3-75.el6_9.x86_64

[root@nfs01 ~]# /etc/init.d/rpcbind start
Starting rpcbind: [ OK ]

[root@nfs01 ~]# rpcinfo -p 10.0.0.31
program vers proto port service
100000 4 tcp 111 portmapper
100000 3 tcp 111 portmapper
100000 2 tcp 111 portmapper
100000 4 udp 111 portmapper
100000 3 udp 111 portmapper
100000 2 udp 111 portmapper
[root@nfs01 ~]# rpcinfo -p localhost
program vers proto port service
100000 4 tcp 111 portmapper
100000 3 tcp 111 portmapper
100000 2 tcp 111 portmapper
100000 4 udp 111 portmapper
100000 3 udp 111 portmapper
100000 2 udp 111 portmapper
[root@nfs01 ~]# rpcinfo -p
program vers proto port service
100000 4 tcp 111 portmapper
100000 3 tcp 111 portmapper
100000 2 tcp 111 portmapper
100000 4 udp 111 portmapper
100000 3 udp 111 portmapper
100000 2 udp 111 portmapper
2.启动nfs服务
[root@nfs01 ~]# /etc/init.d/nfs start

Starting NFS services: [ OK ]
Starting NFS quotas: [ OK ]
Starting NFS mountd: [ OK ]
Starting NFS daemon: [ OK ]
Starting RPC idmapd: [ OK ]

[root@nfs01 ~]# rpcinfo -p 10.0.0.31
program vers proto port service
100000 4 tcp 111 portmapper
100000 3 tcp 111 portmapper
100000 2 tcp 111 portmapper
100000 4 udp 111 portmapper
100000 3 udp 111 portmapper
100000 2 udp 111 portmapper
100011 1 udp 875 rquotad
100011 2 udp 875 rquotad
100011 1 tcp 875 rquotad
100011 2 tcp 875 rquotad
100005 1 udp 16193 mountd
100005 1 tcp 29963 mountd
100005 2 udp 60965 mountd
100005 2 tcp 44387 mountd
100005 3 udp 20361 mountd
100005 3 tcp 32902 mountd
100003 2 tcp 2049 nfs
100003 3 tcp 2049 nfs
100003 4 tcp 2049 nfs
100227 2 tcp 2049 nfs_acl
100227 3 tcp 2049 nfs_acl
100003 2 udp 2049 nfs
100003 3 udp 2049 nfs
100003 4 udp 2049 nfs
100227 2 udp 2049 nfs_acl
100227 3 udp 2049 nfs_acl
100021 1 udp 6552 nlockmgr
100021 3 udp 6552 nlockmgr
100021 4 udp 6552 nlockmgr
100021 1 tcp 8545 nlockmgr
100021 3 tcp 8545 nlockmgr
100021 4 tcp 8545 nlockmgr
3.开机自启动
[root@nfs01 ~]# chkconfig nfs on
[root@nfs01 ~]# chkconfig rpcbind on
[root@nfs01 ~]# chkconfig |egrep 'nfs|rpcbind'
nfs 0:off 1:off 2:on 3:on 4:on 5:on 6:off
nfs-rdma 0:off 1:off 2:off 3:off 4:off 5:off 6:off
nfslock 0:off 1:off 2:off 3:on 4:on 5:on 6:off
rpcbind 0:off 1:off 2:on 3:on 4:on 5:on 6:off
4.共享
让网段的其他主机可以访问到文件服务器
[root@nfs01 ~]# vim /etc/exports
#share /data to 172.16.1.0/24
/data 172.16.1.0/24(rw,sync)
5.创建共享目录
mkdir -p /data
chown -R nfsnobody.nfsnobody /data/        更改共享目录权限
/etc/init.d/nfs reload                    平滑加载
6.查看共享信息
[root@nfs01 ~]# showmount -e 172.16.1.31

Export list for 172.16.1.31:
/data 172.16.1.0/24
7.本地测试

#把nfs服务器共享的目录 挂载到 nfs01本地

[root@nfs01 ~]# mount -t nfs 172.16.1.31:/data /mnt/
[root@nfs01 ~]# df -h

Filesystem Size Used Avail Use% Mounted on
/dev/sda3 8.8G 1.5G 6.9G 18% /
tmpfs 3.9G 0 3.9G 0% /dev/shm
/dev/sda1 190M 40M 141M 22% /boot
172.16.1.31:/data 8.8G 1.5G 6.9G 18% /mnt


[root@nfs01 ~]# touch /mnt/{a..e}.txt
[root@nfs01 ~]# ls -l /mnt/
total 0
-rw-r--r-- 1 nfsnobody nfsnobody 0 Jan 27 21:03 a.txt
-rw-r--r-- 1 nfsnobody nfsnobody 0 Jan 27 21:03 b.txt
-rw-r--r-- 1 nfsnobody nfsnobody 0 Jan 27 21:03 c.txt
-rw-r--r-- 1 nfsnobody nfsnobody 0 Jan 27 21:03 d.txt
-rw-r--r-- 1 nfsnobody nfsnobody 0 Jan 27 21:03 e.txt
[root@nfs01 ~]# ls -l /data/
total 0
-rw-r--r-- 1 nfsnobody nfsnobody 0 Jan 27 21:03 a.txt
-rw-r--r-- 1 nfsnobody nfsnobody 0 Jan 27 21:03 b.txt
-rw-r--r-- 1 nfsnobody nfsnobody 0 Jan 27 21:03 c.txt
-rw-r--r-- 1 nfsnobody nfsnobody 0 Jan 27 21:03 d.txt
-rw-r--r-- 1 nfsnobody nfsnobody 0 Jan 27 21:03 e.txt

解除挂在

[root@nfs01 ~]# umount /mnt/

[root@nfs01 ~]# df -h

Filesystem Size Used Avail Use% Mounted on
/dev/sda3 8.8G 1.5G 6.9G 18% /
tmpfs 3.9G 0 3.9G 0% /dev/shm
/dev/sda1 190M 40M 141M 22% /boot
nfs 客户端配置
这里以 backup 服务器 实验
安装过程

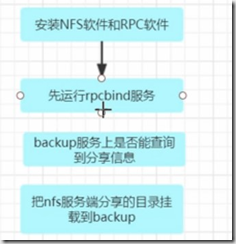
安装软件
[root@backup ~]# yum install nfs-utils rpcbind -y
[root@backup ~]# /etc/init.d/rpcbind start
Starting rpcbind: [ OK ]
开机启动

[root@backup ~]# chkconfig rpcbind on
[root@backup ~]# chkconfig nfs off
[root@backup ~]# showmount -e 172.16.1.31
Export list for 172.16.1.31:
/data 172.16.1.0/24

创建目录并挂载nfs共享目录
[root@backup ~]# mkdir -p /upload
[root@backup ~]# mount -t nfs 172.16.1.31:/data /upload/
[root@backup ~]# df -h
Filesystem Size Used Avail Use% Mounted on
/dev/sda3 8.8G 1.5G 6.9G 18% /
tmpfs 3.9G 0 3.9G 0% /dev/shm
/dev/sda1 190M 40M 141M 22% /boot
172.16.1.31:/data 8.8G 1.5G 6.9G 18% /upload


开机自动挂载

[root@backup ~]# tail -l /etc/rc.local
/bin/mount -t nfs 172.16.1.31:/data /upload/

挂载问题
mount -t nfs 172.16.1.31:/data /mnt/
mount: wrong fs type, bad option, bad superblock on 172.16.1.31:/data,
missing codepage or helper program, or other error
(for several filesystems (e.g. nfs, cifs) you might
need a /sbin/mount.<type> helper program)
In some cases useful info is found in syslog - try
dmesg | tail or so     解答:客户端没有安装nfs软件     yum 安装即可
问题排查
[root@nfs01 ~]# showmount -e 172.16.1.31
clnt_create: RPC: Port mapper failure - Unable to receive: errno 111 (Connection refused)
[root@nfs01 ~]# rpcinfo -p 172.16.1.31
rpcinfo: can't contact portmapper: RPC: Remote system error - Connection refused
1、 前提: NFS原理及部署过程
2、 先在客户的排查
1.ping server_ip
2.telnet server_ip 111 #端口是否通,是否提供服务
3.showmount -e server_ip #rpcinfo -p server_ip
客户端挂载优化
挂载优化
[root@backup ~]# mount -t nfs -o nosuid,noexec,nodev,noatime,nodiratime,rsize=131072,wsize=131072 172.16.1.31:/data/ /upload

[root@backup ~]# grep upload /proc/mounts
172.16.1.31:/data/ /upload nfs4
rw,nosuid,nodev,noexec,noatime,nodiratime,vers=4,rsize=131072,wsize=131072,namlen=255,hard,pro
to=tcp,port=0,timeo=600,retrans=2,sec=sys,clientaddr=172.16.1.45,minorversion=0,local_lock=non
e,addr=172.16.1.31 0 0
nfs 内核优化
cat >>/etc/sysctl.conf<<EOF
net.core.wmem_default = 8388608
net.core.rmem_default = 8388608
net.core.rmem_max = 16777216
net.core.wmem_max = 16777216
EOF
sysctl -p
NFS客户端开机自启动挂载
1./etc/rc.local √ 推荐

2./etc/fstab
如果把客户端挂载命令 放在/etc/fstab里面,可能会起不来
因为系统先读取/etc/fstab 自动挂载列表。
然后启动network服务。
解决:需要让netfs服务开机自启动就可以继续使用fstab开机自动挂载nfs

fstab修改错误导致系统无法启动故障修复案例
维护模式或救援模式:
mount -o rw,remount /
然后修改/etc/fstab
文件系统只读故障修复案例
1)RSYNC bug.
2)文件系统内部自动一致性(只读)
维护模式或救援模式:
mount -o rw,remount /

案例:
http://blog.sina.com.cn/s/blog_4a2fadfb010131jf.html
linux 文件系统变只读 (2012-01-12 11:27:17)转载▼
标签: linux 文件系统只读 it
1. 重启系统看是否可以自动修复。
2. 使用fsck -y /dev/sda1 进行自动修复。(用”-y”选项来执行该命令对硬盘进行检查和修复)   添加参数:fsck -y -C -t ext3 /dev/sda1 (一般情况下修复完成后,所有文件移动到 lost+found目录,文件名会被改变)   (-C 显示进度条 -t 指定文件系统类型 -y 默认自动yes修复)
3. 如果fsck修复完成后,启动系统依然自读。   查看分区结构:   [root@localhost ~]# more /etc/fstab     [root@localhost ~]# more /proc/mounts   [root@localhost ~]# mount   /dev/sda2 on / type ext3 (rw)   proc on /proc type proc (rw)   sysfs on /sys type sysfs (rw)   查看ro挂载的分区,如果发现有ro,就重新mount   umount /dev/sda1   mount /dev/sda1 /boot   如果发现有提示“device is busy”,找到是什么进程使得他busy   fuser -m /boot 将会显示使用这个模块的pid   fuser -mk /boot 将会直接kill那个pid   然后重新mount即可。
4. 直接remount   [root@localhost ~]# mount -o rw,remount /dev/sda1

No route to host
[root@web01 sysconfig]# mount 10.10.11.211:/opt/b2b-data/xmldb /b2b-web1/b2b-data/xmldb -t nfs -o rw
mount: mount to NFS server '10.10.11.211' failed: System Error: No route to host.


RPC: Program not registered & retrying
nfs mount: 172.16.1.31: : RPC: Program not registered
nfs mount: retrying: /data
故障原因:
没有启动NFS共享端服务。
解决:需要重新启动share端的NFS服务,
mount: RPC: Program not registered
# /etc/init.d/nfs restart


The unknown host error
nfs mount: sserver1:: RPC: Unknown host
原因:
hosts文件中的内容不正确。


The stale file handle error
stale NFS file handle
原因:
服务器上的共享资源移动位置了,在客户端使用umount和mount重新挂接就可以了。


The server not responding error
NFS server server2 not responding, still trying

故障原因:
第一,网络不通,用ping命令检测一下。
第二,服务器关机。
inotify 部署
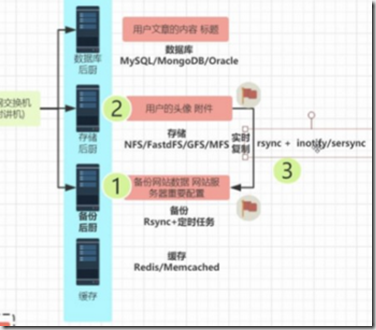
利用 inotify+rsync 实时监控,有文件变动就会同步到服务器,在分布式架构中,负载均衡时,用户上传到某台服务器的数据,下次登录引到另外的服务器时也能够访问到。
前提:rsync服务要先搭好

[root@backup ~]# cat /etc/rsyncd.conf
######rsync_config_______________start
#created by oldboy 15:01 2007-6-5
#QQ 31333741 blog:http://oldboy.blog.51cto.com
##rsyncd.conf start##
uid = rsync
gid = rsync
use chroot = no
max connections = 200
timeout = 300
pid file = /var/run/rsyncd.pid
lock file = /var/run/rsync.lock
log file = /var/log/rsyncd.log
ignore errors
read only = false
list = false
hosts allow = 172.16.1.0/24
#hosts deny = 0.0.0.0/32
auth users = rsync_backup
secrets file = /etc/rsync.password
[backup]
path = /backup/
[nfsbackup]
path = /nfsbackup/

#yum install epel-release –y
yum install inotify
#yum install epel-release -y
#https://mirrors.aliyun.com/help/epel

[root@nfs01 ~]# ls -l /proc/sys/fs/inotify/
total 0
-rw-r--r-- 1 root root 0 Jan 27 23:59 max_queued_events
-rw-r--r-- 1 root root 0 Jan 27 23:59 max_user_instances
-rw-r--r-- 1 root root 0 Jan 27 23:59 max_user_watches
max_user_watches: 设置inotifywait或inotifywatch命令可以监视的文件数量(单进程)。
max_user_instances:设置每个用户可以运行的inotifywait或inotifywatch命令的进程数。
max_queued_events:设置inotify实例事件(event)队列可容纳的事件数量。

[root@nfs01 ~]# cat /server/scripts/jiankong.sh
#!/bin/bash
#desc: watch /data dir && rsync to backup
inotifywait -mrq /data/ --format "%w%f " -e create,modify,close_write,moved_to|while read line
do
    rsync -az /data/ rsync_backup@172.16.1.41::nfsbackup --password-file=/etc/rsync.password
done


/bin/sh /server/scripts/jiankong.sh &


监控格式
inotifywait -mrq /data/ --timefmt "%y-%m-%d %H:%M" --format "%T %w%f" -e create
inotifywait -mrq /data/ --timefmt "%y-%m-%d %H:%M" --format "%T %w%f" -e delete
inotifywait -mrq /data/ --timefmt "%y-%m-%d %H:%M" --format "%T %w%f" -e close_write
inotifywait -mrq /data/ --timefmt "%y-%m-%d %H:%M" --format "%T %w%f " -e create,modify,close_write,moved_to
inotify优点:
1)监控文作系统事件变化,通过固步工其实现实时数据同步。
inotify缺点:
1)并发如果大于200个文件(10-100K),同步就会有延迟。。
2)我们前面写的脚本,每次都是全部推送一次,但确实是增量的。.
也可以只同步变化的文件,不变化的不理
3)监控到事件后,调用rsyac同步是单进程的(加&并发)sersyac 多进程同步。
sersync部署与使用流程
sersync 配置文件采用 xml 格式 ,更加直观,同时支持插件

[root@nfs01 tools]# unzip sersync_installdir_64bit.zip
[root@nfs01 tools]# tree
.
├── sersync_installdir_64bit
│ └── sersync
│ ├── bin
│ │ └── sersync
│ ├── conf
│ │ └── confxml.xml
│ └── logs
└── sersync_installdir_64bit.zip
5 directories, 3 files

环境变量

[root@nfs01 tools]# mv sersync_installdir_64bit/sersync/ /usr/local/
[root@nfs01 tools]#
[root@nfs01 tools]# ls -l /usr/local/sersync/bin/sersync
-rw-r--r-- 1 root root 1810128 Oct 26 2011 /usr/local/sersync/bin/sersync

[root@nfs01 tools]# chmod +x /usr/local/sersync/bin/sersync
ln -s /usr/local/sersync/bin/sersync /usr/local/bin/

<?xml version="1.0" encoding="ISO-8859-1"?>
<head version="2.5">
    <host hostip="localhost" port="8008"></host>
    <debug start="false"/>
    <fileSystem xfs="false"/>
    <filter start="false">
        <exclude expression="(.*)\.svn"></exclude>
        <exclude expression="(.*)\.gz"></exclude>
        <exclude expression="^info/*"></exclude>
        <exclude expression="^static/*"></exclude>
    </filter>
    <inotify>
        <delete start="true"/>
        <createFolder start="true"/>
        <createFile start="false"/>
        <closeWrite start="true"/>
        <moveFrom start="true"/>
        <moveTo start="true"/>
        <attrib start="false"/>
        <modify start="false"/>
    </inotify>
    <sersync>
        <localpath watch="/data">
            <remote ip="172.16.1.41" name="nfsbackup"/>
            <!--<remote ip="192.168.8.39" name="tongbu"/>-->
            <!--<remote ip="192.168.8.40" name="tongbu"/>-->
        </localpath>
        <rsync>
            <commonParams params="-artuz --delete"/>
            <auth start="true" users="rsync_backup" passwordfile="/etc/rsync.password"/>
            <userDefinedPort start="false" port="874"/><!-- port=874 -->
            <timeout start="false" time="100"/><!-- timeout=100 -->
            <ssh start="false"/>
        </rsync>
        <failLog path="/var/log/rsync_fail.log" timeToExecute="60"/><!--default every 60mins
execute once-->
        <crontab start="false" schedule="600"><!--600mins-->
            <crontabfilter start="false">
                <exclude expression="*.php"></exclude>
                <exclude expression="info/*"></exclude>
            </crontabfilter>
        </crontab>
        <plugin start="false" name="command"/>
    </sersync>
    <plugin name="command">
        <param prefix="/bin/sh" suffix="" ignoreError="true"/> <!--prefix /opt/tongbu/mmm.sh
suffix-->
        <filter start="false">
            <include expression="(.*)\.php"/>
            <include expression="(.*)\.sh"/>
        </filter>
    </plugin>
    <plugin name="socket">
        <localpath watch="/opt/tongbu">
            <deshost ip="192.168.138.20" port="8009"/>
        </localpath>
    </plugin>
    <plugin name="refreshCDN">
        <localpath watch="/data0/htdocs/cms.xoyo.com/site/">
            <cdninfo domainname="ccms.chinacache.com" port="80" username="xxxx" passwd="xxxx"/>
            <sendurl base="http://pic.xoyo.com/cms"/>
            <regexurl regex="false" match="cms.xoyo.com/site([/a-zA-Z0-9]*).xoyo.com/images"/>
        </localpath>
    </plugin>
</head>
运行
[root@nfs01 data]# sersync -d -r -o /usr/local/sersync/conf/confxml.xml

解释说明sersync配置中如下内容的含义:

<inotify>
<delete start="true"/>    对删除事件进行监控
<createFolder start="true"/> 对产生的目录进行监控,
<createFile start="false"/>  对于大多数应用,可以尝试把createFile(监控文件事件选项)设置为false来提高性能,减少 rsync通讯。因为拷贝文件到监控目录会产生create事件与close_write事件,所以如果关闭create事件,只监控文件拷贝结束时的事 件close_write,同样可以实现文件完整同步。
<closeWrite start="true"/>   监控文件内容修改
<moveFrom start="true"/>     文件(目录)移动
<moveTo start="true"/>    监控修改文件名称
<attrib start="false"/>    不监控文件或目录内容属性
<modify start="false"/>    不监控文件或目录内容修改
</inotify>
<localpath watch="/data">    监控本地的路径
<remote name="nfsbackup" ip="172.16.1.41"/>    远程的模块和ip地址
<rsync>
<commonParams params="-avz"/>
<auth start="true" passwordfile="/etc/rsync.password" users="rsync_backup"/>
</rsync>    rsync推送用户认证 及参数
<failLog timeToExecute="60" path="/application/logs/rsync_fail_log.sh"/>    日志路径
本文来自博客园,作者:元贞,转载请注明原文链接:https://www.cnblogs.com/yuleicoder/articles/9854573.html


 浙公网安备 33010602011771号