
STM32F207V 进行DS18B20处理
1、 DS18B20接口很简单,VCC、DQ、GND三个引脚,VCC采用外部供电3.3V,DQ需上拉电阻,当时按照参考资料上外接4.7K的上拉电阻,GPIO设置的OD无上拉,始终读不到ROM中的64位序列号,后面发送的转换指令更别想了,后来GPIO改成推挽输出时,诶,就能读到数据,推挽输出无非就是增大驱动能力,仔细看手册,其中有提到,DS18B20空闲处于低功耗状态,在执行温度转换或从高速暂存器向EPPROM传送数据时,工作电流可高达1.5mA,但并有说读ROM中的64位数据时,电流需要多少,也许在读ROM中的数据电流也需要要求。知道了加大驱动能力才能读到,加上之前写I2C和FLASH擦除时,数据线都是设置OD类型,通用性较好,好移植,所以还是改成OD类型,把4.7K的电阻换小点,换成1K电阻,就可以正确的读写操作。
GPIO配置:
 1 void Ds18b20_GPIO_Config(void)
 2 {
 3     GPIO_InitTypeDef  GPIO_InitStructure;
 4
 5     RCC_AHB1PeriphClockCmd( RCC_AHB1Periph_GPIOE,ENABLE);
 6
 7     GPIO_InitStructure.GPIO_Pin = DS18B20_DATA;
 8     GPIO_InitStructure.GPIO_Mode = GPIO_Mode_OUT;
 9     GPIO_InitStructure.GPIO_OType = GPIO_OType_OD;   //OD门
10     GPIO_InitStructure.GPIO_PuPd = GPIO_PuPd_NOPULL;
11     GPIO_InitStructure.GPIO_Speed = GPIO_Speed_50MHz;
12     GPIO_Init(GPIOE,&GPIO_InitStructure);
13 }
2、操作步骤,在使用任何一条功能指令前,都必须先执行有复位、ROM指令。
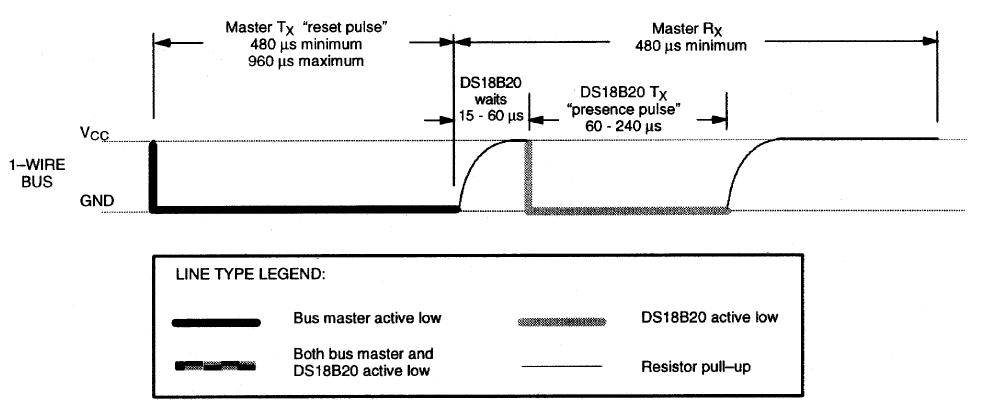
(1)、复位信号就是双方握手,达成协议后才能相互通信。时序如下,一定要注意minimum和maximum,Master主机先发送低电平脉冲,低电平持续480us~960us(这里设置700us,延迟后记得释放数据线,也就是拉高),DS18B20等待15~60us后(用while语句检测低电平的到来),会发出低电平脉冲信号给Master,该低电平脉冲60~240us,Master接收到后,就说明握手成功,用while语句检测高电平结束。
代码:
 1 void Ds18b20_rst(void)
 2 {
 3     DS18B20_DATA_H;
 4     DS18B20_DATA_L;
 5     Ds18b20_delay(T700US);         //700us
 6     DS18B20_DATA_H;                //释放数据线
 7     while(DS18B20_DATA_Read);      //检测低电平
 8     Ds18b20_delay(T700US);
 9     while(!DS18B20_DATA_Read);    //检测高电平
10     DS18B20_DATA_H;
11 }
(2)、发ROM指令和功能指令,就是1bit 1bit 的往外发,读也是1bit 1bit的往里读,发送顺序是先低后高。读写时有高有低,一定要按照时序严格进行操作:
a)、写“0” 和“1”时序,先拉低15us,发送高电平持续45us,注意不低于60us,发送完1bit,释放数据线。

代码:
 1 void Ds18b20_Send_0(void)
 2 {
 3     DS18B20_DATA_L;
 4     Ds18b20_delay(T15US);   //15us
 5     DS18B20_DATA_L;
 6     Ds18b20_delay(T45US);        //45us
 7     DS18B20_DATA_H;        //释放总线
 8 }
 9
10 void Ds18b20_Send_1(void)
11 {
12     DS18B20_DATA_L;
13     Ds18b20_delay(T15US);   //15us
14     DS18B20_DATA_H;
15     Ds18b20_delay(T45US);
16     DS18B20_DATA_H;        //释放总线
17 }
18
19 void Ds18b20_send_byte(uint8_t data)
20 {
21     uint8_t i = 8;
22
23     while(i--)
24     {
25         if(data & 0x01)    //从低位开始发送
26             Ds18b20_Send_1();
27         else
28             Ds18b20_Send_0();
29
30         data >>= 1;
31     }
32 }
b)、读“0” 和“1”时序,在MASTER SAMPLES就可以采样数据,但一般会大于15us后开始采集数据,读写前 和 读写完后,都要记得释放数据

代码:
 1 uint8_t Ds18b20_read_byte(void)
 2 {
 3     uint8_t i = 8;
 4     uint8_t data_buffer = 0;
 5
 6     DS18B20_DATA_H;        //释放数据线
 7     while(i--)
 8     {
 9         data_buffer >>= 1;
10         DS18B20_DATA_L;
11         Ds18b20_delay(T1US);        //1us
12         DS18B20_DATA_H;                //释放数据线
13         Ds18b20_delay(T15US);
14         if(DS18B20_DATA_Read)    //接收低位开始
15         {
16             data_buffer |= 0x80;
17         }
18         Ds18b20_delay(T45US);
19         DS18B20_DATA_H;
20     }
21
22     return data_buffer;
23 }
写好写字节函数 和 读字节函数,那么就可以发送ROM指令和功能指令了,具体指令参考数据手册。
一些具体操作指令代码
ds18b20.c


  1 #include "ds18b20.h"
  2
  3 #define DS18B20_DATA                GPIO_Pin_3
  4 #define DS18B20_DATA_H            GPIOE->BSRRL = GPIO_Pin_3
  5 #define DS18B20_DATA_L            GPIOE->BSRRH = GPIO_Pin_3
  6 #define DS18B20_DATA_Read        GPIOE->IDR   & GPIO_Pin_3
  7
  8 #define T1US                    15
  9 #define T15US                    230
 10 #define T45US                    790
 11 #define T700US                12000
 12
 13 void Ds18b20_GPIO_Config(void)
 14 {
 15     GPIO_InitTypeDef  GPIO_InitStructure;
 16
 17     RCC_AHB1PeriphClockCmd( RCC_AHB1Periph_GPIOE,ENABLE);
 18
 19     GPIO_InitStructure.GPIO_Pin = DS18B20_DATA;
 20     GPIO_InitStructure.GPIO_Mode = GPIO_Mode_OUT;
 21     GPIO_InitStructure.GPIO_OType = GPIO_OType_OD;
 22     GPIO_InitStructure.GPIO_PuPd = GPIO_PuPd_NOPULL;
 23     GPIO_InitStructure.GPIO_Speed = GPIO_Speed_50MHz;
 24     GPIO_Init(GPIOE,&GPIO_InitStructure);
 25 }
 26
 27 void Ds18b20_delay(__IO uint32_t nCount)
 28 {
 29   while(nCount--)
 30   {
 31
 32   }
 33 }
 34
 35 void Ds18b20_rst(void)
 36 {
 37     DS18B20_DATA_H;
 38     DS18B20_DATA_L;
 39     Ds18b20_delay(T700US);        //700us
 40     DS18B20_DATA_H;                //释放数据线
 41     while(DS18B20_DATA_Read);  //检测低电平
 42     Ds18b20_delay(T700US);
 43     while(!DS18B20_DATA_Read);    //检测高电平
 44     DS18B20_DATA_H;
 45 }
 46
 47 void Ds18b20_Send_0(void)
 48 {
 49     DS18B20_DATA_L;
 50     Ds18b20_delay(T15US);   //15us
 51     DS18B20_DATA_L;
 52     Ds18b20_delay(T45US);        //45us
 53     DS18B20_DATA_H;        //释放总线
 54 }
 55
 56 void Ds18b20_Send_1(void)
 57 {
 58     DS18B20_DATA_L;
 59     Ds18b20_delay(T15US);   //15us
 60     DS18B20_DATA_H;
 61     Ds18b20_delay(T45US);
 62     DS18B20_DATA_H;        //释放总线
 63 }
 64
 65 void Ds18b20_send_byte(uint8_t data)
 66 {
 67     uint8_t i = 8;
 68
 69     while(i--)
 70     {
 71         if(data & 0x01)    //从低位开始发送
 72             Ds18b20_Send_1();
 73         else
 74             Ds18b20_Send_0();
 75
 76         data >>= 1;
 77     }
 78 }
 79
 80 uint8_t Ds18b20_read_byte(void)
 81 {
 82     uint8_t i = 8;
 83     uint8_t data_buffer = 0;
 84
 85     DS18B20_DATA_H;        //释放数据线
 86     while(i--)
 87     {
 88         data_buffer >>= 1;
 89         DS18B20_DATA_L;
 90         Ds18b20_delay(T1US);        //1us
 91         DS18B20_DATA_H;                //释放数据线
 92         Ds18b20_delay(T15US);
 93         if(DS18B20_DATA_Read)    //接收低位开始
 94         {
 95             data_buffer |= 0x80;
 96         }
 97         Ds18b20_delay(T45US);
 98         DS18B20_DATA_H;
 99     }
100
101     return data_buffer;
102 }
103
104 void Ds18b20_Read_ROM(uint8_t *pBuff)
105 {
106     uint8_t i =0;
107     Ds18b20_rst();
108     Ds18b20_send_byte(0x33);            //读Rom指令
109     for(i=0; i<8; i++)
110     {
111         pBuff[i] = Ds18b20_read_byte();
112     }
113 }
114
115 void Ds18b20_Convert_temprature(void)
116 {
117     Ds18b20_rst();
118     Ds18b20_send_byte(0xcc);                //忽略ROM指令
119     Ds18b20_send_byte(0x44);                //转换指令
120 }
121
122 void Ds18b20_Read_register(uint8_t *pBuff)
123 {
124     uint8_t i = 0;
125     Ds18b20_Convert_temprature();
126     Ds18b20_rst();
127     Ds18b20_send_byte(0xcc);                //忽略ROM指令
128     Ds18b20_send_byte(0xbe);                //读取存储器指令
129     for(i=0; i<8; i++)
130     {
131         pBuff[i] = Ds18b20_read_byte();
132     }
133 }
134
135 void Ds18b20_weite_threshold(uint8_t TH, uint8_t TL, uint8_t Resolution)
136 {
137     Ds18b20_rst();
138     Ds18b20_send_byte(0xcc);                //忽略ROM指令
139     Ds18b20_send_byte(0x4e);                //写暂存器指令
140     Ds18b20_send_byte(TH);
141     Ds18b20_send_byte(TL);
142     if(Resolution == 9)
143     {
144         Ds18b20_send_byte(0x1f);
145     }
146     else if(Resolution == 10)
147     {
148         Ds18b20_send_byte(0x3f);
149     }
150     else if(Resolution == 11)
151     {
152         Ds18b20_send_byte(0x5f);
153     }
154     else //if(Resolution == 12)    //其他任何都默认设置12bit分辨率
155     {
156         Ds18b20_send_byte(0x7f);
157     }
158 }
主函数:
 1 int main(void)
 2 {
 3     u8 i = 0;
 4     u8 id[8];
 5     RCC_ClocksTypeDef rcc_clocks;
 6
 7     Clock_Config();
 8     USART_Config();
 9
10     Ds18b20_GPIO_Config();
11     Ds18b20_Read_ROM(id);
12     printf("DS18B20 64bit ROM Data:\n");
13     for(i=0; i<8; i++)
14     {
15         printf("0x%02x,",id[i]);
16     }
17     printf("\n");
18     printf("DS18B20 Memory Data:\n");
19
20     Ds18b20_Read_register(id);
21     for(i=0; i<8; i++)
22     {
23         printf("0x%02x,",id[i]);
24     }
25
26     printf("\n");
27
28     Ds18b20_weite_threshold(0x3b,0x36,12);
29     Ds18b20_Read_register(id);
30     for(i=0; i<8; i++)
31     {
32         printf("0x%02x,",id[i]);
33     }
34
35     printf("\n");
36
37     while(1)
38     {
39         Ds18b20_Read_register(id);
40         printf("temprature:%.4f\n",((id[1]<<8) | id[0]) * 6.25 /100);
41         Delay(0x1fffff0);   /* delay 1000ms */
42     }
43 }
3、打印信息
(1)、读5个不同DS18B20中ROM数据:
0x28,0x37,0x4f,0xca,0x06,0x00,0x00,0x03
0x28,0x3b,0xf4,0xc9,0x06,0x00,0x00,0xc9
0x28,0xee,0xa0,0xcc,0x06,0x00,0x00,0xed
0x28,0xca,0x02,0xcb,0x06,0x00,0x00,0xb1
0x28,0xf0,0xbf,0xcb,0x06,0x00,0x00,0x30
最前面8位是单线系列编码固定28H,接着48位是唯一序列号,最后8位是CRC,有关CRC计算参考手册,这里也没有去验证CRC是否正确。
(2)、
DS18B20 64bit ROM Data:
0x28,0xf0,0xbf,0xcb,0x06,0x00,0x00,0x30, //64位中的序列号
DS18B20 Memory Data:
0xcd,0x01,0x4b,0x46,0x7f,0xff,0x03,0x10, //读暂存器中的默认值
0xcd,0x01,0x3b,0x36,0x7f,0xff,0x03,0x10, //改写后,读暂存器中的数据
temprature:28.8125 //转换温度
printf("temprature:%.4f\n",((id[1]<<8) | id[0]) * 6.25 /100);
这里只考虑了正数温度,关于*6.25/100,参考数据手册:"温度传感器的精度为用户可编程的9、10、11或12位,分别以0.5°、0.25°、0.125°和0.0625°增量递增",程序选的是12bit分辨率,单位增量即为0.0625

 浙公网安备 33010602011771号