NetMQ(三): 发布订阅模式 Publisher-Subscriber
ZeroMQ系列 之NetMQ
一:zeromq简介
二:NetMQ 请求响应模式 Request-Reply
三:NetMQ 发布订阅模式 Publisher-Subscriber
四:NetMQ 推拉模式 Push-Pull
NetMQ 发布订阅模式 Publisher-Subscriber
1:简单介绍
PUB-SUB模式一般处理的都不是系统的关键数据。发布者不关注订阅者是否收到发布的消息,订阅者也不知道自己是否收到了发布者发出的所有消息。你也不知道订阅者何时开始收到消息。类似于广播,收音机。因此逻辑上,它都不是可靠的。这个可以通过与请求响应模型组合来解决。
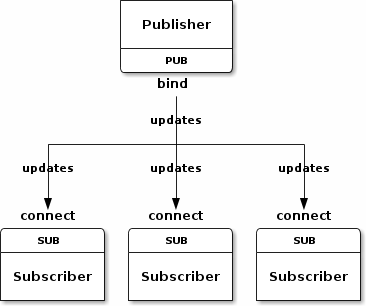
图1:简单的发布订阅模式
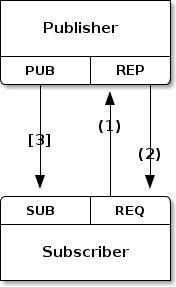
图2:与请求响应模式组合的发布订阅模式
2:案例
接下来,我们通过写一个天气预报的例子,来说明发布订阅模式。发布端一直在发布大量的天气信息,订阅端通过过滤字段,接收到想要的数据。
使用的NetMQ版本是3.3.2.2
发布端代码:
主程序:
class Program
{
    static void Main(string[] args)
    {
        NetMQPub.Start();
    }
}
发布类:
public class NetMQPub
{
    readonly static ManualResetEvent _terminateEvent = new ManualResetEvent(false);
    /// <summary>
    /// NetMQ 发布端
    /// </summary>
    public static void Start()
    {
        string[] weathers = new string[6] { "晴朗", "多云", "阴天", "霾", "雨", "雪" };

        Console.WriteLine("发布多个地区天气预报:");

        using (NetMQContext context = NetMQContext.Create())
        {
            using (var publisher = context.CreatePublisherSocket())
            {
                publisher.Bind("tcp://127.0.0.1:5556");

                var rng = new Random();
                string msg;
                int sleeptime = 1000;//1秒

                ///指定发布的时间间隔,1秒
                while (_terminateEvent.WaitOne(1000) == false)
                {
                    //随机生成天气数据
                    int zipcode = rng.Next(0, 99);
                    int temperature = rng.Next(-50, 50);
                    int weatherId = rng.Next(0, 5);

                    msg = string.Format("{0} {1} {2}", zipcode, temperature, weathers[weatherId]);
                    publisher.SendFrame(msg);

                    Console.WriteLine(msg);
                    Thread.Sleep(sleeptime);
                }
            }
        }
    }

    private static void Console_CancelKeyPress(object sender, ConsoleCancelEventArgs e)
    {
        Console.WriteLine("exit……");
        _terminateEvent.Set();
    }
}
订阅端代码
主程序:
class Program
{
    static void Main(string[] args)
    {
        NetMQSub.Start();
    }
}
订阅类:
public class NetMQSub
{
    public delegate void GetDataHandler(string message);
    public static event GetDataHandler OnGetData;
    /// <summary>
    /// NetMQ 订阅端
    /// </summary>
    public static void Start()
    {
        var rng = new Random();
        int zipcode = rng.Next(0, 99);
        Console.WriteLine("接收本地天气预报{0}……", zipcode);

        OnGetData += new GetDataHandler(ProcessData);

        using (var context = NetMQContext.Create())
        {
            using (var subscriber = context.CreateSubscriberSocket())
            {
                subscriber.Connect("tcp://127.0.0.1:5556");
				//设置过滤字符串
                subscriber.Subscribe(zipcode.ToString(CultureInfo.InvariantCulture));
				//订阅所有的发布端内容
				//subscriber.Subscribe("");
                while (true)
                {
                    string results = subscriber.ReceiveFrameString(Encoding.UTF8);
                    Console.WriteLine(".");

                    string[] split = results.Split(new[] { ' ' }, StringSplitOptions.RemoveEmptyEntries);

                    int zip = int.Parse(split[0]);
                    if (zip == zipcode)
                    {
                        OnGetData(results);
                    }
                }
            }
        }
    }

    private static void ProcessData(string message)
    {
        Console.WriteLine("天气情况:" + message);
    }
}
3:总结
- 一个发布端可以有多个订阅端
- 如果只想要接收指定的数据,订阅端必须要设置过滤字符
- 订阅端设置空字符串,订阅所有的发布内容。【You can set topic an empty string to subscribe to everything】
- 发布端和订阅端的套接字绑定的地址必须一样的。比如:tcp://127.0.0.1:5556,使用tcp协议,监听端口5556
4:下载
感谢您的认真阅读,更多内容请查看:
出处:http://www.cnblogs.com/weiqinl
个人主页http://weiqinl.com
github: weiqinl
简书:weiqinl
您的留言讨论是对博主最大的支持!
本文版权归作者所有,欢迎转载,但未经作者同意必须保留此段声明,且在文章页面明显位置给出原文连接,否则保留追究法律责任的权利。
出处:http://www.cnblogs.com/weiqinl
个人主页http://weiqinl.com
github: weiqinl
简书:weiqinl
您的留言讨论是对博主最大的支持!
本文版权归作者所有,欢迎转载,但未经作者同意必须保留此段声明,且在文章页面明显位置给出原文连接,否则保留追究法律责任的权利。

 浙公网安备 33010602011771号