

VirtualBox——在Win7的HOST上安装配置虚拟机CentOS7
在Win7为HOST的环境下,安装VirtualBox,在其中安装CentOS7,以Bridge的方式搭建网络环境。
主要配置包括VirtualBox中的网络设置,以及CentOS中的网络配置。另外还有个重要的注意点就是如果HOST使用的是无线网,那么即使bridge配置成功了,虚拟机能够与主机互相ping通,虚拟机也无法访问外网。
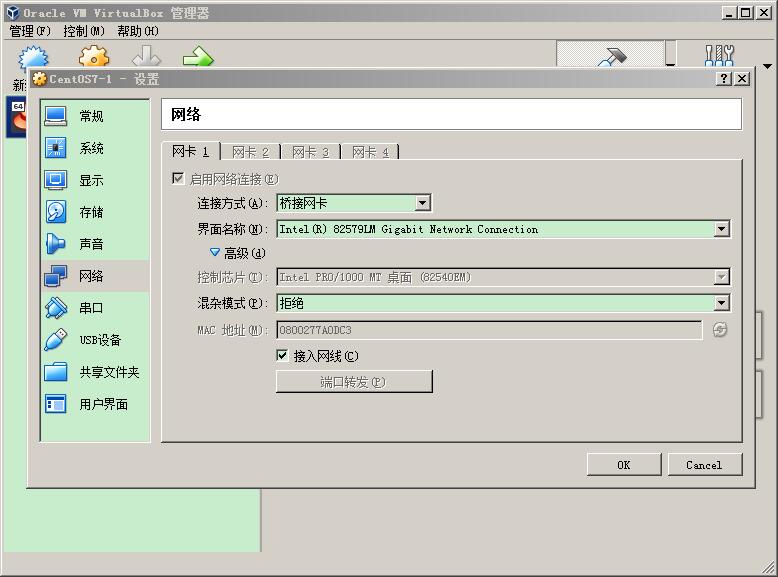
VirtualBox网络配置
CentOS网络配置
修改网络配置文件:
vi /etc/sysconfig/network-scripts/ifcfg-enp0s3
修改后内容:
TYPE=Ethernet
PROXY_METHOD=none
BROWSER_ONLY=no
BOOTPROTO=static
DEFROUTE=yes
IPV4_FAILURE_FATAL=no
IPV6INIT=yes
IPV6_AUTOCONF=yes
IPV6_DEFROUTE=yes
IPV6_FAILURE_FATAL=no
IPV6_ADDR_GEN_MODE=stable-privacy
NAME=enp0s3
UUID=6ce977fe-843a-4fb3-8bda-40b7ae4fc4f5
DEVICE=enp0s3
ONBOOT=yes
HWADDR=08:00:27:7a:0d:c3
IPADDR=192.168.0.150
NETMASK=255.255.255.0
GATEWAY=192.168.0.1
DNS1=192.168.0.1
安装VirtualBox Guest Additational
安装依赖:
yum install kernel-headers
yum install kernel-devel
yum install gcc*
yum install make
安装完成之后重启一下,然后点击虚拟机窗口上的安装增强(如果guest中已经加在过了镜像,就将其退出),然后稍等一会就安装完成了。
如果报以下错误:
this system is currently not set up to build kernel modules
则有可能是kernel的几个包的版本不一致,使用命令:
rpm -qa kernel* |sort -V |tail -n 5
查看几个包的版本是否一致:
kernel-3.10.0-693.el7.x86_64
kernel-devel-3.10.0-693.5.2.el7.x86_64
kernel-headers-3.10.0-693.5.2.el7.x86_64
kernel-tools-3.10.0-693.el7.x86_64
kernel-tools-libs-3.10.0-693.el7.x86_64
如果不一致,可以使用以下命令进行更新:
yum -y upgrade kernel kernel-devel kernel-devel
更新完重启后,再次安装增强控件。
CentOS分辨率问题(存在问题)
以下过程是参照网络上的资料执行的,不过在执行过程中报了一个错,可能是缺少驱动的问题,此处我没有再进一步解决,就此打住了,因为是打算设置一个Linux的Java开发环境,因此打算换一个比较容易操作的版本,换成Ubuntu了。
下面的操作直接导致系统卡在启动界面了,解决方法可以参考日志:
执行命令:
Xorg :1 -configure
执行结果:
X.Org X Server 1.19.3
Release Date: 2017-03-15
X Protocol Version 11, Revision 0
Build Operating System:  3.10.0-514.16.1.el7.x86_64
Current Operating System: Linux localhost.localdomain 3.10.0-693.5.2.el7.x86_64 #1 SMP Fri Oct 20 20:32:50 UTC 2017 x86_64
Kernel command line: BOOT_IMAGE=/vmlinuz-3.10.0-693.5.2.el7.x86_64 root=/dev/mapper/centos-root ro crashkernel=auto rd.lvm.lv=centos/root rd.lvm.lv=centos/swap rhgb quiet LANG=zh_CN.UTF-8
Build Date: 05 August 2017  06:19:43AM
Build ID: xorg-x11-server 1.19.3-11.el7
Current version of pixman: 0.34.0
    Before reporting problems, check http://wiki.x.org
    to make sure that you have the latest version.
Markers: (--) probed, (**) from config file, (==) default setting,
    (++) from command line, (!!) notice, (II) informational,
    (WW) warning, (EE) error, (NI) not implemented, (??) unknown.
(==) Log file: "/var/log/Xorg.1.log", Time: Tue Nov  7 16:08:43 2017
List of video drivers:
    ati
    dummy
    intel
    nouveau
    qxl
    radeon
    v4l
    vmware
    modesetting
    vesa
    fbdev
(++) Using config file: "/root/xorg.conf.new"
(==) Using config directory: "/etc/X11/xorg.conf.d"
(==) Using system config directory "/usr/share/X11/xorg.conf.d"
(EE)
(EE) Backtrace:
(EE) 0: Xorg (xorg_backtrace+0x55) [0x55b8bcdb6655]
(EE) 1: Xorg (0x55b8bcc0a000+0x1b0369) [0x55b8bcdba369]
(EE) 2: /lib64/libpthread.so.0 (0x7fcf0c3ca000+0xf5e0) [0x7fcf0c3d95e0]
(EE)
(EE) Segmentation fault at address 0x0
(EE)
Fatal server error:
(EE) Caught signal 11 (Segmentation fault). Server aborting
(EE)
(EE)
Please consult the The X.Org Foundation support
     at http://wiki.x.org
 for help.
(EE) Please also check the log file at "/var/log/Xorg.1.log" for additional information.
(EE)
(EE) Server terminated with error (1). Closing log file.
已放弃(吐核)
然后将生成的配置文件拷贝到目标路径下:
cp /root/xorg.conf.new /etc/X11/xorg.conf
该文件中的原始内容为:
Section "ServerLayout"
    Identifier     "X.org Configured"
    Screen      0  "Screen0" 0 0
    InputDevice    "Mouse0" "CorePointer"
    InputDevice    "Keyboard0" "CoreKeyboard"
EndSection

Section "Files"
    ModulePath   "/usr/lib64/xorg/modules"
    FontPath     "catalogue:/etc/X11/fontpath.d"
    FontPath     "built-ins"
EndSection

Section "Module"
    Load  "glx"
EndSection

Section "InputDevice"
    Identifier  "Keyboard0"
    Driver      "kbd"
EndSection

Section "InputDevice"
    Identifier  "Mouse0"
    Driver      "mouse"
    Option        "Protocol" "auto"
    Option        "Device" "/dev/input/mice"
    Option        "ZAxisMapping" "4 5 6 7"
EndSection

Section "Monitor"
    Identifier   "Monitor0"
    VendorName   "Monitor Vendor"
    ModelName    "Monitor Model"
EndSection

Section "Device"
        ### Available Driver options are:-
        ### Values: <i>: integer, <f>: float, <bool>: "True"/"False",
        ### <string>: "String", <freq>: "<f> Hz/kHz/MHz",
        ### <percent>: "<f>%"
        ### [arg]: arg optional
        #Option     "SWcursor"               # [<bool>]
        #Option     "kmsdev"                 # <str>
        #Option     "ShadowFB"               # [<bool>]
        #Option     "AccelMethod"            # <str>
        #Option     "PageFlip"               # [<bool>]
        #Option     "ZaphodHeads"            # <str>
        #Option     "DoubleShadow"           # [<bool>]
    Identifier  "Card0"
    Driver      "modesetting"
    BusID       "PCI:0:2:0"
EndSection

Section "Screen"
    Identifier "Screen0"
    Device     "Card0"
    Monitor    "Monitor0"
    SubSection "Display"
        Viewport   0 0
        Depth     1
    EndSubSection
    SubSection "Display"
        Viewport   0 0
        Depth     4
    EndSubSection
    SubSection "Display"
        Viewport   0 0
        Depth     8
    EndSubSection
    SubSection "Display"
        Viewport   0 0
        Depth     15
    EndSubSection
    SubSection "Display"
        Viewport   0 0
        Depth     16
    EndSubSection
    SubSection "Display"
        Viewport   0 0
        Depth     24
    EndSubSection
EndSection
在其中的:
SubSection "Display"
    Viewport   0 0
    Depth     24
EndSubSection
插入内容后形成:
SubSection "Display"
    Viewport   0 0
    Depth     24
    Models    "800x600" "1366x768" "1440x900"
EndSubSection
其中分辨率根据子集的屏幕来设置。

 浙公网安备 33010602011771号