Linux之FTP篇
内容简介:
-
vsftpd的安装
-
目录介绍
-
配置参数解释
-
锁定用户目录
-
其他用户不能登录
----------------------------------------------------------------------------------------------
1、安装vsftpd
安装
yum install vsftpd
配置文件目录
cd /etc/vsftpd
启动、停止、重启
systemctl start vsftpd

systemctl stop vsftpd

systemctl restart vsftpd
2、目录介绍

vsftpd.conf ftp的核心配置文件
ftpusers 禁止登录FTP的用户列表
chroot_list 是否允许用户列表内的用户访问父目录
user_list 是否允许列表内的用户登录
以上将在下个部分讲解
3、配置文件详解
https://www.cnblogs.com/rainiplus/p/3739100.html,,人家写的比我好多了23333
 1 # Allow anonymous FTP?
 2 anonymous_enable=NO
 3
 4 # allow local users to log in.
 5 local_enable=YES
 6
 7 # 允许写操作
 8 write_enable=YES
 9
10 # Default umask for local users is 077. You may wish to change this to 022,
11 # if your users expect that (022 is used by most other ftpd's)
12 local_umask=022
13
14
15 allow_ftpd_full_access
16
17 # 匿名是否允许上传文件
18 #anon_upload_enable=YES
19
20 # 匿名是否允许写操作
21 #anon_mkdir_write_enable=YES
22
23 # 欢迎语设置,如果有.message这个文件
24 # messages given to remote users when they go into a certain directory.
25 dirmessage_enable=YES
26
27 # Activate logging of uploads/downloads.
28 # 上传下载日志记录
29 xferlog_enable=YES
30
31 # Make sure PORT transfer connections originate from port 20 (ftp-data).
32 # 主动模式时使用20端口连接客户端
33 connect_from_port_20=YES
34
35 # You may override where the log file goes if you like. The default is shown
36 # below.
37 #xferlog_file=/var/log/xferlog
38
39 # If you want, you can have your log file in standard ftpd xferlog format.
40 # Note that the default log file location is /var/log/xferlog in this case.
41 # FTP入职格式化
42 xferlog_std_format=YES
43
44 # You may change the default value for timing out an idle session.
45 # 一段时间没有操作后断开连接
46 #idle_session_timeout=600
47
48 # You may change the default value for timing out a data connection.
49 # FTP数据传输最大时间,超过则断开连接
50 #data_connection_timeout=120
51
52 # 是否使用ASCII码传输,默认使用二进制
53 #ascii_upload_enable=YES
54 #ascii_download_enable=YES
55
56
57 # 是否允许用户访问父目录,默认YES
58 chroot_local_user=NO
59 # 文件限制是否开启,若开启后,则列表中的用户无法访问父目录
60 chroot_list_enable=YES
61 chroot_list_file=/etc/vsftpd/chroot_list
62 #iginre the writeable check
63 # 忽略写权限检查,如果chroot_local_user=NO,那么主目录不能有写权限,这里忽略掉它
64 allow_writeable_chroot=YES
65
66 # 是否允许列表用户登录
67 # 开启文件检查
68 #userlist_enable=YES
69 # 文件列表中的用户是否进制登录,YES:禁止登录
70 #userlist_deny=YES
71 #userlist_file=/etc/vsftpd/userlist
72
73 # 监听IPV4
74 listen=YES
75 # 开启IPV4就关闭IPV6,好多还是用的IPV4
76 #listen_ipv6=YES
77
78 # 应该与虚拟用户相关吧,不清楚
79 pam_service_name=vsftpd
80 # 是否允许主机连接。放这吧,不清楚
81 tcp_wrappers=YES
82
83 # 开启被动模式,windows默认开启被动
84 pasv_enable=YES
85 # 端口开放,需要防火墙支持,如果时阿里云则需要开放端口入方向规则
86 pasv_min_port=10010
87 pasv_max_port=10050
88 # 暴漏给客户端外网IP,不设置默认暴漏原始IP,即内网加端口这种形式
89 pasv_address=你的外网ip
4、锁定用户主目录
chroot_list中放置要锁定的用户名,一行一个

修改配置
# 不允许列表中的用户访问父目录
chroot_local_user=NO
# 文件限制是否开启,若开启后,则列表中的用户无法访问父目录
chroot_list_enable=YES
chroot_list_file=/etc/vsftpd/chroot_list
#iginre the writeable check
# 忽略写权限检查,如果chroot_local_user=NO,那么主目录不能有写权限,这里忽略掉它
allow_writeable_chroot=YES
重启即可
5、禁止登陆
方案一:在ftpusers中添加,一行一个
方案二:使用user_list
在user_list中添加禁止登陆的用户,一行一个

修改配置文件
# 是否允许列表用户登录
# 开启文件检查
#userlist_enable=YES
# 文件列表中的用户是否进制登录,YES:禁止登录
#userlist_deny=YES
#userlist_file=/etc/vsftpd/userlist
重启即可
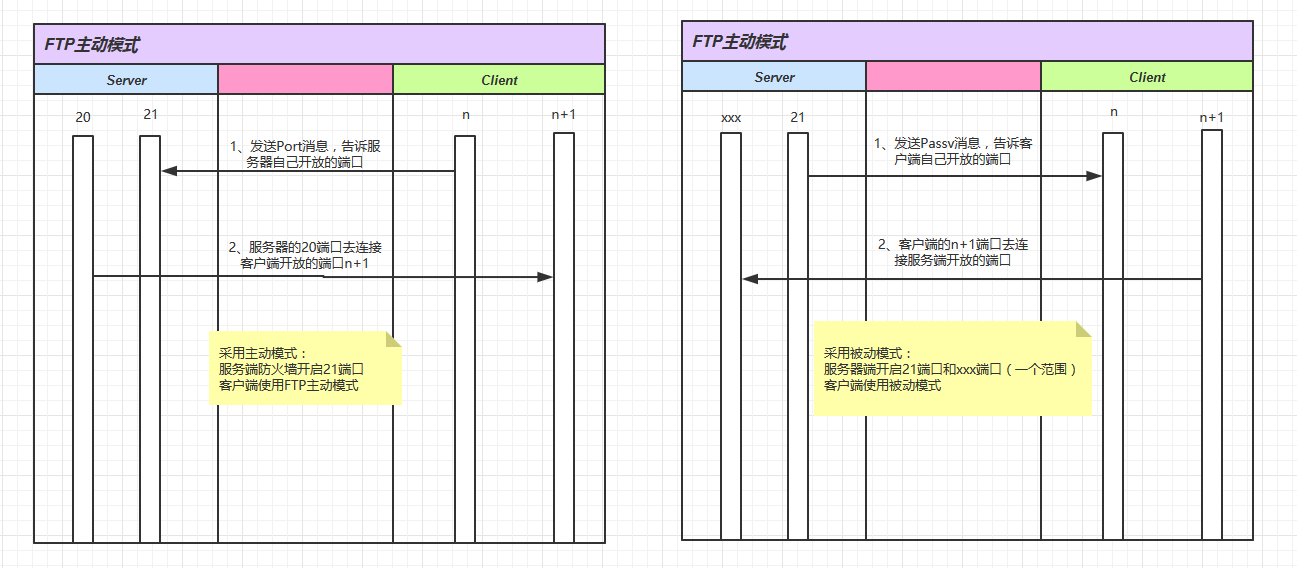
附录:FTP主动和被动区别

 浙公网安备 33010602011771号