微信小程序已经火了一段时间了,之前一直也在关注,就这半年的发展来看,相对原生APP大部分公司还是不愿意将主营业务放到微信平台上,以免受制于腾讯,不过就小程序的应用场景(用完即走和二维码分发等)还是很值得我们学习的,技术上面如果了解React的话,会发现他们在组件化上面有很多雷同之处。说白了,小程序就是基于微信平台的H5轻应用,微信将系统底层功能(设备、位置、媒体、文件等)和微信自身功能(登录、支付、分享等)封装成相应API供小程序调用。
自己根据官方文档写过一个DOME,借助和风天气开放API接口,实现天气预报.
一、小程序基本概念
1、开发工具:为了配合小程序开发,微信专门配备了自己的开发工具,自行选择对应版本安装。
![]()
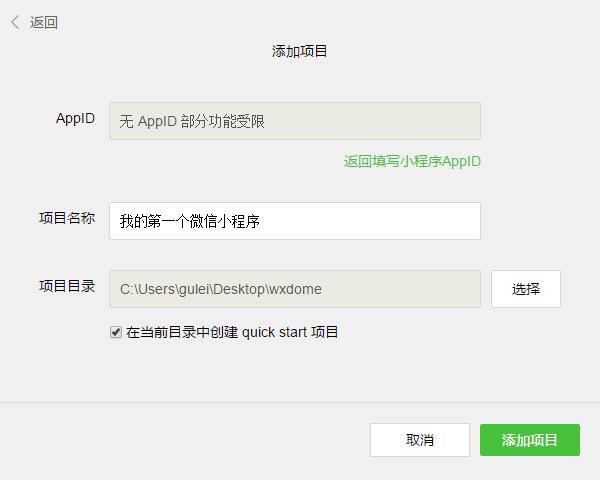
2、创建项目应用:安装完成后,打开并扫码登录。小程序发布需要企业级的认证公众号,所以个人订阅号是不能发布的。所以我这里选择无AppID,创建项目选择一个本地空文件夹,勾选创建quick start 项目生成一个demo。
![]()
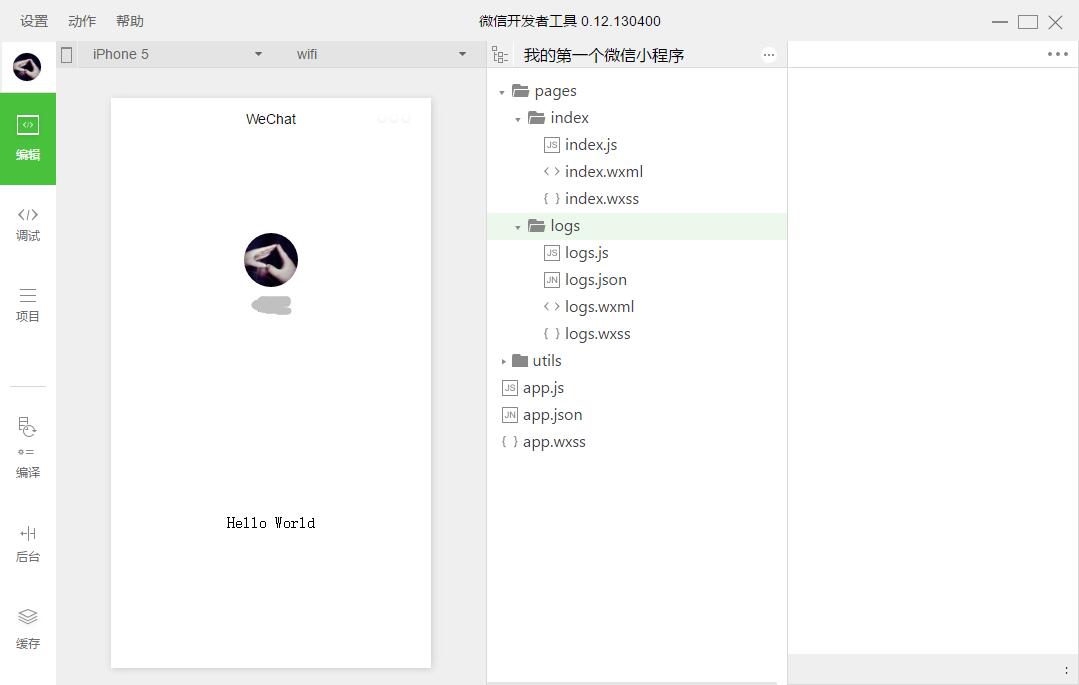
3、编写小程序:demo初始化并包含了一些简单的代码文件,其中app.js、app.json、app.wxss 这三个是必不可少的,小程序会读取这些文件初始化实例。
app.js是小程序的初始化脚本,可以在这个文件中监听小程序的生命周期,申请全局变量和调用API等
app.json是对小程序的全局配置,pages设置页面路径组成(默认第一条为首页),window设置默认页面的窗口表现等
app.wxss 是整个小程序的公共样式表。类似网站开发中的common.css
![]()
4、创建页面:在pages目录下,由一个文件夹中的四个同名不同类型文件组成。.js是脚本文件,.json是配置文件,.wxss是样式表文件,.wxml是页面结构文件,其中json和wxss文件为非必须(默认会继承app的json和wxss默认设置)。
二、小程序的框架
1、小程序的配置
app.json主要分为五个部分:pages:页面组,window:框架样式(状态栏、导航条、标题、窗口背景色),tabBar:底部菜单,networkTimeout:网络超时设置,debug:开启debug模式
page.json针对页面单独设置,层叠掉app.json的全局设置
//app.json
{
  "pages":[
    "pages/index/index",
    "pages/logs/logs"
  ],
  "window":{
    "backgroundTextStyle":"light",
    "navigationBarBackgroundColor": "#000",
    "navigationBarTitleText": "WeChat",
    "navigationBarTextStyle":"white"
  }
}
2、小程序的逻辑
使用App()来注册一个小程序,必须在app.js中注册,且不能注册多个
App({//如下为小程序的生命周期
  onLaunch: function() { },//监听初始化
  onShow: function() {  },//监听显示(进入前台)
  onHide: function() {  },//监听隐藏(进入后台:按home离开微信)
  onError: function(msg) {  },//监听错误
  //如下为自定义的全局方法和全局变量
  globalFun:function(){},
  globalData: 'I am global data'
})
使用Page()注册一个页面,在每个页面的js文件中注册
Page({
  data: {text: "This is page data."},//页面数据,用来维护视图,json格式
  onLoad: function(options) {  },//监听加载
  onReady: function() {  },//监听初次渲染完成
  onShow: function() {  },//监听显示
  onHide: function() {  },//监听隐藏
  onUnload: function() {  },//监听卸载
  onPullDownRefresh: function() {  },//监听下拉
  onReachBottom: function() {  },//监听上拉触底
  onShareAppMessage: function () {  },//监听右上角分享
  //如下为自定义的事件处理函数(视图中绑定的)
  viewTap: function() {//setData设置data值,同时将更新视图
    this.setData({text: 'Set some data for updating view.'})
  }
})
3、小程序的视图与事件绑定
在每个页面中的wxml文件中,对页面js中data进行数据绑定,以及自定义事件绑定
<!--{{}}绑定data中的指定数据并渲染到视图-->
<view class="title">{{text}}</view>

<!--wx:for获取数组数据进行循环渲染,item为数组的每项-->
<view wx:for="{{array}}"> {{item}} </view>

<!--wx:if条件渲染-->
<view wx:if="{{view == 'WEBVIEW'}}"> WEBVIEW </view>
<view wx:elif="{{view == 'APP'}}"> APP </view>
<view wx:else="{{view == 'MINA'}}"> MINA </view>

<!--模板-->
<template name="staffName">
  <view>FirstName: {{firstName}}, LastName: {{lastName}}</view>
</template>
<template is="staffName" data="{{...template.staffA}}"></template>
<template is="staffName" data="{{...template.staffB}}"></template>

<!--bindtap指定tap事件处理函数为ViewTap-->
<view bindtap="ViewTap"> 点我点我 </view>
Page({
  data: {//data数据主要用于视图绑定
    text:"我是一条测试",
    array:[0,1,2,3,4],
    view:"APP",
    template:{
        staffA: {firstName: 'Hulk', lastName: 'Hu'},
        staffB: {firstName: 'Shang', lastName: 'You'}
    }
  },
  ViewTap:function(){console.log('额,点到我了了~')}//自定义事件,主要用于事件绑定
})
4、小程序的样式
在每个页面中的wxss文件中,对wxml中的结构进行样式设置,等同于css,扩展了rpx单位。其中app.wxss默认为全局样式,作用所有页面。
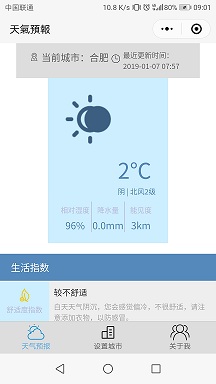
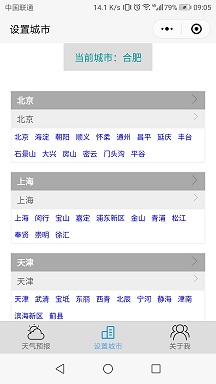
三、小程序实战-天气预报(利用和风天气API)
先看看完成后的效果,一共三个页面
![]()
![]()
1、设置底部菜单和页面
我们就在quick start生成的demo基础上进行修改即可,因为涉及图标icon,我们新建一个images文件夹来存放图片
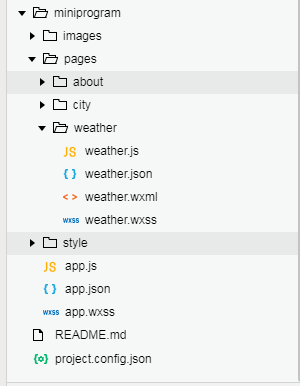
在原先pages文件夹中,删除index和log页面文件夹,新建weather、city、about三个页面文件夹,及三个页面对应的四个文件类型,文件结构如下图
![]()
接下来配置app.json文件
{
"pages": [
"pages/weather/weather",
"pages/about/about",
"pages/city/city"
],
"window": {
"backgroundColor": "#F6F6F6",
"backgroundTextStyle": "dark",
"navigationBarBackgroundColor": "#F6F6F6",
"navigationBarTitleText": "天氣預報",
"navigationBarTextStyle": "black",
"enablePullDownRefresh": true
},
"tabBar": {
"color": "#666",
"selectedColor": "#56abe4",
"backgroundColor": "#ddd",
"borderStyle": "black",
"list": [
{
"pagePath": "pages/weather/weather",
"iconPath": "images/tabbar/weather1.png",
"selectedIconPath": "images/tabbar/weather2.png",
"text": "天气预报"
},
{
"pagePath": "pages/city/city",
"iconPath": "images/tabbar/city1.png",
"selectedIconPath": "images/tabbar/city2.png",
"text": "设置城市"
},
{
"pagePath": "pages/about/about",
"iconPath": "images/tabbar/about1.png",
"selectedIconPath": "images/tabbar/about2.png",
"text": "关于我"
}
],
"position": "bottom"
}
}
2、注册小程序和整体样式
修改app.js和app.wxss两个文件如下
//app.js
App({
//系统事件
onLaunch: function () {//小程序初始化事件
var that = this;
//调用API从本地缓存中获取数据
that.curid = wx.getStorageSync('curid') || that.curid;//API:获取本地缓存,若不存在设置为全局属性
that.setlocal('curid', that.curid);//调用全局方法
},
/*******************************************************/
//自定义全局方法
setlocal: function (id, val) {
wx.setStorageSync(id, val);//API:设置本地缓存
},
//自定义全局属性
curid: "CN101010100",
version: "1.0"
})
/**app.wxss**/
.container {
display: flex;
flex-direction: column;
align-items: center;
box-sizing: border-box;
}
3、页面的结构(wxml)、样式(wxss)、逻辑(js)和配置(json)
小程序中的wxml摒弃了HTML标签, 改用view(类似div)、text(类似span)、icon等等,class同html指定样式,bindtap绑定事件(类似onclick),该页面无特殊配置,json文件内容为空(非必须文件)
![复制代码]()
<!--weather.wxml-->
<view class="container">
<view class="city" bindtap="bindViewTap">
<image class="dwicon" src='../../images/curcity.png'></image>
<text>当前城市:{{basic.location}}</text>
<text class="update">最近更新时间:{{loc}}</text>
<image class="zbicon" src='../../images/update.png'></image>
</view>
<view class="weather" bindtap="showcurid">
<image class="section" src="{{icon}}"></image>
<view class="aside">
<text class="temperature">{{now.tmp}}℃</text>
<text>{{now.cond_txt}} | {{now.wind_dir}}{{now.wind_sc}}级</text>
</view>
<view class="other">
<view class="border_r"><text class="title">相对湿度</text><text class="info">{{now.hum}}%</text></view>
<view class="border_r"><text class="title">降水量</text><text class="info">{{now.pcpn}}mm</text></view>
<view><text class="title">能见度</text><text class="info">{{now.vis}}km</text></view>
</view>
</view>
<view class="suggestion">
<text class="title">生活指数</text>
<view class="list">
<view class="list_l">
<image src="../../images/icon/comf.png"></image>
<text>舒适度指数</text>
</view>
<view class="list_r">
<text class="list_t">{{lifestyle[0].brf}}</text>
<text>{{lifestyle[0].txt}}</text>
</view>
</view>
<view class="list">
<view class="list_l">
<image src="../../images/icon/cw.png"></image>
<text>洗车指数</text>
</view>
<view class="list_r">
<text class="list_t">{{lifestyle[6].brf}}</text>
<text>{{lifestyle[6].txt}}</text>
</view>
</view>
<view class="list">
<view class="list_l">
<image src="../../images/icon/drsg.png"></image>
<text>穿衣指数</text>
</view>
<view class="list_r">
<text class="list_t">{{lifestyle[1].brf}}</text>
<text>{{lifestyle[1].txt}}</text>
</view>
</view>
<view class="list">
<view class="list_l">
<image src="../../images/icon/flu.png"></image>
<text>感冒指数</text>
</view>
<view class="list_r">
<text class="list_t">{{lifestyle[2].brf}}</text>
<text>{{lifestyle[2].txt}}</text>
</view>
</view>
<view class="list">
<view class="list_l">
<image src="../../images/icon/sport.png"></image>
<text>运动指数</text>
</view>
<view class="list_r">
<text class="list_t">{{lifestyle[3].brf}}</text>
<text>{{lifestyle[3].txt}}</text>
</view>
</view>
<view class="list">
<view class="list_l">
<image src="../../images/icon/trav.png"></image>
<text>旅游指数</text>
</view>
<view class="list_r">
<text class="list_t">{{lifestyle[4].brf}}</text>
<text>{{lifestyle[4].txt}}</text>
</view>
</view>
<view class="list">
<view class="list_l">
<image src="../../images/icon/uv.png"></image>
<text>紫外线指数</text>
</view>
<view class="list_r">
<text class="list_t">{{lifestyle[5].brf}}</text>
<text>{{lifestyle[5].txt}}</text>
</view>
</view>
</view>
</view>
![复制代码]()
![复制代码]()
/**weather.wxss**/
/*城市信息*/
.city {padding: 3% 5%; background: #ddd; overflow: hidden;}
.city .dwicon{ width: 30rpx; height: 30rpx; float: left; margin: 5px;}
.city text{font-size: 16px; color: #666; float: left;}
.city .zbicon{ width: 30rpx; height: 30rpx; float: right;margin: 8px 5px;}
.city .update{ font-size: 12px; float: right; width: 110px;}
/*天气预报*/
.weather{overflow: hidden;background: #cef;color: #58b; padding: 5%; }
.weather .section{ float: left; width: 100px; height: 100px; display: block; }
.weather .aside{ float: right; width:40%; margin-top: 5%; font-size: 12px; }
.weather .aside .temperature{ font-size: 36px; display: block;}
.weather .other{ clear:both; padding-top: 5%; display: flex; }
.weather .other view{ flex:1; text-align: center; }
.weather .other .border_r{ border-right: solid 1px #bbd; }
.weather .other .title{font-size: 12px; color: #bbd; }
.weather .other .info{ display: block; padding-top: 5%; }
/*生活指数*/
.suggestion{ margin-top: 5%;}
.suggestion .title{ display: block; padding: 3% 5%; background: #58b; color: #fff;}
.suggestion .list{ display: flex; font-size: 12px; margin-top: 1px; }
.suggestion .list_l{ flex: 1; text-align: center; background: #cef; color: #bbd; padding: 8px;}
.suggestion .list_l image{ width:30px; height: 30px; display: block; margin: 0 auto;}
.suggestion .list_r{ flex: 4; background: #eee; padding: 8px; color: #aaa;}
.suggestion .list_t{ font-size: 14px; display: block; margin-bottom: 5px; color: #333;}
![复制代码]()
![复制代码]()
//weather.js
var app = getApp(); //获取当前小程序实例,方便使用全局方法和属性
Page({
//1、页面数据部分
data: {
cur_id: app.curid,
basic: "",
now: "",
icon: "",
loc:"",
lifestyle: []
}, //设置页面数据,后面空值将在页面显示时通过请求服务器获取
//2、系统事件部分
onLoad: function() {
var that = this;
wx.showToast({
title: '加载中',
icon: 'loading',
duration: 10000
}) //设置加载模态框
that.getnow(function(d) { //获取到数据的回调函数
wx.hideToast();
console.info(d)
var icon1 = "https://cdn.heweather.com/cond_icon/" + d.now.cond_code + ".png";
console.info(icon1)
that.setData({
basic: d.basic,
now: d.now,
icon: icon1,
loc:d.update.loc
}) //更新数据,视图将同步更新
})
that.getsuggestion(function(d) {
console.info(d)
that.setData({
lifestyle: d.lifestyle
}) //更新数据
})
},
//3、自定义页面方法:获取当前天气API
getnow: function(fn) {
wx.request({ //请求服务器,类似ajax
url: 'https://free-api.heweather.net/s6/weather/now',
data: {
location: app.curid,
key: 'e1c701806a6746b6bdf3dd7f7f157ed4'
}, //和风天气提供用户key,可自行注册获得
header: {
'Content-Type': 'application/json'
},
success: function(res) {
fn(res.data.HeWeather6[0]);
} //成功后将数据传给回调函数执行
})
},
//获取生活指数API
getsuggestion: function(fn) {
wx.request({
url: 'https://free-api.heweather.net/s6/weather/lifestyle',
data: {
location: app.curid,
key: 'e1c701806a6746b6bdf3dd7f7f157ed4'
},
header: {
'Content-Type': 'application/json'
},
success: function(res) {
fn(res.data.HeWeather6[0]);
}
})
},
//4、页面事件绑定部分
bindViewTap: function() {
wx.switchTab({
url: '../city/city'
})
} ,//跳转菜单页面
// 下拉刷新
onPullDownRefresh: function () {
// 显示顶部刷新图标
wx.showNavigationBarLoading();
var that = this;
wx.showToast({
title: '加载中',
icon: 'loading',
duration: 10000
}) //设置加载模态框
that.getnow(function (d) { //获取到数据的回调函数
wx.hideToast();
console.info(d)
var icon1 = "https://cdn.heweather.com/cond_icon/" + d.now.cond_code + ".png";
console.info(icon1)
that.setData({
basic: d.basic,
now: d.now,
icon: icon1,
loc: d.update.loc
}) //更新数据,视图将同步更新
})
that.getsuggestion(function (d) {
console.info(d)
that.setData({
lifestyle: d.lifestyle
}) //更新数据
// 隐藏导航栏加载框
wx.hideNavigationBarLoading();
// 停止下拉动作
wx.stopPullDownRefresh();
})
}
})
![复制代码]()
4、注意防坑
跳转并刷新页面:需使用onshow来代替onload执行逻辑,onload只在首次打开页面时执行一次。如:B页面操作全局数据并跳转A页面,A页面onshow中获取全局数据更新视图。
转自:https://www.cnblogs.com/fuyaozhishang/p/10231430.html


 浙公网安备 33010602011771号