
EF(filebeak)K收集nginx与tomcat日志(全)
1.Filebeat基本介绍
官网:https://www.elastic.co/guide/en/beats/filebeat/current/filebeat-installation.html
Filebeat是用于“转发”和“集中日志数据’的“轻量型数据采集器”。Filebeat监视您指定的日志文件路径;
收集日志事件并将数据转发到Elasticsearch或Logstash、Redis、 Kafka等。
正如官方描述:“当您要面对成百上千、甚至成千上万的服务器、虚拟机和容器生成的日志时,请告别 SSH 吧。Filebeat 将为您提供一种轻量型方法,用于转发和汇总日志与文件,让简单的事情不再繁杂。”

2.Filebeat工作流程
当filebeat启动后, filebeat通过Input读取指定的日志路径,然后为该日志启动-个收割进程(harvester )
每一 个收割进程读取一个日志文件的新内容,并发送这些新的日志数据到处理程序(spooler ) ,
处理程序会集合这些事件,最后filebeat会发送集合的数据到你指定的地点。
Filebeat 是安装在服务器上的数据中转代理。它采集数据,并上报到Logstash或Elasticsearch等模块。【日志采集+输送展示】
Filebeat 是 Elastic Stack 的一部分,因此能够与 Logstash、Elasticsearch 和 Kibana 无缝协作。无论您要使用 Logstash 转换或充实日志和文件,还是在 Elasticsearch 中随意处理一些数据分析,亦或在 Kibana 中构建和分享仪表板,Filebeat 都能轻松地将您的数据发送至最关键的地方。

3、FileBeat 的原理
1. FIlebeat 的4大组件
- 关于Filebeat的组成, 有4个非常重要的概念需要我们知道
Prospector 探测--(收取保护费的黑社会大哥)
Harvest 收取--(黑社会马仔小弟)
libeat 汇集对外输送--(黑社会社长)
registry 记录收取进度--(社团财务会计)
在一开始要提前在配置文件中写好日志所在的位置,Prospector就如黑社会大哥一样,如果要去收取保护费,它会负责探索哪里能收取到,在日志所在的位置探索。而Harvest就好比黑社会小弟一样,Prospector决定去哪里收取保护费后,就派小弟Harvest去收取。

每个Prospector 都有一个对应的Harvest,相当于每个大哥手下都有小弟,然后他们有一个共同的老大叫做Libeat,他是黑社会的社长,会汇总所有收集到的东西,然后把所有的东西(日志)传送给指定的地方去消费(酒吧、KTV等),这其中还有个非常重要的角色”registry“,它相当于一个会计,它会记录Harvest小弟 都收割了些啥,收割到哪里了,这样一但有问题了之后,harvest就会跑到会计哪里问:上次大哥指定的那几家的保护费,我收到哪里了? Registry 就会告诉Harvest 你收到哪里了,接下来继续收取就行了。这样就避免了保护费数据重复收集的问题!
2.Filebeat配置
首先,需要知道的是:
filebeat.yml是 filebeat 的配置文件。配置文件的路径会因为你安装方式的不同变化。Beat 所有系列产品的配置文件都基于 YAML 格式,FileBeat 当然也不例外。
filebeat.yml 部分配置示例:
filebeat:
  prospectors:
    - type: log
      paths:
        - /var/log/*.log
      multiline:
        pattern: '^['
        match: after

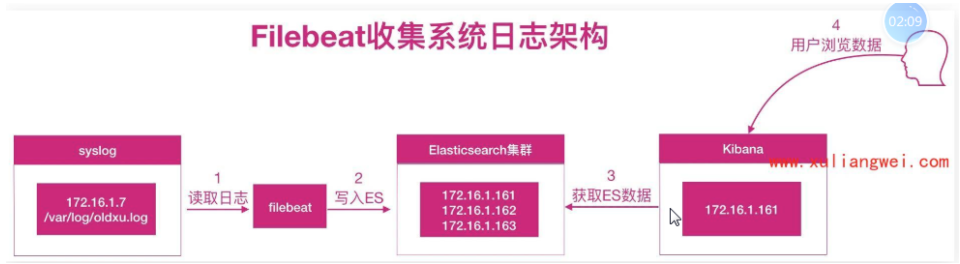
4.系统日志收集概述
1.系统日志-般指的是哪些?
系统日志其实很宽泛通常我们说的是messages、 secure、 cron、 dmesg、 ssh、 boot等日志。
2.系统日志如何统-规范收集?
系统中有很多日志,挨个配置收集就变得非常麻烦了。所以我们需要对这些日志进行统一、集中的管理。
可以通过rsyslog将本地所有类型的日志都写Varl/log/oldxu.log文件中,然后使用filebeat对该文件进行收集。
3.收集系统日志架构图
rsyslog+filebeat --> elasticsearch集群<--kibana
 # 配置rsyslog与filebeat
[root@web01 ~]# yum install rsyslog -y
[root@web01 ~]# yum install filebeat -y
[root@web01 ~]# rpm -ivh filebeat-7.4.0-x86_64.rpm   #需要首先将其上传至家目录
[root@web01 ~]# cd /etc/filebeat/
[root@web01 filebeat]# cp filebeat.yml filebeat.yml.bak
[root@web01 filebeat]# vim filebeat.yml
[root@web01 filebeat]# cat filebeat.yml
#从文件中读取数据
filebeat.inputs:
  - type: log                    #收集日志类型
    enabled: true								 #启用日志收集
    paths:											 #日志路径
      - /var/log/oldxu.log

#输出读取内容到Elasticsearch
output.elasticsearch:
  hosts: ["10.0.0.161:9200","10.0.0.162:9200","10.0.0.163:9200"]

[root@web01 filebeat]# systemctl start filebeat.service
[root@web01 filebeat]# systemctl enable filebeat.service
[root@web01 filebeat]# vim /etc/rsyslog.conf
# ### end of the forwarding rule ###
*.* /var/log/oldxu.log        #oldxu所在日志路径
[root@web01 ~]# systemctl restart rsyslog.service
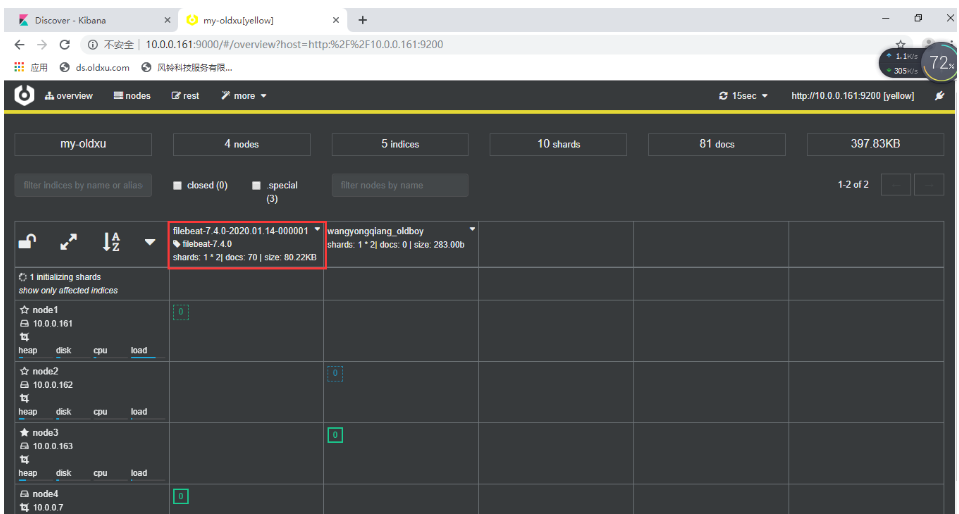
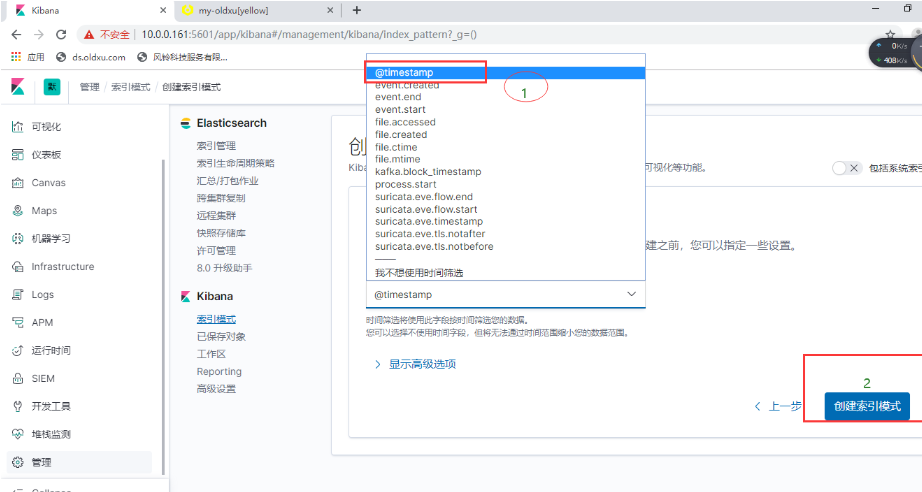
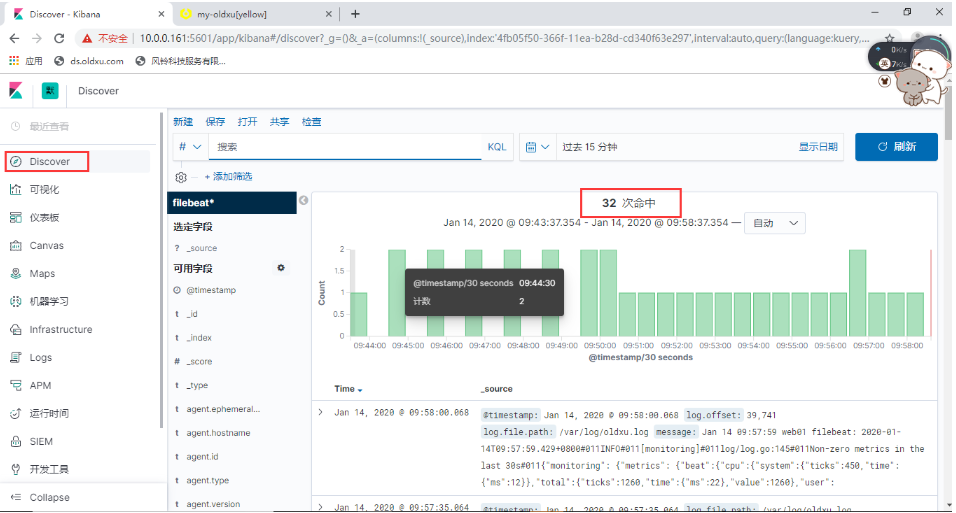
创建索引

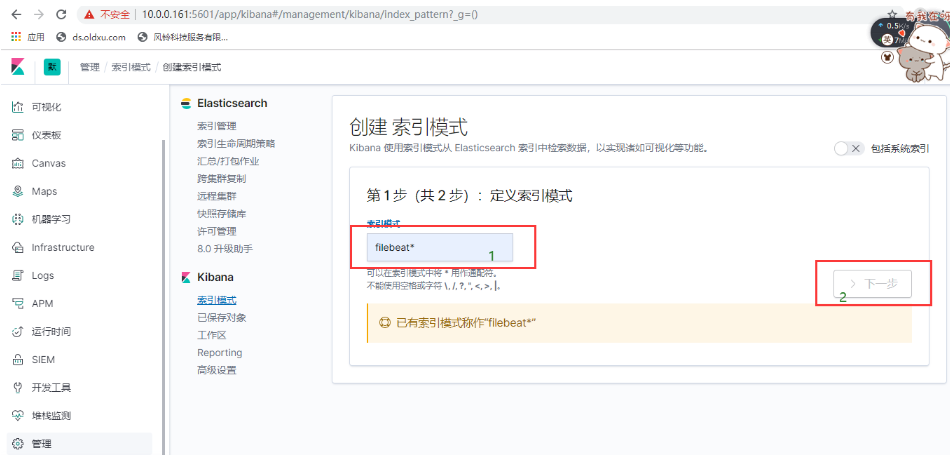
- 索引模式配置
- 日志信息
5、需求:进行日志分析的时候kibana有很多无用消息,只收集警告、err、ssd相关的。
# 添加规则记录,修改filebeat.yml文件
[root@web01 filebeat]# vim filebeat.yml
[root@web01 filebeat]# cat filebeat.yml
filebeat.inputs:
- type: log
  enabled: true
  paths:
    - /var/log/oldxu.log
  include_lines: ['^WARN','^ERR','sshd']   #错误、告警、规则记录

output.elasticsearch:
  hosts: ["10.0.0.161:9200","10.0.0.162:9200","10.0.0.163:9200"]
[root@web01 filebeat]# systemctl restart filebeat
[root@web01 filebeat]# systemctl restart rsyslog.service
注意:必须要删除之前创建的filebeat,否则无法添加。
[root@web01 ~]# cat /etc/filebeat/filebeat.yml
filebeat.inputs:
- type: log #收集日志的类型
enabled: true #启动
paths: #收集日志的路径
- /var/log/oldxu.log
include_lines: ['^ERR', '^WARN', 'sshd'] #只看指定的日志,错误,警告,sshd
output.elasticsearch:
hosts: ["10.0.0.161:9200","10.0.0.162:9200","10.0.0.163:9200"]
index: "system-%{[agent.version]}-%{+yyyy.MM.dd}" #索引名书写格式
setup.ilm.enabled: false
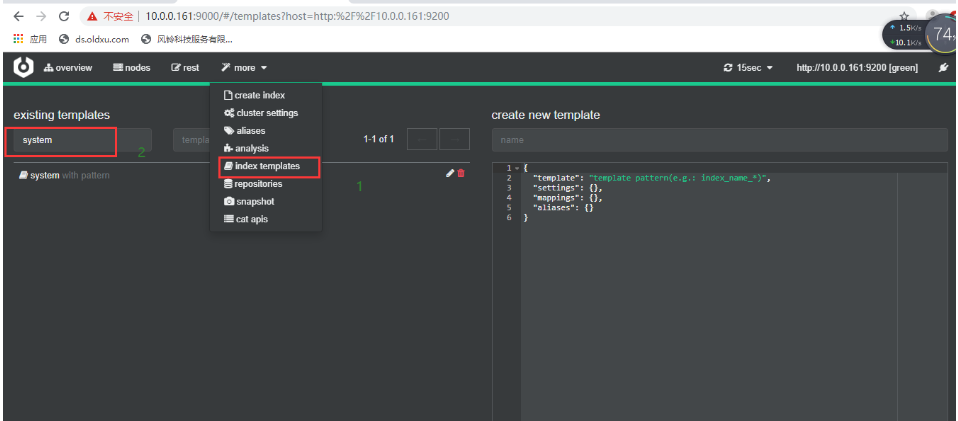
setup.template.name: system #索引关联的模板名称
setup.template.pattern: system-*
#方式一:
###设定system模板的分片数和副本数
#setup.template.settings: #定义索引分片数和副本
# index.number_of_shards: 3
# index.number_of_replicas: 1
#此处取消注释表示在服务器添加
方式二:
"number_of_routing_shards": "30",
"number_of_shards": "10",
"number_of_replicas": "1",
点击update
1.修改system模板 ---> 添加 shards 分片数数量,replicas的数量
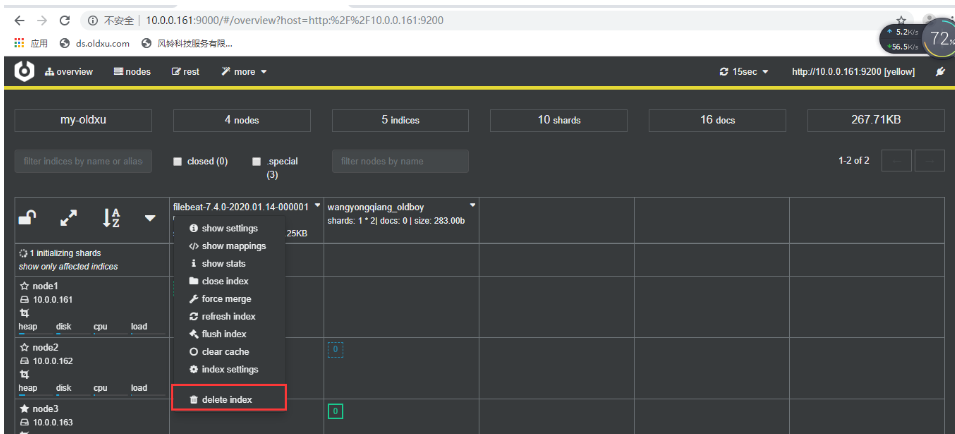
2.删除模板关联的索引
3.删除filebeat自行指定的分片数和副本数
4.重启filebeat
5.产生新的日志

- 分片效果展示

1.Nginx日志收集概述
1.为什么要收集Nginx日志?
我们需要获取用户的信息,比如:来源的IP是哪个地域,网站的PV、UV、 状态码、访问时间等等nginx+filebeat---->elasticsearch <--kibana
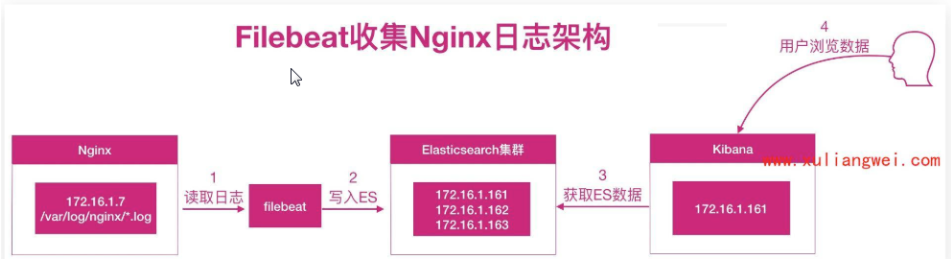
步骤一:安装、配置nginx
#1、安装nginx
[root@web01 conf.d]# yum install nginx -y
[root@web01 conf.d]# cd /etc/nginx/conf.d/
[root@web01 filebeat]# cd /etc/nginx/conf.d/
[root@web01 conf.d]# cat /etc/nginx/conf.d/elk.oldxu.com.conf
server {
       listen 80;
       server_name elk.oldxu.com;

       root /code;
       location / {
		   index index.html;
       }
}
[root@web01 conf.d]# mkdir /code
[root@web01 conf.d]# echo "--elk--web01--" >/code/index.html
[root@web01 conf.d]# systemctl start nginx
[root@web01 conf.d]# tail -f /var/log/nginx/access.log
步骤二:配置filebeat
#2、配置filebeat
[root@web01 filebeat]# cat filebeat.yml
filebeat.inputs:
- type: log
enabled: true
paths:
- /var/log/nginx/access.log
json.keys_under_root: true #默认Flase,还会将json解析的日志存储至messages字段
json.overwrite_keys: true #覆盖默认的key,使用自定义json格式的key
output.elasticsearch:
hosts: ["10.0.0.161:9200","10.0.0.162:9200","10.0.0.163:9200"]
index: "nginx-%{[agent.version]}-%{+yyyy.MM.dd}"
setup.ilm.enabled: false
setup.template.name: nginx #索引关联的模板名称
setup.template.pattern: nginx-*
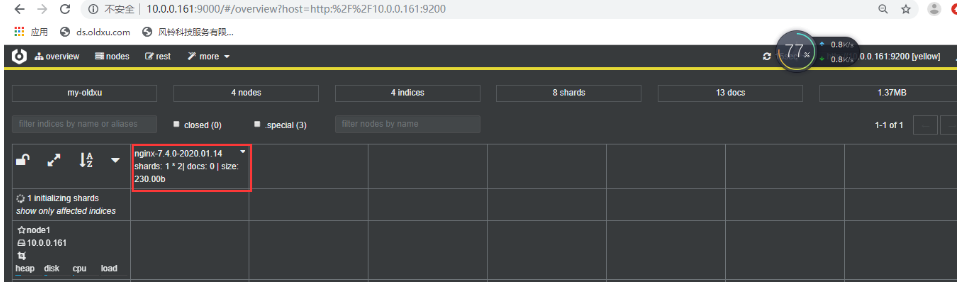
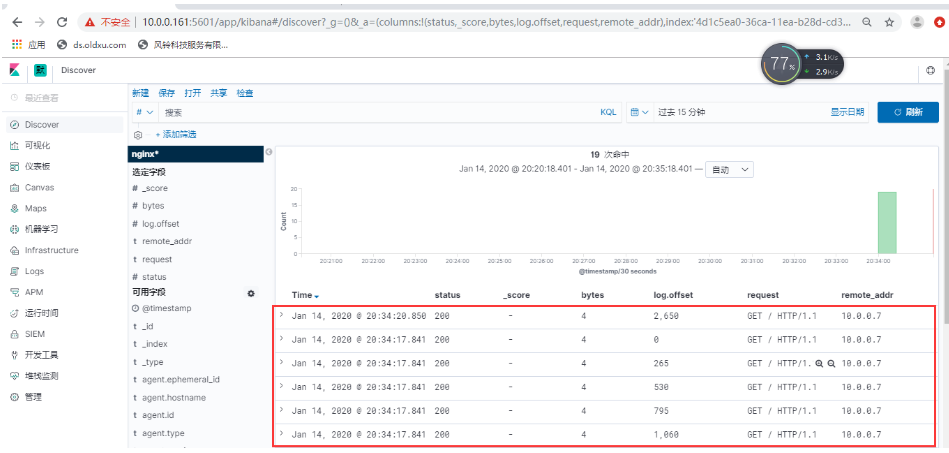
[root@web01 conf.d]# curl -H Host:elk.oldxu.com http://10.0.0.7
浏览器通过访问http://10.0.0.161:5601我们会发现日志虽然已经收集成功,但是没有达到我们的期望值。
1.问题现象?
如上实现了日志收集,但是所有的数据都在message字段中,无法满足分析的需求。比如我们想
统计状态码,但是会发现没有办法过滤数据。
2.解决方案?
需要将日志中的每一个选项都拆分出来 ,拆分成key-value的形式,那么就需要借助json的格
式。
基本写法: oldxu 男20
json写法:姓名:oldxu性别:男年龄: 20.
当我们需要筛选姓名时, JSON的写法会将所有姓名对应的值都会被列出来,便于后续的统计与
分析。
3.如何将nginx日志格式转换成json格式?
###配置log_format即可
[root@web01 conf.d]# cat /etc/nginx/nginx.conf
user www;
worker_processes  auto;

error_log  /var/log/nginx/error.log notice;
pid        /var/run/nginx.pid;

events {
    worker_connections  2048;
}

http {
    include       /etc/nginx/mime.types;
    default_type  application/octet-stream;
    log_format  main  '$remote_addr - $remote_user [$time_local] "$request" '
                      '$status $body_bytes_sent "$http_referer" '
                      '"$http_user_agent" "$http_x_forwarded_for"';
log_format json '{ "time_local": "$time_local", '
                          '"remote_addr": "$remote_addr", '
                          '"referer": "$http_referer", '
                          '"request": "$request", '
                          '"status": $status, '
                          '"bytes": $body_bytes_sent, '
                          '"agent": "$http_user_agent", '
                          '"x_forwarded": "$http_x_forwarded_for", '
                          '"up_addr": "$upstream_addr",'
                          '"up_host": "$upstream_http_host",'
                          '"upstream_time": "$upstream_response_time",'
                          '"request_time": "$request_time"'
    '}';

	access_log /var/log/nginx/access.log json;

    sendfile        on;
    tcp_nopush     on;
    keepalive_timeout  65;
    gzip  on;
    include /etc/nginx/conf.d/*.conf;
}

[root@web01 conf.d]# > /var/log/nginx/access.log
[root@web01 conf.d]# systemctl restart nginx filebeat
#删除之前创建的所有索引
[root@web01 conf.d]#  curl -H Host:elk.oldxu.com http://10.0.0.7  #写入几条数据
但是我们希望的状态如下:
nginx访问日志--存储-> nginx-access-索引
nginx错误日志--存储--> nginx-error-索引
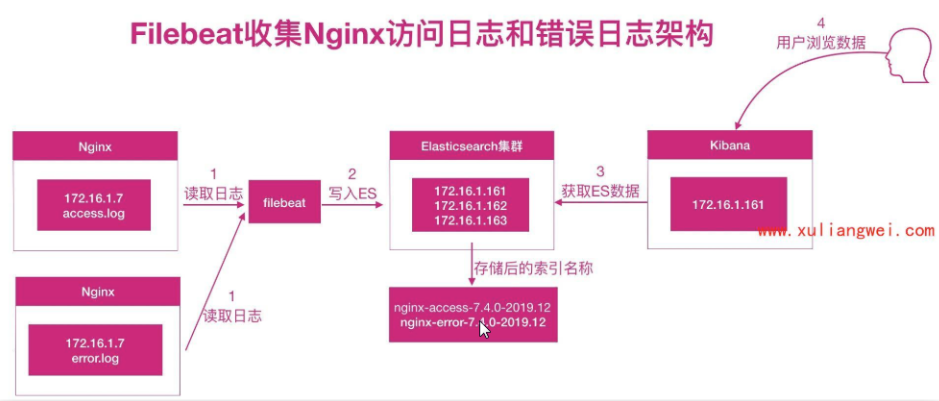
配置filebeat收集多个日志,通过tags标记进行区分
[root@web01 ~]# cd /etc/filebeat/
[root@web01 filebeat]# vim filebeat.yml
[root@web01 filebeat]# cat filebeat.yml
filebeat.inputs:
- type: log
  enabled: true
  paths:
    - /var/log/nginx/access.log
  json.keys_under_root: true    #默认Flase,还会将json解析的日志存储至messages字段
  json.overwrite_keys: true     #覆盖默认的key,使用自定义json格式的key
  tags: ["access"]


- type: log
  enabled: true
  paths:
    - /var/log/nginx/error.log
  tags: ["error"]


output.elasticsearch:
  hosts: ["10.0.0.161:9200","10.0.0.162:9200","10.0.0.163:9200"]
  indices:
    - index: "nginx-access-%{[agent.version]}-%{+yyyy.MM.dd}"
      when.contains:
        tags: "access"

    - index: "nginx-error-%{[agent.version]}-%{+yyyy.MM.dd}"
      when.contains:
        tags: "error"


setup.ilm.enabled: false
setup.template.name: nginx   #索引关联的模板名称
setup.template.pattern: nginx-*
[root@web01 filebeat]#  systemctl restart nginx filebeat
[root@web01 filebeat]#  > /var/log/nginx/access.log
[root@web01 filebeat]# curl -H Host:elk.oldxu.com http://10.0.0.7

#在web上删除之前的日志
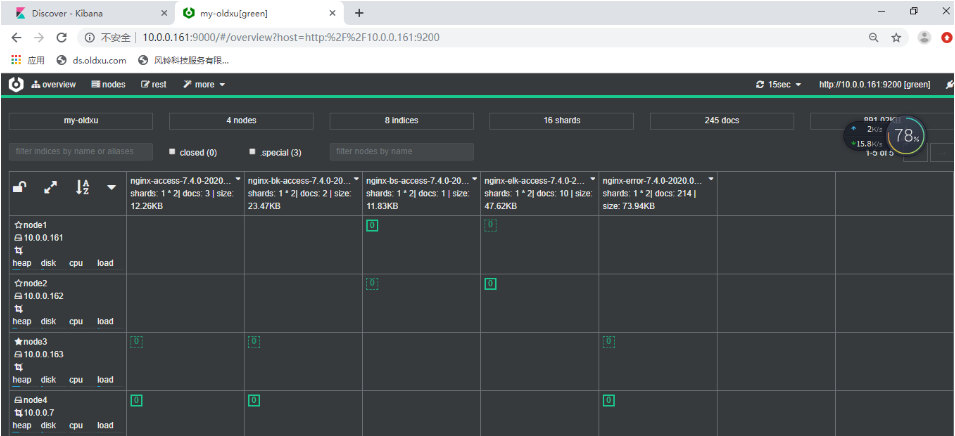
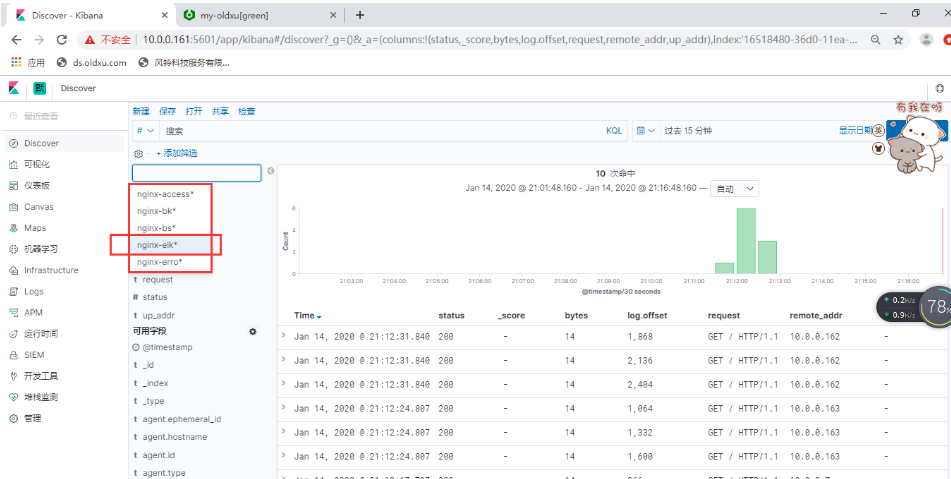
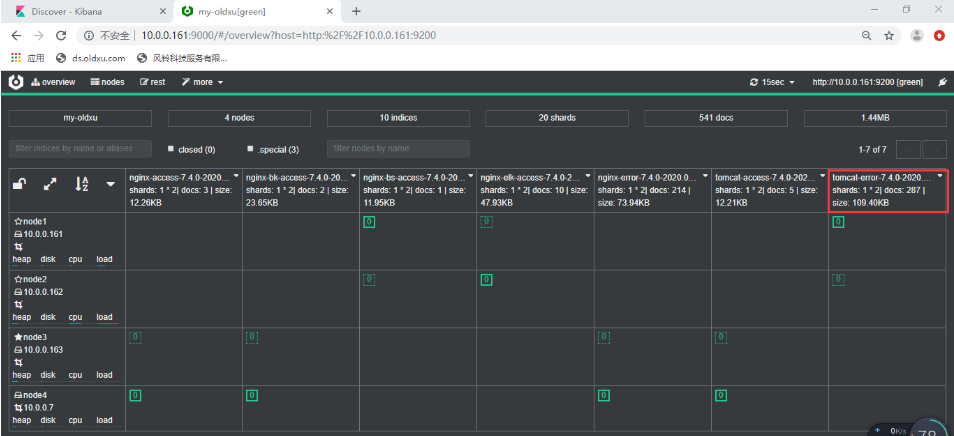
- 效果如下

- 创建两个索引模式,效果图展示

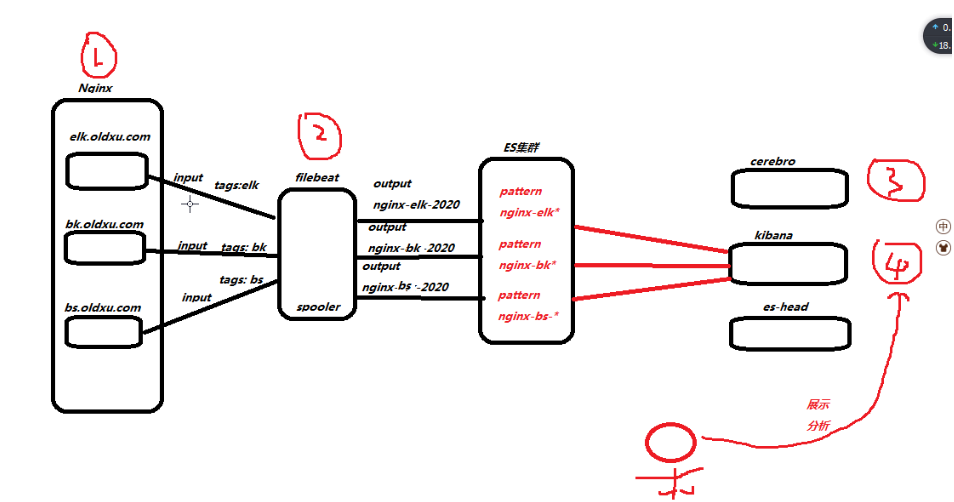
场景还原-->收集多虚拟主机日志
多站点日志分析?公司有三个正在运行的网站域名分别是:
a:elk.oldxu.com bk.oldxu.com bs.oldxu.com 三个都跑在nginx下,要进行日志收集。应该怎么做?
#1、实现
[root@web01 ~]# cd /etc/nginx/conf.d/
[root@web01 conf.d]# vim bk.oldxu.com.conf
[root@web01 conf.d]# vim bs.oldxu.com.conf
[root@web01 conf.d]# vim elk.oldxu.com.conf
[root@web01 conf.d]# cat bk.oldxu.com.conf
server {
       listen 80;
       server_name bk.oldxu.com;
       root /code/bk;
       access_log /var/log/nginx/bk.oldxu.com.log json;

       location / {
		index index.html;
}
}

[root@web01 conf.d]# cat bs.oldxu.com.conf
server {
       listen 80;
       server_name bs.oldxu.com;
       root /code/bs;
       access_log /var/log/nginx/bs.oldxu.com.log json;

       location / {
		index index.html;
}
}

[root@web01 conf.d]# cat elk.oldxu.com.conf
server {
       listen 80;
       server_name elk.oldxu.com;
       root /code/elk;
       access_log /var/log/nginx/elk.oldxu.com.log json;

       location / {
		index index.html;
}
}

#2、测试
[root@web01 conf.d]# systemctl restart nginx
[root@web01 conf.d]# curl -H Host:elk.oldxu.com http://10.0.0.7
elk.oldxu.com
[root@web01 conf.d]# curl -H Host:bs.oldxu.com http://10.0.0.7
bs.oldxu.com
[root@web01 conf.d]# curl -H Host:bk.oldxu.com http://10.0.0.7
bk.oldxu.com
3、收集多虚拟主机日志之filebeat配置
[root@web01 filebeat]# vim filebeat.yml
[root@web01 filebeat]# cat filebeat.yml
filebeat.inputs:
- type: log
  enabled: true
  paths:
    - /var/log/nginx/elk.oldxu.com.log
  json.keys_under_root: true
  json.overwrite_keys: true
  tags: ["nginx-elk-host"]

- type: log
  enabled: true
  paths:
    - /var/log/nginx/bs.oldxu.com.log
  json.keys_under_root: true
  json.overwrite_keys: true
  tags: ["nginx-bs-host"]

- type: log
  enabled: true
  paths:
    - /var/log/nginx/bk.oldxu.com.log
  json.keys_under_root: true
  json.overwrite_keys: true
  tags: ["nginx-bk-host"]


- type: log
  enabled: true
  paths:
    - /var/log/nginx/error.log
  tags: ["nginx-error"]


output.elasticsearch:
  hosts: ["10.0.0.161:9200","10.0.0.162:9200","10.0.0.163:9200"]
  indices:
    - index: "nginx-elk-access-%{[agent.version]}-%{+yyyy.MM.dd}"
      when.contains:
        tags: "nginx-elk-host"

    - index: "nginx-bs-access-%{[agent.version]}-%{+yyyy.MM.dd}"
      when.contains:
        tags: "nginx-bs-host"

    - index: "nginx-bk-access-%{[agent.version]}-%{+yyyy.MM.dd}"
      when.contains:
        tags: "nginx-bk-host"

    - index: "nginx-error-%{[agent.version]}-%{+yyyy.MM.dd}"
      when.contains:
        tags: "nginx-error"

setup.ilm.enabled: false
setup.template.name: nginx   #索引关联的模板名称
setup.template.pattern: nginx-*


[root@web01 filebeat]# systemctl restart filebeat
[root@web01 filebeat]# curl -H Host:elk.oldxu.com http://10.0.0.7
[root@web01 filebeat]# curl -H Host:elk.oldxu.com http://10.0.0.7
[root@web01 filebeat]# curl -H Host:elk.oldxu.com http://10.0.0.7
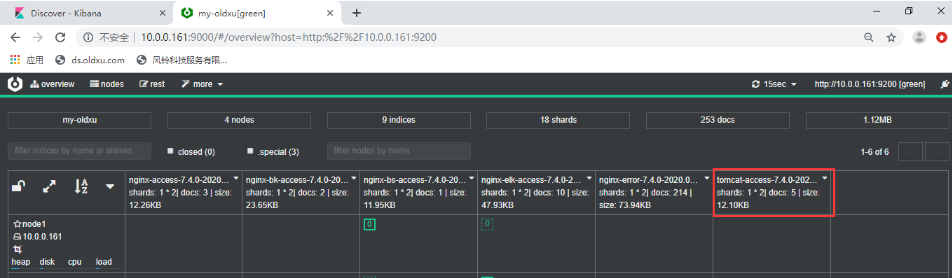
tomcat日志收集
2.收集Java日志思路?
例1: Tomcat正常日志是以"日期"开头的。而报错日志中间的错误都不是以"日期"开头的。
所以我们可以匹配以“日期’开头的一直到下一一个日期出现则为一个事件日志。
例2: Elasticsearch.正常日志是以]开头的。而报错日志中间的错误信息不是以]开头,
所以匹配以[开头的行, - -直到下一一个[开头的出现则为一个事件日志。官方多行匹配方式
[root@web03 ~]# yum install java -y
[root@web03 ~]# mkdir /soft
[root@web03 ~]# cd /soft/
[root@web03 soft]# rz apache-tomcat-9.0.27.tar.gz
[root@web03 soft]# tar xf apache-tomcat-9.0.27.tar.gz
[root@web03 soft]# ln -s apache-tomcat-9.0.27 /soft/tomcat
[root@web03 soft]# cd /soft/tomcat/conf/
[root@web03 conf]# vim server.xml # pattern="后面为将tomcat日志转换为json日志格式
......
</Realm>
<Host name="tomcat.oldxu.com" appBase="/code/tomcat"
unpackWARs="true" autoDeploy="true">
<Valve className="org.apache.catalina.valves.AccessLogValve" directory="logs"
prefix="tomcat.oldxu.com.log" suffix=".txt"
pattern="{"clientip":"%h","ClientUser":"%l","authenticated":"%u","AccessTime":"%t","method":"%r","status":"%s","SendBytes":"%b","Query?string":"%q","partner":"%{Referer}i","AgentVersion":"%{User-Agent}i"}" />
</Host>
</Engine>
[root@web03 soft]# mkdir /code/tomcat/ROOT
[root@web03 soft]# echo "tomcat.oldxu.com" > /code/tomcat/ROOT/index.html
[root@web03 soft]# pkill java
[root@web03 soft]# /soft/tomcat/bin/startup.sh
Using CATALINA_BASE: /soft/tomcat
Using CATALINA_HOME: /soft/tomcat
Using CATALINA_TMPDIR: /soft/tomcat/temp
Using JRE_HOME: /usr
Using CLASSPATH: /soft/tomcat/bin/bootstrap.jar:/soft/tomcat/bin/tomcat-juli.jar
Tomcat started.
[root@web03 soft]# curl -H Host:tomcat.oldxu.com http://10.0.0.9:8080
tomcat.oldxu.com
安装配置filebeat
#安装filebeat
[root@web03 ~]# rz filebeat-7.4.0-x86_64.rpm
[root@web03 ~]# rpm -ivh filebeat-7.4.0-x86_64.rpm
warning: filebeat-7.4.0-x86_64.rpm: Header V4 RSA/SHA512 Signature, key ID d88e42b4: NOKEY
Preparing... ################################# [100%]
package filebeat-7.4.0-1.x86_64 is already installed
[root@web03 ~]# cd /etc/filebeat/
[root@web03 filebeat]# vim filebeat-tomcat.yml
[root@web03 filebeat]# cat filebeat-tomcat.yml
filebeat.inputs:
- type: log
enabled: true
paths:
- /soft/tomcat/logs/tomcat.oldxu.com.log.*.txt
json.keys_under_root: true #默认Flase,还会将json解析的日志存储至messages字段
json.overwrite_keys: true #覆盖默认的key,使用自定义json格式的key
output.elasticsearch:
hosts: ["10.0.0.161:9200","10.0.0.162:9200"]
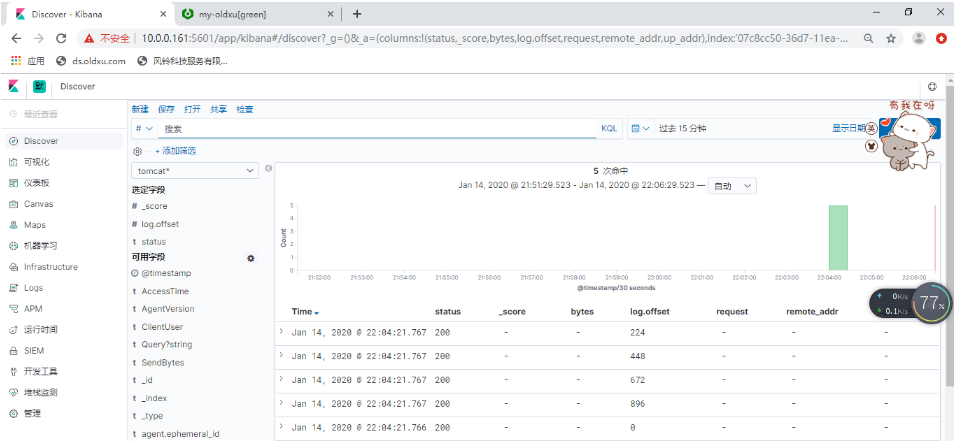
index: "tomcat-access-%{[agent.version]}-%{+yyyy.MM.dd}"
setup.ilm.enabled: false
setup.template.name: tomcat #索引关联的模板名称
setup.template.pattern: tomcat-*
[root@web03 filebeat]# systemctl start filebeat
[root@web03 filebeat]# systemctl restart filebeat
[root@web03 filebeat]# curl -H Host:tomcat.oldxu.com http://10.0.0.9:8080
tomcat.oldxu.com
[root@web03 filebeat]# curl -H Host:tomcat.oldxu.com http://10.0.0.9:8080
tomcat.oldxu.com
[root@web03 filebeat]# curl -H Host:tomcat.oldxu.com http://10.0.0.9:8080
tomcat.oldxu.com
[root@web03 filebeat]# curl -H Host:tomcat.oldxu.com http://10.0.0.9:8080
tomcat.oldxu.com
tomcat错误日志收集
[root@web01 filebeat]# vim filebeat.yml
[root@web01 filebeat]# cat filebeat.yml
filebeat.inputs:
- type: log
  enabled: true
  paths:
    - /soft/tomcat/logs/tomcat.oldxu.com.log.*.txt
  json.keys_under_root: true    #默认Flase,还会将json解析的日志存储至messages字段
  json.overwrite_keys: true     #覆盖默认的key,使用自定义json格式的key
  tags: ["tomcat-access"]

- type: log
  enabled: true
  paths:
    - /soft/tomcat/logs/catalina.out
  multiline.pattern: '^\d{2}'   #匹配以2个数字开头的
  multiline.negate: true
  multiline.match: after
  multiline.max_lines: 10000    #默认最大合并行为500,可根据实际情况调整。
  tags: ["tomcat-error"]


output.elasticsearch:
  hosts: ["10.0.0.161:9200","10.0.0.162:9200"]
  indices:
    - index: "tomcat-access-%{[agent.version]}-%{+yyyy.MM.dd}"
      when.contains:
        tags: "tomcat-access"

    - index: "tomcat-error-%{[agent.version]}-%{+yyyy.MM.dd}"
      when.contains:
        tags: "tomcat-error"


setup.ilm.enabled: false
setup.template.name: tomcat   #索引关联的模板名称
setup.template.pattern: tomcat-*

[root@web03 filebeat]# systemctl restart filebeat
- 改错配置文件测试(此处不再演示--->一般进行多行匹配,多行匹配在上述文件中已经配置)


 浙公网安备 33010602011771号