三、PyQt5 之 常用基础控件(Python操作PyQt)
一、窗口
1.1 窗口的类型
QMainWindow:主窗口,可以包含菜单栏、工具栏、状态栏和标题栏,是最常见的窗口形式
QDialog:是对话窗口的基类。没有菜单栏,工具栏,状态栏(常见为弹出窗口)
QWidget:不确定窗口的用途,就使用该窗口QWidget
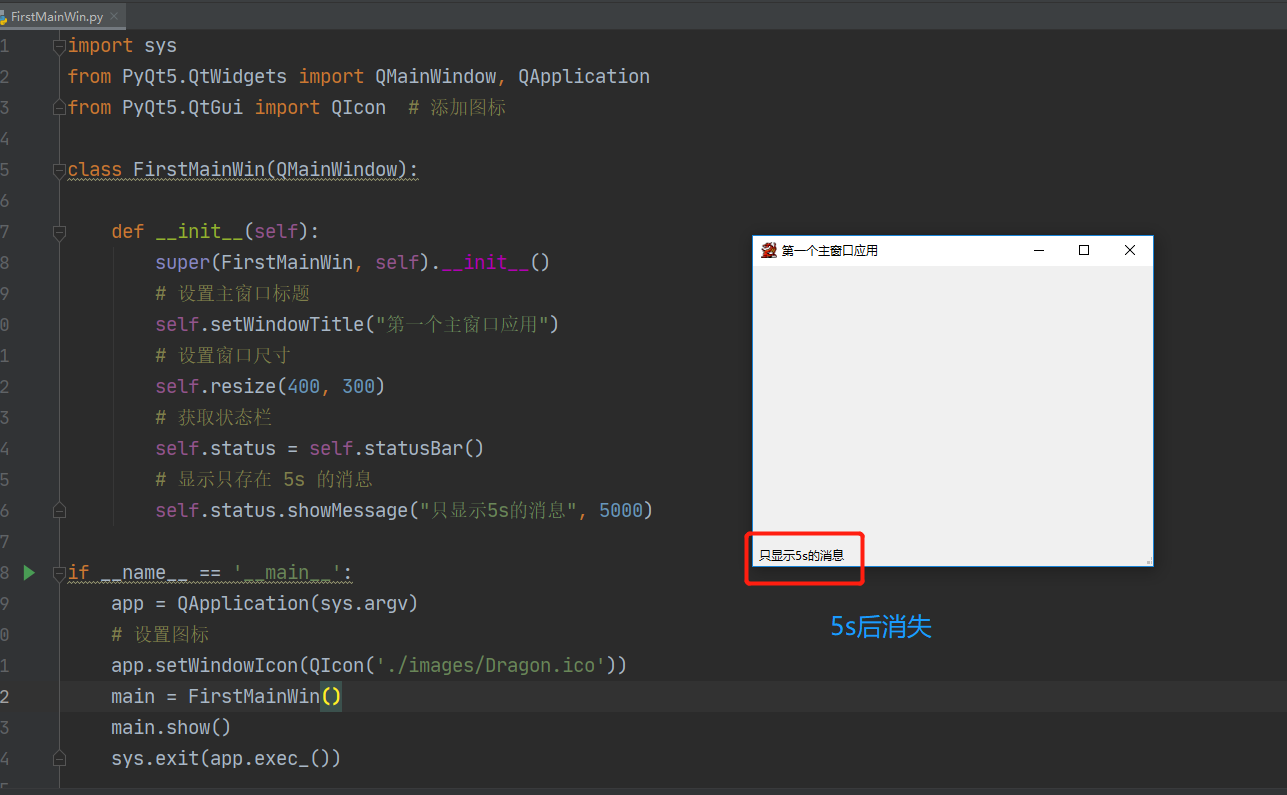
import sys
from PyQt5.QtWidgets import QMainWindow, QApplication
from PyQt5.QtGui import QIcon  # 添加图标

class FirstMainWin(QMainWindow):

    def __init__(self):
        super(FirstMainWin, self).__init__()
        # 设置主窗口标题
        self.setWindowTitle("第一个主窗口应用")
        # 设置窗口尺寸
        self.resize(400, 300)
        # 获取状态栏
        self.status = self.statusBar()
        # 显示只存在 5s 的消息
        self.status.showMessage("只显示5s的消息", 5000)

if __name__ == '__main__':
    app = QApplication(sys.argv)
    # 设置图标
    app.setWindowIcon(QIcon('./images/Dragon.ico'))
    main = FirstMainWin()
    main.show()
    sys.exit(app.exec_())
计算窗口坐标,对于所有的组件和窗口,关于位置的确定都是通过指定左上角的坐标来实现。
实现使得窗口居中,先获得总窗口的坐标,再得到显示的窗口坐标,根据公式:
左上顶点 x 坐标 = (屏幕宽度 - 显示窗口宽度)/ 2
左上顶点 y 坐标 = (屏幕高度 - 显示窗口高度)/ 2import sys from PyQt5.QtWidgets import QMainWindow, QApplication, QDesktopWidget from PyQt5.QtGui import QIcon # 添加图标 class CentosForm(QMainWindow): def __init__(self): super(CentosForm, self).__init__() # 设置主窗口标题 self.setWindowTitle("让窗口居中") # 设置窗口尺寸 self.resize(400, 300) def center(self): # 获取屏幕的大小 screen = QDesktopWidget().screenGeometry() # 获取窗口的大小 size = self.geometry() # 获取窗口居中的x, y坐标 newLeft = (screen.width() - size.width()) / 2 newTop = (screen.height() - size.height()) / 2 self.move(newLeft, newTop) if __name__ == '__main__': app = QApplication(sys.argv) main = CentosForm() main.center() main.show() sys.exit(app.exec_())
借助 QApplication 中的退出应用程序的方法实现退出窗口。
在退出过程中,创建一个button并且将button的信号和我们自定义的槽进行关联import sys from PyQt5.QtWidgets import QMainWindow, QApplication, QWidget from PyQt5.QtWidgets import QHBoxLayout # 水平布局 from PyQt5.QtWidgets import QPushButton # button class QuitApplication(QMainWindow): def __init__(self): super(QuitApplication, self).__init__() self.resize(300, 120) self.setWindowTitle("退出程序") # 添加button按钮 self.button1 = QPushButton("退出应用程序") # 将信号与槽关联 self.button1.clicked.connect(self.onClick_Button) # 创建水平布局 layout = QHBoxLayout() # 将button添加到水平布局中 layout.addWidget(self.button1) # 添加组件的根 mainFrame = QWidget() mainFrame.setLayout(layout) # 充满整个屏幕窗口 self.setCentralWidget(mainFrame) # 按钮单击事件的方法(自定义的槽) def onClick_Button(self): # 获得信号对象,即获取button队形 sender = self.sender() print(sender.text() + "按键被按下") app = QApplication.instance() # 退出应用程序 app.quit() if __name__ == '__main__': app = QApplication(sys.argv) main = QuitApplication() main.show() sys.exit(app.exec_())
对于窗口,我们可以获取窗口的坐标位置,即窗口左上角在屏幕坐标系中的位置;可以获取窗口的功能区的大小以及窗口包含功能栏的大小,通过二者的差值可以得到功能栏的大小。
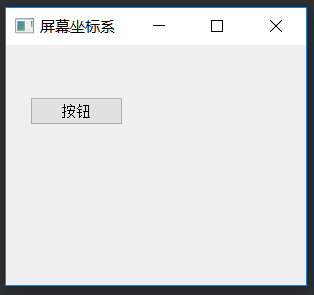
import sys
from PyQt5.QtWidgets import QMainWindow, QApplication, QWidget
from PyQt5.QtWidgets import QHBoxLayout  # 水平布局
from PyQt5.QtWidgets import QPushButton  # button


def onClick_Button():
    print("1")
    print("widget.x() = %s" % widget.x())  # 250  窗口横坐标
    print("widget.y() = %s" % widget.y())  # 200  窗口纵坐标
    print("widget.width() = %s" % widget.width())  # 300  工作区的宽度
    print("widget.height() = %s" % widget.height())  # 240  工作区的高度

    print("2")
    print("widget.geometry().x() = %s" % widget.geometry().x())  # 251  工作区横坐标 + 边框
    print("widget.geometry().y() = %s" % widget.geometry().y())  # 238  工作区纵坐标
    print("widget.geometry().width() = %s" % widget.geometry().width())  # 300  工作区宽度
    print("widget.geometry().height() = %s" % widget.geometry().height())  # 240  工作区高度

    print("3")
    print("widget.frameGeometry().x() = %s" % widget.frameGeometry().x())  # 250  窗口横坐标
    print("widget.frameGeometry().y() = %s" % widget.frameGeometry().y())  # 200  窗口纵坐标
    print("widget.frameGeometry().width() = %s" % widget.frameGeometry().width())  # 302  窗口宽度 + 边框
    print("widget.frameGeometry().height() = %s" % widget.frameGeometry().height())  # 279  窗口高度


if __name__ == '__main__':
    app = QApplication(sys.argv)
    # 创建 QWidget类对象
    widget = QWidget()
    # 创建按钮
    btn = QPushButton(widget)
    btn.setText("按钮")
    btn.clicked.connect(onClick_Button)
    btn.move(24, 52)
    widget.resize(300, 240)  # 这个是设置窗口工作区的尺寸,不是窗口的实际大小
    widget.move(250, 200)
    widget.setWindowTitle("屏幕坐标系")
    widget.show()

    sys.exit(app.exec_())
1.6 设置窗口和应用程序图标(setWindowIcon)
1.6.1 窗口与QApplication 的 setWindowIcon 使用
窗口的setWindowIcon方法 创建应用窗口时,在windows环境下,窗口的左上角会存在一个标志, 苹果系统不起作用
QApplication中的 setWindowIcon 方法用于设置主窗口的图标和应用程序的图标,但是调用了窗口的 setWindowIcon方法,QApplication中的 就只能设置应用程序的图标了
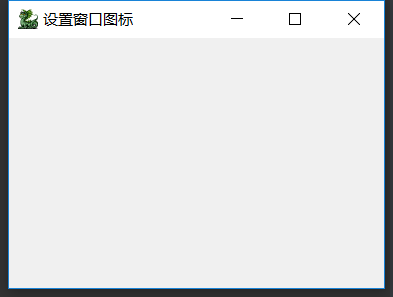
import sys
from PyQt5.QtWidgets import QMainWindow, QApplication
from PyQt5.QtGui import QIcon  # 添加图标


class IconForm(QMainWindow):
    def __init__(self):
        super(IconForm, self).__init__()
        self.initUI()

    def initUI(self):
        # 同时设置窗口的尺寸和位置
        self.setGeometry(300, 300, 250, 250)
        # 设置主窗口标题
        self.setWindowTitle("设置窗口图标")
        # 设置窗口尺图标
        self.setWindowIcon(QIcon("./images/Basilisk.ico"))


if __name__ == '__main__':
    app = QApplication(sys.argv)
    # app.setWindowIcon(QIcon('./images/Dragon.ico'))
    main = IconForm()
    main.show()
    sys.exit(app.exec_())
# 当窗口在windows中运行时,如果想要将图片也生成一个windows工具栏的图标,则添加代码如下:

import ctypes
ctypes.windll.shell32.SetCurrentProcessExplicitAppUserModelID("myappid")
import sys from PyQt5.QtWidgets import QMainWindow, QApplication from PyQt5.QtGui import QIcon # 添加图标 import ctypes ctypes.windll.shell32.SetCurrentProcessExplicitAppUserModelID("myappid") class IconForm(QMainWindow): def __init__(self): super(IconForm, self).__init__() self.initUI() def initUI(self): # 同时设置窗口的尺寸和位置 self.setGeometry(300, 300, 250, 250) # 设置主窗口标题 self.setWindowTitle("设置窗口图标") # 设置窗口尺图标 self.setWindowIcon(QIcon("./images/Basilisk.ico")) if __name__ == '__main__': app = QApplication(sys.argv) # app.setWindowIcon(QIcon('./images/Dragon.ico')) main = IconForm() main.show() sys.exit(app.exec_())
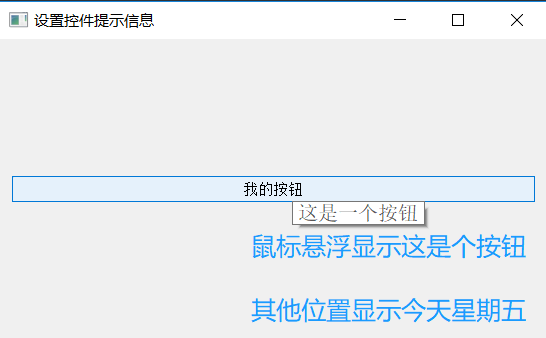
import sys
from PyQt5.QtWidgets import QMainWindow, QApplication, QHBoxLayout, QToolTip, QPushButton, QWidget
from PyQt5.QtGui import QFont  # 字体


class ToolTipForm(QMainWindow):
    def __init__(self):
        super(ToolTipForm, self).__init__()
        self.initUI()

    def initUI(self):
        # 设置字体
        QToolTip.setFont(QFont("SanSerif", 12))
        # 给窗口设置提示
        self.setToolTip("今天是<b>星期五<b>")  # 支持富文本
        # 设置窗口大小和位置
        self.setGeometry(300, 300, 200, 300)
        # 设置窗口辩题
        self.setWindowTitle("设置控件提示信息")

        self.button1 = QPushButton("我的按钮")
        self.button1.setToolTip("这是一个按钮")
        # 创建水平布局
        layout = QHBoxLayout()
        # 将button添加到水平布局中
        layout.addWidget(self.button1)
        # 添加组件的根
        mainFrame = QWidget()
        mainFrame.setLayout(layout)
        # 充满整个窗口
        self.setCentralWidget(mainFrame)


if __name__ == '__main__':
    app = QApplication(sys.argv)
    main = ToolTipForm()
    main.show()
    sys.exit(app.exec_())
三、QLabel控件(展示文本信息)
3.1 QLabel控件的基本使用
QLabel控件常用方法:
setAlignment():设置文本的对齐方式
setIndent():设置文本缩进
text():获取文本内容
setBuddy():设置伙伴关系
setText():设置文本内容
selectedText():返回所选择的字符
setWordWrap():设置是否允许换行
QLabel常用的信号(事件):
1. 当鼠标滑过QLabel控件时触发:linkHovered
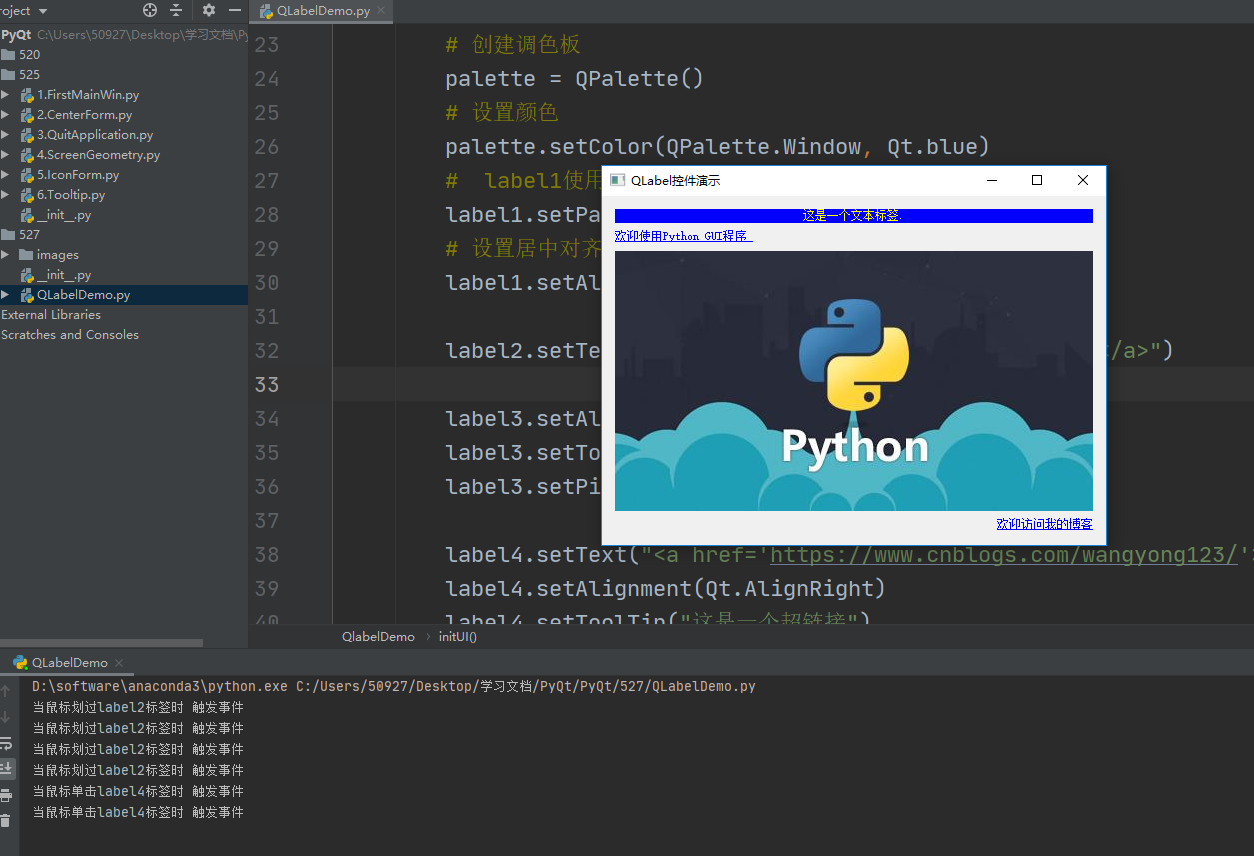
2. 当鼠标单击QLabel控件时触发:linkActivatedimport sys from PyQt5.QtWidgets import QVBoxLayout, QMainWindow, QApplication, QLabel, QWidget from PyQt5.QtGui import QPalette # 调色板,设置label的背景色 from PyQt5.QtCore import Qt from PyQt5.QtGui import QPixmap # 图片 class QlabelDemo(QWidget): def __init__(self): super(QlabelDemo, self).__init__() self.initUI() def initUI(self): label1 = QLabel(self) label2 = QLabel(self) label3 = QLabel(self) label4 = QLabel(self) # 设置内容 label1.setText("<font color=yellow>这是一个文本标签.</font>") # 设置自动填充背景 label1.setAutoFillBackground(True) # 创建调色板 palette = QPalette() # 设置颜色 palette.setColor(QPalette.Window, Qt.blue) # label1使用调色板 label1.setPalette(palette) # 设置居中对齐 label1.setAlignment(Qt.AlignCenter) label2.setText("<a href='#'> 欢迎使用Python GUI程序 </a>") label3.setAlignment(Qt.AlignCenter) label3.setToolTip("这是一个图片标签") label3.setPixmap(QPixmap("./images/python.jpg")) # 如果设为True,用浏览器打开网页,如果设为False,调用槽函数 label4.setOpenExternalLinks(False) label4.setText("<a href='https://www.cnblogs.com/wangyong123/'>欢迎访问我的博客</a>") label4.setAlignment(Qt.AlignRight) label4.setToolTip("这是一个超链接") # 垂直布局 vbox = QVBoxLayout() vbox.addWidget(label1) vbox.addWidget(label2) vbox.addWidget(label3) vbox.addWidget(label4) # 设置信号槽函数 label2.linkHovered.connect(self.linkHover) label4.linkActivated.connect(self.linkClicked) self.setLayout(vbox) self.setWindowTitle("QLabel控件演示") def linkHover(self): print("当鼠标划过label2标签时 触发事件") def linkClicked(self): print("当鼠标单击label4标签时 触发事件") if __name__ == '__main__': app = QApplication(sys.argv) main = QlabelDemo() main.show() sys.exit(app.exec_())
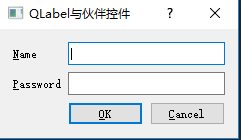
# mainLayout.addWidget(控件对象, rowIndex, columnIndex, row, column)
from PyQt5.QtWidgets import *
import sys


class QLabelBuddy(QDialog):
    def __init__(self):
        super().__init__()
        self.initUI()

    def initUI(self):
        self.setWindowTitle("QLabel与伙伴控件")
        # 添加热键
        nameLabel = QLabel("&Name", self)  # 输入 alt + N
        # 创建LineEdit对象
        nameLineEdit = QLineEdit(self)
        # 设置伙伴关系
        nameLabel.setBuddy(nameLineEdit)

        passwordLabel = QLabel('&Password', self)  # 输入 alt + P
        passwordLineEdit = QLineEdit(self)
        # 设置伙伴控件
        passwordLabel.setBuddy(passwordLineEdit)

        btnOK = QPushButton("&OK")
        btnCancel = QPushButton("&Cancel")

        # 使用栅格布局, 并手工设置组件位置
        mainLayout = QGridLayout(self)
        mainLayout.addWidget(nameLabel, 0, 0)
        mainLayout.addWidget(nameLineEdit, 0, 1, 1, 2)  # 位置1行2列 并占用1行2列的宽度
        mainLayout.addWidget(passwordLabel, 1, 0)
        mainLayout.addWidget(passwordLineEdit, 1, 1, 1, 2)
        mainLayout.addWidget(btnOK, 2, 1)
        mainLayout.addWidget(btnCancel, 2, 2)


if __name__ == '__main__':
    app = QApplication(sys.argv)
    main = QLabelBuddy()
    main.show()
    sys.exit(app.exec_())
四、QLineEdit控件
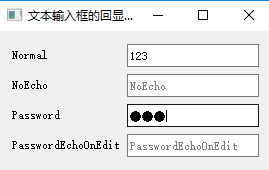
4.1 QLineEdit与回显模式(EchoMode)
#!/usr/bin/python
# -*- coding:utf-8 -*-

from PyQt5.QtWidgets import *
import sys

"""
基本功能:输入当行的文本
EchoMode: 回显模式, 输入内容能显示出来, 也就是显示模式

4中回显模式:
    1. Normal              正常回显模式
    2. NoEcho              不回显模式
    3. Password            密码输入
    4. PasswordEchoOnEdit  先是能看到输入内容,然后再变成密码模式

"""


class QLineEditEchoMode(QWidget):
    def __init__(self):
        super(QLineEditEchoMode, self).__init__()
        self.initUI()

    def initUI(self):
        self.setWindowTitle("文本输入框的回显模式")
        formLayout = QFormLayout()
        normalLineEdit = QLineEdit()
        noEchoLineEdit = QLineEdit()
        passwordLineEdit = QLineEdit()
        passwordEchoOnEditLineEdit = QLineEdit()

        formLayout.addRow("Normal", normalLineEdit)
        formLayout.addRow("NoEcho", noEchoLineEdit)
        formLayout.addRow("Password", passwordLineEdit)
        formLayout.addRow("PasswordEchoOnEdit", passwordEchoOnEditLineEdit)

        # placeholdertext 文本框内容没有输入,灰色显示提示功能
        normalLineEdit.setPlaceholderText("Normal")
        noEchoLineEdit.setPlaceholderText("NoEcho")
        passwordLineEdit.setPlaceholderText("Password")
        passwordEchoOnEditLineEdit.setPlaceholderText("PasswordEchoOnEdit")

        normalLineEdit.setEchoMode(QLineEdit.Normal)
        noEchoLineEdit.setEchoMode(QLineEdit.NoEcho)
        passwordLineEdit.setEchoMode(QLineEdit.Password)
        passwordEchoOnEditLineEdit.setEchoMode(QLineEdit.PasswordEchoOnEdit)

        self.setLayout(formLayout)

if __name__ == '__main__':
    app = QApplication(sys.argv)
    main = QLineEditEchoMode()
    main.show()
    sys.exit(app.exec_())
#!/usr/bin/python
# -*- coding:utf-8 -*-
"""
QLinEdit 校验器, 如限制只能输入整数、浮点数或者满足一定条件的字符串
"""
import sys
from PyQt5.QtWidgets import *
from PyQt5.QtGui import QIntValidator, QDoubleValidator, QRegExpValidator  # 整数类型,浮点型,正则表达式
from PyQt5.QtCore import QRegExp  # 正则表达式的类


class QlineEditValidator(QWidget):

    def __init__(self):
        super(QlineEditValidator, self).__init__()
        self.initUI()

    def initUI(self):
        self.setWindowTitle("校验器")
        # 创建表单布局
        formLayout = QFormLayout()

        intLineEdit = QLineEdit()
        doubleLineEdit = QLineEdit()
        validatorLineEdit = QLineEdit()
        formLayout.addRow("整数类型", intLineEdit)
        formLayout.addRow("浮点类型", doubleLineEdit)
        formLayout.addRow("数字和字母类型", validatorLineEdit)

        # 设置提示文本
        intLineEdit.setPlaceholderText("整型")
        doubleLineEdit.setPlaceholderText("浮点型")
        validatorLineEdit.setPlaceholderText("子母和数字")

        # 整数校验器 [1, 99]
        intValidator = QIntValidator()
        intValidator.setRange(1, 99)
        doubleValidator = QDoubleValidator()

        # 浮点校验器 [-360, 360], 精度小数点后2位
        doubleValidator.setRange(-360, 360)
        # 设置浮点数表示法
        doubleValidator.setNotation(QDoubleValidator.StandardNotation)
        # 设置精度,小数点后 2 位
        doubleValidator.setDecimals(2)

        # 字符和数字校验器
        reg = QRegExp('[a-zA-z0-9]+$')
        validator = QRegExpValidator()
        validator.setRegExp(reg)

        # 设置校验器
        intLineEdit.setValidator(intValidator)
        doubleLineEdit.setValidator(doubleValidator)
        validatorLineEdit.setValidator(validator)

        self.setLayout(formLayout)


if __name__ == '__main__':
    app = QApplication(sys.argv)
    main = QlineEditValidator()
    main.show()
    sys.exit(app.exec_())

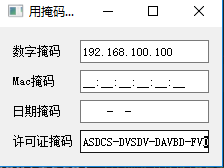
#!/usr/bin/python
# -*- coding:utf-8 -*-

"""
用掩码限制QLineEdit控件的输入

A    ASCII字母字符是必须输入的(A-Z、a-z)
a    ASCII字母字符是允许输入的,但不是必需的(A-Z、a-z)
N    ASCII字母字符是必须输入的(A-Z、a-z、0-9)
n    ASII字母字符是允许输入的,但不是必需的(A-Z、a-z、0-9)
X    任何字符都是必须输入的
x    任何字符都是允许输入的,但不是必需的
9    ASCII数字字符是必须输入的(0-9)
0    ASCII数字字符是允许输入的,但不是必需的(0-9)
D    ASCII数字字符是必须输入的(1-9)
d    ASCII数字字符是允许输入的,但不是必需的(1-9)
#    ASCI数字字符或加减符号是允许输入的,但不是必需的
H    十六进制格式字符是必须输入的(A-F、a-f、0-9)
h    十六进制格式字符是允许输入的,但不是必需的(A-F、a-f、0-9)
B    二进制格式字符是必须输入的(0,1)
b    二进制格式字符是允许输入的,但不是必需的(0,1)
>    所有的字母字符都大写
<    所有的字母字符都小写
!    关闭大小写转换
\    使用"\"转义上面列出的字符
"""
from PyQt5.QtWidgets import *
import sys


class QLineEditMask(QWidget):
    def __init__(self):
        super(QLineEditMask, self).__init__()
        self.initUI()

    def initUI(self):
        self.setWindowTitle("用掩码限制QLineEdit控件的输入")
        formLayout = QFormLayout()

        ipLineEdit = QLineEdit()
        macLineEdit = QLineEdit()
        dateLineEdit = QLineEdit()
        licenseLineEdit = QLineEdit()

        # 192.168.10.10
        ipLineEdit.setInputMask("000.000.000.000;_")  # 没有输入的时候 0 显示为 _
        macLineEdit.setInputMask("HH:HH:HH:HH:HH:HH;_")
        dateLineEdit.setInputMask("0000-00-00")
        licenseLineEdit.setInputMask(">AAAAA-AAAAA-AAAAA-AAAAA-AAAAA;#")

        formLayout.addRow("数字掩码", ipLineEdit)
        formLayout.addRow("Mac掩码", macLineEdit)
        formLayout.addRow("日期掩码", dateLineEdit)
        formLayout.addRow("许可证掩码", licenseLineEdit)

        self.setLayout(formLayout)

if __name__ == '__main__':
    app = QApplication(sys.argv)
    main = QLineEditMask()
    main.show()
    sys.exit(app.exec_())
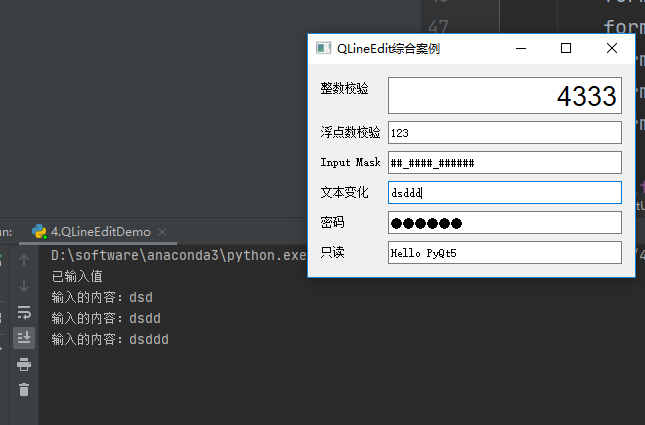
#!/usr/bin/python
# -*- coding:utf-8 -*-

import sys
from PyQt5.QtWidgets import *
from PyQt5.QtGui import *
from PyQt5.QtCore import Qt


class QLineEditDemo(QWidget):
    def __init__(self):
        super(QLineEditDemo, self).__init__()
        self.initUI()

    def initUI(self):
        edit1 = QLineEdit()
        # 使用 int 校验器
        edit1.setValidator(QIntValidator())
        # 不超过9999, 4代表是4位
        edit1.setMaxLength(4)
        # 设置右对齐
        edit1.setAlignment(Qt.AlignRight)
        # 设置字体
        edit1.setFont(QFont('Arial', 20))

        edit2 = QLineEdit()
        # 范围 0.99 - 99.99  精度为 2
        edit2.setValidator(QDoubleValidator(0.99, 99.99, 2))

        edit3 = QLineEdit()
        edit3.setInputMask("99_9999_999999;#")

        edit4 = QLineEdit()
        edit4.textChanged.connect(self.textChanged)

        edit5 = QLineEdit()
        edit5.setEchoMode(QLineEdit.Password)
        edit5.editingFinished.connect(self.enterPress)

        edit6 = QLineEdit("Hello PyQt5")
        edit6.setReadOnly(True)

        # 设置表单布局
        formLayout = QFormLayout()
        formLayout.addRow("整数校验", edit1)
        formLayout.addRow("浮点数校验", edit2)
        formLayout.addRow("Input Mask", edit3)
        formLayout.addRow("文本变化", edit4)
        formLayout.addRow("密码", edit5)
        formLayout.addRow("只读模式", edit6)

        self.setLayout(formLayout)
        self.setWindowTitle("QLineEdit综合案例")

    def textChanged(self, text):
        print('输入的内容:' + text)

    def enterPress(self):
        print('已输入值')


if __name__ == '__main__':
    app = QApplication(sys.argv)
    main = QLineEditDemo()
    main.show()
    sys.exit(app.exec_())
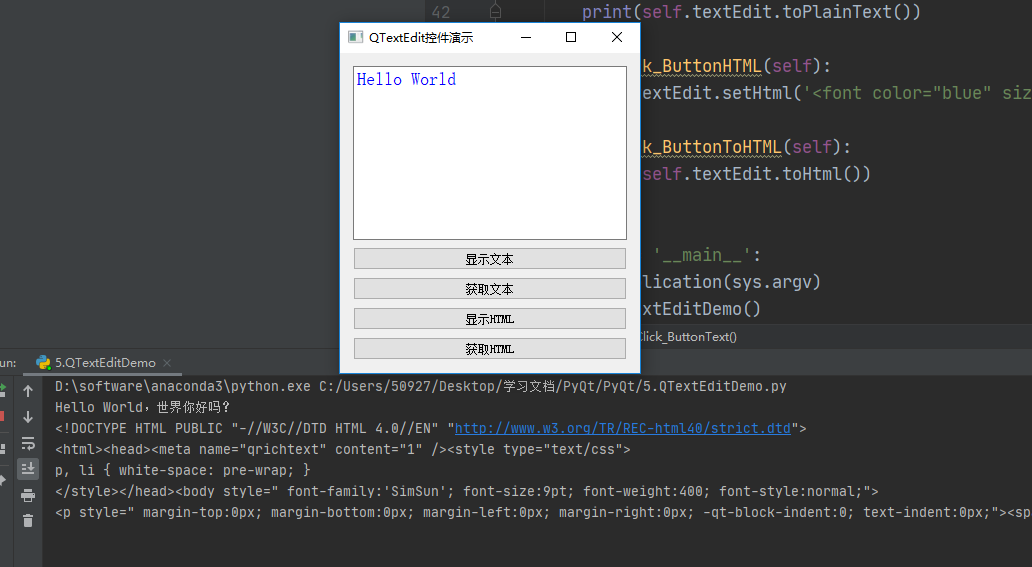
#!/usr/bin/python
# -*- coding:utf-8 -*-

import sys
from PyQt5.QtWidgets import *


class QTextEditDemo(QWidget):
    def __init__(self):
        super(QTextEditDemo, self).__init__()
        self.initUI()

    def initUI(self):
        self.setWindowTitle("QTextEdit控件演示")
        self.resize(300, 320)

        self.textEdit = QTextEdit()
        self.buttonText = QPushButton("显示文本")
        self.buttonHTML = QPushButton("显示HTML")
        self.buttonToText = QPushButton("获取文本")
        self.buttonToHTML = QPushButton("获取HTML")

        # 创建垂直布局
        layout = QVBoxLayout()
        layout.addWidget(self.textEdit)
        layout.addWidget(self.buttonText)
        layout.addWidget(self.buttonToText)
        layout.addWidget(self.buttonHTML)
        layout.addWidget(self.buttonToHTML)

        self.setLayout(layout)

        self.buttonText.clicked.connect(self.onClick_ButtonText)
        self.buttonToText.clicked.connect(self.onClick_ButtonToText)
        self.buttonHTML.clicked.connect(self.onClick_ButtonHTML)
        self.buttonToHTML.clicked.connect(self.onClick_ButtonToHTML)

    def onClick_ButtonText(self):
        self.textEdit.setPlainText("Hello World,世界你好吗?")

    def onClick_ButtonToText(self):
        print(self.textEdit.toPlainText())

    def onClick_ButtonHTML(self):
        self.textEdit.setHtml('<font color="blue" size="5">Hello World</font>')

    def onClick_ButtonToHTML(self):
        print(self.textEdit.toHtml())


if __name__ == '__main__':
    app = QApplication(sys.argv)
    main = QTextEditDemo()
    main.show()
    sys.exit(app.exec_())
QAbstractButton # 所有类的父类
QPushButton # 普通按钮
AToolButton # 工具条按钮
QRadioButton # 单选按钮
QCheckBox # 多选按钮
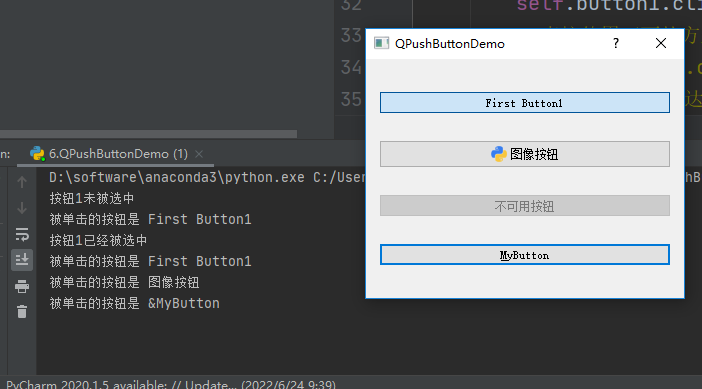
#!/usr/bin/python
# -*- coding:utf-8 -*-


import sys
from PyQt5.QtWidgets import *
from PyQt5.QtCore import *
from PyQt5.QtGui import *


class QPushButtonDemo(QDialog):
    def __init__(self):
        super(QPushButtonDemo, self).__init__()
        self.initUI()

    def initUI(self):
        self.setWindowTitle("QPushButtonDemo")
        layout = QVBoxLayout()

        self.button1 = QPushButton("第1个按钮")
        self.button1.setText("First Button1")
        # 按钮可以复选,类似QCheckBox功能。按下去之后需要再按一次才能起来
        self.button1.setCheckable(True)
        self.button1.toggle()
        # 常规方式信号与槽绑定
        self.button1.clicked.connect(self.buttonState)
        # 直接使用下面的方式调用槽函数,但是参数没办法传递
        # self.button1.clicked.connect(self.whichButton)
        # 使用lamdba 表达式来传递参数
        self.button1.clicked.connect(lambda: self.whichButton(self.button1))
        layout.addWidget(self.button1)

        # 在文本前面显示图像
        self.button2 = QPushButton("图像按钮")
        self.button2.setIcon(QIcon(QPixmap("./images/python.png")))
        self.button2.clicked.connect(lambda: self.whichButton(self.button2))
        layout.addWidget(self.button2)

        self.button3 = QPushButton("不可用按钮")
        self.button3.setEnabled(False)
        layout.addWidget(self.button3)

        # 默认按钮
        self.button4 = QPushButton("&MyButton")
        self.button4.setDefault(True)
        self.button4.clicked.connect(lambda: self.whichButton(self.button4))
        layout.addWidget(self.button4)

        self.setLayout(layout)
        self.resize(400, 300)

    def whichButton(self, btn):
        print("被单击的按钮是 %s" % btn.text())

    def buttonState(self):
        if self.button1.isChecked():
            print("按钮1已经被选中")
        else:
            print("按钮1未被选中")


if __name__ == '__main__':
    app = QApplication(sys.argv)
    main = QPushButtonDemo()
    main.show()
    sys.exit(app.exec_())
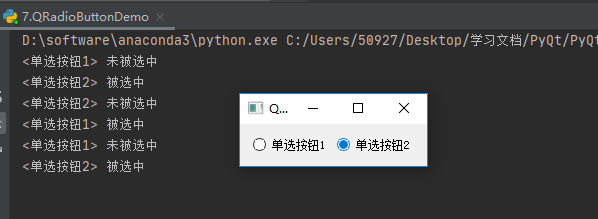
#!/usr/bin/python
# -*- coding:utf-8 -*-


import sys
from PyQt5.QtWidgets import *
from PyQt5.QtCore import *
from PyQt5.QtGui import *


class QRadioButtonDemo(QWidget):
    def __init__(self):
        super(QRadioButtonDemo, self).__init__()
        self.initUI()

    def initUI(self):
        self.setWindowTitle("QRadioButton")
        # 設置水平布局
        layout = QHBoxLayout()

        self.button1 = QRadioButton("单选按钮1")
        self.button1.setChecked(True)
        self.button1.toggled.connect(self.buttonState)
        layout.addWidget(self.button1)

        self.button2 = QRadioButton("单选按钮2")
        self.button2.toggled.connect(self.buttonState)
        layout.addWidget(self.button2)

        self.setLayout(layout)

    def buttonState(self):
        radioButton = self.sender()
        if radioButton.isChecked():
            print("<" + radioButton.text() + "> 被选中")
        else:
            print("<" + radioButton.text() + "> 未被选中")


if __name__ == '__main__':
    app = QApplication(sys.argv)
    main = QRadioButtonDemo()
    main.show()
    sys.exit(app.exec_())
#!/usr/bin/python
# -*- coding:utf-8 -*-

"""
复选框控件 (QCheckBox)
3中状态
未被选中: 0
半选中:   1
选中:    2
"""

import sys
from PyQt5.QtWidgets import *
from PyQt5.QtGui import *
from PyQt5.QtCore import Qt


class QCheckBoxDemo(QWidget):
    def __init__(self):
        super(QCheckBoxDemo, self).__init__()
        self.initUI()

    def initUI(self):
        self.setWindowTitle("复选框")
        layout = QHBoxLayout()

        self.checkBox1 = QCheckBox("复选框控件1")
        self.checkBox1.setChecked(True)
        self.checkBox1.stateChanged.connect(lambda: self.checkState(self.checkBox1))
        layout.addWidget(self.checkBox1)

        self.checkBox2 = QCheckBox("复选框控件2")
        self.checkBox2.stateChanged.connect(lambda: self.checkState(self.checkBox2))
        layout.addWidget(self.checkBox2)

        self.checkBox3 = QCheckBox("半选中")
        self.checkBox3.stateChanged.connect(lambda: self.checkState(self.checkBox3))
        self.checkBox3.setTristate(True)
        self.checkBox3.setCheckState(Qt.PartiallyChecked)
        layout.addWidget(self.checkBox3)

        self.setLayout(layout)

    def checkState(self, cb):
        check1Status = self.checkBox1.text() + ' isChecked = ' + str(
            self.checkBox1.isChecked()) + " checkstate = " + str(self.checkBox1.checkState()) + "\n"
        check2Status = self.checkBox2.text() + ' isChecked = ' + str(
            self.checkBox2.isChecked()) + " checkstate = " + str(self.checkBox2.checkState()) + "\n"
        check3Status = self.checkBox3.text() + ' isChecked = ' + str(
            self.checkBox3.isChecked()) + " checkstate = " + str(self.checkBox3.checkState()) + "\n"
        print(check1Status, check2Status, check3Status)

if __name__ == '__main__':
    app = QApplication(sys.argv)
    main = QCheckBoxDemo()
    main.show()
    sys.exit(app.exec_())

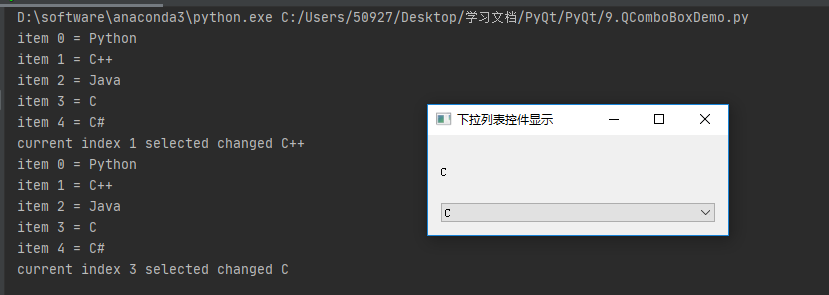
#!/usr/bin/python
# -*- coding:utf-8 -*-
"""
下拉列表控件(QComboBox)
1. 如何将列表项添加到 QComboBox控件中
2. 如何获取列表中的列表项
"""

import sys
from PyQt5.QtCore import *
from PyQt5.QtGui import *
from PyQt5.QtWidgets import *


class QComboBoxDemo(QWidget):
    def __init__(self):
        super(QComboBoxDemo, self).__init__()
        self.initUI()

    def initUI(self):
        self.setWindowTitle("下拉列表控件显示")
        self.resize(300, 100)

        layout = QVBoxLayout()
        self.label = QLabel("请选择编程语言")
        self.cb = QComboBox()
        # 添加一个元素
        self.cb.addItem("Python")
        self.cb.addItem("C++")
        # 同时添加多个元素
        self.cb.addItems(["Java", "C", "C#"])
        # 添加索引变化的信号槽,一般会自动传递两个参数, 一个控件标签对象, 一个控件索引
        self.cb.currentIndexChanged.connect(self.selectionChange)
        layout.addWidget(self.label)
        layout.addWidget(self.cb)
        self.setLayout(layout)

    def selectionChange(self, index):
        self.label.setText(self.cb.currentText())
        # 调整控件尺寸
        self.label.adjustSize()

        # 输出comboBox 中所有的项
        for count in range(self.cb.count()):
            print("item " + str(count) + " = " + self.cb.itemText(count))
        print("current index", index, "selected changed", self.cb.currentText())


if __name__ == '__main__':
    app = QApplication(sys.argv)
    main = QComboBoxDemo()
    main.show()
    sys.exit(app.exec_())
#!/usr/bin/python
# -*- coding:utf-8 -*-

"""
计算器控件(QSpinBox)
"""
import sys
from PyQt5.QtCore import *
from PyQt5.QtGui import *
from PyQt5.QtWidgets import *


class QSplinBoxDemo(QWidget):
    def __init__(self):
        super(QSplinBoxDemo, self).__init__()
        self.initUI()

    def initUI(self):
        self.setWindowTitle("QSpinBox演示")
        self.resize(300, 100)
        layout = QVBoxLayout()
        self.label = QLabel("当前值")
        self.label.setAlignment(Qt.AlignCenter)
        layout.addWidget(self.label)

        self.sb = QSpinBox()
        # 设置默认值
        self.sb.setValue(18)
        # 设置范围
        self.sb.setRange(10, 30)
        # 设置步长
        self.sb.setSingleStep(2)
        self.sb.valueChanged.connect(self.valueChange)
        layout.addWidget(self.sb)

        self.setLayout(layout)

    def valueChange(self):
        self.label.setText("当前值: " + str(self.sb.value()))


if __name__ == '__main__':
    app = QApplication(sys.argv)
    main = QSplinBoxDemo()
    main.show()
    sys.exit(app.exec_())

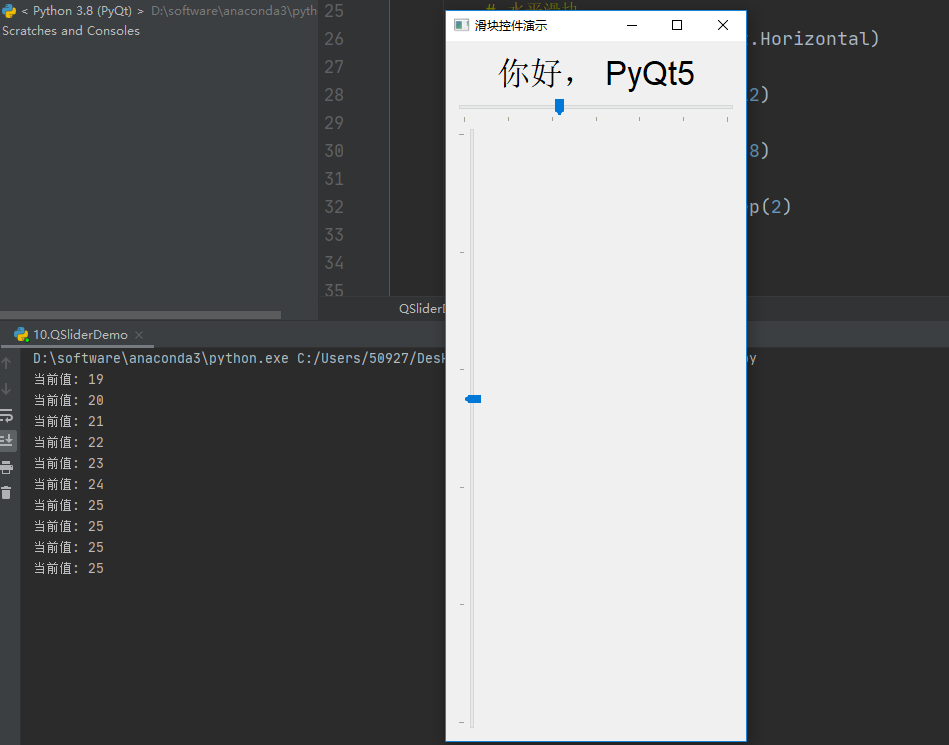
#!/usr/bin/python
# -*- coding:utf-8 -*-

"""
滑块控件(QSlider)
"""
import sys
from PyQt5.QtCore import *
from PyQt5.QtGui import *
from PyQt5.QtWidgets import *


class QSliderDemo(QWidget):
    def __init__(self):
        super(QSliderDemo, self).__init__()
        self.initUI()

    def initUI(self):
        self.setWindowTitle("滑块控件演示")
        self.resize(300, 700)
        layout = QVBoxLayout()
        self.label = QLabel("你好, PyQt5")
        self.label.setAlignment(Qt.AlignCenter)
        layout.addWidget(self.label)
        # 水平滑块
        self.slider = QSlider(Qt.Horizontal)
        # 设置最小值
        self.slider.setMinimum(12)
        # 设置最大值
        self.slider.setMaximum(48)
        # 设置步长
        self.slider.setSingleStep(2)
        # 设置当前值
        self.slider.setValue(18)
        # 设置刻度的位置,刻度在下方
        self.slider.setTickPosition(QSlider.TicksBelow)
        # 设置刻度的间隔
        self.slider.setTickInterval(6)
        self.slider.valueChanged.connect(self.valueChange)
        layout.addWidget(self.slider)

        # 垂直滑块
        self.slider1 = QSlider(Qt.Vertical)
        self.slider1.setMinimum(10)
        self.slider1.setMaximum(30)
        self.slider1.setSingleStep(3)
        self.slider1.setValue(18)
        # 设置刻度的位置,刻度在左边
        self.slider1.setTickPosition(QSlider.TicksLeft)
        self.slider1.setTickInterval(4)
        self.slider1.valueChanged.connect(self.valueChange)
        layout.addWidget(self.slider1)
        self.setLayout(layout)

    def valueChange(self):
        print("当前值: %s" % self.sender().value())
        size = self.sender().value()
        self.label.setFont(QFont("Arial", size))


if __name__ == '__main__':
    app = QApplication(sys.argv)
    main = QSliderDemo()
    main.show()
    sys.exit(app.exec_())


 浙公网安备 33010602011771号