Netty学习
一.概述
1.netty是什么
Netty is an asynchronous event-driven network application framework
for rapid development of maintainable high performance protocol servers & clients.
Netty 是一个异步的、基于事件驱动的网络应用框架,用于快速开发可维护、高性能的网络服务器和客户端。
异步:指得是netty采用多线程的模式。netty并没有使用异步IO(AIO)。
基于事件驱动:指的是底层采用NIO模式,使用Selector多路复用模型
2.netty的优势
如果使用传统NIO,其工作量大,bug 多
- 需要自己构建协议
- 解决 TCP 传输问题,如粘包、半包
- 因为bug的存在,epoll 空轮询导致 CPU 100%
Netty 对 API 进行增强,使之更易用,如
- FastThreadLocal => ThreadLocal
- ByteBuf => ByteBuffer
二.入门案例
1.加入依赖
                <dependency>
		    <groupId>io.netty</groupId>
		    <artifactId>netty-all</artifactId>
		    <version>4.1.10.Final</version>
		</dependency>
2.服务器端
public class HelloServer {
    public static void main(String[] args) {
        // 1、启动器,负责装配netty组件,启动服务器
        new ServerBootstrap()
                // 2、创建 NioEventLoopGroup,每个EventLoop可以简单理解为 线程 + Selector
                .group(new NioEventLoopGroup())
                // 3、选择服务器的 ServerSocketChannel 实现
                .channel(NioServerSocketChannel.class)
                // 4、child 负责处理读写,该方法决定了 child 执行哪些操作
            	// ChannelInitializer 处理器(仅执行一次)
            	// 它的作用是待客户端SocketChannel建立连接后,执行initChannel以便添加别的处理器
                .childHandler(new ChannelInitializer<NioSocketChannel>() {
                    @Override
                    protected void initChannel(NioSocketChannel nioSocketChannel) throws Exception {
                        // 5、SocketChannel的处理器,使用StringDecoder解码,ByteBuf=>String
                        nioSocketChannel.pipeline().addLast(new StringDecoder());
                        // 6、自定义处理器,使用上一个处理器的处理结果
                        nioSocketChannel.pipeline().addLast(new SimpleChannelInboundHandler<String>() {
                            @Override //读事件
                            protected void channelRead(ChannelHandlerContext channelHandlerContext, String s) throws Exception {
                                System.out.println(s);
                            }
                        });
                    }
                    // 7、ServerSocketChannel绑定8080端口
                }).bind(8080);
    }
}
3.客户端
public class HelloClient {
    public static void main(String[] args) throws InterruptedException {
        //启动器
        new Bootstrap()
                .group(new NioEventLoopGroup())
                // 选择客户 Socket 实现类,NioSocketChannel 表示基于 NIO 的客户端实现
                .channel(NioSocketChannel.class)
                // 添加处理器
                // 它的作用是待客户端SocketChannel建立连接后,执行initChannel以便添加更多的处理器
                .handler(new ChannelInitializer<Channel>() {
                    @Override
                    protected void initChannel(Channel channel) throws Exception {
                        // 消息会经过通道 handler 处理,这里是将 String => ByteBuf 编码发出
                        channel.pipeline().addLast(new StringEncoder());
                    }
                })
                // 指定要连接的服务器和端口,返回一个ChannelFuture
                .connect(new InetSocketAddress("localhost", 8080))
                // 阻塞方法,等待 connect 建立连接再往下执行
                .sync()
                // 获取 channel 对象,它即为连接对应的通道
                .channel()
                // 写入消息并清空缓冲区
                .writeAndFlush("hello world");
    }
}
4.运行流程
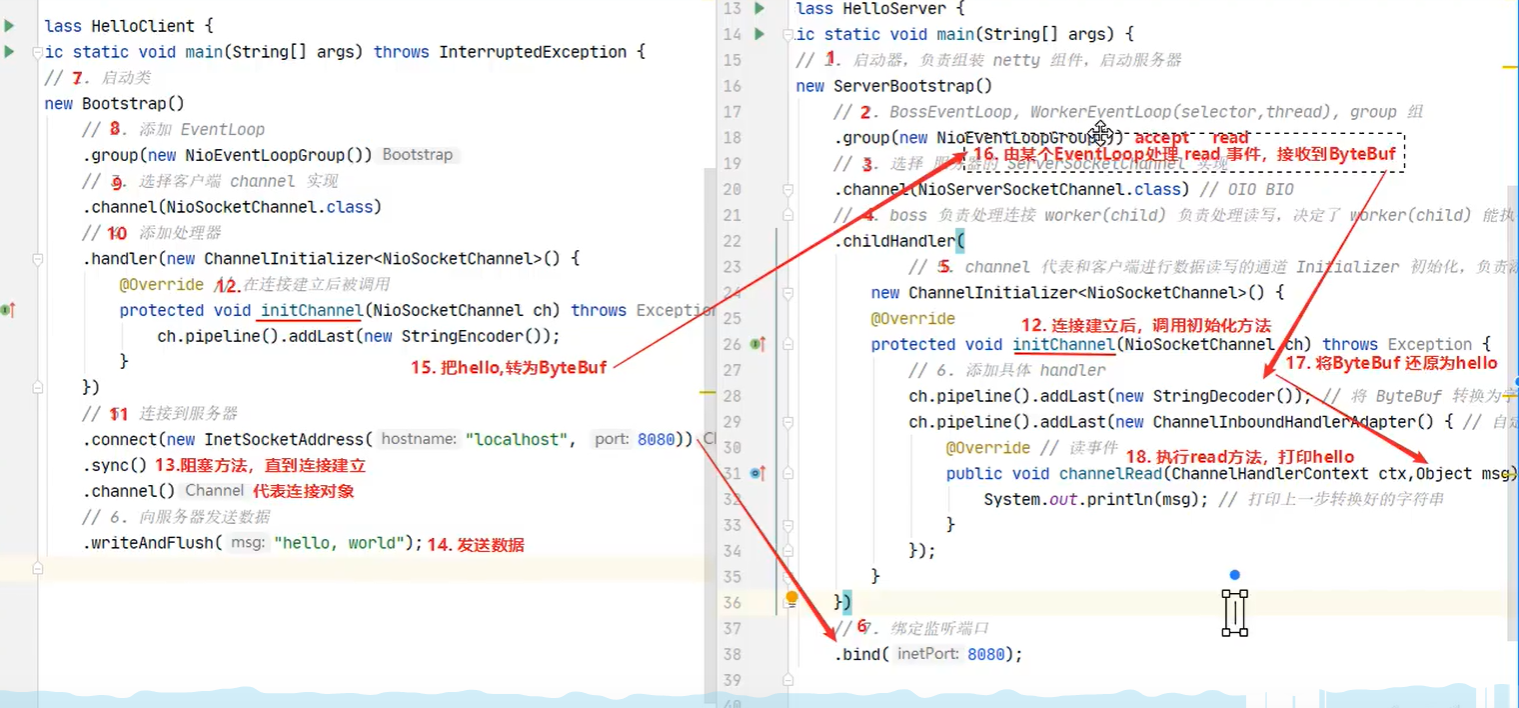
- channel 可以理解为数据的通道
- msg 理解为流动的数据,最开始输入是 ByteBuf,但经过 pipeline 中的各个 handler 加工,会变成其它类型对象,最后输出又变成 ByteBuf
- handler 可以理解为数据的处理工序
- 工序有多道,合在一起就是 pipeline(传递途径),pipeline 负责发布事件(读、读取完成…)传播给每个 handler, handler 对自己感兴趣的事件进行处理(重写了相应事件处理方法)
- pipeline 中有多个 handler,处理时会依次调用其中的 handler
- handler 分 Inbound 和 Outbound 两类
- Inbound 入站:数据输入时,由这类处理器处理
- Outbound 出站:数据写出时,由这类处理器处理
- eventLoop 可以理解为处理数据的工人
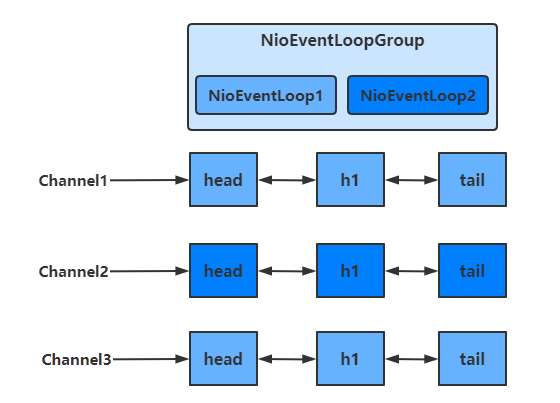
- eventLoop 可以管理多个 channel 的 io 操作,并且一旦 eventLoop 负责了某个 channel,就会将其与channel进行绑定,以后该 channel 中的 io 操作都由该 eventLoop 负责
- eventLoop 既可以执行 io 操作,也可以进行任务处理,每个 eventLoop 有自己的任务队列,队列里可以堆放多个 channel 的待处理任务,任务分为普通任务、定时任务
- eventLoop 按照 pipeline 顺序,依次按照 handler 的规划(代码)处理数据,可以为每个 handler 指定不同的 eventLoop
三.组件
1.EventLoop
public interface EventLoop extends OrderedEventExecutor, EventLoopGroup {
    EventLoopGroup parent();
}
EventLoop 本质是一个单线程执行器(同时维护了一个 Selector),里面有 run 方法处理一个或多个 Channel 上源源不断的 io 事件
它的继承关系如下
- 继承自 j.u.c.ScheduledExecutorService(一个定时任务的线程池类) 因此包含了线程池中所有的方法
- 继承自 netty 自己的 OrderedEventExecutor
- 提供了 boolean inEventLoop(Thread thread) 方法判断一个线程是否属于此 EventLoop
- 提供了 EventLoopGroup parent() 方法来看看自己属于哪个 EventLoopGroup
EventLoopGroup 是一组 EventLoop,Channel 一般会调用 EventLoopGroup 的 register 方法来绑定其中一个 EventLoop,后续这个 Channel 上的 io 事件都由此 EventLoop 来处理(保证了 io 事件处理时的线程安全)。每个EventLoop绑定了线程池中的一个线程。
- 继承自 netty 自己的 EventExecutorGroup
- 实现了 Iterable 接口提供遍历 EventLoop 的能力
- 另有 next 方法获取集合中下一个 EventLoop
处理普通任务和定时任务
//1.创建EventLoopGroup
        //NioEventLoopGroup既能处理IO任务,也能处理普通任务和定时任务
        NioEventLoopGroup group = new NioEventLoopGroup(2);
        // 2.通过next方法可以获得下一个 EventLoop
        System.out.println(group.next());
        System.out.println(group.next());
        //可以调用线程池的一些方法,比如execute(),submit()

        // 3.通过EventLoop执行普通任务
        group.next().execute(()->{
            System.out.println(Thread.currentThread().getName() + " hello");
        });

        // 4.通过EventLoop执行定时任务
        //scheduleAtFixedRate第一个参数是执行的任务,第二个参数是初始延迟时间,第三个参数是间隔时间,第四个参数是时间单位
        group.next().scheduleAtFixedRate(()->{
            System.out.println(Thread.currentThread().getName() + " hello2");
        }, 0, 1, TimeUnit.SECONDS);

        // 5.优雅地关闭
        group.shutdownGracefully();
1.new NioEventLoopGroup()如果不传入EventLoop的数目则默认为
DEFAULT_EVENT_LOOP_THREADS = Math.max(1, SystemPropertyUtil.getInt("io.netty.eventLoopThreads", NettyRuntime.availableProcessors() * 2))
也就说为设置的io.netty.eventLoopThreads(如果没设置则为CPU核心数 *2)
2.优雅关闭 shutdownGracefully 方法。该方法会首先切换 EventLoopGroup 到关闭状态从而拒绝新的任务的加入,然后在任务队列的任务都处理完成后,停止线程的运行。从而确保整体应用是在正常有序的状态下退出的
处理IO任务
服务器代码
public class MyServer {
    public static void main(String[] args) {
        new ServerBootstrap()
                .group(new NioEventLoopGroup())
                .channel(NioServerSocketChannel.class)
                .childHandler(new ChannelInitializer<SocketChannel>() {
                    @Override
                    protected void initChannel(SocketChannel socketChannel) throws Exception {
                        socketChannel.pipeline().addLast(new ChannelInboundHandlerAdapter() {
                            @Override
                            //此时的msg就是ByteBuf
                            public void channelRead(ChannelHandlerContext ctx, Object msg) throws Exception {
                                ByteBuf buf = (ByteBuf) msg;
                                System.out.println(Thread.currentThread().getName() + " " + buf.toString(StandardCharsets.UTF_8));

                            }
                        });
                    }
                })
                .bind(8080);
    }
}
客户端代码
public class MyClient {
    public static void main(String[] args) throws IOException, InterruptedException {
        Channel channel = new Bootstrap()
                .group(new NioEventLoopGroup())
                .channel(NioSocketChannel.class)
                .handler(new ChannelInitializer<SocketChannel>() {
                    @Override
                    protected void initChannel(SocketChannel socketChannel) throws Exception {
                        socketChannel.pipeline().addLast(new StringEncoder());
                    }
                })
                .connect(new InetSocketAddress("localhost", 8080))
                .sync()
                .channel();
        System.out.println(channel);
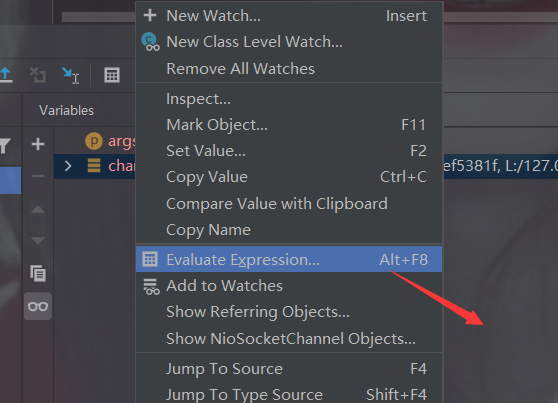
        // 此处打断点调试,调用 channel.writeAndFlush(...);
        System.in.read();
    }
}
这里调试的时候需要注意几个问题:
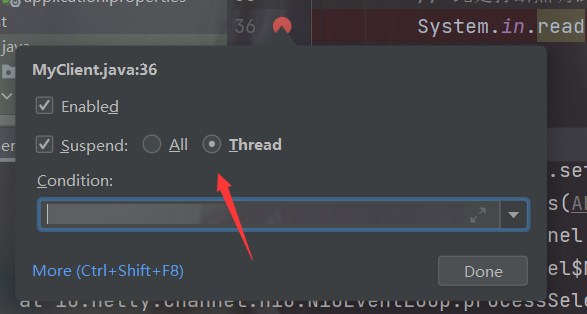
首先把这里调成Thread(因为netty是多线程的,发送数据的不是主线程,我们不能把所有的线程都停止了)
分工细化
我们希望进一步分工我们的NioEventLoopGroup,如之前netty中讲的分成Boss(处理accept事件) 和 Worker (处理read和write事件)
public class MyServer {
    public static void main(String[] args) {
        new ServerBootstrap()
            	// 两个Group,分别为Boss 负责Accept事件,Worker 负责读写事件
                .group(new NioEventLoopGroup(1), new NioEventLoopGroup(2))

				...
    }
}
多个客户端分别发送 hello 结果
nioEventLoopGroup-3-1 hello1
nioEventLoopGroup-3-2 hello2
nioEventLoopGroup-3-1 hello3
nioEventLoopGroup-3-2 hello4
nioEventLoopGroup-3-2 hello4
可以看出,一个EventLoop可以负责多个Channel,且EventLoop一旦与Channel绑定,则一直负责处理该Channel中的事件
增加自定义EventLoopGroup
当有的任务需要较长的时间处理时(比如数据库连接、远程调用等),可以使用非NioEventLoopGroup,避免同一个NioEventLoop中的其他Channel在较长的时间内都无法得到处理
public class MyServer {
    public static void main(String[] args) {
        // 增加自定义的非NioEventLoopGroup
        // DefaultEventLoopGroup只能处理普通任务和定时任务 不能处理IO任务
        EventLoopGroup group = new DefaultEventLoopGroup();

        new ServerBootstrap()
                .group(new NioEventLoopGroup(1), new NioEventLoopGroup(2))
                .channel(NioServerSocketChannel.class)
                .childHandler(new ChannelInitializer<SocketChannel>() {
                    @Override
                    protected void initChannel(SocketChannel socketChannel) throws Exception {
                        // 增加两个handler,第一个使用NioEventLoopGroup处理,第二个使用自定义EventLoopGroup处理

                        // addLast()一共有三个参数,第一个为Handler对应的group(不写默认为链式编程之前配的),第二个为Handler的名字,第三个为Handler对象。

                        // **Handler中的方法交给group中的EventLoop处理**
                        socketChannel.pipeline().addLast("nioHandler",new ChannelInboundHandlerAdapter() {
                            @Override
                            public void channelRead(ChannelHandlerContext ctx, Object msg) throws Exception {
                                ByteBuf buf = (ByteBuf) msg;
                                System.out.println(Thread.currentThread().getName() + " " + buf.toString(StandardCharsets.UTF_8));
                                // 消息传给下一个InboundHandler
                                super.channelRead(ctx,buf);
                            }
                        })
                        // 该handler绑定自定义的Group
                        .addLast(group, "myHandler", new ChannelInboundHandlerAdapter() {
                            @Override
                            public void channelRead(ChannelHandlerContext ctx, Object msg) throws Exception {
                                 //模拟耗时任务
                                  try {
                                      Thread.sleep(5000);
                                  } catch (InterruptedException e) {
                                      Thread.currentThread().interrupt();
                                  }
                                ByteBuf buf = (ByteBuf) msg;
                                System.out.println(Thread.currentThread().getName() + " " + buf.toString(StandardCharsets.UTF_8));
                            }
                        });
                    }
                })
                .bind(8080);
    }
}
启动四个客户端发送数据
nioEventLoopGroup-4-1 hello1
defaultEventLoopGroup-2-1 hello1
nioEventLoopGroup-4-2 hello2
defaultEventLoopGroup-2-2 hello2
nioEventLoopGroup-4-1 hello3
defaultEventLoopGroup-2-3 hello3
nioEventLoopGroup-4-2 hello4
defaultEventLoopGroup-2-4 hello4
可以看出,客户端与服务器之间的事件,被nioEventLoopGroup和defaultEventLoopGroup分别处理
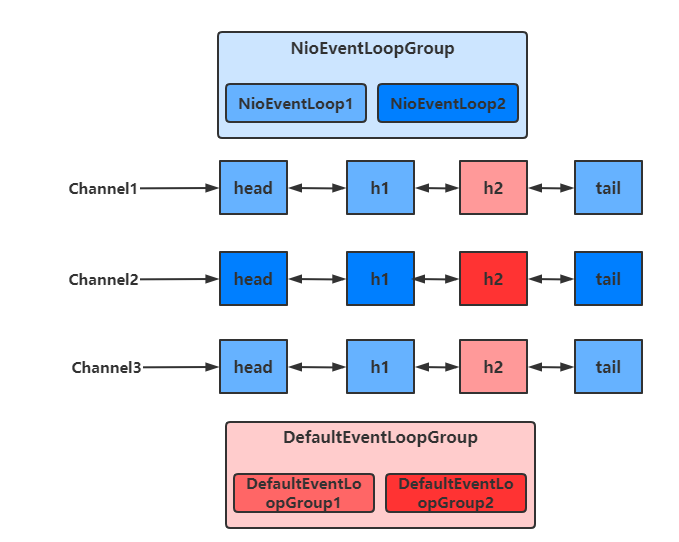
多个Handler之间如果使用不同的EventLoop,是如何切换线程的?
static void invokeChannelRead(final AbstractChannelHandlerContext next, Object msg) {
    final Object m = next.pipeline.touch(ObjectUtil.checkNotNull(msg, "msg"), next);
    // 获得下一个EventLoop, excutor 即为 EventLoopGroup
    EventExecutor executor = next.executor();

    // 如果下一个EventLoop的线程和当前EventLoop线程是同一个
    if (executor.inEventLoop()) {
        //由本线程直接调用
        next.invokeChannelRead(m);
    }
     // 否则将要执行的任务 提交给下一个EventLoop(换人)
    else {
        //由下一个Handler的线程执行
        executor.execute(new Runnable() {
            public void run() {
                next.invokeChannelRead(m);
            }
        });
    }
}
- 如果两个 handler 绑定的是同一个线程,那么就直接调用
- 否则,把要调用的代码封装为一个任务对象,由下一个 handler 的 线程 来调用
2.Channel
Channel 的常用方法
- close() 可以用来关闭Channel
- closeFuture() 用来处理 Channel 的关闭
- sync 方法作用是同步等待 Channel 关闭
- 而 addListener 方法是异步等待 Channel 关闭
- pipeline() 方法用于添加处理器
- write() 方法将数据写入
- 因为缓冲机制,数据被写入到 Channel 中以后,不会立即被发送
- 只有当缓冲满了或者调用了flush()方法后,才会将数据通过 Channel 发送出去
- writeAndFlush() 方法将数据写入并立即发送(刷出)
ChannelFuture
public class MyClient {
    public static void main(String[] args) throws IOException, InterruptedException {
        ChannelFuture channelFuture = new Bootstrap()
                .group(new NioEventLoopGroup())
                .channel(NioSocketChannel.class)
                .handler(new ChannelInitializer<SocketChannel>() {
                    @Override
                    protected void initChannel(SocketChannel socketChannel) throws Exception {
                        socketChannel.pipeline().addLast(new StringEncoder());
                    }
                })
                // 该方法为异步非阻塞方法,主线程调用后不会被阻塞,真正去执行连接操作的是NIO线程
            	// NIO线程:NioEventLoop 中的线程
                .connect(new InetSocketAddress("localhost", 8080));

        // 该方法用于阻塞住当前线程,等待连接真正建立
        channelFuture.sync();

        // 获取客户端-服务器之间的Channel对象
        Channel channel = channelFuture.channel();
        channel.writeAndFlush("hello world");
        System.in.read();
    }
}
如果我们去掉channelFuture.sync()方法,会服务器无法收到hello world
这是因为建立连接(connect)的过程是异步非阻塞的,若不通过sync()方法阻塞主线程,等待连接真正建立,这时通过 channelFuture.channel() 拿到的 Channel 对象,并不是真正与服务器建立好连接的 Channel,也就没法将信息正确的传输给服务器端
所以需要通过channelFuture.sync()方法,阻塞主线程,同步处理结果,等待连接真正建立好以后,再去获得 Channel 传递数据。使用该方法,获取 Channel 和发送数据的线程都是主线程
下面还有一种方法,用于异步获取建立连接后的 Channel 和发送数据,使得执行这些操作的线程是 NIO 线程(去执行connect操作的线程)
addListener方法
通过这种方法可以在NIO线程中获取 Channel 并发送数据,而不是在主线程中执行这些操作
public class MyClient {
    public static void main(String[] args) throws IOException, InterruptedException {
        ChannelFuture channelFuture = new Bootstrap()
                .group(new NioEventLoopGroup())
                .channel(NioSocketChannel.class)
                .handler(new ChannelInitializer<SocketChannel>() {
                    @Override
                    protected void initChannel(SocketChannel socketChannel) throws Exception {
                        socketChannel.pipeline().addLast(new StringEncoder());
                    }
                })
                // 该方法为异步非阻塞方法,主线程调用后不会被阻塞,真正去执行连接操作的是NIO线程
                // NIO线程:NioEventLoop 中的线程
                .connect(new InetSocketAddress("localhost", 8080));

	// 当connect方法执行完毕后,也就是连接真正建立后
        // 会在NIO线程中调用operationComplete方法
        channelFuture.addListener(new ChannelFutureListener() {
            @Override
            public void operationComplete(ChannelFuture channelFuture) throws Exception {
                Channel channel = channelFuture.channel();
                channel.writeAndFlush("hello world");
            }
        });
        System.in.read();
    }
}
处理关闭
如果我们想要在关闭channel后进行一些操作该怎么办?
public class ReadClient {
    public static void main(String[] args) throws InterruptedException {
        // 创建EventLoopGroup,使用完毕后关闭
        NioEventLoopGroup group = new NioEventLoopGroup();

        ChannelFuture channelFuture = new Bootstrap()
                .group(group)
                .channel(NioSocketChannel.class)
                .handler(new ChannelInitializer<SocketChannel>() {
                    @Override
                    protected void initChannel(SocketChannel socketChannel) throws Exception {
                        socketChannel.pipeline().addLast(new StringEncoder());
                    }
                })
                .connect(new InetSocketAddress("localhost", 8080));
        channelFuture.sync();

        Channel channel = channelFuture.channel();
        Scanner scanner = new Scanner(System.in);

        // 创建一个线程用于输入并向服务器发送
        new Thread(()->{
            while (true) {
                String msg = scanner.next();
                if ("q".equals(msg)) {
                    // **关闭操作是异步的,会另起一个线程执行执行**
                    channel.close();
                    //所以说不能将关闭后的操作写在这里
                    break;
                }
                channel.writeAndFlush(msg);
            }
        }, "inputThread").start();

        // 获得closeFuture对象
        ChannelFuture closeFuture = channel.closeFuture();
        System.out.println("waiting close...");

        // 同步等待NIO线程执行完close操作
        closeFuture.sync();

        // 关闭之后执行一些操作,可以保证执行的操作一定是在channel关闭以后执行的
        System.out.println("关闭之后执行一些额外操作...");

        // 关闭EventLoopGroup
        group.shutdownGracefully();
    }
}
当我们要关闭channel时,可以调用channel.close()方法进行关闭。但是该方法也是一个异步方法。真正的关闭操作并不是在调用该方法的线程中执行的,而是在NIO线程中执行真正的关闭操作
如果我们想在channel真正关闭以后,执行一些额外的操作,可以选择以下两种方法来实现
- 通过channel.closeFuture()方法获得对应的ChannelFuture对象,然后调用sync()方法阻塞执行操作的线程,等待channel真正关闭后,再执行其他操作
   // 获得closeFuture对象
   ChannelFuture closeFuture = channel.closeFuture();

   // 同步等待NIO线程执行完close操作
   closeFuture.sync();
- 调用closeFuture.addListener方法,添加close的后续操作
    closeFuture.addListener(new ChannelFutureListener() {
    @Override
    // 等待channel关闭后才执行的操作
    public void operationComplete(ChannelFuture channelFuture) throws Exception {
        System.out.println("关闭之后执行一些额外操作...");
        // 关闭EventLoopGroup
        group.shutdownGracefully();
    }
      });
netty为什么要使用异步
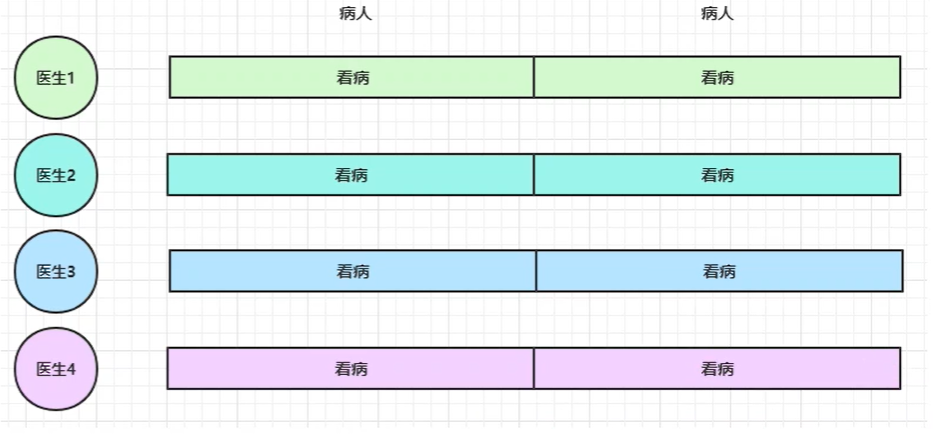
我们以医生看病为例,每个医生代表一个一个线程
netty中的异步并不是
而是
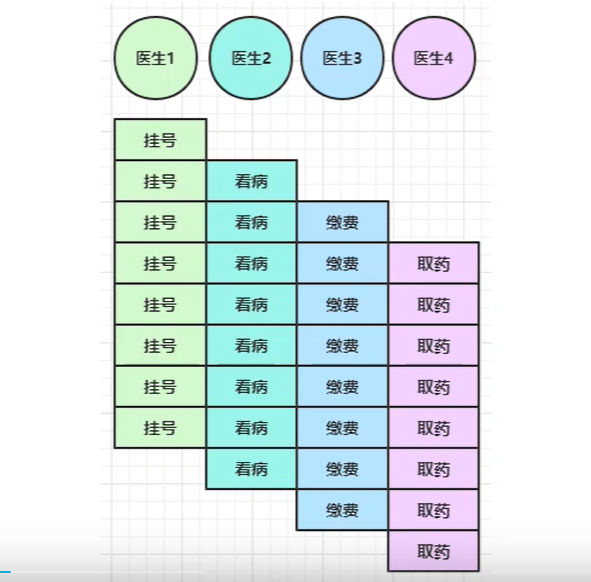
由此可见netty使用异步并没有缩短响应时间反而增加了响应时间,使用异步的目的是提高吞吐量
3.Future与Promise
在异步处理时,经常用到这两个接口
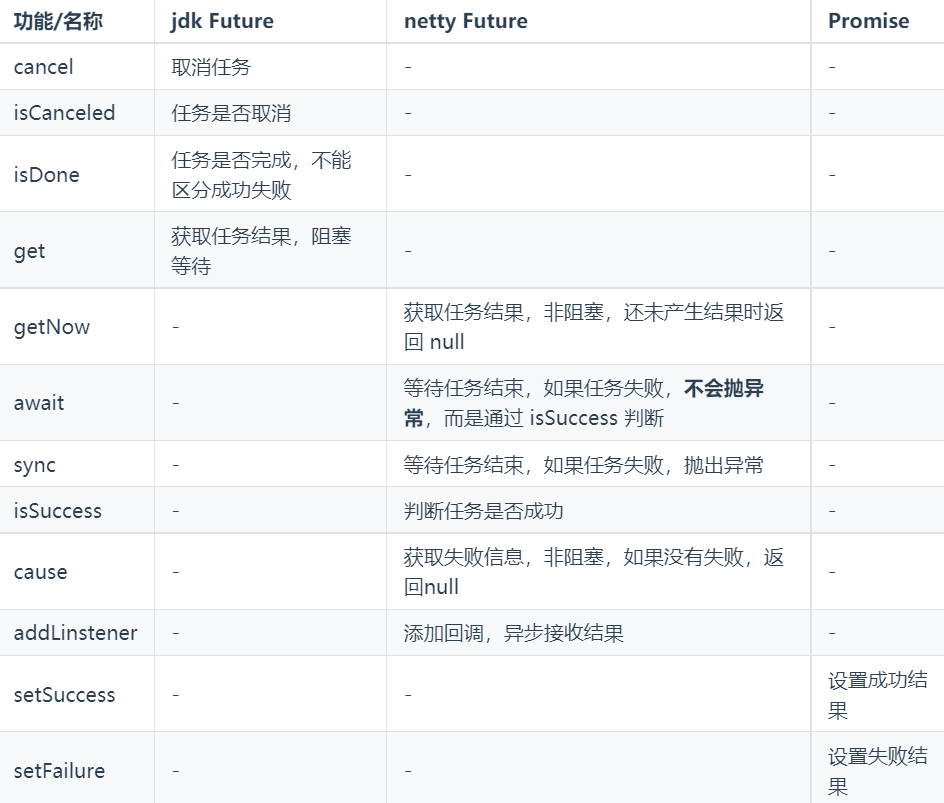
netty 中的 Future 与 jdk 中的 Future 同名,但是是两个接口
netty 的 Future 继承自 jdk 的 Future,而 Promise 又对 netty Future 进行了扩展
- jdk Future 只能同步等待任务结束(阻塞等待)才能得到结果
- netty Future 可以同步等待任务结束得到结果,也可以异步方式得到结果,但都是要等任务结束
- netty Promise 不仅有 netty Future 的功能,而且脱离了任务独立存在,只作为两个线程间传递结果的容器
JDK Future
public class JdkFuture {
    public static void main(String[] args) throws ExecutionException, InterruptedException {
        ThreadFactory factory = new ThreadFactory() {
            @Override
            public Thread newThread(Runnable r) {
                return new Thread(r, "JdkFuture");
            }
        };
        // 创建线程池
        ThreadPoolExecutor executor = new ThreadPoolExecutor(5, 10,10, TimeUnit.SECONDS, new ArrayBlockingQueue<>(10), factory);

        // 获得Future对象
        Future<Integer> future = executor.submit(new Callable<Integer>() {

            @Override
            public Integer call() throws Exception {
                TimeUnit.SECONDS.sleep(1);
                return 50;
            }
        });

        // 通过阻塞的方式,获得运行结果
        System.out.println(future.get());
    }
}
Netty Future
public class NettyFuture {
    public static void main(String[] args) throws ExecutionException, InterruptedException {
        NioEventLoopGroup group = new NioEventLoopGroup();

        // 获得 EventLoop 对象
        EventLoop eventLoop = group.next();

        //获得 Future 对象
        Future<Integer> future = eventLoop.submit(new Callable<Integer>() {
            @Override
            public Integer call() throws Exception {
                return 50;
            }
        });

        // 主线程中获取结果
        System.out.println(Thread.currentThread().getName() + " 获取结果");
        System.out.println("getNow " + future.getNow());
        System.out.println("get " + future.get());

        // NIO线程中异步获取结果
        future.addListener(new GenericFutureListener<Future<? super Integer>>() {
            @Override
            public void operationComplete(Future<? super Integer> future) throws Exception {
                System.out.println(Thread.currentThread().getName() + " 获取结果");
                System.out.println("getNow " + future.getNow());
            }
        });
    }
}
Netty Promise
Promise相当于一个容器,可以用于存放各个线程中的结果,然后让其他线程去获取该结果。
public class NettyPromise {
    public static void main(String[] args) throws ExecutionException, InterruptedException {
        // 创建EventLoop
        NioEventLoopGroup group = new NioEventLoopGroup();
        EventLoop eventLoop = group.next();

        // Promise对象是由我们主动创建的,而非向线程池提交任务获取。用于存放结果。
        DefaultPromise<Integer> promise = new DefaultPromise<>(eventLoop);

        new Thread(()->{
            try {
                TimeUnit.SECONDS.sleep(1);
            } catch (InterruptedException e) {
                e.printStackTrace();
            }
            // 自定义线程向Promise中存放结果
            promise.setSuccess(50);
        }).start();

        // 主线程从Promise中获取结果。get()方法是阻塞的等待结果
        System.out.println(Thread.currentThread().getName() + " " + promise.get());
    }
}
4.Handler与Pipeline
ChannelHandler用来处理Channel上的各种事件,分为入站,出站两种,所有的ChannelHandler被连成一串就是Pipeline
- 入站处理器通常是ChannelInboundHandlerAdapter的子类,主要用来读取客户端数据,写回结果(处理写入的数据)
- 出站处理器通常是ChannelOutboundHandlerAdapter的子类,主要用来对写回结果进行加工(处理写出的数据)
打个比喻,每个Channel就是一个产品的加工车间,Pipeline是车间中的流水线,ChannelHandler就是流水线上的各道工序,ButyBuf是原材料,经过很多工序的加工:经过入站工序,再经过出站工序变成最终的产品
public class PipeLineServer {
    public static void main(String[] args) {
        new ServerBootstrap()
                .group(new NioEventLoopGroup())
                .channel(NioServerSocketChannel.class)
                .childHandler(new ChannelInitializer<SocketChannel>() {
                    @Override
                    protected void initChannel(SocketChannel socketChannel) throws Exception {
                        // 在socketChannel的pipeline中添加handler
                        // pipeline中handler是带有head与tail节点的双向链表,的实际结构为
    			// head <-> handler1 <-> ... <-> handler4 <->tail
                        // Inbound主要处理入站操作,一般为读操作,发生入站操作时会触发Inbound方法
                        // 入站时,handler是从head向后调用的
                        socketChannel.pipeline().addLast("handler1" ,new ChannelInboundHandlerAdapter() {
                            @Override
                            //channelRead在监听到读事件后执行
                            public void channelRead(ChannelHandlerContext ctx, Object msg) throws Exception {
                                System.out.println(Thread.currentThread().getName() + " Inbound handler 1");
                                // 父类该方法内部会调用fireChannelRead
                                // **将数据传递给下一个handler**
                                super.channelRead(ctx, msg);
                            }
                        });
                        socketChannel.pipeline().addLast("handler2", new ChannelInboundHandlerAdapter() {
                            @Override
                            public void channelRead(ChannelHandlerContext ctx, Object msg) throws Exception {
                                System.out.println(Thread.currentThread().getName() + " Inbound handler 2");
                                // 执行write操作,使得Outbound的方法能够得到调用
                                socketChannel.writeAndFlush(ctx.alloc().buffer().writeBytes("Server...".getBytes(StandardCharsets.UTF_8)));
                                super.channelRead(ctx, msg);
                            }
                        });
                        // Outbound主要处理出站操作,一般为写操作,发生出站操作时会触发Outbound方法
                        // 出站时,handler的调用是从tail向前调用的
                        socketChannel.pipeline().addLast("handler3" ,new ChannelOutboundHandlerAdapter(){
                            @Override
                            public void write(ChannelHandlerContext ctx, Object msg, ChannelPromise promise) throws Exception {
                                System.out.println(Thread.currentThread().getName() + " Outbound handler 1");
                                super.write(ctx, msg, promise);
                            }
                        });
                        socketChannel.pipeline().addLast("handler4" ,new ChannelOutboundHandlerAdapter(){
                            @Override
                            public void write(ChannelHandlerContext ctx, Object msg, ChannelPromise promise) throws Exception {
                                System.out.println(Thread.currentThread().getName() + " Outbound handler 2");
                                super.write(ctx, msg, promise);
                            }
                        });
                    }
                })
                .bind(8080);
    }
}
-
入站处理器是从前往后调用,出站处理器是从后往前调用。
-
各个入站处理器之间通过super.channelRead()连接,各个出站处理器之间通过super.write()连接。
-
入站和出站处理器之间通过socketChannel.writeAndFlush()连接。
-
一旦没有进行连接,后续的Handler就不会执行!
运行结果如下:
nioEventLoopGroup-2-2 Inbound handler 1
nioEventLoopGroup-2-2 Inbound handler 2
nioEventLoopGroup-2-2 Outbound handler 2
nioEventLoopGroup-2-2 Outbound handler 1
通过channel.pipeline().addLast(name, handler)添加handler时,记得给handler取名字。这样可以调用pipeline的addAfter、addBefore等方法更灵活地向pipeline中添加handler
handler需要放入通道的pipeline中,才能根据放入顺序来使用handler
- pipeline是结构是一个带有head与tail指针的双向链表,其中的节点为handler
- 要通过ctx.fireChannelRead(msg)等方法,将当前handler的处理结果传递给下一个handler
- 当有入站(Inbound)操作时,会从head开始向后调用handler,直到handler不是处理Inbound操作为止
- 当有出站(Outbound)操作时,会从tail开始向前调用handler,直到handler不是处理Outbound操作为止
具体结构如下

其中head和tail在netty中是自动配置好的,不需要我们操心。
调用顺序如下

socketChannel.writeAndFlush()
当Inboundhandler中调用该方法进行写操作时,会触发Outbound操作,此时是从tail向前寻找OutboundHandler

ctx.writeAndFlush()
当Inboundhandler中调用该方法进行写操作时,会触发Outbound操作,此时是从当前handler向前寻找OutboundHandler

ChannelHandle与ChannelInboundHandler
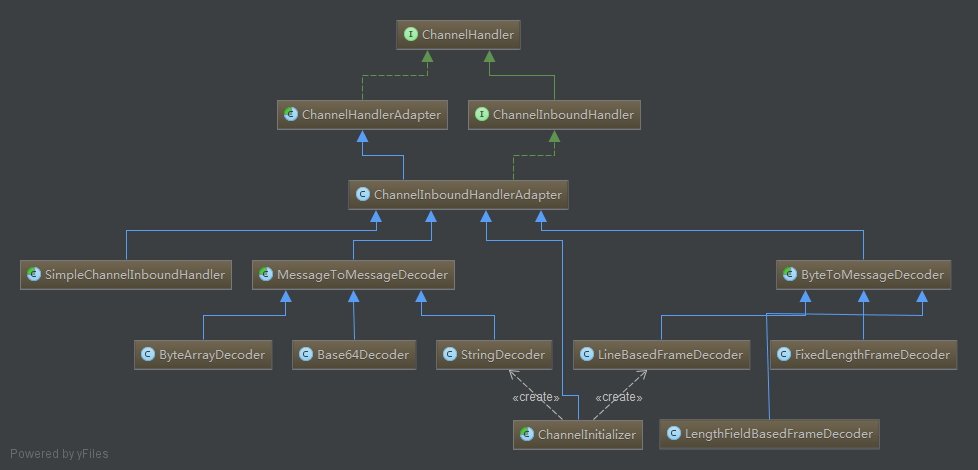
ChanelHandle源码
public interface ChannelHandler {

    	/**
     * 当ChannelHandler被添加到ChannelPipeline,并准备好处理IO事件时(register完成后),触发。
	 * 被调用时机:
	 *  1.  Bootstrap b;b.handler(new ChannelInitializer<SocketChannel>() {//ignore} 当regisger操作(在selector上注
	 *       册channel)完成后触发
	 * 2.channel.pipeline.addxxxx(ChannelHandler)方法时,如果已注册的,则立即触发否则等注册后触发
     **/
    void handlerAdded(ChannelHandlerContext ctx) throws Exception;

    /**
	 * 当ChannelHandler被从ChannelPipeline移除时(不处理IO事件)
     */
    void handlerRemoved(ChannelHandlerContext ctx) throws Exception;


    /**
	* 如果一个ChannelHandler被标记@Sharable,该ChannelHandler可以被添加到一个或多个ChannelPipeline多次。
	*  该ChannelHandler必须是线程安全的。
	* 如果一个ChannelHandler未标记@Sharable,每添加到ChannelPipeline之前,需要创建一个新的实例,再添到ChannelPipeline中
	*
    **/
    @Inherited
    @Documented
    @Target(ElementType.TYPE)
    @Retention(RetentionPolicy.RUNTIME)
    @interface Sharable {
        // no value
    }
}
ChannelInboundHandler源码
public interface ChannelInboundHandler extends ChannelHandler {

    /**
	 * 当Channel注册到EventLoop时触发(只会触发一次)
	 * register事件:即 在jdk的 selector上注册channel , javaChannel().register(eventLoop().selector, 0, this(NioSocketChannel));
	 * 注册完成后触发channelRegistered
	 * 事件源:Bootstrap b; b.connect(serverIp, port)时异步触发register,register完成后,触发channelRegistered
	 *
     */
    void channelRegistered(ChannelHandlerContext ctx) throws Exception;

    /**
	 * 当Channel从EventLoop注销时触发
     */
    void channelUnregistered(ChannelHandlerContext ctx) throws Exception;

    /**
	 * 当Channel建立连接是触发

     */
    void channelActive(ChannelHandlerContext ctx) throws Exception;

    /**
     *
	 * 当Channel断开链触发
     */
    void channelInactive(ChannelHandlerContext ctx) throws Exception;

    /**
     ×
	 * 当Channel从对端接收到数据时触发
     */
    void channelRead(ChannelHandlerContext ctx, Object msg) throws Exception;

    /**
     * Invoked when the last message read by the current read operation has been consumed by
     * {@link #channelRead(ChannelHandlerContext, Object)}.  If {@link ChannelOption#AUTO_READ} is off, no further
     * attempt to read an inbound data from the current {@link Channel} will be made until
     * {@link ChannelHandlerContext#read()} is called.
	 *
     */
    void channelReadComplete(ChannelHandlerContext ctx) throws Exception;

    /**
     *
	 * 当用户事件被触发时调用
     */
    void userEventTriggered(ChannelHandlerContext ctx, Object evt) throws Exception;

    /**
     *
	 * 当channel的可写入状态改变时触发,可以通过 Channel.isWritable()检查是否可以写入
     */
    void channelWritabilityChanged(ChannelHandlerContext ctx) throws Exception;

    /**
     *
	 * 当前生异常时触发
     */
    @Override
    @SuppressWarnings("deprecation")
    void exceptionCaught(ChannelHandlerContext ctx, Throwable cause) throws Exception;
}
ChannelInboundHandlerAdapter
ChannelInboundHandlerAdapter是ChannelInboundHandler的实现类
EmbeddedChannel
EmbeddedChannel可以用于测试各个handler,通过其构造函数按顺序传入需要测试handler,然后调用对应的Inbound和Outbound方法即可
public class TestEmbeddedChannel {
    public static void main(String[] args) {
        ChannelInboundHandlerAdapter h1 = new ChannelInboundHandlerAdapter() {
            @Override
            public void channelRead(ChannelHandlerContext ctx, Object msg) throws Exception {
                System.out.println("1");
                super.channelRead(ctx, msg);
            }
        };

        ChannelInboundHandlerAdapter h2 = new ChannelInboundHandlerAdapter() {
            @Override
            public void channelRead(ChannelHandlerContext ctx, Object msg) throws Exception {
                System.out.println("2");
                super.channelRead(ctx, msg);
            }
        };

        ChannelOutboundHandlerAdapter h3 = new ChannelOutboundHandlerAdapter() {
            @Override
            public void write(ChannelHandlerContext ctx, Object msg, ChannelPromise promise) throws Exception {
                System.out.println("3");
                super.write(ctx, msg, promise);
            }
        };

        ChannelOutboundHandlerAdapter h4 = new ChannelOutboundHandlerAdapter() {
            @Override
            public void write(ChannelHandlerContext ctx, Object msg, ChannelPromise promise) throws Exception {
                System.out.println("4");
                super.write(ctx, msg, promise);
            }
        };

        // 用于测试Handler的Channel
        EmbeddedChannel channel = new EmbeddedChannel(h1, h2, h3, h4);

        // 执行Inbound操作
        channel.writeInbound(ByteBufAllocator.DEFAULT.buffer().writeBytes("hello".getBytes(StandardCharsets.UTF_8)));
        // 执行Outbound操作
        channel.writeOutbound(ByteBufAllocator.DEFAULT.buffer().writeBytes("hello".getBytes(StandardCharsets.UTF_8)));
    }
}
常用内置Handler
-
LoggingHandler:输出日志 一般放在pipline最前边
-
SimpleChannelInboundHandler<>:只接受泛型内的类型的message 必须重写channelRead0方法
-
ByteToMessageCodec<>: 编解码器,将ByteBuf和 消息类型(泛型内规定)相互转换。需要重写encode和decode方法
-
StringDecoder和StringEncoder:将ByteBuf和 String 相互转换
-
SslHandler:负责对请求进行加密和解密,是放在ChannelPipeline中的第一个ChannelHandler
-
HttpClientCodec和HttpServerCodec:HttpClientCodec负责将请求字节解码为HttpRequest、HttpContent和LastHttpContent消息,以及对应的转为字节;HttpServerCodec负责服务端中将字节码解析成HttpResponse、HttpContent和LastHttpContent消息,以及对应的将它转为字节
-
HttpServerCodec 里面组合了HttpResponseEncoder和HttpRequestDecoder
-
HttpClientCodec 里面组合了HttpRequestEncoder和HttpResponseDecoder
-
HttpObjectAggregator: 负责将http聚合成完整的FullHttpRequest
-
HttpContentCompressor和HttpContentDecompressor:HttpContentCompressor用于服务器压缩数据,HttpContentDecompressor用于客户端解压数据
-
IdleStateHandler:连接空闲时间过长,触发IdleStateEvent事件
-
DelimiterBasedFrameDecoder:使用任何用户提供的分隔符来提取帧的通用解码器
-
FixedLengthFrameDecoder:提取在调用构造函数时的定长帧
-
ChunkedWriteHandler:异步分块读写大型数据
-
WebSocketServerProtocolHandler:| WebSocket连接 需要添加该处理器 | header |
5.ByteBuf
创建
public class ByteBufStudy {
    public static void main(String[] args) {
        // 创建ByteBuf
        ByteBuf buffer = ByteBufAllocator.DEFAULT.buffer(16);
        System.out.println(buffer);

        // 向buffer中写入数据
        StringBuilder sb = new StringBuilder();
        for(int i = 0; i < 20; i++) {
            sb.append("a");
        }
        buffer.writeBytes(sb.toString().getBytes(StandardCharsets.UTF_8));

        // 查看写入结果
        System.out.println(buffer);
    }
}
ByteBuf通过ByteBufAllocator选择allocator并调用对应的buffer()方法来创建的,默认使用直接内存作为ByteBuf,容量为256个字节,可以指定初始容量的大小
当ByteBuf的容量无法容纳所有数据时,ByteBuf会进行扩容操作
如果在handler中创建ByteBuf,建议使用ChannelHandlerContext ctx.alloc().buffer()来创建
直接内存与堆内存
通过该方法创建的ByteBuf,使用的是基于直接内存的ByteBuf
ByteBuf buffer = ByteBufAllocator.DEFAULT.buffer(16);
可以使用下面的代码来创建基于堆的 ByteBuf
ByteBuf buffer = ByteBufAllocator.DEFAULT.heapBuffer(16);
也可以使用下面的代码来创建基于直接内存的 ByteBuf
ByteBuf buffer = ByteBufAllocator.DEFAULT.directBuffer(16);
- 直接内存创建和销毁的代价昂贵,但读写性能高(少一次内存复制),适合配合池化功能一起用
池化
池化的最大意义在于可以重用ByteBuf
为什么使用池化?
- 创建对象开销大
- 对象高频率创建且可复用
- 支持并发又能保护系统
- 维护、共享有限的资源
池化的开启 (默认是开启的):
可以通过以下环境变量设置
-Dio.netty.allocator.type=pooled

组成
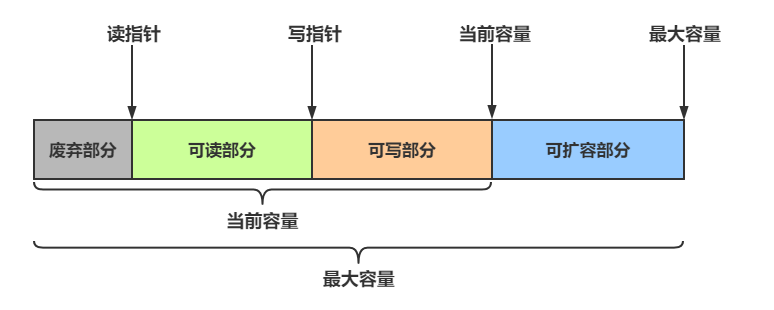
ByteBuf主要有以下几个组成部分
- 最大容量与当前容量
- 在构造ByteBuf时,可传入两个参数,分别代表初始容量和最大容量,若未传入第二个参数(最大容量),最大容量默认为Integer.MAX_VALUE
- 当ByteBuf容量无法容纳所有数据时,会进行扩容操作,若超出最大容量,会抛出java.lang.IndexOutOfBoundsException异常
- 读写操作不同于ByteBuffer只用position进行控制,ByteBuf分别由读指针和写指针两个指针控制。进行读写操作时,无需进行模式的切换
- 读指针前的部分被称为废弃部分,是已经读过的内容
- 读指针与写指针之间的空间称为可读部分
- 写指针与当前容量之间的空间称为可写部分
写入
常用方法如下
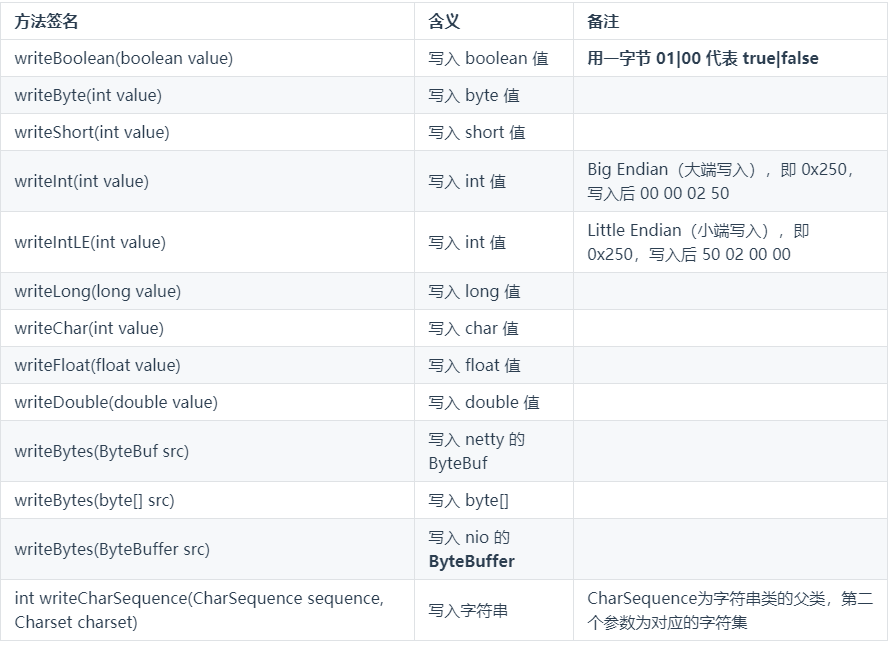
注意:
- writeCharSequence写入CharSequence,CharSequence是String的父类
- 这些方法的未指明返回值的,其返回值都是 ByteBuf,意味着可以链式调用来写入不同的数据
- 网络传输中,默认习惯是 Big Endian,使用 writeInt(int value)
示例:
public class ByteBufStudy {
    public static void main(String[] args) {
        // 创建ByteBuf
        ByteBuf buffer = ByteBufAllocator.DEFAULT.buffer(16, 20);

        // 向buffer中写入4个字节数据
        buffer.writeBytes(new byte[]{1, 2, 3, 4});

        // 写入int类型,int类型为4个字节,默认为大端写入即 00 00 00 05 (16进制)
        buffer.writeInt(5);

        //06 00 00 00
        buffer.writeIntLE(6);

       // 00 00 00 00 00 00 00 07
        buffer.writeLong(7);

    }
}
还有一系列set方法也可以写入,不过不会改变写指针的位置 (相当于替换)
扩容
当ByteBuf中的容量无法容纳写入的数据时,会进行扩容操作
扩容规则
- 如果写入后数据大小未超过 512 字节,则选择下一个 16 的整数倍进行扩容
- 例如写入后大小为 12 字节,则扩容后 capacity 是 16 字节
- 如果写入后数据大小超过 512 字节,则选择下一个 2n
- 例如写入后大小为 513 字节,则扩容后 capacity 是 210=1024 字节(29=512 已经不够了)
- 扩容不能超过 maxCapacity,否则会抛出
java.lang.IndexOutOfBoundsException异常
Exception in thread "main" java.lang.IndexOutOfBoundsException: writerIndex(20) + minWritableBytes(8) exceeds maxCapacity(20): PooledUnsafeDirectByteBuf(ridx: 0, widx: 20, cap: 20/20)
...
读取
读取主要是通过一系列read方法进行读取,读取时会根据读取数据的字节数移动读指针
如果需要重复读取,需要调用buffer.markReaderIndex()对读指针进行标记,并通过buffer.resetReaderIndex()将读指针恢复到mark标记的位置
public class ByteBufStudy {
    public static void main(String[] args) {
        // 创建ByteBuf
        ByteBuf buffer = ByteBufAllocator.DEFAULT.buffer(16, 20);

        // 向buffer中写入数据
        buffer.writeBytes(new byte[]{1, 2, 3, 4});
        buffer.writeInt(5);

        // 一次读取一个字节
        System.out.println(buffer.readByte());
        System.out.println(buffer.readByte());
        System.out.println(buffer.readByte());
        System.out.println(buffer.readByte());
        ByteBufUtil.log(buffer);

        // 通过mark与reset实现重复读取
        buffer.markReaderIndex();
        System.out.println(buffer.readInt());


        // 恢复到mark标记处
        buffer.resetReaderIndex();

    }
}
还有以 get 开头的一系列方法,这些方法不会改变读指针的位置
内存释放
由于 Netty 中有堆外内存(直接内存)的 ByteBuf 实现,堆外内存最好是手动来释放,而不是等 GC 垃圾回收。
- UnpooledHeapByteBuf 使用的是 JVM 内存,只需等 GC 回收内存即可
- UnpooledDirectByteBuf 使用的就是直接内存了,需要特殊的方法来回收内存
- PooledByteBuf 和它的子类使用了池化机制,需要更复杂的规则来回收内存
- Netty 这里采用了引用计数法来控制回收内存,每个 ByteBuf 都实现了 ReferenceCounted 接口
每个 ByteBuf 对象的初始计数为 1
- 调用 release 方法计数减 1,如果计数为 0,ByteBuf 内存被回收
- 调用 retain 方法计数加 1,表示调用者没用完之前,其它 handler 即使调用了 release 也不会造成回收
- 当计数为 0 时,底层内存会被回收,这时即使 ByteBuf 对象还在,其各个方法均无法正常使用
释放规则
因为 pipeline 的存在,一般需要将 ByteBuf 传递给下一个 ChannelHandler,如果在每个 ChannelHandler 中都去调用 release ,就失去了传递性(如果在这个 ChannelHandler 内这个 ByteBuf 已完成了它的使命,那么便无须再传递)
基本规则是,谁是最后使用者,谁负责 release
-
起点,对于 NIO 实现来讲,在 io.netty.channel.nio.AbstractNioByteChannel.NioByteUnsafe.read 方法中首次创建 ByteBuf 放入 pipeline(line 163
pipeline.fireChannelRead(byteBuf)) -
入站 ByteBuf 处理原则
- 对原始 ByteBuf 不做处理,调用 ctx.fireChannelRead(msg) 向后传递,这时无须 release
- 将原始 ByteBuf 转换为其它类型的 Java 对象,这时 ByteBuf 就没用了,必须 release
- 如果不调用 ctx.fireChannelRead(msg) (或者super.ChannelRead)向后传递,那么也必须 release
- 注意各种异常,如果 ByteBuf 没有成功传递到下一个 ChannelHandler,必须 release
- 假设消息一直向后传,那么 TailContext 会自动负责释放未处理消息(原始的 ByteBuf)
-
出站 ByteBuf 处理原则
- 出站消息最终都会转为 ByteBuf 输出,一直向前传,由 HeadContext flush 后 release
-
异常处理原则
- 有时候不清楚 ByteBuf 被引用了多少次,但又必须彻底释放,可以循环调用 release 直到返回 true
while (!buffer.release()) {}
当ByteBuf被传到了pipeline的head与tail时,ByteBuf会被其中的方法彻底释放,但前提是ByteBuf被传递到了head与tail中
TailConext中释放ByteBuf的源码
protected void onUnhandledInboundMessage(Object msg) {
    try {
        logger.debug("Discarded inbound message {} that reached at the tail of the pipeline. Please check your pipeline configuration.", msg);
    } finally {
        // 具体的释放方法
        ReferenceCountUtil.release(msg);
    }
}
判断传过来的是否为ByteBuf,是的话才需要释放
public static boolean release(Object msg) {
	return msg instanceof ReferenceCounted ? ((ReferenceCounted)msg).release() : false;
}
切片(零拷贝)
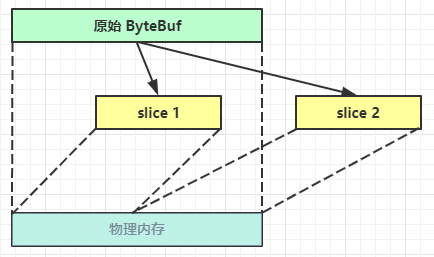
ByteBuf切片是【零拷贝】的体现之一,对原始 ByteBuf 进行切片成多个 ByteBuf,切片后的 ByteBuf 并没有发生内存复制,还是使用原始 ByteBuf 的内存,切片后的 ByteBuf 维护独立的 read,write 指针
得到分片后的buffer后,要调用其retain方法,使其内部的引用计数加一。避免原ByteBuf释放,导致切片buffer无法使用
修改原ByteBuf中的值,也会影响切片后得到的ByteBuf
切片后得到的ByteBuf容量不能增加
public class TestSlice {
    public static void main(String[] args) {
        // 创建ByteBuf
        ByteBuf buffer = ByteBufAllocator.DEFAULT.buffer(16, 20);

        // 向buffer中写入数据
        buffer.writeBytes(new byte[]{1, 2, 3, 4, 5, 6, 7, 8, 9, 10});

        // 将buffer分成两部分(起点,长度)
        ByteBuf slice1 = buffer.slice(0, 5);
        ByteBuf slice2 = buffer.slice(5, 5);

        // 需要让分片的buffer引用计数加一
        // 避免原Buffer释放导致分片buffer无法使用
        slice1.retain();
        slice2.retain();


        // 更改原始buffer中的值
        System.out.println("===========修改原buffer中的值===========");
        buffer.setByte(0,5);

        System.out.println("===========打印slice1===========");

    }
}
组合小的ByteBuf:
    CompositeByteBuf buffer = ByteBufAllocator.DEFAULT.compositeBuffer();
    buffer.addComponents(true,buf1,buf2);
ByteBuf优势
- 池化思想 - 可以重用池中 ByteBuf 实例,更节约内存,减少内存溢出的可能
- 读写指针分离,不需要像 ByteBuffer 一样切换读写模式
- 可以自动扩容
- 支持链式调用,使用更流畅
- 很多地方体现零拷贝,例如
slice、duplicate、CompositeByteBuf
四.应用
1.粘包与半包
服务器代码
public class StudyServer {
    static final Logger log = LoggerFactory.getLogger(StudyServer.class);
    void start() {
        NioEventLoopGroup boss = new NioEventLoopGroup(1);
        NioEventLoopGroup worker = new NioEventLoopGroup();
        try {
            ServerBootstrap serverBootstrap = new ServerBootstrap();
            serverBootstrap.channel(NioServerSocketChannel.class);
            serverBootstrap.group(boss, worker);
            serverBootstrap.childHandler(new ChannelInitializer<SocketChannel>() {
                @Override
                protected void initChannel(SocketChannel ch) {
                    ch.pipeline().addLast(new LoggingHandler(LogLevel.DEBUG));
                    ch.pipeline().addLast(new ChannelInboundHandlerAdapter() {
                        @Override
                        // 连接建立时会执行该方法
                        public void channelActive(ChannelHandlerContext ctx) throws Exception {

                            log.debug("connected {}", ctx.channel());
                            super.channelActive(ctx);
                        }

                        @Override
                        public void channelInactive(ChannelHandlerContext ctx) throws Exception {
                            // 连接断开时会执行该方法
                            log.debug("disconnect {}", ctx.channel());
                            super.channelInactive(ctx);
                        }
                    });
                }
            });
            ChannelFuture channelFuture = serverBootstrap.bind(8080);
            log.debug("{} binding...", channelFuture.channel());
            channelFuture.sync();
            log.debug("{} bound...", channelFuture.channel());
            // 关闭channel
            channelFuture.channel().closeFuture().sync();
        } catch (InterruptedException e) {
            log.error("server error", e);
        } finally {
            boss.shutdownGracefully();
            worker.shutdownGracefully();
            log.debug("stopped");
        }
    }

    public static void main(String[] args) {
        new StudyServer().start();
    }
}
粘包现象
客户端代码
public class StudyClient {
    static final Logger log = LoggerFactory.getLogger(StudyClient.class);
    public static void main(String[] args) {
        NioEventLoopGroup worker = new NioEventLoopGroup();
        try {
            Bootstrap bootstrap = new Bootstrap();
            bootstrap.channel(NioSocketChannel.class);
            bootstrap.group(worker);
            bootstrap.handler(new ChannelInitializer<SocketChannel>() {
                @Override
                protected void initChannel(SocketChannel ch) throws Exception {
                    log.debug("connected...");
                    ch.pipeline().addLast(new ChannelInboundHandlerAdapter() {
                        @Override
                        public void channelActive(ChannelHandlerContext ctx) throws Exception {
                            log.debug("sending...");
                            // 每次发送16个字节的数据,共发送10次
                            for (int i = 0; i < 10; i++) {
                                ByteBuf buffer = ctx.alloc().buffer();
                                buffer.writeBytes(new byte[]{0, 1, 2, 3, 4, 5, 6, 7, 8, 9, 10, 11, 12, 13, 14, 15});
                                ctx.writeAndFlush(buffer);
                            }
                        }
                    });
                }
            });
            ChannelFuture channelFuture = bootstrap.connect("127.0.0.1", 8080).sync();
            channelFuture.channel().closeFuture().sync();

        } catch (InterruptedException e) {
            log.error("client error", e);
        } finally {
            worker.shutdownGracefully();
        }
    }
}
服务器接收结果
7999 [nioEventLoopGroup-3-1] DEBUG io.netty.handler.logging.LoggingHandler  - [id: 0x5b43ecb0, L:/127.0.0.1:8080 - R:/127.0.0.1:53797] READ: 160B
         +-------------------------------------------------+
         |  0  1  2  3  4  5  6  7  8  9  a  b  c  d  e  f |
+--------+-------------------------------------------------+----------------+
|00000000| 00 01 02 03 04 05 06 07 08 09 0a 0b 0c 0d 0e 0f |................|
|00000010| 00 01 02 03 04 05 06 07 08 09 0a 0b 0c 0d 0e 0f |................|
|00000020| 00 01 02 03 04 05 06 07 08 09 0a 0b 0c 0d 0e 0f |................|
|00000030| 00 01 02 03 04 05 06 07 08 09 0a 0b 0c 0d 0e 0f |................|
|00000040| 00 01 02 03 04 05 06 07 08 09 0a 0b 0c 0d 0e 0f |................|
|00000050| 00 01 02 03 04 05 06 07 08 09 0a 0b 0c 0d 0e 0f |................|
|00000060| 00 01 02 03 04 05 06 07 08 09 0a 0b 0c 0d 0e 0f |................|
|00000070| 00 01 02 03 04 05 06 07 08 09 0a 0b 0c 0d 0e 0f |................|
|00000080| 00 01 02 03 04 05 06 07 08 09 0a 0b 0c 0d 0e 0f |................|
|00000090| 00 01 02 03 04 05 06 07 08 09 0a 0b 0c 0d 0e 0f |................|
+--------+-------------------------------------------------+----------------+
可见虽然客户端是分别以16字节为单位,通过channel向服务器发送了10次数据,可是服务器端却只接收了一次,接收数据的大小为160B,即客户端发送的数据总大小,这就是粘包现象
半包现象
将客户端-服务器之间的channel容量进行调整
// 调整channel的容量
serverBootstrap.option(ChannelOption.SO_RCVBUF, 10);
注意:
- serverBootstrap.option(ChannelOption.SO_RCVBUF, 10) 影响的底层接收缓冲区(即滑动窗口)大小,仅决定了 netty 读取的最小单位,netty 实际每次读取的一般是它的整数倍
服务器接收结果
5901 [nioEventLoopGroup-3-1] DEBUG io.netty.handler.logging.LoggingHandler  - [id: 0xc73284f3, L:/127.0.0.1:8080 - R:/127.0.0.1:49679] READ: 36B
         +-------------------------------------------------+
         |  0  1  2  3  4  5  6  7  8  9  a  b  c  d  e  f |
+--------+-------------------------------------------------+----------------+
|00000000| 00 01 02 03 04 05 06 07 08 09 0a 0b 0c 0d 0e 0f |................|
|00000010| 00 01 02 03 04 05 06 07 08 09 0a 0b 0c 0d 0e 0f |................|
|00000020| 00 01 02 03                                     |....            |
+--------+-------------------------------------------------+----------------+

5901 [nioEventLoopGroup-3-1] DEBUG io.netty.handler.logging.LoggingHandler  - [id: 0xc73284f3, L:/127.0.0.1:8080 - R:/127.0.0.1:49679] READ: 40B
         +-------------------------------------------------+
         |  0  1  2  3  4  5  6  7  8  9  a  b  c  d  e  f |
+--------+-------------------------------------------------+----------------+
|00000000| 04 05 06 07 08 09 0a 0b 0c 0d 0e 0f 00 01 02 03 |................|
|00000010| 04 05 06 07 08 09 0a 0b 0c 0d 0e 0f 00 01 02 03 |................|
|00000020| 04 05 06 07 08 09 0a 0b                         |........        |
+--------+-------------------------------------------------+----------------+

5901 [nioEventLoopGroup-3-1] DEBUG io.netty.handler.logging.LoggingHandler  - [id: 0xc73284f3, L:/127.0.0.1:8080 - R:/127.0.0.1:49679] READ: 40B
         +-------------------------------------------------+
         |  0  1  2  3  4  5  6  7  8  9  a  b  c  d  e  f |
+--------+-------------------------------------------------+----------------+
|00000000| 0c 0d 0e 0f 00 01 02 03 04 05 06 07 08 09 0a 0b |................|
|00000010| 0c 0d 0e 0f 00 01 02 03 04 05 06 07 08 09 0a 0b |................|
|00000020| 0c 0d 0e 0f 00 01 02 03                         |........        |
+--------+-------------------------------------------------+----------------+

5901 [nioEventLoopGroup-3-1] DEBUG io.netty.handler.logging.LoggingHandler  - [id: 0xc73284f3, L:/127.0.0.1:8080 - R:/127.0.0.1:49679] READ: 40B
         +-------------------------------------------------+
         |  0  1  2  3  4  5  6  7  8  9  a  b  c  d  e  f |
+--------+-------------------------------------------------+----------------+
|00000000| 04 05 06 07 08 09 0a 0b 0c 0d 0e 0f 00 01 02 03 |................|
|00000010| 04 05 06 07 08 09 0a 0b 0c 0d 0e 0f 00 01 02 03 |................|
|00000020| 04 05 06 07 08 09 0a 0b                         |........        |
+--------+-------------------------------------------------+----------------+

5901 [nioEventLoopGroup-3-1] DEBUG io.netty.handler.logging.LoggingHandler  - [id: 0xc73284f3, L:/127.0.0.1:8080 - R:/127.0.0.1:49679] READ: 4B
         +-------------------------------------------------+
         |  0  1  2  3  4  5  6  7  8  9  a  b  c  d  e  f |
+--------+-------------------------------------------------+----------------+
|00000000| 0c 0d 0e 0f                                     |....            |
+--------+-------------------------------------------------+----------------+
可见客户端每次发送的数据,因channel容量不足,无法将发送的数据一次性接收,便产生了半包现象
现象分析
粘包
- 现象
- 发送 abc def,接收 abcdef
- 原因
- 应用层
- 接收方 ByteBuf 设置太大(Netty 默认 1024)
- 传输层-网络层
- 滑动窗口:假设发送方 256 bytes 表示一个完整报文,但由于接收方处理不及时且窗口大小足够大(大于256 bytes),这 256 bytes 字节就会缓冲在接收方的滑动窗口中,
当滑动窗口中缓冲了多个报文就会粘包
- 滑动窗口:假设发送方 256 bytes 表示一个完整报文,但由于接收方处理不及时且窗口大小足够大(大于256 bytes),这 256 bytes 字节就会缓冲在接收方的滑动窗口中,
- Nagle 算法:会造成粘包
- 应用层
半包
- 现象
- 发送 abcdef,接收 abc def
- 原因
- 应用层
- 接收方 ByteBuf 小于实际发送数据量
- 传输层-网络层
- 滑动窗口:假设接收方的窗口只剩了 128 bytes,发送方的报文大小是 256 bytes,这时接收方窗口中无法容纳发送方的全部报文,发送方只能先发送前 128 bytes,等待
ack 后才能发送剩余部分,这就造成了半包
- 滑动窗口:假设接收方的窗口只剩了 128 bytes,发送方的报文大小是 256 bytes,这时接收方窗口中无法容纳发送方的全部报文,发送方只能先发送前 128 bytes,等待
- 数据链路层
- MSS 限制:当发送的数据超过 MSS 限制后,会将数据切分发送,就会造成半包
- 应用层
本质
发生粘包与半包现象的本质是因为 TCP 是流式协议,消息无边界
解决方案
短链接
客户端每次向服务器发送数据以后,就与服务器断开连接,此时的消息边界为连接建立到连接断开。这时便无需使用滑动窗口等技术来缓冲数据,则不会发生粘包现象。但如果一次性数据发送过多,接收方无法一次性容纳所有数据,还是会发生半包现象,所以短链接无法解决半包现象
客户端代码改进:
修改channelActive方法
public void channelActive(ChannelHandlerContext ctx) throws Exception {
    log.debug("sending...");
    ByteBuf buffer = ctx.alloc().buffer(16);
    buffer.writeBytes(new byte[]{0, 1, 2, 3, 4, 5, 6, 7, 8, 9, 10, 11, 12, 13, 14, 15});
    ctx.writeAndFlush(buffer);
    // 使用短链接,每次发送完毕后就断开连接
    ctx.channel().close();
}
将发送步骤整体封装为send()方法,调用10次send()方法,模拟发送10次数据
public static void main(String[] args) {
    // 发送10次
    for (int i = 0; i < 10; i++) {
        send();
    }
}
运行结果
6452 [nioEventLoopGroup-3-1] DEBUG io.netty.handler.logging.LoggingHandler  - [id: 0x3eb6a684, L:/127.0.0.1:8080 - R:/127.0.0.1:65024] ACTIVE

6468 [nioEventLoopGroup-3-1] DEBUG io.netty.handler.logging.LoggingHandler  - [id: 0x3eb6a684, L:/127.0.0.1:8080 - R:/127.0.0.1:65024] READ: 16B
         +-------------------------------------------------+
         |  0  1  2  3  4  5  6  7  8  9  a  b  c  d  e  f |
+--------+-------------------------------------------------+----------------+
|00000000| 00 01 02 03 04 05 06 07 08 09 0a 0b 0c 0d 0e 0f |................|
+--------+-------------------------------------------------+----------------+

6468 [nioEventLoopGroup-3-1] DEBUG io.netty.handler.logging.LoggingHandler  - [id: 0x3eb6a684, L:/127.0.0.1:8080 ! R:/127.0.0.1:65024] INACTIVE

6483 [nioEventLoopGroup-3-2] DEBUG io.netty.handler.logging.LoggingHandler  - [id: 0x7dcc31ff, L:/127.0.0.1:8080 - R:/127.0.0.1:65057] ACTIVE

6483 [nioEventLoopGroup-3-2] DEBUG io.netty.handler.logging.LoggingHandler  - [id: 0x7dcc31ff, L:/127.0.0.1:8080 - R:/127.0.0.1:65057] READ: 16B
         +-------------------------------------------------+
         |  0  1  2  3  4  5  6  7  8  9  a  b  c  d  e  f |
+--------+-------------------------------------------------+----------------+
|00000000| 00 01 02 03 04 05 06 07 08 09 0a 0b 0c 0d 0e 0f |................|
+--------+-------------------------------------------------+----------------+

6483 [nioEventLoopGroup-3-2] DEBUG io.netty.handler.logging.LoggingHandler  - [id: 0x7dcc31ff, L:/127.0.0.1:8080 ! R:/127.0.0.1:65057] INACTIVE

...
客户端先于服务器建立连接,此时控制台打印ACTIVE,之后客户端向服务器发送了16B的数据,发送后断开连接,此时控制台打印INACTIVE,可见未出现粘包现象
定长解码器
客户端于服务器约定一个最大长度,保证客户端每次发送的数据长度都不会大于该长度。若发送数据长度不足则需要补齐至该长度
服务器接收数据时,将接收到的数据按照约定的最大长度进行拆分,即使发送过程中产生了粘包,也可以通过定长解码器将数据正确地进行拆分。服务端需要用到FixedLengthFrameDecoder(入站处理器的一种)对数据进行定长解码,具体使用方法如下
//表示 按16个字节一组 进行拆分
ch.pipeline().addLast(new FixedLengthFrameDecoder(16));
客户端代码
客户端发送数据的代码如下:
// 约定最大长度为16
final int maxLength = 16;
// 被发送的数据
char c = 'a';
// 向服务器发送10个报文
for (int i = 0; i < 10; i++) {
    ByteBuf buffer = ctx.alloc().buffer(maxLength);
    // 定长byte数组,未使用部分会以0进行填充
    byte[] bytes = new byte[maxLength];
    // 生成长度为0~15的数据
    for (int j = 0; j < (int)(Math.random()*(maxLength-1)); j++) {
        bytes[j] = (byte) c;
    }
    buffer.writeBytes(bytes);
    c++;
    // 将数据发送给服务器
    ctx.writeAndFlush(buffer);
}
服务器代码
使用FixedLengthFrameDecoder对粘包数据进行拆分,该handler需要添加在LoggingHandler之前,保证数据被打印时已被拆分
// 通过定长解码器对粘包数据进行拆分
ch.pipeline().addLast(new FixedLengthFrameDecoder(16));
ch.pipeline().addLast(new LoggingHandler(LogLevel.DEBUG));
行解码器(分隔符)
行解码器的是通过分隔符对数据进行拆分来解决粘包半包问题的
可以通过LineBasedFrameDecoder(int maxLength)来拆分以换行符(\n)为分隔符的数据,也可以通过DelimiterBasedFrameDecoder(int maxFrameLength, ByteBuf... delimiters)来指定通过什么分隔符来拆分数据(可以传入多个分隔符)
两种解码器都需要传入数据的最大长度,若超出最大长度,会抛出TooLongFrameException异常
以换行符 \n 为分隔符
客户端代码
// 约定最大长度为 64
final int maxLength = 64;
// 被发送的数据
char c = 'a';
for (int i = 0; i < 10; i++) {
    ByteBuf buffer = ctx.alloc().buffer(maxLength);
    // 生成长度为0~62的数据
    Random random = new Random();
    StringBuilder sb = new StringBuilder();
    for (int j = 0; j < (int)(random.nextInt(maxLength-2)); j++) {
        sb.append(c);
    }
    // 数据以 \n 结尾
    sb.append("\n");
    buffer.writeBytes(sb.toString().getBytes(StandardCharsets.UTF_8));
    c++;
    // 将数据发送给服务器
    ctx.writeAndFlush(buffer);
}
服务器代码
// 通过行解码器对粘包数据进行拆分,以 \n 为分隔符
// 需要指定最大长度
ch.pipeline().addLast(new DelimiterBasedFrameDecoder(64));
ch.pipeline().addLast(new LoggingHandler(LogLevel.DEBUG));
以自定义分隔符 \c 为分隔符
客户端代码
...

// 数据以 \c 结尾
sb.append("\\c");
buffer.writeBytes(sb.toString().getBytes(StandardCharsets.UTF_8));

...
服务器代码
// 将分隔符放入ByteBuf中
ByteBuf bufSet = ch.alloc().buffer().writeBytes("\\c".getBytes(StandardCharsets.UTF_8));
// 通过行解码器对粘包数据进行拆分,以 \c 为分隔符
ch.pipeline().addLast(new DelimiterBasedFrameDecoder(64, ch.alloc().buffer().writeBytes(bufSet)));
ch.pipeline().addLast(new LoggingHandler(LogLevel.DEBUG));
长度字段解码器
在传送数据时可以在数据中添加一个用于表示有用数据长度的字段,在解码时读取出这个用于表明长度的字段,同时读取其他相关参数,即可知道最终需要的数据是什么样子的
LengthFieldBasedFrameDecoder解码器可以提供更为丰富的拆分方法,其构造方法有五个参数
public LengthFieldBasedFrameDecoder(
    int maxFrameLength,
    int lengthFieldOffset, int lengthFieldLength,
    int lengthAdjustment, int initialBytesToStrip)
参数解析
-
maxFrameLength 数据最大长度
- 表示数据的最大长度(包括附加信息、长度标识等内容)
- 超出这个长度还没有解析成功会报异常
-
lengthFieldOffset 数据长度标识的起始偏移量
- 用于指明数据第几个字节开始是用于标识有用字节长度的,因为前面可能还有其他附加信息
-
lengthFieldLength 数据长度标识所占字节数(用于指明有用数据的长度)
- 数据中用于表示有用数据长度的标识所占的字节数
-
lengthAdjustment 长度表示与有用数据的偏移量
- 数据长度后还有多少个字节的其他信息
-
initialBytesToStrip 数据读取起点
- 读取起点,不读取 0 ~ initialBytesToStrip 之间的数据

使用
通过 EmbeddedChannel 对 handler 进行测试
public class EncoderStudy {
    public static void main(String[] args) {
        // 模拟服务器
        // 使用EmbeddedChannel测试handler
        EmbeddedChannel channel = new EmbeddedChannel(
                // 数据最大长度为1KB,长度标识前后各有1个字节的附加信息,长度标识长度为4个字节(int)
                new LengthFieldBasedFrameDecoder(1024, 1, 4, 1, 0),
                new LoggingHandler(LogLevel.DEBUG)
        );

        // 模拟客户端,写入数据
        ByteBuf buffer = ByteBufAllocator.DEFAULT.buffer();
        send(buffer, "Hello");
        channel.writeInbound(buffer);
        send(buffer, "World");
        channel.writeInbound(buffer);
    }

    private static void send(ByteBuf buf, String msg) {
        // 得到数据的长度
        int length = msg.length();
        byte[] bytes = msg.getBytes(StandardCharsets.UTF_8);
        // 将数据信息写入buf
        // 写入长度标识前的其他信息
        buf.writeByte(0xCA);
        // 写入数据长度标识
        buf.writeInt(length);
        // 写入长度标识后的其他信息
        buf.writeByte(0xFE);
        // 写入具体的数据
        buf.writeBytes(bytes);
    }
}
运行结果
146  [main] DEBUG io.netty.handler.logging.LoggingHandler  - [id: 0xembedded, L:embedded - R:embedded] READ: 11B
         +-------------------------------------------------+
         |  0  1  2  3  4  5  6  7  8  9  a  b  c  d  e  f |
+--------+-------------------------------------------------+----------------+
|00000000| ca 00 00 00 05 fe 48 65 6c 6c 6f                |......Hello     |
+--------+-------------------------------------------------+----------------+

146  [main] DEBUG io.netty.handler.logging.LoggingHandler  - [id: 0xembedded, L:embedded - R:embedded] READ: 11B
         +-------------------------------------------------+
         |  0  1  2  3  4  5  6  7  8  9  a  b  c  d  e  f |
+--------+-------------------------------------------------+----------------+
|00000000| ca 00 00 00 05 fe 57 6f 72 6c 64                |......World     |
+--------+-------------------------------------------------+----------------+
2.协议设计与解析
HTTP协议
HTTP协议在请求行请求头中都有很多的内容,自己实现较为困难,可以使用HttpServerCodec作为服务器端的解码器与编码器,来处理HTTP请求
// HttpServerCodec 中既有请求的解码器 HttpRequestDecoder 又有响应的编码器 HttpResponseEncoder
// Codec(CodeCombine) 一般代表该类既作为 编码器 又作为 解码器
public final class HttpServerCodec extends CombinedChannelDuplexHandler<HttpRequestDecoder, HttpResponseEncoder>
        implements HttpServerUpgradeHandler.SourceCodec
服务器代码
public class HttpServer {
    static final Logger log = LoggerFactory.getLogger(StudyServer.class);

    public static void main(String[] args) {
        NioEventLoopGroup group = new NioEventLoopGroup();
        new ServerBootstrap()
                .group(group)
                .channel(NioServerSocketChannel.class)
                .childHandler(new ChannelInitializer<SocketChannel>() {
                    @Override
                    protected void initChannel(SocketChannel ch) {
                        ch.pipeline().addLast(new LoggingHandler(LogLevel.DEBUG));
                        // 作为服务器,使用 HttpServerCodec 作为编码器与解码器
                        ch.pipeline().addLast(new HttpServerCodec());
                        // 服务器只处理HTTPRequest
                        ch.pipeline().addLast(new SimpleChannelInboundHandler<HttpRequest>() {
                            @Override
                            protected void channelRead0(ChannelHandlerContext ctx, HttpRequest msg) {
                                // 获得请求uri
                                log.debug(msg.uri());

                                // 获得完整响应,设置版本号与状态码
                                DefaultFullHttpResponse response = new DefaultFullHttpResponse(msg.protocolVersion(), HttpResponseStatus.OK);
                                // 设置响应内容
                                byte[] bytes = "<h1>Hello, World!</h1>".getBytes(StandardCharsets.UTF_8);
                                // 设置响应体长度,避免浏览器一直接收响应内容
                                response.headers().setInt(CONTENT_LENGTH, bytes.length);
                                // 设置响应体
                                response.content().writeBytes(bytes);

                                // 写回响应
                                ctx.writeAndFlush(response);
                            }
                        });
                    }
                })
                .bind(8080);
    }
}
服务器负责处理请求并响应浏览器。所以只需要处理HTTP请求即可
// 服务器只处理HTTPRequest
ch.pipeline().addLast(new SimpleChannelInboundHandler<HttpRequest>()
SimpleChannelInboundHandler<>()能保证只接受泛型指定类型的消息对象
获得请求后,需要返回响应给浏览器。需要创建响应对象DefaultFullHttpResponse,设置HTTP版本号及状态码,为避免浏览器获得响应后,因为获得CONTENT_LENGTH而一直空转,需要添加CONTENT_LENGTH字段,表明响应体中数据的具体长度
// 获得完整响应,设置版本号与状态码
DefaultFullHttpResponse response = new DefaultFullHttpResponse(msg.protocolVersion(), HttpResponseStatus.OK);
// 设置响应内容
byte[] bytes = "<h1>Hello, World!</h1>".getBytes(StandardCharsets.UTF_8);
// 设置响应体长度,避免浏览器一直接收响应内容
response.headers().setInt(CONTENT_LENGTH, bytes.length);
// 设置响应体
response.content().writeBytes(bytes);
运行结果

自定义协议
组成要素
- 魔数:用来在第一时间判定接收的数据是否为无效数据包
- 版本号:可以支持协议的升级
- 序列化算法:消息正文到底采用哪种序列化反序列化方式
- 如:json、protobuf、hessian、jdk
- 指令类型:是登录、注册、单聊、群聊… 跟业务相关
- 请求序号:为了双工通信,提供异步能力
- 正文长度
- 消息正文
编码器与解码器
//ByteToMessageCodec是编解码器的抽象基类,提供了ByteBuf与Message(自定义消息类)的相互转换

public class MessageCodec extends ByteToMessageCodec<Message> {

    @Override
     //encode 出站处理器调用
    //把我们的消息按照协议约定的格式写入ByteBuf中
    protected void encode(ChannelHandlerContext ctx, Message msg, ByteBuf out) throws Exception {
        // 设置魔数 4个字节
        out.writeBytes(new byte[]{'N','Y','I','M'});
        // 设置版本号 1个字节
        out.writeByte(1);
        // 设置序列化方式 1个字节
        out.writeByte(1);
        // 设置指令类型 1个字节
        out.writeByte(msg.getMessageType());
        // 设置请求序号 4个字节
        out.writeInt(msg.getSequenceId());
        // 为了补齐为16个字节,填充1个字节的数据
        out.writeByte(0xff);

        // 获得序列化后的msg  (msg -> byte[])
        ByteArrayOutputStream bos = new ByteArrayOutputStream();
        ObjectOutputStream oos = new ObjectOutputStream(bos);
        oos.writeObject(msg);
        byte[] bytes = bos.toByteArray();

        // 获得并设置正文长度 长度用4个字节标识
        out.writeInt(bytes.length);
        // 设置消息正文
        out.writeBytes(bytes);
    }

    //decode 入站处理器调用
    @Override
    protected void decode(ChannelHandlerContext ctx, ByteBuf in, List<Object> out) throws Exception {
        // 获取魔数 (读取一个int)
        int magic = in.readInt();
        // 获取版本号
        byte version = in.readByte();
        // 获得序列化方式
        byte seqType = in.readByte();
        // 获得指令类型
        byte messageType = in.readByte();
        // 获得请求序号
        int sequenceId = in.readInt();
        // 移除补齐字节
        in.readByte();
        // 获得正文长度
        int length = in.readInt();
        // 获得正文
        byte[] bytes = new byte[length];
        in.readBytes(bytes, 0, length);
        ObjectInputStream ois = new ObjectInputStream(new ByteArrayInputStream(bytes));
        Message message = (Message) ois.readObject();

	// **将信息放入List中,给下一个handler使用**
        out.add(message);

        // 打印获得的信息正文
        System.out.println("===========魔数===========");
        System.out.println(magic);
        System.out.println("===========版本号===========");
        System.out.println(version);
        System.out.println("===========序列化方法===========");
        System.out.println(seqType);
        System.out.println("===========指令类型===========");
        System.out.println(messageType);
        System.out.println("===========请求序号===========");
        System.out.println(sequenceId);
        System.out.println("===========正文长度===========");
        System.out.println(length);
        System.out.println("===========正文===========");
        System.out.println(message);
    }
}
- 编码器与解码器方法源于父类ByteToMessageCodec,通过该类可以自定义编码器与解码器,泛型类型为被编码与被解码的类。此处使用了自定义类Message,代表消息
public class MessageCodec extends ByteToMessageCodec<Message>
-
编码器负责将附加信息与正文信息写入到ByteBuf中,其中附加信息总字节数最好为2n,不足需要补齐。正文内容如果为对象,需要通过序列化将其放入到ByteBuf中
-
解码器负责将ByteBuf中的信息取出,并放入List中,该List用于将信息传递给下一个handler
编写测试类
public class TestCodec {
    static final org.slf4j.Logger log = LoggerFactory.getLogger(StudyServer.class);
    public static void main(String[] args) throws Exception {
        EmbeddedChannel channel = new EmbeddedChannel();
        // 添加解码器,避免粘包半包问题
        channel.pipeline().addLast(new LengthFieldBasedFrameDecoder(1024, 12, 4, 0, 0));
        channel.pipeline().addLast(new LoggingHandler(LogLevel.DEBUG));
        channel.pipeline().addLast(new MessageCodec());
        LoginRequestMessage user = new LoginRequestMessage("Nyima", "123");

        // 测试编码与解码
        ByteBuf byteBuf = ByteBufAllocator.DEFAULT.buffer();
        // 把Message转化为ByteBuf
        new MessageCodec().encode(null, user, byteBuf);
        channel.writeInbound(byteBuf);
    }
}
- 由于我们在消息中写了消息的长度,因此不怕粘包问题。但是如果出现半包问题(abcdef ->abc def)就不能正确的反序列化消息
- 因此我们用到了LengthFieldBasedFrameDecoder,避免粘包半包问题
- LengthFieldBasedFrameDecoder在发现数据不完整后会继续等待下一个ByteBuf直到数据完整后 传递给下一个Handler
- 出站通过MessageCodec的encode方法将附加信息与正文写入到ByteBuf中,通过channel执行入站操作。入站时会调用decode方法进行解码
运行结果
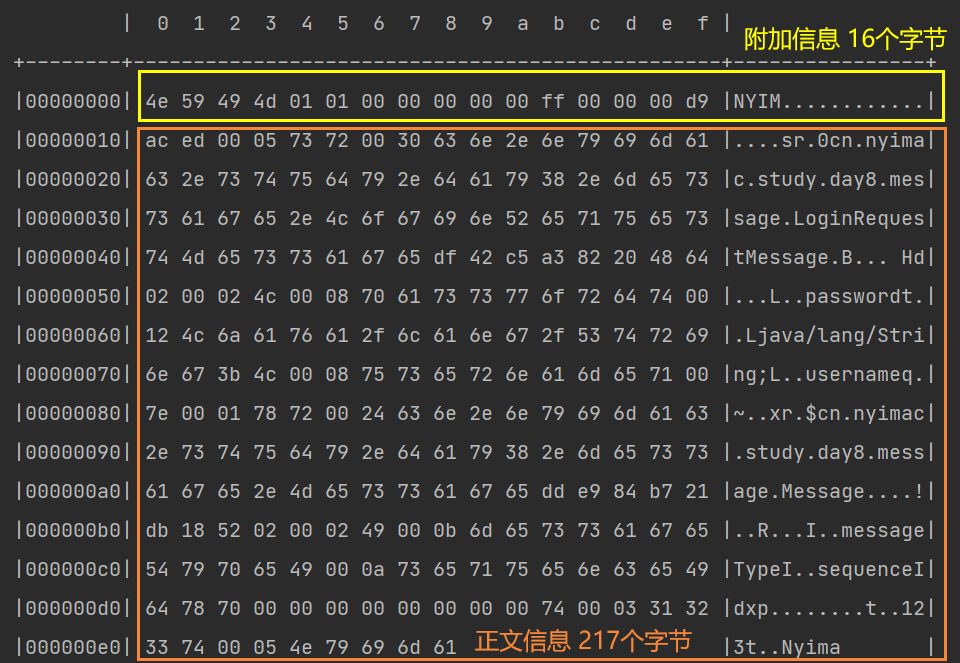
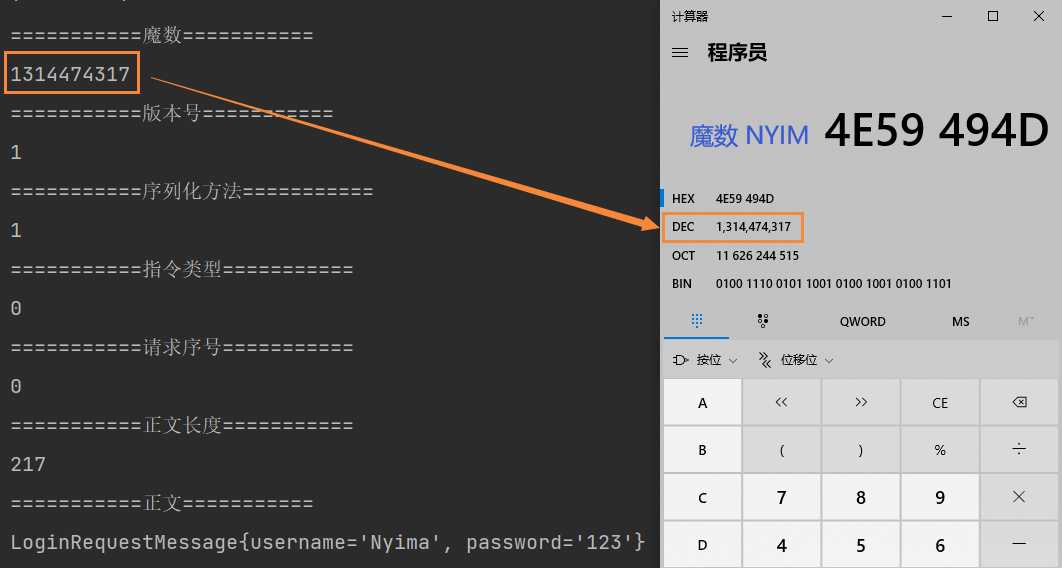
@Sharable注解
为了提高handler的复用率,可以将handler创建为handler对象,然后在不同的channel中使用该handler对象进行处理操作
LoggingHandler loggingHandler = new LoggingHandler(LogLevel.DEBUG);
// 不同的channel中使用同一个handler对象,提高复用率
channel1.pipeline().addLast(loggingHandler);
channel2.pipeline().addLast(loggingHandler);
但是并不是所有的handler都能通过这种方法来提高复用率的,例如LengthFieldBasedFrameDecoder。如果多个channel中使用同一个LengthFieldBasedFrameDecoder对象,则可能发生如下问题
- channel1中收到了一个半包,LengthFieldBasedFrameDecoder发现不是一条完整的数据,则没有继续向下传播
- 此时channel2中也收到了一个半包,因为两个channel使用了同一个LengthFieldBasedFrameDecoder,存入其中的数据刚好拼凑成了一个完整的数据包。 LengthFieldBasedFrameDecoder让该数据包继续向下传播,最终引发错误
为了提高handler的复用率,同时又避免出现一些并发问题,Netty中原生的handler中用@Sharable注解来标明,该handler能否在多个channel中共享。
只有带有该注解,才能通过对象的方式被共享,否则无法被共享
自定义编解码器能否使用@Sharable注解
这需要根据自定义的handler的处理逻辑进行分析
我们的MessageCodec本身接收的是LengthFieldBasedFrameDecoder处理之后的数据,那么数据肯定是完整的,按分析来说是可以添加@Sharable注解的
但是实际情况我们并不能添加该注解,会抛出异常信息ChannelHandler cn.nyimac.study.day8.protocol.MessageCodec is not allowed to be shared
因为MessageCodec继承自ByteToMessageCodec,ByteToMessageCodec类的注解如下

这就意味着ByteToMessageCodec不能被多个channel所共享的
- 原因:因为该类的目标是:将ByteBuf转化为Message,意味着传进该handler的数据还未被处理过。所以传过来的ByteBuf可能并不是完整的数据,如果共享则会出现问题
如果想要共享,需要怎么办呢?
继承MessageToMessageDecoder即可。该类的目标是:将已经被处理的完整数据再次被处理。传过来的Message如果是被处理过的完整数据,那么被共享也就不会出现问题了,也就可以使用@Sharable注解了。实现方式与ByteToMessageCodec类似
@ChannelHandler.Sharable
public class MessageSharableCodec extends MessageToMessageCodec<ByteBuf, Message> {
    @Override
    protected void encode(ChannelHandlerContext ctx, Message msg, List<Object> out) throws Exception {
        ...
    }

    @Override
    protected void decode(ChannelHandlerContext ctx, ByteBuf msg, List<Object> out) throws Exception {
		...
    }
}
构建WebSocket服务器
WebSocket
WebSocket是一种规范,是Html5规范的一部分,websocket解决什么问题呢?解决http协议的一些不足。我们知道,http协议是一种无状态的,基于请求响应模式的协议。
网页聊天的程序(基于http协议的),浏览器客户端发送一个数据,服务器接收到这个浏览器数据之后,如何将数据推送给其他的浏览器客户端呢?
这就涉及到服务器的推技术。早年为了实现这种服务器也可以像浏览器客户端推送消息的长连接需求,有很多方案,比如说最常用的采用一种轮询技术,就是客户端每隔一段时间,比如说2s或者3s向服务器发送请求,去请求服务器端是否还有信息没有响应给客户端,有就响应给客户端,当然没有响应就只是一种无用的请求。
WebSocket一种在单个 TCP 连接上进行全双工通讯的协议。WebSocket通信协议于2011年被IETF定为标准RFC 6455,并被RFC7936所补充规范。WebSocket API也被W3C定为标准。
WebSocket 使得客户端和服务器之间的数据交换变得更加简单,允许服务端主动向客户端推送数据。在 WebSocket API 中,浏览器和服务器只需要完成一次握手,两者之间就直接可以创建持久性的连接,并进行双向数据传输。
websocket的出现就是解决了客户端与服务端的这种长连接问题,这种长连接是真正意义上的长连接。客户端与服务器一旦连接建立双方就是对等的实体,不再区分严格意义的客户端和服务端。长连接只有在初次建立的时候,客户端才会向服务端发送一些请求,这些请求包括请求头和请求体,一旦建立好连接之后,客户端和服务器只会发送数据本身而不需要再去发送请求头信息,这样大量减少了
网络带宽。websocket协议本身是构建在http协议之上的升级协议,客户端首先向服务器端去建立连接,这个连接本身就是http协议只是在头信息中包含了一些websocket协议的相关信息,一旦http连接建立之后,服务器端读到这些websocket协议的相关信息就将此协议升级成websocket协议。websocket协议也可以应用在非浏览器应用,只需要引入相关的websocket库就可以了。
HTML5定义了WebSocket协议,能更好的节省服务器资源和带宽,并且能够更实时地进行通讯。Websocket使用ws或wss的统一资源标志符,类似于HTTPS,其中wss表示在TLS之上的Websocket。如:
ws://example.com/wsapi
wss://secure.example.com/
netty实现WebSocket
服务器端
import io.netty.bootstrap.ServerBootstrap;
import io.netty.channel.ChannelFuture;
import io.netty.channel.EventLoopGroup;
import io.netty.channel.nio.NioEventLoopGroup;
import io.netty.channel.socket.nio.NioServerSocketChannel;
import io.netty.handler.logging.LogLevel;
import io.netty.handler.logging.LoggingHandler;

import java.net.InetSocketAddress;

//websocket长连接示例
public class MyServer {
    public static void main(String[] args) throws Exception{
        EventLoopGroup bossGroup = new NioEventLoopGroup();
        EventLoopGroup wokerGroup = new NioEventLoopGroup();

        try{
            ServerBootstrap serverBootstrap = new ServerBootstrap();
            serverBootstrap.group(bossGroup,wokerGroup).channel(NioServerSocketChannel.class)
                    .handler(new LoggingHandler(LogLevel.INFO))
                     //配置各种处理器
                    .childHandler(new WebSocketChannelInitializer());

            ChannelFuture channelFuture = serverBootstrap.bind(new InetSocketAddress(8899)).sync();
            channelFuture.channel().closeFuture().sync();
        }finally {
            bossGroup.shutdownGracefully();
            wokerGroup.shutdownGracefully();
        }

    }
}
import io.netty.channel.ChannelInitializer;
import io.netty.channel.ChannelPipeline;
import io.netty.channel.socket.SocketChannel;
import io.netty.handler.codec.http.HttpObjectAggregator;
import io.netty.handler.codec.http.HttpServerCodec;
import io.netty.handler.codec.http.websocketx.WebSocketServerProtocolHandler;
import io.netty.handler.stream.ChunkedWriteHandler;

public class WebSocketChannelInitializer extends ChannelInitializer<SocketChannel>{

    @Override
    protected void initChannel(SocketChannel ch) throws Exception {
        ChannelPipeline pipeline = ch.pipeline();

        //websocket协议本身是基于http协议的,所以这边也要使用http解编码器
        pipeline.addLast(new HttpServerCodec());

        //以块的方式来写的处理器(处理大数据)
        pipeline.addLast(new ChunkedWriteHandler());

        //netty是基于分段请求的,HttpObjectAggregator的作用是将请求体分段再聚合,参数是聚合字节的最大长度
        pipeline.addLast(new HttpObjectAggregator(8192));

        //ws://server:port/context_path
        //ws://localhost:9999/ws
        //参数指的是contex_path
        pipeline.addLast(new WebSocketServerProtocolHandler("/ws"));

        //自定义处理器
        pipeline.addLast(new TextWebSocketFrameHandler());

    }
}
经过WebSocketServerProtocolHandler后得到的消息是WebSocketFrame,一共有六种WebSocketFrame

其中TextWebSocketFrame是一个消息帧
import io.netty.channel.ChannelHandlerContext;
import io.netty.channel.SimpleChannelInboundHandler;
import io.netty.handler.codec.http.websocketx.TextWebSocketFrame;

import java.time.LocalDateTime;

//处理文本协议数据,处理TextWebSocketFrame类型的数据,websocket专门处理文本的frame就是TextWebSocketFrame
public class TextWebSocketFrameHandler extends SimpleChannelInboundHandler<TextWebSocketFrame>{

    //读到客户端的内容并且向客户端去写内容
    @Override
    protected void channelRead0(ChannelHandlerContext ctx, TextWebSocketFrame msg) throws Exception {
        System.out.println("收到消息:"+msg.text());

        /**
         * writeAndFlush接收的参数类型是Object类型,但是一般我们都是要传入管道中传输数据的类型,比如我们当前的demo
         * 传输的就是TextWebSocketFrame类型的数据
         */
        ctx.channel().writeAndFlush(new TextWebSocketFrame("服务时间:"+ LocalDateTime.now()));

    }

    //**其实真正在建立连接或者断开连接时,应该由前端发送一个消息,交给channelRead0方法 建立 用户id和channel之间的对应关系**

    @Override
    public void channelActive(ChannelHandlerContext ctx) throws Exception {

        logger.debug("客户端加入连接:"+ctx.channel());
        SessionHolder.channelGroup.add(ctx.channel());
    }

    @Override
    public void channelInactive(ChannelHandlerContext ctx) throws Exception {
        //断开连接
        logger.debug("客户端断开连接:"+ctx.channel());
        SessionHolder.channelGroup.remove(ctx.channel());
    }

    @Override
    public void exceptionCaught(ChannelHandlerContext ctx, Throwable cause) throws Exception {
        System.out.println("异常发生");
        ctx.channel().close();
       channelGroup.remove(ctx.channel());

    }
}
//会话工具类,保存用户和通道的对应关系,用于广播和点对点聊天
public class SessionHolder {

    /**
     * 存储每个客户端接入进来时的 channel 对象
     * 主要用于使用 writeAndFlush 方法广播信息
     */
    public static ChannelGroup channelGroup = new DefaultChannelGroup(GlobalEventExecutor.INSTANCE);

    /**
     * 用于客户端和服务端握手时存储用户id和netty Channel对应关系
     */
    public static Map<String, Channel> channelMap = new ConcurrentHashMap<String, Channel>();

}
前端
<!DOCTYPE html>
<html lang="en">
<head>
    <meta charset="UTF-8">
    <title>WebSocket客户端</title>
</head>
<body>
<script type="text/javascript">
    var socket;

    //如果浏览器支持WebSocket
    if(window.WebSocket){
        //参数就是与服务器连接的地址
        socket = new WebSocket("ws://localhost:8899/ws");

        //客户端收到服务器消息的时候就会执行这个回调方法
        socket.onmessage = function (event) {
            var ta = document.getElementById("responseText");
            ta.value = ta.value + "\n"+event.data;
        }

        //连接建立的回调函数
        socket.onopen = function(event){
            var ta = document.getElementById("responseText");
            ta.value = "连接开启";
        }

        //连接断掉的回调函数
        socket.onclose = function (event) {
            var ta = document.getElementById("responseText");
            ta.value = ta.value +"\n"+"连接关闭";
        }
    }else{
        alert("浏览器不支持WebSocket!");
    }

    //发送数据
    function send(message){
        if(!window.WebSocket){
            return;
        }

        //当websocket状态打开
        if(socket.readyState == WebSocket.OPEN){
            socket.send(message);
        }else{
            alert("连接没有开启");
        }
    }
</script>
<form onsubmit="return false">
    <textarea name = "message" style="width: 400px;height: 200px"></textarea>

    <input type ="button" value="发送数据" onclick="send(this.form.message.value);">

    <h3>服务器输出:</h3>

    <textarea id ="responseText" style="width: 400px;height: 300px;"></textarea>

    <input type="button" onclick="javascript:document.getElementById('responseText').value=''" value="清空数据">
</form>
</body>
</html>
心跳检测
心跳机制
心跳机制是定时发送一个自定义的结构体(心跳包),让对方知道自己还活着,以确保连接的有效性的机制。
在WebSocket中即判断套接字是否已经与服务器断开,无法使用,此时要清理服务器的该套接字进程以免浪费资源。
心跳包就是客户端定时发送简单的信息给服务器端告诉它还在正常运行。
实现
首先创建一个handler,实现心跳。仅检测读写空闲
public class HeartBeatHandler extends ChannelInboundHandlerAdapter {


    @Override
    public void userEventTriggered(ChannelHandlerContext ctx, Object evt) throws Exception {

        //判断evt是否是IdleStateEvent(用于触发用户事件,包含读空闲/写空闲/读写空闲)
        if(evt instanceof IdleState){
            IdleStateEvent idleStateEvent = (IdleStateEvent) evt;

            if(idleStateEvent.state() == IdleState.READER_IDLE){
                System.out.println("进入读空闲...");
            }else if(idleStateEvent.state() == IdleState.WRITER_IDLE){
                System.out.println("进入写空闲...");
            }else if(idleStateEvent.state() == IdleState.ALL_IDLE){
                System.out.println("进入读写空闲...");

                Channel channel = ctx.channel();
                //关闭无用channel,避免浪费资源
                channel.close();
            }
        }
    }
}
后在初始化器中添加handler
//空闲定义Handler
//三个参数分别为读/写/读写的空闲,我们只针对读写空闲检测
pipeline.addLast(new IdleStateHandler(2,4,60));

//进入空闲处理Handler
pipeline.addLast(new HeartBeatHandler());
接着在前端的WebSocket的onopen事件中定时发送一条数据就好了,对该数据不做处理,让服务器知道有请求发送,客户端还在就好了。
//后端每60秒检测一次,这里只要小于60秒就行了
socket.onopen:function(){
    setInterval("CHAT.keepalive()", 50000);
}

keepalive: function() {
	// 构建对象
	var dataContent = "test alive";
	// 发送心跳
	socket.send(dataContent);
}
五.优化
1.拓展序列化算法
序列化接口
public interface Serializer {
    /**
     * 序列化
     * @param object 被序列化的对象
     * @param <T> 被序列化对象类型
     * @return 序列化后的字节数组
     */
    <T> byte[] serialize(T object);

    /**
     * 反序列化
     * @param clazz 反序列化的目标类的Class对象
     * @param bytes 被反序列化的字节数组
     * @param <T> 反序列化目标类
     * @return 反序列化后的对象
     */
    <T> T deserialize(Class<T> clazz, byte[] bytes);
}
枚举实现类
public enum SerializerAlgorithm implements Serializer {
    // Java的序列化和反序列化
    Java {
        @Override
        public <T> byte[] serialize(T object) {
            // 序列化后的字节数组
            byte[] bytes = null;
            try (ByteArrayOutputStream bos = new ByteArrayOutputStream();
                 ObjectOutputStream oos = new ObjectOutputStream(bos)) {
                oos.writeObject(object);
                bytes = bos.toByteArray();
            } catch (IOException e) {
                e.printStackTrace();
            }
            return bytes;
        }

        @Override
        public <T> T deserialize(Class<T> clazz, byte[] bytes) {
            T target = null;
            System.out.println(Arrays.toString(bytes));
            try (ByteArrayInputStream bis = new ByteArrayInputStream(bytes);
                 ObjectInputStream ois = new ObjectInputStream(bis)) {
                target = (T) ois.readObject();
            } catch (IOException | ClassNotFoundException e) {
                e.printStackTrace();
            }
            // 返回反序列化后的对象
            return target;
        }
    }

     // Json的序列化和反序列化
    Json {
        @Override
        public <T> byte[] serialize(T object) {
            String s = new Gson().toJson(object);
            System.out.println(s);
            // 指定字符集,获得字节数组
            return s.getBytes(StandardCharsets.UTF_8);
        }

        @Override
        public <T> T deserialize(Class<T> clazz, byte[] bytes) {
            String s = new String(bytes, StandardCharsets.UTF_8);
            System.out.println(s);
            // 此处的clazz为具体类型的Class对象,而不是父类Message的
            return new Gson().fromJson(s, clazz);
        }
    }
}
修改原编解码器
编码
// 获得序列化后的msg
// 使用指定的序列化方式
SerializerAlgorithm[] values = SerializerAlgorithm.values();
// 获得序列化后的对象
byte[] bytes = values[out.getByte(5)-1].serialize(msg);
解码
// 获得反序列化方式
SerializerAlgorithm[] values = SerializerAlgorithm.values();
// 通过指定方式进行反序列化
// 需要通过Message的方法获得具体的消息类型
Message message = values[seqType-1].deserialize(Message.getMessageClass(messageType), bytes);
2.参数调优
CONNECT_TIMEOUT_MILLIS
- 属于 SocketChannal 的参数
- 用在客户端建立连接时,如果在指定毫秒内无法连接,会抛出 timeout 异常
- 注意:Netty 中不要用成了SO_TIMEOUT 主要用在阻塞 IO,而 Netty 是非阻塞 IO
使用
public class TestParam {
    public static void main(String[] args) {
        // SocketChannel 5s内未建立连接就抛出异常
        new Bootstrap().option(ChannelOption.CONNECT_TIMEOUT_MILLIS, 5000);

        // ServerSocketChannel 5s内未建立连接就抛出异常
        new ServerBootstrap().option(ChannelOption.CONNECT_TIMEOUT_MILLIS,5000);
        // SocketChannel 5s内未建立连接就抛出异常
        new ServerBootstrap().childOption(ChannelOption.CONNECT_TIMEOUT_MILLIS, 5000);
    }
}
- 客户端通过 Bootstrap.option 函数来配置参数,配置参数作用于 SocketChannel
- 服务器通过 ServerBootstrap来配置参数,但是对于不同的 Channel 需要选择不同的方法
- 通过 option 来配置 ServerSocketChannel 上的参数
- 通过 childOption 来配置 SocketChannel 上的参数
源码分析
客户端中连接服务器的线程是 NIO 线程,抛出异常的是主线程。这是如何做到超时判断以及线程通信的呢?
AbstractNioChannel.AbstractNioUnsafe.connect方法中
public final void connect(
                final SocketAddress remoteAddress, final SocketAddress localAddress, final ChannelPromise promise) {

    ...

    // Schedule connect timeout.
    // 设置超时时间,通过option方法传入的CONNECT_TIMEOUT_MILLIS参数进行设置
    int connectTimeoutMillis = config().getConnectTimeoutMillis();
    // 如果超时时间大于0
    if (connectTimeoutMillis > 0) {
        // 创建一个定时任务,延时connectTimeoutMillis(设置的超时时间时间)后执行
        // schedule(Runnable command, long delay, TimeUnit unit)
        connectTimeoutFuture = eventLoop().schedule(new Runnable() {
            @Override
            public void run() {
                // 判断是否建立连接,Promise进行NIO线程与主线程之间的通信
                // 如果超时,则通过tryFailure方法将异常放入Promise中
                // 在主线程中抛出
                ChannelPromise connectPromise = AbstractNioChannel.this.connectPromise;
                ConnectTimeoutException cause = new ConnectTimeoutException("connection timed out: " + remoteAddress);
                if (connectPromise != null && connectPromise.tryFailure(cause)) {
                    close(voidPromise());
                }
            }
        }, connectTimeoutMillis, TimeUnit.MILLISECONDS);
    }

   	...

}
超时的判断主要是通过 Eventloop 的 schedule 方法和 Promise 共同实现的
- schedule 设置了一个定时任务,延迟connectTimeoutMillis秒后执行该方法
- 如果指定时间内没有建立连接,则会执行其中的任务
- 任务负责创建 ConnectTimeoutException 异常,并将异常通过 Pormise 传给主线程并抛出
SO_BACKLOG
该参数是 ServerSocketChannel 的参数
三次握手与连接队列
第一次握手时,因为客户端与服务器之间的连接还未完全建立,连接会被放入半连接队列中
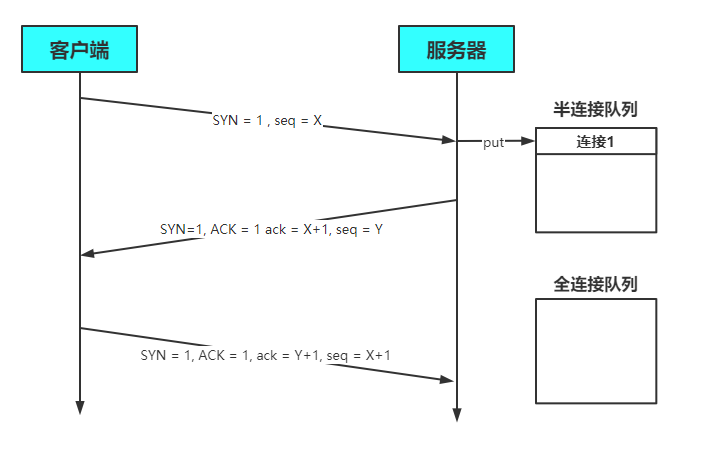
当完成三次握手以后,连接会被放入全连接队列中
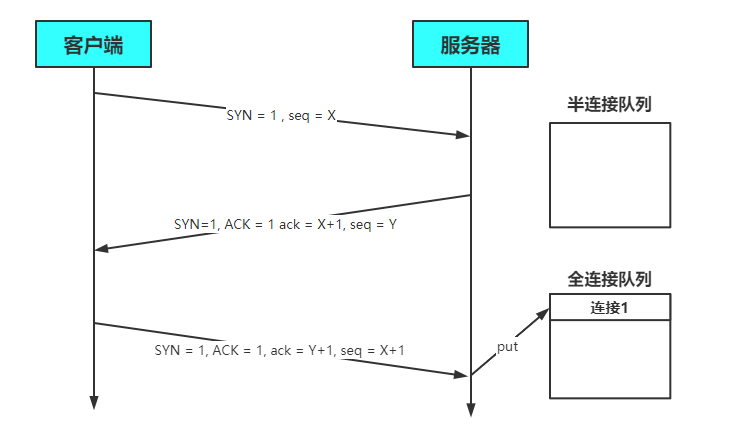
服务器处理Accept事件是在TCP三次握手,也就是建立连接之后。服务器会从全连接队列中获取连接并进行处理
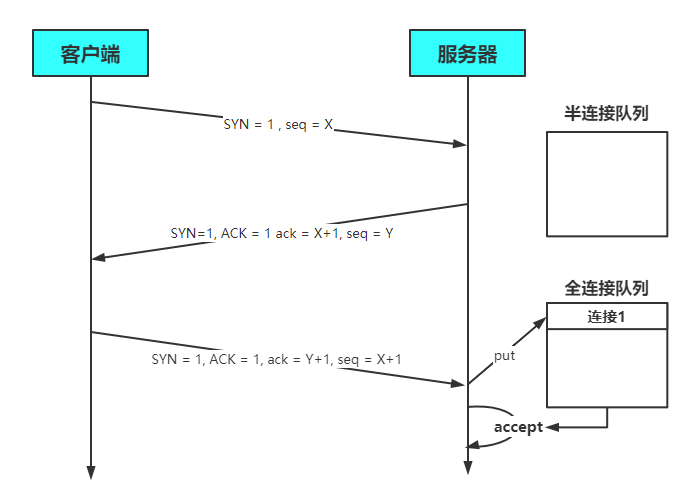
在 linux 2.2 之前,backlog 大小包括了两个队列的大小,在 linux 2.2 之后,分别用下面两个参数来控制
- 半连接队列 - sync queue
- 大小通过 /proc/sys/net/ipv4/tcp_max_syn_backlog 指定,在 syncookies 启用的情况下,逻辑上没有最大值限制,这个设置便被忽略
- 全连接队列 - accept queue
- 其大小通过 /proc/sys/net/core/somaxconn 指定,在使用 listen 函数时,内核会根据传入的 backlog 参数与系统参数,取二者的较小值
- 如果 accpet queue 队列满了,server 将发送一个拒绝连接的错误信息到 client
作用
在Netty中,SO_BACKLOG主要用于设置全连接队列的大小。当处理Accept的速率小于连接建立的速率时,全连接队列中堆积的连接数大于SO_BACKLOG设置的值是,便会抛出异常
设置方式如下
// 设置全连接队列,大小为2
new ServerBootstrap().option(ChannelOption.SO_BACKLOG, 2);
默认值
backlog参数在NioSocketChannel.doBind方法被使用
@Override
protected void doBind(SocketAddress localAddress) throws Exception {
    if (PlatformDependent.javaVersion() >= 7) {
        javaChannel().bind(localAddress, config.getBacklog());
    } else {
        javaChannel().socket().bind(localAddress, config.getBacklog());
    }
}
其中backlog被保存在了DefaultServerSocketChannelConfig配置类中
private volatile int backlog = NetUtil.SOMAXCONN;
具体的赋值操作如下
SOMAXCONN = AccessController.doPrivileged(new PrivilegedAction<Integer>() {
    @Override
    public Integer run() {
        // Determine the default somaxconn (server socket backlog) value of the platform.
        // The known defaults:
        // - Windows NT Server 4.0+: 200
        // - Linux and Mac OS X: 128
        int somaxconn = PlatformDependent.isWindows() ? 200 : 128;
        File file = new File("/proc/sys/net/core/somaxconn");
        BufferedReader in = null;
        try {
            // file.exists() may throw a SecurityException if a SecurityManager is used, so execute it in the
            // try / catch block.
            // See https://github.com/netty/netty/issues/4936
            if (file.exists()) {
                in = new BufferedReader(new FileReader(file));
                // 将somaxconn设置为Linux配置文件中设置的值
                somaxconn = Integer.parseInt(in.readLine());
                if (logger.isDebugEnabled()) {
                    logger.debug("{}: {}", file, somaxconn);
                }
            } else {
                ...
            }
            ...
        }
        // 返回backlog的值
        return somaxconn;
    }
}
- backlog的值会根据操作系统的不同,来选择不同的默认值
- Windows 200
- Linux/Mac OS 128
- 如果配置文件/proc/sys/net/core/somaxconn存在,会读取配置文件中的值,并将backlog的值设置为配置文件中指定的
TCP_NODELAY
- 属于 SocketChannal 参数
- 因为 Nagle 算法,数据包会堆积到一定的数量后一起发送,这就可能导致数据的发送存在一定的延时
- 该参数默认为false,如果不希望的发送被延时,则需要将该值设置为true
SO_SNDBUF & SO_RCVBUF
- SO_SNDBUF 属于 SocketChannal 参数
- SO_RCVBUF 既可用于 SocketChannal 参数,也可以用于 ServerSocketChannal 参数(建议设置到 ServerSocketChannal 上)
- 该参数用于指定接收方与发送方的滑动窗口大小
ALLOCATOR
- 属于 SocketChannal 参数
- 用来配置 ByteBuf 是池化还是非池化,是直接内存还是堆内存
RCVBUF_ALLOCATOR
- 属于 SocketChannal 参数
- 控制 Netty 接收缓冲区大小
- 负责入站数据的分配,决定入站缓冲区的大小(并可动态调整),统一采用 direct 直接内存,具体池化还是非池化由 allocator 决定
FastThreadLocal
FastThreadLocal解决了ThreadLocal使用线性探测法解决哈希冲突效率低的问题
每一个FastThreadLocal实例创建时,分配一个数组下标index;分配index使用AtomicInteger实现,每个FastThreadLocal都能获取到一个不重复的下标。(换句话说它不是通过对FastThreadLocal对象计算哈希算出数组下标的)


 浙公网安备 33010602011771号