


第九篇:常用模块
一.时间模块
1.1time模块
import time

#时间分为三种形式
#1、时间戳,说白了就是时间的秒数表达形式
print(time.time())
start_time=time.time()
time.sleep(3)
stop_time=time.time()
print(stop_time-start_time)

#2、格式化的字符串,更多是给人看的时间
print(time.strftime('%Y-%m-%d %H:%M:%S %p'))
print(time.strftime('%Y-%m-%d %X %p'))

#3、struct_time对象
print(time.localtime()) # 上海:东八区
print(time.localtime().tm_year)
print(time.localtime().tm_mday)

print(time.gmtime()) # UTC时区 世界标准时区
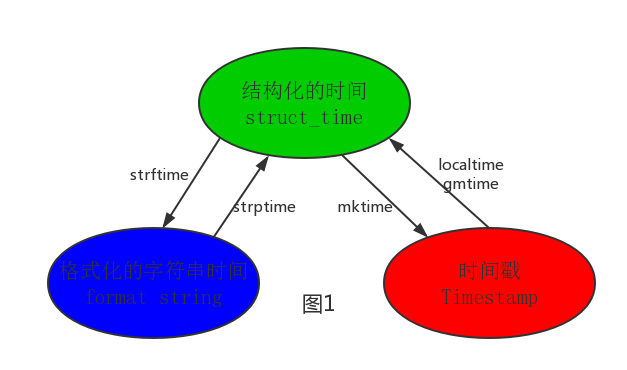
其中计算机认识的时间只能是'时间戳'格式,而程序员可处理的或者说人类能看懂的时间有: '格式化的时间字符串','结构化的时间' ,于是有了下图的转换关系
#了解的知识
print(time.localtime(1111111111).tm_hour)
print(time.gmtime(1111111111).tm_hour)

print(time.mktime(time.localtime()))

print(time.strftime('%Y/%m/%d',time.localtime()))
print(time.strptime('2017/04/08','%Y/%m/%d'))
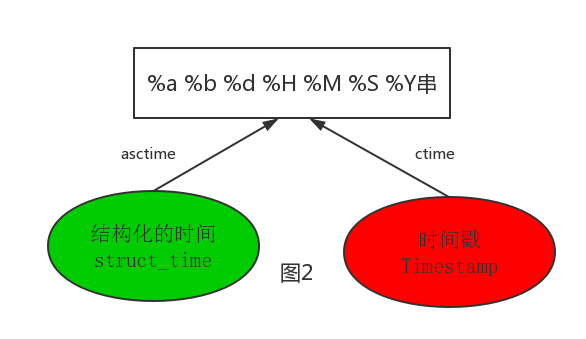
print(time.asctime(time.localtime()))
print(time.ctime(12312312321))
1.2datetime模块
import datetime

print(datetime.datetime.now())
print(datetime.datetime.now() + datetime.timedelta(days=3)) #3天后
print(datetime.datetime.now() + datetime.timedelta(days=-3)) #3天前
print(datetime.datetime.now() + datetime.timedelta(hours=3))  #3个月之后
print(datetime.datetime.now() + datetime.timedelta(seconds=111))

current_time=datetime.datetime.now()
print(current_time.replace(year=1977))

print(datetime.date.fromtimestamp(1111111111))
二.random模块
import random
print(random.random())  # (0,1)----float    大于0且小于1之间的小数
print(random.randint(1, 3))  # [1,3]    大于等于1且小于等于3之间的整数
print(random.randrange(1, 3))  # [1,3)    大于等于1且小于3之间的整数
print(random.choice([1, '23', [4, 5]]))  # 1或者23或者[4,5]
print(random.sample([1, '23', [4, 5]], 2))  # 列表元素任意2个组合
print(random.uniform(1, 3))  # 大于1小于3的小数,如1.927109612082716

item = [1, 3, 5, 7, 9]
random.shuffle(item)  # 打乱item的顺序,相当于"洗牌"
print(item)


import random
def make_code(n):#传入几位不能写死
    res=""
    for i in range(n):
        s1=str(random.randint(0,9))
        s2=chr(random.randint(65,90))#把数字转化成字母
        res+=random.choice([s1,s2])
    return res

print(make_code(10))
三.os模块
3.1os基本模块
import os

"""
os 表示操作系统
该模块主要处理与操作系统相关的操作
最常用的是文件操作
打开  读取  写入  删除  复制  重命名

"""
os.getcwd() #获取当前工作目录,即当前python脚本工作的目录路径
os.chdir("dirname")  #改变当前脚本工作目录;相当于shell下cd
os.curdir  #返回当前目录: ('.')
os.pardir  #获取当前目录的父目录字符串名:('..')
os.makedirs('dirname1/dirname2')    #可生成多层递归目录
os.removedirs('dirname1')    #若目录为空,则删除,并递归到上一级目录,如若也为空,则删除,依此类推
os.mkdir('dirname')    #生成单级目录;相当于shell中mkdir dirname
os.rmdir('dirname')    #删除单级空目录,若目录不为空则无法删除,报错;相当于shell中rmdir dirname
os.listdir('dirname')    #列出指定目录下的所有文件和子目录,包括隐藏文件,并以列表方式打印
os.remove()  #删除一个文件
os.rename("oldname","newname")  #重命名文件/目录
os.stat('path/filename')  #获取文件/目录信息
os.sep    #输出操作系统特定的路径分隔符,win下为"\\",Linux下为"/"
os.linesep    #输出当前平台使用的行终止符,win下为"\t\n",Linux下为"\n"
os.pathsep    #输出用于分割文件路径的字符串 win下为;,Linux下为:
os.name    #输出字符串指示当前使用平台。win->'nt'; Linux->'posix'
os.system("bash command")  #运行shell命令,直接显示
os.environ  #获取系统环境变量
3.2熟练掌握os.path模块
os.path.abspath(path)  #返回path规范化的绝对路径
os.path.split(path)  #将path分割成目录和文件名二元组返回
os.path.dirname(path)  #返回path的目录。其实就是os.path.split(path)的第一个元素
os.path.basename(path)  #返回path最后的文件名。如何path以/或\结尾,那么就会返回空值。即os.path.split(path)的第二个元素
os.path.exists(path)  #如果path存在,返回True;如果path不存在,返回False
os.path.isabs(path)  #如果path是绝对路径,返回True
os.path.isfile(path)  #如果path是一个存在的文件,返回True。否则返回False
os.path.isdir(path)  #如果path是一个存在的目录,则返回True。否则返回False
os.path.join(path1[, path2[, ...]])  #将多个路径组合后返回,第一个绝对路径之前的参数将被忽略
os.path.getatime(path)  #返回path所指向的文件或者目录的最后存取时间
os.path.getmtime(path)  #返回path所指向的文件或者目录的最后修改时间
os.path.getsize(path) #返回path的大小
四.sys模块
sys.argv           #命令行参数List,第一个元素是程序本身路径
sys.exit(n)        #退出程序,正常退出时exit(0)
sys.version        #获取Python解释程序的版本信息
sys.maxint         #最大的Int值
sys.path           #返回模块的搜索路径,初始化时使用PYTHONPATH环境变量的值
sys.platform       #返回操作系统平台名称
def progress(percent,width=50):
    if percent > 1:
        percent=1
    show_str=('[%%-%ds]' %width) %(int(width*percent) * '#')
    print('\r%s %d%%' %(show_str,int(100*percent)),end='')

import time
recv_size=0
total_size=8097
while recv_size < total_size:
    time.sleep(0.1)
    recv_size+=8096
    percent=recv_size / total_size
    progress(percent)
五.shutil模块
#压缩文件夹(一般把注释空格压缩一下)
import shutil
import time
ret = shutil.make_archive(
    "day15_bak_%s" %time.strftime('%Y-%m-%d'),
    'gztar',
    root_dir=r'D:\code\SH_fullstack_s1\day15'
)

#解压文件夹
import tarfile
t=tarfile.open('day15_bak_2018-04-08.tar.gz','r')
t.extractall(r'D:\code\SH_fullstack_s1\day16\解包目录')
t.close()
六.json&pickle模块
6.1什么是序列化?什么是反序列化
把对象(变量)从内存中变成可存储或传输的过程称之为序列化,在python中叫pickling
序列化的过程:
内存中的数据结构----》转成一种中间格式(字符串)----》存到文件中
反序列化的过程:
反序列化:文件----》读取中间格式(字符串)------》eval转成内存中数据结构
6.2为什么要序列化?
1.持久保存状态
2.跨平台数据交互
6.3json序列化与反序列化的应用
#序列化反序列化--------------------》json.dumps,json.loads
import json
# 序列化:内存中的数据结构----》转成一种中间格式(字符串)----》存到文件中
dic={'name':'egon','age':18}

res=json.dumps(dic) # json格式全都是双引号
print(res,type(res))

with open('db.json','wb') as f:
    f.write(res.encode('utf-8'))

#反序列化:文件----》读取中间格式(字符串)------》json转成内存中数据结构
with open('db.json','r',encoding='utf-8') as f:
    data=f.read()
    dic=json.loads(data)
    print(dic,type(dic),dic['name'])

# 验证json格式全都为双引号
with open('db.txt','r',encoding='utf-8') as f:
    data=f.read()
    dic=json.loads(data)
    print(dic,type(dic),dic['name'])

# 简化版
#序列化反序列化--------------------》json.dump,json.load
import json
dic={'name':'egon','age':18}
#序列化
with open('db1.json','wt',encoding='utf-8') as f:
    json.dump(dic,f)

#反序列化
with open('db1.json','rt',encoding='utf-8') as f:
    dic=json.load(f)
    print(dic['name'])
6.4pickle序列化与反序列化的应用
import pickle
#序列化
s={1,2,3,4,}
res=pickle.dumps(s)
print(res,type(res))

with open('db.pkl','wb') as f:
    f.write(res)

#反序列化
with open('db.pkl','rb') as f:
    data=f.read()
    # print(data)
    s=pickle.loads(data)
    print(s,type(s))

#dump与load
import pickle
s={1,2,3}
with open('db1.pkl','wb') as f:
    pickle.dump(s,f)

with open('db1.pkl','rb') as f:
    s=pickle.load(f)
    print(s,type(s))
6.5如何序列化之python与pickle
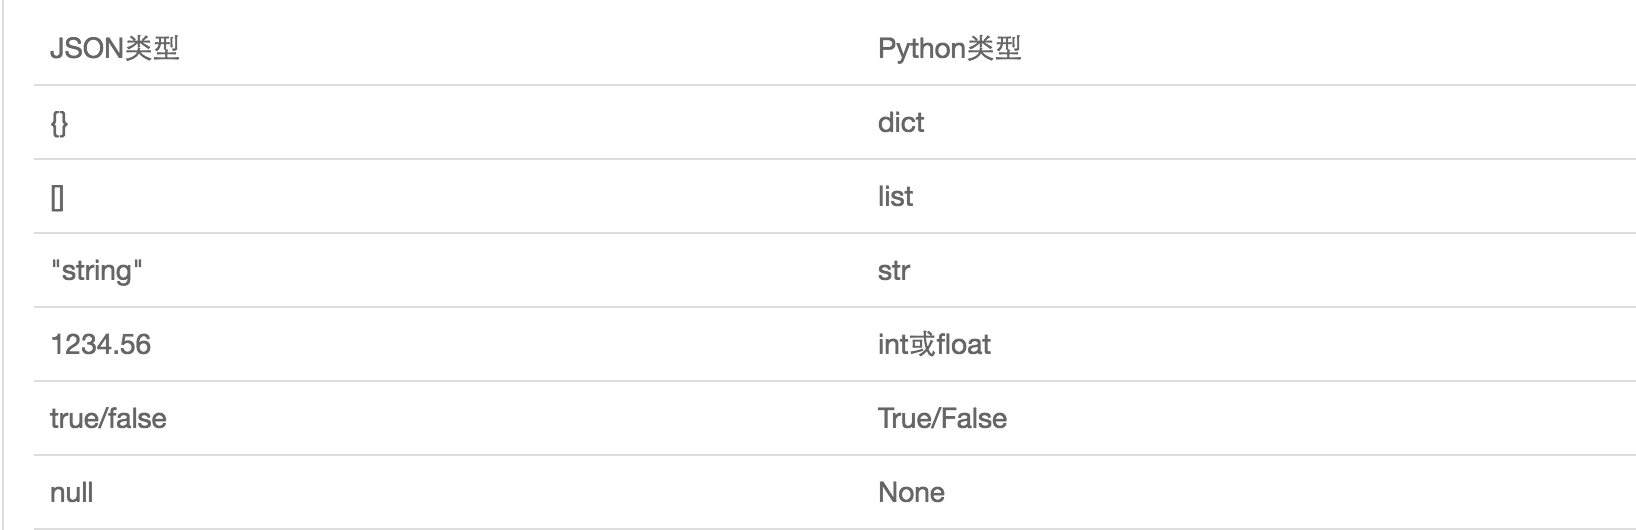
JSON和Python内置的数据类型对应如下:
json 以t模式写到文件中

pickle 以b模式写到文件中

七.shelve模块
# 了解
import shelve
#序列化
# info1={'age':18,'height':180,'weight':80}
# info2={'age':73,'height':150,'weight':80}
#
# d=shelve.open('db.shv')#上述内存中的两个字典都存到这个文件中去了
# d['egon']=info1
# d['alex']=info2
# d.close()

#反序列化
# d=shelve.open('db.shv')
# # print(d['egon'])
# # print(d['alex'])
# d.close()

# d=shelve.open('db.shv',writeback=True)#writeback回写,写回
# d['alex']['age']=10000
# # print(d['alex'])
# d.close()

# d=shelve.open('db.shv',writeback=True)
# print(d['alex'])
# d.close()
八.xml模块
pass
九.configparser模块
my.ini文件
[egon]
age=18
pwd=123
sex=male
salary=5.1
is_beatifull=True

[lsb]
age=30
pwd=123456
sex=female
salary=4.111
is_beatifull=Falase
执行文件
import configparser

config=configparser.ConfigParser()
config.read('my.ini')#读一下这个文件

secs=config.sections()
print(secs)#取标题

print(config.options('egon'))#取配置

age=config.get('egon','age')#取到egon下面的age
# age=config.getint('egon','age')
print(age,type(age))

salary=config.getfloat('egon','salary')
print(salary,type(salary))

b=config.getboolean('egon','is_beatifull')
print(b,type(b))
十.hashlib模块
10.1什么叫hash
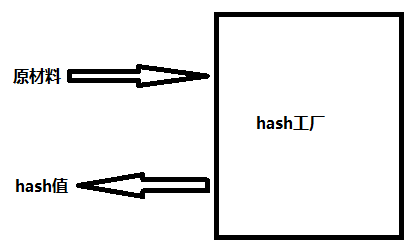
hash是一种算法,该算法接受传入的内容,经过运算得到一串hash值
hash算法就像一座工厂,工厂接收你送来的原材料(可以用m.update()为工厂运送原材料),经过加工返回的产品就是hash值
10.2hash值的特点
1 只要传入的内容一样,得到的hash值必然一样=====>要用明文传输密码文件完整性校验
2 不能由hash值反解成内容=======》把密码做成hash值,不应该在网络传输明文密码
3 只要使用的hash算法不变,无论校验的内容有多大,得到的hash值长度是固定的
import hashlib
m=hashlib.md5()
m.update('hello'.encode('utf-8'))
m.update('world'.encode('utf-8'))
m.update('egon'.encode('utf-8'))
print(m.hexdigest()) #3801fab9b8c8d9fcb481017969843ed5

# import hashlib
# m=hashlib.md5()
# m.update('h'.encode('utf-8'))
# m.update('e'.encode('utf-8'))
# m.update('lloworld'.encode('utf-8'))
# m.update('egon'.encode('utf-8'))
# print(m.hexdigest()) #3801fab9b8c8d9fcb481017969843ed5
10.3密码加盐
import hashlib
pwd='alex3714'

m=hashlib.md5()
m.update('一行白鹭上青天')
m.update(pwd.encode('utf-8'))
m.update('天'.encode('utf-8'))

m.update('小雨一米五'.encode('utf-8'))
print(m.hexdigest())
10.4不同的算法
import hashlib

# m=hashlib.md5()
# m.update('helloworld'.encode('utf-8'))
# print(m.hexdigest()) #fc5e038d38a57032085441e7fe7010b0

m=hashlib.sha256()
m.update('helloworld'.encode('utf-8'))
print(m.hexdigest()) #936a185caaa266bb9cbe981e9e05cb78cd732b0b3280eb944412bb6f8f8f07af


m=hashlib.sha512()
m.update('helloworld'.encode('utf-8'))
print(m.hexdigest()) #1594244d52f2d8c12b142bb61f47bc2eaf503d6d9ca8480cae9fcf112f66e4967dc5e8fa98285e36db8af1b8ffa8b84cb15e0fbcf836c3deb803c13f37659a
10.5hmac模块 #强制密码加盐
import hmac
m=hmac.new('天王盖地虎,小鸡炖模块'.encode('utf-8'))
m.update('alex3814'.encode('utf-8'))
print(m.hexdigest())
十一.suprocess模块 #用来执行系统命令
11.1部分dos命令
ipconfig 查看本地ip地址
tasklist | findstr python
taskkill /?
D:\code>tasklist | findstr python
python.exe                   12360 Console                    1     11,024 K

D:\code>taskkill /F /PID 12360    #强制杀进程
11.2linux系统(了解)
ps aux | grep python
kill -9 PID
11.3subprocess模块的应用
import subprocess

obj=subprocess.Popen('dir',     #这条命令表示丢管道的意思,丢到一个地方先存起来
                     shell=True,#shell就是命令解释器,把dir识别一个具体的指令
                     stdout=subprocess.PIPE,
                     stderr=subprocess.PIPE
                     )

print(obj)

res1=obj.stdout.read()
print('正确结果1111: ',res1)

res2=obj.stdout.read()
print('正确结果2222: ',res2) #只能取一次,取走了就没有了

res2=obj.stderr.read()

 浙公网安备 33010602011771号