Spring-s
Server
Spring
SpringMVC
Mybatis
server
♥所有maven仓库:
servlet:
<dependency>
<groupId>javax.servlet</groupId>
<artifactId>javax.servlet-api</artifactId>
<version>4.0.1</version>
<scope>compile</scope>
</dependency>
<dependency>
<groupId>javax.servlet.jsp</groupId>
<artifactId>jsp-api</artifactId>
<version>2.1</version>
<scope>provided</scope>
</dependency>
<dependency>
<groupId>javax.servlet.jsp.jstl</groupId>
<artifactId>jstl-api</artifactId>
<version>1.2</version>
</dependency>
<dependency>
<groupId>taglibs</groupId>
<artifactId>standard</artifactId>
<version>1.1.2</version>
</dependency>
<dependency>
<groupId>commons-io</groupId>
<artifactId>commons-io</artifactId>
<version>2.7</version>
</dependency>
<dependency>
<groupId>commons-fileupload</groupId>
<artifactId>commons-fileupload</artifactId>
<version>1.2.1</version>
</dependency>
Mybatis:
<dependency>
    <groupId>org.mybatis</groupId>
    <artifactId>mybatis</artifactId>
    <version>3.5.2</version>
</dependency>
<dependency>
    <groupId>mysql</groupId>
    <artifactId>mysql-connector-java</artifactId>
    <version>5.1.46</version>
</dependency>
Spring:
<dependency>
    <groupId>org.springframework</groupId>
    <artifactId>spring-webmvc</artifactId>
    <version>5.2.0.RELEASE</version>
</dependency>
<dependency>
    <groupId>org.springframework</groupId>
    <artifactId>spring-jdbc</artifactId>
    <version>5.1.9.RELEASE</version>
</dependency>

<dependency>
    <groupId>org.mybatis</groupId>
    <artifactId>mybatis-spring</artifactId>
    <version>2.0.2</version>
</dependency>
<dependency>
    <groupId>mysql</groupId>
    <artifactId>mysql-connector-java</artifactId>
    <version>5.1.46</version>
</dependency>

web.xml  4.0版本:
<?xml version="1.0" encoding="UTF-8"?>
<web-app xmlns="http://xmlns.jcp.org/xml/ns/javaee"
         xmlns:xsi="http://www.w3.org/2001/XMLSchema-instance"
         xsi:schemaLocation="http://xmlns.jcp.org/xml/ns/javaee
                             http://xmlns.jcp.org/xml/ns/javaee/web-app_4_0.xsd"
         version="4.0">
  <display-name>Archetype Created Web Application</display-name>
</web-app>
Spring
♥IOC
maven仓库:
<dependency>
    <groupId>org.springframework</groupId>
    <artifactId>spring-webmvc</artifactId>
    <version>5.2.0.RELEASE</version>
</dependency>


beans.xml文件:
<?xml version="1.0" encoding="UTF-8"?>
<beans xmlns="http://www.springframework.org/schema/beans"
       xmlns:xsi="http://www.w3.org/2001/XMLSchema-instance"
       xsi:schemaLocation="http://www.springframework.org/schema/beans
  http://www.springframework.org/schema/beans/spring-beans.xsd">
<bean></bean>
</beans>

注:
1.在使用c命名或者p命名时需要加入以下xml约束:
  xmlns:c="http://www.springframework.org/schema/c"
  xmlns:p="http://www.springframework.org/schema/p"
2.在使用注解装配和aop时需要导入以下xml约束:
<beans xmlns="http://www.springframework.org/schema/beans"
xmlns:xsi="http://www.w3.org/2001/XMLSchema-instance"
xmlns:context="http://www.springframework.org/schema/context"
xmlns:aop="http://www.springframework.org/schema/aop"
xsi:schemaLocation="http://www.springframework.org/schema/beans
http://www.springframework.org/schema/beans/spring-beans.xsd
http://www.springframework.org/schema/context
http://www.springframework.org/schema/context/spring-context.xsd
http://www.springframework.org/schema/aop
http://www.springframework.org/schema/aop/spring-aop.xsd">
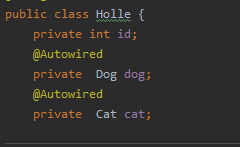
3.使用注解装配的步骤:
(1)导入xml约束
(2)在xml中开启注解 :<context:annotation-config/>
(3)编写<bean id= class=>(id必须与装配的字段,与Autowire="byName" 用法一样)

(4)为需要自动装配的字段添加@Autowired 注解
测试:
ApplicationContext context = new ClassPathXmlApplicationContext("beans.xml");
UserService userService =(UserService) context.getBean(UserService.class);//调用无参的构造方法创建对象,可用类的反射 亦可用文件xml中的id属性
ApplicationContext context = new AnnotationConfigApplicationContext(javaConfig.class);//使用javaConfig文件配置
Holle holle = (Holle) context.getBean("getHolle");//这里不能用反射进行配置
♥AOP(面向切面):
maven仓库:
<dependency>
    <groupId>org.aspectj</groupId>
    <artifactId>aspectjweaver</artifactId>
    <version>1.9.4</version>
</dependency>

xml文件配置:
使用Spring API原生接口配置(方式一):
<bean id="befor" class="com.wang.log.Befor"/>
<aop:config>
    <aop:pointcut id="before" expression="execution(* com.wang.service.UserServiceImpl.*(..))"/>
    <aop:advisor advice-ref="befor" pointcut-ref="before"/>
</aop:config>
使用自定义类配置(方式二):
    <bean id="diy" class="com.wang.log.diy"/>
<aop:config>
    <aop:aspect ref="diy">
        <aop:pointcut id="cut" expression="execution(* com.wang.service.UserServiceImpl.*(..))"/>
        <aop:before method="aaa" pointcut-ref="cut"/>
        <aop:after method="bbb" pointcut-ref="cut"/>
    </aop:aspect>
</aop:config>

♥声明式事务(通过aop实现,只要在beans.xml文件中配置即可无需改动源代码):
1.配置声明式事务管理器:
<bean id="transcationManager" class="org.springframework.jdbc.datasource.DataSourceTransactionManager">
    <property name="dataSource" ref="dataSource"></property>
</bean>

2.配置事务通知(需要添加约束):
<tx:advice id="txAdvice" transaction-manager="transcationManager">
    <tx:attributes>
        <tx:method name="*" propagation="REQUIRED" />
    </tx:attributes>
</tx:advice>

3.配置事务切入(aop):
<aop:config>
    <aop:pointcut id="pointcut" expression="execution(* com.wang.dao.*.*(..))"/>
    <aop:advisor advice-ref="txAdvice" pointcut-ref="pointcut"/>
</aop:config>
SpringMVC
maven 仓库:
<dependencies>
<dependency>
    <groupId>javax.servlet</groupId>
    <artifactId>javax.servlet-api</artifactId>
    <version>4.0.1</version>
    <scope>compile</scope>
</dependency>

<dependency>
    <groupId>javax.servlet.jsp</groupId>
    <artifactId>jsp-api</artifactId>
    <version>2.1</version>
    <scope>provided</scope>
</dependency>

<dependency>
    <groupId>org.springframework</groupId>
    <artifactId>spring-webmvc</artifactId>
    <version>5.2.0.RELEASE</version>
</dependency>

<dependency>
    <groupId>javax.servlet.jsp.jstl</groupId>
    <artifactId>jstl-api</artifactId>
    <version>1.2</version>
</dependency>
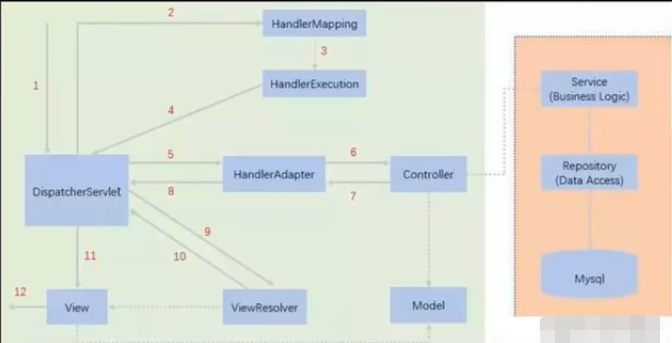
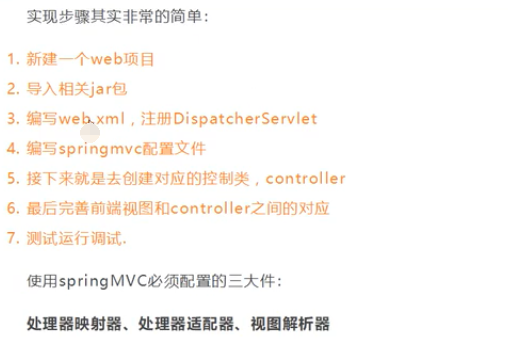
♥配置SpringMVC步骤(不使用注解):
1.配置Web.xml文件(版本必须最新):
<?xml version="1.0" encoding="UTF-8"?>
<web-app xmlns="http://xmlns.jcp.org/xml/ns/javaee"
         xmlns:xsi="http://www.w3.org/2001/XMLSchema-instance"
         xsi:schemaLocation="http://xmlns.jcp.org/xml/ns/javaee http://xmlns.jcp.org/xml/ns/javaee/web-app_4_0.xsd"
         version="4.0">
    <servlet>
        <servlet-name>springmvc</servlet-name>
        <servlet-class>org.springframework.web.servlet.DispatcherServlet</servlet-class>
        <init-param>
            <param-name>contextConfigLocation</param-name>
            <param-value>classpath:springmvc-servlet.xml</param-value>
        </init-param>
        <load-on-startup>1</load-on-startup>
    </servlet>
    <servlet-mapping>
        <servlet-name>springmvc</servlet-name>
        <url-pattern>/</url-pattern>
    </servlet-mapping>

    <!--处理乱码问题-->
    <filter>
        <filter-name>encoding</filter-name>
        <filter-class>org.springframework.web.filter.CharacterEncodingFilter</filter-class>
        <init-param>
            <param-name>encoding</param-name>
            <param-value>UTF-8</param-value>
        </init-param>
    </filter>
    <filter-mapping>
        <filter-name>encoding</filter-name>
        <url-pattern>/*</url-pattern>
    </filter-mapping>
</web-app>
注:在servl-mapping中的url中不能加*,否则会404!!
上述处理Post方法请求乱码问题,但是对于Get方法可能不起效,具体处理get方法请求问题解决:
改一下tomcat的server.xml文件,找到70行左右这几句话
<Connector port="8080"
           protocol="HTTP/1.1"
           connectionTimeout="20000"
           redirectPort="8443" />
修改为:
<Connector port="8080"
           protocol="HTTP/1.1"
           connectionTimeout="20000"
           redirectPort="8443"
           URIEncoding="UTF-8"/>
2.配置springmvc-servlet.xml文件:
<?xml version="1.0" encoding="UTF-8"?>
<beans xmlns="http://www.springframework.org/schema/beans"
       xmlns:xsi="http://www.w3.org/2001/XMLSchema-instance"
       xsi:schemaLocation="http://www.springframework.org/schema/beans
  http://www.springframework.org/schema/beans/spring-beans.xsd">
<!--    处理器映射器-->
    <bean class="org.springframework.web.servlet.handler.BeanNameUrlHandlerMapping"/>
<!--    处理器适配器-->
    <bean class="org.springframework.web.servlet.mvc.SimpleControllerHandlerAdapter"/>
<!--    视图解析器-->
    <bean class="org.springframework.web.servlet.view.InternalResourceViewResolver">
        <property name="prefix" value="/"/>
        <property name="suffix" value=".jsp"/>
    </bean>
<!--    Handler-->
    <bean id="/hello" class="com.wang.controller.Controller"/>
</beans>

3.Conrtoller文件,实现Controller接口(返回mv):
ModelAndView mv = new ModelAndView();
mv.addObject("msg","hello!!");
mv.setViewName("hello");
return mv;

♥使用注解配置SpringMVC步骤:
1.web.xml文档(如上)
2.springmvc-servlet.xml文档(启用注解,扫描包,处理器映射器和处理器适配器则被注解代替可以删除!):
<!--    自动装配-->
    <context:annotation-config/>
<!--    扫描包 省略<bean id="" class="" > -->
    <context:component-scan base-package="com.wang"/>
<!--    过滤静态资源,-->
    <mvc:default-servlet-handler/>
<!--    替代处理器映射器和适配器,使用注解-->
    <mvc:annotation-driven/>
<!--    视图解析器-->
    <bean class="org.springframework.web.servlet.view.InternalResourceViewResolver">
        <property name="prefix" value="/jsp/"/>
        <property name="suffix" value=".jsp"/>
    </bean>

3.Controller文件:
@Controller//组件,表明该类为Controller层
public class Controller02 {

    @RequestMapping("/hello1")//解释:该注解的参数即为原来bean中的id,方法的返回值为原来mv.setViewName("hello")即转向页面!
    public String hello(Model model){
        model.addAttribute("msg","lalala");
        return  "hello";
    }
    @RequestMapping("/hello2")
    public String hello(Model model){
        model.addAttribute("msg","lalala");
        return  "hello";
    }
}
Mybatis
<dependency>
    <groupId>mysql</groupId>
    <artifactId>mysql-connector-java</artifactId>
    <version>5.1.46</version>
</dependency>
<dependency>
    <groupId>org.mybatis</groupId>
    <artifactId>mybatis</artifactId>
    <version>3.5.2</version>
</dependency>
<dependency>
    <groupId>junit</groupId>
    <artifactId>junit</artifactId>
    <version>4.12</version>
    <scope>test</scope>
</dependency>
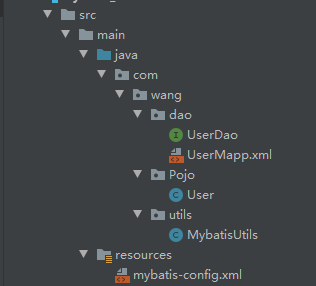
1.首先编写 Mabatis工具类:
package com.wang.utils;

import org.apache.ibatis.io.Resources;
import org.apache.ibatis.session.SqlSession;
import org.apache.ibatis.session.SqlSessionFactory;
import org.apache.ibatis.session.SqlSessionFactoryBuilder;
import java.io.InputStream;

public class MybatisUtils {
    private static  SqlSessionFactory sqlSessionFactory;
    static {
        try {
            String resource="mybatis-config.xml";
            InputStream is = Resources.getResourceAsStream(resource);
            sqlSessionFactory=new SqlSessionFactoryBuilder().build(is);
        } catch (Exception e) {
            e.printStackTrace();
        }
    }
    public  static SqlSession getSqlSession(){
        return  sqlSessionFactory.openSession();
    }
}
在其中准备连接数据库所需资源(mybatis-config.xml):
<?xml version="1.0" encoding="UTF-8"?>
<!DOCTYPE configuration
PUBLIC "-//mybatis.org//DTD Config 3.0//EN"
"http://mybatis.org/dtd/mybatis-3-config.dtd">
<configuration>
<environments default="development">
<environment id="development">
<transactionManager type="JDBC"/>
<dataSource type="POOLED">
<property name="driver" value="com.mysql.jdbc.Driver" />
<property name="url"
value="jdbc:mysql://localhost:3306/wang?useUnicode=true&characterEncoding=UTF-8&useSSL=true" />
<property name="username" value="root" />
<property name="password" value="123456" />
</dataSource>
</environment>
</environments>
    <mappers>
        <mapper resource="com/wang/dao/UserMapp.xml"></mapper>
    </mappers>
</configuration>
注:在mybatis-config.xml文件中 需要与第二步中的Mapp建立联系,格式如下:
<mappers>
<mapper resource="com/wang/dao/UserMapp.xml"></mapper>
</mappers>
2.编写Dao中文件:(Dao接口,Mapp.xml)
Dao接口文件:可以在已添加接口
package com.wang.dao;

import com.wang.Pojo.User;
import java.util.List;
public interface UserDao {
 List<User> getUser();//查
@Insert("insert into user(u_id,u_name,u_sex) value(#{id},#{name},#{password})")
int  insertUser(user user);//增
@Delete(" delete  from user where u_id=#{idd}")
int  deleteUser( @Param("idd") int id);//删
int  updatetUser(Map<String,Object> map);//改

}
注:可以直接使用注解配置SQL文,@Param但是绑定接口如下:
<mappers>
    <mapper class="com.wang.dao.UserDao"></mapper>
</mappers>
Mapp.xml文件:
<?xml version="1.0" encoding="UTF-8" ?>
<!DOCTYPE mapper PUBLIC "-//mybatis.org//DTD Mapper 3.0//EN"
"http://mybatis.org/dtd/mybatis-3-mapper.dtd">

<mapper namespace="com.wang.dao.UserDao">
    <select id="getUser"  resultType="com.wang.Pojo.User">
        SELECT * FROM user
    </select>
<insert id="insertUser" parameterType="com.wang.Pojo.User" >
    insert into user(id,name,email) value (#{id},#{name} ,#{email})
</insert>
<update id="updatetUser" parameterType="map" >
    update user set name=#{name},email=#{email}  where id=#{id}
</update>
<delete id="deleteUser" parameterType="String">
    delete  from user where id=#{id}
</delete>


</mapper>
注:其中nameSpace是Dao接口的文件
       id为Dao接口中的方法
       resultType为返回结果的类型


3.编写主程序:
//第一步,用工具类获取sqlSession。
SqlSession sqlSession = MybatisUtils.getSqlSession();
//第二步,获取Dao对象
UserDao userDao = sqlSession.getMapper(UserDao.class);
//第三步,通过Dao对象调用其中的方法,返回集合
//        int num = userDao.insertUser(new User("09", "haha", "999"));
//        int num = userDao.updatetUser(new User("09", "lalala", "888"));
//        int num = userDao.deleteUser("09");
//        List<User> list = userDao.getUser();
//        for(User u:list){
//            System.out.println(u.toString());
//        }
 sqlSession.commit();//除查询之外,其他操作必须要有事务提交,否则不会更新表
sqlSession.close();//关闭资源
声明:(Mapp.xml导出资源问题):需要在pom.xml文件添加以下代码:
<build>
    <resources>
        <resource>
            <directory>src/main/resources</directory>
            <includes>
                <include>**/*.properties</include>
                <include>**/*.xml</include>
            </includes>
            <filtering>true</filtering>
        </resource>

        <resource>
            <directory>src/main/java</directory>
            <includes>
                <include>**/*.properties</include>
                <include>**/*.xml</include>
            </includes>
            <filtering>true</filtering>
        </resource>
    </resources>
</build>
♥.Mybstis与Spring整合:
 maven仓库:
<dependency>
    <groupId>org.springframework</groupId>
    <artifactId>spring-jdbc</artifactId>
    <version>5.1.9.RELEASE</version>
</dependency>

<dependency>
    <groupId>org.mybatis</groupId>
    <artifactId>mybatis-spring</artifactId>
    <version>2.0.2</version>
</dependency>
步骤:
1.编写mybatis-config.xml和bean.xml文件:
mybatis-config.xml:
<?xml version="1.0" encoding="UTF-8"?>
<!DOCTYPE configuration
        PUBLIC "-//mybatis.org//DTD Config 3.0//EN"
        "http://mybatis.org/dtd/mybatis-3-config.dtd">
<configuration>
    <typeAliases>
        <typeAlias type="com.wang.Pojo.stu" alias="stu"/>
    </typeAliases>
</configuration>
注: 改文件下 只写别名 和设置

bean.xml文件:
<?xml version="1.0" encoding="UTF-8"?>
<beans xmlns="http://www.springframework.org/schema/beans"
xmlns:xsi="http://www.w3.org/2001/XMLSchema-instance"
xsi:schemaLocation="http://www.springframework.org/schema/beans
http://www.springframework.org/schema/beans/spring-beans.xsd">
<bean id="dataSource" class="org.springframework.jdbc.datasource.DriverManagerDataSource">
<property name="driverClassName" value="com.mysql.jdbc.Driver"/>
<property name="url" value="jdbc:mysql://localhost:3306/wang?useUnicode=true&characterEncoding=UTF-8&useSSL=true"/>
<property name="username" value="root"/>
<property name="password" value="123456"/>
</bean>
<!-- 配置Mybatis-config.xml和MapperImpl.xml文件-->
<bean id="sqlSessionFactory" class="org.mybatis.spring.SqlSessionFactoryBean">
<property name="dataSource" ref="dataSource"/>
<property name="configLocation" value="classpath:mybatis-config.xml"/>
<property name="mapperLocations" value="classpath:com/wang/dao/*.xml"/>
</bean>
<bean id="sqlSession" class="org.mybatis.spring.SqlSessionTemplate">
<constructor-arg index="0" ref="sqlSessionFactory"/>
</bean>
<!--装配MapperImpl文件-->
<bean id="userMapperImpl" class="com.wang.dao.UserMapperImpl">
<property name="sqlSession" ref="sqlSession"/>
</bean>
</beans>

注:改文件下文字删除,否则会出错
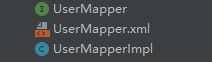
2.编写MapperImpl,Mapper,Mapper.xml三个文件:
其中MappImpl,Mapper.xml文件规范如上(不改变),主要是MapperImpl文件:
private SqlSessionTemplate sqlSession;
public void setSqlSession(SqlSessionTemplate sqlSession) {
    this.sqlSession = sqlSession;
}
//实现接口,获取返回查询结果
public List getUser() {
    UserMapper mapper = sqlSession.getMapper(UserMapper.class);
    List user = mapper.getUser();
    return user;
}
3.测试:
ApplicationContext context = new ClassPathXmlApplicationContext("beans.xml");
UserMapper userMapper = (UserMapper) context.getBean("userMapperImpl");
List<stu> user = userMapper.getUser();
整合mybatis-spring方式二:
在方式一的基础上修改 MapperImpl 和beans.xml文件

MapperImpl文件:不用创建SqlSessionTemplate属性,
而是继承SqlSessionDaoSupport,进而使用父类中的getSqlSession()方法获得SqlSession:
public List getUser() {
    SqlSession sqlSession = getSqlSession();
    UserMapper mapper = sqlSession.getMapper(UserMapper.class);
    List user = mapper.getUser();
    return user;
}
beans.xml文件:装配MapperImpl文件时省略SqlSessionTamplate,直接配置sqlSessionFactory属性
<bean id="userMapperImpl2" class="com.wang.dao.UserMapperImpl2">
    <property name="sqlSessionFactory" ref="sqlSessionFactory"/>
</bean>
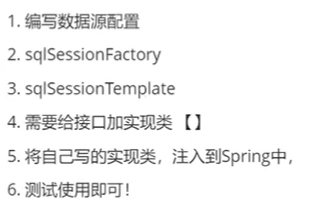
♥整合SSM(三者整合)
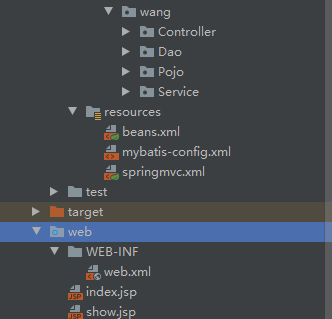
整合时主要文件:dao层,service层,controller层,pojo类,mybatis-config.xml,beans.xml,springmvc.xml,web.xml
步骤:
1.首先建立三层文件,并且编写内容
  其中dao层:MapperImpl文件:有两种实现,在Spring-Mybatis整合中详见!
  service层:调用dao层,可以处理事务等!
  其中controller层(使用注解自动装配,自动注入):
2.编写beans.xml,mybatis-config.xml文件
  其中mybatis-config.xml可有可无,并且只配置别名和setting。
  主要是beans.xml(包括spring.xml和springmvc.xml):
   springmvc.xml:开启注解,扫描包,视图解析器
   重中之重是beans.xml:
<?xml version="1.0" encoding="UTF-8"?>
<beans xmlns="http://www.springframework.org/schema/beans"
xmlns:xsi="http://www.w3.org/2001/XMLSchema-instance"
xsi:schemaLocation="http://www.springframework.org/schema/beans
http://www.springframework.org/schema/beans/spring-beans.xsd">
<import resource="springmvc.xml"/>
<bean id="dataSource" class="org.springframework.jdbc.datasource.DriverManagerDataSource">
<property name="driverClassName" value="com.mysql.jdbc.Driver"/>
<property name="url" value="jdbc:mysql://localhost:3306/wang?useUnicode=true&characterEncoding=UTF-8&useSSL=true"/>
<property name="username" value="root"/>
<property name="password" value="123456"/>
</bean>
<bean id="sqlSessionFactory" class="org.mybatis.spring.SqlSessionFactoryBean">
<property name="dataSource" ref="dataSource"/>
<property name="configLocation" value="classpath:mybatis-config.xml"/>
<property name="mapperLocations" value="classpath:com/wang/Dao/*.xml"/>
</bean>
<!--注入Mapper,让接口也可以注入-->
<bean class="org.mybatis.spring.mapper.MapperScannerConfigurer">
<property name="sqlSessionFactoryBeanName" value="sqlSessionFactory"/>
<property name="basePackage" value="com.wang.Dao"/>
</bean>
<!--注入service-->
<bean id="ServiceImpl" class="com.wang.Service.ServiceImpl">
<property name="mapper" ref="mapper"/>
</bean>
</beans>
3.Controller层:
@org.springframework.stereotype.Controller
public class Controller {
    @Autowired
    @Qualifier("ServiceImpl")
    private Service service;
@RequestMapping("getStu")
    public  String getStu(Model model){
        List<Stu> stu = service.getStu();
        model.addAttribute("stu",stu);
        return "show";
    }
}

 浙公网安备 33010602011771号