Android 组件化架构
Android 组件化架构
1、组件化优势
- 编译块
- 模块之间耦合度降低
- 提高代码复用率
- 提高开发效率
2、组件结构
(该结构基于我 demo 仅供参考)
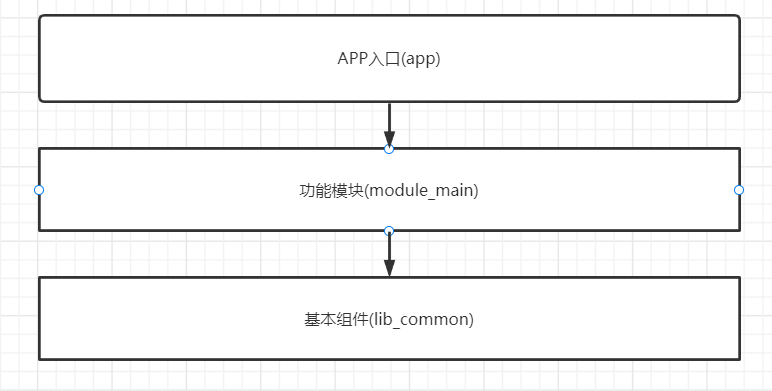
2.1、基本组件
基础模块,封装基本View,第三方SDK,网络访问框架等
2.2、功能模块
利用基础模块实现业务功能
2.3、App入口
配置全局 Application 和 主Activity,不包含业务代码
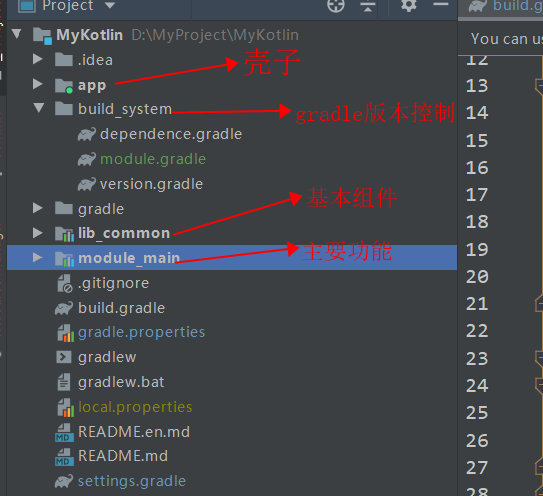
2.4、项目结构
3、配置信息
首先需要在 gradle.properties 中添加一个变量,标识当前产物类型
//当isModule 为 true 时,当前产物为集成产物
isModule = true
随后在每个module 中配置 build.gradle 文件
-
配置壳子 build.gradle
plugins { id 'com.android.application' id 'androidx.navigation.safeargs' id 'kotlin-android' id 'kotlin-kapt' } android { ... } dependencies { //当isModule 为 true 时,当前产物为集成产物 if(isModule.toBoolean()){ //导入业务功能模块 api project(":module_main") } } -
配置壳子 AndroidManifest.xml 文件
保留基本配置信息
<?xml version="1.0" encoding="utf-8"?> <manifest xmlns:android="http://schemas.android.com/apk/res/android" package="com.gwm.app.mykotlin"> <application android:allowBackup="true" android:label="@string/app_name" android:supportsRtl="true"> </application> </manifest> -
配置 公共库 module 的 build.gradle
plugins{ //由于公共库不会作为独立应用出现 //所以这里可以写死 为 library id 'com.android.library' id 'kotlin-android' }-
配置公共库的 AndroidManifest.xml
<?xml version="1.0" encoding="utf-8"?>
<manifest xmlns:android="http://schemas.android.com/apk/res/android"
    package="com.gwm.app.lib.common">

    <application
        android:allowBackup="true"
        android:supportsRtl="true" />

</manifest>
-
-
配置 业务功能模块的 build.gradle
if(isModule.toBoolean()){
    //构建后输出一个 APK 安装包
    apply plugin: 'com.android.application'
    apply plugin: 'kotlin-android'
    apply plugin: 'kotlin-kapt'
}else{
    //构建后输出 ARR 包
    apply plugin: 'com.android.library'
    apply plugin: 'kotlin-android'
    apply plugin: 'kotlin-kapt'
}
android {
    sourceSets {
        main {
            if (isModule.toBoolean()) {
                //独立调试
                manifest.srcFile 'src/main/debug/AndroidManifest.xml'
            } else {
                //集成调试
                manifest.srcFile 'src/main/AndroidManifest.xml'
            }
        }
    }
}
dependencies {
    //导入基本组件module
    api project(':lib_common')
}
-
配置业务模块 AndroidManifest.xml
配置应用入口Activity
<?xml version="1.0" encoding="utf-8"?>
<manifest xmlns:android="http://schemas.android.com/apk/res/android"
    package="com.gwm.app.module.main">

    <application
        android:allowBackup="true"
        android:icon="@mipmap/ic_launcher"
        android:label="@string/app_name"
        android:roundIcon="@mipmap/ic_launcher_round"
        android:supportsRtl="true"
        android:theme="@style/Theme.MyKotlin" >
        <activity android:name=".MainActivity" >
            <intent-filter>
                <action android:name="android.intent.action.MAIN" />
                <category android:name="android.intent.category.LAUNCHER" />
            </intent-filter>
        </activity>
    </application>


</manifest>
4、使用
-
直接跳转
目前跳转只限于跳转到Activity,Fragment 之间的跳转暂未实现
//目的Activity
@Route(path = "/main/SecondActivity")
class SecondActivity: BaseActivity() {}
//跳转方式 ARouter.getInstance().build("/main/SecondActivity").navigation() -
携带参数
//跳转方式
ARouter.getInstance().build("/main/SecondActivity")
                    .withString("key", "value")
                    .withBundle("key1", bundle)
                    .navigation()
接收方
//目的Activity
@Route(path = "/main/SecondActivity")
class SecondActivity: BaseActivity() {
	@Autowried
    var key: String? = null
    @Autowried
   var key1: String? = null
    @Autowried
    var bundle: Bundle? = null
    override fun onCreate(savedInstanceState: Bundle?) {
        super.onCreate(savedInstanceState)
        ARouter.getInstance().inject(this)
        Log.e("TAG", "key = $key, key1 = $key1")
    }
}
引用:Android 手把手带你搭建一个组件化项目架构 - 掘金 (juejin.cn)

 浙公网安备 33010602011771号