模板匹配
1. 模板匹配步骤
模板匹配是一种基于图像的技术,用于在图像中寻找与给定模板图像相似的部分。由于模板图像的尺寸小于待匹配图像的尺寸,同时又需要比较两幅图像的每一个像素的灰度值,因此常采用在待匹配图像中选择与模板相同的尺寸的滑动窗口,通过比较滑动窗口与模板的相似程度,判断待匹配图像中是否含有与模板图像相同的内容。
以下是模板匹配的基本步骤:
-
准备模板和目标图像:首先,需要准备一个模板图像(即要在目标图像中寻找的图案)和一个目标图像(即待搜索的图像)。
-
选择匹配方法:选择适当的匹配方法来度量模板和图像局部区域之间的相似度。常用的匹配方法包括平方差匹配、归一化平方差匹配、相关系数匹配等。
-
滑动模板:在目标图像上滑动模板,并在每个位置上应用所选的匹配方法计算相似度得分。
-
找到最佳匹配位置:根据相似度得分找到目标图像中与模板最匹配的位置。
-
绘制结果:可选的步骤,可以将最佳匹配位置标记在目标图像上,并进行可视化展示。
2. 常见的模板匹配方法
opencv中的标志参数与方法名称如下:
|
标志参数
|
简记 | 方法名称 |
| TM_SQDIFF | 0 | 平方差匹配法 |
| TM_SQDIFF_NORMED | 1 | 归一化平方差匹配法 |
| TM_CCORR | 2 | 相关匹配法 |
| TM_CCORR_NORMED | 3 | 归一化相关匹配法 |
| TM_CCOEFF | 4 | 系数匹配法 |
| TM_CCOEFF_NORMED | 5 | 归一化相关系数匹配法 |
3. 公式及其说明
T表示模板图像,I表示原始图像。
TM_SQDIFF:平方差匹配法,公式如下:

计算了图像中每个位置的像素值与模板对应位置的像素值之间的差的平方,并对所有差值求和。值越小表示匹配程度越高。值为0时,表示完全匹配。
TM_SQDIFF_NORMED:归一化平方差匹配法,公式如下:

将平方差方法进行归一化,使得输入结果归一化到0~1,当模板与华东窗口完全匹配时,计算值为0.
TM_CCORR:相关匹配法,公式如下:

采用模板和图像间的乘法操作,值越大,匹配效果越好,0表示最坏匹配结果。
TM_CCORR_NORMED:归一化相关匹配法,公式如下:

结果为0~1范围,完全匹配时,值为1,完全不匹配时,值为0.
TM_CCOEFF:系数匹配法,公式如下:

其中,

这种方法是将相关匹配法对模板减去均值的结果和原始图像减去均值的结果进行匹配,可以很好的解决模板图像和原始图像之间由于亮度不同而产生的影响。值可以为负数,值越大匹配越好,越小,匹配越差。
TM_CCOEFF_NORMED:归一化相关系数匹配法,公式如下:

值为-1~1,为1时表示完全匹配,为-1时,表示完全不匹配。TM_CCOEFF_NORMED也是用得最常用的一种方法。
4. python代码示例
原图如下:
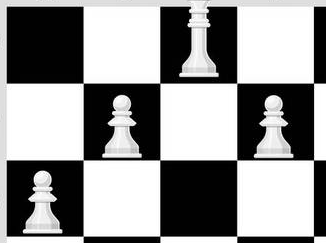
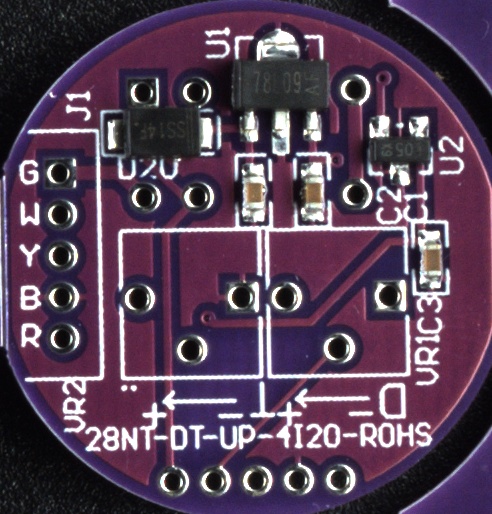
模板图如下(是从上图中裁剪下来的最右边的那个格子。)

现在使用模板匹配TM_CCOEFF_NORMED方法寻找最优的匹配位置。
import cv2
import numpy as np

# 读取原始图像和模板图像
original_image = cv2.imread(r'example.png', 1)
gray_image=cv2.cvtColor(original_image,cv2.COLOR_BGR2GRAY)
template = cv2.imread(r'template.png', 0)#模板图以灰度读取
template_height, template_width = template.shape[:2]# 获得模板图像的高度和宽度
result = cv2.matchTemplate(gray_image, template, cv2.TM_CCOEFF_NORMED)# 使用 TM_CCOEFF_NORMED 方法进行模板匹配
threshold = 0.85# 设置匹配阈值,这里设定为0.85
locations = np.where(result >= threshold)# 获取匹配结果大于阈值的位置
#获取最优
best_score = -np.inf
best_loc = None
for loc in zip(*locations[::-1]):
    score = result[loc[1], loc[0]]  # loc[1] 对应行坐标,loc[0] 对应列坐标
    if score > best_score:
        best_score = score
        best_loc = loc

print("Best score:", best_score)#0.99999994
print("Best location:", best_loc)# (237, 83)左上角x,y
if best_loc is not None:
    bottom_right = (best_loc[0] + template_width, best_loc[1] + template_height)
    cv2.rectangle(original_image, best_loc, bottom_right, (0,255,0), 1)#1表示绘制线条的宽度
    cv2.imwrite('./test.png',original_image)
匹配结果保存的图如下:

获取全部满足阈值的代码及匹配结果如下:
import cv2
import numpy as np

original_image = cv2.imread(r'example.png', 1)
gray_image=cv2.cvtColor(original_image,cv2.COLOR_BGR2GRAY)
template = cv2.imread(r'template.png', 0)
template_height, template_width = template.shape[:2]# 获得模板图像的高度和宽度
result = cv2.matchTemplate(gray_image, template, cv2.TM_CCOEFF_NORMED)# 使用 TM_CCOEFF_NORMED 方法进行模板匹配
threshold = 0.85# 设置匹配阈值,这里设定为0.85
locations = np.where(result >= threshold)# 获取匹配结果大于阈值的位置
for loc in zip(*locations[::-1]):# 在原始图像中标记匹配的位置
    bottom_right = (loc[0] + template_width, loc[1] + template_height)
    cv2.rectangle(original_image, loc, bottom_right, (0,255,0), 1)
cv2.imwrite('./test.png',original_image)

仔细观察,发现这个图比上面的获得最优位置的匹配图绘制的绿色矩形框的线条变粗了,这是因为匹配过程中,满足阈值的匹配结果很多,也就是说图中并不只是三个位置匹配到了,对于同一个位置,匹配的多个结果矩形框之间位置挨得很近,所以绘制绿色矩形框就呈现粗的现象。实际上在for循环中打印loc就知道绘制了多少次了。
5.补充关于匹配区域重叠问题
上面说的,同一个地方绿色框绘制了很多,其实就是每个框挨的很近,这里给出增加NMS功能的封装后的代码,前面的可以不用看了,直接调用这里的就可以了。
import cv2
import numpy as np


def nms(boxes, scores, iou_threshold=0.8):
    """
    非极大值抑制 (NMS)

    参数:
        boxes: 矩形框列表,每个框为 [x1, y1, x2, y2]
        scores: 对应的置信度分数
        iou_threshold: IoU阈值,超过此阈值的框会被抑制

    返回:
        保留的框的索引列表
    """
    if len(boxes) == 0:
        return []

    # 将boxes转换为numpy数组
    boxes = np.array(boxes)
    scores = np.array(scores)

    # 获取所有框的坐标
    x1 = boxes[:, 0]
    y1 = boxes[:, 1]
    x2 = boxes[:, 2]
    y2 = boxes[:, 3]

    # 计算每个框的面积
    areas = (x2 - x1 + 1) * (y2 - y1 + 1)

    # 按置信度分数降序排序
    order = scores.argsort()[::-1]

    keep = []  # 保留的框索引

    while len(order) > 0:
        # 取当前置信度最高的框
        i = order[0]
        keep.append(i)

        # 如果只剩下一个框,结束循环
        if len(order) == 1:
            break

        # 计算当前框与其他框的交集坐标
        xx1 = np.maximum(x1[i], x1[order[1:]])
        yy1 = np.maximum(y1[i], y1[order[1:]])
        xx2 = np.minimum(x2[i], x2[order[1:]])
        yy2 = np.minimum(y2[i], y2[order[1:]])

        # 计算交集区域的宽和高
        w = np.maximum(0.0, xx2 - xx1 + 1)
        h = np.maximum(0.0, yy2 - yy1 + 1)

        # 计算交集面积
        intersection = w * h

        # 计算IoU
        iou = intersection / (areas[i] + areas[order[1:]] - intersection)

        # 保留IoU小于阈值的框
        inds = np.where(iou <= iou_threshold)[0]
        order = order[inds + 1]  # +1是因为inds相对于order[1:]的索引

    return keep


def template_match_with_nms(template_img, target_img,
                            match_method=cv2.TM_CCOEFF_NORMED,
                            threshold=0.4, iou_threshold=0.8,
                            ):
    """
    使用模板匹配并进行NMS过滤

    参数:
        template_img: 模板图像路径或numpy数组 (灰度图)
        target_img: 目标图像路径或numpy数组 (灰度图或BGR图)
        match_method: 匹配方法,默认cv2.TM_CCOEFF_NORMED
        threshold: 匹配阈值,默认0.4
        iou_threshold: NMS的IoU阈值,默认0.8
        min_score: 最小置信度分数,默认0.0

    返回:
        rectangles: 矩形列表,每个矩形为 [x, y, w, h, score]
                    (左上角x, 左上角y, 宽度, 高度, 置信度)
    """
    # 1. 读取图像
    if isinstance(template_img, str):
        template = cv2.imread(template_img, 0)  # 以灰度图读取
    else:
        template = cv2.cvtColor(template_img, cv2.COLOR_BGR2GRAY) if len(template_img.shape) == 3 else template_img

    if isinstance(target_img, str):
        target = cv2.imread(target_img, 0)  # 以灰度图读取
        target_color = cv2.imread(target_img, 1)  # 保留彩色用于可视化
    else:
        target = cv2.cvtColor(target_img, cv2.COLOR_BGR2GRAY) if len(target_img.shape) == 3 else target_img
        target_color = target_img.copy() if len(target_img.shape) == 3 else cv2.cvtColor(target_img, cv2.COLOR_GRAY2BGR)

    # 检查图像是否成功读取
    if template is None:
        raise ValueError(f"无法读取模板图像: {template_img}")
    if target is None:
        raise ValueError(f"无法读取目标图像: {target_img}")

    # 2. 获取模板尺寸
    template_height, template_width = template.shape[:2]

    # 3. 模板匹配
    result = cv2.matchTemplate(target, template, match_method)

    # 4. 获取匹配结果大于阈值的位置
    locations = np.where(result >= threshold)

    # 如果没有检测到框,返回空列表
    if len(locations[0]) == 0:
        print(f"阈值 {threshold} 下未检测到任何匹配区域")
        return []

    print(f"匹配阈值 {threshold} 下检测到 {len(locations[0])} 个候选框")

    # 5. 收集所有检测框和对应的置信度
    boxes = []  # 存储 [x1, y1, x2, y2]
    scores = []  # 存储置信度分数
    rectangles = []  # 存储 [x, y, w, h, score]

    for y, x in zip(locations[0], locations[1]):
        # 获取置信度分数
        score = result[y, x]

        # # 如果分数低于最小阈值,跳过
        # if score < min_score:
        #     continue

        # 构建矩形框 [x1, y1, x2, y2]
        x1 = x
        y1 = y
        x2 = x + template_width
        y2 = y + template_height

        boxes.append([x1, y1, x2, y2])
        scores.append(score)
        rectangles.append([x1, y1, template_width, template_height, score])

    # 如果没有满足条件的框,返回空列表
    if len(boxes) == 0:return []

    # 6. 应用NMS过滤重叠框
    print(f"应用NMS前有 {len(boxes)} 个框")
    keep_indices = nms(boxes, scores, iou_threshold)
    print(f"应用NMS后有 {len(keep_indices)} 个框")

    # 7. 根据NMS结果筛选矩形
    final_rectangles = [rectangles[i] for i in keep_indices]

    return final_rectangles


def draw_rectangles_on_image(image, rectangles, color=(0, 255, 0), thickness=2, show_score=True):
    """
    在图像上绘制矩形

    参数:
        image: 输入图像 (彩色)
        rectangles: 矩形列表,每个为 [x, y, w, h, score]
        color: 矩形颜色 (B, G, R)
        thickness: 线宽
        show_score: 是否显示置信度分数

    返回:
        绘制了矩形的图像
    """
    result = image.copy()

    for rect in rectangles:
        x, y, w, h, score = rect

        # 绘制矩形
        cv2.rectangle(result, (x, y), (x + w, y + h), color, thickness)

        # 如果需要显示分数
        if show_score:
            # 在矩形左上角显示置信度
            label = f"{score:.3f}"
            (label_width, label_height), baseline = cv2.getTextSize(
                label, cv2.FONT_HERSHEY_SIMPLEX, 0.5, 1
            )

            # 绘制标签背景
            cv2.rectangle(result,
                          (x, y - label_height - 5),
                          (x + label_width, y),
                          color, -1)

            # 绘制标签文字
            cv2.putText(result, label,
                        (x, y - 5),
                        cv2.FONT_HERSHEY_SIMPLEX, 0.5, (0, 0, 0), 1)

    return result


def visualize_results(template_path, target_path, output_path='result.png', **kwargs):
    """
    可视化模板匹配结果

    参数:
        template_path: 模板图像路径
        target_path: 目标图像路径
        output_path: 输出图像路径
        **kwargs: 传递给template_match_with_nms的参数
    """
    # 执行模板匹配
    rectangles = template_match_with_nms(template_path, target_path, **kwargs)

    # 读取彩色图像用于绘制
    target_color = cv2.imread(target_path, 1)

    # 绘制结果
    if len(rectangles) > 0:
        result_img = draw_rectangles_on_image(target_color, rectangles)

        # 保存结果
        cv2.imwrite(output_path, result_img)
        print(f"结果已保存到: {output_path}")

        # 显示结果
        cv2.imshow('Template Matching Result', result_img)
        cv2.waitKey(0)
        cv2.destroyAllWindows()

        # 打印检测到的矩形信息
        print(f"\n检测到的矩形 (x, y, w, h, score):")
        for i, rect in enumerate(rectangles):
            x, y, w, h, score = rect
            print(f"  矩形 {i + 1}: [{x}, {y}, {w}, {h}, {score:.4f}]")
    else:
        print("未检测到任何目标")

    return rectangles


def draw_rectangles_on_image(image, rectangles, color=(0, 255, 0), thickness=2, show_score=True):
    """
    在图像上绘制矩形
    """
    result = image.copy()

    for rect in rectangles:
        x, y, w, h, score = rect

        # 绘制矩形
        cv2.rectangle(result, (x, y), (x + w, y + h), color, thickness)

        # 显示分数
        if show_score:
            label = f"{score:.3f}"
            cv2.putText(result, label, (x, y - 5),cv2.FONT_HERSHEY_SIMPLEX, 0.5, color, 1)

    return result

# 使用示例
if __name__ == "__main__":
    # 示例1: 基本使用
    template_path = 'template/template.jpg'
    target_path = 'images/1.bmp'

    # # 执行模板匹配并获取矩形列表
    # rectangles = template_match_with_nms(
    #     template_path,
    #     target_path,
    #     threshold=0.4,
    #     iou_threshold=0.8,
    #     min_score=0.5
    # )
    #
    # print(f"\n最终检测到的矩形数量: {len(rectangles)}")
    # for i, rect in enumerate(rectangles):
    #     print(f"矩形 {i + 1}: x={rect[0]}, y={rect[1]}, w={rect[2]}, h={rect[3]}, score={rect[4]:.4f}")

    # 示例2: 可视化结果
    # visualize_results(template_path, target_path, 'result.png', threshold=0.4, iou_threshold=0.8)

    # 示例3: 直接使用图像数组
    template_img = cv2.imread('template/template.jpg', 0)
    target_img = cv2.imread('images/1.bmp', 1)
    rectangles = template_match_with_nms(template_img, target_img,threshold=0.4,iou_threshold=0.8) #[[x,y,w,h,score],......]
    print("rectangles",rectangles)


    print(f"\n最终检测到的矩形数量: {len(rectangles)}")
    for i, rect in enumerate(rectangles):
        print(f"矩形 {i + 1}: x={rect[0]}, y={rect[1]}, w={rect[2]}, h={rect[3]}, score={rect[4]:.4f}")

    result_image=draw_rectangles_on_image(target_img, rectangles, color=(0, 255, 0), thickness=1, show_score=True)
    cv2.imwrite('result.png', result_image)
模板图如下:
检测效果如下:
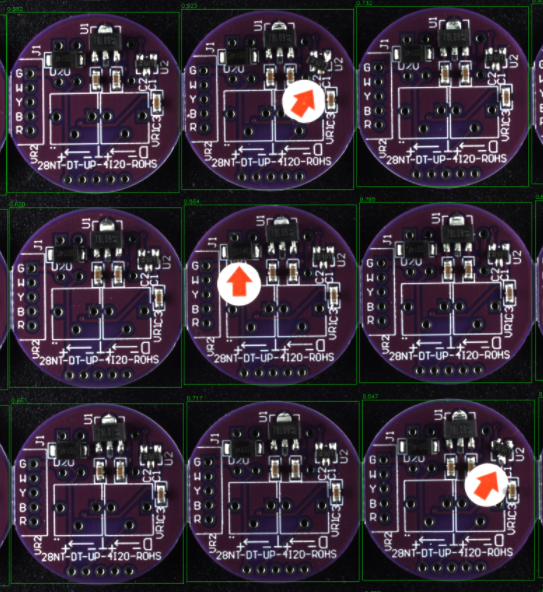
小结:如果匹配不需要那么严格,TM_CCOEFF_NORMED模板匹配可以通过调小阈值来达到要求,但是由于模板匹配是由公式计算来完成的,对于背景差异很大,尽管前景目标一致,也很难匹配到。就比如上图中如果这个棋子在图中白色格子也出现了,可能就匹配不到了。
若存在不足或错误之处,欢迎指出与评论,谢谢!

 浙公网安备 33010602011771号