

spring源码阅读笔记10:bean生命周期
前面的文章主要集中在分析Spring IOC容器部分的原理,这部分的核心逻辑是和bean创建及管理相关,对于单例bean的管理,从创建好到缓存起来再到销毁,其是有一个完整的生命周期,并且Spring也在整个bean的创建过程中提供了多处接口供使用者自己扩展,本文就来梳理一下Spring中的bean生命周期。
1. Spring 容器中 Bean 的生命周期
对于prototype作用域的Bean,Spring容器仅仅负责创建,当容器创建了Bean实例之后,Bean实例完全交给客户端代码管理,容器不再跟踪其生命周期。每次客户端请求prototype作用域的Bean时,Spring都会产生一个新的实例,Spring容器无法知道它曾经创造了多少个prototype作用域的Bean,也无从知道这些prototype作用域的Bean什么时候才会销毁。因此,Spring无法管理prototype作用域的Bean。
对于singleton作用域的Bean,每次客户端代码请求时,都返回同一个共享实例,客户端代码不能控制Bean的销毁,Spring容器负责跟踪Bean实例的产生、销毁。Spring容器可以在创建Bean之后,进行某些通用资源的申请;还可以在销毁Bean实例之前,先回收某些资源,比如数据库连接等。
先来看一下Spring Bean的完整生命周期,从创建Spring容器开始,直到最终Spring容器销毁Bean:
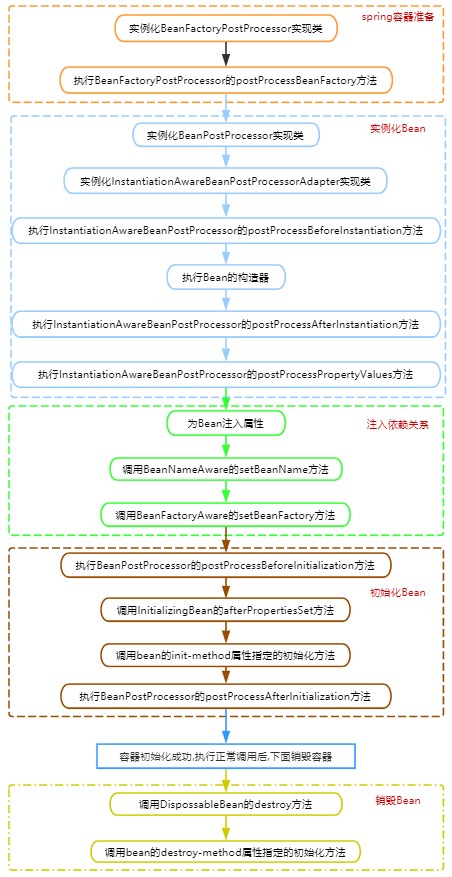
我们将Spring容器中Bean的生命周期级别分为四级,分别是:
- Bean自身方法;
- Bean级生命周期接口方法;
- 容器级生命周期接口方法;
- 工厂后处理器接口方法。
1.1 Bean自身方法
Bean自身的方法:调用构造函数实例化bean,调用setter设置属性,调用init-method,destroy-method。
1.2 Bean级生命周期接口方法
Bean级生命周期方法:如BeanNameAware,BeanFactoryAware,InitializingBean和DisposableBean,这些接口由bean直接实现。
1.3 容器级生命周期接口方法
容器级生命周期接口方法:有InstantiationAwareBeanPostProcessor和BeanPostProcessor这两个接口实现,一般称他们的实现类为后处理器。实现类独立于bean,以容器附加装置的形式注册到spring当中。当spring创建任何bean时,这些后处理器都会发生作用,所以后处理器的影响是全局性的。当然,用户可以通过合理的编写后处理器,让其仅对感兴趣的bean进行加工处理。
Bean级生命接口和容器级生命接口是个性和共性辩证统一思想的体现。前者解决bean的个性化处理的问题,后者解决容器中某些bean共性化处理的问题。
1.4 工厂后处理器接口方法
工厂级生命周期接口方法(BeanFactoryPostProcessor接口的实现类),可以对bean的定义(配置元数据)进行处理。也就是说,Spring IoC容器允许BeanFactoryPostProcessor在容器实际实例化任何其它的bean之前读取配置元数据,并有可能修改它。
2. bean生命周期演示示例
下面通过一个例子来实际体验一下bean的生命周期中的各个关键接口方法的调用。FruitStore类中定义了Bean自身方法以及Bean级生命周期方法:
public class FruitStore implements BeanNameAware, ApplicationContextAware, InitializingBean, DisposableBean{

    private String name;
    private String address;

    private ApplicationContext applicationContext;
    private String             beanName;

    public FruitStore() {
        System.out.println("[FruitStore]--构造器");
    }

    /** Bean自身方法 **/

    // 通过<bean>的init-method属性指定的初始化方法
    public void myInit() {
        System.out.println("[Bean自身方法] [init-method]  初始化方法...");
    }

    // 通过<bean>的destroy-method属性指定的初始化方法
    public void myDestory() {
        System.out.println("[Bean自身方法] [destroy-method]  销毁方法...");
    }

    public void sayHello() {
        System.out.println("[Bean自身方法]  sayHello...");
    }

    /** Bean级生命接口方法begin **/

    public void setName(String name) {
        this.name = name;
        System.out.println("[Bean级接口] [注入属性]  注入属性name...");
    }

    public void setAddress(String address) {
        this.address = address;
        System.out.println("[Bean级接口] [注入属性]  注入属性address...");
    }


    // DiposibleBean接口方法
    public void destroy() throws Exception {
        System.out.println("[Bean级接口]  销毁方法...");
    }

    // InitializingBean接口方法
    public void afterPropertiesSet() throws Exception {
        System.out.println("[Bean级接口] [InitializingBean接口]  初始化方法...");
    }

    // BeanFactoryAware接口方法
    public void setApplicationContext(ApplicationContext arg0) throws BeansException {
        this.applicationContext = arg0;
        System.out.println("[Bean级接口] [ApplicationContextAware接口]  注入Spring容器ApplicationContext...");
    }

    // BeanNameAware接口方法
    public void setBeanName(String name) {
        this.beanName = name;
        System.out.println("[Bean级接口] [BeanNameAware接口]  注入beanName...");
    }

    @Override
    public String toString() {
        return "FruitStore [name=" + name +
                ", address=" + address +
                ", applicationContext=" + applicationContext +
                ", beanName=" + beanName +
                "]";
    }
}
分别实现两种容器级接口,首先是InstantiationAwareBeanPostProcessor接口:
public class MyInstantiationAwareBeanPostProcessor extends InstantiationAwareBeanPostProcessorAdapter {

    public MyInstantiationAwareBeanPostProcessor() {
        super();
        System.out.println("[容器级接口] [InstantiationAwareBeanPostProcessor实现类]--构造器");
    }

    // 实例化Bean之前调用
    @Override
    public Object postProcessBeforeInstantiation(Class<?> beanClass, String beanName) throws BeansException {
        System.out.println("[容器级接口] [InstantiationAwareBeanPostProcessor实现类]--实例化Bean之前调用");
        return null;
    }

    // 实例化Bean之后调用
    @Override
    public boolean postProcessAfterInstantiation(Object bean, String beanName) throws BeansException {
        System.out.println("[容器级接口] [InstantiationAwareBeanPostProcessor实现类]--实例化Bean之后调用");
        return true;
    }

    // 初始化Bean之前调用
    @Override
    public Object postProcessBeforeInitialization(Object bean, String beanName) throws BeansException {
        System.out.println("[容器级接口] [InstantiationAwareBeanPostProcessor实现类]--初始化Bean之前调用");
        return bean;
    }

    // 初始化Bean之后调用
    @Override
    public Object postProcessAfterInitialization(Object bean, String beanName) throws BeansException {
        System.out.println("[容器级接口] [InstantiationAwareBeanPostProcessor实现类]--初始化Bean之后调用");
        return bean;
    }

    // 设置某个属性时调用
    @Override
    public PropertyValues postProcessPropertyValues(PropertyValues pvs, PropertyDescriptor[] pds, Object bean,
            String beanName) throws BeansException {
        System.out.println("[容器级接口] [InstantiationAwareBeanPostProcessor实现类]--实例化Bean之后,设置某个属性时调用");
        return pvs;
    }
}
然后实现BeanPostProcessor接口:
public class MyBeanPostProcessor implements BeanPostProcessor{

    public MyBeanPostProcessor() {
        System.out.println("[容器级接口] [MyBeanPostProcessor实现类]--构造器");
    }

    // 初始化Bean之前调用
    public Object postProcessBeforeInitialization(Object bean, String beanName) throws BeansException {
        System.out.println("[容器级接口] [BeanPostProcessor实现类]--初始化Bean之前调用");
        return bean;
    }

    // 初始化Bean之后调用
    public Object postProcessAfterInitialization(Object bean, String beanName) throws BeansException {
        System.out.println("[容器级接口] [BeanPostProcessor实现类]--初始化Bean之后调用");
        return bean;
    }
}
工厂级生命周期接口方法(BeanFactoryPostProcessor接口的实现类):
public class MyBeanFactoryPostProcessor implements BeanFactoryPostProcessor{

    public MyBeanFactoryPostProcessor() {
        super();
        System.out.println("[工厂级接口] [BeanFactoryPostProcessor实现类]--构造器");
    }

    public void postProcessBeanFactory(ConfigurableListableBeanFactory arg0) throws BeansException {
        System.out.println("[工厂级接口] [BeanFactoryPostProcessor实现类] Spring容器加载之后,所有Bean实例化之前调用");
        // 重写Person Bean的phone属性
        BeanDefinition bd = arg0.getBeanDefinition("fruitStore");
        bd.getPropertyValues().addPropertyValue("name", "papaya-mangos");
    }
}
配置文件:
<?xml version="1.0" encoding="UTF-8"?>
<beans xmlns:xsi="http://www.w3.org/2001/XMLSchema-instance"
       xmlns="http://www.springframework.org/schema/beans"
       xsi:schemaLocation="http://www.springframework.org/schema/beans
     http://www.springframework.org/schema/beans/spring-beans-4.0.xsd">

        <!-- 定义工厂级生命周期接口. -->
    <bean id="beanFactoryPostProcessor" class="spring.source.MyBeanFactoryPostProcessor"></bean>

    <!-- 定义容器级生命周期接口. -->
    <bean id="beanPostProcessor" class="xxx.xxx"></bean>
    <bean id="instantiationAwareBeanPostProcessor" class="xxx.xxx"></bean>

    <!-- 定义Bean自身及Bean级生命周期接口. -->
    <bean id="fruitStore" class="xxx.xxx"
            init-method="myInit"
            destroy-method="myDestory"
            scope="singleton">
        <property name="name"    value="永辉超市"></property>
        <property name="address" value="杭州"></property>
    </bean>
</beans>
测试代码:
public static void main(String[] args) {
        try{
            System.out.println("============================== 现在开始初始化容器. ==============================");
            ClassPathXmlApplicationContext ctx = new ClassPathXmlApplicationContext("beans.xml");
       System.out.println("\r\n============================== 容器初始化成功. ==============================");
            //得到Preson,并使用
            FruitStore fruitStore = ctx.getBean("fruitStore",FruitStore.class);
            fruitStore.sayHello();
            System.out.println(fruitStore);

            System.out.println("\r\n============================== 现在开始关闭容器! ==============================");
            ctx.close();
        }catch (Exception e){
            e.printStackTrace();
        }
    }
运行结果为:

这里再分析上述运行结果:
-
准备Spring容器
- 实例化BeanFactoryPostProcessor实现类;
- 执行BeanFactoryPostProcessor的postProcessBeanFactory修改XML对Bean配置的元信息,这里是改了一下fruitStore这个Bean的name属性值;
-
实例化Bean
- 实例化BeanPostProcessor实现类;
- 实例化InstantiationAwareBeanPostProcessorAdapter实现类;
- Bean实例化之前调用InstantiationAwareBeanPostProcessor的postProcessBeforeInstantiation方法;
- 调用FruitStore的构造器进行实例化;
- Bean实例化之后调用InstantiationAwareBeanPostProcessor的postProcessAfterInstantiation方法;
- 在属性注入之前,调用InstantiationAwareBeanPostProcessor的postProcessPropertyValues方法,可以修改Bean的属性信息;
-
注入依赖关系
- 注入属性:name、address;
-
初始化Bean
- 注入BeanName;
- 注入ApplicationContext;
- 初始化Bean之前调用BeanPostProcessor实现类调用接口方法postProcessBeforeInitialization;
- 初始化Bean之前调用InstantiationAwareBeanPostProcessor的postProcessBeforeInitialization方法;
- 调用InitializingBean实现类的afterPropertiesSet()进行Bean的初始化;
- 调用<bean>的init-method属性指定的初始化方法;
- 初始化Bean之后调用BeanPostProcessor实现类接口方法postProcessAfterInitialization;
- 初始化Bean之后调用InstantiationAwareBeanPostProcessor的postProcessAfterInitialization方法;
-
使用Bean
- 调用sayHello()方法;
- 打印FruitStore信息(可以发现名称name已改为papaya-mangos,和配置文件中不同);
-
销毁Bean
- 调用DiposibleBean接口的destory方法;
- 调用<bean>的destroy-method属性指定的销毁方法;
3. 总结
本文我们总结了Spring中Bean的生命周期,主要有如下流程:
- Spring容器准备,这里可以应用工厂级别的后处理器BeanFactoryPostProcessor的实现类;
- 实例化Bean,这里可以应用容器级别的后处理InstantiationAwareBeanPostProcessor的实现类来在实例化Bean前后做一些处理;
- 依赖注入,这里可以应用容器级别后处理器InstantiationAwareBeanPostProcessor的实现类来在属性注入之前做一些处理;
- 对Bean进行初始化,这里可以应用Bean级生命周期接口方法(BeanNameAware、InitializingBean等接口)及容器级后处理器BeanPostProcessor实现类;
- 使用Bean;
- 销毁Bean,这里会应用Bean级生命周期接口方法DisposableBean及Bean自身方法destroy-method;
总结了常见的配置Bean生命周期的方式主要有三种:
- 继承接口,如BeanNameAware、InitializingBean等;
- 配置xml配置文件,如init-method,destroy-method;
- 添加处理器,如实现BeanPostProcessor;
通过<bean>的init-method和destroy-method属性配置方式为bean指定初始化和销毁的方法,采用这种方式的效果和通过实现InitializingBean,DisposableBean接口所达到的效果是完全相同的,但是采用前者配置方式可以使bean不需要和特定的spring接口绑定,前者是和spring“不对应用程序类作任何限制”的理论相符合的。
而像BeanPostProcessor这类的后处理器接口则不一样,它不要求bean去继承它,而是完全像插件一样注册到spring容器中,为容器提供额外的功能。spring充分利用了BeanPostProcessor对bean进行加工处理(SpringAOP以此为基础,后面会细说)。
spring作为ioc容器其核心功能就是管理bean的创建以及bean之间的依赖关系,再进一步就是说spring管理bean的整个生命周期,从实例化到初始化,再到缓存创建好的bean以及销毁bean。在这个过程中,spring提供了多种方式(如上所述),使得用户可以在bean的整个生命周期中方便地做一些自定义的操作。这也是spring中体现出来的一种优秀的设计方法论,easy to change,对扩展开放。

 浙公网安备 33010602011771号