SpringBoot搭建web项目
1.SpringBoot的优点
- 支持内嵌的servlet容器,只需要将项目打包jar包,使用java -jar xxx即可运行项目
- 提供大量的start来简化maven配置
- 提供了默认的spring配置
- 提供了服务监控工具Actuator
2.使用SpringBoot创建web项目
以IntelliJ IDEA为例子。点击File-new project,到以下页面:
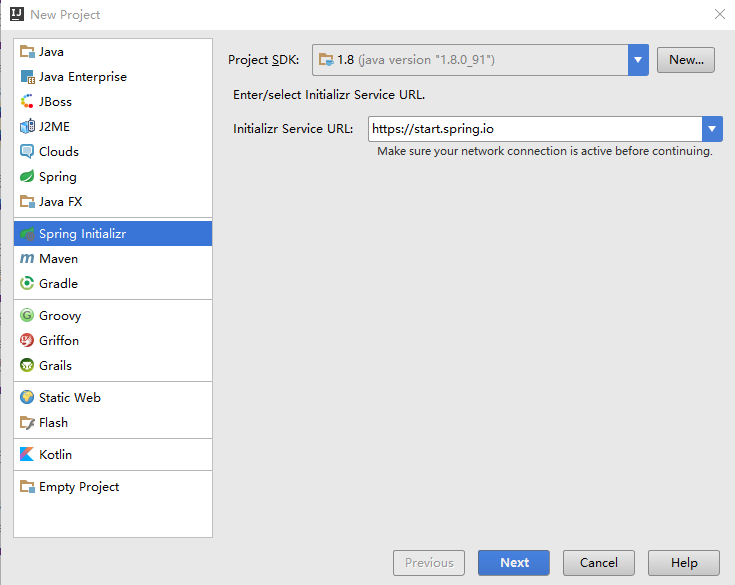
选择Spring Initializer,点击next,到以下页面:

输入正确的项目名称,使用默认配置一直点击下一步。到创建项目完成。
项目创建完成后目录结构如下图:

其中DemoApplication代码如下如下:
@SpringBootApplication
   public class DemoApplication {

	public static void main(String[] args) {
		SpringApplication.run(DemoApplication.class, args);
	}
}
此类中的main方法为springboot项目启动的入口。
此类中的SpringBootApplication注解可以触发自动配置Spring功能,并且项目自动扫描此注解标识的类同目录文件下的所有Spring的bean。
3.创建web接口
pom文件中添加Springboot-web-start依赖:
    <!-- https://mvnrepository.com/artifact/org.springframework.boot/spring-boot-starter-web -->
		<dependency>
			<groupId>org.springframework.boot</groupId>
			<artifactId>spring-boot-starter-web</artifactId>
		</dependency>
创建Response类用来返回给客户端数据,代码如下:
public class Response<T> {

    /**
     * 接口响应代码
     */
    private int code = 200;

    /**
     * 接口访问信息
     */
    private String message = "Success";

    private T data;

    public int getCode() {
        return code;
    }

    public void setCode(int code) {
        this.code = code;
    }

    public String getMessage() {
        return message;
    }

    public void setMessage(String message) {
        this.message = message;
    }

    public T getData() {
        return data;
    }

    public void setData(T data) {
        this.data = data;
    }

    @Override
    public String toString() {
        return "Response{" +
                "code=" + code +
                ", message='" + message + '\'' +
                ", data=" + data +
                '}';
    }
}
创建Controller接口,代码如下:
@RestController
@RequestMapping(value = "/user")
public class UserController {

    @GetMapping
    public Response<Map<String, Object>> get(){
        Response<Map<String, Object>> response = new Response<>();
        Map<String, Object> user = new HashMap<>();
        user.put("name", "demo");
        user.put("age", 25);
        response.setData(user);
        return  response;
    }
}
其中RestController为组合注解,等于在UserController添加了Controller和ResponseBody两个注解。
其中GetMapping注解等同于
@RequestMapping(method = RequestMethod.GET)
点击下图按钮启动项目、

项目启动后在浏览器中输入:
http://localhost:8080/user
会返回json字符串。返回数据如下:
{
  "code": 200,
  "message": "Success",
  "data": {
    "name": "demo",
    "age": 25
  }
}
至此,已经使用SpringBoot成功搭建起来一个web项目。下面对SpringBoot项目启动原理分析。
4.SpringBoot的配置介绍
servlet相关配置:
在resource/application.properties文件中添加以下配置更改服务监听端口和服务环境路径:
#端口号
server.port=8081
#服务环境路径
server.servlet.context-path=/demo
添加此配置后重启服务。在浏览器中输入:
http://localhost:8081/demo/user
可成功访问接口。
修改banner的内容
SpringBoot默认的banner为:
      .   ____          _            __ _ _
 /\\ / ___'_ __ _ _(_)_ __  __ _ \ \ \ \
( ( )\___ | '_ | '_| | '_ \/ _` | \ \ \ \
 \\/  ___)| |_)| | | | | || (_| |  ) ) ) )
  '  |____| .__|_| |_|_| |_\__, | / / / /
 =========|_|==============|___/=/_/_/_/
可以通过配置修改banner的内容。首先访问一下网站;
http://patorjk.com/software/taag/#p=display&f=Graffiti&t=demo
输入文本,生成相应的banner,此处以demo为例生成一下内容:
    .___
  __| _/____   _____   ____
 / __ |/ __ \ /     \ /  _ \
/ /_/ \  ___/|  Y Y  (  <_> )
\____ |\___  >__|_|  /\____/
     \/    \/      \/
在resource目录下新建banner.txt,并将上面内容复制到文件中。最后在resource/application.properties文件中添加以下配置内容:
spring.banner.location=banner.txt
重新启动服务,即可看到自定义的banner。
关闭banner显示功能
关闭banner功能,只需要在在启动类的main方法中加入以下代码:
    public static void main(String[] args) {
		SpringApplication application = new SpringApplication(DemoApplication.class);
		application.setBannerMode(Banner.Mode.OFF);
        application.run(args);
	}
重启服务即可。

 浙公网安备 33010602011771号