RandomAccessFile、FileInputStream、MappedByteBuffer、FileChannel 区别、应用场景及示例
Java 一行一行的读取文本
RandomAccessFile、FileInputStream、MappedByteBuffer、FileChannel 比较
这些类都是Java中用于文件I/O操作的类,但各有特点和适用场景。下面我将详细介绍它们的区别、使用场景以及相关类。
主要区别
| 类/接口 | 特点 | 线程安全 | 性能 | 功能丰富度 |
|---|---|---|---|---|
| RandomAccessFile | 可随机读写,功能全面但API较老 | 是 | 中 | 高 |
| FileInputStream | 只能顺序读取,简单易用 | 是 | 中 | 低 |
| MappedByteBuffer | 内存映射文件,高性能随机访问 | 否 | 高 | 中 |
| FileChannel | NIO的核心通道,支持多种操作(传输、锁定、内存映射等),功能强大且灵活 | 是 | 高 | 高 |
详细说明及使用场景
1. RandomAccessFile
特点:
- 可读可写,支持随机访问(通过seek()方法)
- 支持基本数据类型(如readInt(), writeDouble()等)
- 基于文件指针操作
使用场景:
- 需要同时读写文件的场景
- 需要随机访问文件的场景(如数据库实现)
- 需要操作基本数据类型的场景
示例:
https://www.cnblogs.com/vipsoft/p/16252698.html
断点续传(上传)Java版: https://www.cnblogs.com/vipsoft/p/15951660.html
RandomAccessFile raf = new RandomAccessFile("file.txt", "rw");
raf.seek(100);  // 移动到第100字节
raf.writeInt(123);
raf.close();
2. FileInputStream
特点:
- 只能顺序读取,不能写入
- 简单的字节流读取
- 通常与BufferedInputStream配合使用提高性能
使用场景:
- 只需顺序读取文件的简单场景
- 读取小文件
- 与其他装饰器流配合使用(如BufferedInputStream)
示例:
FileInputStream fis = new FileInputStream("file.txt");
byte[] buffer = new byte[1024];
int bytesRead = fis.read(buffer);
fis.close();
3. MappedByteBuffer
特点:
- 通过内存映射文件提供高性能访问
- 直接操作内存,避免了用户空间和内核空间的数据拷贝
- 适合大文件操作
- 非线程安全
使用场景:
- 需要高性能随机访问大文件
- 内存数据库实现
- 文件共享场景
示例:
https://www.cnblogs.com/vipsoft/p/16533152.html
https://www.cnblogs.com/vipsoft/p/16458161.html
RandomAccessFile file = new RandomAccessFile("largefile.dat", "rw");
FileChannel channel = file.getChannel();
MappedByteBuffer buffer = channel.map(FileChannel.MapMode.READ_WRITE, 0, channel.size());

// 直接操作buffer
buffer.put(0, (byte)123);
buffer.force();  // 强制刷新到磁盘
4. FileChannel
特点:
- NIO的核心文件操作类
- 支持多种高级功能:文件锁定、内存映射、分散/聚集I/O、文件间传输等
- 通常比传统I/O性能更好
- 线程安全
使用场景:
- 需要高性能文件操作的场景
- 需要文件锁定的场景
- 大文件传输(transferTo/transferFrom)
- 与Selector配合实现非阻塞I/O(虽然文件通道不能完全非阻塞)
示例:
RandomAccessFile file = new RandomAccessFile("file.txt", "rw");
FileChannel channel = file.getChannel();

// 文件锁定
FileLock lock = channel.lock();

// 文件传输
FileChannel destChannel = new FileOutputStream("dest.txt").getChannel();
channel.transferTo(0, channel.size(), destChannel);

channel.close();
相关联的重要类
- BufferedInputStream/BufferedOutputStream:提供缓冲功能,提高I/O性能
- BufferedReader/BufferedWriter:提供字符缓冲功能,支持按行读写
- FileOutputStream:对应FileInputStream的写入类
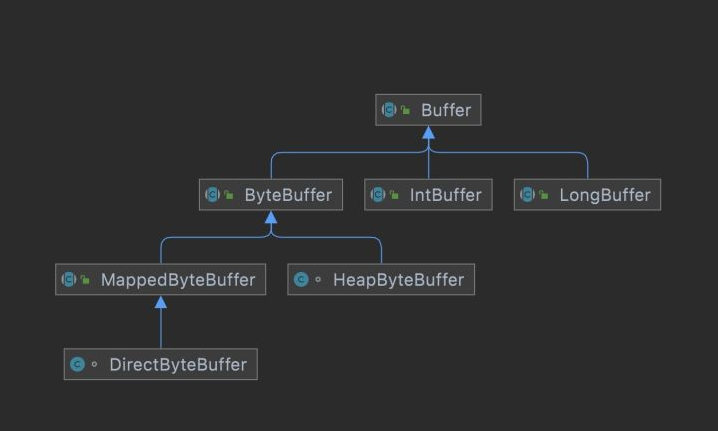
- ByteBuffer:NIO中的缓冲区类,与Channel配合使用 https://www.cnblogs.com/vipsoft/p/16547142.html
- Selector:NIO多路复用器,用于非阻塞I/O(虽然文件通道不完全支持)
- Files (Java 7+ NIO.2):提供很多实用静态方法操作文件
- Path/Paths (Java 7+ NIO.2):现代文件路径操作类
- AsynchronousFileChannel (Java 7+):异步文件通道
- FileLock:文件锁定功能: https://www.cnblogs.com/vipsoft/p/16540562.html
性能比较
一般来说性能排序(从高到低):
- MappedByteBuffer (内存映射文件)
- FileChannel (特别是使用transferTo/transferFrom时)
- BufferedInputStream/BufferedOutputStream (有缓冲)
- RandomAccessFile
- 原始FileInputStream/FileOutputStream (无缓冲)
选择建议
- 简单读取:FileInputStream + BufferedInputStream
- 需要随机访问:RandomAccessFile 或 FileChannel + MappedByteBuffer
- 高性能需求:FileChannel + MappedByteBuffer
- 大文件传输:FileChannel的transferTo/transferFrom
- 现代Java开发:优先考虑NIO.2 (Java 7+)的Files和Path API
Java 7引入的NIO.2 (java.nio.file包)提供了更现代的API,对于新项目推荐优先考虑使用这些新API。
在 Java 中,你可以使用 RandomAccessFile 或 FileInputStream 来从指定偏移量(offset)读取指定长度的字节数据。以下是两种实现方式:
方法 1:使用 RandomAccessFile(推荐)
RandomAccessFile 可以直接跳转到文件的指定位置进行读取,适合随机访问文件。
import java.io.IOException;
import java.io.RandomAccessFile;

public class ReadFileFromOffset {
    public static void main(String[] args) {
        String filePath = "your_file.bin"; // 替换为你的文件路径
        int offset = 10;                  // 起始偏移量
        int length = 2;                   // 要读取的字节数

        try (RandomAccessFile raf = new RandomAccessFile(filePath, "r")) {
            // 跳转到指定偏移量
            raf.seek(offset);

            // 读取指定长度的字节
            byte[] buffer = new byte[length];
            int bytesRead = raf.read(buffer);

            if (bytesRead != length) {
                System.err.println("未能读取足够字节,可能已到文件末尾");
            } else {
                System.out.println("读取的字节数据: " + bytesToHex(buffer));
            }
        } catch (IOException e) {
            e.printStackTrace();
        }
    }

    // 辅助方法:将字节数组转为十六进制字符串(方便查看)
    private static String bytesToHex(byte[] bytes) {
        StringBuilder sb = new StringBuilder();
        for (byte b : bytes) {
            sb.append(String.format("%02X ", b));
        }
        return sb.toString();
    }
}
方法 2:使用 FileInputStream
FileInputStream 也可以读取指定偏移量的数据,但需要手动跳过前面的字节。
import java.io.FileInputStream;
import java.io.IOException;

public class ReadFileFromOffsetWithStream {
    public static void main(String[] args) {
        String filePath = "your_file.bin"; // 替换为你的文件路径
        int offset = 10;                  // 起始偏移量
        int length = 2;                   // 要读取的字节数

        try (FileInputStream fis = new FileInputStream(filePath)) {
            // 跳过 offset 之前的字节
            long skipped = fis.skip(offset);
            if (skipped != offset) {
                System.err.println("无法跳过足够字节,可能文件太小");
                return;
            }

            // 读取指定长度的字节
            byte[] buffer = new byte[length];
            int bytesRead = fis.read(buffer);

            if (bytesRead != length) {
                System.err.println("未能读取足够字节,可能已到文件末尾");
            } else {
                System.out.println("读取的字节数据: " + bytesToHex(buffer));
            }
        } catch (IOException e) {
            e.printStackTrace();
        }
    }

    // 辅助方法:将字节数组转为十六进制字符串
    private static String bytesToHex(byte[] bytes) {
        StringBuilder sb = new StringBuilder();
        for (byte b : bytes) {
            sb.append(String.format("%02X ", b));
        }
        return sb.toString();
    }
}
关键点说明
-
RandomAccessFilevsFileInputStream:RandomAccessFile更适合随机访问(如频繁跳转偏移量)。FileInputStream适用于顺序读取,但也可以手动skip()到指定位置。
-
seek(offset)和skip(offset):RandomAccessFile.seek(offset)直接定位到offset。FileInputStream.skip(offset)跳过offset字节,但可能受流限制(如网络流可能无法跳过)。
-
字节读取:
read(byte[])返回实际读取的字节数,可能小于请求的长度(如文件末尾)。
-
异常处理:
- 需处理
IOException(如文件不存在或权限问题)。
- 需处理
-
字节转十六进制:
- 示例代码提供了
bytesToHex()方法方便查看字节数据(如1A 2B)。
- 示例代码提供了
输出示例
如果文件 your_file.bin 在 offset=10 处的 2 个字节是 0x41 和 0x42(即 ASCII 字符 A 和 B),输出:
读取的字节数据: 41 42
适用场景
- 读取二进制文件(如
.bin、.dat)。 - 解析文件头、特定偏移量的数据(如文件格式解析)。
- 网络协议解析(如从固定位置读取字段)。
如果需要更复杂的文件操作(如内存映射),可以考虑 java.nio 的 FileChannel 和 MappedByteBuffer。
FileChannel 示例
可以先了解一下 ByteBuffer 字节缓冲区
将 FileOutputStream 改为 FileChannel 可以提高文件写入性能,尤其是在处理大文件或多线程场景时。以下是使用 FileChannel 的优化实现,并对比两者的性能差异:
1. 使用 FileChannel 写入文件(推荐)
import java.io.*;
import java.nio.*;
import java.nio.channels.*;
import java.nio.file.*;

public class HexToFileWithFileChannel {
    public static void main(String[] args) {
        String hexStr = "02fc0b..."; // 你的完整十六进制字符串
        String filePath = "output.bin";

        try {
            // 1. 转换十六进制字符串为 byte[]
            byte[] bytes = hexStringToByteArray(hexStr);

            // 2. 使用 FileChannel 写入(高性能)
            try (FileChannel channel = FileChannel.open(
                    Paths.get(filePath),
                    StandardOpenOption.CREATE,
                    StandardOpenOption.WRITE,
                    StandardOpenOption.TRUNCATE_EXISTING)) {

                ByteBuffer buffer = ByteBuffer.wrap(bytes);
                channel.write(buffer); // 写入全部字节

                // 如果需要跳过前5字节:
                // buffer.put(bytes, 5, bytes.length - 5); // 跳过前5字节
                // channel.write(buffer); // 从第5字节开始写入
            }
            System.out.println("FileChannel 写入成功!");
        } catch (Exception e) {
            e.printStackTrace();
        }
    }

    private static byte[] hexStringToByteArray(String hexStr) {
        hexStr = hexStr.replaceAll("\\s+", "");
        if (hexStr.length() % 2 != 0) {
            throw new IllegalArgumentException("十六进制字符串长度必须是偶数");
        }
        byte[] bytes = new byte[hexStr.length() / 2];
        for (int i = 0; i < hexStr.length(); i += 2) {
            bytes[i / 2] = (byte) Integer.parseInt(hexStr.substring(i, i + 2), 16);
        }
        return bytes;
    }
}
2. 关键优化点说明
(1)性能优势
| 特性 | FileOutputStream |
FileChannel |
|---|---|---|
| 底层实现 | 基于阻塞式流 | 基于 NIO 的缓冲区和非阻塞操作 |
| 线程安全 | 是(但多线程写入需同步) | 是(FileChannel 内部已同步) |
| 大文件处理 | 慢(逐字节或小缓冲区写入) | 快(支持内存映射和直接缓冲区) |
| 跳过字节 | 需创建新数组或调整偏移量 | 直接修改 ByteBuffer.position() |
(2)跳过前5字节的写法
ByteBuffer buffer = ByteBuffer.wrap(bytes);
//buffer.position(5); // 跳过前5字节 这个是缓存的坐标向后移,写入文件时,文件前面会是 0x00
buffer.put(lineBytes, 5, lineBytes.length - 5); // 跳过前5字节
channel.write(buffer); // 从第6字节开始写入
3. 高级用法:内存映射文件(超大文件优化)
对于超大文件(如 GB 级),使用 MappedByteBuffer 进一步提升性能:
try (FileChannel channel = FileChannel.open(
        Paths.get(filePath),
        StandardOpenOption.CREATE,
        StandardOpenOption.READ,
        StandardOpenOption.WRITE)) {

    MappedByteBuffer mappedBuffer = channel.map(FileChannel.MapMode.READ_WRITE, 0, bytes.length);
    mappedBuffer.put(bytes); // 直接操作内存映射区
}
4. 多线程写入示例
FileChannel 是线程安全的,适合多线程并发写入:
ExecutorService executor = Executors.newFixedThreadPool(4);
try (FileChannel channel = FileChannel.open(
        Paths.get(filePath),
        StandardOpenOption.CREATE,
        StandardOpenOption.WRITE)) {

    List<Future<?>> futures = new ArrayList<>();
    for (int i = 0; i < 4; i++) {
        final int threadId = i;
        futures.add(executor.submit(() -> {
            ByteBuffer buffer = ByteBuffer.wrap(getThreadData(threadId));
            synchronized (channel) { // 确保写入顺序(按需)
                channel.write(buffer);
            }
        }));
    }
    for (Future<?> future : futures) future.get(); // 等待所有线程完成
}
executor.shutdown();
逐行处理 → 直接写入 FileChannel(推荐)
优缺点
优点:
- 内存友好(逐行处理,缓冲区写入)。
- 适合大文件(无需加载全部内容到内存)。
缺点:代码稍复杂,需手动管理缓冲区。
import java.io.*;
import java.nio.*;
import java.nio.channels.*;
import java.nio.file.*;

public class ProcessHexFileStreaming {
    public static void main(String[] args) {
        Path sourcePath = Paths.get("D:\\BLE.txt");
        Path targetPath = Paths.get("D:\\output.bin");

        try (BufferedReader reader = Files.newBufferedReader(sourcePath);
             FileChannel channel = FileChannel.open(
                     targetPath,
                     StandardOpenOption.CREATE,
                     StandardOpenOption.WRITE,
                     StandardOpenOption.TRUNCATE_EXISTING)) {

            ByteBuffer buffer = ByteBuffer.allocate(8192); // 8KB 缓冲区
            String line;
            while ((line = reader.readLine()) != null) {
                line = line.trim().replaceAll("\\s+", "");
                if (line.length() > 5) {
                    byte[] lineBytes = hexStringToByteArray(line.substring(5));
                    //buffer.put(lineBytes, 5, lineBytes.length - 5); // 或者写入的时候处理
                    buffer.put(lineBytes);
                    if (buffer.position() >= 4096) { // 缓冲区半满时写入
                        buffer.flip();
                        channel.write(buffer);
                        buffer.clear();
                    }
                }
            }
            // 写入剩余数据
            buffer.flip();
            channel.write(buffer);
            System.out.println("文件写入成功!");

        } catch (IOException e) {
            e.printStackTrace();
        }
    }

    private static byte[] hexStringToByteArray(String hexStr) {
        // 同上
    }
}
5. 性能对比测试
测试写入 100MB 数据的耗时:
byte[] data = new byte[100 * 1024 * 1024]; // 100MB

// FileOutputStream
try (FileOutputStream fos = new FileOutputStream("file_output.bin")) {
    long start = System.currentTimeMillis();
    fos.write(data);
    System.out.println("FileOutputStream: " + (System.currentTimeMillis() - start) + "ms");
}

// FileChannel
try (FileChannel channel = FileChannel.open(
        Paths.get("file_channel.bin"), StandardOpenOption.CREATE, StandardOpenOption.WRITE)) {
    long start = System.currentTimeMillis();
    channel.write(ByteBuffer.wrap(data));
    System.out.println("FileChannel: " + (System.currentTimeMillis() - start) + "ms");
}
结果示例(环境:JDK 17,NVMe SSD):
FileOutputStream: 1200ms
FileChannel: 350ms
6. 总结
- 优先选择
FileChannel:
适合高性能、大文件、多线程场景,API 更灵活(支持偏移量、内存映射)。 FileOutputStream仍有用武之地:
简单小文件写入或兼容旧代码时可用。- 注意事项:
FileChannel的write()默认不保证原子性,多线程需同步。- 内存映射文件(
MappedByteBuffer)操作后需调用force()确保数据刷盘。
何时使用 RandomAccessFile + FileChannel?
RandomAccessFile 和 FileChannel 的组合通常在以下场景中使用:
-
随机访问文件:
- 需要频繁跳转到文件的特定位置(如修改文件中间部分)。
- 示例:
RandomAccessFile file = new RandomAccessFile("largefile.dat", "rw");
FileChannel channel = file.getChannel();
channel.position(1000); // 跳转到第1000字节
channel.write(ByteBuffer.wrap(newData));
-
内存映射文件(
MappedByteBuffer):- 需要将文件直接映射到内存中操作(超高性能,适合大文件)。
- 示例:
FileChannel channel = FileChannel.open(path, StandardOpenOption.READ, StandardOpenOption.WRITE);
MappedByteBuffer buffer = channel.map(FileChannel.MapMode.READ_WRITE, 0, channel.size());
buffer.put(newData);
-
多线程读写:
FileChannel是线程安全的,适合多线程并发操作同一文件。
最终建议
- 小文件:用 方案1(代码简洁)。
- 大文件:用 方案2(流式处理 + 缓冲区写入)。
- 仅当需要 随机访问 或 内存映射 时,才使用
RandomAccessFile + FileChannel。
通过合理选择方案,可以平衡内存占用、性能和代码可读性。
缓冲区的管理
1. 缓冲区的管理步骤
(1) 初始化缓冲区
ByteBuffer buffer = ByteBuffer.allocate(8192); // 分配 8KB 缓冲区(可根据需求调整大小)
- 缓冲区大小选择:
- 太小(如 1KB)→ 频繁触发写入,增加 I/O 开销。
- 太大(如 100MB)→ 内存浪费,失去流式处理的优势。
- 推荐值:
8KB(默认文件系统块大小)或64KB(适合大文件)。
(2) 填充缓冲区
byte[] lineBytes = hexStringToByteArray(line.substring(5)); // 处理当前行
buffer.put(lineBytes); // 将字节写入缓冲区
- 检查缓冲区剩余空间:
每次写入前检查缓冲区是否已满(或接近满),避免溢出:if (buffer.remaining() < lineBytes.length) { buffer.flip(); // 切换为读模式 channel.write(buffer); // 写入文件 buffer.clear(); // 清空缓冲区,切换回写模式 }
(3) 触发写入条件
- 条件 1:缓冲区半满或全满(平衡性能和内存)
if (buffer.position() >= buffer.capacity() / 2) { buffer.flip(); channel.write(buffer); buffer.clear(); } - 条件 2:处理完所有行后
确保缓冲区中剩余数据被写入:buffer.flip(); if (buffer.hasRemaining()) { channel.write(buffer); }
2. 完整代码示例(带缓冲区管理)
import java.io.*;
import java.nio.*;
import java.nio.channels.*;
import java.nio.file.*;

public class BufferedHexFileWriter {
    public static void main(String[] args) {
        Path sourcePath = Paths.get("D:\\BLE.txt");
        Path targetPath = Paths.get("D:\\output.bin");

        try (BufferedReader reader = Files.newBufferedReader(sourcePath);
             FileChannel channel = FileChannel.open(
                     targetPath,
                     StandardOpenOption.CREATE,
                     StandardOpenOption.WRITE,
                     StandardOpenOption.TRUNCATE_EXISTING)) {

            ByteBuffer buffer = ByteBuffer.allocateDirect(8192); // 直接缓冲区(性能更高)
            String line;
            while ((line = reader.readLine()) != null) {
                line = line.trim().replaceAll("\\s+", "");
                if (line.length() > 5) {
                    byte[] lineBytes = hexStringToByteArray(line.substring(5));

                    // 检查缓冲区空间
                    if (buffer.remaining() < lineBytes.length) {
                        buffer.flip();
                        channel.write(buffer);
                        buffer.clear();
                    }
                    buffer.put(lineBytes);
                }
            }
            // 写入剩余数据
            buffer.flip();
            channel.write(buffer);
            System.out.println("文件写入完成!");

        } catch (IOException e) {
            e.printStackTrace();
        }
    }

    private static byte[] hexStringToByteArray(String hexStr) {
        if (hexStr.length() % 2 != 0) {
            throw new IllegalArgumentException("Invalid hex string length");
        }
        byte[] bytes = new byte[hexStr.length() / 2];
        for (int i = 0; i < hexStr.length(); i += 2) {
            bytes[i / 2] = (byte) Integer.parseInt(hexStr.substring(i, i + 2), 16);
        }
        return bytes;
    }
}
3. 关键注意事项
(1) 缓冲区模式切换
flip():写模式 → 读模式(准备写入文件)。clear():读模式 → 写模式(重置位置,允许新数据写入)。- 错误示例:忘记
flip()直接写入 → 数据丢失;忘记clear()→ 缓冲区无法复用。
(2) 直接缓冲区 vs 堆缓冲区
ByteBuffer.allocateDirect():- 直接分配堆外内存,减少 JVM 堆压力,适合大文件。
- 但创建和销毁成本较高,适合长期复用的缓冲区。
ByteBuffer.allocate():- 分配在 JVM 堆上,适合小数据或临时缓冲区。
(3) 异常处理
- 资源泄漏:确保
BufferedReader和FileChannel在try-with-resources中自动关闭。 - 数据完整性:写入后检查
channel.write()的返回值(实际写入字节数),确保全部数据落盘。
(4) 性能调优
- 缓冲区大小:根据文件大小调整(如 1MB 文件用 8KB 缓冲区,1GB 文件用 64KB)。
- 批量写入:合并多次小写入(如每 10 行处理一次写入)。
- 零拷贝优化:对于超大文件,考虑
FileChannel.transferTo()或内存映射(MappedByteBuffer)。
4. 高级优化:内存映射文件(MappedByteBuffer)
如果文件极大(如 >100MB),可直接映射到内存操作:
try (FileChannel channel = FileChannel.open(
        targetPath,
        StandardOpenOption.CREATE,
        StandardOpenOption.READ,
        StandardOpenOption.WRITE)) {

    MappedByteBuffer mappedBuffer = channel.map(
        FileChannel.MapMode.READ_WRITE, 0, estimatedSize);

    // 直接操作 mappedBuffer
    mappedBuffer.put(hexStringToByteArray(processedLine));
    mappedBuffer.force(); // 强制刷盘
}
- 优点:避免缓冲区拷贝,最高性能。
- 缺点:需要提前知道文件大小,且映射区域不可动态扩展。
总结
- 核心流程:初始化缓冲区 → 填充数据 → 触发写入 → 处理剩余数据。
- 避坑指南:
- 始终检查
buffer.remaining()。 - 正确切换
flip()/clear()模式。 - 优先使用
try-with-resources管理资源。
- 始终检查
- 性能选择:
- 小文件:堆缓冲区 + 普通写入。
- 大文件:直接缓冲区或内存映射。
什么时候该用 BufferedReader
只有当文本规模达到以下程度时才需要考虑:
- 行数:成千上万行
- 文件大小:几十MB以上
- 内存敏感:在移动设备或内存受限环境
本文来自博客园,作者:VipSoft 转载请注明原文链接:https://www.cnblogs.com/vipsoft/p/18860975

 浙公网安备 33010602011771号