springboot制作自定义starter
SpringBoot中的starter是一种非常重要的机制,能够抛弃以前繁杂的配置,将其统一集成进 starter,应用者只需要在maven中引入starter依赖,SpringBoot就能自动扫描到要加载的信息并启 动相应的默认配置。starter让我们摆脱了各种依赖库的处理,需要配置各种信息的困扰。 SpringBoot会自动通过classpath路径下的类发现需要的Bean,并注册进IOC容器。SpringBoot提供 了针对日常企业应用研发各种场景的spring-boot-starter依赖模块。所有这些依赖模块都遵循着约定 成俗的默认配置,并允许我们调整这些配置,即遵循“约定大于配置”的理念。
为什么要自定义starter
在日常开发工作中,经常会有一些独立于业务之外的配置模块,我们经常将其放到一个特定的 包下,然后如果另一个工程需要复用这块功能的时候,需要将代码硬拷贝到另一个工程,重新集成一遍,比较麻烦。如果我们将这些可独立于业务代码之外的功配置模块封装成一个个starter,复用的时候只需要将其在pom中引用依赖即可,SpringBoot为我们完成自动装配。
自定义starter的命名规则
SpringBoot提供的starter以spring-boot-starter-xxx的方式命名的。官方建议自定义的starter使用 xxx-spring-boot-starter命名规则。以区分SpringBoot生态提供的starter。
操作步骤
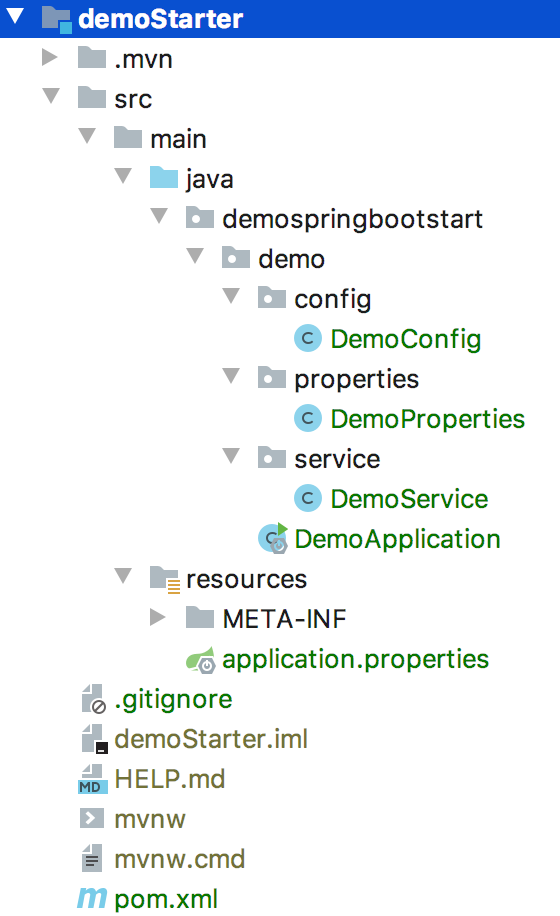
1.新建spring工程
这个应该不用多说,使用idea中Spring Initializr即可构建
工程结构如下
2.pom配置
<?xml version="1.0" encoding="UTF-8"?>
<project xmlns="http://maven.apache.org/POM/4.0.0" xmlns:xsi="http://www.w3.org/2001/XMLSchema-instance"
         xsi:schemaLocation="http://maven.apache.org/POM/4.0.0 https://maven.apache.org/xsd/maven-4.0.0.xsd">
    <modelVersion>4.0.0</modelVersion>
    <parent>
        <groupId>org.springframework.boot</groupId>
        <artifactId>spring-boot-starter-parent</artifactId>
        <version>2.2.6.RELEASE</version>
        <relativePath/> <!-- lookup parent from repository -->
    </parent>
    <groupId>demo-spring-boot-starter</groupId>
    <artifactId>demo</artifactId>
    <version>0.0.1-SNAPSHOT</version>
    <name>demo</name>
    <description>Demo project for Spring Boot</description>

    <properties>
        <java.version>1.8</java.version>
    </properties>

    <dependencies>
        <dependency>
            <groupId>org.springframework.boot</groupId>
            <artifactId>spring-boot-starter</artifactId>
        </dependency>
        <dependency>
            <groupId>org.springframework.boot</groupId>
            <artifactId>spring-boot-autoconfigure</artifactId>
        </dependency>
        <dependency>
            <groupId>org.springframework.boot</groupId>
            <artifactId>spring-boot-configuration-processor</artifactId>
            <optional>true</optional>
        </dependency>
    </dependencies>

    <build>
        <plugins>
            <plugin>
                <groupId>org.springframework.boot</groupId>
                <artifactId>spring-boot-maven-plugin</artifactId>
            </plugin>
        </plugins>
    </build>

</project>
3.定义一个实体类映射配置信息
package demospringbootstart.demo.properties;

import org.springframework.boot.context.properties.ConfigurationProperties;

/**
 * @Author:VIC
 * @Date:Created in 15:04 2020/04/09
 * @Description:配置信息实体类
 */
// 该注解可以把相同前缀的配置信息通过配置项名称映射成实体类,这里我们指定前缀"demo",
// 就可以将以"demo"为前缀的配置项信息拿到
@ConfigurationProperties(prefix = "demo")
public class DemoProperties {

    private String sayWhat;
    private String toWho;

    public String getSayWhat() {
        return sayWhat;
    }

    public void setSayWhat(String sayWhat) {
        this.sayWhat = sayWhat;
    }

    public String getToWho() {
        return toWho;
    }

    public void setToWho(String toWho) {
        this.toWho = toWho;
    }
}
4.定义配置类
package demospringbootstart.demo.config;

import demospringbootstart.demo.properties.DemoProperties;
import demospringbootstart.demo.service.DemoService;
import org.springframework.beans.factory.annotation.Autowired;
import org.springframework.boot.autoconfigure.condition.ConditionalOnProperty;
import org.springframework.boot.context.properties.EnableConfigurationProperties;
import org.springframework.context.annotation.Bean;
import org.springframework.context.annotation.Configuration;

/**
 * @Author:VIC
 * @Date:Created in 15:35 2020/04/09
 * @Description:配置类
 */
//@Configuration声明为一个配置类,没什么好说的
@Configuration
//该注解用来开启上面一步 @ConfigurationProperties 注解配置bean的支持,
//就是告诉springboot能够支持@ConfigurationProperties,
// 或者你也可以在@ConfigurationProperties注解标识的类上添加@Configuration和@Component,效果一样
@EnableConfigurationProperties(DemoProperties.class)
//@ConditionalOnProperty用来控制@Configuration是否生效,简单来说也就是我们可以通过在yml或properties配置文件中控制 @Configuration 注解的配置类是否生效。
@ConditionalOnProperty(prefix = "demo", name = "isopen", havingValue = "true")
public class DemoConfig {

    @Autowired
    private DemoProperties properties;

    @Bean
    public DemoService demoService() {
        return new DemoService(properties.getSayWhat(), properties.getToWho());
    }
}
5.提供一个service类
package demospringbootstart.demo.service;

/**
 * @Author:VIC
 * @Date:Created in 15:28 2020/04/09
 * @Description:随便实现一个service,这里没什么好说的,这个service提供给集成该starter的业务方调用
 */
public class DemoService {

    public String sayWhat;
    public String toWho;

    public DemoService(String sayWhat, String toWho) {
        this.sayWhat = sayWhat;
        this.toWho = toWho;
    }

    public String sayHello() {
        return this.sayWhat + "!!!" + this.toWho;
    }
}
6.新建spring.factories文件(重要)
将spring.factories放到META-INF文件夹下面,spring.factories文件内容如下
#自动装配,至于为什么配置了这个文件,springboot就会去装配这里配置的Democonfig类,读者可以去看看springboot SPI机制的实现(有时间搞一篇博客)
org.springframework.boot.autoconfigure.EnableAutoConfiguration=demospringbootstart.demo.config.DemoConfig
7.测试使用
以上步骤完成后,然后只需mvn clean install,一个自定义starter就制作完成了
======================分隔线======================
使用自定义的starter
1.引入starter依赖
<dependency>
    <groupId>demo-spring-boot-starter</groupId>
    <artifactId>demo</artifactId>
    <version>0.0.1-SNAPSHOT</version>
</dependency>
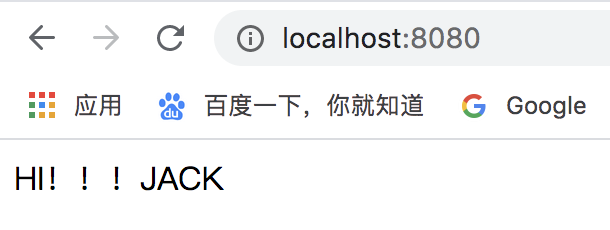
2.填写配置文件内容
demo.isopen=true
demo.to-who=JACK
demo.say-what=HI
3.写段代码调用一下看看
package com.zhaowa.course.design.controller;

import demospringbootstart.demo.service.DemoService;
import org.springframework.web.bind.annotation.RequestMapping;
import org.springframework.web.bind.annotation.RestController;
import javax.annotation.Resource;

/**
 * @Author:VIC
 * @Date:Created in 15:53 2020/04/09
 * @Description:
 */
@RestController
public class TestController {

    @Resource
    private DemoService demoService;

    @RequestMapping("/")
    public String test(){
        return demoService.sayHello();
    }
}

 浙公网安备 33010602011771号