06-vue项目02:vuex、Mutation、Action、ElementUI、axios
1、Vuex
1、为什么使用VueX
data从最上面的组件,一层层往下传值,一层层的验证

Vue单向数据流
“中央空调“,代理
VueX 解决数据 传值。。

2、Vuex介绍与安装
(1)Vuex官网
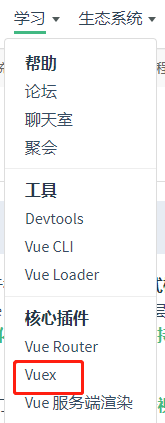
Vuex官网 https://vuex.vuejs.org/zh/installation.html

Vue单向数据流


(2)安装
VueX安装:https://vuex.vuejs.org/zh/installation.html


3、Vuex的使用
data在store中state

main.js 代码

import Vue from 'vue'
import App from './App'

import router from './router'
Vue.config.productionTip = false

// 1.0 引用vuex
import Vuex from "vuex"
Vue.use(Vuex);

// 1.1 创建sotre
// 如果在模块化构建系统中,请确保在开头调用了 Vue.use(Vuex)
const store = new Vuex.Store({
  state: {

    allList:[]  // 后端的数据保存在state中
    // state 这里面的状态跟每个组件的数据属性有关系

  },
  mutations: {

  }
})


/* eslint-disable no-new */
new Vue({
  el: '#app',
  router,
  store,  // 1.3 引入store
  components: { App },
  template: '<App/>'
})
4、ajax 获取后端数据(jquery):跨域问题
(1)下载jQuery

(2)使用jQuery发送ajax

<template>
  <div id="app">

    <!-- 2.3 使用Vheader组件 -->
    <Vheader></Vheader>

    <router-view/>  <!-- 路由切换 -->
  </div>
</template>

<script>
// 1.0 导入bootstrap
import "bootstrap/dist/css/bootstrap.min.css"

// 2.1 先引入vheader
import Vheader from "./components/Vheader"

// 3.0 引入jQuery
import $ from 'jquery'

export default {
    name: 'App',
    data(){
      return {
        // allList:[] 不会在data存储太多的数据
      }
    },

    // 2.2 挂载Vheader
    components:{
      Vheader
    },
    created(){

    },
    mounted(){

      // 3.1 ajax请求数据
      var _this = this;

      $.ajax({
        url:'http://127.0.0.1:9527/api/v1/comments/',
        methods:"get",
        success:function(data){
          console.log(data)
          console.log(_this)

          _this.$store.state.allList = data;
        }

      })
    }
  }
</script>

<style>

</style>
data

(3)vuex: this 如何定位allList


(4) 跨域问题

django后端settings后端设置
https://www.jianshu.com/p/3961366f9ce9


INSTALLED_APPS = [
    'django.contrib.admin',
    'django.contrib.auth',
    'django.contrib.contenttypes',
    'django.contrib.sessions',
    'django.contrib.messages',
    'django.contrib.staticfiles',
    'corsheaders',
    'rest_framework',
    'app01',
]

MIDDLEWARE = [
    'django.middleware.security.SecurityMiddleware',
    'django.contrib.sessions.middleware.SessionMiddleware',
    'django.middleware.common.CommonMiddleware',
    'django.middleware.csrf.CsrfViewMiddleware',
    'django.contrib.auth.middleware.AuthenticationMiddleware',
    'django.contrib.messages.middleware.MessageMiddleware',
    'django.middleware.clickjacking.XFrameOptionsMiddleware',
    'corsheaders.middleware.CorsMiddleware',
    'django.middleware.common.CommonMiddleware',  # 注意顺序
]
#跨域增加忽略
CORS_ORIGIN_ALLOW_ALL = True #允许所有源访问(如果不需要允许全部,可以设置CORS_ORIGIN_WHITELIST=()参数,将需要访问的域名添加即可)

CORS_ALLOW_CREDENTIALS = True  #是否允许携带cookie


CORS_ALLOW_METHODS = (
    'DELETE',
    'GET',
    'OPTIONS',
    'PATCH',
    'POST',
    'PUT',
    'VIEW',
)


CORS_ALLOW_HEADERS = (
    'XMLHttpRequest',
    'X_FILENAME',
    'accept-encoding',
    'authorization',
    'content-type',
    'dnt',
    'origin',
    'user-agent',
    'x-csrftoken',
    'x-requested-with',
    'Pragma',
)
5、allList of state of store 如何使用?

(1)VnoteList.vue

<template>
    <ul>
        <VnoteItem v-for="(item,index) in getAllDatas" :data="item"></VnoteItem>
    </ul>

</template>

<script>
    import VnoteItem from "./VnoteItem"
    export default {
        name:"VnoteList",
        data(){
            return{}
        },
        components:{
            VnoteItem,
        },
        computed:{
            // 监听
            getAllDatas(){
                return this.$store.state.allList;
        }
    }
    }
</script>

<style scoped>

</style>
(2)VnoteItem.vue
 ..
..
<template>
    <li >
        <h2>{{ data.title }}</h2>
        <p>{{ data.content }}</p>
    </li>

</template>

<script>
export default {
    name:"VnoteItem",
    data(){
        return{

        }
    },
    props:{
        // 验证
        data:Object
    }

}
</script>

<style scoped>

</style>

2、ajax提交数据
post提交一条笔记
1、效果

2、流程如何走
(1)APP.vue + main.js
显示页面+控制vuex的store数据


(2)Vnote显示Vmark组件

3、Vmark组件
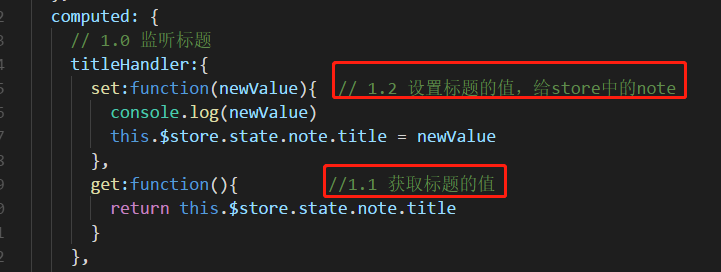
<template>
    <div class='wrap'>
    请输入文字标题: <input type="text" name="" v-model="titleHandler">

    <button class="btn btn-success" @click="addOneNote">提交</button>

        <div class="mark">

            <textarea rows="10" cols="100" class='editor' v-model='markdownHandler' ></textarea>

            <div class='show' v-html='currentValue' ref="t"></div>

        </div>
    </div>
</template>

<script>

// 导入jQuery
import $ from "jquery"

import Marked from "marked";
export default {
  name: "Vmark",
  data() {
    return {
      // markValue: ""
    };
  },
  methods: {
    // 添加1条笔记
    addOneNote(){
      console.log(this.$refs.t)
      console.log(this.$refs.t.innerText)

      var json = {
        title:this.titleHandler,  // 1.3 标题添加到json
        markdown:this.markdownHandler,
        content:this.$refs.t.innerText,

      }
      console.log(json);

      // 每次提交刷新数据
      var _this = this;

      // ajax请求 post
      $.ajax({
        url:"http://127.0.0.1:9527/api/v1/comments/",
        method:"post",
        data:json,
        success:function(data){
          console.log(data)
          _this.$store.state.allList = data  // allList笔记列表,更新数据
        },
        error:function(err){
          console.log(err)
        }
      })
    }
  },
  computed: {
    // 1.0 监听标题
    titleHandler:{
      set:function(newValue){  // 1.2 设置标题的值,给store中的note
        console.log(newValue)
        this.$store.state.note.title = newValue
      },
      get:function(){         //1.1 获取标题的值
        return this.$store.state.note.title
      }
    },

    // 监听markdown
    markdownHandler:{
      set:function(newValue){
        console.log(newValue)
        this.$store.state.note.markdown = newValue
      },
      get:function(){
        return this.$store.state.note.markdown
      }
    },

    currentValue() {
      return Marked(this.$store.state.note.markdown);
    }
  }
};
</script>

<style>

.mark {
  width: 800px;
  height: 400px;
  margin: 0 auto;
}
.editor,.show {
  float: left;
  width: 395px;
  height: 400px;
  border: 1px solid #666;
}
</style>
(1) Vmark监听数据

(2)computed计算属性:$store.state.note
(3)click提交数据+ajax提交json+刷新数据

(4)markdown格式:获取一块标签 refs.t


3、mutations 如何使用(不推荐)
Mutaitons官网 https://vuex.vuejs.org/zh/guide/mutations.html
1、改变store中的store

2、$ajax: get方法
原冗余代码

main.js 声明回调函数

App.vue 调用 回调函数

3、$ajax:post方法
原冗余ajax

main.js 声明回调函数,带参数

Vmark.vue调用回调函数 ,传参数

4、Action(推荐)
https://vuex.vuejs.org/zh/guide/actions.html
1、为什么使用Action?异步


2、如何使用
ation --->commit触发---->mutations

dispatch分发Action

5、Element
1、介绍
前端UI对比:https://www.cnblogs.com/elesos/p/9533204.html
ElementUI https://element.eleme.cn/#/zh-CN/component/installation
2、使用element

在 main.js 中写入以下内容:
import Vue from 'vue';
import App from './App.vue';

// 使用element
import ElementUI from 'element-ui';
import 'element-ui/lib/theme-chalk/index.css';

Vue.use(ElementUI);


new Vue({
  el: '#app',
  render: h => h(App)
});

使用btn按钮


3、封装自己的按钮(slot)
(1)达到这种效果


(2)class去计算属性

(3)实现
VnoteItem.vue 声明,引入按钮
<template>
    <li >
        <h2>{{ data.title }}</h2>
        <p>{{ data.content }}</p>
        <!-- <el-button type="success" round>成功按钮</el-button> -->
        <VnoteBtn typed='info' >删除按钮</VnoteBtn>

    </li>

</template>

<script>
import VnoteBtn from "./VnoteBtn"
export default {
    name:"VnoteItem",
    data(){
        return{

        }
    },
    props:{
        // 验证
        data:Object
    },
    computed:{

    },
    methods:{
        // var id

        // dispatch
    },
    components:{
        VnoteBtn
    }

}
</script>

<style scoped>

</style>

VnoteBtn.vue组件,设计
<template>
    <button class="btn" :class = "currentBtn" >
        <!-- 插槽  分发 -->
        <slot>按钮</slot>

    </button>
</template>


<script>
export default {
    name:"VnoteBtn",
    data(){
        return {

        }
    },
    props:{
        typed:String
    },
    computed:{
        currentBtn(){
            console.log(this.typed)
            return{
                "btn-success": this.typed == "success"? true:false,
                "btn-info": this.typed == "info"? true:false,
            }
        }
    }

}
</script>

<style scoped>


</style>

4、后续作业
删除一条数据
点击一条数据,赋值到markdown
6、axios技术:vue中的ajax
处理请求
之前用jquery的$.ajax
vue也有,axios技术
axios文档 https://www.kancloud.cn/yunye/axios/234845
axios中文官网 http://www.axios-js.com/zh-cn/docs/

 浙公网安备 33010602011771号