PostgreSQL
安装 https://wiki.postgresql.org/wiki/YUM_Installation
配置 https://wiki.postgresql.org/wiki/First_steps
查看服务状态

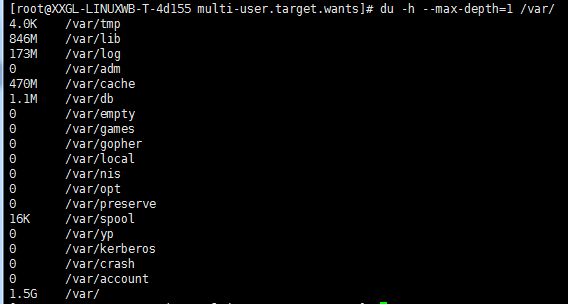
这里的数据是放在/var目录下的,建议换个地方存放,因为数据量大了很快就把/var空间占用完了
使用df -h 命令可以查看各个空间占用

通过以下命令查看具体每个目录占用空间情况
du -h --max-depth=1 /

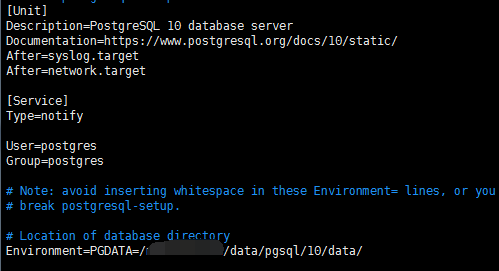
编辑服务配置文件
vi /etc/systemd/system/multi-user.target.wants/postgresql-10.service
修改这里的数据文件位置
这里要注意看配置文件的路径 ,配置远程访问需要修改下面两个文件

修改postgresql.conf

修改pg_hba.conf

这里是使用密码访问,具体参数设置参考:
https://www.postgresql.org/docs/current/static/auth-pg-hba-conf.html
程序连接
新建Asp.Net Core Web Api 应用程序
使用Nuget安装Dapper和Npgsql
修改入口类Program
public static IWebHost BuildWebHost(string[] args) =>
            WebHost.CreateDefaultBuilder(args)
                .UseStartup<Startup>()
                //.UseKestrel(options=> {
                //    options.Listen(IPAddress.Any, 5000);
                //})
                .UseKestrel()
                .UseUrls("http://*:5000")
                .Build();
新增用户类User
public class User
    {
        public int id { get; set; }
        public string name { get; set; }
    }
修改 ValuesController
[HttpGet("{id}")]
        public string Get(int id)
        {
            var conn = new NpgsqlConnection(@"Server=10.15.4.155;Port=5432;User Id=root;Password=pass;Database=postgres;");
            var result= conn.Query<User>("select * from test.test").FirstOrDefault();
            return result.name;
        }
使用应用名运行程序

打开浏览器:http://10.200.80.21:5000/api/values/1

发布到文件目录,将目录上传至CentOS
使用dotnet命令启动
dotnet WebApplication1.dll

打开浏览器查看结果

新建数据库
在CentOS中登录
su - postgres
创建数据库
create database idcenter;
授权
grant all on database idcenter to root;


 浙公网安备 33010602011771号