
【APP自动化基础】Appium自动化
Appium架构原理
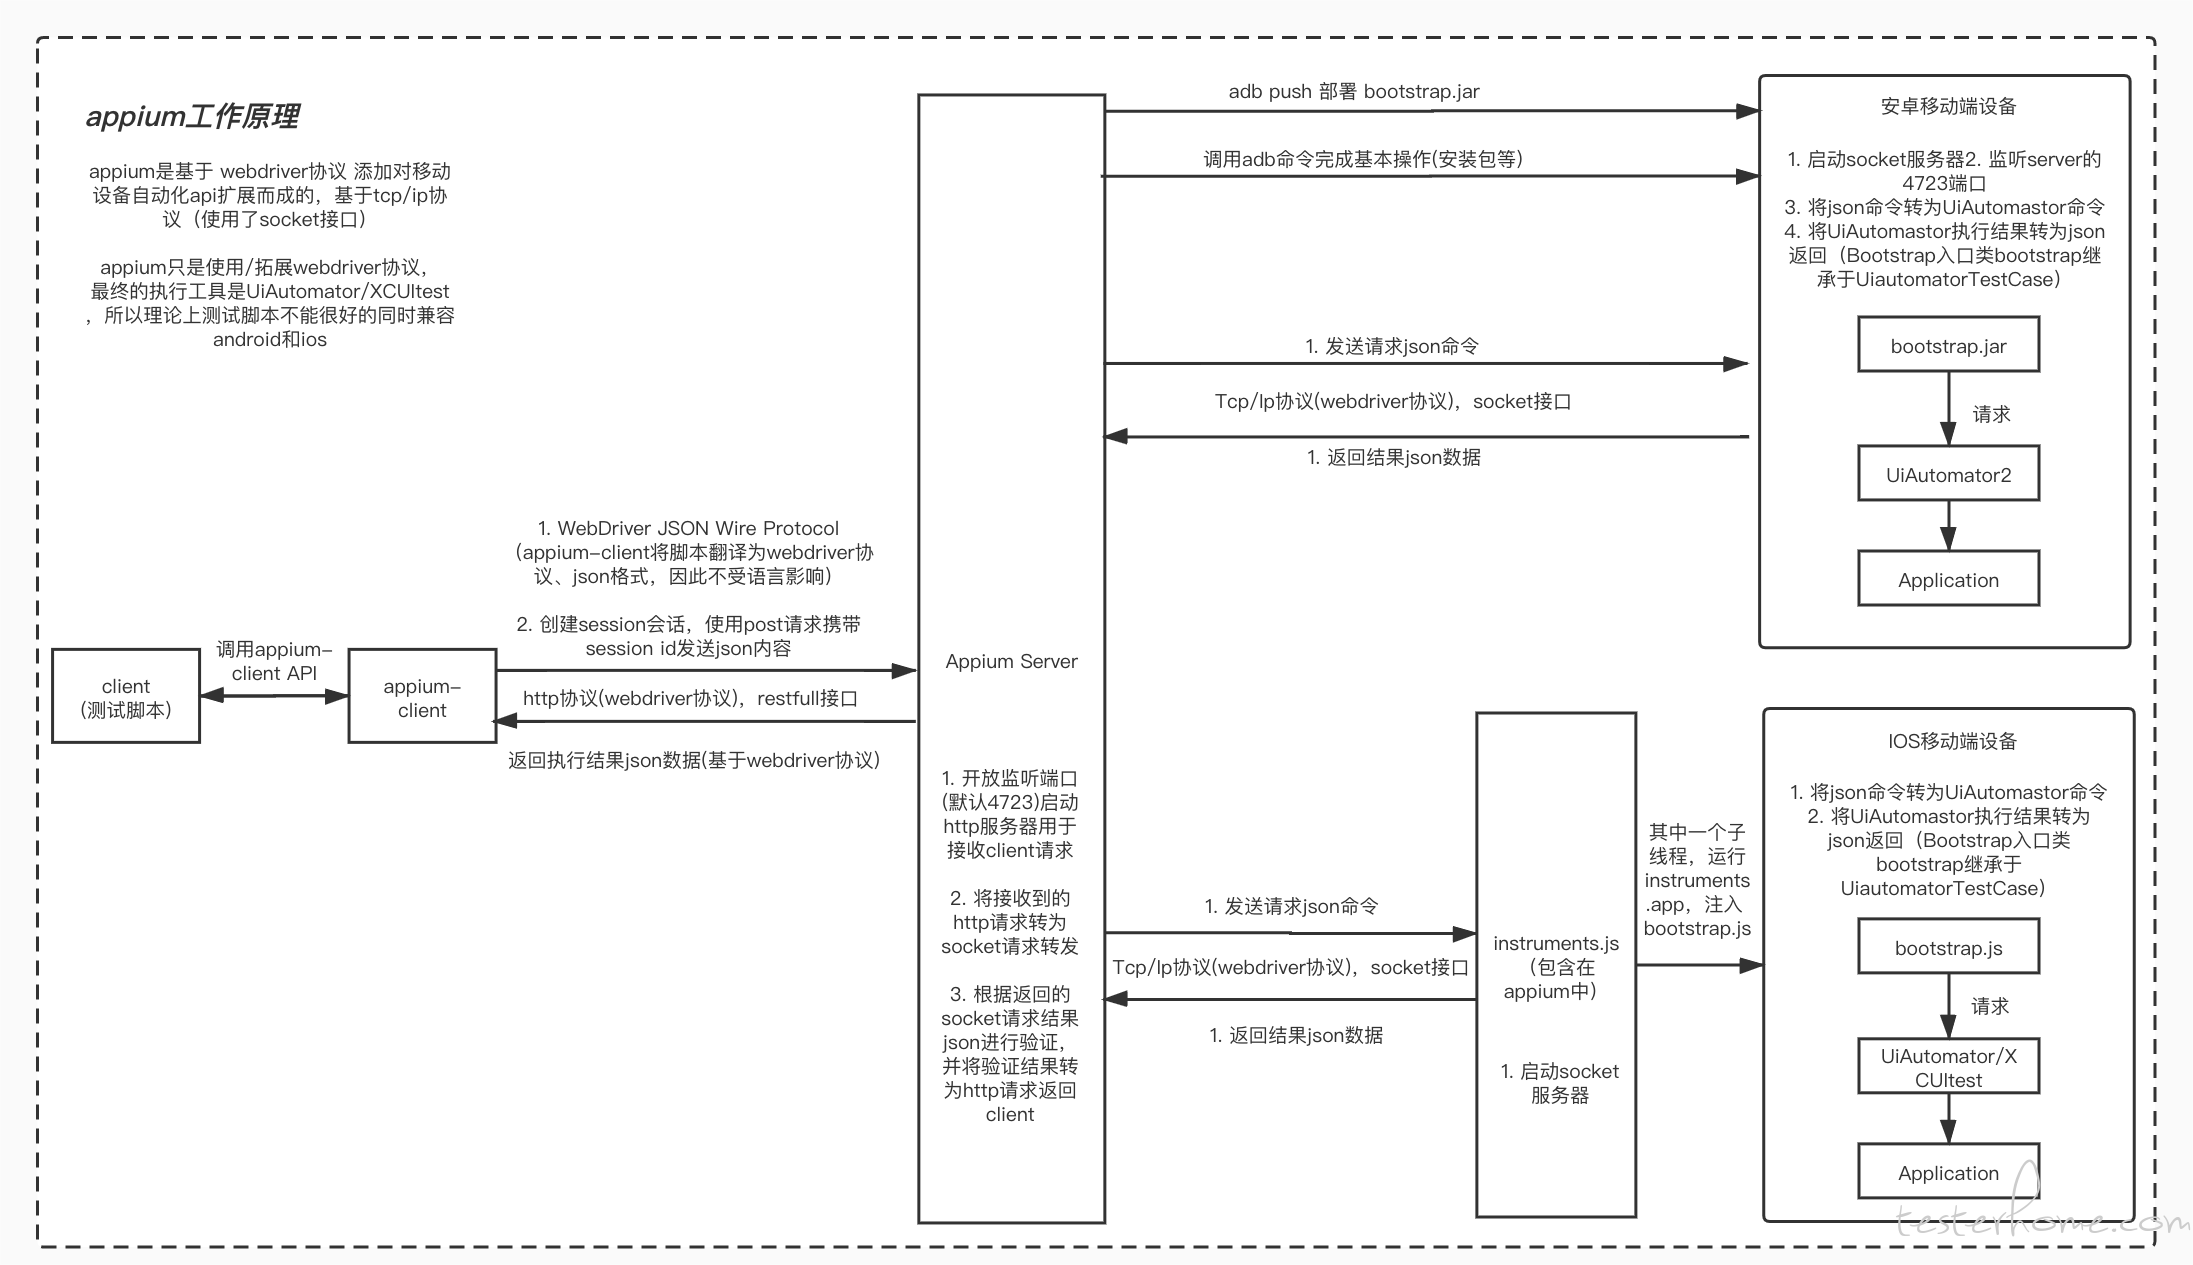

Appium通过WebDriver协议与Android和iOS设备进行通信。(WebDriver协议支持跨平台操作,并且支持多种编程语言。)
- Android端,appium基于WebDriver协议,利用bootstrap.jar开启服务,最后通过调⽤UiAutomator2框架,实现App的自动化操作。
- IOS端,appium基于WebDriver协议,通过WebDriverAgent(WDA)框架,在Client端创建了一个Server,并在手机端安装了一个名为WebDriverAgentRunner的应用。这个应用会接收来自Server的指令,并连接底层的XCTest.framework,然后让XCTest.framework调用苹果的API来操作手机进行自动化。
WebDriverAgent是Facebook开发的一个iOS自动化测试工具。
IOS端早期版本是利用instruments.js运行instruments.app来注入bootstrap.js,并通过XCUItest框架(再早之前是UiAutomator框架),实现自动化操作的;ios9.3版本后就被WebDriverAgent(WDA)取代了。
Bootstrap的主要功能是在安卓目标测试机器上开启一个socket服务器,监听端口4724,将Appium从PC端发送的命令转发给UIAutomator进行处理。
UiAutomator2是UiAutomator的升级版,增加了对Web应用的支持和其他新功能。(Android 5.0开始引入UiAutomator2;之前版本引用UiAutomator)
UiAutomator测试框架是Android SDK自带的App UI自动化测试Java库。
XCUItest 是苹果提供的用于 iOS 应用 UI 测试的框架。
Appium在驱动iOS时,之前版本是通过UIAutomation,然后更新为XCUITest。
在iOS 9.2及更低版本中,苹果提供的唯一自动化技术是UIAutomation,它运行在“Instruments”中。
从iOS 10开始,苹果完全删除了UIAutomation工具,因此Appium无法按照以前的方式进行测试。为了替代UIAutomation,苹果推出了一款名为XCUITest的新型自动化技术,从iOS 9.3到iOS 10及以上版本,XCUITest成为苹果唯一支持的自动化框架。
Appium从1.6版本开始支持XCUITest,尽管XCUITest的功能与UIAutomation相似,但在使用过程中仍存在一些差异。例如,XCUITest为UI元素提供了不同的类名,如XCUIElementTypeButton代替了UIAButton。此外,XCUITest的页面源码输出与基于UIAutomation的结果也有显著不同。
为了支持XCUITest,Appium在iOS 9.3之后全面采用了WebDriverAgent方案,这是一个由Facebook开发的iOS自动化测试工具,能够支持单台Mac对应多个设备。
Appium 1.6.3及之后的版本添加了WebDriverAgent模块
WebDriverAgentRunner实际上集成了XCUItest的功能,使Appium能够利用XCUItest框架进行iOS设备的自动化测试
环境搭建
获取app的Activity和Package的五种方式
方式一:通过dumpsys window获取
# 获取当前页面的Package和Activity
adb shell dumpsys window w | findstr \/ | findstr name=
# 或者:
adb shell dumpsys window | findstr mCurrentFocus
adb shell dumpsys window | grep mCu
# Mac端,获取当前页面的Package和Activity
adb shell dumpsys window w |grep / |grep name=
adb shell dumpsys window | grep mCurrentFocus

# 获取模拟器正在运行的APP的Package和Activity
adb shell dumpsys activity | find "mFocusedActivity"
adb shell dumpsys window windows | findstr mFocusedApp
# 获取真机正在运行的APP的Package和Activity---适用于Android 8.0以上
adb shell dumpsys activity | find "mResumedActivity"
#获取带端口号的Activity
adb shell dumpsys activity top | findstr ACTIVITY
方式二:列出模拟器或真机中所有软件的Package
# 获取设备的所有apk对应的包名和路径
adb shell pm list package -f
# 获取第三方apk的包
adb shell pm list package -3 -f
方式三:logcat日志抓START
adb shell logcat | grep START
方式四:logcat日志抓ActivityManager(实时查看)
adb shell logcat | grep ActivityManager
adb logcat | grep ActivityManager
adb logcat | grep -i ActivityManager.*Displayed
方式五:通过aapt工具获取
aapt dump badging C:\apk\weixin01.apk
元素定位获取工具
- uiautomatorviewer
- Appium Inspector
- weditor
ADB启动app
adb shell am start com.tencent.tmgp.WePop/.PermissionActivity
adb shell am start -W -n com.tencent.tmgp.WePop/com.tencent.tmgp.WePop.PermissionActivity -S
-W:等待启动完成。
-n component 指定带有软件包名称前缀的组件名称以创建显式 intent,如 com.example.app/.ExampleActivity。
-S:在启动 Activity 前,强行停止目标应用。
具体am参数解释参考:https://blog.csdn.net/weixin_44380181/article/details/129698064
UI自动化项目Demo
import time
from appium import webdriver
from selenium.webdriver.support.wait import WebDriverWait
from selenium.webdriver.common.by import By
from appium.webdriver.common.touch_action import TouchAction


class Base:
    """基类公共方法封装"""

    def __init__(self, driver):
        """初始化"""
        self.driver = driver

    def base_find(self, loc, timeout=5, poll_frequency=0.5):
        """获取查找元素"""
        # 显示等待
        return WebDriverWait(self.driver,
                             timeout=timeout,
                             poll_frequency=poll_frequency) \
            .until(lambda x: x.find_element(*loc))

    def base_input(self, loc, value):
        """输入操作"""
        # 获取元素
        el = self.base_find(loc)
        # 清空(防止缓存数据)
        el.clear()
        # 输入
        el.send_keys(value)

    def base_click(self, loc):
        """点击操作"""
        self.base_find(loc).click()

    def base_get(self, loc):
        """获取文本"""
        return self.base_find(loc).text

    def base_xy_click(self, x, y):
        """根据xy轴位置进行点击"""
        return TouchAction(self.driver).press(x=x, y=y).release().perform()

    def base_switch_handle(self):
        """窗口句柄切换"""
        handle = self.driver.current_window_handle   # 当前窗体句柄
        print("当前窗体句柄:", handle)
        handles = self.driver.window_handles    # 所有窗体句柄
        print("窗体句柄", handles)       # 获取浏览器所有窗体的句柄
        self.driver.switch_to.window(handles[-1])   # 切换至最新窗口句柄

class PaoPao:
    # 1.初始化脚本
    def __init__(self):
        desired_caps = {
                  'platformName': 'Android',  # 平台系统
                  'deviceName': 'emulator-5554',  # 设备名称
                  'platformVersion': '7.1.2',  # 系统版本
                  'appPackage': 'com.xueqiu.android',  # 被测应用包
                  'appActivity': '.view.WelcomeActivityAlias',  # 要打开的应用活动
                  # 'udid': '750BBKL22GDN'   # 苹果配置
                  # 'app': 'xueqiu.apk',   # 安装应用包
                  # 'autoLaunch': False,  #是否让Appium自动安装和启动应用,默认为True
                  # 'automationName': "uiautomator1",         # 自动化测试框架 (1.4以上的appium不用写)
                  'autoGrantPermissions': "true",  # 默认允许app获取相关权限
                  'noReset': 'True',  # 每次非首次启动(冷启动)可以记住登录
                  'unicodeKeyboard': 'true',            # 此两行是为了解决字符输入不正确的问题
                  'resetKeyboard': 'true',              # 运行完成后重置软键盘的状态

        }
        self.driver = webdriver.Remote("http://localhost:4723/wd/hub", desired_caps)
        self.base = Base(self.driver)
    # 2.执行脚本编写
    def run(self):
        # 判断登录状态

        self.base.base_click((By.ID, "dialog_confirm_btn"))
        print("tag")
        time.sleep(2)
        self.base.base_click((By.TAG_NAME, "同意"))


if __name__ == '__main__':
    PaoPao().run()
POM设计模式
POM模式介绍
POM(page object model)页面对象模型,将每个待测页面都封装成一个page类。然后将那些繁琐的元素定位和元素操作都封装到这个类里,是一种封装思想。在自动化测试中引入POM设计模式,可以实现页面元素和测试用例的分离,能使测试代码的可读性、维护性和复用性变得更好。
POM设计思路
POM设计模式一般分为三层(分层设计模式)
- 第一层:对selenium进行二次封装,定义一个所有页面类都继承的BasePage类,封装selenium的常用方法,如元素的定位、输入、点击等,用那些封装那些。
- 第二层:将每个待测页面封装成一个page类,这个类中包含三个小层:
- 表现层,页面的可见元素。
- 操作层,对页面元素进行的操作,如输入、点击等。
- 业务层,对页面元素操作后实现的功能,如登录、注册、支付等。
- 第三层:使用单元测试框架对业务逻辑进行测试,并实现数据驱动(参数化)。
项目实战
进群交流、获取更多干货, 请关注微信公众号:

> > > 咨询交流、进群,请加微信,备注来意:sanshu1318 (←点击获取二维码)
> > > 学习路线+测试实用干货精选汇总:
https://www.cnblogs.com/upstudy/p/15859768.html
> > > 【自动化测试实战】python+requests+Pytest+Excel+Allure,测试都在学的热门技术:
https://www.cnblogs.com/upstudy/p/15921045.html
> > > 【热门测试技术,建议收藏备用】项目实战、简历、笔试题、面试题、职业规划:
https://www.cnblogs.com/upstudy/p/15901367.html
> > > 声明:如有侵权,请联系删除。
============================= 升职加薪 ==========================
更多干货,正在挤时间不断更新中,敬请关注+期待。

 浙公网安备 33010602011771号