
跟我学ASP.NET MVC之七:SportsStrore一个完整的购物车
摘要:
SportsStore应用程序进展很顺利,但是我不能销售产品直到设计了一个购物车。在这篇文章里,我就将创建一个购物车。
在目录下的每个产品旁边添加一个添加到购物车按钮。点击这个按钮将显示客户到目前为止选择的产品摘要,包含总价格。这时候,用户可以点击继续购物按钮返回产品目录,或者点击现在下单按钮完成订单结束购物过程。
定义Cart实体类
在SportsStore.Domain工程的Entities文件夹下,创建代码文件Cart.cs。
 1 using System.Collections.Generic;
 2 using System.Linq;
 3
 4 namespace SportsStore.Domain.Entities
 5 {
 6     public class Cart
 7     {
 8         private List<CartLine> lineCollection = new List<CartLine>();
 9         public void AddItem(Product product, int quantity)
10         {
11             CartLine line = lineCollection.Where(p => p.Product.ProductID == product.ProductID).FirstOrDefault();
12             if (line == null)
13             {
14                 lineCollection.Add(new CartLine
15                 {
16                     Product = product,
17                     Quantity = quantity
18                 });
19             }
20             else {
21                 line.Quantity += quantity;
22             }
23         }
24
25         public void RemoveLine(Product product)
26         {
27             lineCollection.RemoveAll(l => l.Product.ProductID == product.ProductID);
28         }
29
30         public decimal ComputeTotalValue()
31         {
32             return lineCollection.Sum(e => e.Product.Price * e.Quantity);
33         }
34
35         public void Clear()
36         {
37             lineCollection.Clear();
38         }
39
40         public IEnumerable<CartLine> CartLines
41         {
42             get { return lineCollection; }
43         }
44     }
45
46     public class CartLine
47     {
48         public Product Product { get; set; }
49         public int Quantity { get; set; }
50     }
51 }
Cart类使用了CartLine类,他们定义在同一个代码文件内,保存一个客户选择的产品,以及客户想买的数量。我定义了添加条目到购物车的方法,从购物车删除之前已经添加的条目的方法,计算购物车内条目总价格,以及删除所有条目清空购物车的方法。我还提供了一个通过IEnumrable<CartLine>访问购物车内容的属性。这些都很直观,通过一点点LINQ很容易用C#实施。
定义视图模型类
在SportsStore.WebUI工程的Models文件夹内,创建代码文件CartIndexViewModel。
 1 using SportsStore.Domain.Entities;
 2
 3 namespace SportsStore.WebUI.Models
 4 {
 5     public class CartIndexViewModel
 6     {
 7         public Cart Cart { get; set; }
 8         public string ReturnUrl { get; set; }
 9     }
10 }
该模型类有两个属性。Cart属性保存了购物车信息,ReturnUrl保存了产品目录的URL,需要这个信息是因为,客户可以随时点击继续购物按钮,返回之前的产品目录URL。
添加购物车控制器CartController
 1 using SportsStore.Domain.Abstract;
 2 using SportsStore.Domain.Entities;
 3 using SportsStore.WebUI.Models;
 4 using System.Linq;
 5 using System.Web.Mvc;
 6
 7 namespace SportsStore.WebUI.Controllers
 8 {
 9     public class CartController : Controller
10     {
11         private IProductRepository repository;
12
13         public CartController(IProductRepository productRepository)
14         {
15             repository = productRepository;
16         }
17
18         public ActionResult Index(string returnUrl)
19         {
20             return View(new CartIndexViewModel
21             {
22                 Cart = GetCart(),
23                 ReturnUrl = returnUrl
24             });
25         }
26
27         public RedirectToRouteResult AddToCart(int productId, string returnUrl)
28         {
29             Product product = repository.Products.FirstOrDefault(p => p.ProductID == productId);
30             if (product != null)
31             {
32                 GetCart().AddItem(product, 1);
33             }
34             return RedirectToAction("Index", new { returnUrl = returnUrl });
35         }
36
37         public RedirectToRouteResult RemoveFromCart(int productId, string returnUrl)
38         {
39             Product product = repository.Products.FirstOrDefault(p => p.ProductID == productId);
40             if (product != null)
41             {
42                 GetCart().RemoveLine(product);
43             }
44             return RedirectToAction("Index", new { returnUrl });
45         }
46
47         private Cart GetCart()
48         {
49             Cart cart = (Cart)Session["Cart"];
50             if (cart == null)
51             {
52                 cart = new Cart();
53                 Session["Cart"] = cart;
54             }
55
56            return cart;
57         }
58     }
59 }
该控制器的一些解释:
- GetCart方法:从Session里获取购物车对象,如果该对象为空,则创建这个对象,添加到Session,并返回该对象。
- Index方法:传入returnUrl参数,返回购物车摘要信息视图。该视图的模型类是CartIndexViewModel,模型类对象的Cart属性通过调用方法GetCart返回,ReturnUrl属性使用方法参数赋值。
- AddToCart方法:传入productId参数和returnUrl参数,添加产品到购物车,并返回重定向的购物车摘要信息视图。方法的返回类型是RedirectToRouteResult,该类的基类是ActionResult。
- RemoveFromCart方法:传入productId参数和returnUrl参数,从购物车中删除产品,并返回重定向的购物车摘要信息视图。
- AddToCart方法和RemoveFromCart方法都是通过调用Controller基类的RedirectToAction方法,返回重定向视图类RedirectToRouteResult的对象。
- RedirectToAction方法的第一个参数是Action名称,第二个无类型对象参数提供传入Action的参数值。这里将重定向到Cart控制器的Index方法。
添加到购物车按钮
修改ProductSummary.cshtml视图,添加Add to Cart按钮。
 1 @model SportsStore.Domain.Entities.Product
 2
 3 <div class="well">
 4     <h3>
 5         <strong>@Model.Name</strong>
 6         <span class="pull-right label label-primary">@Model.Price.ToString("c")</span>
 7     </h3>
 8     @using (Html.BeginForm("AddToCart", "Cart"))
 9     {
10         <div class="pull-right">
11             @Html.HiddenFor(x => x.ProductID)
12             @Html.Hidden("returnUrl", Request.Url.PathAndQuery)
13             <input type="submit" class="btn btn-success" value="Add to cart" />
14         </div>
15     }
16     <span class="lead"> @Model.Description</span>
17 </div>
- 使用Html.BeginForm帮助方法,生成AddToCart表单。方法的第一个参数是Action名称AddToCart,第二个参数是控制器名称Cart。
- 使用Html.HiddenFor帮助方法,生成表单的hidden html元素,该元素的name属性是字符串ProductID,值是该产品的ProductID值。
- 使用Html.Hidden帮助方法,生成表单的hidden html元素,该元素的name属性是字符串returnUrl,值是当前页面的Url。
- 控制器的AddToCart方法将通过表单元素的名称,获取要传入该方法的参数productID和returnUrl的值(大小写不敏感)。
添加购物车详细信息视图
在Views文件夹的Cart文件夹内,添加Index.cshtml。
 1 @model SportsStore.WebUI.Models.CartIndexViewModel
 2
 3 @{
 4     ViewBag.Title = "Sports Store: Your Cart";
 5 }
 6 <style>
 7     #cartTable td {
 8         vertical-align: middle;
 9     }
10 </style>
11 <h2>Your cart</h2>
12 <table id="cartTable" class="table">
13     <thead>
14         <tr>
15             <th>Quantity</th>
16             <th>Item</th>
17             <th class="text-right">Price</th>
18             <th class="text-right">Subtotal</th>
19         </tr>
20     </thead>
21     <tbody>
22         @foreach (var line in Model.Cart.CartLines)
23         {
24             <tr>
25                 <td class="text-center">@line.Quantity</td>
26                 <td class="text-left">@line.Product.Name</td>
27                 <td class="text-right">
28                     @line.Product.Price.ToString("c")
29                 </td>
30                 <td class="text-right">
31                     @((line.Quantity * line.Product.Price).ToString("c"))
32                 </td>
33                 <td>
34                     @using (Html.BeginForm("RemoveFromCart", "Cart"))
35                     {
36                         @Html.Hidden("ProductId", line.Product.ProductID)
37                         @Html.HiddenFor(x => x.ReturnUrl)
38                         <input class="btn btn-sm btn-warning" type="submit" value="Remove" />
39                     }
40                 </td>
41             </tr>
42         }
43     </tbody>
44     <tfoot>
45         <tr>
46             <td colspan="3" class="text-right">Total:</td>
47             <td class="text-right">
48                 @Model.Cart.ComputeTotalValue().ToString("c")
49             </td>
50         </tr>
51     </tfoot>
52 </table>
53 <div class="text-center">
54     <a class="btn btn-primary" href="@Model.ReturnUrl">Continue shopping</a>
55 </div>
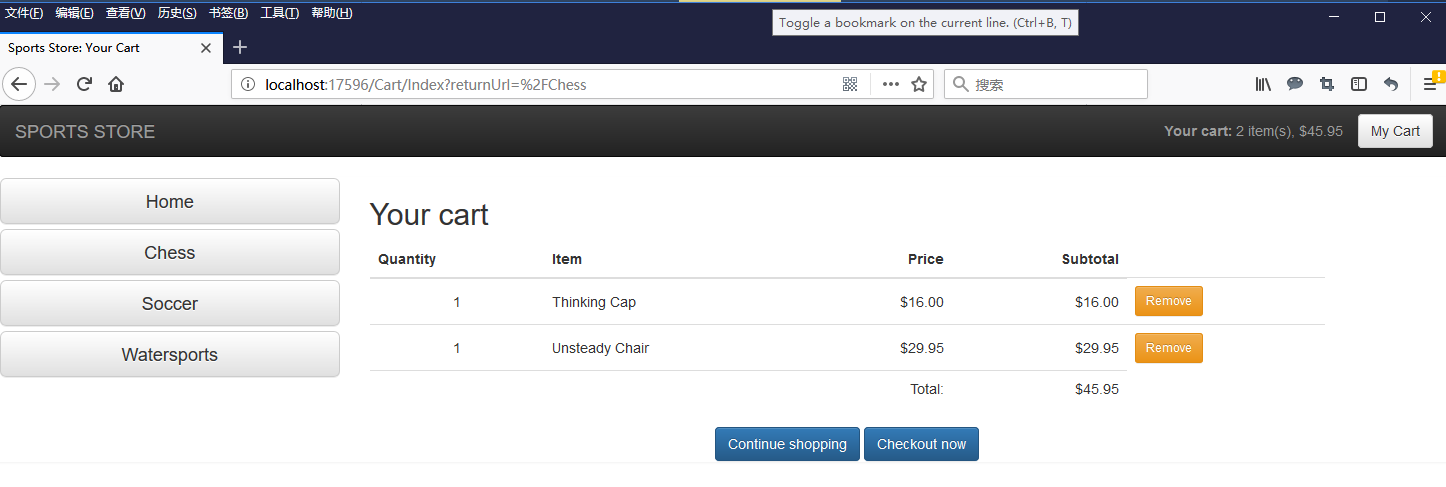
- 这个视图以表格的形式,展示了购物车摘要产品信息,包含了产品名称、购买数量、单价、价格信息。
- 每个产品条目后面,添加删除表单和删除按钮,这里的表单和按钮,同之前添加到购物车按钮一样。
- 表格底部,调用ComputeTotalValue方法,返回总价格。
- 页面底部中间,显示一个Continue Shopping按钮,ReturnUrl属性指向之前的产品目录Url,点击后返回产品目录页面。
运行程序,得到运行结果。
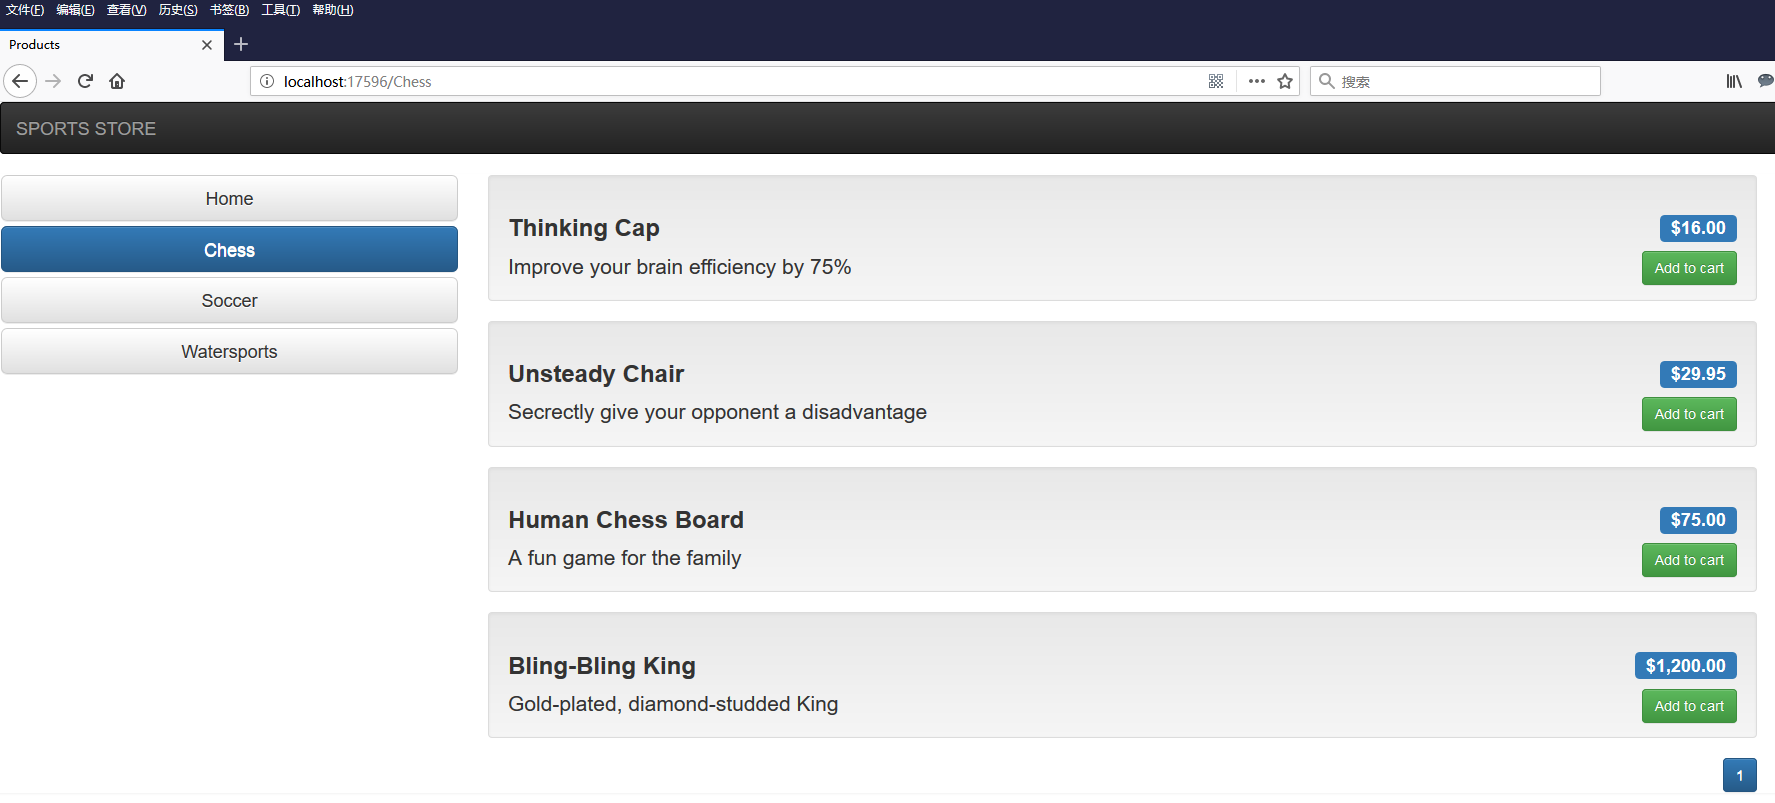
这里我选择了Chess目录,浏览器地址栏上的URL变成了:http://localhost:17596/Chess
如果我点击Human Chess Board产品的Add To Cart按钮,得到页面:

注意这时候的浏览器地址栏的地址变成了:http://localhost:17596/Cart/Index?returnUrl=%2FChess,包含的购物车的Cart/Index,以及以问号?开始的参数?returnUrl=%2FChess。returnUrl的值就是刚才的页面地址。
如果再点击Continue Shoppinga按钮,将返回到returnUrl指向的页面,既是刚才的页面:http://localhost:17596/Chess
添加购物车摘要视图
我还需要添加一个显示购物车摘要信息的小部件,可以在所有应用程序页面上都能看到,点击后返回购物车详细信息。这个小部件和导航条目类似,需要使用返回PartialViewResult的Action方法,在_Layout.cshtml视图中,使用Html.Action方法嵌入这个视图。
首先修改CartController控制器,添加Summary方法。
1         public PartialViewResult Summary()
2         {
3             return PartialView(GetCart());
4         }
然后,添加Summary视图。
 1 @model SportsStore.Domain.Entities.Cart
 2
 3 <div class="navbar-right">
 4     @Html.ActionLink("My Cart", "Index", "Cart", new { returnUrl = Request.Url.PathAndQuery }, new { @class = "btn btn-default navbar-btn" })
 5 </div>
 6 <div class="navbar-text navbar-right">
 7     <b>Your cart:</b>
 8     @Model.CartLines.Sum(x => x.Quantity) item(s),
 9     @Model.ComputeTotalValue().ToString("c")
10 </div>
最后,修改_Layout.cshtml文件,调用Html帮助类方法Action,嵌入这个视图到头部导航栏内。
 1 <!DOCTYPE html>
 2
 3 <html>
 4 <head>
 5     <meta name="viewport" content="width=device-width, initial-scale=1.0">
 6     <link href="~/Content/bootstrap.css" rel="stylesheet" />
 7     <link href="~/Content/bootstrap-theme.css" rel="stylesheet" />
 8     <title>@ViewBag.Title</title>
 9     <style>
10         .navbar-right {
11             float: right !important;
12             margin-right: 15px;
13             margin-left: 15px;
14         }
15     </style>
16 </head>
17 <body>
18     <div class="navbar navbar-inverse" role="navigation">
19         <a class="navbar-brand" href="#">SPORTS STORE</a>
20         @Html.Action("Summary", "Cart")
21     </div>
22     <div class="row panel">
23         <div id="categories" class="col-xs-3">
24             @Html.Action("Menu", "Nav")
25         </div>
26         <div class="col-xs-8">
27             @RenderBody()
28         </div>
29     </div>
30 </body>
31 </html>
这里添加页面样式navbar-right,使得购物车摘要信息部件在头部导航栏内靠右显示。
运行程序,得到运行结果。

使用模板绑定
MVC使用一个名叫模板绑定的系统,为了传参数给行为方法,它从HTTP请求创建C#对象并作为参数传给行为方法。MVC框架就是这样来处理表单的。它看到目标行为方法的参数,然后使用模板绑定得到浏览器发送过来的表单里元素的值,然后根据名称转化成对应类型的相同名称的参数,传给行为方法。
模板绑定可以从请求里的任何信息中创建C#类型。这是MVC框架的核心特征之一。我将创建一个客户的模板绑定来改进CartController控制器。
在SportsStore.WebUI工程的Infrastructure文件夹内创建子文件夹Binders,并在子文件夹下创建代码文件CartModelBinder.cs。
 1 using SportsStore.Domain.Entities;
 2 using System.Web.Mvc;
 3
 4 namespace SportsStore.WebUI.Infrastructure.Binders
 5 {
 6     public class CartModelBinder : IModelBinder
 7     {
 8         private const string sessionKey = "Cart";
 9
10         public object BindModel(ControllerContext controllerContext, ModelBindingContext bindingContext)
11         {
12             // get the Cart from the session
13             Cart cart = null;
14             if (controllerContext.HttpContext.Session != null)
15             {
16                 cart = (Cart)controllerContext.HttpContext.Session[sessionKey];
17             }
18             // create the Cart if there wasn't one in the session data
19             if (cart == null)
20             {
21                 cart = new Cart();
22                 if (controllerContext.HttpContext.Session != null)
23                 {
24                     controllerContext.HttpContext.Session[sessionKey] = cart;
25                 }
26             }
27             // return the cart
28             return cart;
29         }
30     }
31 }
- CartModelBinder类继承接口IModelBinder,并实现接口的方法BindModel。
- 接口方法BindModel提供两个参数,参数类型ControllerContext:controllerContext获取控制器上下文环境信息,参数类型ModelBindingContext:bindingContext获取绑定的上下文信息。
- 接口方法BindModel返回类型是object,他返回的对象的值就是Action方法参数的值。
- 参数controllerContext对象的HttpContext属性保存了HTTP请求中的信息,通过controllerContext.HttpContext.Session获取HTTP请求中的Session信息。
- 我的BindMode方法的方法体代码和CartController控制器的GetCart方法相同。都是从Session里获取购物车对象,如果该对象为空,则创建这个对象,添加到Session,并返回该对象。
有了模板绑定方法后,还需要将模板方法在Global.asax.cs代码的事件Application_Start内,通过调用ModelBinders.Binders.Add方法,注册到MVC应用程序里。
修改Global.asax代码。
 1 using SportsStore.Domain.Entities;
 2 using SportsStore.WebUI.Infrastructure.Binders;
 3 using System;
 4 using System.Collections.Generic;
 5 using System.Linq;
 6 using System.Web;
 7 using System.Web.Mvc;
 8 using System.Web.Routing;
 9
10 namespace SportsStore
11 {
12     public class MvcApplication : System.Web.HttpApplication
13     {
14         protected void Application_Start()
15         {
16             AreaRegistration.RegisterAllAreas();
17             RouteConfig.RegisterRoutes(RouteTable.Routes);
18
19             ModelBinders.Binders.Add(typeof(Cart), new CartModelBinder());
20         }
21     }
22 }
ModelBinders.Binders是ModelBinders的静态属性,它是一个继承自IDictionary类型的对象,它的Add方法提供两个参数完成模板绑定类型的绑定。第一个参数是返回类型参数,第二个参数实例化一个继承自IModelBinder类型的对象。
这样,我现在可以修改CartController控制器的各个Action方法,添加Cart类型参数,并使用模板绑定方式获得Cart对象参数的值。
 1 using SportsStore.Domain.Abstract;
 2 using SportsStore.Domain.Entities;
 3 using SportsStore.WebUI.Models;
 4 using System.Linq;
 5 using System.Web.Mvc;
 6
 7 namespace SportsStore.WebUI.Controllers
 8 {
 9     public class CartController : Controller
10     {
11         private IProductRepository repository;
12
13         public CartController(IProductRepository productRepository)
14         {
15             repository = productRepository;
16         }
17
18         public ActionResult Index(Cart cart, string returnUrl)
19         {
20             return View(new CartIndexViewModel
21             {
22                 Cart = cart,
23                 ReturnUrl = returnUrl
24             });
25         }
26
27         public RedirectToRouteResult AddToCart(Cart cart, int productId, string returnUrl)
28         {
29             Product product = repository.Products.FirstOrDefault(p => p.ProductID == productId);
30             if (product != null)
31             {
32                 cart.AddItem(product, 1);
33             }
34             return RedirectToAction("Index", new { returnUrl = returnUrl });
35         }
36
37         public RedirectToRouteResult RemoveFromCart(Cart cart, int productId, string returnUrl)
38         {
39             Product product = repository.Products.FirstOrDefault(p => p.ProductID == productId);
40             if (product != null)
41             {
42                 cart.RemoveLine(product);
43             }
44             return RedirectToAction("Index", new { returnUrl });
45         }
46
47         public PartialViewResult Summary(Cart cart)
48         {
49             return PartialView(cart);
50         }
51     }
52 }
控制器方法的参数Cart:cart将从模板绑定类的方法BindModel中,返回cart对象。
提交订单
在SportsStore.Domain工程里的Entities文件夹内,创建代码文件ShippingDetails,表示物流表单信息。
 1 namespace SportsStore.Domain.Entities
 2 {
 3     public class ShippingDetails
 4     {
 5         public string Name { get; set; }
 6         public string Line1 { get; set; }
 7         public string Line2 { get; set; }
 8         public string Line3 { get; set; }
 9         public string City { get; set; }
10         public string State { get; set; }
11         public string Zip { get; set; }
12         public string Country { get; set; }
13         public bool GiftWrap { get; set; }
14     }
15 }
创建提交订单的接口IOrderProcessor。
1 using SportsStore.Domain.Entities;
2
3 namespace SportsStore.Domain.Abstract
4 {
5     public interface IOrderProcessor
6     {
7         void ProcessOrder(Cart cart, ShippingDetails shippingDetails);
8     }
9 }
该接口只有一个方法ProcessOrder,接受Cart类型参数和ShippingDefails参数,处理订单。
创建订单处理类EmailOrderProcessor,实现接口IOrderProcessor。
 1 using SportsStore.Domain.Abstract;
 2 using SportsStore.Domain.Entities;
 3 using System.Net;
 4 using System.Net.Mail;
 5 using System.Text;
 6
 7 namespace SportsStore.Domain.Concrete
 8 {
 9     public class EmailSettings
10     {
11         public string MailToAddress = "your email address to receive Email";
12         public string MailFromAddress = "your email address to send Email";
13         public bool UseSsl = true;
14         public string Username = "user name of email account to send Email";
15         public string Password = "password of email account to send Email";
16         public string ServerName = "smtp server address";
17         public int ServerPort = smtp port;
18         public bool WriteAsFile = false;
19         public string FileLocation = @"c:\sports_store_emails";
20     }
21
22     public class EmailOrderProcessor : IOrderProcessor
23     {
24         private EmailSettings emailSettings;
25
26         public EmailOrderProcessor(EmailSettings settings)
27         {
28             emailSettings = settings;
29         }
30
31         public void ProcessOrder(Cart cart, ShippingDetails shippingInfo)
32         {
33             using (var smtpClient = new SmtpClient())
34             {
35                 smtpClient.EnableSsl = emailSettings.UseSsl;
36                 smtpClient.Host = emailSettings.ServerName;
37                 //smtpClient.Port = emailSettings.ServerPort;
38                 smtpClient.UseDefaultCredentials = true;
39                 smtpClient.Credentials = new NetworkCredential(emailSettings.Username, emailSettings.Password);
40                 if (emailSettings.WriteAsFile)
41                 {
42                     //smtpClient.DeliveryMethod = SmtpDeliveryMethod.SpecifiedPickupDirectory;
43                     //smtpClient.PickupDirectoryLocation = emailSettings.FileLocation;
44                     //smtpClient.EnableSsl = false;
45                 }
46                 else
47                 {
48                     smtpClient.DeliveryMethod = smtpClient.DeliveryMethod;
49                 }
50                 StringBuilder body = new StringBuilder()
51                     .AppendLine("A new order has been submitted")
52                     .AppendLine("---")
53                     .AppendLine("Items:");
54                 foreach (var line in cart.CartLines)
55                 {
56                     var subtotal = line.Product.Price * line.Quantity;
57                     body.AppendFormat("{0} x {1} (subtotal: {2:c}) ",
58                     line.Quantity,
59                     line.Product.Name,
60                     subtotal);
61                     body.AppendLine();
62                 }
63                 body.AppendFormat("Total order value: {0:c}", cart.ComputeTotalValue())
64                 .AppendLine()
65                 .AppendLine("---")
66                 .AppendLine()
67                 .AppendLine("Ship to:")
68                 .AppendLine(shippingInfo.Name)
69                 .AppendLine(shippingInfo.Line1)
70                 .AppendLine(shippingInfo.Line2 ?? "")
71                 .AppendLine(shippingInfo.Line3 ?? "")
72                 .AppendLine(shippingInfo.City)
73                 .AppendLine(shippingInfo.State ?? "")
74                 .AppendLine(shippingInfo.Country)
75                 .AppendLine(shippingInfo.Zip)
76                 .AppendLine("---")
77                 .AppendFormat("Gift wrap: {0}",
78                 shippingInfo.GiftWrap ? "Yes" : "No");
79                 MailMessage mailMessage = new MailMessage(emailSettings.MailFromAddress, emailSettings.MailToAddress, "New order submitted!", body.ToString());
80                 if (emailSettings.WriteAsFile)
81                 {
82                     mailMessage.BodyEncoding = Encoding.ASCII;
83                 }
84                 try
85                 {
86                     smtpClient.Send(mailMessage);
87                 }
88                 catch (System.Exception e)
89                 {
90
91                 }
92             }
93         }
94     }
95 }
这里使用SmtpClient对象发送邮件。
- EmailOrderProcessor类对象里包含了EmailSettings对象,EmailSettings对象保存了用于接收和发送邮件的配置信息。
- EmailOrderProcessor类对象使用构造函数方式,实例化EmailSettings对象。
在Infrastructure文件夹内找到代码文件NinjectDependencyResolver.cs,在AddBindings方法内,添加Ninject注册对接口IOrderProcessor和类EmailOrderProcessor的绑定。
 1         private void AddBindings()
 2         {
 3             kernel.Bind<IProductRepository>().To<EFProductRepository>();
 4
 5             EmailSettings emailSettings = new EmailSettings
 6             {
 7                 WriteAsFile = bool.Parse(System.Configuration.ConfigurationManager.AppSettings["Email.WriteAsFile"] ?? "false")
 8             };
 9             kernel.Bind<IOrderProcessor>().To<EmailOrderProcessor>().WithConstructorArgument("settings", emailSettings);
10         }
这里,使用方法WithConstructorArgument("settings", emailSettings),将对象emailSettings,通过构造函数方式注入到EmailOrderProcessor对象内的emailSettings属性。
现在我们可以修改CartController控制器,添加提交订单的业务逻辑代码了。
 1 using SportsStore.Domain.Abstract;
 2 using SportsStore.Domain.Entities;
 3 using SportsStore.WebUI.Models;
 4 using System.Linq;
 5 using System.Web.Mvc;
 6
 7 namespace SportsStore.WebUI.Controllers
 8 {
 9     public class CartController : Controller
10     {
11         private IProductRepository repository;
12         private IOrderProcessor orderProcessor;
13
14         public CartController(IProductRepository productRepository, IOrderProcessor productOrderProcessor)
15         {
16             repository = productRepository;
17             orderProcessor = productOrderProcessor;
18         }
19
20         public ActionResult Index(Cart cart, string returnUrl)
21         {
22             return View(new CartIndexViewModel
23             {
24                 Cart = cart,
25                 ReturnUrl = returnUrl
26             });
27         }
28
29         public RedirectToRouteResult AddToCart(Cart cart, int productId, string returnUrl)
30         {
31             Product product = repository.Products.FirstOrDefault(p => p.ProductID == productId);
32             if (product != null)
33             {
34                 cart.AddItem(product, 1);
35             }
36             return RedirectToAction("Index", new { returnUrl = returnUrl });
37         }
38
39         public RedirectToRouteResult RemoveFromCart(Cart cart, int productId, string returnUrl)
40         {
41             Product product = repository.Products.FirstOrDefault(p => p.ProductID == productId);
42             if (product != null)
43             {
44                 cart.RemoveLine(product);
45             }
46             return RedirectToAction("Index", new { returnUrl });
47         }
48
49         public PartialViewResult Summary(Cart cart)
50         {
51             return PartialView(cart);
52         }
53
54         public ViewResult Checkout()
55         {
56             return View(new ShippingDetails());
57         }
58
59         [HttpPost]
60         public ViewResult Checkout(Cart cart, ShippingDetails shippingDetails)
61         {
62             if (cart.CartLines.Count() == 0)
63             {
64                 ModelState.AddModelError("", "Sorry, your cart is empty!");
65             }
66             if (ModelState.IsValid)
67             {
68                 orderProcessor.ProcessOrder(cart, shippingDetails);
69                 cart.Clear();
70                 return View("Completed");
71             }
72             else
73             {
74                 return View(shippingDetails);
75             }
76         }
77     }
78 }
- 跟接口属性epository属性一样,通过构造函数注入接口属性orderProcessor属性值。
- 两个Action方法名称都是Checkout,MVC通过方法特性识别它们。第一个Checkout没有添加任何方法特性,在HTTP GET请求的时候调用它。第二个Checkout有[HttpPost]特性修饰,在HTTP POST请求的时候调用它。
- 第一个Checkout方法,返回ShippingDetails类型对象作为视图模型的视图,用于填写物流表单。
- 第二个Checkout方法,第一个参数类型是Cart,通过模板方法返回参数值。第二个参数类型是ShippingDetails,通过获取视图的表单元素值获取该对象。
- 如果购物车内为空,则通过调用ModelState.AddModelError方法,向视图添加错误消息。添加错误消息后,ModelState的IsValid属性将为false。
- 如果ModelState.IsValid属性为true,则处理该订单,这里是发送邮件。清空购物车,并返回Complete视图给客户。
- 如果ModelState.IsValid属性为false,还是发送HTTP GET请求的Checkout视图,将刚才填写的shippingDetails对象返回至Checkout视图。这样,客户可以看到和修改刚才填写的信息。
最后是修改视图。
订单详情视图Index.cshtml上添加Checkout按钮。
 1 @model SportsStore.WebUI.Models.CartIndexViewModel
 2
 3 @{
 4     ViewBag.Title = "Sports Store: Your Cart";
 5 }
 6 <style>
 7     #cartTable td {
 8         vertical-align: middle;
 9     }
10 </style>
11 <h2>Your cart</h2>
12 <table id="cartTable" class="table">
13     <thead>
14         <tr>
15             <th>Quantity</th>
16             <th>Item</th>
17             <th class="text-right">Price</th>
18             <th class="text-right">Subtotal</th>
19         </tr>
20     </thead>
21     <tbody>
22         @foreach (var line in Model.Cart.CartLines)
23         {
24             <tr>
25                 <td class="text-center">@line.Quantity</td>
26                 <td class="text-left">@line.Product.Name</td>
27                 <td class="text-right">
28                     @line.Product.Price.ToString("c")
29                 </td>
30                 <td class="text-right">
31                     @((line.Quantity * line.Product.Price).ToString("c"))
32                 </td>
33                 <td>
34                     @using (Html.BeginForm("RemoveFromCart", "Cart"))
35                     {
36                         @Html.Hidden("ProductId", line.Product.ProductID)
37                         @Html.HiddenFor(x => x.ReturnUrl)
38                         <input class="btn btn-sm btn-warning" type="submit" value="Remove" />
39                     }
40                 </td>
41             </tr>
42         }
43     </tbody>
44     <tfoot>
45         <tr>
46             <td colspan="3" class="text-right">Total:</td>
47             <td class="text-right">
48                 @Model.Cart.ComputeTotalValue().ToString("c")
49             </td>
50         </tr>
51     </tfoot>
52 </table>
53 <div class="text-center">
54     <a class="btn btn-primary" href="@Model.ReturnUrl">Continue shopping</a>
55     @Html.ActionLink("Checkout now", "Checkout", null, new { @class = "btn btn-primary" })
56 </div>
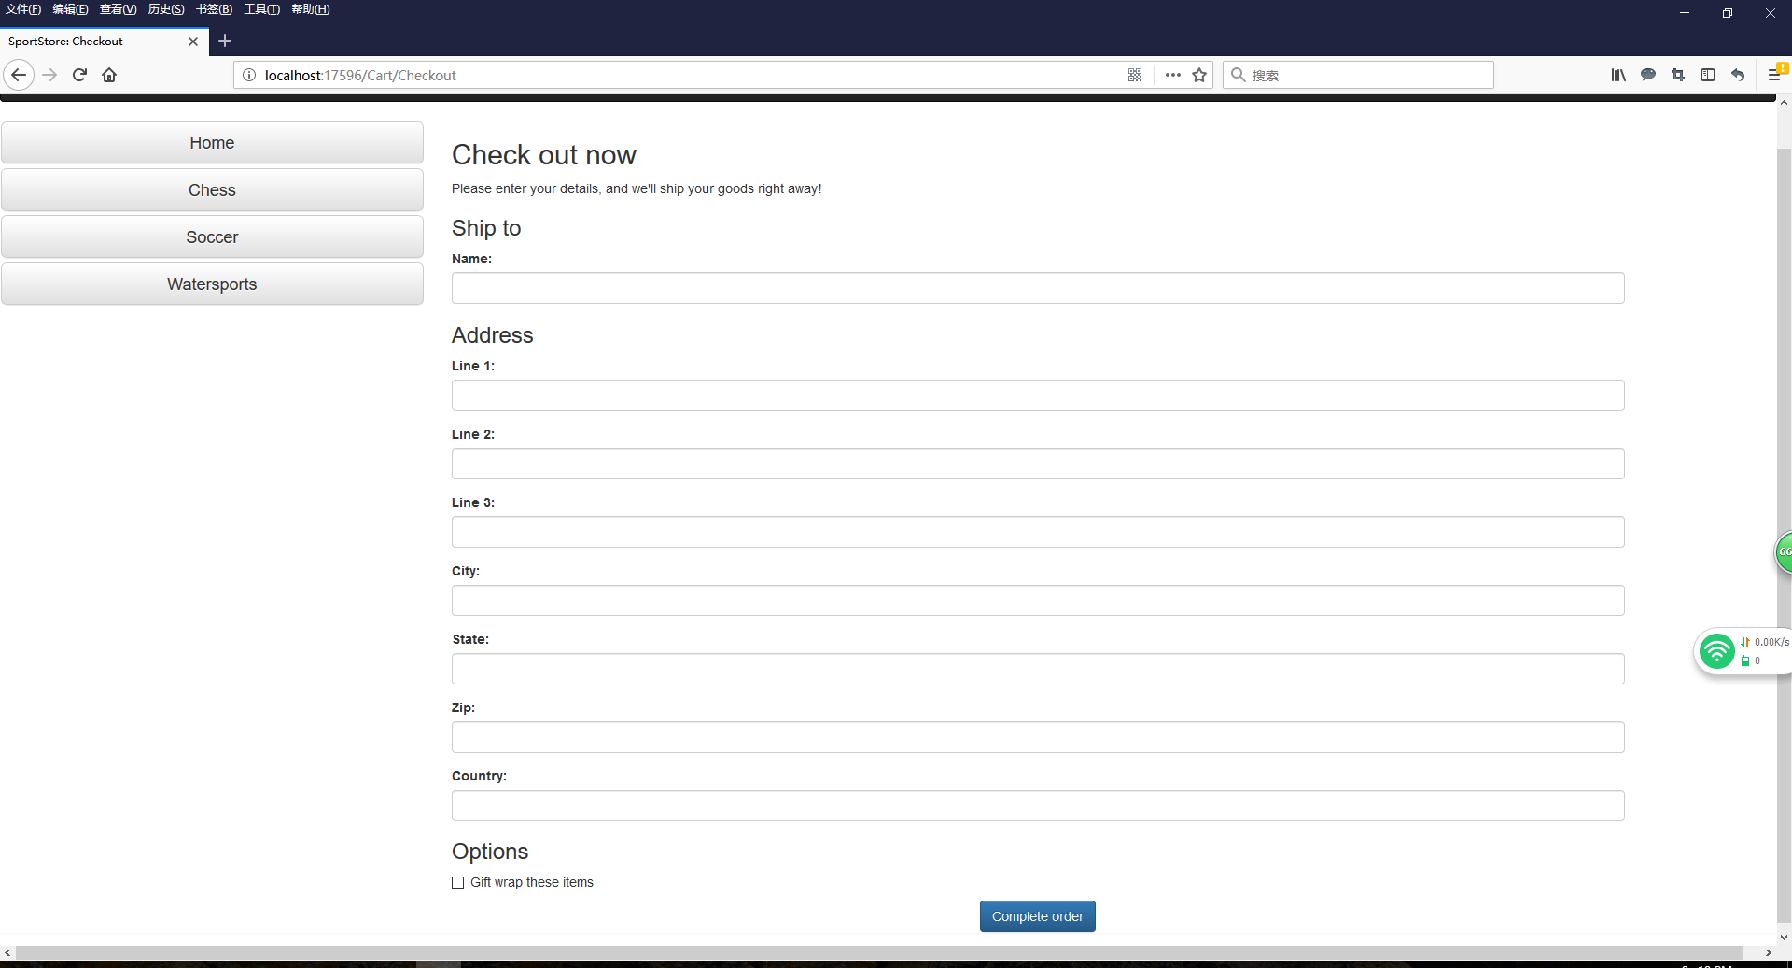
Checkout视图:
 1 @model SportsStore.Domain.Entities.ShippingDetails
 2
 3 @{
 4     ViewBag.Title = "SportStore: Checkout";
 5 }
 6 <h2>Check out now</h2>
 7 <p>Please enter your details, and we'll ship your goods right away!</p>
 8 @using (Html.BeginForm())
 9 {
10     <h3>Ship to</h3>
11     <div class="form-group">
12         <label>Name:</label>
13         @Html.TextBoxFor(x => x.Name, new { @class = "form-control" })
14     </div>
15     <h3>Address</h3>
16     <div class="form-group">
17         <label>Line 1:</label>
18         @Html.TextBoxFor(x => x.Line1, new { @class = "form-control" })
19     </div>
20     <div class="form-group">
21         <label>Line 2:</label>
22         @Html.TextBoxFor(x => x.Line2, new { @class = "form-control" })
23     </div>
24     <div class="form-group">
25         <label>Line 3:</label>
26         @Html.TextBoxFor(x => x.Line3, new { @class = "form-control" })
27     </div>
28     <div class="form-group">
29         <label>City:</label>
30         @Html.TextBoxFor(x => x.City, new { @class = "form-control" })
31     </div>
32     <div class="form-group">
33         <label>State:</label>
34         @Html.TextBoxFor(x => x.State, new { @class = "form-control" })
35     </div>
36     <div class="form-group">
37         <label>Zip:</label>
38         @Html.TextBoxFor(x => x.Zip, new { @class = "form-control" })
39     </div>
40     <div class="form-group">
41         <label>Country:</label>
42         @Html.TextBoxFor(x => x.Country, new { @class = "form-control" })
43     </div>
44         <h3>Options</h3>
45         <div class="checkbox">
46             <label>
47                 @Html.EditorFor(x => x.GiftWrap)
48                 Gift wrap these items
49             </label>
50         </div>
51         <div class="text-center">
52             <input class="btn btn-primary" type="submit" value="Complete order" />
53         </div>
54 }
注意这里,我都是使用的Html.TextBoxFor方法和Html.EditorFor方法,通过传入一个lamda表达式的形式,创建表单元素。这样创建的表单元素能够对应Action的参数ShippingDetails类型的属性名称,自动创建对象并传给方法参数。
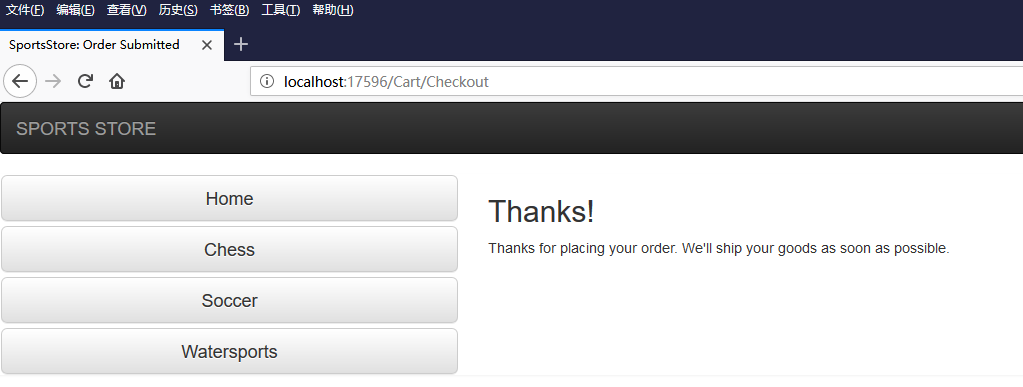
Completed视图:
@{
    ViewBag.Title = "SportsStore: Order Submitted";
}
<h2>Thanks!</h2>
Thanks for placing your order. We'll ship your goods as soon as possible.
运行程序,得到运行结果。
Checkout视图:
点击Complete order按钮,返回Complete视图。
添加表单验证
刚才的表单,如果不填写任何内容,也能提交成功。这种操作是非法的,现在我们需要给表单添加客户端验证。
一般的客户端开发,都是将验证的JavaScript代码直接写在页面上。但是MVC框架提供了从实体类到客户端的验证方式,那就是给实体类属性添加ValidationAttribute。
修改ShippingDetails内,给属性添加ValidationAttribute特性。
 1 using System.ComponentModel.DataAnnotations;
 2
 3 namespace SportsStore.Domain.Entities
 4 {
 5     public class ShippingDetails
 6     {
 7         [Required(ErrorMessage = "Please enter a name")]
 8         public string Name { get; set; }
 9         [Required(ErrorMessage = "Please enter the first address line")]
10         public string Line1 { get; set; }
11         public string Line2 { get; set; }
12         public string Line3 { get; set; }
13         [Required(ErrorMessage = "Please enter a city name")]
14         public string City { get; set; }
15         [Required(ErrorMessage = "Please enter a state name")]
16         public string State { get; set; }
17         public string Zip { get; set; }
18         [Required(ErrorMessage = "Please enter a country name")]
19         public string Country { get; set; }
20         public bool GiftWrap { get; set; }
21     }
22 }
这里,为几个必填字段添加了Required特性,提供的参数是个字符串,如果实体绑定失败的时候(ModelState.IsValid为false),用于在客户端显示该字符串。
修改Checkout视图,添加@Html.ValidationSummary(),用于在一个页面区域显示完整的表单错误消息。
 1 @model SportsStore.Domain.Entities.ShippingDetails
 2
 3 @{
 4     ViewBag.Title = "SportStore: Checkout";
 5 }
 6 <h2>Check out now</h2>
 7 <p>Please enter your details, and we'll ship your goods right away!</p>
 8 @using (Html.BeginForm())
 9 {
10     @Html.ValidationSummary()
11     <h3>Ship to</h3>
12     <div class="form-group">
13         <label>Name:</label>
14         @Html.TextBoxFor(x => x.Name, new { @class = "form-control" })
15     </div>
16     <h3>Address</h3>
17     <div class="form-group">
18         <label>Line 1:</label>
19         @Html.TextBoxFor(x => x.Line1, new { @class = "form-control" })
20     </div>
21     <div class="form-group">
22         <label>Line 2:</label>
23         @Html.TextBoxFor(x => x.Line2, new { @class = "form-control" })
24     </div>
25     <div class="form-group">
26         <label>Line 3:</label>
27         @Html.TextBoxFor(x => x.Line3, new { @class = "form-control" })
28     </div>
29     <div class="form-group">
30         <label>City:</label>
31         @Html.TextBoxFor(x => x.City, new { @class = "form-control" })
32     </div>
33     <div class="form-group">
34         <label>State:</label>
35         @Html.TextBoxFor(x => x.State, new { @class = "form-control" })
36     </div>
37     <div class="form-group">
38         <label>Zip:</label>
39         @Html.TextBoxFor(x => x.Zip, new { @class = "form-control" })
40     </div>
41     <div class="form-group">
42         <label>Country:</label>
43         @Html.TextBoxFor(x => x.Country, new { @class = "form-control" })
44     </div>
45         <h3>Options</h3>
46         <div class="checkbox">
47             <label>
48                 @Html.EditorFor(x => x.GiftWrap)
49                 Gift wrap these items
50             </label>
51         </div>
52         <div class="text-center">
53             <input class="btn btn-primary" type="submit" value="Complete order" />
54         </div>
55 }
为了更美观,我再Content文件夹内添加样式表文件ErrorStyles.css,并在_Layout.cshtml引用它。
1 .field-validation-error {color: #f00;}
2 .field-validation-valid { display: none;}
3 .input-validation-error { border: 1px solid #f00; background-color:#fee; }
4 .validation-summary-errors { font-weight: bold; color: #f00;}
5 .validation-summary-valid { display: none;}
实体对象验证失败后,新生成的视图表单元素,将包含这些css的class属性,在统一的ErrorStyles.css样式表内定义这些样式。
新的_Layout.cshtml文件
 1 <!DOCTYPE html>
 2
 3 <html>
 4 <head>
 5     <meta name="viewport" content="width=device-width, initial-scale=1.0">
 6     <link href="~/Content/bootstrap.css" rel="stylesheet" />
 7     <link href="~/Content/bootstrap-theme.css" rel="stylesheet" />
 8     <link href="~/Content/ErrorStyles.css" rel="stylesheet" />
 9     <title>@ViewBag.Title</title>
10     <style>
11         .navbar-right {
12             float: right !important;
13             margin-right: 15px;
14             margin-left: 15px;
15         }
16     </style>
17 </head>
18 <body>
19     <div class="navbar navbar-inverse" role="navigation">
20         <a class="navbar-brand" href="#">SPORTS STORE</a>
21         @Html.Action("Summary", "Cart")
22     </div>
23     <div class="row panel">
24         <div id="categories" class="col-xs-3">
25             @Html.Action("Menu", "Nav")
26         </div>
27         <div class="col-xs-8">
28             @RenderBody()
29         </div>
30     </div>
31 </body>
32 </html>
运行程序,得到表单验证错误时的运行页面。
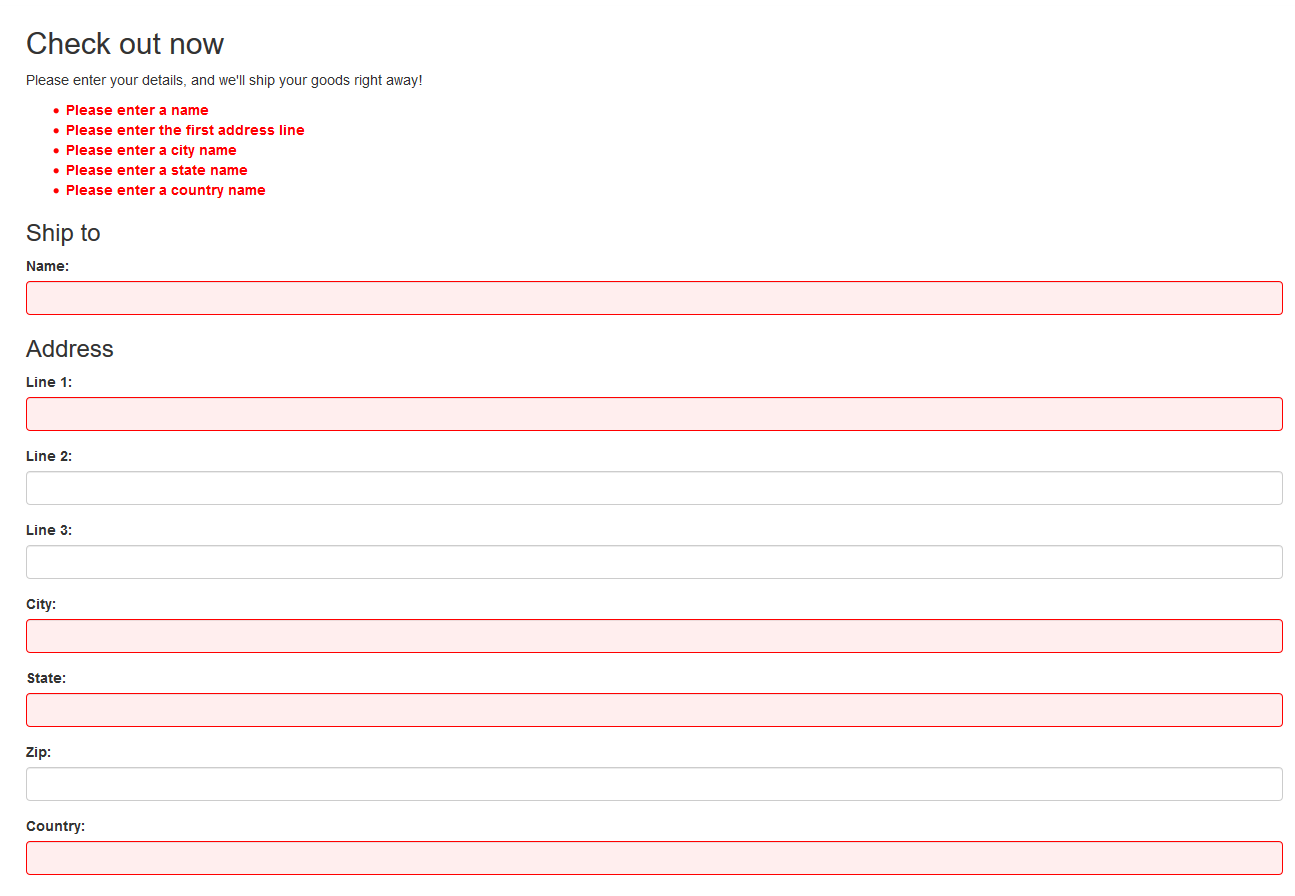
这里看到,出错的表单元素显示红色背景色和红色边框。表单上部用刚才定义的样式,显示了定义在实体类属性的特性上的错误提示字符串。
作者:丹尼大叔
出处:http://www.cnblogs.com/uncle_danny
本文版权归作者和博客园共有,欢迎转载。但未经作者同意必须保留此段声明,且在文章页面明显位置给出原文链接,否则保留追究法律责任的权利。

 浙公网安备 33010602011771号