
spring-envrionment
概述
Spring中的环境Environment,表示的是一个Spring应用在运行时所处的环境,应用在运行时,可以从Environment中获取环境信息
因素
实际在Spring中Environment环境主要由两个因素组成
-
properties -
profiles
properties
所谓properties,其实际上就是一组key-value的键值对存储
properties属性的来源(属性源)可以有多个,且来源类型有多种properties/yml文件JVM propertiesJNDIservlet context parameters上下文参数- 特殊
properties对象 - ...
properties的主要作用是
- 用户配置属性源
- 程序从属性源中获取目标属性
profiles
所谓profiles,就是在逻辑上将properties/bean进行分组,启动程序时可以通过激活不同profile,来实现不同环境的切换
- 每个
profile需要一个当前应用中的唯一名称 - 只有当
profile被激活时,其对应properties/bean才会生效
系统环境
系统环境指的是Java程序运行的环境,其主要包括
- 系统属性
JRE环境的一部分,存储JVM虚拟机与Java应用的一些信息- 可以使用
System#getProperties方法获取
- 环境变量
Java应用运行的宿主机操作系统的信息- 可以使用
System#getenv方法获取
属性文件
properties文件
properties文件是常用的属性文件
- 其在
Spring/SpringBoot中都可以使用 Spring中提供了PropertiesLoaderUtils工具类可以加载解析properties文件- 解析结果封装为
Properties实例
- 解析结果封装为
properties文件的存储格式:
- 每行存储,存储格式为
key=value - 其中
List/Array默认对值通过,分割- 也可以通过添加
[index]后缀自定义,但是需要保证序号连续,序号从0开始
- 也可以通过添加
#int
person.id=1
#String
person.name=tom
#List
person.hobby=吃饭,睡觉
#Array
person.family=father,mather
person.color[0]=red
person.color[1]=blue
#map
person.map.k1=v1
person.map.k2=v2
#实体对象
person.pet.type=dog
person.pet.name=旺财
yaml文件
以yaml/yml为后缀的文件,是遵循yaml语法的一种配置文件,通常用于SpringBoot项目中
其配置示例如下:
person:
  #int
  id: 1
  #String
  name: tom
  #List/Array
  hobby:
    - 吃饭
    - 睡觉
  family:
    father,
    mather
  #Array特有
# family: [father,mather]
  #map
  map:
    k1: v1
    k2: v2
# map: {k1: v1,k2: v2}
  #实体对象
  pet:
    type: dog
    name: 旺财
yaml语法不详细展开,其中需要注意的是
- 在
Springboot中使用yaml配置文件,可以在单yaml文件中编写多个配置 - 其中多个配置使用
---进行分割,通过spring.profiles定义配置所属profile - 通过
spring.profiles.active决定启用那个配置 - 注意,此配置方式只能在
application.yml配置文件中使用
# 公共配置
spring:
  profiles:
    active: pro # 使用名为pro的配置,这里可以切换成dev
  datasource:
    url: jdbc:mysql://localhost:3306/test_db?serverTimezone=UTC&useSSL=false&allowPublicKeyRetrieval=true
    password: 123456
    username: root
---
# 开发环境配置
spring:
  profiles: dev # profiles属性 代表配置的名称

server:
  port: 8080
---
# 生产环境配置
spring:
  profiles: pro

server:
  port: 80
在SpringBoot中提供了YamlPropertySourceLoader用于加载yaml
基类分析
标准环境
类图
StandardEnvironment是一个标准环境对象,我们查看其类图

PropertyResolver
PropertyResolver属性解析器顶级接口
// org.springframework.core.env.PropertyResolver
public interface PropertyResolver {

    // 判断属性是否存在
    boolean containsProperty(String key);

    // 获取属性值
    String getProperty(String key);

    // 解析源数据中占位符,使用对应属性值填充
    String resolvePlaceholders(String text);
}
分析可知,PropertyResolver主要对于环境中属性的处理
- 判断属性是否存在
- 获取属性值
- 解析源数据中占位符,使用对应属性值填充
Environment
// org.springframework.core.env.Environment
public interface Environment extends PropertyResolver {

    // 获取激活的 profiles
    String[] getActiveProfiles();

    // 获取默认的 profiles
    String[] getDefaultProfiles();

    // 判断 profiles 是否激活
    boolean acceptsProfiles(String... profiles);
}
分析可知
Environment主要针对于profiles
ConfigurablePropertyResolver
// org.springframework.core.env.ConfigurablePropertyResolver
public interface ConfigurablePropertyResolver extends PropertyResolver {

    // 类型转换服务器
    ConfigurableConversionService getConversionService();

    // 占位符前后缀
    void setPlaceholderPrefix(String placeholderPrefix);
    void setPlaceholderSuffix(String placeholderSuffix);

    // 占位符中 propertyName 与 defaultVal 的分隔符
    void setValueSeparator(@Nullable String valueSeparator);
}
分析可知,一个属性解析器可以配置以下属性
- 类型转换服务器
- 占位符前后缀
- 占位符中
propertyName与defaultVal的分隔符- 通用占位符格式
${propertyName:defaultVal}- 其中分隔符为
:
- 通用占位符格式
ConfigurableEnvironment
// org.springframework.core.env.ConfigurableEnvironment
public interface ConfigurableEnvironment extends Environment, ConfigurablePropertyResolver {

    // profile 设置
    void setActiveProfiles(String... profiles);
    void addActiveProfile(String profile);
    void setDefaultProfiles(String... profiles);

    // 属性源获取
    MutablePropertySources getPropertySources();

    // 获取系统属性
    Map<String, Object> getSystemProperties();
    // 获取系统环境信息
    Map<String, Object> getSystemEnvironment();

    // 合并父环境 Environment 信息
    void merge(ConfigurableEnvironment parent);
}
分析可知
Environment可以配置profilesEnvironment默认存在包含系统属性/系统环境信息Environment可以合并一个父环境Environment- 存在相同属性,子
Environment覆盖父Environment
- 存在相同属性,子
AbstractEnvironment
AbstractEnvironment是Environment的抽象基类,其中定义了一些基础属性
// org.springframework.core.env.AbstractEnvironment
public abstract class AbstractEnvironment implements ConfigurableEnvironment {

    // 激活 profiles
    public static final String ACTIVE_PROFILES_PROPERTY_NAME = "spring.profiles.active";
    private final Set<String> activeProfiles = new LinkedHashSet<>();

    // 默认 profiles
    public static final String DEFAULT_PROFILES_PROPERTY_NAME = "spring.profiles.default";
	private final Set<String> defaultProfiles = new LinkedHashSet<>(getReservedDefaultProfiles());

    // 可变属性源
	private final MutablePropertySources propertySources;

    // 属性解析器
	private final ConfigurablePropertyResolver propertyResolver;

    /* 无参构造 */
    public AbstractEnvironment() {
        // 默认无参构造调用重载有参构造
		this(new MutablePropertySources());
	}

    /* 有参构造 */
    protected AbstractEnvironment(MutablePropertySources propertySources) {
		this.propertySources = propertySources;
        // 创建属性解析器
		this.propertyResolver = createPropertyResolver(propertySources);
        // 自定义属性配置
		customizePropertySources(propertySources);
	}
}
分析可知,一个Environment包括
profiles存储- 属性存储源
MutablePropertySources - 属性解析器
ConfigurablePropertyResolver
同时要注意:
AbstractEnvironment的构造时,将调用customizePropertySources进行自定义属性源配置- 所以
AbstractEnvironment子类也会调用customizePropertySources
StandardEnvironment
StandardEnvironment就是一个标准的Environment实现
// org.springframework.core.env.StandardEnvironment
public class StandardEnvironment extends AbstractEnvironment {

    // 默认的系统属性源名称
    public static final String SYSTEM_ENVIRONMENT_PROPERTY_SOURCE_NAME = "systemEnvironment";
    public static final String SYSTEM_PROPERTIES_PROPERTY_SOURCE_NAME = "systemProperties";

    protected void customizePropertySources(MutablePropertySources propertySources) {
        // 添加两个默认的系统属性源
		propertySources.addLast(
				new PropertiesPropertySource(SYSTEM_PROPERTIES_PROPERTY_SOURCE_NAME, getSystemProperties()));
		propertySources.addLast(
				new SystemEnvironmentPropertySource(SYSTEM_ENVIRONMENT_PROPERTY_SOURCE_NAME, getSystemEnvironment()));
	}
}
分析可知
- 标准环境默认存在两个系统属性源
- 系统环境信息属性源
- 系统属性属性源
小结
经过上述分析,一个标准的属性Environment实例包括以下信息:
profiles- 环境管理逻辑组
MutablePropertySources- 属性存储源
- 具体属性存储的对象
- 默认包含两个系统属性源
- 系统环境信息属性源
- 系统属性属性源
- 属性存储源
ConfigurablePropertyResolver- 属性解析器
- 从属性源中解析出属性值
- 额外包含
ConfigurableConversionService- 属性值类型转换器
- 占位符相关
placeholderPrefix/placeholderSuffix- 占位符的前后缀
- 默认为
${}
valueSeparator- 占位符中
propertyName与defaultVal的分隔符
- 占位符中
- 属性解析器
属性源
属性源,是真实属性存储的对象
PropertySource
PropertySource是属性源的顶级抽象父类
// org.springframework.core.env.PropertySource
public abstract class PropertySource<T> {

    // 属性源的名称
    protected final String name;

    // 属性的取值来源,真实存储
	protected final T source;

    // 获取属性值
    public abstract Object getProperty(String name);
}
分析可知
- 每个属性源都有对应的名称
PropertySource管理一个泛型类型的属性source,它是真正存储属性数据的实例
PropertySources
PropertySources是管理多个PropertySource的属性源接口
// org.springframework.core.env.PropertySources
public interface PropertySources extends Iterable<PropertySource<?>> {

    // 获取属性源列表的 Stream
    default Stream<PropertySource<?>> stream() {
		return StreamSupport.stream(spliterator(), false);
	}

    // 是否包含目标 name 的属性源
    boolean contains(String name);

    // 根据名称获取属性源
    PropertySource<?> get(String name);
}
MutablePropertySources
// org.springframework.core.env.MutablePropertySources
public class MutablePropertySources implements PropertySources {

    // 数据源列表
    private final List<PropertySource<?>> propertySourceList = new CopyOnWriteArrayList<>();

    // 数据源列表操作函数
    // addFirst、addLast、stream ...

    // 属性操作函数
    // contains、get ...
}
分析可知
- 使用
CopyOnWriteArrayList管理多个属性源
为何使用CopyOnWriteArrayList作为存储容器
- 属性源有优先级顺序,
List可以按序从属性源中获取属性 - 属性源不经常变动,
CopyOnWriteArrayList的遍历更加稳定
常用实现
MapPropertySource
MapPropertySource的主要特点就是其中source实例为一个Map<String, Object>类型对象
// org.springframework.core.env.MapPropertySource
public class MapPropertySource extends EnumerablePropertySource<Map<String, Object>> {}
PropertiesPropertySource
PropertiesPropertySource是MapPropertySource的实现,其特点是source为Properties实例
// org.springframework.core.env.PropertiesPropertySource
public class PropertiesPropertySource extends MapPropertySource {

    public PropertiesPropertySource(String name, Properties source) {
		super(name, (Map) source);
	}
}
SystemEnvironmentPropertySource
PropertiesPropertySource是MapPropertySource的实现,其特点在于将会对属性名称进行预处理化匹配,包括
- 忽略大小写
- 替换
-与.字符为_
具体处理查看源码
// org.springframework.core.env.SystemEnvironmentPropertySource
public class SystemEnvironmentPropertySource extends MapPropertySource {

    public SystemEnvironmentPropertySource(String name, Map<String, Object> source) {
		super(name, source);
	}
}
StubPropertySource
// org.springframework.core.env.PropertySource.StubPropertySource
public static class StubPropertySource extends PropertySource<Object> {

    public StubPropertySource(String name) {
        super(name, new Object());
    }
}
StubPropertySource是PropertySource中的一个静态内部类,可以发现:
StubPropertySource中的source实际是一个Object实例- 实际上
StubPropertySource并不是一个真正意义上可以使用的属性源,其主要就是用于占位,以便在后续的实际属性源对象准备好后,能够按照预期的搜索顺序进行查找和使用
属性解析
属性解析,就是从属性源中解析出目标属性值
属性解析器
PropertySourcesPropertyResolver
// org.springframework.core.env.PropertySourcesPropertyResolver
public class PropertySourcesPropertyResolver extends AbstractPropertyResolver {

    // 属性源
    private final PropertySources propertySources;

    protected <T> T getProperty(String key, Class<T> targetValueType, boolean resolveNestedPlaceholders) {
		if (this.propertySources != null) {
            // 1. 遍历管理的属性源
			for (PropertySource<?> propertySource : this.propertySources) {
                // 2. 尝试从属性中获取
				Object value = propertySource.getProperty(key);
				if (value != null) {	// 3. 当前属性源中能获取到值
					if (resolveNestedPlaceholders && value instanceof String) {
                        // 3.1 进行占位符解析
						value = resolveNestedPlaceholders((String) value);
					}
                    // 3.2 进行类型转换后返回值
					return convertValueIfNecessary(value, targetValueType);
				}
                // 4. 当前属性源中无法获取,则尝试从下个属性源中获取
			}
		}
        // 5. 遍历所有属性源,都无法获取,则返回空
		return null;
	}
}
分析可知:
-
属性解析器的工作
- 遍历属性源进行属性获取
- 对于
String类型属性,解析其占位符- 实际通过
PropertyPlaceholderHelper实例完成
- 实际通过
- 根据返回类型,对属性值进行类型转换
- 实际通过
ConfigurableConversionService实例完成
- 实际通过
-
属性源是有优先级的
- 由于是通过遍历属性源进行属性获取,那么排在前面的属性源的优先级就高
占位符解析器
PropertyPlaceholderHelper
PropertyPlaceholderHelper主要用于解析字符串中的占位符信息
// org.springframework.util.PropertyPlaceholderHelper
public class PropertyPlaceholderHelper {

    // 占位符前后缀
    private final String placeholderPrefix;
	private final String placeholderSuffix;

    // 占位符中 propertyName 与 defaultVal 的分隔符
    private final String valueSeparator;

    // 是否忽略无法解析的占位符属性
    private final boolean ignoreUnresolvablePlaceholders;


    // 占位符解析方法
    public String replacePlaceholders(String value, final Properties properties) {
		return replacePlaceholders(value, properties::getProperty);
	}

    public String replacePlaceholders(String value, PlaceholderResolver placeholderResolver) {
		return parseStringValue(value, placeholderResolver, null);
	}
}
PropertyPlaceholderHelper提供了replacePlaceholders用于解析字符串中占位符,此方法需要两个参数
value- 即包含占位符的源字符串
Properties/PlaceholderResolver- 即解析占位符对应属性时,具体取值的来源
调用的解析方法为parseStringValue,实际使用的是PlaceholdersResolver完成占位符解析工作,具体的解析逻辑此处不赘述,可查看源码
类型转换器
ConversionService
ConversionService是转换服务的顶级接口
// org.springframework.core.convert.ConversionService
public interface ConversionService {

    // 类型转换判断
    boolean canConvert(@Nullable Class<?> sourceType, Class<?> targetType);
    boolean canConvert(@Nullable TypeDescriptor sourceType, TypeDescriptor targetType);

    // 类型转换
    <T> T convert(@Nullable Object source, Class<T> targetType);
    Object convert(@Nullable Object source, @Nullable TypeDescriptor sourceType, TypeDescriptor targetType);
}
ConverterRegistry
ConverterRegistry是转换策略顶级接口
// org.springframework.core.convert.converter.ConverterRegistry
public interface ConverterRegistry {

    // 添加转换器
    void addConverter(Converter<?, ?> converter);
    void addConverter(GenericConverter converter);

    // 添加转换工厂
    void addConverterFactory(ConverterFactory<?, ?> factory);
}
分析可知:
- 实际转换工作由
Converter/ConverterFactory完成
Converter
Converter是转换器的顶级接口
// org.springframework.core.convert.converter.Converter
public interface Converter<S, T> {

    // 类型转换
    T convert(S source);
}
ConverterFactory
ConverterFactory是用于创建Converter的工厂
// org.springframework.core.convert.converter.ConverterFactory
public interface ConverterFactory<S, R> {

	<T extends R> Converter<S, T> getConverter(Class<T> targetType);
}
ConfigurableConversionService
ConfigurableConversionService主要用于组合ConversionService、ConverterRegistry接口
// org.springframework.core.convert.support.ConfigurableConversionService
public interface ConfigurableConversionService extends ConversionService, ConverterRegistry {}
DefaultConversionService
DefaultConversionService是默认的ConfigurableConversionService实现
// org.springframework.core.convert.support.DefaultConversionService
public class DefaultConversionService extends GenericConversionService {

}
其中通过addDefaultConverters/addCollectionConverters/addScalarConverters添加了大量的常用Converter实现
小结
分析上述基类可知
- 环境包括
profiles/properties两部分profile用于环境切换与控制properties用于属性提供
- 属性来源于
PropertySource - 属性不直接从
PropertySource中获取,而是通过属性解析器从属性源中获取 - 基于属性解析器
PropertySourcesPropertyResolver的属性解析逻辑,实现了数据源的优先级 - 属性解析主要包括
- 属性源中属性值获取
- 占位符解析
- 结果类型转换
Spring环境加载源码分析
环境实例创建
对于Spring项目而言,无论是XML配置方式,还是注解配置方式,它们的上下文ClassPathXmlApplicationContext/AnnotationConfigApplicationContext的父类都是AbstractApplicationContext,其中提供了getEnvironment方法用于获取环境实例
// org.springframework.context.support.AbstractApplicationContext
public abstract class AbstractApplicationContext extends DefaultResourceLoader implements ConfigurableApplicationContext {

    private ConfigurableEnvironment environment;

    public ConfigurableEnvironment getEnvironment() {
		if (this.environment == null) {
			this.environment = createEnvironment();
		}
		return this.environment;
	}

    protected ConfigurableEnvironment createEnvironment() {
		return new StandardEnvironment();
	}
}
分析可知:
- 实际创建的环境实例是
StandardEnvironment实例
属性源获取
1. 系统环境获取
在StandardEnvironment构造过程中,默认调用父类构造,而其父类AbstractEnvironment在构造时,将调用customizePropertySources方法
所以跟踪分析StandardEnvironment#customizePropertySources实现
// org.springframework.core.env.StandardEnvironment
public class StandardEnvironment extends AbstractEnvironment {

    // 默认的系统属性源名称
    public static final String SYSTEM_ENVIRONMENT_PROPERTY_SOURCE_NAME = "systemEnvironment";
    public static final String SYSTEM_PROPERTIES_PROPERTY_SOURCE_NAME = "systemProperties";

    protected void customizePropertySources(MutablePropertySources propertySources) {
        // 添加两个默认的系统属性源
		propertySources.addLast(
				new PropertiesPropertySource(SYSTEM_PROPERTIES_PROPERTY_SOURCE_NAME, getSystemProperties()));
		propertySources.addLast(
				new SystemEnvironmentPropertySource(SYSTEM_ENVIRONMENT_PROPERTY_SOURCE_NAME, getSystemEnvironment()));
	}
}
可以发现,在StandardEnvironment中,其customizePropertySources方法中默认添加了两个系统环境信息属性源
所以StandardEnvironment实例在构造时,就会添加两个系统环境相关的属性源
跟进getSystemProperties/getSystemEnvironment分析可知,其实际是基于System实例进行属性获取
- 系统属性
systemPropertiesSystem#getProperties
- 环境变量
systemEnvironmentSystem#getenv
- 且
systemProperties优先级比systemEnvironment高
2. @PropertySource加载
基类
@PropertySource
@PropertySource是Spring中提供的用于加载属性源的注解
// org.springframework.context.annotation.PropertySource
@Target(ElementType.TYPE)
@Retention(RetentionPolicy.RUNTIME)
@Repeatable(PropertySources.class)
public @interface PropertySource {

    // 属性文件位置
    String name() default "";
    String[] value();

    // 属性解析工厂类
    Class<? extends PropertySourceFactory> factory() default PropertySourceFactory.class;
}
PropertySourceFactory
PropertySourceFactory是数据源工厂的顶级接口
// org.springframework.core.io.support.PropertySourceFactory
public interface PropertySourceFactory {

    // 根据 IO 资源创建属性源
    PropertySource<?> createPropertySource(@Nullable String name, EncodedResource resource) throws IOException;
}
源码分析
处理入口
在IOC注解配置解析过程中,在ConfigurationClassParser#processPropertySource中,定义了对于@PropertySource注解解析的过程
// org.springframework.context.annotation.ConfigurationClassParser
class ConfigurationClassParser {

    // 默认 PropertySourceFactory 实现
    private static final PropertySourceFactory DEFAULT_PROPERTY_SOURCE_FACTORY = new DefaultPropertySourceFactory();

    private void processPropertySource(AnnotationAttributes propertySource) throws IOException {
        String name = propertySource.getString("name");

        // 1. 获取@PropertySource注解value值
        String[] locations = propertySource.getStringArray("value");

        // 2. 创建属性源解析工厂
        // 默认使用 DefaultPropertySourceFactory
        PropertySourceFactory factory = (factoryClass == PropertySourceFactory.class ? DEFAULT_PROPERTY_SOURCE_FACTORY : BeanUtils.instantiateClass(factoryClass));

        // 3. 遍历处理
        for (String location : locations) {
            // 3.1 尝试解析配置路径中环境信息(如果存在)
            String resolvedLocation = this.environment.resolveRequiredPlaceholders(location);

            // 3.2 配置资源文件加载
            Resource resource = this.resourceLoader.getResource(resolvedLocation);

            // 3.3 通过 PropertySourceFactory 创建 PropertySource
            // 3.4 将创建的 PropertySource 添加到 environment 实例中
            addPropertySource(factory.createPropertySource(name, new EncodedResource(resource, encoding)));
        }
    }
}
分析可知
- 其实际是通过
PropertySourceFactory实例来构建属性源 - 默认
PropertySourceFactory实现为DefaultPropertySourceFactory
属性源创建
默认使用DefaultPropertySourceFactory创建数据源,跟进分析
// org.springframework.core.io.support.DefaultPropertySourceFactory
public class DefaultPropertySourceFactory implements PropertySourceFactory {

    public PropertySource<?> createPropertySource(@Nullable String name, EncodedResource resource) throws IOException {
		return (name != null ? new ResourcePropertySource(name, resource) : new ResourcePropertySource(resource));
	}
}
分析可知,其创建的属性源类型为ResourcePropertySource,跟进分析
// org.springframework.core.io.support.ResourcePropertySource
public class ResourcePropertySource extends PropertiesPropertySource {

    // IO 资源名称
    private final String resourceName;

    public ResourcePropertySource(EncodedResource resource) throws IOException {
		super(getNameForResource(resource.getResource()), PropertiesLoaderUtils.loadProperties(resource));
		this.resourceName = null;
	}
}
分析可知,实际source由PropertiesLoaderUtils#loadProperties获得,跟进分析
// org.springframework.core.io.support.PropertiesLoaderUtils
public abstract class PropertiesLoaderUtils {

    private static final String XML_FILE_EXTENSION = ".xml";

    public static Properties loadProperties(EncodedResource resource) throws IOException {
        Properties props = new Properties();
        // 属性填充
        fillProperties(props, resource);
        return props;
    }

    public static void fillProperties(Properties props, EncodedResource resource) throws IOException {
        fillProperties(props, resource, ResourcePropertiesPersister.INSTANCE);
    }

    static void fillProperties(Properties props, EncodedResource resource, PropertiesPersister persister) {
        String filename = resource.getResource().getFilename();

        // 针对不同情况进行属性加载
        if (filename != null && filename.endsWith(XML_FILE_EXTENSION)) {
            stream = resource.getInputStream();
            persister.loadFromXml(props, stream);
        } else if (resource.requiresReader()) {
            reader = resource.getReader();
            persister.load(props, reader);
        } else {
            stream = resource.getInputStream();
            persister.load(props, stream);
        }
    }
}
属性加载
上述加载都是由ResourcePropertiesPersister实例完成
xml文件- 使用
loadFromXml方法加载
- 使用
- 非
xml文件- 使用
load方法加载
- 使用
这两方法实际都由父类DefaultPropertiesPersister实现
// org.springframework.util.DefaultPropertiesPersister
public class DefaultPropertiesPersister implements PropertiesPersister {

    public void load(Properties props, InputStream is) throws IOException {
		props.load(is);
	}

	public void load(Properties props, Reader reader) throws IOException {
		props.load(reader);
	}

    public void loadFromXml(Properties props, InputStream is) throws IOException {
		props.loadFromXML(is);
	}
}
可以发现,实际都是由Properties类进行加载
其中对于xml文件与非xml文件处理不同
1. 非xml文件加载
// java.util.Properties
public class Properties extends Hashtable<Object,Object> {

    public synchronized void load(Reader reader) throws IOException {
        load0(new LineReader(reader));
    }

    public synchronized void load(InputStream inStream) throws IOException {
        load0(new LineReader(inStream));
    }

    private void load0 (LineReader lr) throws IOException {
        // 具体处理逻辑
    }
}
其实际上是将所有非xml文件视为properties文件进行处理
- 逐行解析处理
- 解析出
key/value后存储到Properties中
2. xml文件加载
// java.util.Properties
public class Properties extends Hashtable<Object,Object> {

    public synchronized void loadFromXML(InputStream in) {
        XmlSupport.load(this, Objects.requireNonNull(in));
        in.close();
    }
}
可以发现,实际加载动作由XmlSupport完成,实际由XmlPropertiesProvider进行解析
默认使用的是PlatformXmlPropertiesProvider,其解析的xml文件格式如下
<?xml version="1.0" encoding="utf-8" ?>
<!DOCTYPE properties SYSTEM "http://java.sun.com/dtd/properties.dtd">
<properties>
    <entry key="person.age">18</entry>
</properties>
自定义数据源工厂
经过上述分析可知
@PropertySource仅加载默认类型文件properties文件- 固定格式的
xml文件
实际是因为其使用的PropertySourceFactory为默认的DefaultPropertySourceFactory
@PropertySource提供了factory属性用于定义PropertySourceFactory实现,所以可以通过自定义PropertySourceFactory实现类,来解析不同类型的文件
注意点
如果使用@PropertySource加载多个属性文件,越靠后加载的文件,其对应的属性源的优先级越高
// org.springframework.context.annotation.ConfigurationClassParser
class ConfigurationClassParser {

    private void addPropertySource(PropertySource<?> propertySource) {
        // ...

        if (this.propertySourceNames.isEmpty()) {
			propertySources.addLast(propertySource);
		} else {
            // 后加载的属性文件,属性源放在前面
			String firstProcessed = this.propertySourceNames.get(this.propertySourceNames.size() - 1);
			propertySources.addBefore(firstProcessed, propertySource);
		}
		this.propertySourceNames.add(name);
    }
}
3. 自定义属性源
Environment获取
Spring中提供了EnvironmentAware/ApplicationContextAware接口,用于获取Environment/ApplicationContext实例
并且ApplicationContext可以通过getEnvironment获取Environment实例
添加自定义属性源
在获取到Environment实例后,就可以向其中添加自定义的属性源
举个🌰:
public class EnvironmentAwareBean implements EnvironmentAware {

    @Override
    public void setEnvironment(Environment environment) {
        ConfigurableEnvironment configurableEnvironment = (ConfigurableEnvironment)environment;
        Properties properties = new Properties();
        properties.setProperty("person.sex", "man");
        PropertiesPropertySource propertySource = new PropertiesPropertySource("test", properties);
        configurableEnvironment.getPropertySources().addLast(propertySource);
    }
}
注意点
EnvironmentAware#setEnvironment的处理调用,是在ApplicationContextAwareProcessor进行初始化前置处理过程中,实际就是在IOC工厂实例化对应Bean的过程中调用
-
而如果此时我们添加的属性源在其他
Bean的实例化过程中需要使用到,那么就需要确保EnvironmentAware实现的Bean在前面进行实例化 -
而
IOC工厂实例化Bean的顺序,只与其注册BeanDefinition到IOC工厂的顺序一致
需要注意的是:
@Order注解只适用于部分由Spring管理的Bean的处理的顺序,而无法决定IOC容器加载/实例化Bean的顺序,所以无法使用@Order注解使EnvironmentAware的实现Bean在前面加载
最好的方法就是:
- 使用
IOC中XML配置方式- 可以在
XML中将EnvironmentAware实现放在前面加载
- 可以在
- 使用
IOC中注解配置方式- 由于解析入口在
@Configuration注解注释的主配置类- 可以由主配置类实现
EnvironmentAware接口 - 可以在主配置类中通过
@Bean加载EnvironmentAware实现
- 可以由主配置类实现
- 由于解析入口在
举个🌰:
@ComponentScan
@Configuration
public class MyConfiguration {

    @Bean
    public EnvironmentAwareBean registerEnvironmentAwareBean() {
        return new EnvironmentAwareBean();
    }
}
SpringBoot环境加载源码分析
前言
profiles相关配置
SpringBoot中提供与profiles相关的配置有spring.profiles.[group/include/active/default]
-
SpringBoot中默认加载名为application的配置文件 -
在
application配置文件中,可以添加spring.profiles.[group/include/active/default]配置来引入其他配置文件 -
配置分析
- 整体的
spring.profiles配置解析过程在ConfigDataEnvironment#withProfiles可以查看 spring.profiles.include- 表示当前配置文件包含的其他配置文件
spring.profiles.group- 表示
profile配置的分组,可以通过active/default激活分组中所有profile - 🌰
- 分组配置为:
spring.profiles.group.groupA=dev,uat - 当
spring.profiles.active=groupA时,表示激活的profile为dev,uat
- 分组配置为:
- 表示
spring.profiles.active- 表示激活的
profile,将加载对应的application-<profile>配置文件作为属性源
- 表示激活的
spring.profiles.default- 如果没有配置
spring.profiles.active,则从默认的spring.profiles.default获取激活的profile- 所以
active与default是互斥的配置
- 所以
- 其默认值为
default
- 如果没有配置
- 整体的
-
注意
spring.profiles.[group/include/active/default]只能在application配置文件,或者其他属性源中配置- 在
application-<profile>配置文件,不可以嵌套添加spring.profiles.[group/include/active/default]配置- 否则将报错,具体校验逻辑在
InvalidConfigDataPropertyException#throwOrWarn方法中
- 否则将报错,具体校验逻辑在
一、环境构建阶段
处理入口
SpringBoot项目启动时,在SpringApplication#run方法处理过程中,其中调用了prepareEnvironment方法用于环境准备
// org.springframework.boot.SpringApplication
public class SpringApplication {

    private ConfigurableEnvironment prepareEnvironment(SpringApplicationRunListeners listeners,
                                                       ApplicationArguments applicationArguments) {
        // 1. 根据容器类型创建对应 Environment 对象
        ConfigurableEnvironment environment = getOrCreateEnvironment();

        // 2. 获取参数 args 和环境信息中的 profiles 激活的信息
        configureEnvironment(environment, applicationArguments.getSourceArgs());
        ConfigurationPropertySources.attach(environment);

        // 3. 通过 ConfigFileApplicationListener (由spring.factories中对应ApplicationListener.class获取) 监听器
        // 加载默认的 application.propertis,以及当前激活的 profiles 对应配置文件,保存到 environment 中
        listeners.environmentPrepared(environment);

        // 4. 将 Environment 对象绑定到 Spring 上下文中
        bindToSpringApplication(environment);

        if (!this.isCustomEnvironment) {
            environment = new EnvironmentConverter(getClassLoader())
                .convertEnvironmentIfNecessary(environment, deduceEnvironmentClass());
        }
        ConfigurationPropertySources.attach(environment);
        return environment;
    }
}
可以发现其通过多个步骤完成环境准备工作,下面我们一一分析
1. Environment实例创建
处理入口
跟进分析getOrCreateEnvironment方法
// org.springframework.boot.SpringApplication
public class SpringApplication {

    // 环境实例
    private ConfigurableEnvironment environment;

    // 上下文工厂
    private ApplicationContextFactory applicationContextFactory = ApplicationContextFactory.DEFAULT;

    // application容器类型
    private WebApplicationType webApplicationType;

    private ConfigurableEnvironment getOrCreateEnvironment() {
		if (this.environment != null) {
            // 存在直接返回
			return this.environment;
		}
        // 1. 使用`ApplicationContextFactory`工厂创建`Environment`实例
		ConfigurableEnvironment environment = this.applicationContextFactory.createEnvironment(this.webApplicationType);

		if (environment == null && this.applicationContextFactory != ApplicationContextFactory.DEFAULT) {
			environment = ApplicationContextFactory.DEFAULT.createEnvironment(this.webApplicationType);
		}

        // 2. 创建失败则返回 ApplicationEnvironment 实例
		return (environment != null) ? environment : new ApplicationEnvironment();
	}
}
实际使用ApplicationContextFactory工厂创建Environment实例,工厂使用默认实现DefaultApplicationContextFactory,跟进分析
// org.springframework.boot.DefaultApplicationContextFactory
class DefaultApplicationContextFactory implements ApplicationContextFactory {

    public ConfigurableEnvironment createEnvironment(WebApplicationType webApplicationType) {
		return getFromSpringFactories(webApplicationType, ApplicationContextFactory::createEnvironment, null);
	}

    private <T> T getFromSpringFactories(WebApplicationType webApplicationType,
			BiFunction<ApplicationContextFactory, WebApplicationType, T> action, Supplier<T> defaultResult) {
        // 基于 spring.factories 加载 ApplicationContextFactory 实例
		for (ApplicationContextFactory candidate :
             SpringFactoriesLoader.loadFactories(ApplicationContextFactory.class, getClass().getClassLoader())) {
            // 尝试使用 ApplicationContextFactory 创建环境实例
			T result = action.apply(candidate, webApplicationType);
			if (result != null) {
				return result;
			}
		}
		return (defaultResult != null) ? defaultResult.get() : null;
	}
}
Springboot项目中的ApplicationContextFactory,除了默认的DefaultApplicationContextFactory,还有
AnnotationConfigReactiveWebServerApplicationContext中内部FactoryAnnotationConfigServletWebServerApplicationContext中内部Factory
而通常使用的是WebApplicationType.SERVLET,其对应AnnotationConfigServletWebServerApplicationContext.Factory处理
// org.springframework.boot.web.servlet.context.AnnotationConfigServletWebServerApplicationContext.Factory
static class Factory implements ApplicationContextFactory {

    public ConfigurableEnvironment createEnvironment(WebApplicationType webApplicationType) {
			return (webApplicationType != WebApplicationType.SERVLET) ? null : new ApplicationServletEnvironment();
		}
}
最终创建了ApplicationServletEnvironment实例
构造过程
ApplicationServletEnvironment的父类AbstractEnvironment在构造时,将调用customizePropertySources方法
跟进分析ApplicationServletEnvironment#customizePropertySources实现
// org.springframework.web.context.support.StandardServletEnvironment
public class StandardServletEnvironment extends StandardEnvironment implements ConfigurableWebEnvironment {

    public static final String SERVLET_CONTEXT_PROPERTY_SOURCE_NAME = "servletContextInitParams";

    public static final String SERVLET_CONFIG_PROPERTY_SOURCE_NAME = "servletConfigInitParams";

    protected void customizePropertySources(MutablePropertySources propertySources) {
        // 添加两个 servlet 相关数据源
		propertySources.addLast(new StubPropertySource(SERVLET_CONFIG_PROPERTY_SOURCE_NAME));
		propertySources.addLast(new StubPropertySource(SERVLET_CONTEXT_PROPERTY_SOURCE_NAME));
		if (jndiPresent && JndiLocatorDelegate.isDefaultJndiEnvironmentAvailable()) {
			propertySources.addLast(new JndiPropertySource(JNDI_PROPERTY_SOURCE_NAME));
		}
        // 父类调用
		super.customizePropertySources(propertySources);
	}
}
分析可知:
-
StandardServletEnvironment构造时,添加了servletContextInitParams/servletConfigInitParams两个属性源- 此时添加的属性源类型是
StubPropertySource- 其实际作为占位属性源,内部并不存储属性,仅仅是在
MutablePropertySources中占据一个位置,用于优先级排序
- 其实际作为占位属性源,内部并不存储属性,仅仅是在
- 后续真实属性源添加位置:
WebApplicationContextUtils#initServletPropertySources
- 此时添加的属性源类型是
-
通过父类构造,还会添加
systemEnvironment/systemProperties这两个属性源
实际上构造过程中添加了四个属性源,其优先级排序为:
servletContextInitParamsservletConfigInitParamssystemPropertiessystemEnvironment
小结
经过上述处理:
- 对应
SERVLET环境,创建了ApplicationServletEnvironment作为Environment实例 - 在
ApplicationServletEnvironment构造过程中默认添加了属性源servletContextInitParamsservletConfigInitParamssystemPropertiessystemEnvironment
2. 命令行属性源配置
跟进分析configureEnvironment方法
// org.springframework.boot.SpringApplication
public class SpringApplication {

    protected void configureEnvironment(ConfigurableEnvironment environment, String[] args) {
        // 1. 将 run 方法参数 args 封装为 SimpleCommandLinePropertySource 添加到 environment 中
        configurePropertySources(environment, args);
    }
}
跟进分析configurePropertySources方法
// org.springframework.boot.SpringApplication
public class SpringApplication {

    protected void configurePropertySources(ConfigurableEnvironment environment, String[] args) {
        // 1. 获取 environment 中的 sources
        MutablePropertySources sources = environment.getPropertySources();

        // 2. 配置默认属性源
        if (!CollectionUtils.isEmpty(this.defaultProperties)) {
			DefaultPropertiesPropertySource.addOrMerge(this.defaultProperties, sources);
		}

        // 3. 如果 args 参数存在,配置命令行属性源
        if (this.addCommandLineProperties && args.length > 0) {
            // 属性源名称为:commandLineArgs
            String name = CommandLinePropertySource.COMMAND_LINE_PROPERTY_SOURCE_NAME;
            if (sources.contains(name)) {	// 3.1 属性源已存在
                PropertySource<?> source = sources.get(name);
                // 创建 CompositePropertySource 属性源用于封装多个属性源
                CompositePropertySource composite = new CompositePropertySource(name);
                // 属性源类型为:SimpleCommandLinePropertySource
                composite.addPropertySource(new SimpleCommandLinePropertySource("springApplicationCommandLineArgs", args));
                composite.addPropertySource(source);
                // 属性源替换
                sources.replace(name, composite);
            } else {	// 3.2 属性源不存在
                // 直接封装为 SimpleCommandLinePropertySource 对象
                // 保存到 sources 中,且优先级最高
                sources.addFirst(new SimpleCommandLinePropertySource(args));
            }
        }
    }
}
分析可知:
- 将
run方法参数封装为SimpleCommandLinePropertySource类型属性源- 实际对应通过
java命令启动时设置的参数 java -D<systemPropertyName>=<value> -X<jvmparam>=<value> xxx.jar arg1 arg2 arg3 ...中arg1 arg2 arg3 ...部分
- 实际对应通过
- 此属性源名称为
commandLineArgs - 此属性源优先级最高
3. Profiles环境准备
处理入口(监听处理)
在上述处理后,将通过SpringApplicationRunListeners进行环境准备,其调用了environmentPrepared方法进行处理
跟踪其调用链,其调用了doWithListeners进行处理
// org.springframework.boot.SpringApplicationRunListeners
class SpringApplicationRunListeners {

    // Spring 应用运行监听器
    private final List<SpringApplicationRunListener> listeners;

    /* 环境准备 */
    void environmentPrepared(ConfigurableBootstrapContext bootstrapContext, ConfigurableEnvironment environment) {
		doWithListeners("spring.boot.application.environment-prepared",
				(listener) -> listener.environmentPrepared(bootstrapContext, environment));
	}

    /* 监听处理 */
    private void doWithListeners(String stepName, Consumer<SpringApplicationRunListener> listenerAction,
			Consumer<StartupStep> stepAction) {
        // 遍历监听器,调用其 environmentPrepared 方法进行处理
		this.listeners.forEach(listenerAction);
	}
}
SpringBoot中默认提供的监听器为EventPublishingRunListener,跟踪其environmentPrepared方法实现
// org.springframework.boot.context.event.EventPublishingRunListener
public class EventPublishingRunListener implements SpringApplicationRunListener, Ordered {

    // 事件多播器
    private final SimpleApplicationEventMulticaster initialMulticaster;

    public void environmentPrepared(ConfigurableBootstrapContext bootstrapContext,
			ConfigurableEnvironment environment) {
        // 通过事件多播器,多播一个 ApplicationEnvironmentPreparedEvent 事件
		this.initialMulticaster.multicastEvent(
				new ApplicationEnvironmentPreparedEvent(bootstrapContext, this.application, this.args, environment));
	}
}
分析可知:
- 封装一个
ApplicationEnvironmentPreparedEvent类型事件 - 通过
SimpleApplicationEventMulticaster事件多播器进行多播处理
事件多播
实际由SimpleApplicationEventMulticaster#multicastEvent方法进行事件多播处理,跟进分析
// org.springframework.context.event.SimpleApplicationEventMulticaster
public class SimpleApplicationEventMulticaster extends AbstractApplicationEventMulticaster {

    public void multicastEvent(final ApplicationEvent event, @Nullable ResolvableType eventType) {
        // 解析事件类型
        ResolvableType type = (eventType != null ? eventType : resolveDefaultEventType(event));
        // 根据事件类型,获取其对应事件监听器
        for (ApplicationListener<?> listener : getApplicationListeners(event, type)) {
			// 遍历监听器进行处理
            // 最终调用 ApplicationListener#onApplicationEvent 方法处理事件
            invokeListener(listener, event);
        }
    }
}
分析可知:
- 根据事件类型获取对应的事件监听器
- 遍历监听器调用
invokeListener进行事件处理- 实际上
invokeListener方法最终就是调用ApplicationListener#onApplicationEvent方法处理事件
- 实际上
事件处理
通过getApplicationListeners可以获取多个事件监听器,其中与环境准备相关的实现是为EnvironmentPostProcessorApplicationListener
跟进其onApplicationEvent处理,对于ApplicationEnvironmentPreparedEvent类型事件,其通过onApplicationEnvironmentPreparedEvent方法处理
// org.springframework.boot.env.EnvironmentPostProcessorApplicationListener
public class EnvironmentPostProcessorApplicationListener implements SmartApplicationListener, Ordered {

    private void onApplicationEnvironmentPreparedEvent(ApplicationEnvironmentPreparedEvent event) {
        // 基于事件对象获取 环境实例/应用实例
		ConfigurableEnvironment environment = event.getEnvironment();
		SpringApplication application = event.getSpringApplication();
        // 通过 getEnvironmentPostProcessors 获取环境前置处理器
		for (EnvironmentPostProcessor postProcessor : getEnvironmentPostProcessors(application.getResourceLoader(),
				event.getBootstrapContext())) {
            // 调用 EnvironmentPostProcessor#postProcessEnvironment 进行前置处理
			postProcessor.postProcessEnvironment(environment, application);
		}
	}
}
分析可知:
- 获取环境前置处理器
EnvironmentPostProcessor - 遍历调用
EnvironmentPostProcessor#postProcessEnvironment进行环境前置处理
环境前置处理
通过getEnvironmentPostProcessors可以获取多个环境前置处理器,其中我们需要关注的实现为ConfigDataEnvironmentPostProcessor
跟进分析其postProcessEnvironment实现
// org.springframework.boot.context.config.ConfigDataEnvironmentPostProcessor
public class ConfigDataEnvironmentPostProcessor implements EnvironmentPostProcessor, Ordered {

    void postProcessEnvironment(ConfigurableEnvironment environment, ResourceLoader resourceLoader,
                                Collection<String> additionalProfiles) {
        // 创建资源加载器
        resourceLoader = (resourceLoader != null) ? resourceLoader : new DefaultResourceLoader();
        // 创建 配置数据环境 实例
        // 调用 processAndApply 方法处理
        getConfigDataEnvironment(environment, resourceLoader, additionalProfiles).processAndApply();
    }
}
分析可知
- 其主要是创建一个
ConfigDataEnvironment实例 - 其次就是调用其
processAndApply进行处理
小结
经过上述分析可知:
- 创建
ApplicationServletEnvironment实例作为Environment环境对象- 通过初始化构造添加默认属性源
servletContextInitParamsservletConfigInitParamssystemPropertiessystemEnvironment
- 通过初始化构造添加默认属性源
- 解析命令行参数
- 封装为
SimpleCommandLinePropertySource实例,添加到ApplicationServletEnvironment中 - 优先级最高
- 封装为
- 进行
profiles环境准备- 重点在于创建
ConfigDataEnvironment实例 - 并调用
ConfigDataEnvironment#processAndApply进行前置处理
- 重点在于创建
二、配置数据环境分析
上述分析可知,profiles环境准备主要由ConfigDataEnvironment实例完成,我们将其单独拆分分析
1. 基类分析
配置数据形态相关
ConfigDataLocation
ConfigDataLocation是对配置文件路径的封装结果
// org.springframework.boot.context.config.ConfigDataLocation
public final class ConfigDataLocation implements OriginProvider {

	// 可选前缀
	public static final String OPTIONAL_PREFIX = "optional:";

    // 是否可选
	private final boolean optional;

    // 文件路径
	private final String value;

    // 提供静态函数用于构建 ConfigDataLocation 实例
    public static ConfigDataLocation of(String location) {
        // 判断是否可选
		boolean optional = location != null && location.startsWith(OPTIONAL_PREFIX);
        // 截取实际文件路径
		String value = (!optional) ? location : location.substring(OPTIONAL_PREFIX.length());
		if (!StringUtils.hasText(value)) {
			return null;
		}
        // 构建实例
		return new ConfigDataLocation(optional, value, null);
	}
}
分析:
- 实际就是通过
value存储配置文件路径- 实际上
value可以包含多个文件路径,其使用;进行分割
- 实际上
optional:- 是可选标志前缀
- 对于目标配置路径,如果不存在配置数据文件
- 添加了可选标志前缀,即使不存在,也可以正常启动
- 否则将启动失败
举个🌰:
-
源配置路径为:
optional:classpath:/;optional:classpath:/config/ -
其实际对应两个配置路径
classpath:/classpath:/config/
-
上述配置路径封装为
ConfigDataLocation,其value值为:classpath:/;optional:classpath:/config/
ConfigDataProperties
ConfigDataProperties是配置文件属性,其用于封装多个ConfigDataLocation实例
// org.springframework.boot.context.config.ConfigDataProperties
class ConfigDataProperties {

    private final List<ConfigDataLocation> imports;
}
StandardConfigDataReference
StandardConfigDataReference是由ConfigDataLocation解析后对应的单个具体资源
// org.springframework.boot.context.config.StandardConfigDataReference
class StandardConfigDataReference {

    // 对应的配置数据路径
	private final ConfigDataLocation configDataLocation;

    // 对应资源路径名称
	private final String resourceLocation;

    // 所属的文件夹
	private final String directory;

    // 对应的 profile 环境
	private final String profile;

    // 对应的属性源加载器
	private final PropertySourceLoader propertySourceLoader;
}
ConfigDataResource
ConfigDataResource表示单个配置文件资源
// org.springframework.boot.context.config.ConfigDataResource
public abstract class ConfigDataResource {

    private final boolean optional;
}
StandardConfigDataResource
StandardConfigDataResource是标准的ConfigDataResource的实现类
// org.springframework.boot.context.config.StandardConfigDataResource
public class StandardConfigDataResource extends ConfigDataResource {

    // 配置数据参考
    private final StandardConfigDataReference reference;

    // 具体文件资源
    private final Resource resource;

    // 是否空目录
    private final boolean emptyDirectory;
}
ConfigDataResolutionResult
// org.springframework.boot.context.config.ConfigDataResolutionResult
class ConfigDataResolutionResult {

    // 配置数据路径
    private final ConfigDataLocation location;

    // 配置数据资源
	private final ConfigDataResource resource;

    // 是否 profile 配置
	private final boolean profileSpecific;
}
ConfigDataResolutionResult主要是封装StandardConfigDataResource,而StandardConfigDataResource中又封装了StandardConfigDataReference实例
ConfigData
ConfigData主要封装用于解析资源文件得到的属性源
// org.springframework.boot.context.config.ConfigData
public final class ConfigData {

    // 存储属性源
    private final List<PropertySource<?>> propertySources;
}
配置数据路径相关
ConfigDataLocationResolver
ConfigDataLocationResolver配置文件路径解析器,是用于解析配置文件路径的接口
// org.springframework.boot.context.config.ConfigDataLocationResolver
public interface ConfigDataLocationResolver<R extends ConfigDataResource> {
    boolean isResolvable(ConfigDataLocationResolverContext context, ConfigDataLocation location);
}
ConfigDataLocationResolvers
ConfigDataLocationResolvers是配置文件路径解析器集合类,用于封装多个配置文件路径解析器ConfigDataLocationResolver
// org.springframework.boot.context.config.ConfigDataLocationResolvers
class ConfigDataLocationResolvers {

    private final List<ConfigDataLocationResolver<?>> resolvers;
}
配置数据加载相关
ConfigDataLoader
ConfigDataLoader用于加载配置文件
// org.springframework.boot.context.config.ConfigDataLoader
public interface ConfigDataLoader<R extends ConfigDataResource> {

    default boolean isLoadable(ConfigDataLoaderContext context, R resource) {
		return true;
	}

    ConfigData load(ConfigDataLoaderContext context, R resource);
}
ConfigDataLoaders
ConfigDataLoaders用于封装多个ConfigDataLoader实例
// org.springframework.boot.context.config.ConfigDataImporter
class ConfigDataLoaders {

    // 配置文件加载器
	private final List<ConfigDataLoader<?>> loaders;

    // 配置文件加载器所加载的资源类型,实际是 ConfigDataLoader 对应的泛型
	private final List<Class<?>> resourceTypes;
}
贡献者相关
ConfigDataEnvironmentContributor
ConfigDataEnvironmentContributor实际就是属性源的封装
// org.springframework.boot.context.config.ConfigDataEnvironmentContributor
class ConfigDataEnvironmentContributor implements Iterable<ConfigDataEnvironmentContributor> {

    // 实际存储属性源
    private final PropertySource<?> propertySource;

    // 子贡献者存储
    private final Map<ImportPhase, List<ConfigDataEnvironmentContributor>> children;

    // 贡献者类型
    private final Kind kind;
}
贡献者类型有多种,由其内部枚举类Kind定义
-
ROOT- 根贡献者
- 本身不提供配置,通过
children存储所有贡献者
-
EXISTING- 已存在贡献者
- 在初始化配置文件之前,已经存在的配置数据/属性源,解析成对应的贡献者
-
INITIAL_IMPORT- 初始导入贡献者
- 在初始化过程中,导入的配置数据
- 主要由
spring.config.location / spring.config.additional-location / spring.config.import指定的路径和默认配置路径中获取
-
UNBOUND_IMPORT- 未导入完全贡献者
- 已经导入的贡献者,但其本身可能会解析出更多贡献者
-
BOUND_IMPORT- 导入完全贡献者
- 已经完成解析的贡献者,其中存储属性源
-
EMPTY_LOCATION- 空的贡献者
ConfigDataEnvironmentContributors
ConfigDataEnvironmentContributors用于管理ConfigDataEnvironmentContributor实例
// org.springframework.boot.context.config.ConfigDataEnvironmentContributors
class ConfigDataEnvironmentContributors implements Iterable<ConfigDataEnvironmentContributor> {

    // 封装一个根贡献者
    private final ConfigDataEnvironmentContributor root;
}
其中重点是根贡献者root
- 它本身不包含属性源
- 其主要通过
children管理多个子贡献者,子贡献者才是真实属性源存储者
属性源加载器
PropertySourceLoader
PropertySourceLoader是用于加载具体文件资源,获取PropertySource属性源的接口
// org.springframework.boot.env.PropertySourceLoader
public interface PropertySourceLoader {

    // 当前属性源加载器可以处理的文件对应的扩展名
    String[] getFileExtensions();

    // 加载资源,获取属性源
    List<PropertySource<?>> load(String name, Resource resource) throws IOException;
}
PropertiesPropertySourceLoader
PropertiesPropertySourceLoader是用于解析扩展名为properties/xml的资源文件
// org.springframework.boot.env.PropertiesPropertySourceLoader
public class PropertiesPropertySourceLoader implements PropertySourceLoader {

    /* 文件扩展名 */
    public String[] getFileExtensions() {
		return new String[] { "properties", "xml" };
	}
}
具体load处理细节此处不予分析
YamlPropertySourceLoader
YamlPropertySourceLoader是用于解析扩展名为yml/yaml的资源文件
// org.springframework.boot.env.PropertiesPropertySourceLoader
public class PropertiesPropertySourceLoader implements PropertySourceLoader {

    /* 文件扩展名 */
    public String[] getFileExtensions() {
		return new String[] { "yml", "yaml" };
	}
}
具体load处理细节此处不予分析
profiles相关
ConfigDataActivationContext
ConfigDataActivationContext表示配置数据激活状态的上下文
// org.springframework.boot.context.config.ConfigDataActivationContext
class ConfigDataActivationContext {

    // 存储 Profiles 实例
    private final Profiles profiles;
}
Profiles
Profiles实例主要用于管理profiles配置情况
// org.springframework.boot.context.config.Profiles
public class Profiles implements Iterable<String> {

    // 激活的 profile
    private final List<String> activeProfiles;

    // 默认的 profile
    private final List<String> defaultProfiles;

    // profile 组别
    // key:组别名称
    // value:组别中包含的 profile,多个使用 `,` 分割
    private final MultiValueMap<String, String> groups;
}
2. 实例构建
既然工作由ConfigDataEnvironment实例完成,我们首先分析一下此类
实例结构
// org.springframework.boot.context.config.ConfigDataEnvironment
class ConfigDataEnvironment {

    // 几个配置路径属性
    static final String IMPORT_PROPERTY = "spring.config.import";
    static final String ADDITIONAL_LOCATION_PROPERTY = "spring.config.additional-location";
    static final String LOCATION_PROPERTY = "spring.config.location";

    // 默认扫描路径
    static final ConfigDataLocation[] DEFAULT_SEARCH_LOCATIONS;
	static {
		List<ConfigDataLocation> locations = new ArrayList<>();
        // 1. src/main/resources/ 2. src/main/resources/config/ 目录下
		locations.add(ConfigDataLocation.of("optional:classpath:/;optional:classpath:/config/"));
        // 1. 项目根目录下 2. 项目根目录下的 config 目录下
		locations.add(ConfigDataLocation.of("optional:file:./;optional:file:./config/;optional:file:./config/*/"));
		DEFAULT_SEARCH_LOCATIONS = locations.toArray(new ConfigDataLocation[0]);
	}

    // 原始环境实例
    private final ConfigurableEnvironment environment;

    // 配置数据路径解析器
    private final ConfigDataLocationResolvers resolvers;

    // 配置数据加载器
    private final ConfigDataLoaders loaders;

    // 配置数据环境贡献者管理者
    private final ConfigDataEnvironmentContributors contributors;
}
构造分析
跟进分析ConfigDataEnvironment实例构造处理
// org.springframework.boot.context.config.ConfigDataEnvironment
class ConfigDataEnvironment {

    /* 构造器 */
    ConfigDataEnvironment(DeferredLogFactory logFactory, ConfigurableBootstrapContext bootstrapContext,
                          ConfigurableEnvironment environment, ResourceLoader resourceLoader,
                          Collection<String> additionalProfiles,
                          ConfigDataEnvironmentUpdateListener environmentUpdateListener) {
        // 1. 使用 Binder 封装 environment,便于后续操作
        Binder binder = Binder.get(environment);
        UseLegacyConfigProcessingException.throwIfRequested(binder);
        this.logFactory = logFactory;
        this.logger = logFactory.getLog(getClass());
        this.notFoundAction = binder.bind(ON_NOT_FOUND_PROPERTY, ConfigDataNotFoundAction.class)
            .orElse(ConfigDataNotFoundAction.FAIL);
        this.bootstrapContext = bootstrapContext;
        this.environment = environment;
        // 2. 构建配置数据路径解析器
        this.resolvers = createConfigDataLocationResolvers(logFactory, bootstrapContext, binder, resourceLoader);
        this.additionalProfiles = additionalProfiles;
        this.environmentUpdateListener = (environmentUpdateListener != null) ? environmentUpdateListener
            : ConfigDataEnvironmentUpdateListener.NONE;
        // 3. 构建配置数据加载器
        this.loaders = new ConfigDataLoaders(logFactory, bootstrapContext, resourceLoader.getClassLoader());
        // 4. 创建配置数据环境贡献管理者
        this.contributors = createContributors(binder);
    }
}
在ConfigDataEnvironment构造过程中,我们主要需要关注的部分有:
- 使用组件
ConfigDataLocationResolvers- 用于解析配置数据文件
ConfigDataLoaders- 用于加载配置数据
ConfigDataEnvironmentContributors- 用于封装配置数据信息
1. 构建配置数据路径解析器
跟进createConfigDataLocationResolvers方法
-
实际创建的是
ConfigDataLocationResolvers实例 -
在
ConfigDataLocationResolvers构造中,通过SpringFactoriesLoader#loadFactoryNames获取ConfigDataLocationResolver实例 -
其中我们需要关注的是
StandardConfigDataLocationResolver
2. 构建配置数据加载器
-
创建了
ConfigDataLoaders实例 -
在
ConfigDataLoaders构造中,通过SpringFactoriesLoader#loadFactoryNames获取ConfigDataLoader实例 -
其中我们需要关注的是
StandardConfigDataLoader
3. 创建贡献管理者
跟进分析createContributors方法
// org.springframework.boot.context.config.ConfigDataEnvironment
class ConfigDataEnvironment {

    private ConfigDataEnvironmentContributors createContributors(Binder binder) {
        // 获取当前环境存在的属性源
        MutablePropertySources propertySources = this.environment.getPropertySources();
        List<ConfigDataEnvironmentContributor> contributors = new ArrayList<>(propertySources.size() + 10);
        PropertySource<?> defaultPropertySource = null;

        // 1. 基于环境已有属性源,创建对应的贡献者
        for (PropertySource<?> propertySource : propertySources) {
            if (DefaultPropertiesPropertySource.hasMatchingName(propertySource)) {
                // 将名称为 defaultProperties 的属性源设置为默认属性源
                defaultPropertySource = propertySource;
            } else {
				// 将属性源封装为类型为 EXISTING 的 ConfigDataEnvironmentContributor 实例
                contributors.add(ConfigDataEnvironmentContributor.ofExisting(propertySource));
            }
        }

        // 2. 获取类型为 INITIAL_IMPORT 的 ConfigDataEnvironmentContributor 实例
        contributors.addAll(getInitialImportContributors(binder));

        if (defaultPropertySource != null) {
            // 默认属性源也封装为类型为 EXISTING 的 ConfigDataEnvironmentContributor 实例
            contributors.add(ConfigDataEnvironmentContributor.ofExisting(defaultPropertySource));
        }

        // 3. 由 ConfigDataEnvironmentContributor 实例集合创建 ConfigDataEnvironmentContributors 实例
        return createContributors(contributors);
    }
}
分析可知:
-
获取基础的贡献者
- 已有贡献者
- 其基于
environment中的已有的属性源,逐一构建类型为EXISTING的ConfigDataEnvironmentContributor实例- 就是用
ConfigDataEnvironmentContributor封装属性源
- 就是用
- 其基于
- 初始导入贡献者
- 其通过
getInitialImportContributors方法,构建类型为INITIAL_IMPORT的ConfigDataEnvironmentContributor实例
- 其通过
- 已有贡献者
-
将获取的
ConfigDataEnvironmentContributor列表封装为ConfigDataEnvironmentContributors实例ConfigDataEnvironmentContributors就是一个用于管理贡献者的贡献管理者
初始导入贡献者获取
主要分析getInitialImportContributors的处理过程
// org.springframework.boot.context.config.ConfigDataEnvironment
class ConfigDataEnvironment {

    // 几个配置路径属性
    static final String IMPORT_PROPERTY = "spring.config.import";
    static final String ADDITIONAL_LOCATION_PROPERTY = "spring.config.additional-location";
    static final String LOCATION_PROPERTY = "spring.config.location";

    private static final ConfigDataLocation[] EMPTY_LOCATIONS = new ConfigDataLocation[0];

    // 默认扫描路径
    static final ConfigDataLocation[] DEFAULT_SEARCH_LOCATIONS;
	static {
		List<ConfigDataLocation> locations = new ArrayList<>();
        // 1. src/main/resources/ 2. src/main/resources/config/ 目录下
		locations.add(ConfigDataLocation.of("optional:classpath:/;optional:classpath:/config/"));
        // 1. 项目根目录下 2. 项目根目录下的 config 目录下
		locations.add(ConfigDataLocation.of("optional:file:./;optional:file:./config/;optional:file:./config/*/"));
		DEFAULT_SEARCH_LOCATIONS = locations.toArray(new ConfigDataLocation[0]);
	}

    /* 获取初始贡献者 */
    private List<ConfigDataEnvironmentContributor> getInitialImportContributors(Binder binder) {
        List<ConfigDataEnvironmentContributor> initialContributors = new ArrayList<>();
        // 基于配置路径属性值,创建贡献者实例
        addInitialImportContributors(initialContributors,
                                     bindLocations(binder, IMPORT_PROPERTY, EMPTY_LOCATIONS));
        addInitialImportContributors(initialContributors,
                                     bindLocations(binder, ADDITIONAL_LOCATION_PROPERTY, EMPTY_LOCATIONS));
        addInitialImportContributors(initialContributors,
                                     bindLocations(binder, LOCATION_PROPERTY, DEFAULT_SEARCH_LOCATIONS));
        return initialContributors;
    }
}
细节分析
创建贡献者主要通过bindLocations/addInitialImportContributors方法完成,跟进分析
路径绑定
跟踪bindLocations方法处理,其实际处理分为两个分支:
- 从属性源中获取对应配置路径值
- 如果存在配置,将其转换为
ConfigDataLocation[]后返回 - 如果不存在配置,则返回
bindLocations参数中的默认结果
- 如果存在配置,将其转换为
其中由findProperty方法完成从属性源中取值的工作
// org.springframework.boot.context.properties.bind.Binder
public class Binder {

    private <T> ConfigurationProperty findProperty(ConfigurationPropertyName name, Bindable<T> target, Context context) {
		if (name.isEmpty() || target.hasBindRestriction(BindRestriction.NO_DIRECT_PROPERTY)) {
			return null;
		}
		for (ConfigurationPropertySource source : context.getSources()) {
            // 从属性源中获取对应配置值
			ConfigurationProperty property = source.getConfigurationProperty(name);
			if (property != null) {
				return property;
			}
		}
		return null;
	}
}
属性值转换为ConfigDataLocation[]的过程不予分析
举个🌰:
- 假设配置了
spring.config.import=import1.yaml;import2.yaml属性 - 则创建一个
ConfigDataLocation实例- 其
value值为import1.yaml;import2.yaml
- 其
贡献者获取
跟进分析addInitialImportContributors方法,其就是基于ConfigDataLocation[]创建ConfigDataEnvironmentContributor实例
// org.springframework.boot.context.config.ConfigDataEnvironment
class ConfigDataEnvironment {

    private void addInitialImportContributors(List<ConfigDataEnvironmentContributor> initialContributors,
			ConfigDataLocation[] locations) {
		for (int i = locations.length - 1; i >= 0; i--) {
            // 遍历每个配置路径创建实例
			initialContributors.add(createInitialImportContributor(locations[i]));
		}
	}
}
跟进createInitialImportContributor处理
// org.springframework.boot.context.config.ConfigDataEnvironment
class ConfigDataEnvironment {

    private ConfigDataEnvironmentContributor createInitialImportContributor(ConfigDataLocation location) {
		return ConfigDataEnvironmentContributor.ofInitialImport(location);
	}
}

// org.springframework.boot.context.config.ConfigDataEnvironmentContributor
class ConfigDataEnvironmentContributor implements Iterable<ConfigDataEnvironmentContributor> {

    static ConfigDataEnvironmentContributor ofInitialImport(ConfigDataLocation initialImport) {
        // 使用数组封装 ConfigDataLocation
		List<ConfigDataLocation> imports = Collections.singletonList(initialImport);
        // 创建一个 ConfigDataProperties 实例,封装 ConfigDataLocation 列表
		ConfigDataProperties properties = new ConfigDataProperties(imports, null);
        // 创建类型为 INITIAL_IMPORT 的 ConfigDataEnvironmentContributor 实例
		return new ConfigDataEnvironmentContributor(Kind.INITIAL_IMPORT, null, null, false, null, null, properties, null, null);
	}
}
分析可知:
- 使用
ConfigDataProperties封装ConfigDataLocation数组 - 基于
ConfigDataProperties实例,创建ConfigDataEnvironmentContributor实例
小结
经过上述分析可知:
-
配置属性处理
-
默认从属性源中加载属性值
- 包括
spring.config.import/pring.config.additional-location/spring.config.location配置 - 注意
- 如果配置的资源式可选的,需要在配置前面加上
optional:表示可选
- 如果配置的资源式可选的,需要在配置前面加上
- 包括
-
对属性值进行判断
- 如果存在,则基于此值创建
ConfigDataLocation实例- 如果不存在,则返回默认结果
- 只有
spring.config.import对应的默认值存为非空数组DEFAULT_SEARCH_LOCATIONSDEFAULT_SEARCH_LOCATIONS通过静态初始化赋值
- 只有
- 如果不存在,则返回默认结果
- 如果存在,则基于此值创建
-
-
使用
ConfigDataProperties封装上述得到的ConfigDataLocation数组 -
基于
ConfigDataProperties实例,创建ConfigDataEnvironmentContributor实例
正常不配置spring.config.import/pring.config.additional-location/spring.config.location时
- 其仅仅创建两个类型为
INITIAL_IMPORT的ConfigDataEnvironmentContributor实例 - 分别对应路径为
optional:classpath:/;optional:classpath:/config/optional:file:./;optional:file:./config/;optional:file:./config/*/
至此,完成了ConfigDataEnvironment实例的创建,其结构大致如下

3. 处理与应用
在ConfigDataEnvironment实例创建完成后,将调用processAndApply方法进行处理
处理入口
跟进分析processAndApply方法
// org.springframework.boot.context.config.ConfigDataEnvironment
class ConfigDataEnvironment {

    void processAndApply() {
        // 1. 创建一个 ConfigDataImporter 实例
        ConfigDataImporter importer = new ConfigDataImporter(this.logFactory, this.notFoundAction, this.resolvers, this.loaders);
        registerBootstrapBinder(this.contributors, null, DENY_INACTIVE_BINDING);

        // 2. 三阶段处理
        // 2.1 阶段一:解析初始导入贡献者
        ConfigDataEnvironmentContributors contributors = processInitial(this.contributors, importer);

        // 创建 ConfigDataActivationContext 实例
        ConfigDataActivationContext activationContext = createActivationContext(
            contributors.getBinder(null, BinderOption.FAIL_ON_BIND_TO_INACTIVE_SOURCE));

        // 2.2 阶段一:解析云平台配置
        contributors = processWithoutProfiles(contributors, importer, activationContext);

        // 2.3 阶段三:解析激活配置 spring.profile.active 和 spring.profile.groups
        // 处理 阶段一处理后的 profiles 配置
        activationContext = withProfiles(contributors, activationContext);
        // 进行 profiles 处理
        contributors = processWithProfiles(contributors, importer, activationContext);

        // 3. 将所有由贡献者解析出来的属性源,添加到 environment 实例中
        applyToEnvironment(contributors, activationContext, importer.getLoadedLocations(), importer.getOptionalLocations());
    }
}
分析可知:
- 其主要通过三阶段处理贡献者
- 每个阶段处理不同场景
- 阶段一:解析处理默认的
application文件资源 - 阶段二:解析处理云平台配置(暂不关注)
- 阶段三:解析处理
profiles对应的application-<profile>文件资源
- 处理完后,将贡献者中的属性源添加到
Environment实例中
阶段处理公共逻辑分析
在processAndApply中,其主要通过三个阶段完成处理,其各自对应一个处理函数,跟进分析
// org.springframework.boot.context.config.ConfigDataEnvironment
class ConfigDataEnvironment {

    /* 阶段一处理:无 activationContext,其实就是无云平台,无 profiles */
    private ConfigDataEnvironmentContributors processInitial(ConfigDataEnvironmentContributors contributors,
        	ConfigDataImporter importer) {
        contributors = contributors.withProcessedImports(importer, null);
        registerBootstrapBinder(contributors, null, DENY_INACTIVE_BINDING);
        return contributors;
    }

    /* 阶段二处理:如果配置了云计算平台,此时就会进行云平台解析 */
    private ConfigDataEnvironmentContributors processWithoutProfiles(ConfigDataEnvironmentContributors contributors,
        	ConfigDataImporter importer, ConfigDataActivationContext activationContext) {
        contributors = contributors.withProcessedImports(importer, activationContext);
        registerBootstrapBinder(contributors, activationContext, DENY_INACTIVE_BINDING);
        return contributors;
    }

    /* 阶段三处理:如果配置了 spring.profile.active和spring.profile.groups 则会进行响应解析 */
    private ConfigDataEnvironmentContributors processWithProfiles(ConfigDataEnvironmentContributors contributors,
        	ConfigDataImporter importer, ConfigDataActivationContext activationContext) {
        contributors = contributors.withProcessedImports(importer, activationContext);
        registerBootstrapBinder(contributors, activationContext, ALLOW_INACTIVE_BINDING);
        return contributors;
    }
}
分析可知:
- 三个阶段处理过程大致类似,都是通过
withProcessedImports进行处理
导入处理分析
下面跟进分析三个阶段的公共处理逻辑withProcessedImports
// org.springframework.boot.context.config.ConfigDataEnvironment
class ConfigDataEnvironment {

    ConfigDataEnvironmentContributors withProcessedImports(ConfigDataImporter importer, ConfigDataActivationContext activationContext) {
		// 1. 定义导入阶段
        // 第一二阶段为:BEFORE_PROFILE_ACTIVATION(默认配置文件激活前)
        // 第三阶段为:AFTER_PROFILE_ACTIVATION(默认配置文件激活后)
        ImportPhase importPhase = ImportPhase.get(activationContext);

		ConfigDataEnvironmentContributors result = this;
		int processed = 0;
		while (true) {
            // 2. 遍历获取需要处理的 ConfigDataEnvironmentContributor 实例进行处理
			ConfigDataEnvironmentContributor contributor = getNextToProcess(result, activationContext, importPhase);

            if (contributor == null) {
                // 没有需要处理的,则返回结果
				return result;
			}

            // 3. 解析类型为 UNBOUND_IMPORT 的贡献者
			if (contributor.getKind() == Kind.UNBOUND_IMPORT) {
				ConfigDataEnvironmentContributor bound = contributor.withBoundProperties(result, activationContext);
				result = new ConfigDataEnvironmentContributors(this.logger, this.bootstrapContext,
						result.getRoot().withReplacement(contributor, bound));
				continue;
			}

            // 4. 处理满足 isActiveWithUnprocessedImports 判断的贡献者(二类贡献者)
            // 4.1 创建路径解析上下文
			ConfigDataLocationResolverContext locationResolverContext = new ContributorConfigDataLocationResolverContext(
					result, contributor, activationContext);
            // 4.2 创建配置数据加载上下文
			ConfigDataLoaderContext loaderContext = new ContributorDataLoaderContext(this);

            // 4.3 获取要解析的配置数据路径
			List<ConfigDataLocation> imports = contributor.getImports();

            // 4.4 通过导入器,解析具体的配置数据路径,得到解析结果
            // ConfigDataResolutionResult 包含 location 和 resource
            // ConfigData 包含 PropertiesSource
			Map<ConfigDataResolutionResult, ConfigData> imported = importer.resolveAndLoad(activationContext,
					locationResolverContext, loaderContext, imports);

            // 4.5 创建一个新的贡献者,这个贡献者在importPhase阶段的子贡献者就是解析出的数据
			ConfigDataEnvironmentContributor contributorAndChildren = contributor
                .withChildren(importPhase, asContributors(imported));

            // 4.6 替换 root 贡献者中的当前解析贡献者,为上面的新的已被解析的贡献者
            result = new ConfigDataEnvironmentContributors(this.logger, this.bootstrapContext,
					result.getRoot().withReplacement(contributor, contributorAndChildren));

			processed++;
		}
	}
}
分析可知:
- 首先通过
getNextToProcess方法进行判断,获取其中需要处理的贡献者- 实际上存在两种类型
- 后续对两种类型的贡献者,分别进行分支处理
贡献者判断
此处仅仅解析需要处理的贡献者,一个贡献者是否需要进行解析,其通过getNextToProcess方法进行判断,返回需要处理的贡献者
// org.springframework.boot.context.config.ConfigDataEnvironment
class ConfigDataEnvironment {

    private ConfigDataEnvironmentContributor getNextToProcess(ConfigDataEnvironmentContributors contributors,
			ConfigDataActivationContext activationContext, ImportPhase importPhase) {
		for (ConfigDataEnvironmentContributor contributor : contributors.getRoot()) {
            // 一类:类型为 UNBOUND_IMPORT(未导入完全贡献者)
            // 二类:处于 未处理的导入状态
			if (contributor.getKind() == Kind.UNBOUND_IMPORT
					|| isActiveWithUnprocessedImports(activationContext, importPhase, contributor)) {
				return contributor;
			}
		}
		return null;
	}
}
分析可知,需要处理的贡献者为两类:
- 一类
- 类型为
UNBOUND_IMPORT(未导入完全贡献者)的贡献者 - 资源已经处理,但未导入到
Environment环境中
- 类型为
- 二类
- 通过
isActiveWithUnprocessedImports方法筛选的贡献者
- 通过
其中isActiveWithUnprocessedImports对ConfigDataEnvironmentContributor实例的判断逻辑大致如下:
properties为nullproperties不为null,但是properties的activate属性为nullproperties不为null,properties的activate属性也不为null,但是传入的activationContext为nullproperties,properties的activate,传入的activationContext都不为为null,并且满足下面两个条件properties中的onCloudPlatform为null- 或者
properties中的onCloudPlatform不为null,并且和activationContext中onCloudPlatform相同
- 或者
properties中的onProfile为null- 或者
properties中的onProfile不为null,并且和activationContext中的profiles匹配
- 或者
所以二类贡献者,简化来说就是:
- 贡献者有
properties中指示了有要解析的配置文件路径,但是children中发现并没有对应的解析配置,所以就需要解析
二类贡献者处理
实际上对于二类贡献者,其主要处理逻辑有两部分:
- 通过
resolveAndLoad解析加载配置数据对应数据源 - 将结果封装为新的贡献者
- 由新的贡献者与旧的贡献管理者,生成新的贡献管理者,进行替换
解析与加载
跟踪分析resolveAndLoad方法
// org.springframework.boot.context.config.ConfigDataImporter
class ConfigDataImporter {

    Map<ConfigDataResolutionResult, ConfigData> resolveAndLoad(ConfigDataActivationContext activationContext,
			ConfigDataLocationResolverContext locationResolverContext, ConfigDataLoaderContext loaderContext,
			List<ConfigDataLocation> locations) {
		// 1. 获取 Profiles
        // 在第三阶段,如果有配置,则有值
        Profiles profiles = (activationContext != null) ? activationContext.getProfiles() : null;
        // 2. 基于 ConfigDataLocation 封装为 ConfigDataResolutionResult 列表
        List<ConfigDataResolutionResult> resolved = resolve(locationResolverContext, profiles, locations);
        // 3. 解析 ConfigDataResolutionResult 得到 ConfigData 结果
        return load(loaderContext, resolved);
	}
}
分析可知,其分为两步走:
resolve:解析配置路径load:加载配置资源
此部分分析过程在下述4. 二类贡献者解析与加载部分
解析结果处理
经过ConfigDataImporter#resolveAndLoad处理后,得到Map<ConfigDataResolutionResult, ConfigData> imported结果
下面需要将其封装,得到最终的贡献管理者ConfigDataEnvironmentContributors
分析可知,其实际上又分为两步走:
-
首先将每个二类贡献者的解析结果
Map<ConfigDataResolutionResult, ConfigData> imported封装为一个贡献者实例-
先调用
ConfigDataEnvironmentContributors#asContributors将其封装为贡献者列表 -
由当前贡献者调用
withChildren,将当前二类贡献者与上面创建的贡献者组合封装为一个新贡献者
-
-
创建一个新的贡献管理者,替代旧的贡献管理者
- 将旧的贡献管理者中管理的贡献者与上面创建的贡献者整合
下面一步步分析
- 解析结果封装为贡献者
这个步骤由ConfigDataEnvironmentContributors#asContributors方法完成,跟进分析
// org.springframework.boot.context.config.ConfigDataEnvironmentContributors
class ConfigDataEnvironmentContributors implements Iterable<ConfigDataEnvironmentContributor> {

    private List<ConfigDataEnvironmentContributor> asContributors(
        Map<ConfigDataResolutionResult, ConfigData> imported) {
        // 创建结果列表
        List<ConfigDataEnvironmentContributor> contributors = new ArrayList<>(imported.size() * 5);

        // 遍历处理
        imported.forEach((resolutionResult, data) -> {
            ConfigDataLocation location = resolutionResult.getLocation();
            ConfigDataResource resource = resolutionResult.getResource();
            boolean profileSpecific = resolutionResult.isProfileSpecific();
            if (data.getPropertySources().isEmpty()) {
                // 空属性源,创建类型为 EMPTY_LOCATION 的贡献者
                contributors.add(ConfigDataEnvironmentContributor.ofEmptyLocation(location, profileSpecific));
            } else {
                // 遍历 ConfigData 中的属性源
                for (int i = data.getPropertySources().size() - 1; i >= 0; i--) {
                    // 每个属性源创建一个类型为 UNBOUND_IMPORT 的贡献者
                    contributors.add(ConfigDataEnvironmentContributor
                                     .ofUnboundImport(location, resource, profileSpecific, data, i));
                }
            }
        });

        return Collections.unmodifiableList(contributors);
    }
}
分析可知:
- 其实际就是将上述解析得到的属性源封装为贡献者
- 处理
- 如果数据配置路径下没有解析到属性源,则封装类型为
EMPTY_LOCATION的贡献者,其中没有属性源 - 如果数据配置路径下有解析到属性源,则遍历其属性源,封装为贡献者
- 如果数据配置路径下没有解析到属性源,则封装类型为
- 每个属性源封装为一个类型为
UNBOUND_IMPORT的贡献者- 其中封装了属性源
- 组合二类贡献者与新贡献者
此步骤由二类贡献者调用ConfigDataEnvironmentContributor#withChildren方法完成
// org.springframework.boot.context.config.ConfigDataEnvironmentContributor
class ConfigDataEnvironmentContributor implements Iterable<ConfigDataEnvironmentContributor> {

    // 实际存储属性源
    private final PropertySource<?> propertySource;

    // 子贡献者存储
    private final Map<ImportPhase, List<ConfigDataEnvironmentContributor>> children;

    // 贡献者类型
    private final Kind kind;

    /* 基于子贡献者进行构造 */
    ConfigDataEnvironmentContributor withChildren(ImportPhase importPhase,
			List<ConfigDataEnvironmentContributor> children) {
        // 以二类贡献者原有子贡献者作为基础
		Map<ImportPhase, List<ConfigDataEnvironmentContributor>> updatedChildren = new LinkedHashMap<>(this.children);
        // 将新的贡献者列表加入
		updatedChildren.put(importPhase, children);

        // 如果是 profile 相关,即第三阶段处理
		if (importPhase == ImportPhase.AFTER_PROFILE_ACTIVATION) {
			moveProfileSpecific(updatedChildren);
		}

        // 创建新的贡献者返回,其中包括了 二类贡献者已有的子贡献者 和 二类贡献者解析结果封装的贡献者
		return new ConfigDataEnvironmentContributor(this.kind, this.location, this.resource,
				this.fromProfileSpecificImport, this.propertySource, this.configurationPropertySource, this.properties,
				this.configDataOptions, updatedChildren);
	}
}
分析可知:
- 实际就是创建一个新的贡献,其管理的子贡献者包括
- 二类贡献者中原有的子贡献者
- 二类贡献者解析结果封装的贡献者
- 创建新的贡献管理者
其中主要的是root根贡献者,其由原有贡献管理者中管理的root根贡献者调用withReplacement方法完成
// org.springframework.boot.context.config.ConfigDataEnvironmentContributor
class ConfigDataEnvironmentContributor implements Iterable<ConfigDataEnvironmentContributor> {

    // 实际存储属性源
    private final PropertySource<?> propertySource;

    // 子贡献者存储
    private final Map<ImportPhase, List<ConfigDataEnvironmentContributor>> children;

    // 贡献者类型
    private final Kind kind;

    /* 替代根贡献者 */
    ConfigDataEnvironmentContributor withReplacement(ConfigDataEnvironmentContributor existing,
                                                     ConfigDataEnvironmentContributor replacement) {
		// 如果当前二类贡献者就是根贡献者,则直接返回前面处理结果
        if (this == existing) {
            return replacement;
        }
        // 创建子贡献者结果容器
        Map<ImportPhase, List<ConfigDataEnvironmentContributor>> updatedChildren = new LinkedHashMap<>(this.children.size());
        // 遍历根贡献中原有子贡献者
        this.children.forEach((importPhase, contributors) -> {
            List<ConfigDataEnvironmentContributor> updatedContributors = new ArrayList<>(contributors.size());
            for (ConfigDataEnvironmentContributor contributor : contributors) {
                // 处理每个子贡献者,递归调用 withReplacement
                updatedContributors.add(contributor.withReplacement(existing, replacement));
            }
            // 子贡献者结果列表转换为不可变列表
            updatedChildren.put(importPhase, Collections.unmodifiableList(updatedContributors));
        });
        // 封装创建新的根贡献者
        return new ConfigDataEnvironmentContributor(this.kind, this.location, this.resource,
                                                    this.fromProfileSpecificImport, this.propertySource, this.configurationPropertySource, this.properties,
                                                    this.configDataOptions, updatedChildren);
    }

}
分析可知:
- 其实际就是将原有贡献管理者中管理的二类贡献者,由此二类贡献者处理后得到的新的贡献者进行替代
小结
- 二类贡献者经过处理,其配置路径对应的资源的资源文件,都将转换为类型为
UNBOUND_IMPORT的贡献者 - 二类贡献者处理得到的类型为
UNBOUND_IMPORT的贡献者,实际就是一类贡献者了,由于处理过程中贡献管理者result在不断更新替换,所以所有二类贡献者处理得到的型为UNBOUND_IMPORT的一类贡献者还将再次进行处理
一类贡献者处理
对于一类贡献者,其主要是通过ConfigDataEnvironmentContributor#withBoundProperties封装为一个新的贡献者
// org.springframework.boot.context.config.ConfigDataEnvironmentContributor
class ConfigDataEnvironmentContributor implements Iterable<ConfigDataEnvironmentContributor> {

    // 实际存储属性源
    private final PropertySource<?> propertySource;

    // 子贡献者存储
    private final Map<ImportPhase, List<ConfigDataEnvironmentContributor>> children;

    // 贡献者类型
    private final Kind kind;

    /* 处理一类贡献者 */
    ConfigDataEnvironmentContributor withBoundProperties(Iterable<ConfigDataEnvironmentContributor> contributors,
			ConfigDataActivationContext activationContext) {
        // 获取内部管理的属性源的迭代器
		Iterable<ConfigurationPropertySource> sources = Collections.singleton(getConfigurationPropertySource());

        // 创建一个占位符解析器
		PlaceholdersResolver placeholdersResolver = new ConfigDataEnvironmentContributorPlaceholdersResolver(
				contributors, activationContext, this, true);

		Binder binder = new Binder(sources, placeholdersResolver, null, null, null);
		UseLegacyConfigProcessingException.throwIfRequested(binder);

        // 创建配置数据属性实例
		ConfigDataProperties properties = ConfigDataProperties.get(binder);
		if (properties != null && this.configDataOptions.contains(ConfigData.Option.IGNORE_IMPORTS)) {
			properties = properties.withoutImports();
		}

        // 封装为类型为 BOUND_IMPORT 的贡献者
		return new ConfigDataEnvironmentContributor(Kind.BOUND_IMPORT, this.location, this.resource,
				this.fromProfileSpecificImport, this.propertySource, this.configurationPropertySource, properties,
				this.configDataOptions, null);
	}

}
处理过程扩展(跳转)
- 对于二类贡献者的解析与加载的分析,请查看
4. 二类贡献者解析与加载(扩展) - 第三阶段对于
profiles的解析,请查看5. profils环境处理(扩展)
贡献解析阶段总结(重点)
分析至此,我们做一个贡献解析阶段的总结
-
在实例构建阶段
- 主要构建了贡献管理者
- 基于
Environment环境中已有的属性源,创建了EXISTING已存贡献者 - 创建
INITIAL_IMPORT初始贡献者- 基于
spring.config.import/pring.config.additional-location/spring.config.location配置,创建对应的初始贡献者 - 如果没有对应配置,默认创建两个初始贡献者,其配置路径对应以下两个路径
optional:classpath:/;optional:classpath:/config/optional:file:./;optional:file:./config/;optional:file:./config/*/
- 基于
-
处理过程
- 整个处理过程分为三个阶段,分别处理不同配置的资源文件
- 阶段一
- 默认处理配置路径下名称为
application的资源文件- 资源文件的文件扩展名由
PropertySourceLoader决定,默认配置了两个属性源加载器PropertiesPropertySourceLoader- 解析扩展名为
properties/xml的资源文件 YamlPropertySourceLoader- 解析扩展名为
yml/yaml的资源文件
- 解析扩展名为
- 资源文件的文件扩展名由
- 默认处理配置路径下名称为
- 阶段二
- 处理云平台相关的资源文件,此处不赘述
- 阶段三
- 基于上述阶段处理后已有的贡献者中的属性源,获取
profiles激活情况(具体查看5. profiles环境处理)- 涉及的配置项有:
spring.profiles.[include/group/active/default]
- 涉及的配置项有:
- 基于
profiles激活情况,处理配置路径下名称为application-<profile>的资源文件- 资源文件的文件扩展名由
PropertySourceLoader决定
- 资源文件的文件扩展名由
- 基于上述阶段处理后已有的贡献者中的属性源,获取
- 阶段一
- 整个处理过程分为三个阶段,分别处理不同配置的资源文件
-
阶段处理(实际上,三阶段处理的逻辑大致相同)
-
首先对贡献管理者中的贡献者进行判断
- 确定哪些贡献者需要处理,以及根据贡献者分类进行处理分支选择
- 主要分析了二类贡献者的处理过程
- 确定哪些贡献者需要处理,以及根据贡献者分类进行处理分支选择
-
二类贡献者解析与加载
-
首先解析配置路径,获取候选参考实例
- 实际就是基于配置路径/资源名称/资源后缀名,进行叉乘,得到所有可能需要加载的资源文件
-
资源文件加载
- 上述解析的候选参考对应的资源文件只是可能存在,所以需要加载确定存在的资源文件
- 将加载到的资源文件通过属性源加载器,解析为属性源实例
- 将解析得到的属性源,封装为
Map<ConfigDataResolutionResult, ConfigData>结果返回
-
结果贡献管理者封装
- 基于
Map<ConfigDataResolutionResult, ConfigData>结果,封装类型为UNBOUND_IMPORT类型的一类贡献者
- 基于
-
贡献管理者替换
- 将新建的一类贡献者,结合旧的贡献管理者,封装新的贡献管理者
- 实际作用是将新建的一类贡献者,放置到处理循环中
-
-
一类贡献者处理
- 实际就是基于上述创建的一类贡献者,创建对应的类型为
BOUND_IMPORT的贡献者,其中封装了属性源
- 实际就是基于上述创建的一类贡献者,创建对应的类型为
-
总而言之就是在配置路径下,加载对应资源文件,通过属性源加载器解析为属性源
应用至环境
在完成阶段处理后,就需要将由解析贡献者得到的属性源添加到Environment环境实例中,此部分由applyToEnvironment方法完成,跟进分析
// org.springframework.boot.context.config.ConfigDataEnvironment
class ConfigDataEnvironment {

    /* 应用到环境 */
    private void applyToEnvironment(ConfigDataEnvironmentContributors contributors,
                                    ConfigDataActivationContext activationContext, Set<ConfigDataLocation> loadedLocations,
                                    Set<ConfigDataLocation> optionalLocations) {
        checkForInvalidProperties(contributors);
        checkMandatoryLocations(contributors, activationContext, loadedLocations, optionalLocations);
        // 1. 获取环境可变属性源
        MutablePropertySources propertySources = this.environment.getPropertySources();
        // 2. 应用 贡献者中属性源 到 可变属性源 中
        applyContributor(contributors, activationContext, propertySources);
        DefaultPropertiesPropertySource.moveToEnd(propertySources);

        // 3. 更新 profiles 信息到 Environment 环境实例中,资源文件中存在新的配置,需要同步更新
        Profiles profiles = activationContext.getProfiles();
        this.environment.setDefaultProfiles(StringUtils.toStringArray(profiles.getDefault()));
        this.environment.setActiveProfiles(StringUtils.toStringArray(profiles.getActive()));
        // 触发环境更新事件监听
        this.environmentUpdateListener.onSetProfiles(profiles);
    }
}
分析可知:
- 其主要处理部分有
- 将贡献者中属性源应用到
Environment环境实例管理的可变属性源中 - 将
Profiles信息更新到Environment环境实例中
- 将贡献者中属性源应用到
属性源应用处理
属性源应用主要由applyContributor方法完成,跟进分析
// org.springframework.boot.context.config.ConfigDataEnvironment
class ConfigDataEnvironment {

    private void applyContributor(ConfigDataEnvironmentContributors contributors,
                                  ConfigDataActivationContext activationContext, MutablePropertySources propertySources) {
        // 遍历贡献管理者管理的子贡献者
        // 贡献者管理的子贡献者类似于一棵树,以 root 贡献者为根节点,遍历时会以叶子节点(最底层的子贡献者)进行遍历
        for (ConfigDataEnvironmentContributor contributor : contributors) {
            // 获取贡献者中属性源
            PropertySource<?> propertySource = contributor.getPropertySource();
            // 仅处理类型为 BOUND_IMPORT(一类贡献者处理结果),且属性源不为空的
            if (contributor.getKind() == ConfigDataEnvironmentContributor.Kind.BOUND_IMPORT && propertySource != null) {
                // 将属性源添加到可变属性源中
                propertySources.addLast(propertySource);
            }
        }
    }
}
小结
分析可知:
- 实际应用的过程,就是将贡献者中的属性源提取,添加到
Environment环境实例中
4. 二类贡献者解析与加载(扩展)
处理入口(ConfigDataImporter)
解析与加载贡献者的处理过程相对复杂,所以将其抽取出来分析,对应ConfigDataImporter#resolveAndLoad方法处理
// org.springframework.boot.context.config.ConfigDataImporter
class ConfigDataImporter {

    Map<ConfigDataResolutionResult, ConfigData> resolveAndLoad(ConfigDataActivationContext activationContext,
			ConfigDataLocationResolverContext locationResolverContext, ConfigDataLoaderContext loaderContext,
			List<ConfigDataLocation> locations) {
		// 1. 获取 Profiles
        // 在第三阶段,如果有配置,则有值
        Profiles profiles = (activationContext != null) ? activationContext.getProfiles() : null;

        // 2. 基于 ConfigDataLocation 封装为 ConfigDataResolutionResult 列表
        List<ConfigDataResolutionResult> resolved = resolve(locationResolverContext, profiles, locations);

        // 3. 解析 ConfigDataResolutionResult 得到 ConfigData 结果
        return load(loaderContext, resolved);
	}
}
基于前面分析可知,其主要分为两部分:
resolve- 解析配置路径,获取
ConfigDataResolutionResult列表
- 解析配置路径,获取
load- 加载配置资源,基于
ConfigDataResolutionResult获取对应的ConfigData
- 加载配置资源,基于
配置路径解析
首先通过ConfigDataImporter#resolve方法解析配置路径,获取ConfigDataResolutionResult列表
处理入口
跟进分析ConfigDataImporter#resolve方法
// org.springframework.boot.context.config.ConfigDataImporter
class ConfigDataImporter {

    // 配置路径解析器
    private final ConfigDataLocationResolvers resolvers;

    /* 配置路径解析 */
    private List<ConfigDataResolutionResult> resolve(ConfigDataLocationResolverContext locationResolverContext,
                                                     Profiles profiles, List<ConfigDataLocation> locations) {
        List<ConfigDataResolutionResult> resolved = new ArrayList<>(locations.size());
        for (ConfigDataLocation location : locations) {
            // 遍历解析单个配置路径
            resolved.addAll(resolve(locationResolverContext, profiles, location));
        }
        return Collections.unmodifiableList(resolved);
    }

	/* 单个配置路径解析 */
    private List<ConfigDataResolutionResult> resolve(ConfigDataLocationResolverContext locationResolverContext,
                                                     Profiles profiles, ConfigDataLocation location) {
        return this.resolvers.resolve(locationResolverContext, location, profiles);
    }
}
分析可知:
- 实际由
ConfigDataLocationResolvers#resolve完成解析路径 - 解析结果为
ConfigDataResolutionResult集合
ConfigDataLocationResolvers处理
跟进分析ConfigDataLocationResolvers#resolve处理
// org.springframework.boot.context.config.ConfigDataLocationResolvers
class ConfigDataLocationResolvers {

    // 配置路径解析器列表
    private final List<ConfigDataLocationResolver<?>> resolvers;

    /* 1. 解析入口 */
    List<ConfigDataResolutionResult> resolve(ConfigDataLocationResolverContext context, ConfigDataLocation location,
                                             Profiles profiles) {
        for (ConfigDataLocationResolver<?> resolver : getResolvers()) {
            // 遍历解析器尝试进行配置路径解析
            if (resolver.isResolvable(context, location)) {
                return resolve(resolver, context, location, profiles);
            }
        }
    }

    /* 2. 遍历配置路径解析器,尝试进行解析 */
    private List<ConfigDataResolutionResult> resolve(ConfigDataLocationResolver<?> resolver,
			ConfigDataLocationResolverContext context, ConfigDataLocation location, Profiles profiles) {
        // 1. 进行基础解析,不分析 profile
		List<ConfigDataResolutionResult> resolved = resolve(location, false, () -> resolver.resolve(context, location));

        if (profiles == null) {
            // 没有配置 profiles 直接返回
			return resolved;
		}
        // 2. 针对 profile 进行解析
		List<ConfigDataResolutionResult> profileSpecific = resolve(location, true,
				() -> resolver.resolveProfileSpecific(context, location, profiles));

        // 3. 合并结果
		return merge(resolved, profileSpecific);
	}

    /* 3. 具体解析调用 */
    private List<ConfigDataResolutionResult> resolve(ConfigDataLocation location, boolean profileSpecific,
			Supplier<List<? extends ConfigDataResource>> resolveAction) {
        // 通过 Lambda 表达式,实际调用 ConfigDataLocationResolver#resolve/resolveProfileSpecific 方法
		List<ConfigDataResource> resources = nonNullList(resolveAction.get());

		List<ConfigDataResolutionResult> resolved = new ArrayList<>(resources.size());
		for (ConfigDataResource resource : resources) {
            // 将解析得到的 ConfigDataResource 封装为 ConfigDataResolutionResult 实例返回
			resolved.add(new ConfigDataResolutionResult(location, resource, profileSpecific));
		}
		return resolved;
	}
}
分析可知:
- 实际解析工作由
ConfigDataLocationResolver实例完成 - 对于
profile判断后,通过两个方法进行处理ConfigDataLocationResolver#resolve- 解析非
profile的基础处理
- 解析非
ConfigDataLocationResolver#resolveProfileSpecific- 解析
profile的环境处理
- 解析
ConfigDataLocationResolver处理
上述分析可知,实际解析工作由ConfigDataLocationResolver实例完成
-
ConfigDataLocationResolvers中管理的ConfigDataLocationResolver列表,实际是通过SpringFactoriesLoader#oadFactoryNames获取 -
其中实际使用的是
StandardConfigDataLocationResolver
跟进StandardConfigDataLocationResolver处理分析
// org.springframework.boot.context.config.StandardConfigDataLocationResolver
public class StandardConfigDataLocationResolver {

    /* 1. 非 profile 的基础解析 */
    public List<StandardConfigDataResource> resolve(ConfigDataLocationResolverContext context,
			ConfigDataLocation location) throws ConfigDataNotFoundException {
        // 1. 解析配置路径为 StandardConfigDataReference
        // 2. 解析 StandardConfigDataReference
		return resolve(getReferences(context, location.split()));
	}

    /* 2. profile 的环境解析 */
    public List<StandardConfigDataResource> resolveProfileSpecific(ConfigDataLocationResolverContext context,
			ConfigDataLocation location, Profiles profiles) {
        // 1. 解析配置路径为 StandardConfigDataReference
        // 2. 解析 StandardConfigDataReference
		return resolve(getProfileSpecificReferences(context, location.split(), profiles));
	}
}
分析可知:
-
解析步骤
-
解析配置路径为
StandardConfigDataReference- 配置路径内容将会由
;进行分割,之后进行处理
- 配置路径内容将会由
-
解析
StandardConfigDataReference
-
-
对于
profile判断- 非
profile的基础处理,使用getReferences获取StandardConfigDataResource实例 profile的环境处理,使用getProfileSpecificReferences获取StandardConfigDataResource实例
- 非
1. 解析路径获取参考实例
首先就是要解析ConfigDataLocation,获取对应的StandardConfigDataResource实例
需要注意的是,源配置路径ConfigDataLocation将会由;进行分割得到ConfigDataLocation[]作为入参
🌰:
optional:classpath:/;optional:classpath:/config/- 分割后结果
optional:classpath:/optional:classpath:/config/
处理入口
首先通过getReferences方法将ConfigDataLocation解析为StandardConfigDataReference
// org.springframework.boot.context.config.StandardConfigDataLocationResolver
public class StandardConfigDataLocationResolver {

    /* 1. 处理多个 ConfigDataLocation */
    private Set<StandardConfigDataReference> getReferences(ConfigDataLocationResolverContext context,
                                                           ConfigDataLocation[] configDataLocations) {
        Set<StandardConfigDataReference> references = new LinkedHashSet<>();
        // 遍历处理使用 ; 分割后的配置路径
        for (ConfigDataLocation configDataLocation : configDataLocations) {
            // 通过 getReferences 处理单个配置路径
            // 将结果添加
            references.addAll(getReferences(context, configDataLocation));
        }
        return references;
    }

    /* 2. 处理单个 ConfigDataLocation */
    private Set<StandardConfigDataReference> getReferences(ConfigDataLocationResolverContext context,
                                                           ConfigDataLocation configDataLocation) {
        String resourceLocation = getResourceLocation(context, configDataLocation);

        if (isDirectory(resourceLocation)) {
            // 如果配置路径为文件夹
            return getReferencesForDirectory(configDataLocation, resourceLocation, NO_PROFILE);
        }
        // 如果配置路径为文件资源
        return getReferencesForFile(configDataLocation, resourceLocation, NO_PROFILE);
    }
}
分析可知,对于不同类型路径,其通过不同方法处理,下面一一分析
文件目录解析
对于文件目录类型路径,其通过getReferencesForDirectory方法进行解析,跟进分析
// org.springframework.boot.context.config.StandardConfigDataLocationResolver
public class StandardConfigDataLocationResolver {

    // 默认为 ["application"]
    private final String[] configNames;

    private Set<StandardConfigDataReference> getReferencesForDirectory(
        ConfigDataLocation configDataLocation, String directory, String profile) {

        Set<StandardConfigDataReference> references = new LinkedHashSet<>();

        // 遍历每个配置名称进行处理
        for (String name : this.configNames) {
            // 获取配置路径下多个符合的资源,解析为 StandardConfigDataReference 实例
            Deque<StandardConfigDataReference> referencesForName = getReferencesForConfigName(
                name, configDataLocation, directory, profile);
            // 添加到结果中
            references.addAll(referencesForName);
        }
        return references;
    }
}
跟进分析getReferencesForConfigName方法
// org.springframework.boot.context.config.StandardConfigDataLocationResolver
public class StandardConfigDataLocationResolver {

    // 包括 YamlPropertySourceLoader/PropertiesPropertySourceLoader
    private final List<PropertySourceLoader> propertySourceLoaders;

    private Deque<StandardConfigDataReference> getReferencesForConfigName(String name,
			ConfigDataLocation configDataLocation, String directory, String profile) {
		Deque<StandardConfigDataReference> references = new ArrayDeque<>();
        // 遍历属性源加载器
		for (PropertySourceLoader propertySourceLoader : this.propertySourceLoaders) {
            // 获取 属性源加载器 处理的文件扩展名,遍历处理
			for (String extension : propertySourceLoader.getFileExtensions()) {
                // 对应每个扩展名,创建一个 StandardConfigDataReference 实例
				StandardConfigDataReference reference = new StandardConfigDataReference(configDataLocation, directory,
						directory + name, profile, extension, propertySourceLoader);
				if (!references.contains(reference)) {
                    // 实例添加
					references.addFirst(reference);
				}
			}
		}
        // 结果返回
		return references;
	}
}
分析可知:
- 对于文件目录类型,实际就是遍历获取可能的意向文件
- 名称为
application - 扩展名由
PropertySourceLoader决定- 通常为
properties/xml/yml/yaml
- 通常为
- 名称为
单一文件解析
跟进分析getReferencesForFile方法
// org.springframework.boot.context.config.StandardConfigDataLocationResolver
public class StandardConfigDataLocationResolver {

    // 包括 YamlPropertySourceLoader/PropertiesPropertySourceLoader
    private final List<PropertySourceLoader> propertySourceLoaders;

    private Set<StandardConfigDataReference> getReferencesForFile(
        ConfigDataLocation configDataLocation, String file, String profile) {

        // 判断是否扩展模式
        // 🌰:application[.yaml]
        Matcher extensionHintMatcher = EXTENSION_HINT_PATTERN.matcher(file);
        boolean extensionHintLocation = extensionHintMatcher.matches();
        if (extensionHintLocation) {
            // 如果是扩展模式,解析
            // 🌰:application[.yaml] --> application.yaml
            file = extensionHintMatcher.group(1) + extensionHintMatcher.group(2);
        }
        // 遍历属性源加载器
        for (PropertySourceLoader propertySourceLoader : this.propertySourceLoaders) {
            // 判断文件是否符合属性源加载器处理范围
            String extension = getLoadableFileExtension(propertySourceLoader, file);
            if (extension != null) {
                // 获取文件名称;application
                String root = file.substring(0, file.length() - extension.length() - 1);
                // 创建 StandardConfigDataReference 实例
                StandardConfigDataReference reference = new StandardConfigDataReference(
                    configDataLocation, null, root, profile, (!extensionHintLocation) ? extension : null, propertySourceLoader);
                // 返回结果
                return Collections.singleton(reference);
            }
        }
        if (configDataLocation.isOptional()) {
            return Collections.emptySet();
        }
    }
}
分析可知:
- 对于单一文件类型,要求扩展名符合
PropertySourceLoader处理范围
参考实例构建
上述对于资源路径的处理,最终都将构建StandardConfigDataReference实例,跟进分析
// org.springframework.boot.context.config.StandardConfigDataReference
class StandardConfigDataReference {

    // 源配置路径示例
    private final ConfigDataLocation configDataLocation;

    // 资源路径
    private final String resourceLocation;

    // 资源所处文件目录
	private final String directory;

    // 对应的 profile
	private final String profile;

    // 加载此资源对应的 属性源加载器
	private final PropertySourceLoader propertySourceLoader;

    /* 构造 */
    StandardConfigDataReference(ConfigDataLocation configDataLocation, String directory, String root, String profile,
			String extension, PropertySourceLoader propertySourceLoader) {
        // 保存源配置路径示例
		this.configDataLocation = configDataLocation;
        // 判断 profile,定义后缀
		String profileSuffix = (StringUtils.hasText(profile)) ? "-" + profile : "";
        // 定义资源路径
		this.resourceLocation = root + profileSuffix + ((extension != null) ? "." + extension : "");
		this.directory = directory;
		this.profile = profile;
        // 保存对应的 属性源加载器
		this.propertySourceLoader = propertySourceLoader;
	}
}
分析可知:
- 参考实例
StandardConfigDataReference主要保存两部分信息- 配置路径信息
- 当前配置资源对应的属性源加载器
PropertySourceLoader
属性源加载器
上述处理过程中,通过PropertySourceLoader获取处理范围
实际上PropertySourceLoader是由SpringFactoriesLoader#loadFactories获取,常用的实现有:
PropertiesPropertySourceLoader- 解析扩展名为
properties/xml的资源文件
- 解析扩展名为
YamlPropertySourceLoader- 解析扩展名为
yml/yaml的资源文件
- 解析扩展名为
小结
- 实际通过路径解析器解析配置路径,其得到的
StandardConfigDataReference被称为配置数据参考- 其为何被称为
参考,因为它只是可能存在的资源,表示需要关注的资源范围
- 其为何被称为
实际上以源配置路径optional:classpath:/;optional:classpath:/config/ 为例,其最终解析后得到的结果如下所示:
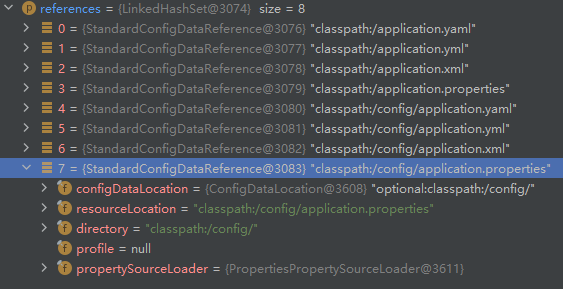
2. 参考解析
经过上述路径解析后,我们得到了StandardConfigDataReference集合,其中包含了所有需要关注的资源
处理入口
下面就是需要将它们解析获取真实资源,跟进分析resolve方法
// org.springframework.boot.context.config.StandardConfigDataLocationResolver
public class StandardConfigDataLocationResolver {

    // 路径资源加载器
    private final LocationResourceLoader resourceLoader;

    /* 参考集合解析 */
    private List<StandardConfigDataResource> resolve(Set<StandardConfigDataReference> references) {
		List<StandardConfigDataResource> resolved = new ArrayList<>();
        // 遍历参考信息进行解析
		for (StandardConfigDataReference reference : references) {
			resolved.addAll(resolve(reference));
		}
		if (resolved.isEmpty()) {
			resolved.addAll(resolveEmptyDirectories(references));
		}
		return resolved;
	}

    /* 单个配置参考解析 */
    private List<StandardConfigDataResource> resolve(StandardConfigDataReference reference) {
		if (!this.resourceLoader.isPattern(reference.getResourceLocation())) {
            // 资源路径不包含 * ,解析得到单个资源
			return resolveNonPattern(reference);
		}
        // 资源路径不包含 * ,解析得到多个资源
		return resolvePattern(reference);
	}
}
分析可知:
- 此时配置路径有两种
- 配置路径中不包含
*,表示单一资源文件- 使用
resolveNonPattern方法处理
- 使用
- 配置路径中包含
*,表示多个资源文件- 使用
resolvePattern方法处理
- 使用
- 配置路径中不包含
资源路径解析
对于配置数据参考实例的路径,将通过resolveNonPattern/resolvePattern方法进行处理,跟进分析
// org.springframework.boot.context.config.StandardConfigDataLocationResolver
public class StandardConfigDataLocationResolver {

    // LocationResourceLoader 实例
    private final LocationResourceLoader resourceLoader;

	/* 资源路径不包含 * ,解析得到单个资源 */
    private List<StandardConfigDataResource> resolveNonPattern(StandardConfigDataReference reference) {
        Resource resource = this.resourceLoader.getResource(reference.getResourceLocation());
        if (!resource.exists() && reference.isSkippable()) {
            logSkippingResource(reference);
            // 如果资源不存在,则返回空
            return Collections.emptyList();
        }
        // 否则封装为 StandardConfigDataResource 实例返回
        return Collections.singletonList(createConfigResourceLocation(reference, resource));
    }

    /* 资源路径不包含 * ,解析得到多个资源 */
    private List<StandardConfigDataResource> resolvePattern(StandardConfigDataReference reference) {
		List<StandardConfigDataResource> resolved = new ArrayList<>();
		for (Resource resource : this.resourceLoader.getResources(reference.getResourceLocation(), ResourceType.FILE)) {
			if (!resource.exists() && reference.isSkippable()) {
				logSkippingResource(reference);
			} else {
                // 如果资源存在,则封装为 StandardConfigDataResource 实例返回
				resolved.add(createConfigResourceLocation(reference, resource));
			}
		}
		return resolved;
	}
}
分析可知:
- 首先通过
LocationResourceLoader尝试进行资源加载- 加载成功,则封装为
StandardConfigDataResource实例 - 加载失败,则记录日志并跳过
- 加载成功,则封装为
资源加载
实际资源加载工作都是由LocationResourceLoader进行,跟进分析其getResource方法
// org.springframework.boot.context.config.LocationResourceLoader
class LocationResourceLoader {

    // 默认为 DefaultResourceLoader 实例
    private final ResourceLoader resourceLoader;

    Resource getResource(String location) {
        // 对路径进行前置处理
		validateNonPattern(location);
		location = StringUtils.cleanPath(location);
		if (!ResourceUtils.isUrl(location)) {
			location = ResourceUtils.FILE_URL_PREFIX + location;
		}
        // 加载资源
		return this.resourceLoader.getResource(location);
	}

}
跟进分析资源加载
// org.springframework.core.io.DefaultResourceLoader
public class DefaultResourceLoader implements ResourceLoader {

    public Resource getResource(String location) {
        // 不同格式名称文件,处理方式不同
        if (location.startsWith("/")) {
            return getResourceByPath(location);
        } else if (location.startsWith(CLASSPATH_URL_PREFIX)) {
            return new ClassPathResource(location.substring(CLASSPATH_URL_PREFIX.length()), getClassLoader());
        } else {
            URL url = new URL(location);
            return (ResourceUtils.isFileURL(url) ? new FileUrlResource(url) : new UrlResource(url));
        }
    }
}
3.小结
经过上述分析可知:
- 基于源
ConfigDataLocation进行解析,源ConfigDataLocation将会通过;进行分割,得到独立的配置数据路径 - 🌰
optional:classpath:/;optional:classpath:/config/- 分割后结果
optional:classpath:/optional:classpath:/config/
- 对每个
ConfigDataLocation进行解析,获取StandardConfigDataResource参考实例- 实际就是获取对应
PropertySourceLoader的所有可能的文件资源
- 实际就是获取对应
- 解析
StandardConfigDataResource- 对于真实存在的资源,创建对应的
StandardConfigDataResource实例 - 对于不存在的参考,输出日志后跳过即可
- 对于真实存在的资源,创建对应的
4. 结果封装
经过上述处理后得到StandardConfigDataResource实例,在ConfigDataLocationResolvers#resolve中最终会将其封装为ConfigDataResolutionResult进行返回
// org.springframework.boot.context.config.ConfigDataLocationResolvers
class ConfigDataLocationResolvers {

    /* 3. 具体解析调用 */
    private List<ConfigDataResolutionResult> resolve(ConfigDataLocation location, boolean profileSpecific,
			Supplier<List<? extends ConfigDataResource>> resolveAction) {
        // 通过 Lambda 表达式,实际调用 ConfigDataLocationResolver#resolve/resolveProfileSpecific 方法
		List<ConfigDataResource> resources = nonNullList(resolveAction.get());

		List<ConfigDataResolutionResult> resolved = new ArrayList<>(resources.size());
		for (ConfigDataResource resource : resources) {
            // 将解析得到的 ConfigDataResource 封装为 ConfigDataResolutionResult 实例返回
			resolved.add(new ConfigDataResolutionResult(location, resource, profileSpecific));
		}
		return resolved;
	}
}
示例结果如下:

配置数据加载
在ConfigDataImporter#resolveAndLoad中,通过resolve方法获取List<ConfigDataResolutionResult>列表后,将通过load加载获取ConfigData
处理入口
跟进分析ConfigDataImporter#load方法
// org.springframework.boot.context.config.ConfigDataImporter
class ConfigDataImporter {

    // 配置数据加载器
	private final ConfigDataLoaders loaders;

    /* 加载获取配置数据 */
    private Map<ConfigDataResolutionResult, ConfigData> load(ConfigDataLoaderContext loaderContext,
        	List<ConfigDataResolutionResult> candidates) throws IOException {
        // 创建结果容器
        Map<ConfigDataResolutionResult, ConfigData> result = new LinkedHashMap<>();
        // 遍历处理
        for (int i = candidates.size() - 1; i >= 0; i--) {
            ConfigDataResolutionResult candidate = candidates.get(i);
            ConfigDataLocation location = candidate.getLocation();
            ConfigDataResource resource = candidate.getResource();

            if (resource.isOptional()) {
                this.optionalLocations.add(location);
            }
            if (this.loaded.contains(resource)) {
                this.loadedLocations.add(location);
            } else {
                // 使用 配置数据加载器 加载资源,获取配置数据
                ConfigData loaded = this.loaders.load(loaderContext, resource);
                if (loaded != null) {
                    this.loaded.add(resource);
                    this.loadedLocations.add(location);
                    // 将结果保存
                    result.put(candidate, loaded);
                }
            }
        }
        return Collections.unmodifiableMap(result);
    }
}
分析可知:
- 实际加载工作由
ConfigDataLoaders实例完成
资源加载
跟进分析ConfigDataLoaders#load方法
// org.springframework.boot.context.config.ConfigDataImporter
class ConfigDataLoaders {

    // 配置文件加载器
	private final List<ConfigDataLoader<?>> loaders;

    /*  */
    <R extends ConfigDataResource> ConfigData load(ConfigDataLoaderContext context, R resource) throws IOException {
        // 1. 根据资源类型,获取对应的 加载器
		ConfigDataLoader<R> loader = getLoader(context, resource);
        // 2. 调用 ConfigDataLoader#load 进行加载
		return loader.load(context, resource);
	}
}
基于上述分析,实际上我们使用的是StandardConfigDataLoader,跟进分析
// org.springframework.boot.context.config.StandardConfigDataLoader
public class StandardConfigDataLoader implements ConfigDataLoader<StandardConfigDataResource> {

    /* 资源加载 */
    public ConfigData load(ConfigDataLoaderContext context, StandardConfigDataResource resource)
			throws IOException, ConfigDataNotFoundException {
		if (resource.isEmptyDirectory()) {
			return ConfigData.EMPTY;
		}
        // 资源不存在,将报错
		ConfigDataResourceNotFoundException.throwIfDoesNotExist(resource, resource.getResource());

        // 获取参考实例
		StandardConfigDataReference reference = resource.getReference();
		Resource originTrackedResource = OriginTrackedResource.of(resource.getResource(), Origin.from(reference.getConfigDataLocation()));
		String name = String.format("Config resource '%s' via location '%s'", resource, reference.getConfigDataLocation());

        // 获取参考实例中存储的 属性源加载器,使用它加载资源文件,得到属性源
        List<PropertySource<?>> propertySources = reference.getPropertySourceLoader().load(name, originTrackedResource);
		PropertySourceOptions options = (resource.getProfile() != null) ? PROFILE_SPECIFIC : NON_PROFILE_SPECIFIC;

        // 将属性源封装为 ConfigData 实例
		return new ConfigData(propertySources, options);
	}
}
分析可知:
- 实际是通过参考实例
StandardConfigDataReference中存储的属性源加载器PropertySourceLoader进行加载,获取属性源- 对应属性源加载器,在上述有分析
- 将加载资源得到的属性源,封装为
ConfigData实例返回
配置数据实例构建
跟进分析一下ConfigData实例
// org.springframework.boot.context.config.ConfigData
public final class ConfigData {

    // 存储属性源
    private final List<PropertySource<?>> propertySources;

    public ConfigData(Collection<? extends PropertySource<?>> propertySources, PropertySourceOptions propertySourceOptions) {
		// 存储属性源,设置为不可变列表
        this.propertySources = Collections.unmodifiableList(new ArrayList<>(propertySources));
	}
}
小结
在整个二类贡献者解析/加载过程中,配置数据的形态转换过程如下图所示:

5. profiles环境处理(扩展)
处理入口
在ConfigDataEnvironment#processAndApply处理过程中,第三阶段就是处理profile环境相关
// org.springframework.boot.context.config.ConfigDataEnvironment
class ConfigDataEnvironment {

    void processAndApply() {
        // 2.2 阶段一:解析云平台配置
        ConfigDataActivationContext activationContext = createActivationContext(
            contributors.getBinder(null, BinderOption.FAIL_ON_BIND_TO_INACTIVE_SOURCE));

        // 2.3 阶段三:解析激活配置 spring.profile.active 和 spring.profile.groups
        // 处理 阶段一处理后的 profiles 配置
        activationContext = withProfiles(contributors, activationContext);
        // 进行 profiles 处理
        contributors = processWithProfiles(contributors, importer, activationContext);

    }
}
分析可知:
- 初始创建
ConfigDataActivationContext实例 - 处理阶段一处理后的
profiles配置 - 进行
profiles处理
此时有个前提,经过前两阶段的处理后,此时ConfigDataEnvironmentContributors包含的贡献者有:
- 包括原始的
EXISTING贡献者- 即在
ApplicationServletEnvironment本身具有的属性源,包括实例实例化过程中添加的属性源 - 从这些属性源中获取对应属性值
- 即在
- 包括
INITIAL_IMPORT贡献者- 即解析
application资源文件获取的属性源中获取对应属性值
- 即解析
上下文创建
跟进分析createActivationContext处理
// org.springframework.boot.context.config.ConfigDataEnvironment
class ConfigDataEnvironment {

    private ConfigDataActivationContext createActivationContext(Binder initialBinder) {
        // 创建上下文实例
        return new ConfigDataActivationContext(this.environment, initialBinder);
    }
}
实际创建了ConfigDataActivationContext,此时内部Profiles = null
profiles解析
通过withProfiles方法解析profiles配置,跟进分析
// org.springframework.boot.context.config.ConfigDataEnvironment
class ConfigDataEnvironment {

    // 附加 profiles
    private final Collection<String> additionalProfiles;

    /* profiles 解析 */
    private ConfigDataActivationContext withProfiles(ConfigDataEnvironmentContributors contributors,
                                                     ConfigDataActivationContext activationContext) {
        Binder binder = contributors.getBinder(activationContext,
        	(contributor) -> !contributor.hasConfigDataOption(ConfigData.Option.IGNORE_PROFILES),
        	BinderOption.FAIL_ON_BIND_TO_INACTIVE_SOURCE);

        // 1. 创建 profiles 集合
        Set<String> additionalProfiles = new LinkedHashSet<>(this.additionalProfiles);
        // 2. 解析 spring.profiles.include 配置
        additionalProfiles.addAll(getIncludedProfiles(contributors, activationContext));
        // 3. 封装 Profiles 实例
        Profiles profiles = new Profiles(this.environment, binder, additionalProfiles);
        // 4. 将 Profiles 实例保存到 ConfigDataActivationContext 中
        return activationContext.withProfiles(profiles);
    }
}
分析可知:
- 通过
getIncludedProfiles方法解析spring.profiles.include配置 - 创建
Profiles实例 - 将
Profiles实例设置到ConfigDataActivationContext上下文中
includeProfiles解析
跟进分析getIncludedProfiles方法
// org.springframework.boot.context.config.ConfigDataEnvironment
class ConfigDataEnvironment {

    //
    public static final String INCLUDE_PROFILES_PROPERTY_NAME = "spring.profiles.include";
	static final ConfigurationPropertyName INCLUDE_PROFILES = ConfigurationPropertyName.of(Profiles.INCLUDE_PROFILES_PROPERTY_NAME);

    /* profiles 解析 */
    private Collection<? extends String> getIncludedProfiles(ConfigDataEnvironmentContributors contributors,
			ConfigDataActivationContext activationContext) {
        // 创建一个 占位符解析器
		PlaceholdersResolver placeholdersResolver = new ConfigDataEnvironmentContributorPlaceholdersResolver(
				contributors, activationContext, null, true);

		Set<String> result = new LinkedHashSet<>();
		for (ConfigDataEnvironmentContributor contributor : contributors) {
            // 获取配置数据贡献者对应的属性源
			ConfigurationPropertySource source = contributor.getConfigurationPropertySource();
            // 要求:1. 属性源存在;2. 贡献者不会忽略 spring.profiles.include 与 spring.profiles.active
			if (source != null && !contributor.hasConfigDataOption(ConfigData.Option.IGNORE_PROFILES)) {
				Binder binder = new Binder(Collections.singleton(source), placeholdersResolver);
                // 从属性源中解析获取 spring.profiles.include 值,includes 参数为解析结果
				binder.bind(Profiles.INCLUDE_PROFILES, STRING_LIST).ifBound((includes) -> {
					// 结果添加
					result.addAll(includes);
				});
			}
		}
		return result;
	}
}
分析可知:
- 实际就是从贡献者中解析出
spring.profiles.include配置值
Profiles实例构建
// org.springframework.boot.context.config.Profiles
public class Profiles implements Iterable<String> {

    // 激活的 profile
    private final List<String> activeProfiles;

    // 默认的 profile
    private final List<String> defaultProfiles;

    // profile 组别
    // key:组别名称
    // value:组别中包含的 profile,多个使用 `,` 分割
    private final MultiValueMap<String, String> groups;

    Profiles(Environment environment, Binder binder, Collection<String> additionalProfiles) {
        // 1. 解析环境中 spring.profiles.group 配置,得到 groups 组别
		this.groups = binder.bind("spring.profiles.group", STRING_STRINGS_MAP).orElseGet(LinkedMultiValueMap::new);

        // 2. 调用 getActivatedProfiles 获取激活的 profiles
        // 调用 expandProfiles,通过 groups 扩展 profiles
		this.activeProfiles = expandProfiles(getActivatedProfiles(environment, binder, additionalProfiles));

        // 3. 调用 getDefaultProfiles 获取默认的 profiles
        // 调用 expandProfiles,通过 groups 扩展 profiles
		this.defaultProfiles = expandProfiles(getDefaultProfiles(environment, binder));
	}
}
分析可知:
- 从贡献者中获取
spring.profiles.group配置,得到groups - 获取激活的
profiles配置- 来源
- 从
Environment环境/贡献者中获取spring.profiles.active配置 - 包含前面解析得到的
spring.profiles.include配置
- 从
- 默认为空列表
- 来源
- 获取默认的
profiles配置- 来源
- 从
Environment环境/贡献者中获取spring.profiles.default配置
- 从
- 默认列表为
["default"],对应application-default文件资源
- 来源
- 通过
groups扩展- 实际可能
profile值对应groups#key,则此key对应的value也要添加到profiles中 - 即
profile对应group组别配置
- 实际可能
小结
分析可知:
- 完成了对于
profiles相关属性的解析groups组别spring.profiles.group配置
- 激活的
profilesspring.profiles.include/spring.profiles.active配置
- 默认的
profilesspring.profiles.default配置
- 将上述结果封装为
Profiles实例
profiles处理
经过上述处理后,后续将调用processWithProfiles进行处理
处理入口
processWithProfiles阶段处理在前面3. 处理与应用中有分析,对应具体贡献者解析,在4. 二类贡献者解析与加载中有分析
其中特殊的点在于ConfigDataLocationResolvers处理中,对于基础解析与profiles解析,在调用resolve方法时,其传入lambda对应的resolveAction不一致
- 基础解析,调用
ConfigDataLocationResolver#resolve处理 profiles解析,调用ConfigDataLocationResolver#resolveProfileSpecific处理
具体代码如下:
// org.springframework.boot.context.config.ConfigDataLocationResolvers
class ConfigDataLocationResolvers {

    /* 2. 遍历配置路径解析器,尝试进行解析 */
    private List<ConfigDataResolutionResult> resolve(ConfigDataLocationResolver<?> resolver,
			ConfigDataLocationResolverContext context, ConfigDataLocation location, Profiles profiles) {
        // 1. 进行基础解析,不分析 profile
		List<ConfigDataResolutionResult> resolved = resolve(location, false, () -> resolver.resolve(context, location));

        if (profiles == null) {
            // 没有配置 profiles 直接返回
			return resolved;
		}
        // 2. 针对 profiles 进行解析
		List<ConfigDataResolutionResult> profileSpecific = resolve(location, true,
				() -> resolver.resolveProfileSpecific(context, location, profiles));

        // 3. 合并结果
		return merge(resolved, profileSpecific);
	}

    /* 3. 具体解析调用 */
    private List<ConfigDataResolutionResult> resolve(ConfigDataLocation location, boolean profileSpecific,
			Supplier<List<? extends ConfigDataResource>> resolveAction) {
        // 通过 Lambda 表达式,实际调用 ConfigDataLocationResolver#resolve/resolveProfileSpecific 方法
		List<ConfigDataResource> resources = nonNullList(resolveAction.get());

		List<ConfigDataResolutionResult> resolved = new ArrayList<>(resources.size());
		for (ConfigDataResource resource : resources) {
            // 将解析得到的 ConfigDataResource 封装为 ConfigDataResolutionResult 实例返回
			resolved.add(new ConfigDataResolutionResult(location, resource, profileSpecific));
		}
		return resolved;
	}
}
所以我们主要分析ConfigDataLocationResolver#resolveProfileSpecific处理
资源获取
跟进分析ConfigDataLocationResolver#resolveProfileSpecific处理
// org.springframework.boot.context.config.StandardConfigDataLocationResolver
public class StandardConfigDataLocationResolver {

    /* 2. profile 的环境解析 */
    public List<StandardConfigDataResource> resolveProfileSpecific(ConfigDataLocationResolverContext context,
			ConfigDataLocation location, Profiles profiles) {
        // 1. 解析配置路径为 StandardConfigDataReference
        // 2. 解析 StandardConfigDataReference
		return resolve(getProfileSpecificReferences(context, location.split(), profiles));
	}
}
分析可知:
- 与基础解析不同的是
- 基础解析,调用
StandardConfigDataLocationResolver#getReferences获取参考实例- 对应
4 -> 1. 解析路径获取参考实例分析
- 对应
profiles解析,调用StandardConfigDataLocationResolver#getProfileSpecificReferences获取参考实例
- 基础解析,调用
至于后续调用StandardConfigDataLocationResolver#resolve解析参考实例的过程,在4 -> 2. 参考解析 中有分析
参考获取
跟进分析StandardConfigDataLocationResolver#getProfileSpecificReferences处理
// org.springframework.boot.context.config.StandardConfigDataLocationResolver
public class StandardConfigDataLocationResolver {

    /* 获取 profiles 对应 参考实例 */
    private Set<StandardConfigDataReference> getProfileSpecificReferences(ConfigDataLocationResolverContext context,
        	ConfigDataLocation[] configDataLocations, Profiles profiles) {
        Set<StandardConfigDataReference> references = new LinkedHashSet<>();
        // 遍历 profiles
        for (String profile : profiles) {
            // 遍历通过 , 分割后的配置数据路径
            for (ConfigDataLocation configDataLocation : configDataLocations) {
                String resourceLocation = getResourceLocation(context, configDataLocation);
                // 调用 getReferences 获取参考实例
                // 将获取到的参考实例添加到集合中
                references.addAll(getReferences(configDataLocation, resourceLocation, profile));
            }
        }
        return references;
    }
}
跟进分析getReferences方法
// org.springframework.boot.context.config.StandardConfigDataLocationResolver
public class StandardConfigDataLocationResolver {

    private Set<StandardConfigDataReference> getReferences(ConfigDataLocation configDataLocation,
			String resourceLocation, String profile) {
		if (isDirectory(resourceLocation)) {
            // 如果配置路径为文件夹
			return getReferencesForDirectory(configDataLocation, resourceLocation, profile);
		}
        // 如果配置路径为文件资源
		return getReferencesForFile(configDataLocation, resourceLocation, profile);
	}
}
分析可知:
- 其也存在
单一文件/文件目录的两个分支,与基础解析不同的是,其传入的profile不是null
对于getReferencesForDirectory/getReferencesForFile方法处理,其传入的profile是有值或者null的区别在于构建StandardConfigDataReference时构造处理
// org.springframework.boot.context.config.StandardConfigDataReference
class StandardConfigDataReference {

    StandardConfigDataReference(ConfigDataLocation configDataLocation, String directory, String root, String profile,
			String extension, PropertySourceLoader propertySourceLoader) {
		this.configDataLocation = configDataLocation;
        // 存在 profile 时,定义后缀为 -<profile>
		String profileSuffix = (StringUtils.hasText(profile)) ? "-" + profile : "";
        // 存在 profile 时,追加文件后缀
		this.resourceLocation = root + profileSuffix + ((extension != null) ? "." + extension : "");
		this.directory = directory;
		this.profile = profile;
		this.propertySourceLoader = propertySourceLoader;
	}
}
分析可知:
- 存在
profile时,将获取application-<profile>对应的参考实例
经过上述处理,其获取的参考实例如下:

小结
经过上述分析可知:
- 基于
spring.profiles.[group/include/active/default]配置,构建Profiles实例,其中存储profiles信息- 取值来源
ApplicationServletEnvironment本身具有的属性源,包括实例实例化过程中添加的属性源- 解析
application资源文件获取的属性源
- 取值来源
- 在参考获取部分,其获取的是
application-<profile>对应的参考实例- 所以后续处理的也是这部分
application-<profile>对应资源
- 所以后续处理的也是这部分
其他解析工作,与基础解析部分一致,此处不赘述
6. 总结
基于上述分析,可知:
- 一切基于
ConfigDataEnvironment实例及其processAndApply方法作为入口 - 创建贡献管理者,并获取初始导入贡献者
- 配置路径获取
- 基于
spring.profiles.[group/include/active/default]配置,获取配置路径- 没有则使用默认配置路径
optional:classpath:/;optional:classpath:/config/optional:file:./;optional:file:./config/;optional:file:./config/*/
- 没有则使用默认配置路径
- 基于
- 配置路径封装为贡献者
- 配置路径获取
- 阶段处理
- 总体分为三阶段处理
- 每个阶段进行贡献者处理
- 处理贡献者,获取对应属性源
- 将获取的属性源,应用到
Environment环境中
环境属性源应用
环境实例获取
在Spring中,提供了Aware接口,其中,获取环境Environment实例可以通过EnvironmentAware/ApplicationContextAware完成
// 方式一:EnvironmentAware
@Component
public class MyEnvironmentAware implements EnvironmentAware {

    private Environment environment;

    @Override
    public void setEnvironment(Environment environment) {
        this.environment = environment;
    }
}


// 方式二:ApplicationContextAware
@Component
public class MyApplicationContextAware implements ApplicationContextAware {

    private ApplicationContext applicationContext;
    private Environment environment;


    @Override
    public void setApplicationContext(ApplicationContext applicationContext) throws BeansException {
        this.applicationContext = applicationContext;
        // 从上下文中获取环境实例
        this.environment = applicationContext.getEnvironment();
    }
}
@EnableConfigurationProperties使用
简介
在使用@ConfigurationProperties注解前,首先通过@EnableConfigurationProperties开启配置功能
// org.springframework.boot.context.properties.EnableConfigurationProperties
@Target(ElementType.TYPE)
@Import(EnableConfigurationPropertiesRegistrar.class)
public @interface EnableConfigurationProperties {

    // 属性验证器对应的 BeanName
    String VALIDATOR_BEAN_NAME = "configurationPropertiesValidator";

    // 需要注入的添加了 @ConfigurationProperties 注解的类
    // 主要针对不属于 Spring Bean 的类
    Class<?>[] value() default {};
}
分析可知:
EnableConfigurationProperties主要作用是通过@Import注解注入EnableConfigurationPropertiesRegistrar实例
注册分析
基于Spring分析可知,对于@Import注入的类,基于其情况分为不同处理,而EnableConfigurationPropertiesRegistrar类是ImportBeanDefinitionRegistrar实现,所以主要关注其registerBeanDefinitions方法实现
// org.springframework.boot.context.properties.EnableConfigurationPropertiesRegistrar
class EnableConfigurationPropertiesRegistrar implements ImportBeanDefinitionRegistrar {

	/* 注册 Bean */
    public void registerBeanDefinitions(AnnotationMetadata metadata, BeanDefinitionRegistry registry) {
        // 1. 注册基础结构 Bean
        registerInfrastructureBeans(registry);

        // 2. 注册方法验证排除筛选器
        registerMethodValidationExcludeFilter(registry);

        // 3. ConfigurationPropertiesBeanRegistrar 处理
        // 创建 ConfigurationPropertiesBeanRegistrar 实例
        ConfigurationPropertiesBeanRegistrar beanRegistrar = new ConfigurationPropertiesBeanRegistrar(registry);
        // 调用 ConfigurationPropertiesBeanRegistrar#register
        getTypes(metadata).forEach(beanRegistrar::register);
    }
}
分析可知,整个过程分为三部分:
- 注册基础结构
Bean - 注册方法验证排除筛选器
- 向
IOC容器中注册MethodValidationExcludeFilter实例定义
- 向
ConfigurationPropertiesBeanRegistrar处理
基础结构Bean注册
跟进分析registerInfrastructureBeans方法
// org.springframework.boot.context.properties.EnableConfigurationPropertiesRegistrar
class EnableConfigurationPropertiesRegistrar implements ImportBeanDefinitionRegistrar {

	/* 注册基础结构 Bean */
    static void registerInfrastructureBeans(BeanDefinitionRegistry registry) {
        // 1. 向 IOC 容器中注册 ConfigurationPropertiesBindingPostProcessor 定义
        // 2. 向 IOC 容器中注册 ConfigurationPropertiesBinder 定义
		ConfigurationPropertiesBindingPostProcessor.register(registry);

        // 3. 向 IOC 容器中注册 BoundConfigurationProperties 定义
		BoundConfigurationProperties.register(registry);
	}
}
分析可知,其实际就是向IOC容器中注册以下实例定义
ConfigurationPropertiesBindingPostProcessorConfigurationPropertiesBinder- 包括注册
ConfigurationPropertiesBinder.Factory工厂实例 - 实际由
ConfigurationPropertiesBinder.Factory工厂实例创建
- 包括注册
BoundConfigurationProperties
配置属性实例注册处理
配置属性实例注册处理主要分为两部分:
- 通过
getTypes获取需要注册的配置属性实例类型 - 通过
ConfigurationPropertiesBeanRegistrar将配置属性实例定义注册到IOC实例中
配置属性类获取
跟进分析getTypes方法
// org.springframework.boot.context.properties.EnableConfigurationPropertiesRegistrar
class EnableConfigurationPropertiesRegistrar implements ImportBeanDefinitionRegistrar {

    private Set<Class<?>> getTypes(AnnotationMetadata metadata) {
        // 1. 获取添加了 @EnableConfigurationProperties 注解的配置类中的 @EnableConfigurationProperties 注解信息
        // 2. 获取 @EnableConfigurationProperties 注解中 value 数组
        // 3. 将其封装为 Set 集合返回
		return metadata.getAnnotations()
			.stream(EnableConfigurationProperties.class)
			.flatMap((annotation) -> Arrays.stream(annotation.getClassArray(MergedAnnotation.VALUE)))
			.filter((type) -> void.class != type)
			.collect(Collectors.toSet());
	}
}
分析可知:
getTypes方法主要用于获取@EnableConfigurationProperties注解的value值- 对应需要进行配置属性处理的添加了
@ConfigurationProperties注解的类
- 对应需要进行配置属性处理的添加了
配置属性类注册
上述获取了配置属性类集合,将其遍历进行注册到IOC容器中,跟进分析ConfigurationPropertiesBeanRegistrar#register方法处理
// org.springframework.boot.context.properties.ConfigurationPropertiesBeanRegistrar
final class ConfigurationPropertiesBeanRegistrar {

    // IOC注册器
    private final BeanDefinitionRegistry registry;

    // IOC实例工厂
	private final BeanFactory beanFactory;

    /* 注册 */
    void register(Class<?> type) {
        // 获取配置属性类上的 @ConfigurationProperties 注解信息
		MergedAnnotation<ConfigurationProperties> annotation = MergedAnnotations
			.from(type, SearchStrategy.TYPE_HIERARCHY)
			.get(ConfigurationProperties.class);
        // 进行注册
		register(type, annotation);
	}

    /* 注册 */
    void register(Class<?> type, MergedAnnotation<ConfigurationProperties> annotation) {
        // 获取 beanName
		String name = getName(type, annotation);
		if (!containsBeanDefinition(name)) {
            // 如果 IOC 容器中不存在,则注册定义
			registerBeanDefinition(name, type, annotation);
		}
	}
}
跟进分析registerBeanDefinition方法处理
// org.springframework.boot.context.properties.ConfigurationPropertiesBeanRegistrar
final class ConfigurationPropertiesBeanRegistrar {

    // IOC注册器
    private final BeanDefinitionRegistry registry;

    // IOC实例工厂
	private final BeanFactory beanFactory;

    /* 注册定义 */
    private void registerBeanDefinition(String beanName, Class<?> type, MergedAnnotation<ConfigurationProperties> annotation) {
		// 如果配置属性类上没有添加 @ConfigurationProperties,则报错
        Assert.state(annotation.isPresent(), "...");
        // 创建定义 BeanDefinition 并注册到 IOC 容器中
		this.registry.registerBeanDefinition(beanName, createBeanDefinition(beanName, type));
	}
}
小结
分析可知,此部分主要工作如下:
- 获取
@EnableConfigurationProperties注解中value值对应的配置属性类 - 将配置属性类注册到
IOC容器中- 前提是此配置属性类需要添加
@ConfigurationProperties注解,否则报错
- 前提是此配置属性类需要添加
总结
添加@EnableConfigurationProperties注解,其前置处理如下:
- 通过
@Import注解导入EnableConfigurationPropertiesRegistrar实例,进行前置处理 - 处理过程主要是向
IOC容器中注入实例BeanDefinition定义- 基础结构
BeanConfigurationPropertiesBindingPostProcessorConfigurationPropertiesBinderBoundConfigurationProperties
- 方法验证排除筛选器
MethodValidationExcludeFilter
- 配置属性类
@EnableConfigurationProperties注解的value值对应的配置属性类- 要求配置属性类添加
@ConfigurationProperties注解
- 要求配置属性类添加
- 基础结构
@ConfigurationProperties使用
简介
@ConfigurationProperties是SpringBoot中提供用于属性配置化的一个注解
// org.springframework.boot.context.properties.ConfigurationProperties
@Target({ ElementType.TYPE, ElementType.METHOD })
@Retention(RetentionPolicy.RUNTIME)
public @interface ConfigurationProperties {

    // 绑定的属性前缀
    @AliasFor("prefix")
	String value() default "";
    @AliasFor("value")
	String prefix() default "";

    // 是否忽略类型错误字段
    boolean ignoreInvalidFields() default false;

    // 是否忽略属性错误(不存在)字段
    boolean ignoreUnknownFields() default true;
}
注意:
@ConfigurationProperties可以结合添加了@Bean的方法使用,其作用是对此方法返回对象实例进行属性绑定- 添加
@ConfigurationProperties注解的Bean需要交由Spring管理- 结合
@Component使用 - 通过
@EnableConfigurationProperties注解引入
- 结合
通过@ConfigurationProperties注解,可以从环境中取值,将指定前缀对应的属性注入到对象属性中
使用示例🌰:
@Component
@ConfigurationProperties(prefix = "prefix")
public class ConfigProperties {

    // 对应 prefix.enable 属性
    private boolean enable;

    // 对应 prefix.mode 属性
    private String mode;
}
基类
ConfigurationPropertiesBean
ConfigurationPropertiesBean主要是封装添加了@ConfigurationProperties注解的SpringBean的信息
// org.springframework.boot.context.properties.ConfigurationPropertiesBean
public final class ConfigurationPropertiesBean {

    // 源对象 beanName
    private final String name;

    // 源对象实例
    private final Object instance;

    // 源对象上 ConfigurationProperties 注解信息
    private final ConfigurationProperties annotation;

    // 由 instance 封装为 Bindable 实例
    private final Bindable<?> bindTarget;
}
分析可知,ConfigurationPropertiesBean主要封装了SpringBean的以下信息:
beanNameSpringBean实例本身SpringBean实例上面的@ConfigurationProperties注解信息
处理入口
在IOC流程中,在创建实例后,通过AbstractAutowireCapableBeanFactory#initializeBean初始化实例的过程中,将调用applyBeanPostProcessorsBeforeInitialization方法
// org.springframework.beans.factory.support.AbstractAutowireCapableBeanFactory
public abstract class AbstractAutowireCapableBeanFactory extends AbstractBeanFactory implements AutowireCapableBeanFactory {

    public Object applyBeanPostProcessorsBeforeInitialization(Object existingBean, String beanName){
        Object result = existingBean;
        // 遍历注册的BeanPostProcessor,调用postProcessBeforeInitialization方法进行初始化前处理
        for (BeanPostProcessor processor : getBeanPostProcessors()) {
            Object current = processor.postProcessBeforeInitialization(result, beanName);
            if (current == null) {
                return result;
            }
            result = current;
        }
        return result;
    }
}
注意:
-
通过
BeanPostProcessor进行初始化前置处理,其中需要关注的是ConfigurationPropertiesBindingPostProcessor,主要通过它完成配置化属性 -
ConfigurationPropertiesBindingPostProcessor实例由@EnableConfigurationProperties处理过程导入
实例初始化前置处理
跟进分析ConfigurationPropertiesBindingPostProcessor#postProcessBeforeInitialization实现
// org.springframework.boot.context.properties.ConfigurationPropertiesBindingPostProcessor+
public class ConfigurationPropertiesBindingPostProcessor
		implements BeanPostProcessor, PriorityOrdered, ApplicationContextAware, InitializingBean {

    // 应用上下文
    private ApplicationContext applicationContext;

    public Object postProcessBeforeInitialization(Object bean, String beanName) throws BeansException {
        // 1. 封装实例为配置化属性Bean
        // 2. 调用 bind 方法进行属性绑定
		bind(ConfigurationPropertiesBean.get(this.applicationContext, bean, beanName));
		return bean;
	}

}
分析可知,其主要分为两步
- 封装配置属性实例为
ConfigurationPropertiesBean - 调用
bind方法进行属性绑定
封装配置属性Bean
封装过程跟进分析ConfigurationPropertiesBean#get处理
// org.springframework.boot.context.properties.ConfigurationPropertiesBean
public final class ConfigurationPropertiesBean {

    /* 实例获取 */
    public static ConfigurationPropertiesBean get(ApplicationContext applicationContext, Object bean, String beanName) {
        // 1. 查找创建此实例的工厂方法(如果是通过 @Bean 注解注入),可能为空
		Method factoryMethod = findFactoryMethod(applicationContext, beanName);

        // 2. 创建 ConfigurationPropertiesBean 实例
		return create(beanName, bean, bean.getClass(), factoryMethod);
	}
}
跟进create方法进行ConfigurationPropertiesBean实例创建
// org.springframework.boot.context.properties.ConfigurationPropertiesBean
public final class ConfigurationPropertiesBean {

    private static ConfigurationPropertiesBean create(String name, Object instance, Class<?> type, Method factory) {
        // 1. 获取配置的 @ConfigurationProperties 注解信息
        ConfigurationProperties annotation = findAnnotation(instance, type, factory, ConfigurationProperties.class);

        if (annotation == null) {
            // 没有配置此注解,直接返回 null
            return null;
        }

        // 解析配置的 @Validated
        Validated validated = findAnnotation(instance, type, factory, Validated.class);
        Annotation[] annotations = (validated != null) ?
            new Annotation[] { annotation, validated } : new Annotation[] { annotation };

        // 如果是添加 @Bean 注解的 factoryMethod,根据其返回值类型,获取需要进行数据绑定的目标类型
        ResolvableType bindType = (factory != null) ? ResolvableType.forMethodReturnType(factory) : ResolvableType.forClass(type);

        // 将 class类型/注解 一起封装
        Bindable<Object> bindTarget = Bindable.of(bindType).withAnnotations(annotations);
        if (instance != null) {
            bindTarget = bindTarget.withExistingValue(instance);
        }

        // 将上述信息封装构建 ConfigurationPropertiesBean 实例
        return new ConfigurationPropertiesBean(name, instance, annotation, bindTarget);
    }
}
分析可知:
-
主要处理添加了
@ConfigurationProperties注解的SpringBean,将其封装为ConfigurationPropertiesBean -
ConfigurationPropertiesBean主要包括了以下内容- 对象名称
beanName - 对象实例
SpringBean - 对象所添加的注解信息
- 由对象实例封装得到的
Bindable实例
- 对象名称
属性绑定
有上述过程封装了ConfigurationPropertiesBean实例后,下面就要对目标实例进行属性绑定
跟进分析bind方法
// org.springframework.boot.context.properties.ConfigurationPropertiesBindingPostProcessor+
public class ConfigurationPropertiesBindingPostProcessor
    implements BeanPostProcessor, PriorityOrdered, ApplicationContextAware, InitializingBean {

    // 配置属性绑定器
    private ConfigurationPropertiesBinder binder;

    private void bind(ConfigurationPropertiesBean bean) {
        if (bean == null || hasBoundValueObject(bean.getName())) {
            // 1. 没有添加 @ConfigurationProperties 注解
            // 2. 已经完成过绑定动作
            return;
        }

        // 通过 ConfigurationPropertiesBinder 实例进行绑定
        this.binder.bind(bean);
    }
}
实际绑定工作由ConfigurationPropertiesBinder实例完成
小结
分析可知:
- 实际就是对添加了
@ConfigurationProperties注解的实例进行初始化前置处理(属性绑定) - 具体处理过程
- 将配置属性实例封装为
ConfigurationPropertiesBean - 由
ConfigurationPropertiesBinder实例处理ConfigurationPropertiesBean实例,完成属性绑定动作
- 将配置属性实例封装为
绑定过程分析
属性绑定过程ConfigurationPropertiesBinder#bind方法完成,跟进分析
// org.springframework.boot.context.properties.ConfigurationPropertiesBinder
class ConfigurationPropertiesBinder {

    // 从上下文中获取的属性源
    private final PropertySources propertySources;

    // 绑定器
    private volatile Binder binder;

    /* 绑定处理入口 */
    BindResult<?> bind(ConfigurationPropertiesBean propertiesBean) {
        // 1. 封装的绑定目标,其中包括 class类型/注解信息
        Bindable<?> target = propertiesBean.asBindTarget();
        // 2. 获取 @ConfigurationProperties 注解信息
        ConfigurationProperties annotation = propertiesBean.getAnnotation();

        // 3. 获取目标的绑定处理器
        BindHandler bindHandler = getBindHandler(target, annotation);

        // 4.1 获取 Binder 实例
        // 4.2 调用 Binder#bind 进行绑定,基于 属性前缀、绑定目标、绑定处理器
        return getBinder().bind(annotation.prefix(), target, bindHandler);
    }
}
分析可知,其中重点部分为:
- 获取绑定处理器
BindHandler - 获取
Binder实例 - 调用
Binder#bind进行绑定处理
绑定处理器获取
跟进分析ConfigurationPropertiesBinder#getBindHandler方法
// org.springframework.boot.context.properties.ConfigurationPropertiesBinder
class ConfigurationPropertiesBinder {

    /* 获取绑定处理器 */
    private <T> BindHandler getBindHandler(Bindable<T> target, ConfigurationProperties annotation) {
        // 1. 基于 @Validated 注解获取 校验器
		List<Validator> validators = getValidators(target);
        // 2. 获取初始的 IgnoreTopLevelConverterNotFoundBindHandler 绑定处理器
		BindHandler handler = getHandler();
        // 3. 包装为 ConfigurationPropertiesBindHandler 实例
		handler = new ConfigurationPropertiesBindHandler(handler);

		if (annotation.ignoreInvalidFields()) {
            // 忽略无效类型字段,包装为 IgnoreErrorsBindHandler
			handler = new IgnoreErrorsBindHandler(handler);
		}
		if (!annotation.ignoreUnknownFields()) {
            // 忽略未知属性,包装为 NoUnboundElementsBindHandler,对应 UnboundElementsSourceFilter 过滤器
			UnboundElementsSourceFilter filter = new UnboundElementsSourceFilter();
			handler = new NoUnboundElementsBindHandler(handler, filter);
		}
		if (!validators.isEmpty()) {
            // 存在校验器,包装为 ValidationBindHandler
			handler = new ValidationBindHandler(handler, validators.toArray(new Validator[0]));
		}

		for (ConfigurationPropertiesBindHandlerAdvisor advisor : getBindHandlerAdvisors()) {
            // 存在增强,则使用增强器增强
			handler = advisor.apply(handler);
		}

        // 返回最终的绑定处理器
		return handler;
	}

    /* 获取初始处理器 */
    private IgnoreTopLevelConverterNotFoundBindHandler getHandler() {
		BoundConfigurationProperties bound = BoundConfigurationProperties.get(this.applicationContext);
		return (bound != null)
				? new IgnoreTopLevelConverterNotFoundBindHandler(new BoundPropertiesTrackingBindHandler(bound::add))
				: new IgnoreTopLevelConverterNotFoundBindHandler();
	}
}
分析可知:
- 实际得到的绑定处理器,是根据条件,通过多级绑定处理器父子关联的结果
绑定器获取
跟进分析getBinder方法
// org.springframework.boot.context.properties.ConfigurationPropertiesBinder
class ConfigurationPropertiesBinder {

    // 绑定器
    private volatile Binder binder;

    private Binder getBinder() {
		if (this.binder == null) {
			this.binder = new Binder(getConfigurationPropertySources(), getPropertySourcesPlaceholdersResolver(),
					getConversionServices(), getPropertyEditorInitializer(), null,
					ConfigurationPropertiesBindConstructorProvider.INSTANCE);
		}
		return this.binder;
	}
}
分析可知:
- 如果没有,则直接通过构造实例化
Binder实例
绑定处理
具体数据绑定处理由Binder完成,其绑定过程请查看扩展部分的数据绑定机制
@Profile使用
简介
基于Profiles配置,可以加载不同的application-<profile>配置文件作为属性源,体现了不同环境的差异性
实际对于SpringBean,也可以基于profiles配置,进行不同环境的配置,其就是使用@Profile注解
首先分析一下@Profile注解
// org.springframework.context.annotation.Profile
@Target({ElementType.TYPE, ElementType.METHOD})
@Retention(RetentionPolicy.RUNTIME)
@Conditional(ProfileCondition.class)
public @interface Profile {

	String[] value();
}
实际上@Profile的作用:
- 可以结合
@Component/@Bean注解,对SpringBean添加profile标记 - 仅当
Spring.profils.active/default激活的profile匹配时,才会注册此SpringBean到IOC容器中
源码分析
匹配入口
类路径扫描
在ClassPathBeanDefinitionScanner进行类路径扫描时,将对扫描的组件进行condition判断
调用链跟踪如下:
// org.springframework.context.annotation.ClassPathBeanDefinitionScanner#doScan
// org.springframework.context.annotation.ClassPathScanningCandidateComponentProvider#findCandidateComponents
// org.springframework.context.annotation.ClassPathScanningCandidateComponentProvider#scanCandidateComponents
// org.springframework.context.annotation.ClassPathScanningCandidateComponentProvider#isCandidateComponent

// org.springframework.context.annotation.ClassPathScanningCandidateComponentProvider
public class ClassPathScanningCandidateComponentProvider implements EnvironmentCapable, ResourceLoaderAware {

    // 条件评估器
    private ConditionEvaluator conditionEvaluator;

    private boolean isConditionMatch(MetadataReader metadataReader) {
		if (this.conditionEvaluator == null) {
			this.conditionEvaluator = new ConditionEvaluator(getRegistry(), this.environment, this.resourcePatternResolver);
		}
        // 由条件评估器判断是否跳过此组件
		return !this.conditionEvaluator.shouldSkip(metadataReader.getAnnotationMetadata());
	}
}
注解定义读取
在AnnotatedBeanDefinitionReader进行注解定义读取注册时,将对扫描的组件进行condition判断
调用链跟踪如下:
// org.springframework.context.annotation.AnnotatedBeanDefinitionReader
public class AnnotatedBeanDefinitionReader {

    private <T> void doRegisterBean(Class<T> beanClass, @Nullable String name,
			@Nullable Class<? extends Annotation>[] qualifiers, @Nullable Supplier<T> supplier,
			@Nullable BeanDefinitionCustomizer[] customizers) {

        AnnotatedGenericBeanDefinition abd = new AnnotatedGenericBeanDefinition(beanClass);
        // 由条件评估器判断是否跳过此组件
		if (this.conditionEvaluator.shouldSkip(abd.getMetadata())) {
			return;
		}

        // ...
    }
}
条件评估器评估
由上述分析可知,组件评估工作都由ConditionEvaluator条件评估器完成,跟进分析
// org.springframework.context.annotation.ConditionEvaluator
class ConditionEvaluator {

    public boolean shouldSkip(@Nullable AnnotatedTypeMetadata metadata, @Nullable ConfigurationPhase phase) {
        // 1. 没有添加注解;2. 有添加注解,但是没有 @Conditional 注解
        if (metadata == null || !metadata.isAnnotated(Conditional.class.getName())) {
			return false;
		}

        // 解析注解,获取 @Conditional 注解对应的 Condition 实例
        List<Condition> conditions = new ArrayList<>();
		for (String[] conditionClasses : getConditionClasses(metadata)) {
			for (String conditionClass : conditionClasses) {
				Condition condition = getCondition(conditionClass, this.context.getClassLoader());
				conditions.add(condition);
			}
		}

        // 对 Condition 实例进行排序
        AnnotationAwareOrderComparator.sort(conditions);

        for (Condition condition : conditions) {
			ConfigurationPhase requiredPhase = null;
			if (condition instanceof ConfigurationCondition) {
				requiredPhase = ((ConfigurationCondition) condition).getConfigurationPhase();
			}
            // 重点在于调用 Condition#matches 判断是否匹配条件
			if ((requiredPhase == null || requiredPhase == phase) && !condition.matches(this.context, metadata)) {
				return true;
			}
		}

		return false;
    }
}
匹配逻辑
实际上@Profile注解重点在于其通过@Conditional引入了ProfileCondition,跟进分析ProfileCondition
// org.springframework.context.annotation.ProfileCondition
class ProfileCondition implements Condition {

	@Override
	public boolean matches(ConditionContext context, AnnotatedTypeMetadata metadata) {
        // 1. 获取 SpringBean 上添加的 @Profile 注解的属性
		MultiValueMap<String, Object> attrs = metadata.getAllAnnotationAttributes(Profile.class.getName());
		if (attrs != null) {
			for (Object value : attrs.get("value")) {
                // 2. 将激活的 profile 与 @Profile 注解 value 属性进行匹配
                // 如果有重合部分,则返回 true,表示此 @Conditional 条件满足
				if (context.getEnvironment().acceptsProfiles(Profiles.of((String[]) value))) {
					return true;
				}
			}
			return false;
		}
        // 如果 @Profile 注解没有定义 value 值,则表示所有 profile 都匹配
		return true;
	}
}
分析可知:
ProfileCondition中主要就是将@Profile中value值与环境Environment实例中激活的profile进行匹配
总结
基于源码分析可知:
- 由
@Profile注解,通过@Conditional引入了ProfileCondition - 通过
ProfileCondition#matches进行条件匹配,实现@Profile注解的多环境功能
扩展
数据绑定机制
简介
当我们拥有Environment环境实例后,通常用它来干嘛呢?
- 从其中的属性源中获取所需属性值
- 将属性值赋值到所需的目标上
- 赋值过程中可能包括类型类型转换
Spring为了简化上述步骤,提供了Binder数据绑定机制,以下述代码为例
@Setter
@Component
public class BinderTest {

    @Autowired
    private Environment environment;

    /* 普通方式 */
    private void common() {
        String propertyName = "age";
        // 从环境中获取属性值
        String propertyValue = environment.getProperty(propertyName);
        // 将属性值赋值到目标
        // 其中包括自定义的类型转换
        Integer result = Integer.parseInt(propertyValue);
    }

    /* 数据绑定方式 */
    private void bind() {
        String propertyName = "age";
        BindResult<Integer> bindResult = Binder.get(environment).bind(propertyName, Integer.class);
        Integer result = bindResult.get();
    }
}
上述只是以简单的示例进行比对,实际上数据绑定的目标结果可能存在的类型有:
- 基本类型/
String类型 - 聚合类型
Map/Collection/Array
- 对象类型
而且对象类型可以嵌套不同类型的属性,通过普通方式手动实现数据绑定,比较麻烦,而Binder数据绑定机制可以帮我们快速实现
基类
绑定器
Binder
Binder是数据绑定的入口
// org.springframework.boot.context.properties.bind.Binder
public class Binder {

    // 不可绑定类型:Object、Class
    private static final Set<Class<?>> NON_BEAN_CLASSES = Collections.unmodifiableSet(new HashSet<>(Arrays.asList(Object.class, Class.class)));

    // 配置属性源-迭代器
	private final Iterable<ConfigurationPropertySource> sources;

    // 占位符解析器
	private final PlaceholdersResolver placeholdersResolver;

    // 绑定转换器,用于类型转换
	private final BindConverter bindConverter;

    // 绑定处理器,用于绑定过程扩展处理
	private final BindHandler defaultBindHandler;

    // 数据对象绑定器-列表
	private final List<DataObjectBinder> dataObjectBinders;
}
分析可知,Binder实例中封装了绑定过程中所需的工具实例
- 属性源
- 用于获取属性值
- 占位符解析器
- 用于解析属性名称/属性值中的占位符
- 转换器
- 用于类型转换
- 绑定处理器
- 用于绑定处理过程中的扩展处理
- 数据对象绑定器
- 处理对象类型时,需要递归处理其属性组成,所需的特殊绑定器
数据对象绑定器
DataObjectBinder
DataObjectBinder是针对于对象类型进行属性的递归绑定时的特殊绑定器,它是数据对象绑定器的顶级接口
// org.springframework.boot.context.properties.bind.DataObjectBinder
interface DataObjectBinder {

    /* 数据绑定处理 */
    <T> T bind(ConfigurationPropertyName name, Bindable<T> target, Context context, DataObjectPropertyBinder propertyBinder);

    /* 创建新的目标实例 */
    <T> T create(Bindable<T> target, Context context);
}
JavaBeanBinder
JavaBeanBinder是DataObjectBinder实现类,其主要针对于可变JavaBean类型的数据绑定
// org.springframework.boot.context.properties.bind.JavaBeanBinder
class JavaBeanBinder implements DataObjectBinder {

    // 常量实例
    static final JavaBeanBinder INSTANCE = new JavaBeanBinder();
}
数据对象属性绑定器
DataObjectPropertyBinder
DataObjectPropertyBinder是针对于对象实例的属性进行数据绑定的绑定器,它是顶级接口
// org.springframework.boot.context.properties.bind.DataObjectPropertyBinder
interface DataObjectPropertyBinder {

    /* 属性绑定 */
    Object bindProperty(String propertyName, Bindable<?> target);
}
聚合绑定器
AggregateBinder
AggregateBinder是聚合结果类型绑定器的抽象父类
// org.springframework.boot.context.properties.bind.AggregateBinder
abstract class AggregateBinder<T> {

    // 持有上下文
    private final Context context;
}
IndexedElementsBinder
IndexedElementsBinder是针对于Array/Collection的索引元素绑定处理的抽象父类
// org.springframework.boot.context.properties.bind.IndexedElementsBinder
abstract class IndexedElementsBinder<T> extends AggregateBinder<T> {}
ArrayBinder
ArrayBinder是IndexedElementsBinder实现类,其针对于Array类型绑定处理的绑定器
// org.springframework.boot.context.properties.bind.ArrayBinder
class ArrayBinder extends IndexedElementsBinder<Object> {}
CollectionBinder
CollectionBinder是IndexedElementsBinder实现类,其针对于Collection类型绑定处理的绑定器
// org.springframework.boot.context.properties.bind.CollectionBinder
class CollectionBinder extends IndexedElementsBinder<Collection<Object>> {}
MapBinder
MapBinder是针对于Map类型绑定处理的绑定器
// org.springframework.boot.context.properties.bind.MapBinder
class MapBinder extends AggregateBinder<Map<Object, Object>> {}
绑定上下文
绑定上下文主要用于在绑定过程中记录上下文信息
BindContext
// org.springframework.boot.context.properties.bind.BindContext
public interface BindContext {

    // 获取绑定器
    Binder getBinder();

    // 获取深度
    int getDepth();

    // 获取属性源迭代器
    Iterable<ConfigurationPropertySource> getSources();

    // 获取绑定配置属性
    ConfigurationProperty getConfigurationProperty();
}
Context
// org.springframework.boot.context.properties.bind.Binder.Context
final class Context implements BindContext {

    // 记录下钻深度
    private int depth;

    // 属性源列表
    private final List<ConfigurationPropertySource> source = Arrays.asList((ConfigurationPropertySource) null);

    // 配置属性
    private ConfigurationProperty configurationProperty;

    // 绑定过程中记录数据对象类型的队列
    private final Deque<Class<?>> dataObjectBindings = new ArrayDeque<>();
}
绑定处理器
BindHandler
BindHandler是绑定处理器的顶级接口
// org.springframework.boot.context.properties.bind.BindHandler
public interface BindHandler {

    // 默认实例
    BindHandler DEFAULT = new BindHandler() {};

    /* 绑定开始时调用 */
    default <T> Bindable<T> onStart(ConfigurationPropertyName name, Bindable<T> target, BindContext context) {
		return target;
	}

    /* 绑定成功时调用 */
    default Object onSuccess(ConfigurationPropertyName name, Bindable<?> target, BindContext context, Object result) {
		return result;
	}

    /* 绑定过程中创建新实例返回时调用 */
    default Object onCreate(ConfigurationPropertyName name, Bindable<?> target, BindContext context, Object result) {
		return result;
	}

    /* 绑定失败时调用 */
    default Object onFailure(ConfigurationPropertyName name, Bindable<?> target, BindContext context, Exception error) throws Exception {
		throw error;
	}

    /* 完成绑定后调用 */
    default void onFinish(ConfigurationPropertyName name, Bindable<?> target, BindContext context, Object result) throws Exception {
	}
}
分析可知:
BindHandler提供了绑定过程中不同时机的回调处理函数
AbstractBindHandler
AbstractBindHandler是实现了BindHandler接口的抽象基类
// org.springframework.boot.context.properties.bind.AbstractBindHandler
public abstract class AbstractBindHandler implements BindHandler {

    // 父子关联,关联父绑定处理器
    private final BindHandler parent;
}
其他
Bindable
Bindable用于封装可绑定实例,主要对其进行数据绑定操作
// org.springframework.boot.context.properties.bind.Bindable
public final class Bindable<T> {

    // 实例类型
    private final ResolvableType type;

    // 实例包装类型,对应基本类型
	private final ResolvableType boxedType;

    // 实例提供者
	private final Supplier<T> value;

    // 注解数组
	private final Annotation[] annotations;

    // 绑定限制
	private final EnumSet<BindRestriction> bindRestrictions;
}
BindRestriction
BindRestriction表示绑定限制枚举
// org.springframework.boot.context.properties.bind.Bindable.BindRestriction
public enum BindRestriction {

    // 不直接绑定属性,主要对应 @ConfigurationProperties 的前缀处理
    NO_DIRECT_PROPERTY
}
ConfigurationPropertyName
配置属性名称,主要用于封装属性名称/属性名称前缀
// org.springframework.boot.context.properties.source.ConfigurationPropertyName
public final class ConfigurationPropertyName implements Comparable<ConfigurationPropertyName> {

    // 属性名称
    private String string;
}
ConfigurationProperty
配置属性
// org.springframework.boot.context.properties.source.ConfigurationProperty
public final class ConfigurationProperty implements OriginProvider, Comparable<ConfigurationProperty> {

    // 配置属性名称
    private final ConfigurationPropertyName name;

    // 配置属性值
	private final Object value;

    // 对应的配置属性源
	private final ConfigurationPropertySource source;

    // 属性起源
	private final Origin origin;
}
绑定处理过程分析
构建Binder实例
Binder实例作为数据绑定的入口,首先就需要构建一个Binder实例
在Binder类中提供了两种实例构建方式
- 普通构造器构造
get方法构造
如果对于Binder中的功能属性组件没有特殊定义,通常使用get方法构造即可
// org.springframework.boot.context.properties.bind.Binder
public class Binder {

    /* 由 Environment 实例构建 Binder 实例 */
    public static Binder get(Environment environment) {
		return get(environment, null);
	}
}
绑定处理入口
绑定处理实际由Binder#bind方法完成,其存在多个重载方法

- 其中多个重载方法的统一入口为以下重载
// org.springframework.boot.context.properties.bind.Binder
public class Binder {

    /* 核心重载方法 */
    public <T> BindResult<T> bind(ConfigurationPropertyName name, Bindable<T> target, BindHandler handler) {
        // 1. 调用重载方法,获取绑定结果
        T bound = bind(name, target, handler, false);
        // 2. 封装绑定结果为 BindResult 实例
        return BindResult.of(bound);
    }
}
此bind重载存在三个参数:
name- 由属性名称/属性名称前缀封装为
ConfigurationPropertyName实例
- 由属性名称/属性名称前缀封装为
target- 封装具体数据绑定目标的
Bindable实例 - 其中封装了数据绑定目标的具体信息
- 封装具体数据绑定目标的
handler- 用于绑定过程中处理的
BindHandler - 实际由父子层级包装多个
BindHandler实例
- 用于绑定过程中处理的
- 跟进
bind重载
// org.springframework.boot.context.properties.bind.Binder
public class Binder {

    private <T> T bind(ConfigurationPropertyName name, Bindable<T> target, BindHandler handler, boolean create) {
        // 1. 入参信息校验
		Assert.notNull(name, "Name must not be null");
		Assert.notNull(target, "Target must not be null");
        // 2. 设置默认绑定处理器
		handler = (handler != null) ? handler : this.defaultBindHandler;
        // 3. 创建绑定上下文
		Context context = new Context();
        // 4. 调用重载方法,获取绑定结果
		return bind(name, target, handler, context, false, create);
	}
}
分析可知:
- 此重载添加了新的入参
create- 其主要在于如果获取绑定结果为空,是否创建默认结果
- 此方法中重点在于创建了
Context上下文实例- 此上下文用于后续整个绑定过程
- 注意,此时
Context应用的是Binder实例中管理的属性源
- 继续跟进分析
Binder#bind方法重载
// org.springframework.boot.context.properties.bind.Binder
public class Binder {

    // 属性源迭代器
    private final Iterable<ConfigurationPropertySource> sources;

    // 占位符解析器
    private final PlaceholdersResolver placeholdersResolver;

    // 类型转换器
    private final BindConverter bindConverter;

    /* 绑定处理,基于 属性前缀、绑定目标、绑定处理器 */
    private <T> T bind(ConfigurationPropertyName name, Bindable<T> target, BindHandler handler, Context context,
                       boolean allowRecursiveBinding, boolean create) {
        try {
            // 绑定前置处理
            Bindable<T> replacementTarget = handler.onStart(name, target, context);

            if (replacementTarget == null) {
                // 如果 target 本身就为 null,则直接处理绑定结果为 null
                return handleBindResult(name, target, handler, context, null, create);
            }

            target = replacementTarget;
            // 进行对象绑定
            Object bound = bindObject(name, target, handler, context, allowRecursiveBinding);
            // 处理绑定结果
            return handleBindResult(name, target, handler, context, bound, create);
        } catch (Exception ex) {
            // 绑定处理异常时处理
            return handleBindError(name, target, handler, context, ex);
        }
    }
}
分析可知:
-
此重载方法真正开始进行绑定动作
-
其绑定过程的主线分为以下部分
-
首先通过绑定处理器进行前置处理
-
对象绑定处理,获取绑定对象结果
-
处理绑定结果
-
-
如果绑定过程出现异常,则通过
handleBindError方法处理
绑定处理过程拆分
下面对bind的多个部分进行拆分
1. 处理器前置处理
第一部分为调用BindHandler#onStart进行前置处理,其中需要重点关注的是ConfigurationPropertiesBindHandler的实现
// org.springframework.boot.context.properties.ConfigurationPropertiesBinder.ConfigurationPropertiesBindHandler
private static class ConfigurationPropertiesBindHandler extends AbstractBindHandler {

    /* 开始绑定动作的前置处理 */
    public <T> Bindable<T> onStart(ConfigurationPropertyName name, Bindable<T> target, BindContext context) {
        // 对于添加 @ConfigurationProperties 注解,设置 NO_DIRECT_PROPERTY 绑定限制(表示不直接绑定)
        return isConfigurationProperties(target.getType().resolve())
            ? target.withBindRestrictions(BindRestriction.NO_DIRECT_PROPERTY) : target;
    }

    /* 判断是否添加 @ConfigurationProperties 注解 */
    private boolean isConfigurationProperties(Class<?> target) {
        return target != null && MergedAnnotations.from(target).isPresent(ConfigurationProperties.class);
    }
}
分析可知:
- 实际是针对与
@ConfigurationProperties注解- 有添加
@ConfigurationProperties注解Bindable实例设置NO_DIRECT_PROPERTY绑定限制(表示不直接绑定)后返回- 其作用具体看后续处理
- 没有添加
@ConfigurationProperties注解- 则返回原
Bindable实例
- 则返回原
- 有添加
2. 对象绑定处理
第二部分为对象绑定处理,获取绑定对象结果
其主要由Binder#bindObject方法完成,跟进分析
// org.springframework.boot.context.properties.bind.Binder
public class Binder {

    /* 对象绑定处理 */
    private <T> Object bindObject(ConfigurationPropertyName name, Bindable<T> target, BindHandler handler,
                                  Context context, boolean allowRecursiveBinding) {
        // 1. 首先尝试基于属性名称从上下文中获取属性
        ConfigurationProperty property = findProperty(name, target, context);

        if (property == null && context.depth != 0 && containsNoDescendantOf(context.getSources(), name)) {
            // 1. 无法通过属性名称获取属性值;2. 此时上下文不是在初始深度;3. 此属性没有下级属性
            return null;
        }

        // 2. 如果是 map/collection/array,则使用聚合绑定
        AggregateBinder<?> aggregateBinder = getAggregateBinder(target, context);
        if (aggregateBinder != null) {
            return bindAggregate(name, target, handler, context, aggregateBinder);
        }

        // 3. 普通属性处理
        if (property != null) {
            // 如果已经获取到属性,则直接绑定属性
            return bindProperty(target, context, property);
        }
        // 4. 绑定数据对象
        return bindDataObject(name, target, handler, context, allowRecursiveBinding);
    }
}
分析可知:
- 对于属性的处理,其主要分为三类
- 聚合属性处理
bindAggregate- 属性为聚合属性
- 普通属性处理
bindProperty- 属性为非聚合属性,且能通过属性名称获取值
- 数据对象处理
bindDataObject
- 聚合属性处理
对于不同类型属性的具体处理过程由后续分析
3. 绑定结果处理
第三部分为处理绑定结果,将获取的属性结果绑定到目标实例中
其由Binder#handleBindResult方法完成,跟进分析
// org.springframework.boot.context.properties.bind.Binder
public class Binder {

    /* 处理绑定结果 */
    private <T> T handleBindResult(ConfigurationPropertyName name, Bindable<T> target, BindHandler handler,
                                   Context context, Object result, boolean create) throws Exception {
        // 1. 结果存在
        if (result != null) {
            // 绑定处理器调用 onSuccess 处理
            result = handler.onSuccess(name, target, context, result);
            // 使用类型转换器,将结果转换为所需类型
            result = context.getConverter().convert(result, target);
        }

        // 2. 结果为空,但是需要创建
        if (result == null && create) {
            // 创建结果
            result = create(target, context);
            // 绑定处理器调用 onCreate 处理
            result = handler.onCreate(name, target, context, result);
            // 使用类型转换器,将结果转换为所需类型
            result = context.getConverter().convert(result, target);
            // 断言处理
            Assert.state(result != null, () -> "Unable to create instance for " + target.getType());
        }

        // 绑定处理器调用 onFinish 处理
        handler.onFinish(name, target, context, result);
        // 使用类型转换器,将结果转换为所需类型
        // 返回结果
        return context.getConverter().convert(result, target);
    }

    /* 创建结果 */
    private Object create(Bindable<?> target, Context context) {
		for (DataObjectBinder dataObjectBinder : this.dataObjectBinders) {
            // 遍历使用 DataObjectBinder 进行结果创建
			Object instance = dataObjectBinder.create(target, context);
			if (instance != null) {
                // 创建成功返回
				return instance;
			}
		}
        // 创建失败返回
		return null;
	}
}
分析可知,其中重点需要关注的部分有:
- 绑定处理器
BindHandler的onSuccess/onCreate处理 - 结果对象的创建
- 结果的类型转换
总结
整体的绑定过程可以总结为以下部分:
- 构建
Binder实例- 基于
Binder#bind方法作为数据绑定处理的入口 - 其中封装属性源,用于属性值获取
- 基于
- 创建绑定上下文
ContextContext用于记录以下信息- 当前处理的属性
- 递归深度
- 进行绑定处理
- 绑定处理器前置处理
- 对象绑定处理
- 针对不同结果类型,进行不同处理
- 绑定结果处理
- 将得到的结果与目标进行绑定
- 包括类型转换处理
不同结果类型处理
在Binder#bindObject方法中,针对不同结果类型提供了不同的处理,下面就一一分析
简单示例
此处提供一个简单示例,用于展示对于不同结果类型的处理
@Getter
@Setter
@Component
@ConfigurationProperties(prefix = "boss")
public class MyConfigurationProperties {

    private String name;

    private Integer age;

    // 小伙伴
    private LittlePartner partner;

    // 爱好
    private List<String> hobbies;

    // 别名
    private String[] alias;

    // 信息
    private Map<String, String> infos;
}


@Getter
@Setter
public class LittlePartner {

    private String name;

    private Integer age;

}
boss:
  name: 张三
  age: 16
  partner:
    name: 李四
    age: 17
  hobbies:
    - 吃饭
    - 睡觉
  alias: [张三丰,张上人]
  infos:
    heights: 178
    weight: 60
处理入口
其主要由Binder#bindObject方法完成,跟进分析
// org.springframework.boot.context.properties.bind.Binder
public class Binder {

    /* 对象绑定处理 */
    private <T> Object bindObject(ConfigurationPropertyName name, Bindable<T> target, BindHandler handler,
                                  Context context, boolean allowRecursiveBinding) {
        // 1. 首先尝试基于属性名称从上下文中获取属性
        ConfigurationProperty property = findProperty(name, target, context);

        if (property == null && context.depth != 0 && containsNoDescendantOf(context.getSources(), name)) {
            // 1. 无法通过属性名称获取属性值;2. 此时上下文不是在初始深度;3. 此属性没有下级属性
            return null;
        }

        // 2. 如果是 map/collection/array,则使用聚合绑定
        // 2.1 获取对应的 AggregateBinder 实例
        AggregateBinder<?> aggregateBinder = getAggregateBinder(target, context);
        if (aggregateBinder != null) {
            // 2.2 调用 bindAggregate 进行聚合绑定
            return bindAggregate(name, target, handler, context, aggregateBinder);
        }

        // 3. 普通属性处理
        if (property != null) {
            // 如果已经获取到属性,则直接绑定属性
            return bindProperty(target, context, property);
        }
        // 4. 绑定数据对象
        return bindDataObject(name, target, handler, context, allowRecursiveBinding);
    }
}
尝试属性值获取
首先尝试基于属性名称从上下文中获取属性,跟进分析findProperty方法
// org.springframework.boot.context.properties.bind.Binder
public class Binder {

    /* 属性获取 */
    private <T> ConfigurationProperty findProperty(ConfigurationPropertyName name, Bindable<T> target, Context context) {
        if (name.isEmpty() || target.hasBindRestriction(BindRestriction.NO_DIRECT_PROPERTY)) {
            // 1. 属性名为空
            // 2. 目标由 @ConfigurationProperties 注解注释,所以设置了 NO_DIRECT_PROPERTY 的绑定拒绝策略
            return null;
        }

        // 遍历属性源,实际是 Binder 实例管理的属性源
        for (ConfigurationPropertySource source : context.getSources()) {
            // 尝试从属性源中获取属性
            ConfigurationProperty property = source.getConfigurationProperty(name);
            if (property != null) {
                // 属性获取成功,返回
                return property;
            }
        }
        // 属性获取失败,返回空
        return null;
    }
}
分析可知:
- 以下两种类型不尝试进行属性值获取
- 属性名为空
- 目标由
@ConfigurationProperties注解注释- 在
ConfigurationPropertiesBindHandler的前置处理部分,添加了NO_DIRECT_PROPERTY绑定限制
- 在
- 否则遍历属性源,基于属性名称获取属性值
1. 数据对象结果类型处理
对于数据对象结果类型,其通过Binder#bindDataObject方法完成处理,跟进分析
// org.springframework.boot.context.properties.bind.Binder
public class Binder {

    private Object bindDataObject(ConfigurationPropertyName name, Bindable<?> target, BindHandler handler,
			Context context, boolean allowRecursiveBinding) {
        // 1. 前置判断
		if (isUnbindableBean(name, target, context)) {
            // 如果绑定目标类是不可绑定对象,则返回空
            // 包括 基础类型、Object、Class
			return null;
		}

        // 获取绑定目标类
		Class<?> type = target.getType().resolve(Object.class);
		if (!allowRecursiveBinding && context.isBindingDataObject(type)) {
            // 1. 不允许递归绑定,即绑定下级;2. 此类型已经完成绑定
            // 意思是,绑定对象类型的下级递归了此绑定对象类型,返回空
			return null;
		}

        // 2. 进行绑定处理
        // 2.1 通过 lambda 表达式创建 DataObjectPropertyBinder(对象属性绑定器)
        // 实际是递归调用 bind 方法,只是其属性名称为 prefix.propertyName
		DataObjectPropertyBinder propertyBinder = (propertyName, propertyTarget) ->
            bind(name.append(propertyName), propertyTarget, handler, context, false, false);

        // 2.2 上下文处理数据对象
        // 通过 lambda 表达式创建 Supplier 用于实例获取
        // 调用 Context#withDataObject 处理
		return context.withDataObject(type, () -> {
			for (DataObjectBinder dataObjectBinder : this.dataObjectBinders) {
                // 使用 DataObjectBinder 进行绑定工作
				Object instance = dataObjectBinder.bind(name, target, context, propertyBinder);
				if (instance != null) {
                    // 绑定成功,返回实例
					return instance;
				}
			}
            // 绑定失败,返回空
			return null;
		});
	}
}
分析可知,其中重点的部分有:
- 上下文处理
- 基于
lambda表达式创建的用于实例获取的Supplier部分 - 基于
lambda表达式创建的用于对象属性绑定的DataObjectPropertyBinder部分
上下文处理
首先分析Context#withDataObject方法处理
// org.springframework.boot.context.properties.bind.Binder.Context
final class Context implements BindContext {

    // 记录下钻深度
    private int depth;

    // 绑定过程中记录数据对象类型的队列
    private final Deque<Class<?>> dataObjectBindings = new ArrayDeque<>();

    /* 记录绑定过程中数据对象类型 */
    private <T> T withDataObject(Class<?> type, Supplier<T> supplier) {
        // 加入类型
        this.dataObjectBindings.push(type);
        try {
            // 进行深度处理
            return withIncreasedDepth(supplier);
        } finally {
            // 处理完毕,弹出类型
            this.dataObjectBindings.pop();
        }
    }

    /* 深度处理 */
    private <T> T withIncreasedDepth(Supplier<T> supplier) {
        // 增加深度
        increaseDepth();
        try {
            // 由 Supplier 提供实例
            return supplier.get();
        } finally {
            // 处理完毕,减少深度
            decreaseDepth();
        }
    }
}
分析可知,上下文主要完成以下工作:
- 记录绑定过程中数据对象类型
- 深度处理
实例获取
实例获取工作由lambda表达式创建的Supplier实例完成
() -> {
    for (DataObjectBinder dataObjectBinder : this.dataObjectBinders) {
        // 使用 DataObjectBinder 进行绑定工作
        Object instance = dataObjectBinder.bind(name, target, context, propertyBinder);
        if (instance != null) {
            // 绑定成功,返回实例
            return instance;
        }
    }
    // 绑定失败,返回空
    return null;
}
分析可知:
- 绑定工作实际由
DataObjectBinder实例完成 DataObjectBinder存在两种实现ValueObjectBinder- 用于处理不可变值对象
JavaBeanBinder- 用于处理可变
JavaBean
- 用于处理可变
处理入口
我们需要关注的是JavaBeanBinder处理,跟进分析JavaBeanBinder#bind
// org.springframework.boot.context.properties.bind.JavaBeanBinder
class JavaBeanBinder implements DataObjectBinder {

    /* 绑定处理 */
    public <T> T bind(ConfigurationPropertyName name, Bindable<T> target, Context context, DataObjectPropertyBinder propertyBinder) {
        // 目标结果不为空 & 存在此属性名称对应的后代属性
        boolean hasKnownBindableProperties = target.getValue() != null && hasKnownBindableProperties(name, context);
        // 基于 Bindable 封装 Bean 实例
        Bean<T> bean = Bean.get(target, hasKnownBindableProperties);
        if (bean == null) {
            return null;
        }
        // 获取实例贡献者
        BeanSupplier<T> beanSupplier = bean.getSupplier(target);
        // 调用重载方法
        boolean bound = bind(propertyBinder, bean, beanSupplier, context);
        // 返回结果
        return (bound ? beanSupplier.get() : null);
    }
}
分析可知,上述过程重要的有三部分:
- 封装
Bean实例 - 创建
BeanSupplier实例 - 调用重载方法进行绑定
封装Bean实例
跟进分析Bean#get方法
// org.springframework.boot.context.properties.bind.JavaBeanBinder.Bean
static class Bean<T> {

    // 对象类型信息
    private final ResolvableType type;
    private final Class<?> resolvedType;

    // 对象属性信息
    private final Map<String, BeanProperty> properties = new LinkedHashMap<>();

    /* 获取 Bean 实例 */
    static <T> Bean<T> get(Bindable<T> bindable, boolean canCallGetValue) {
        // 获取对象类型信息
        ResolvableType type = bindable.getType();
        Class<?> resolvedType = type.resolve(Object.class);
        // 获取实例贡献者
        Supplier<T> value = bindable.getValue();
        T instance = null;

        if (canCallGetValue && value != null) {
            // 获取实例
            instance = value.get();
            // 更新对象类型信息
            resolvedType = (instance != null) ? instance.getClass() : resolvedType;
        }
        if (instance == null && !isInstantiable(resolvedType)) {
            // 实例为空,且为不可实例化类型,则返回空
            return null;
        }
        Bean<?> bean = Bean.cached;
        if (bean == null || !bean.isOfType(type, resolvedType)) {
            // 构建 Bean 实例
            bean = new Bean<>(type, resolvedType);
            cached = bean;
        }
        return (Bean<T>) bean;
    }

    /* 构造 */
    Bean(ResolvableType type, Class<?> resolvedType) {
        // 记录对象类型信息
        this.type = type;
        this.resolvedType = resolvedType;
        // 设置对象属性
        addProperties(resolvedType);
    }
}
分析可知:
Bean实例主要作用是封装了对象属性信息
重载bind方法分析
// org.springframework.boot.context.properties.bind.JavaBeanBinder
class JavaBeanBinder implements DataObjectBinder {

    /* 对象绑定重载 */
    private <T> boolean bind(DataObjectPropertyBinder propertyBinder, Bean<T> bean, BeanSupplier<T> beanSupplier, Context context) {
        boolean bound = false;
        for (BeanProperty beanProperty : bean.getProperties().values()) {
            // 遍历所有属性,进行绑定
            bound |= bind(beanSupplier, propertyBinder, beanProperty);
            context.clearConfigurationProperty();
        }
        return bound;
    }

    /* 对象属性绑定 */
    private <T> boolean bind(BeanSupplier<T> beanSupplier, DataObjectPropertyBinder propertyBinder, BeanProperty property) {
        // 获取属性名称与类型
		String propertyName = property.getName();
		ResolvableType type = property.getType();

		Supplier<Object> value = property.getValue(beanSupplier);
        // 获取注解信息
		Annotation[] annotations = property.getAnnotations();

        // 由 DataObjectPropertyBinder 实例完成属性绑定工作
		Object bound = propertyBinder.bindProperty(propertyName,
				Bindable.of(type).withSuppliedValue(value).withAnnotations(annotations));

		if (bound == null) {
            // 如果属性绑定失败,则返回
			return false;
		}

		if (property.isSettable()) {
            // 属性绑定成功过,则将属性设置到对象实例中
			property.setValue(beanSupplier, bound);
		} else if (value == null || !bound.equals(value.get())) {
            // 没有 setter 则报错
			throw new IllegalStateException("No setter found for property: " + property.getName());
		}
		return true;
	}
}
分析可知:
- 对于对象绑定而言,实际上就是遍历其属性进行绑定
- 属性绑定的动作由
DataObjectPropertyBinder实例完成 - 如果属性绑定成功,则通过
setter方法设置到对象实例中
对象属性绑定
属性绑定的动作由DataObjectPropertyBinder实例完成,而DataObjectPropertyBinder由Lambda表达式构建
(propertyName, propertyTarget) ->
    bind(name.append(propertyName), propertyTarget, handler, context, false, false)
分析可知:
name为属性所属对象本身对应的属性名称前缀- 属性对应属性名称为:
<name>.<propertyName> - 对于属性的绑定,实际是递归调用
Binder#bind方法,将属性本身作为一个可绑定项进行处理- 具体绑定处理过程基于上述分析可知
- 不同属性基于属性类型不同,分为不同结果类型进行处理
- 属性也可为内嵌对象类型
2. 普通结果类型处理
普通结果类型包括基本类型/String类型
对于普通类型,在Binder#bindObject存在以下两种情况
- 能基于属性名称,从属性源中获取属性值
- 继续调用
Binder#bindProperty进行处理
- 继续调用
- 不能基于属性名称,从属性源中获取属性值
- 返回
null
- 返回
跟进分析Binder#bindProperty方法处理
// org.springframework.boot.context.properties.bind.Binder
public class Binder {

    /* 简单类型属性绑定 */
    private <T> Object bindProperty(Bindable<T> target, Context context, ConfigurationProperty property) {
        context.setConfigurationProperty(property);
        // 1. 获取属性值
        Object result = property.getValue();
        // 2. 处理属性值中的占位符
        result = this.placeholdersResolver.resolvePlaceholders(result);
        // 3. 对属性值进行类型转换
        result = context.getConverter().convert(result, target);
        // 返回结果
        return result;
    }
}
分析可知:
- 简单属性的处理步骤十分简单
- 获取属性值
- 处理属性值中的占位符
- 对属性值进行类型转换
3. 聚合结果类型处理
对于聚合结果类型
// org.springframework.boot.context.properties.bind.Binder
public class Binder {

    /* 对象绑定处理 */
    private <T> Object bindObject(ConfigurationPropertyName name, Bindable<T> target, BindHandler handler,
                                  Context context, boolean allowRecursiveBinding) {

        // ...

        // 2. 如果是 map/collection/array,则使用聚合绑定
        // 2.1 获取对应的 AggregateBinder 实例
        AggregateBinder<?> aggregateBinder = getAggregateBinder(target, context);
        if (aggregateBinder != null) {
            // 2.2 调用 bindAggregate 进行聚合绑定
            return bindAggregate(name, target, handler, context, aggregateBinder);
        }

        // ...
    }
}
分析可知,其主要分为两部分:
- 聚合绑定器获取
bindAggregate方法处理
聚合绑定器获取
跟进分析getAggregateBinder方法对于聚合属性类型,首先根据其类型获取对应的AggregateBinder
// org.springframework.boot.context.properties.bind.Binder
public class Binder {

    private AggregateBinder<?> getAggregateBinder(Bindable<?> target, Context context) {
        // 1. 从 Bindable 实例中获取目标类型
        Class<?> resolvedType = target.getType().resolve(Object.class);

        // 2. 根据类型,获取其对应的聚合绑定器
        if (Map.class.isAssignableFrom(resolvedType)) {
            return new MapBinder(context);
        }
        if (Collection.class.isAssignableFrom(resolvedType)) {
            return new CollectionBinder(context);
        }
        if (target.getType().isArray()) {
            return new ArrayBinder(context);
        }

        // 3. 如果目标类型不是聚合类型,则返回空
        return null;
    }
}
分析可知:
- 主要针对三种聚合属性,与其对应的聚合绑定器类型
Map:MapBinderCollection:CollectionArray:ArrayBinder
聚合绑定入口
跟进分析bindAggregate方法
// org.springframework.boot.context.properties.bind.Binder
public class Binder {

    private <T> Object bindAggregate(ConfigurationPropertyName name, Bindable<T> target, BindHandler handler,
                                     Context context, AggregateBinder<?> aggregateBinder) {
        // 1. 基于 Lambda 创建一个 AggregateElementBinder 实例
        AggregateElementBinder elementBinder = (itemName, itemTarget, source) -> {
            // 是否允许递归绑定
            boolean allowRecursiveBinding = aggregateBinder.isAllowRecursiveBinding(source);
            // 递归绑定
            Supplier<?> supplier = () -> bind(itemName, itemTarget, handler, context, allowRecursiveBinding, false);
            // 上下文中添加属性源,再返回绑定结果
            return context.withSource(source, supplier);
        };

        // 2. 上下文加深,同时进行聚合绑定操作
        return context.withIncreasedDepth(() -> aggregateBinder.bind(name, target, elementBinder));
    }

}
分析可知,其主要由两部分组成:
- 构建
AggregateElementBinder实例 - 使用
AggregateBinder#bind进行绑定操作
聚合绑定
跟进分析AggregateBinder#bind方法
// org.springframework.boot.context.properties.bind.AggregateBinder
abstract class AggregateBinder<T> {

    /* 聚合绑定 */
    final Object bind(ConfigurationPropertyName name, Bindable<?> target, AggregateElementBinder elementBinder) {
        // 1. 由子类实现 bindAggregate 方法完成聚合类型绑定,返回结果
        Object result = bindAggregate(name, target, elementBinder);
        Supplier<?> value = target.getValue();
        if (result == null || value == null) {
            // 绑定失败,则直接返回 null
            return result;
        }
        // 绑定成功,则由子类实现 merge 方法完成结果聚合
        return merge((Supplier<T>) value, (T) result);
    }
}
分析可知:
- 实际聚合绑定处理由子类实现的
bindAggregate/merge方法完成
3.1 数组结果类型绑定
对于数组结果类型,其绑定工作由ArrayBinder完成,跟进分析其bindAggregate方法实现
// org.springframework.boot.context.properties.bind.ArrayBinder
class ArrayBinder extends IndexedElementsBinder<Object> {

    protected Object bindAggregate(ConfigurationPropertyName name, Bindable<?> target, AggregateElementBinder elementBinder) {
        // 1. 构建一个结果封装贡献者
        IndexedCollectionSupplier result = new IndexedCollectionSupplier(ArrayList::new);
        // 2. 获取结果类型信息
        ResolvableType aggregateType = target.getType();
        ResolvableType elementType = target.getType().getComponentType();
        // 3. 索引绑定
        bindIndexed(name, target, elementBinder, aggregateType, elementType, result);

        if (result.wasSupplied()) {
            // 如果绑定成功,则将 List 结果转换为 Array 进行返回
            List<Object> list = (List<Object>) result.get();
            Object array = Array.newInstance(elementType.resolve(), list.size());
            for (int i = 0; i < list.size(); i++) {
                Array.set(array, i, list.get(i));
            }
            return array;
        }
        // 如果绑定失败,返回 null
        return null;
    }
}
分析可知:
- 实际绑定操作由父类
IndexedElementsBinder#bindIndexed完成
3.2 集合结果类型绑定
对于集合结果类型,其绑定工作由CollectionBinder完成,跟进分析其bindAggregate方法实现
// org.springframework.boot.context.properties.bind.CollectionBinder
class CollectionBinder extends IndexedElementsBinder<Collection<Object>> {

    protected Object bindAggregate(ConfigurationPropertyName name, Bindable<?> target, AggregateElementBinder elementBinder) {
        // 获取集合类型信息
		Class<?> collectionType = (target.getValue() != null) ? List.class : target.getType().resolve(Object.class);
		ResolvableType aggregateType = ResolvableType.forClassWithGenerics(List.class, target.getType().asCollection().getGenerics());
		ResolvableType elementType = target.getType().asCollection().getGeneric();
		// 创建一个 IndexedCollectionSupplier 实例用于结果封装
        IndexedCollectionSupplier result = new IndexedCollectionSupplier(
				() -> CollectionFactory.createCollection(collectionType, elementType.resolve(), 0));
        // 调用 bindIndexed 方法进行绑定处理
		bindIndexed(name, target, elementBinder, aggregateType, elementType, result);

		if (result.wasSupplied()) {
            // 绑定成功,返回结果
			return result.get();
		}
        // 绑定失败,返回空
		return null;
	}
}
分析可知:
- 实际绑定操作由父类
IndexedElementsBinder#bindIndexed完成
3.3 索引元素绑定器
上述数组结果类型与集合结果类型,其最后都是由IndexedElementsBinder完成工作
索引元素绑定器IndexedElementsBinder,是ArrayBinder/CollectionBinder的抽象父类,其主要针对于多个索引项的处理
配置情况
对于Array/Collection类型的配置,其存在两种情况:
- 值为多个
- 值为单个
其对应的配置也不同
- 值为单个
boss:
  # Collection
  hobbies: 吃饭
  # Array
  alias: 张三丰
- 值为多个
boss:
  # Collection
  hobbies:
    - 吃饭
    - 睡觉
  # Array
  alias: [张三丰,张上人]
其由YamlPropertySourceLoader加载解析后的结果也不同,其解析后与properties文件配置类似
- 值为单个
boss.hobbies=吃饭
boss.alias=张三丰
- 值为多个
boss.hobbies[0]=吃饭
boss.hobbies[1]=睡觉
boss.alias[0]=张三丰
boss.alias[1]=张上人
可以发现,当值为多个时,其属性名称变为name[index],IndexedElementsBinder就是针对这个区别进行特殊处理的绑定器
绑定分析
绑定处理由IndexedElementsBinder#bindIndexed方法完成,跟进分析
// org.springframework.boot.context.properties.bind.IndexedElementsBinder
abstract class IndexedElementsBinder<T> extends AggregateBinder<T> {

    /* 索引绑定 */
    protected final void bindIndexed(ConfigurationPropertyName name, Bindable<?> target,
			AggregateElementBinder elementBinder, ResolvableType aggregateType, ResolvableType elementType,
			IndexedCollectionSupplier result) {
		for (ConfigurationPropertySource source : getContext().getSources()) {
            // 遍历属性源,调用重载方法进行绑定
			bindIndexed(source, name, target, elementBinder, result, aggregateType, elementType);

			if (result.wasSupplied() && result.get() != null) {
                // 绑定成功则返回,退出循环
				return;
			}
		}
	}
}
分析可知,其遍历多个属性源,调用重载方法进行绑定,继续跟进
// org.springframework.boot.context.properties.bind.IndexedElementsBinder
abstract class IndexedElementsBinder<T> extends AggregateBinder<T> {

    /* 索引绑定 */
    private void bindIndexed(ConfigurationPropertySource source, ConfigurationPropertyName root, Bindable<?> target,
			AggregateElementBinder elementBinder, IndexedCollectionSupplier collection, ResolvableType aggregateType,
			ResolvableType elementType) {
        // 尝试从属性源中获取属性值
		ConfigurationProperty property = source.getConfigurationProperty(root);
		if (property != null) {
            // 1. 能直接获取属性值,则将值进行绑定
			getContext().setConfigurationProperty(property);
			bindValue(target, collection.get(), aggregateType, elementType, property.getValue());
		} else {
            // 2. 不能直接获取属性值,则获取属性索引顺序值
			bindIndexed(source, root, elementBinder, collection, elementType);
		}
	}
}
分析可知:
- 对于单值情况,可以直接根据属性名称获取值,则调用
bindValue绑定值 - 对于多值情况,需要调用重载
bindIndexed方法进行处理
单值处理
跟进分析bindValue方法
// org.springframework.boot.context.properties.bind.IndexedElementsBinder
abstract class IndexedElementsBinder<T> extends AggregateBinder<T> {

    /* 单值情况绑定 */
    private void bindValue(Bindable<?> target, Collection<Object> collection, ResolvableType aggregateType,
			ResolvableType elementType, Object value) {

		if (value == null || value instanceof CharSequence && ((CharSequence) value).length() == 0) {
            // 如果值为空/空字符串,则直接返回
			return;
		}
        // 使用转换器将值转换为所需的 Array 类型,其中包括了
		Object aggregate = convert(value, aggregateType, target.getAnnotations());
        // 将 Array 类型结果转换为 Collection 类型结果,并将其保存到 入参 collection 实例中
		ResolvableType collectionType = ResolvableType.forClassWithGenerics(collection.getClass(), elementType);
		Collection<Object> elements = convert(aggregate, collectionType);
		collection.addAll(elements);
	}

}
需要注意的是:
- 对于值,在转换过程中,将会使用分隔符进行分割处理
- 具体处理过程在
DelimitedStringToArrayConverter#convert中,默认分割符为, - 可以通过添加
@Delimiter注解自定义分割符
- 具体处理过程在
多值处理
对于多值情况,跟进分析重载bindIndexed方法
// org.springframework.boot.context.properties.bind.IndexedElementsBinder
abstract class IndexedElementsBinder<T> extends AggregateBinder<T> {

    /* 索引绑定 */
    private void bindIndexed(ConfigurationPropertySource source, ConfigurationPropertyName root,
			AggregateElementBinder elementBinder, IndexedCollectionSupplier collection, ResolvableType elementType) {
        // 1. 从属性源中获取索引子代:name[i]
		MultiValueMap<String, ConfigurationPropertyName> knownIndexedChildren = getKnownIndexedChildren(source, root);

        // 遍历处理,从索引 0 开始
		for (int i = 0; i < Integer.MAX_VALUE; i++) {
            // 拼接索引子代属性名称:name[i]
			ConfigurationPropertyName name = root.append((i != 0) ? "[" + i + "]" : INDEX_ZERO);
            // 通过 AggregateElementBinder 实例获取 索引子代属性值
			Object value = elementBinder.bind(name, Bindable.of(elementType), source);

			if (value == null) {
                // 获取属性值失败,则退出循环
				break;
			}
            // 获取属性值成功
            // 将对应索引移除
			knownIndexedChildren.remove(name.getLastElement(Form.UNIFORM));
            // 将值添加
			collection.get().add(value);
		}
        // 经过处理,如果还存在已知的索引子代属性没有成功获取属性值,则报错
		assertNoUnboundChildren(source, knownIndexedChildren);
	}

}
分析可知:
- 索引子代索引序号必须按顺序从
0号索引开始- 主要针对于
properties配置,因为yaml配置是不需要自定义索引序号的
- 主要针对于
- 按序获取索引子代属性值,必须要有值,否则影响后续索引序号取值
- 对于索引子代的处理,由
AggregateElementBinder完成
索引子代处理
在多值情况处理中,对于索引子代的处理,由AggregateElementBinder完成
而此AggregateElementBinder实例为Binder#bindAggregate方法中通过Lambda表达式构建
AggregateElementBinder elementBinder = (itemName, itemTarget, source) -> {
    // 是否允许递归绑定
    boolean allowRecursiveBinding = aggregateBinder.isAllowRecursiveBinding(source);
    // 递归绑定
    Supplier<?> supplier = () -> bind(itemName, itemTarget, handler, context, allowRecursiveBinding, false);
    // 上下文中添加属性源,再返回绑定结果
    return context.withSource(source, supplier);
};
分析可知:
- 其实际就是以
itemName(name[i])作为属性名称,递归调用Binder#bind方法获取属性值
小结
分析可知:
- 索引元素绑定器
IndexedElementsBinder作为ArrayBinder/CollectionBinder的抽象父类,其提供了bindIndexed统一处理数组/集合结果类型绑定 - 实际处理过程中,都是将其视为
Collection集合结果类型进行处理
3.4 Map结果类型绑定
对于Map结果类型,其绑定工作由MapBinder完成,跟进分析其bindAggregate方法实现
// org.springframework.boot.context.properties.bind.MapBinder
class MapBinder extends AggregateBinder<Map<Object, Object>> {

    protected Object bindAggregate(ConfigurationPropertyName name, Bindable<?> target, AggregateElementBinder elementBinder) {
        // 创建 Map 实例存储结果
		Map<Object, Object> map = CollectionFactory
				.createMap((target.getValue() != null) ? Map.class : target.getType().resolve(Object.class), 0);
		Bindable<?> resolvedTarget = resolveTarget(target);
        // 基于属性源,判断是否存在后代属性
		boolean hasDescendants = hasDescendants(name);

        // 遍历属性源处理
		for (ConfigurationPropertySource source : getContext().getSources()) {
			if (!ConfigurationPropertyName.EMPTY.equals(name)) {
				ConfigurationProperty property = source.getConfigurationProperty(name);
				if (property != null && !hasDescendants) {
					getContext().setConfigurationProperty(property);
					return getContext().getConverter().convert(property.getValue(), target);
				}
                // 过滤属性源中以 name 为前缀的属性,封装为新的属性源
				source = source.filter(name::isAncestorOf);
			}

            // 构建 EntryBinder 实例
            // 调用 bindEntries 绑定 map#entry 属性
			new EntryBinder(name, resolvedTarget, elementBinder).bindEntries(source, map);
		}
        // 返回绑定结果
		return map.isEmpty() ? null : map;
	}
}
分析可知,主要关注的部分为:
- 首先创建
Map作为结果存储 - 将属性源中
name的后代属性过滤封装为新的属性源- 属性名称以
name为前缀 - 比如示例中以
boss.infos为前缀的属性:boss.infos.heights
- 属性名称以
条目绑定
跟进分析EntryBinder
// org.springframework.boot.context.properties.bind.MapBinder.EntryBinder
private class EntryBinder {

    // map 的根属性明细
    // 示例中为 boss.infos
    private final ConfigurationPropertyName root;

    // 封装了 AggregateElementBinder
    private final AggregateElementBinder elementBinder;

    // Map 集合的类型信息
    private final ResolvableType mapType;
    private final ResolvableType keyType;
    private final ResolvableType valueType;

    /* 条目绑定 */
    void bindEntries(ConfigurationPropertySource source, Map<Object, Object> map) {
        if (source instanceof IterableConfigurationPropertySource) {
            for (ConfigurationPropertyName name : (IterableConfigurationPropertySource) source) {
                // 遍历属性源中属性,实际是经过过滤后的,仅保留以 root 对应的属性名称为前缀的属性列表

                // 1. 封装条目类型信息为 Bindable 示例
                Bindable<?> valueBindable = getValueBindable(name);
                // 2. 封装条目名称为 ConfigurationPropertyName 示例
                ConfigurationPropertyName entryName = getEntryName(source, name);
                // 3. 基于条目名称,解析出 map#key
                Object key = getContext().getConverter().convert(getKeyName(entryName), this.keyType);
                // 4.1 基于条目名称,由 AggregateElementBinder 获取条目值
                // 4.2 基于 key:条目值,保存到 Map 中
                map.computeIfAbsent(key, (k) -> this.elementBinder.bind(entryName, valueBindable));
            }
        }
    }
}
分析可知:
- 实际处理以
rootName为前缀的条目属性- 在
MapBinder#bindAggregate处理过程中通过过滤封装新的属性源
- 在
- 对于单个条目,实际是通过
AggregateElementBinder示例完成绑定操作- 实际就是
3.3 -> 索引子代处理部分
- 实际就是

 浙公网安备 33010602011771号