
【Java】多线程相关复习—— 线程的创建、名字、运行情况以及顺序控制(join方法) 【一】
· 继承Thread类
· 实现Runnable接口
· 实现Callable接口
· 线程名字 getName()
· 线程活动情况 isAlive()
· 控制线程运行次序 join()
① 继承Thread类
/**
 * 步骤:
 * 继承Thread重写run方法,创建该线程实例,调用start()方法启动线程
 * @author ChristineBassoon
 *
 */
public class test {
	public static void main(String[] args) {
		MyThread t = new MyThread();
		t.start();
	}

}

class MyThread extends Thread{

	@Override
	public void run() {
		for(int i=0;i<50;i++) {
			System.out.println(i+"["+this.getName()+"]");
		}
	}
}
同种方法以匿名内部类形式
new Thread(){
  @Override
  public void run() {
    for(int i=0;i<50;i++) {
      System.out.println(i+"["+Thread.currentThread().getName()+"]");
    }
  }
}.start();
② 实现Runnable接口
/**
 * 步骤:
 * 实现Runnable接口,重写run方法,以此Runnable实例作为Thread的target创建Thread对象
 * 调用start方法启动线程
 * @author ChristineBassoon
 *
 */
public class test {
	public static void main(String[] args) {
		Thread t = new Thread(new MyRunnable());
		t.start();
	}
}

class MyRunnable implements Runnable{

	@Override
	public void run() {
		for(int i=0;i<50;i++) {
			System.out.println(i+"["+Thread.currentThread().getName()+"]");
		}
	}
}

//匿名内部类形式
new Thread(new Runnable(){
    @Override
    public void run() {
      for(int i=0;i<50;i++) {
        System.out.println(i+"["+Thread.currentThread().getName()+"]");
      }
    }
  }).start();
}
③ Callable方式
/**
 * 步骤:
 * 1. 实现Callable接口,使用FutureTask类来包装Callable对象
 * 2. FutureTaskd对象作为Thread对象的target创建并启动线程
 * (FutureTask同时实现了Runnable和Callable接口,所以能作为Thread对象的的target)
 * 3. FutureTask的get()方法在子线程结束后可获得返回值(以此判断线程能否正常运行)
 */
public class test {
	public static void main(String[] args) {

		CallableThread ct = new CallableThread();
        FutureTask ft = new FutureTask<>(ct);
        new Thread(ft).start();
        try {
			System.out.println("子线程返回值为:"+ft.get());
		} catch (InterruptedException e) {
			e.printStackTrace();
		} catch (ExecutionException e) {
			e.printStackTrace();
		}
	}

}

class CallableThread implements Callable {

	@Override
	public Integer call() throws Exception {
		for(int i=0;i<50;i++) {
			System.out.println(i+"["+Thread.currentThread().getName()+"]");
		}
		return 1;
	}
}
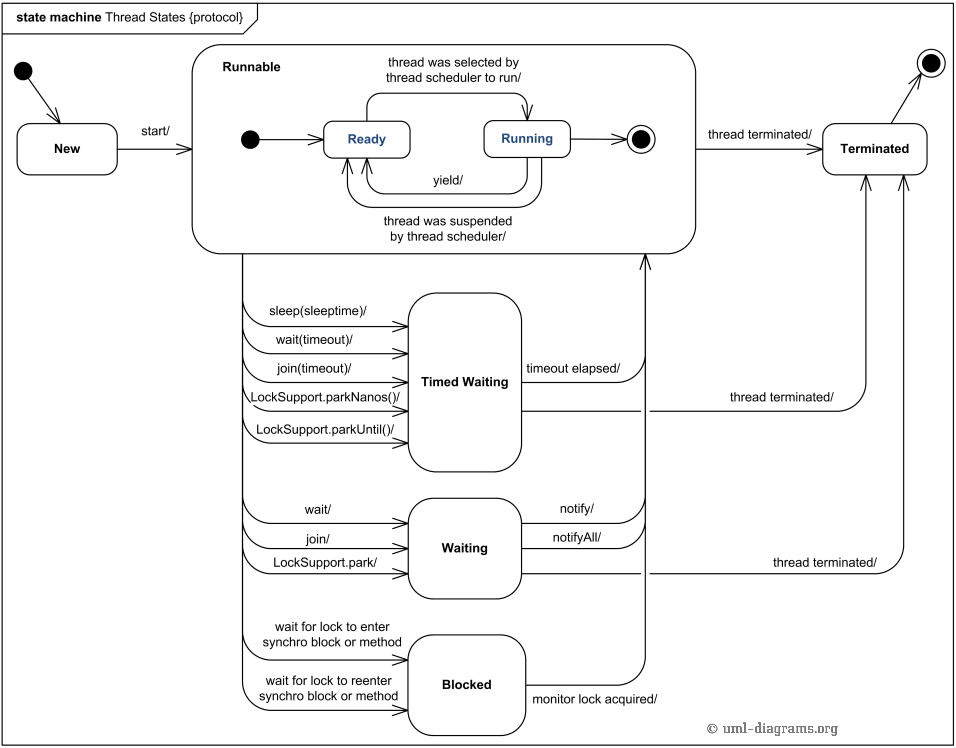
线程的几个状态可用图概括 (图源自google image),解释得非常清楚
//获取当前线程的名字
Thread.currentThread().getName();
//判断当前线程运行情况
Thread.currentThread().isAlive();
//设定线程的名字
Thread.currentThread().setName("");
//只有该线程结束后,程序才会向下进行
[new Thread()].join();//[]表示某线程
① 获取当前线程名字 —— getName()
情况1,获取主线程名字
public class ThreadTest {
	public static void main(String[] args) {
        System.out.println(Thread.currentThread().getName());

	}
}
结果为


main
情况2:获取子线程名字
new Thread() {
    @Override
    public void run(){
        for(int i=0;i<5;i++) {
        System.out.println(i+"["+Thread.currentThread().getName()+"]");
        System.out.println(i+"["+this.getName()+"]");
        }
    }
}.start();
结果为
0[Thread-0]
0[Thread-0]
1[Thread-0]
1[Thread-0]
2[Thread-0]
2[Thread-0]
3[Thread-0]
3[Thread-0]
4[Thread-0]
4[Thread-0]
可看出,子程序运行期间,当前的线程( Thread.currentThread() )名字就是子程序的线程名。
②线程运行情况,判断线程是否在运行当中—— isAlive()
public class ThreadTest {
	public static void main(String[] args) {
		MyThread myThread = new MyThread();
		myThread.start();
		System.out.println("");
		try {
			myThread.join();//确保子线程结束后才执行下方语句
		} catch (InterruptedException e) {
			e.printStackTrace();
		}
		System.out.println("");
		System.out.println("myThread线程运行情况:"+myThread.isAlive());
	}
}

class MyThread extends Thread {

	public MyThread(){
		System.out.println("====构造函数开始====");
		System.out.println(this.isAlive());
		System.out.println("====构造函数结束====");
	}

	@Override
	public void run(){
		System.out.println("=====run开始======");
		System.out.println(this.isAlive());
		System.out.println("=====run结束======");
	}
}
结果为:
====构造函数开始====
false
====构造函数结束====

=====run开始======
true
=====run结束======

myThread线程运行情况:false
总结:子线程只有调用start()方法后才会运行。
③ 线程之间的运行顺序 —— join() 方法的调控
接下来我们实验一下:
public class condition {
	public static void main(String[] args) {

		MyThread myThread = new MyThread();
		myThread.setName("子线程");//设定子线程名字
		myThread.start();
		System.out.println();
		System.out.println("主线程运行完毕");
	}
}


class MyThread extends Thread {

	@Override
	public void run(){
		for(int i=0;i<20;i++) {
			System.out.println(i+"["+this.getName()+"]");
		}
	}
}
结果:
主线程运行完毕
0[子线程]
1[子线程]
2[子线程]
3[子线程]
4[子线程]
5[子线程]
6[子线程]
7[子线程]
8[子线程]
9[子线程]
10[子线程]
11[子线程]
12[子线程]
13[子线程]
14[子线程]
15[子线程]
16[子线程]
17[子线程]
18[子线程]
19[子线程]
如果按照执行次序,本来应该最后打印的内容应该最后显示的,现在却放在最前头了。事实上,线程之间会互相争夺cpu资源,谁先抢到谁执行,像上述这种情况,则是主线程先抢到了cpu资源。如果必须保证先执行子线程,最后再执行主线程的打印动作的话,可以使用 join() 方法控制线程之间的执行次序。
我们再来实验一下主线程和单个子线程
public class condition {
	public static void main(String[] args) {

		MyThread myThread = new MyThread();
		myThread.setName("子线程");//设定子线程名字
		myThread.start();
		try {
			myThread.join();
		} catch (InterruptedException e) {
			e.printStackTrace();
		}

		System.out.println("主线程运行完毕");
	}
}

class MyThread extends Thread {

	@Override
	public void run(){
		for(int i=0;i<5;i++) {
			System.out.println(i+"["+this.getName()+"]");
		}
	}
}
结果为
0[子线程]
1[子线程]
2[子线程]
3[子线程]
4[子线程]
主线程运行完毕
两个或多个子线程之间的顺序同样如此,
如果执行顺序限制为 【子线程1 → 子线程2 → 主线程结束】
public class condition {
	public static void main(String[] args) {

		MyThread t1 = new MyThread("子线程1");
		MyThread t2 = new MyThread("子线程2");

		try {
			t1.start();
			t1.join();//join()方法只有在调用start()方法后使用才有意义
			t2.start();
			t2.join();
		} catch (InterruptedException e) {
			e.printStackTrace();
		}
		System.out.println("主线程结束");
	}
}

class MyThread extends Thread {

	public MyThread(String string) {
		this.setName(string);
	}

	@Override
	public void run(){
		for(int i=0;i<5;i++) {
			System.out.println(i+"["+this.getName()+"]");
		}
	}
}
结果为:
0[子线程1]
1[子线程1]
2[子线程1]
3[子线程1]
4[子线程1]
0[子线程2]
1[子线程2]
2[子线程2]
3[子线程2]
4[子线程2]
主线程结束
参考:https://www.cnblogs.com/songshu120/p/7966314.html(多线程创建的三种方式)

 浙公网安备 33010602011771号