react基础
一、React简介
一、介绍
React起源于Facebook的内部项目,它是一个用于构建用户界面的javascript库,Facebook用它来架设公司的Instagram网站,并于2013年5月开源。
-
-
你只要描述UI看起来是什么样式,就跟写HTML一样,React负责渲染UI
-
-
基于组件
-
组件是React最重要的内容,组件表示页面中的部分内容
-
-
学习一次,随处可用
-
React可以开发Web应用—ReactJs
-
React可以开发移动端—react-native
-
-
三、react与传统MVC关系
四、开发工具安装

vscode安装react开发扩展
五、使用
React开发需要引入多个依赖文件
- react.js
- React核心,提供创建元素,组件等功能
- react-dom.js
- 提供DOM相关功能
使用步骤
1 <!-- React 的核心库 -->
2 <script src="js/react.development.js"></script>
3
4 <!-- DOM 相关的功能 -->
5 <script src="js/react-dom.development.js"></script>
Hello World演示
 1 <div id="app"></div>
 2 <!-- 引入react相关的文件 -->
 3 <script src="./js/react.development.js"></script>
 4 <script src="./js/react-dom.development.js"></script>
 5 <script>
 6   // 1、创建虚拟dom
 7   // React.createElement(标签名称,对象形式的DOM属性信息,DOM中的内容/子DOM)
 8   // React.createElement(标签名称,对象形式的DOM属性信息,DOM中的内容/子DOM,DOM中的内容/子DOM,...)
 9   // React.createElement(标签名称,对象形式的DOM属性信息,[DOM中的内容/子DOM,DOM中的内容/子DOM,...])
10   const vNode = React.createElement("div", {}, "hello world");
11
12   // 2、获取挂载点
13   const el = document.getElementById("app");
14   // const el = document.querySelector("#app")
15
16   // 3、页面渲染:ReactDOM.render(虚拟DOM, 挂载点)
17   ReactDOM.render(vNode, el);
18 </script>
注意:
1 const vNode = React.createElement("div", {id: "hi",className: "cls"}, "hello world");
二、JSX
一、JSX概述
由于通过React.createElement()方法创建的React元素代码比较繁琐,结构不直观,无法一眼看出描述的结构,不优雅,开发时写代码很不友好。
React使用JSX来替代常规的JavaScript,JSX可以理解为的JavaScript语法扩展,它里面的标签申明要符合XML规范要求。
- React不一定非要使用JSX,但它有以下优点:
-
 1 <div id="app"></div>
 2 <!-- 引入react相关的文件 -->
 3 <script src="./js/react.development.js"></script>
 4 <script src="./js/react-dom.development.js"></script>
 5 <script src="./js/babel.min.js"></script>
 6
 7 <!-- script标签上一定要写上 type="text/babel" -->
 8 <script type="text/babel">
 9   // 1、创建虚拟dom
10   const vNode = <div>hello world</div>;
11
12   // 2、获取挂载点
13   const el = document.getElementById("app");
14
15   // 3、页面渲染
16   ReactDOM.render(vNode, el);
17 </script>
三、JSX语法中的js表达式
1、嵌入js表达式
在jsx语法中,要把js代码写到{}中,所有标签必须要闭合
 1 let num = 100;
 2 let bool = false;
 3
 4 // JSX 语法
 5 var vNode = (
 6   <div>
 7     {/* 我是注释 */}
 8     {num}
 9     <hr />
10     {/* 三目运算 */}
11     {bool ? "条件为真" : "条件为假"}
12   </div>
13 );
14
15 ReactDOM.render(vNode, document.getElementById("app"));
2、属性绑定
对标:Vue的v-bind指令
 1 const src = "http://www.mobiletrain.org/images/index/new_logo.png";
 2 const style = { fontSize: "20px", color: "red" };
 3 const html = "<a href='http://www.baidu.com'>百度一下</a>";
 4
 5 // 获取元素
 6 const app = document.getElementById("app");
 7 // 创建虚拟DOM
 8 const vNode = (
 9   <div>
10     { /*标签的属性如果需要被JSX解析,则属性的值不能加引号*/ }
11     <img src={src} />
12     <hr/>
13     <p style={style}>北川3次地震为汶川地震余震</p>
14     <hr/>
15     <p className="cl1">iPhone12开售排队</p>
16     {
17       /*
18         输出HTML字符串(了解)
19         注意点:react默认不解析html字符串
20         原因是:安全问题
21         如果真要输出解析的html字符串请按照以下的语法
22       */
23     }
24     <p dangerouslySetInnerHTML={{__html:html}}></p>
25   </div>
26 );
27 // 渲染页面
28 ReactDOM.render(vNode, app);
3、数组渲染
直接渲染:会连接在一起,不便于区分
 1 let arr = ["张三", "李四", "王五", "罗翔"];
 2 // 获取挂载点
 3 const el = document.getElementById("app");
 4 // 创建虚拟DOM
 5 const vNode = (
 6   <div>
 7     {/* 直接输出数据 */}
 8     {arr}
 9   </div>
10 );
11 // 渲染
12 ReactDOM.render(vNode, el); // 张三李四王五罗翔
处理后渲染
 1 let arr = ["张三", "李四", "王五", "罗翔"];
 2 // 获取挂载点
 3 const el = document.getElementById("app");
 4 // 创建虚拟DOM
 5 const vNode = (
 6   <div>
 7     {/* 给循环体包裹一层{},不包就错 */}
 8     {
 9       arr.map((item, index) => {
10         return <li key={index}>{item}</li>;
11       })
12     }
13
14     {/*如果循环体就1行,{}与return可以被省略(箭头函数)*/}
15     {
16       arr.map((item, index) => (
17         <li key={index}>{item}</li>;
18       ))
19     }
20   </div>
21 );
22 // 渲染
23 ReactDOM.render(vNode, el);
三、React组件
一、组件的概念
此后代码基于React脚手架(第十一节)
1、组件允许我们将UI拆分为独立可复用的代码片段,并对每个片段进行独立构思。
2、从概念上类似于JavaScript函数,它接受任意的入参(props),并返回用于描述页面展示内容的React元素(JSX)

二、组件的创建方式
1、函数组件
- 函数组件的特点
- 函数组件(无状态组件):使用JS的函数创建的组件
- 函数名称以大写字母开头(建议)
- 函数组件必须有返回值,表示该组件的结构(虚拟DOM),且内容必须有顶级元素
例如(使用脚手架创建项目):
 1 // 引入React的作用:通过babel将jsx编译成普通js代码会用到React.createElement,所以需要React
 2 import React from 'react'
 3
 4 // 函数名首字母必须大写
 5 function App() {
 6   return (
 7     <div>这是第一个函数组件</div>
 8   )
 9 }
10
11 export default App;
1 import React from "react";
2 import ReactDOM from "react-dom";
3
4 import App from "./App";
5
6 ReactDOM.render(<App/>, document.getElementById("root"));
注意:在
 1 // 创建一个类
 2 class Person{
 3   // 构造器中的this是类的实例对象(构造器可以不写,但为了区分p1、p2,此处写上比较好)
 4   constructor(name, age){
 5     this.name = name;
 6     this.age = age;
 7   }
 8   // 一般方法
 9   speak(){
10     //类的方法放在了类的原型对象上,供实例使用
11     console.log(`我叫${this.name},我今年${this.age}`);
12   }
13 }
14
15 const p1 = new Person('tom', 18);
16 const p2 = new Person('jerry', 19);
17
18 console.log(p1);
19 console.log(p2);
20 console.log(p1.speak());
21 console.log(p2.speak());
22
23 // 类的继承
24 class Student extends Person{
25   // 此处构造器可以不写,有新参数传入时要写
26   constructor(name, age, grade){
27     super(name, age);
28     this.grade = grade;
29   }
30 }
31 const s1 = new Student('小张', 15, '高一');
32 console.log(s1);
 1 import React from "react";
 2
 3 // 创建class类,继承React.Component
 4 // 在里面提供render方法,在return里面返回内容
 5 class App extends React.Component {
 6   render() {
 7     return <div>这是第一个类组件</div>;
 8   }
 9 }
10
11 export default App;
除了上述的写法以外,还可以对React.Component
 1 // 引入react和Component
 2 import React, { Component } from "react";
 3
 4 // 类组件
 5 class App extends Component {
 6   render() {
 7     return <div>这是第一个类组件</div>;
 8   }
 9 }
10
11 // 导出
12 export default App;
四、React事件处理
一、事件绑定
React元素的事件处理和DOM元素的很相似,但是有一点语法上的不同,
 1 // 函数组件事件绑定
 2 import React from "react";
 3
 4 const clickHandler = () => {
 5   console.log("海纳百川有容乃大,壁立千仞无欲则刚。");
 6 };
 7
 8 const App = () => {
 9   return <button onClick={clickHandler}>老林说</button>;
10 };
11
12 export default App;
 1 // 类组件事件绑定
 2 import React, { Component } from 'react';
 3 class App extends Component{
 4   render() {
 5     return (
 6       <div>
 7           <!-- 使用JSX 语法时,需要传入一个函数作为事件处理函数-->
 8         <button onClick={this.clickHandler}>老林说</button>
 9       </div>
10     )
11   }
12   clickHandler() {
13     console.log('海纳百川有容乃大,壁立千仞无欲则刚。')
14   }
15 }
二、事件对象
1、React中可以通过,事件处理函数的参数,获取到事件对象
2、它的事件对象叫做:合成事件,即兼容所有浏览器,无需担心跨浏览器兼容问题
3、React中的事件对象并不是浏览器提供的,而是它自己内部所构建的
4、
5、
 1 import React, { Component } from "react";
 2
 3 class App extends Component {
 4   render() {
 5     return (
 6       <div>
 7         <button onClick={this.clickHandler}>老林说</button>
 8       </div>
 9     );
10   }
11   clickHandler(e) {
12     console.log("海纳百川有容乃大,壁立千仞无欲则刚。");
13     console.log(e);
14     console.log(e.target); // dom对象
15     console.log(e.nativeEvent); // 浏览器原生事件对象
16   }
17 }
18
19 export default App;
三、事件方法传参
React中对于事件方法传参的方式有着非常灵活的用法。
 1 import React, { Component } from "react";
 2
 3 class App extends Component {
 4   render() {
 5     return (
 6       <div>
 7         <button onClick={this.clickHandler}>
 8           老林说
 9         </button>
10       </div>
11     );
12   }
13   clickHandler() {
14     console.log(this);
15   }
16 }
17
18 export default App;
解决this指向问题的方法
1、通过类组件的构造函数进行绑定
 1 import React, { Component } from "react";
 2
 3 class App extends Component {
 4   constructor(props) {
 5     super(props)
 6     this.clickHandler = this.clickHandler.bind(this)
 7   }
 8   render() {
 9     return (
10       <div>
11         <button onClick={this.clickHandler}>
12           老林说
13         </button>
14       </div>
15     );
16   }
17   clickHandler() {
18     console.log(this);
19   }
20 }
21
22 export default App;
2、使用bind绑定
 1 import React, { Component } from "react";
 2
 3 class App extends Component {
 4   render() {
 5     return (
 6       <div>
 7         <button onClick={this.clickHandler.bind(this)}>
 8           老林说
 9         </button>
10       </div>
11     );
12   }
13   clickHandler() {
14     console.log(this);
15   }
16 }
17
18 export default App;
3、使用箭头函数:方式一
 1 import React, { Component } from "react";
 2
 3 class App extends Component {
 4   render() {
 5     return (
 6       <div>
 7         <button onClick={() => this.clickHandler()}>老林说</button>
 8       </div>
 9     );
10   }
11   clickHandler() {
12     console.log(this);
13   }
14 }
4、使用箭头函数:方式二
 1 import React, { Component } from "react";
 2
 3 class App extends Component {
 4   render() {
 5     return (
 6       <div>
 7         <button onClick={this.clickHandler}>老林说</button>
 8       </div>
 9     );
10   }
11   clickHandler = () => {
12     console.log(this);
13   }
14 }
15
16 export default App;
五、state状态
1、状态就是组件描述某种显示情况的数据,由组件自己设置和更改
2、使用状态的目的就是为了在不同的状态下使组件的显示不同
3、
一、基本使用
- 状态(state)即数据,是组件自己内部的私有数据,只能在组件内部使用
- state的值是对象,表示一个组件中可以有多个数据
 1 // state定义在类的构造方法中
 2 import React, { Component } from 'react';
 3
 4 class App extends Component {
 5   // 构造函数初始state
 6   constructor(props){
 7     super(props);
 8     this.state = {
 9       count: 0
10     }
11   }
12   render(){
13     return <div>{this.state.count}</div>
14   }
15 }
16
17 export default App;
 1 // state定义在类的成员属性中
 2 import React, { Component } from "react";
 3
 4 class App extends Component {
 5   // 常规初始化
 6   state = {
 7     count: 0,
 8   }
 9   render() {
10     return <div>{this.state.count}</div>;
11   }
12 }
13
14 export default App;
二、修改状态
React无法直接修改state,
1 this.setState(state => {
2   return {
3     count: state.count + 1,
4     // ....
5   }
6 })
2、对象形式
1 this.setState({
2   count: this.state.count + 1,
3   // ....
4 })
注意:
- 是否绑定了this
- 对象形式写法如果针对多个相同的修改操作,会合并掉多余的相同操作,例如:5次
+1操作实际上只执行一次,也就有了1+1+1+1+1=1
三、
props:接受任意的入参,并返回用于描述页面展示内容的React元素
1、函数组件传值
 1 import React from "react";
 2
 3 import Item from "./Components/Item";
 4
 5 class App extends React.Component {
 6   render() {
 7     return <Item name="林则徐" next="壁立千仞无欲则刚"></Item>;
 8   }
 9 }
10
11 export default App;
- 子组件接收
 1 import React from "react";
 2
 3 const Item = (props) => {
 4   return (
 5     <div>
 6       {props.name}:海纳百川有容乃大,{props.next}。
 7     </div>
 8   );
 9 };
10
11 export default Item;
2、类组件传值
-
-
子级类组件中通过
this.props
 1 import React, { Component } from "react";
 2
 3 class Item extends Component {
 4   render() {
 5     return (
 6       <div>
 7         {this.props.name}:海纳百川有容乃大,{this.props.next}。
 8       </div>
 9     );
10   }
11 }
12
13 export default Item;
二、children属性
- 与普通的props一样,其值可以是任意类型
- 注意
- 如果子组件标签里只存在一个子节点,则children属性值为一个字符串
- 如果子组件标签里存在多个子节点,那么children属性的值为一个索引数组
例如,有父组件代码
 1 import React, { Component } from 'react';
 2 import Cmp from './Components/Cmp';
 3
 4 class App extends Component{
 5   state = {
 6     content: '我是state内容'
 7   }
 8     renter() {
 9     // this.state.content即为子组件标签中的子节点
10     return <Cmp>{this.state.content}</Cmp>
11   }
12 }
13 export default App;
子组件代码
1 // 子组件的props属性里就存在一个children属性,可以获取到父组件传入的内容
2 import React, { Component } from "react";
3
4 class Cmp extends Component {
5   render() {
6     return <div>{this.props.children}</div>;
7   }
8 }
9 export default Cmp;
三、prop-types
关于JavaScript的class中的静态成员与常规成员
 1 class App {
 2   static uname = '张三'
 3     age = 20
 4 }
 5 // 常规的属性是在对象里的,如果要用得先实例化
 6 console.log((new App).age);  // 20
 7 console.log((new App).uname);  // undefined
 8
 9 // 静态属性是类里面的,使用的时候不要实例化
10 console.log(App.uname);  // 张三
11
12 // 静态成员要优先于常规的成员
React是为了构建大型应用程序而生,在一个大型应用开发过程中会进行多人协作,往往可能根本不知道别人使用你写的组件的时候会传入什么样的参数,这样就有可能会造成应用程序运行不了但是又不报错的情况。所以必须要对于props
1 npm i -S prop-types
在使用时,无论是函数组件还是类组件,都需要对prop-types
1 // 注意PropTypes大小写,大驼峰
2 import PropTypes from "prop-types"
随后依据使用的组件类型选择对应的应用方式
函数组件
 1 function App(props){
 2   // 函数组件声明过程
 3   return "";
 4 }
 5
 6 // 为App方法组件挂上验证规则(注意大小写,小驼峰)
 7 App.propTypes = {
 8   // 待验证的属性名:PropTypes.类型规则[.isRequired]
 9   // isRequired表示必传
10   name: PropTypes.string.isRequired,
11   age: PropTypes.number
12   // ...
13 }
类组件
 1 class App extends Component{
 2   // 类内部完成检查(注意大小写,小驼峰)
 3   static propTypes = {
 4     name: PropTypes.string
 5   }
 6   // 渲染
 7   render() {
 8     return "";
 9   }
10 }
函数验证:func
本质上来上面类组件的写法与方法组件的写法是一样的,只不过考虑到类组件的代码完整性,我们把规则的验证做成了类的静态成员属性的方式,如果还原成最初的代码则如下:
 1 class App extends Component {
 2   render() {
 3     return(
 4         <div>{this.props.flag}--{this.props.num}</div>
 5     )
 6   }
 7 }
 8
 9 App.propTypes = {
10   flag: PropTypes.string,
11   num: PropTypes.number.isRequired,
12 };
需要注意,isRequired规则必须放在最后且不能独立于其他规则存在。更多的验证规则,可以参考
函数组件
 1 function App(props){
 2   // 函数组件声明过程
 3   return "";
 4 }
 5 // 为App方法组件挂上默认值
 6 App.defaultProps = {
 7   // 属性名:默认值
 8   title: "标题",
 9   // ...
10 }
类组件
1 class App extends Component {
2   // 添加静态成员属性`defaultProps`设置props的默认值
3   static defaultProps = {
4     // 属性名:默认值
5     title: "标题"
6     // ...
7   }
8 }
七、refs
组件内的标签可以定义ref属性来标识自己 (不要过度使用ref)
一、字符串形式的ref
不推荐使用,已经过时,存在一些效率问题
 1 import React, { Component } from "react";
 2
 3 class App extends Component {
 4   showData = () => {
 5     // this里的refs是ref的集合(包括input1、button1)
 6     const {input1} = this.refs;
 7     console.log(input1); // 获取input节点
 8   }
 9   render() {
10     return (
11       <div>
12         <input
13           ref="input1"
14           type="text"
15           placeholder="点击按钮提示数据"/>
16         <button
17           ref="button1"
18           onClick={this.showData}>
19           点我显示左侧数据
20         </button>
21       </div>
22     );
23   }
24 }
25 export default App;
二、回调形式的ref
 1 import React, { Component } from "react";
 2
 3 class App extends Component {
 4   showData = () => {
 5     // 从实例自身获取input节点
 6     const {input1} = this
 7     console.log(input1);
 8     console.log(input1.value);
 9   }
10   render() {
11     return (
12       <div>
13         <input
14           ref={(c) => {this.input1 = c}} //将input节点赋值给实例自身
15           type="text"
16           placeholder="点击按钮提示数据"/>
17         <button
18           onClick={this.showData}>
19           点我显示左侧数据
20         </button>
21       </div>
22     );
23   }
24 }
25 export default App;
- ref调用次数的问题
 1 // 内联函数形式(会多次调用,不过没有影响)
 2 import React, { Component } from "react";
 3
 4 class App extends Component {
 5   state = {isHot: true}
 6
 7   showData = () => {
 8     const {input1} = this
 9     console.log(input1.value)
10   }
11   changeWeather = () => {
12     this.setState(state => {
13       return {isHot: !state.isHot}
14     })
15   }
16
17   render() {
18     const {isHot} = this.state
19     return (
20       <div>
21         <h2>今天天气{isHot ? '炎热' : '凉爽 '}</h2><br/>
22         <button
23           onClick={this.changeWeather}>
24           点我切换天气
25         </button><br/>
26         <input
27           ref={(c) => {
28             this.input1 = c;
29             console.log('打印节点',c)}} //获取input节点并输出
30           type="text"/>
31         <button
32           onClick={this.showData}>
33           点我显示左侧数据
34         </button>
35       </div>
36     );
37   }
38 }
39 export default App;
 1 // 定义成class的绑定函数形式(不会多次调用)
 2 import React, { Component } from "react";
 3
 4 class App extends Component {
 5   state = {isHot: true}
 6
 7   showData = () => {
 8     const {input1} = this
 9     alert(input1.value)
10   }
11   changeWeather = () => {
12     this.setState(state => {
13       return {isHot: !state.isHot}
14     })
15   }
16   saveInput = (c) => {
17     this.input1 = c;
18     console.log('打印节点',c)}
19   }
20
21   render() {
22     const {isHot} = this.state
23     return (
24       <div>
25         <h2>今天天气{isHot ? '炎热' : '凉爽 '}</h2><br/>
26         <button
27           onClick={this.changeWeather}>
28           点我切换天气
29         </button><br/>
30         <input
31           ref={(c) => {this.saveInput}} //获取input节点并输出
32           type="text"/>
33         <button
34           onClick={this.showData}>
35           点我显示左侧数据
36         </button>
37       </div>
38     );
39   }
40 }
41 export default App;
三、createRef创建ref
注意:createRef创建的ref专人专用
应用:转第十节(表单处理)
 1 import React, { Component } from "react";
 2
 3 class App extends Component {
 4
 5   myRef = React.createRef()
 6   myRef2 = React.createRef()
 7
 8   showData = () => {
 9     console.log(this.myRef) //{current: input}
10     //获取节点
11     console.log(this.myRef.current)
12     //打印value值
13     console.log(this.myRef.current.value)
14   }
15   showData2 = () => {
16     console.log(this.myRef.current.value)
17   }
18
19   render() {
20     return (
21       <div>
22         <input
23           ref={this.myRef}
24           type="text"/>
25         <button
26           onClick={this.showData}>
27           点我显示左侧数据
28         </button>
29         <input
30           ref={this.myRef2}
31           type="text"
32           onBlur={showData2}/>
33       </div>
34     );
35   }
36 }
37 export default App;
八、组件通信
组件通信除了props(父传子)以外,还有其他方式
一、父传子(ref)
1、父组件将自己的状态传递给子组件,子组件当做属性来接收,当父组件更改自己状态的时候,子组件接收到的属性就会发生改变
2、父组件利用ref对子组件做标记,通过调用子组件的方法以更改子组件的状态,也可以调用子组件的方法
 1 // 父组件
 2 import React, { Component, createRef } from "react";
 3
 4 import Cmp from "./Components/Cmp";
 5 class App extends Component {
 6   constructor(props) {
 7     super(props);
 8     // 创建ref对象,用于控制子组件,专人专用
 9     this.child = createRef();
10   }
11   state = {
12     xiaoxi: "两岸进入准战争状态?国台办回应",
13   }
14   clickHandler = () => {
15     // 获取子组件的state中msg(子 - 父)
16     console.log(this.child.current.state.msg);
17     // 调用子组件的changeMsg方法设置新的msg(父 - 子)
18     this.child.current.changeMsg(this.state.xiaoxi)
19   }
20   render() {
21     return (
22       <div>
23         <button onClick={this.clickHandler}>
24           控制子组件
25         </button>
26         <hr />
27         <Cmp ref={this.child}></Cmp>
28       </div>
29     );
30   }
31 }
32 export default App;
 1 // 子组件
 2 import React, { Component } from "react";
 3
 4 class Cmp extends Component {
 5   state = {
 6     msg: "hello world",
 7   };
 8   constructor(props) {
 9     super(props);
10   }
11   render() {
12     return <div>{this.state.msg}</div>;
13   }
14   changeMsg = (msg) => {
15     // msg来自于父组件
16     console.log(msg);
17     this.setState(() => {
18       return {
19         msg: msg,
20       };
21     });
22   }
23 }
24 export default Cmp;
使用render传值
1、render名称不固定,习惯写法
2、灵活性好,定义组件时不知道父子关系,使用时由程序员确定
3、类似Vue插槽
 1 import React,{Component} from 'react'
 2
 3 export default class Parent extends Component{
 4   render(){
 5     return(
 6         <div className="parent">
 7         <h3>我是Parent组件</h3>
 8         {/*B组件是A组件的子组件*/}
 9         <A render={name => <B name={name}/>}/>
10       </div>
11     )
12   }
13 }
14 class A extends Component{
15   state = {name: 'tom'}
16     render(){
17     const {name} = this.state
18     return(
19       <div className="a">
20           <h3>我是A组件</h3>
21         {this.props.render(name)}
22       </div>
23     )
24   }
25 }
26 class B extends Component{
27     render(){
28     console.log('B---render')
29     return(
30       <div className="b">
31           <h3>我是B组件,{this.props.name}</h3>
32       </div>
33     )
34   }
35 }
二、子传父
 1 // 父组件
 2 import React, { Component } from "react";
 3 import Cmp8 from "./Components/Cmp8";
 4
 5 class App16 extends Component {
 6   constructor(props) {
 7     super(props);
 8   }
 9   state = {
10     xiaoxi: "两岸进入准战争状态?国台办回应",
11   }
12   // 获取当前组件的`xiaoxi`
13   getXiaoxi = () => {
14     return this.state.xiaoxi;
15   }
16   // 设置当前组件的`xiaoxi`
17   setXiaoxi = (msg) => {
18     this.setState(() => {
19       return {
20         xiaoxi: msg,
21       };
22     });
23   }
24   render() {
25     return (
26       <div>
27         <Cmp8 chengxu={this.getXiaoxi} chengxu2={this.setXiaoxi}></Cmp8>
28       </div>
29     );
30   }
31 }
32 export default App16;
 1 // 子组件
 2 import React, { Component } from "react";
 3
 4 class Cmp8 extends Component {
 5   render() {
 6     return <div></div>;
 7   }
 8   componentDidMount(){
 9     // 获取父state中的数据(父 - 子)
10     console.log(this.props.chengxu());
11     // 在子中给父state改数据(子 - 父)
12     this.props.chengxu2("吴京 好丈夫要做老婆的跟屁虫");
13   }
14 }
15 export default Cmp8;
注意:此处的组件通信(父子,子父)并不是单向的,更像是组件之间的互相交流,并不像vue中父说子听或者子说父听
三、跨组件通信

使用步骤
1、创建Context对象,当React渲染一个订阅了这个Context对象的组件,这个组件会从组件树中离自身最近的那个匹配的Provider中读取到当前的context值
1 // 定义全局context
2 // 由于这个操作后期可能被复用,建议独立文件去创建。此处以`src/Context/index.js`为例
3 import { createContext } from "react"
4
5 export default createContext()
2、发布消息
 1 // 在App.jsx组件中发布消息,这样所有的组件都可以消费它的消息
 2 import React, { Component } from "react";
 3 import Cmp1 from "./Components/Cmp1";
 4 import Cmp2 from "./Components/Cmp2";
 5
 6 // 在消费者引入之后再引入Provider
 7 import context from "./Context/index";
 8 let { Provider } = context;
 9
10 class App extends Component {
11   state = {
12     count: 12345,
13   };
14   render() {
15     return (
16       <div>
17         <Provider value={this.state.count}>
18           <Cmp1></Cmp1>
19           <Cmp2></Cmp2>
20         </Provider>
21       </div>
22     );
23   }
24 }
25 export default App;
3、组件消费(消费方式有两种)
 1 // 方式一:通过组件消费,函数组件、类组件都可以
 2 import React, { Component } from "react";
 3
 4 import context from "../Context/index";
 5 let { Consumer } = context;
 6
 7 class Cmp1 extends Component {
 8   render() {
 9     return (
10       <div>
11         <Consumer>
12           {(value) => {
13             return <div>获取到的值是:{value}</div>;
14           }}
15         </Consumer>
16       </div>
17     );
18   }
19 }
20
21 export default Cmp1;
 1 // 方式二:通过绑定静态属性来消费,只有类组件可用
 2 import React, { Component } from "react";
 3 import context from "../Context/index";
 4
 5 class Cmp2 extends Component {
 6   static contextType = context;
 7   render() {
 8     return <div>{this.context}</div>;
 9   }
10 }
11
12 export default Cmp2;
四、pubsubjs
pubsubjs是一个利用JavaScript进行发布/订阅的库
1 npm i S pubsub-js
注意:使用结束要在组件卸载时取消订阅
 1 import React,{ Component } from 'react'
 2 // 导入pubsub-js
 3 import PubSub from "pubsub-js"
 4
 5 // 发布
 6 class Data extends Component{
 7   pubmsg = ()=>{
 8     PubSub.publish("频道","频道发布的消息")
 9   }
10   render() {
11     return(
12       <button onClick={this.pubmsg}>发布消息</button>
13     )
14   }
15 }
16
17 // 订阅
18 class App extends Component {
19   // 组件渲染的时候进行订阅
20   componentDidMount() {
21     let token = PubSub.subscribe("频道", (msg,data)=> {
22       console.log(msg,data)
23     })
24   }
25   // 组件卸载前取消订阅
26   componentWillUnmount() {
27     PubSub.unsubscribe(token)
28   }
29
30   render() {
31     return (
32       <div className="App">
33         <Data />
34       </div>
35     );
36   }
37 }
九、React生命周期函数
- 函数组件无生命周期一说
- 生命周期函数指在某一时刻组件会自动调用并执行的函数

常见生命周期图

一、新旧生命周期函数
1、旧生命周期函数
- 初始化阶段:由ReactDOM.render()触发---初次渲染
- constructor()
- componentWillMount()
- render()
- componentDidMount()
- 更新阶段:由组件内部this.setState()或父组件重新render触发
- shouldComponentUpdate()
- componentWillUpdate()
- render()
- componentDidUpdate()
- 卸载:由ReactDOM.unmountComponentAtNode(组件)触发
- componentWillUnmount()
2、新生命周期函数
- 初始化阶段:由ReactDOM.render()触发---初次渲染
- constructor()
- getDerivedStateFromProps()
- render()
- componentDidMount()
- 更新阶段:由组件内部this.setState()或父组件重新render触发
- getDerivedStateFromProps()
- shouldComponentUpdate()
- render()
- getSnapshortBeforeUpdate()
- componentDidUpdate()
- 卸载:由ReactDOM.unmountComponentAtNode(组件)触发
- componentWillUnmount()
3、重要的钩子函数
- render():初始化渲染或更新时调用
- componentDidMount():开启监听、发送ajax请求
- componentWillUnmount():做一些收尾工作
4、
 1 // 类似于vue里的data
 2 data(): {
 3     return {
 4         a: 0
 5     }
 6 },
 7 props: ["num"],
 8 mounted() {
 9     this.a = this.num;
10 }
上述vue代码转化成当前的react代码即有如下的效果:
 1 state = {
 2   num: 0,
 3   uname: "zhangsan",
 4 };
 5
 6 render() {
 7   return <div>当前的num是{this.state.num}</div>;
 8 }
 9
10 // 从props中获取数据,绑定到当前的这个组件中的state
11 static getDerivedStateFromProps(props, state) {
12   if (props.amount === state.num) {
13     // 不需要更新当前state
14     return null;
15   } else {
16     return { num: props.amount };
17   }
18 }
如果本身当前组件中的状态数据有很多,但是生命周期函数最后返回的只是其中的部分数据,这个不会覆盖掉其他的数据。
例如上述代码,对象虽然只返回了num值,结果不会使uname丢失。
-
-
如果是由于父组件的
props更改,所带来的重新渲染,也会触发此方法 -
调用
setState()不会触发getDerivedStateFromProps() -
之前是使用
constructor+componentWillRecieveProps完成相同的功能 -
-
-
-
默认每个状态的更改都会重新渲染,大多数情况下应该保持这个默认行为
-
在渲染新的
props或state前,shouldComponentUpdate会被调用 -
这个方法不会在初始化时被调用,也不会在
forceUpdate()时被调用 -
返回
false不会阻止子组件在state
 1 shouldComponentUpdate(nextProps, nextState) {
 2     // 判断是否需要被渲染,如果需要则返回true,否则返回false
 3     // nextProps.b最新的b的值,this.props.b是原先的b的值
 4     // 比较的时候需要使用全等运算符
 5     if (nextProps.b === this.props.b) {
 6         return false;
 7     } else {
 8         return true;
 9     }
10 }
 1 // 上述代码虽然可以解决组件不用被无缘无故的渲染浪费资源,但是如果涉及到的条件值较多的话则编写起来是一件非常痛苦的事情
 2 // 因此React给我们提供简化的写法,使用简化写法后,这个生命周期函数就忘了它吧
 3 // 简化方法:只需要将类组件的继承关系改成继承`PureComponent`即可,这样一来,框架会自动判断值是否有变化进一步决定组件是否需要被渲染
 4 import React, { PureComponent } from "react";
 5
 6 class Cmp6 extends PureComponent {
 7   render() {
 8     console.log("Cmp6被渲染了");
 9     return <div>父亲传递过来的值b为:{this.props.b}</div>;
10   }
11 }
12 export default Cmp6;
如果shouldComponentUpdate()返回false,componentWillUpdate,render和componentDidUpdate不会被调用
3、render
5、
- 类似于vue的updated生命周期,在更新发生后立即调用
- 有三个参数,上一次的props,上一次的state,和快照
 1 import React from 'react'
 2 import './newslist.css'
 3
 4 class NewsList extends React.Component{
 5   state = {newsArr: 0}
 6     componentDidMount(){
 7     setInterval(() => {
 8       const {newsArr} = this.state
 9       const news = '新闻' + {newsArr.length + 1}
10       this.setState(() => {
11         return {newsArr: [news, ...newsArr]}
12       })
13     })
14   }
15     getSnapshotBeforUpdate(){
16     return this.refs.list.scrollHeight
17   }
18     componentDidUpdate(prevProps, prevState, height){
19     // this.refs.list.scrollHeight和height的差值是一定的(比如11条的高度和10条的高度)
20     this.refs.list.scrollTop += this.refs.list.scrollHeight - height
21   }
22     render(){
23     return(
24       <div className="list" ref="list">
25           {
26           this.state.newsArr.map((n, index) => {
27             return <div className="news" key={index}>{n}</div>
28           })
29         }
30       </div>
31     )
32   }
33 }
34 export defalult NewsList;
 1 /*newslist.css*/
 2 .list{
 3   width: 200px;
 4   height: 150px;
 5   background: skyblue;
 6   overflow: auto;
 7 }
 8 .news{
 9   height: 30px;
10 }
四、卸载组件
由ReactDOM.unmountComponentAtNode(组件)触发,对应ReactDOM.render
1、componentWillUnmount()
- 类似于vue的beforeDestory,在组件被卸载并销毁之前立即被调用
五、其他
捕获生命周期里的错误(主要是render里)
子组件有错误,在父组件里处理,使错误不影响外层功能
父组件
 1 import React,{Component} from 'react'
 2 import Child from './Child'
 3
 4 export default class Parent extends Component{
 5   state = {
 6     hasError: '' // 用于标识子组件是否产生错误
 7   }
 8     static getDerivedStateFromError(error){
 9     console.log('错误信息',error)
10     return {hasError: error}
11   }
12     componentDidCatch(){
13     console.log('此处统计错误次数,发送给后台')
14   }
15     render(){
16     return(
17       <div>
18         <h2>我是Parent组件</h2>
19         {this.state.hasError ? <h2>当前网络不稳定</h2> : <Child/>}
20       </div>
21     )
22   }
23 }
子组件
 1 import React,{Component} from 'react'
 2
 3 export default class Parent extends Component{
 4   state = {
 5     users: 'abc'
 6   }
 7     render(){
 8     return(
 9       <div>
10         <h2>我是Child组件</h2>
11         {
12           // users是数组才能map
13           this.state.users.map((userObj) => {
14             return <h4 key={userObj.id}>:{userObj.name}</h4>
15           })
16         }
17       </div>
18     )
19   }
20 }
2、static getDerivedStateFromError()
六、
 1 import React from 'react'
 2 class Demo extends React.Component{
 3   state = {
 4     persons: [
 5       {id: 1, name: '张三', age: 18}
 6     ]
 7   }
 8   add = () => {
 9     const {persons} = this.state
10     const newPerson = {id: persons.length + 1, name: '王五', age: 20}
11     this.setState(state => {
12       return {
13         // newPerson加在数组前面
14         persons: [newPerson, ...persons]
15       }
16     })
17   }
18   render(){
19     return(
20       <div>
21         <ul>
22             {
23             this.state.persons.map((item, index) => {
24               return(
25                   <li key={index}>
26                     {item.name}---{item.age}
27                 </li>
28               )
29             })
30           }
31         </ul>
32       </div>
33     )
34   }
35 }
更新前后对比
 1 //初始数据
 2 {id: 1, name: '张三', age: 18}
 3 {id: 2, name: '李四', age: 19}
 4 //初始虚拟DOM
 5 <li key=0>张三---18</li>
 6 <li key=1>李四---19</li>
 7
 8 //更新后数据
 9 {id: 3, name: '王五', age: 20}
10 {id: 1, name: '张三', age: 18}
11 {id: 2, name: '李四', age: 19}
12 //更新后的虚拟DOM,key更改了,不能用以前的虚拟DOM,效率降低
13 <li key=0>王五---20</li>
14 <li key=1>张三---18</li>
15 <li key=2>李四---19</li>
2、key的作用
十、React表单处理
一、说明
下面代码运行后会报错,因为在React中并不存在类似于Vue的双向数据绑定操作
 1 import React, { Component } from "react";
 2
 3 class App extends Component {
 4   state = {
 5     msg: "hello world",
 6   };
 7   render() {
 8     return (
 9       <div>
10         <input type="text" value={this.state.msg} />
11       </div>
12     );
13   }
14 }
15
16 export default App;
需要注意以下几点
1、
2、
绑定步骤
1、添加一个state状态,作为表单元素的value值
2、给表单元素绑定change事件,将表单元素的值设置为state的值
 1 // 案例一:
 2 import React from 'react'
 3 class Login extends React.Component{
 4
 5   state = {
 6     username: '',
 7     password: ''
 8   }
 9
10     // 保存用户名到状态中
11     saveUsername = (event) => {
12     this.setState(state => {
13       return {
14         username: event.target.value
15       }
16     })
17   }
18   // 保存用户密码到状态中
19     savePassword = (event) => {
20     this.setState(state => {
21       return {
22         password: event.target.value
23       }
24     })
25   }
26   // 表单提交的回调
27   handleSubmit = (event) => {
28     event.preventDefault()
29     const {username, password} = this.state
30     //console.log(username, password)
31   }
32
33   render(){
34     return(
35       <form
36         action="https://www.baidu.com"
37         onSubmit={handleSubmit}>
38           用户名:<input
39               onChange={saveUsername}
40               type="text"
41               name="usename"/>
42         密码:<input
43              onChange={savePassword}
44              type="text"
45              name="password"/>
46         <button>登录</button>
47       </form>
48     )
49   }
50 }
51 export default Login;
 1 // 案例二:受控组件,用户信息修改
 2 import React, { Component } from "react";
 3
 4 class App extends Component {
 5   state = {
 6     userinfo: {
 7       username: "zhangsan",
 8       mobile: "13800138000",
 9       email: "zhangsan@hahaha.com",
10       gender: "女",
11       edm: true,
12     },
13   };
14   render() {
15     // 获取初始的数据
16     let { username, mobile, email, gender, edm } = this.state.userinfo;
17     return (
18       <div>
19         <div>
20           <input
21             type="text"
22             value={username}
23             name="username"
24             onChange={this.changeHandler}/>
25         </div>
26         <div>
27           <input
28             type="text"
29             value={mobile}
30             name="mobile"
31             onChange={this.changeHandler}/>
32         </div>
33         <div>
34           <input
35             type="text"
36             value={email}
37             name="email"
38             onChange={this.changeHandler}/>
39         </div>
40         <div>
41           <input
42             type="radio"
43             value="男"
44             name="gender"
45             checked={gender === "男" ? true : false}
46             onChange={this.changeHandler}/>
47           男
48           <input
49             type="radio"
50             value="女"
51             name="gender"
52             checked={gender === "女" ? true : false}
53             onChange={this.changeHandler}/>
54           女
55         </div>
56         <div>
57           <input
58             type="checkbox"
59             name="edm"
60             checked={edm ? true : false}
61             onChange={this.changeHandler}/>
62           接受电子邮件营销
63         </div>
64         <div>
65           <button onClick={this.submitForm}>提交</button>
66         </div>
67       </div>
68     );
69   }
70   changeHandler = (e) => {
71     // console.log(e.target.value);
72     let value = e.target.value;
73     let name = e.target.name;
74     let type = e.target.type;
75     this.setState((state) => {
76       if (type === "checkbox") {
77         state.userinfo[name] = !state.userinfo[name];
78         // if(state.userinfo[name]){
79         //     state.userinfo[name] = false;
80         // }else{
81         //     state.userinfo[name] = true;
82         // }
83       } else {
84         state.userinfo[name] = value;
85       }
86       return state;
87     });
88   }
89   submitForm(){
90     // 表单提交时收集表单数据
91     console.log(this.state.userinfo);
92   }
93 }
94 export default App;
- 如果需要将原本应该分别处理的事件合在一起去写的话,一定需要多传递一个参数用于记录当前修改的是state中的哪一个值,此时可以选择以下方案中的任意一种:
 1 // 案例一:回调形式的ref
 2 import React from 'react'
 3 class Login extends React.Component{
 4
 5   handleSubmit = (event) => {
 6     event.preventDefault()
 7     const {username, password} = this
 8     console.log(username, password)
 9   }
10
11   render(){
12     return(
13       <form
14         action="https://www.baidu.com"
15         onSubmit={handleSubmit}>
16           用户名:<input
17               ref={c => this.username = c}
18               type="text"
19               name="usename"/>
20         密码:<input
21              ref={c => this.password = c}
22              type="text"
23              name="password"/>
24         <button>登录</button>
25       </form>
26     )
27   }
28 }
29 export default Login
- 使用步骤
- 调用React.createRef()方法创建ref对象
- 将创建好的ref对象添加到文本框中
- 通过ref对象获取到文本框的值
一般表单项少的时候可以考虑使用非受控组件。
 1 // 案例二:createRef()形式
 2 import React, { Component, createRef } from "react";
 3
 4 class App extends Component {
 5   constructor(props) {
 6     super(props)
 7     this.username = createRef()
 8   }
 9   render() {
10     return (
11       <div>
12         <div>
13           <input type="text" defaultValue="" ref={this.username} />
14         </div>
15         <div>
16           <button onClick={this.submitForm.bind(this)}>提交</button>
17         </div>
18       </div>
19     );
20   }
21   submitForm() {
22     console.log(this.username.current.value);
23   }
24 }
25
26 export default App;
十一、React脚手架
一、使用步骤
安装脚手架
1 npm i -g create-react-app
创建项目
1 create-react-app 项目名称
1 #也可以不用安装create-react-app创建项目
2 npx create-react-app my-app
清理创建好的项目中不需要的文件及文件夹
 1 <!DOCTYPE html>
 2 <html lang="en">
 3   <head>
 4     <meta charset="utf-8" />
 5     <!-- %PUBLIC_URL%代表public文件夹 -->
 6     <link rel="icon" href="%PUBLIC_URL%/favicon.ico" />
 7     <!-- 开启理想视口,用于移动端适配 -->
 8     <meta name="viewport" content="width=device-width,initial-scale=1,minimum-scale=1,maximum-scale=1,user-scalable=no" />
 9     <!-- 用于配置浏览器页签+地址栏颜色(仅支持安卓手机浏览器) -->
10     <!-- <meta name="theme-color" content="#000000" /> -->
11     <!-- 描述网站信息 -->
12     <meta
13       name="description"
14       content="Web site created using create-react-app"
15     />
16     <!-- 用于指定网页添加到手机主屏后的图标 -->
17     <!-- <link rel="apple-touch-icon" href="%PUBLIC_URL%/logo192.png" /> -->
18     <!-- 应用夹壳配置文件manifest.json -->
19     <!-- <link rel="manifest" href="%PUBLIC_URL%/manifest.json" /> -->
20     <title>React App</title>
21   </head>
22   <body>
23     <div id="root"></div>
24   </body>
25 </html>
在src目录下创建根组件
 1 import React, { Component } from 'react'
 2
 3 export default class App extends Component {
 4   render() {
 5     return (
 6       <div>
 7         react
 8       </div>
 9     )
10   }
11 }
在src目录下创建项目入口文件
 1 import React from 'react';
 2 import ReactDOM from 'react-dom';
 3 // import './index.css';
 4 import App from './App';
 5 // reportWebVitals用于记录页面性能
 6 // import reportWebVitals from './reportWebVitals';
 7
 8 ReactDOM.render(
 9   // React.StrictMode检查代码
10   // <React.StrictMode>
11     <App />,
12   // </React.StrictMode>,
13   document.getElementById('root')
14 );
15
16 // reportWebVitals();
二、目录划分
src/components/Hello/index.jsx
1 import React,{Component} from 'react'
2 import hello from './index.module.css'
3
4 export defaule class Hello extends Component{
5   render(){
6     return <h2 className={hello.title}>Hello,React</h2>
7   }
8 }
src/components/Hello/index.module.css
1 /* 注意:css文件名要加module */
2 .title{
3   background: skyblue;
4 }
1 rcc
- 函数组件
1 rfc
折叠注释的部分:regin
1 function demo(){
2   //#regin
3   //注释内容
4   //...
5   //#endregin
6 }
五、配置文件
1、webpack配置
react的webpack配置默认隐藏,修改配置需要使用第三方包
1 npm i -D customize-cra react-app-rewired
1 "scripts": {
2   "start": "react-app-rewired start",
3   "build": "react-app-rewired build",
4   "test": "react-app-rewired test",
5   "eject": "react-scripts eject"
6 }
 1 const {
 2     override,
 3     addDecoratorsLegacy,
 4     disableEsLint,
 5     addBundleVisualizer,
 6     addWebpackAlias,
 7     adjustWorkbox,
 8       fixBabelImports
 9 } = require("customize-cra");
10 const path = require("path");
11
12 module.exports = override(
13     // 在webpack中禁用eslint
14     disableEsLint(),
15
16     // 添加webpack路径别名
17     addWebpackAlias({
18         ["@"]: path.resolve("./src"),
19     })
20
21     // 按需加载样式&组件代码,需要先安装babel-plugin-import(npm i -S babel-plugin-import)
22     fixBabelImports("import", {
23         libraryName: "antd-mobile",
24         style: "css",
25     })
26 );
2、配置代理
接口设置反向代理
1 npm i -D http-proxy-middleware
 1 const proxy = require('http-proxy-middleware')
 2
 3 module.exports = function(app){
 4   app.use(
 5       proxy('/api1', {//遇见/api1前缀的请求,就会触发该代理配置
 6       //请求转发给谁
 7       target: 'http://localhost:5000',
 8       //控制服务器收到的请求头中Host的值
 9       changeOrigin: true,
10       //去除请求前缀,重写请求路径
11       parthRewrite:{'^/api1':''}
12     }),
13     proxy('/api2', {
14       target: 'http://localhost:5001',
15       changeOrigin: true,
16       parthRewrite:{'^/api2':''}
17     })
18   )
19 }
使用时在端口后面加上对应代理前缀设置:
1 npm i uuid
nanoid:库比较小
1 npm i nanoid
使用
1 import { nanoid } from 'nanoid'
2 // nanoid是个函数
3 console.log(nanoid())
七、打包运行
模拟服务器运行,安装serve
1 npm i serve -g
运行(以build文件为根路径)
1 serve build
十二、网络请求
一、axios基本属性和设置
安装
1 npm i -S axios
axios支持的请求方式
- get
- post
- put:修改数据
- delete:删除数据
axios响应结果的属性
- config:配置信息
- data:实际响应的数据
- headers:响应头信息
- status:响应状态码
- statusText:响应状态信息
axios请求配置
1 // 设置根路径地址
2 axios.defaults.baseURL = 'https://api.example.com';
1 // 设置超时时间
2 axios.defaults.timeout = 3000;
1 // 设置请求头
2 axios.defaults.headers.post['Content-Type'] = 'application/x-www-form-urlencoded;charset=UTF-8';
二、axios封装
 1 import axios form 'axios'
 2
 3 export function request(config) {
 4   // 1、创建axios实例
 5   const instance1 = axios.create({
 6     baseUrl: 'http://www.baidu.com',
 7     timeout: 5000
 8     // headers: {'X-Custom-Header': 'foobar'}
 9   })
10
11   // 2.1、axios拦截器——请求拦截
12   instance1.interceptors.request.use(config => {
13     // 1.比如config中一些信息不符合服务器要求,需要修改
14
15     // 2.比如每次发送网络请求时,希望在界面添加一个loading加载的图标
16
17     // 3.某些网络请求(比如登录(需要携带token),携带一定信息)
18
19     return config
20   }, err => {
21     console.log(err)
22   })
23
24   // 2.2、axios拦截器——响应拦截
25   instance1.interceptors.response.use(res => {
26     // 处理响应数据
27     return res.data
28   }, err => {
29     console.log(err)
30   })
31
32   // 3、发送真正的网络请求
33   return instance1(config)
34 }
请求封装:
 1 import { request } from './request'
 2
 3 export function getHomeMultidata () {
 4   return request({
 5     url: '/home/mulitdata'
 6   })
 7 }
 8
 9 export function getHomeGoods (type, page) {
10   return request({
11     url: '/home/mulitdata',
12     params: {
13       type,
14       page
15     }
16   })
17 }
组件内调用
 1 getHomeMultidata () {
 2     getHomeMultidata().then(res => {
 3         this.banners = res.data.banner.list
 4     })
 5 },
 6 getHomeGoods (type) {
 7     const page = this.goods[type].page + 1
 8     getHomeGoods(type, page).then(res => {
 9         this.goods[type].list.push(...res.data.list)
10         this.goods[type].page += 1
11     })
12 }
三、mock数据
 1 {
 2     "msg": "success",
 3     "code": 0,
 4     "data": [
 5     {
 6         "id": 1,
 7         "img": "https://storage.lynnn.cn/assets/markdown/91147/pictures/2020/11/bce52a5f143cd3e25c6c39c7a0fd7f276ce43bad.png?sign=f4ec5771f7eabd11226fe5f4b7f0f6e8&t=5fa403f2",
 8         "title": "第1张图片"
 9     },
10     {
11         "id": 2,
12         "img": "https://storage.lynnn.cn/assets/markdown/91147/pictures/2020/11/6018ac895dd29437b1d023c121c7539ecf2e9221.jpeg?sign=47da092f8a6a1650df3da3dd3dd40cb3&t=5fa4041d",
13         "title": "第2张图片"
14     },
15     {
16         "id": 3,
17         "img": "https://storage.lynnn.cn/assets/markdown/91147/pictures/2020/11/f81d133833b89a18cb1842f449810d16ec5d3c78.jpeg?sign=22eadb72caac161df642aa18b84127a8&t=5fa40431",
18         "title": "第3张图片"
19     }]
20 }
1 npm i -g json-server
3、配置mock:有多个json文件
-
创建
public/mock/mock.js文件(文件名并非固定)
1 // json-server配置文件(commonJs模块化)
2 const swiper = require("./cb-swiper.json");
3
4 // 导出
5 module.exports = () => ({
6   swiper,
7 });
1 {
2   "/api/swiper": "/swiper"
3 }
- 在package.json文件中的scripts中配置启动命令

- 启动web服务
1 npm run mock

十三、高阶组件
Higher - Order Components:其实就是一个函数,传给它一个组件,它返回一个新的组件
形如:
1 const NewComponent = HOC(YourComponent)
- 高阶组件是强化组件的一种方式,一般是具备复用的,如果只是某个组件需要强化,则没有必要写成高阶组件的形式
- HOC实现步骤
- 创建一个函数
- 指定函数参数,参数应该以大写字母开头
- 在函数内部创建一个类组件,提供复用的状态(如有)及逻辑代码,并返回
- 在该组件中,渲染参数组件,同时将状态通过props传递给参数组件(可选,如有)
- 调用该高阶组件,传入要增强的组件,通过返回值拿到增强后的组件,并将其渲染到页面
例如:自动注入一个版权信息
1 // src/Hoc/Hoc_copyright.jsx 2 // Fragment是一个伪标签,渲染的时候是不会显示在页面中的,因此也不会影响样式,可以写key属性 3 import React, { Component, Fragment } from "react"; 4 5 const withCopyright = (Cmp) => { 6 return class Hoc extends Component { 7 render() { 8 return ( 9 <Fragment> 10 <Cmp></Cmp> 11 <div>© 2020 开始发行</div> 12 </Fragment> 13 ); 14 } 15 };x 16 }; 17 export default withCopyright;
使用方式
 1 import React, { Component } from "react";
 2 // 引入HOC
 3 import Hoc from './Hoc/Hoc_copyright'
 4
 5 class App extends Component {
 6   render() {
 7     return (
 8       <div>
 9         <h1>网站首页</h1>
10       </div>
11     );
12   }
13 }
14 // 使用HOC
15 export default Hoc(App);
十四、Redux
一、Redux简介
1 npm i -S redux

1、store通过reducer创建了初始状态
2、组件通过store.getState()获取到store中保存的state挂载在了自己的状态上
3、用户产生了操作,调用了actions 的方法
4、actions的方法被调用,创建了带有标示性信息的action(描述对象)
5、actions将action通过调用store.dispatch方法发送到了reducer中
6、reducer接收到action并(根据标识信息判断之后)返回了新的state
7、store的state被reducer更改为新state的时候,store.subscribe方法里的回调函数会执行,此时就可以通知组件去重新获取state
二、三个核心概念
1、
1 {type: 'add', data: {name: '张三'}}
2、reducer
- 用于初始化状态,加工状态
- 纯函数,根据旧的state和action加工成新的state,两个参数
- 参数一:preState,之前的状态
- 参数二:action,动作对象
3、store
- 将state、action、reducer联系在一起的对象
- 如何得到此对象
import {createStore} from 'redux'import reducer from './reducer'const store = createStore(reducer)
- 此处的功能
getState():得到statedispatch(action)
三、三大原则
1、单一数据源
 1 // 常规导入
 2 import { createStore } from "redux";
 3
 4 // 创建默认的数据源(state名字随意,前后保持一致)
 5 const defaultState = {
 6   // 初始数据
 7   count: 0
 8 };
 9
10 // 负责处理数据(深拷贝,reducer名字随意,前后保持一致)
11 function reducers(state = defaultState, action) {
12   // 数据处理逻辑
13   if(action.type === 'incr'){
14     return {
15       count: state.count + action.payload
16     }
17   }
18   return state
19 }
20
21 // 创建仓库
22 const store = createStore(reducers);
23
24 // 导出
25 export default store;
组件中获取/设置数据
 1 import React, { Component } from "react";
 2 // 导入仓库
 3 import store from './Store/index'
 4
 5 class App extends Component {
 6   constructor(props){
 7     super(props)
 8     // 获取初始数据
 9     this.state = store.getState()
10     // 订阅数据(获取更新)
11     store.subscribe(() => {
12       this.setState(() => store.getState())
13       // this.setState((state) => (state = store.getState()))
14     });
15   }
16   render() {
17     return (
18       <div>
19         { /* 渲染的内容 */ }
20       </div>
21     );
22   }
23   incr() {
24     // 任务清单(对象或函数形式)
25     // const actionCreator = {
26     //   type: 'incr',
27     //   payload: 2
28     // }
29     const actionCreator = () => {
30       return {
31         type: 'incr',
32         payload: 2
33       }
34     }
35     // 派发任务清单
36     store.dispatch(actionCreator());
37   }
38 }
39 export default App;
1 // 创建仓库
2 const store = createStore(
3   reducer,
4   window.__REDUX_DEVTOOLS_EXTENSION__ && window.__REDUX_DEVTOOLS_EXTENSION__()
5 );
6
7 // 如果需要使用安装的浏览器插件则需要添加
8 // window.__REDUX_DEVTOOLS_EXTENSION__ && window.__REDUX_DEVTOOLS_EXTENSION__()
打开浏览器调试工具就可以看到类似如下界面:

五、代码模块化
1 import { createStore } from 'redux'
2
3 import countReducer from './reducers/count_reducer'
4
5 export default createStore(countReducer)
1 /**
2  * 定义action对象中的type类型常量值
3  */
4 export const INCREMENT = 'increment'
5 export const DECREMENT = 'decrement'
初始数据与reducer拆分到一个文件:
 1 /**
 2  * reducer文件
 3  */
 4 import { INCREMENT, DECREMENT } from '../constant'
 5
 6 // 初始化状态
 7 const initState = 0
 8
 9 // 加工状态
10 export default function countReducer(preState = initState, action) {
11   //获取action里的type,data
12   const { type, data } = action
13   // 根据type决定如何加工数据
14   switch (type) {
15     case INCREMENT:
16       return preState + data
17     case DECREMENT:
18       return preState - data
19     default:
20       return preState
21   }
22 }
 1 /**
 2  * action文件:为action生成action对象,定义修改规则
 3  */
 4 import { INCREMENT, DECREMENT } from '../constant'
 5
 6 export const createIncrementAction = (data) => {
 7   return { type: INCREMENT, data }
 8 }
 9
10 export const createDecrementAction = (data) => {
11   return { type: DECREMENT, data }
12 }
Count组件内使用
1 import React, { Component } from 'react'
2 import store from '@/redux/store'
3
4 // 引入actionCreator,用于创建action对象
5 import {
6 createIncrementAction,
7 createDecrementAction,
8 createIncrementAsyncAction
9 } from '@/redux/actions/count_action'
10
11 export default class Count extends Component {
12 state = {
13 carName: '组件自己的state'
14 }
15 increment = () => {
16 const { value } = this.selectNumber
17 store.dispatch(createIncrementAction(value*1))
18 }
19 decrement = () => {
20 const { value } = this.selectNumber
21 store.dispatch(createDecrementAction(value*1))
22 }
23 incrementOdd = () => {
24 const { value } = this.selectNumber
25 const count = store.getState()
26 if (count % 2 !== 0) {
27 store.dispatch(createIncrementAction(value*1))
28 }
29 }
30 incrementAsync = () => {
31 const { value } = this.selectNumber
32 setTimeout(() => {
33 store.dispatch(createIncrementAction(value*1))
34 }, 1000);
35 }
36 render() {
37 return (
38 <div>
39 <h2>当前求和为:{ store.getState() }</h2>
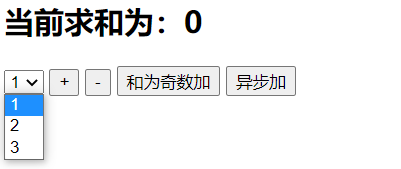
40 <select ref={c => this.selectNumber = c} name="" id="">
41 <option value="1">1</option>
42 <option value="2">2</option>
43 <option value="3">3</option>
44 </select>
45 <button onClick={this.increment}>+</button>
46 <button onClick={this.decrement}>-</button>
47 <button onClick={this.incrementOdd}>和为奇数加</button>
48 <button onClick={this.incrementAsync}>异步加</button>
49 </div>
50 )
51 }
52 }
引入也可写成如下方式

六、redux中间件
1、概述
通常情况下,action只是一个对象,不能包含异步操作

- 这导致了很多创建action的逻辑只能写在组件中,代码量较多也不便于复用
- 同时对该部分代码测试的时候也比较困难,组件的业务逻辑也不清晰
- 使用中间件了之后,可以通过actionCreator异步编写action
- 这样代码就会拆分到actionCreator中,可维护性大大提高,可以方便于测试、复用
- 同时actionCreator还集成了异步操作中不同的action派发机制,减少编码过程中的代码量

2、使用
安装
1 npm i -S redux-thunk
1 import { createStore, applyMiddleware } from 'redux'
2 import thunk from 'redux-thunk'
3
4 import countReducer from './reducers/count_reducer'
5
6 export default createStore(
7   countReducer,
8   applyMiddleware(thunk)
9 )
 1 /**
 2  * action文件:为action生成action对象,定义修改规则
 3  */
 4 import { INCREMENT, DECREMENT } from '../constant'
 5
 6 export const createIncrementAction = (data) => {
 7   return { type: INCREMENT, data }
 8 }
 9
10 export const createDecrementAction = (data) => {
11   return { type: DECREMENT, data }
12 }
13
14 // 异步action,就是指action的值为函数
15 // 异步action一般会调用同步action
16 export const createIncrementAsyncAction = (data, time) => {
17   return (dispatch) => {
18     setTimeout(() => {
19       dispatch(createIncrementAction(data))
20     }, time);
21   }
22 }
Count组件内使用
 1 import {
 2   createIncrementAction,
 3   createDecrementAction,
 4   createIncrementAsyncAction
 5 } from '@/redux/actions/count_action'
 6
 7 //...
 8
 9 incrementAsync = () => {
10   const { value } = this.selectNumber
11   store.dispatch(createIncrementAsyncAction(value*1, 1000))
12 }
需要注意:让redux调试工具正常使用,需要调整store代码
 1 /**
 2  * 1、compose用于redux调试工具
 3  */
 4 import { createStore, applyMiddleware, compose } from 'redux'
 5 import thunk from 'redux-thunk'
 6
 7 // 引入reducer
 8 import countReducer from './reducers/count_reducer'
 9
10 // 使redux调试工具生效
11 const composeEnhancers =
12  (typeof window !== "undefined" && window.__REDUX_DEVTOOLS_EXTENSION_COMPOSE__) || compose;
13
14 export default createStore(
15   countReducer,
16   composeEnhancers(applyMiddleware(thunk))
17 )
七、react-redux
使用react-redux之后不需要在每个组件中手动的订阅数据的更新了

容器组件连接UI组件和redux
1、安装
- React-Redux是Redux的官方针对React开发的扩展库,默认没有在React项目中安装,需要手动来安装
- react-redux是依赖于redux,所以必须先安装redux
1 npm i -S redux react-redux
2、使用步骤
定义Provider(项目入口文件),去掉App组件中store单独引入
 1 import React from "react";
 2 import ReactDOM from "react-dom";
 3 import App from "./App";
 4
 5 // 定义provider,引入store
 6 import { Provider } from "react-redux";
 7 import store from "./store/index";
 8
 9 ReactDOM.render(
10     <Provider store={store}>
11         <App></App>
12     </Provider>,
13     document.getElementById("root")
14 );
1 /**
2 * 容器组件+UI组件
3 */
4 import React, { Component } from 'react'
5 // 引入action
6 import {
7 createIncrementAction,
8 createDecrementAction,
9 createIncrementAsyncAction
10 } from '@/redux/actions/count_action'
11
12 // 引入connect,连接容器组件与UI组件
13 import { connect } from 'react-redux'
14
15 // 定义UI组件
16 class CountUI extends Component {
17 state = {
18 carName: '组件自己的state'
19 }
20 increment = () => {
21 const { value } = this.selectNumber
22 this.props.jia(value*1)
23 }
24 decrement = () => {
25 const { value } = this.selectNumber
26 this.props.jian(value*1)
27 }
28 incrementOdd = () => {
29 const { value } = this.selectNumber
30 if (this.props.count % 2 !== 0) {
31 this.props.jia(value*1)
32 }
33 }
34 incrementAsync = () => {
35 const { value } = this.selectNumber
36 this.props.jiaAsync(value*1, 1000)
37 }
38 render() {
39 return (
40 <div>
41 <h2>当前求和为:{ this.props.count }</h2>
42 <select ref={c => this.selectNumber = c} name="" id="">
43 <option value="1">1</option>
44 <option value="2">2</option>
45 <option value="3">3</option>
46 </select>
47 <button onClick={this.increment}>+</button>
48 <button onClick={this.decrement}>-</button>
49 <button onClick={this.incrementOdd}>和为奇数加</button>
50 <button onClick={this.incrementAsync}>异步加</button>
51 </div>
52 )
53 }
54 }
55
56 // 传递状态
57 const mapStateToProps = (state) => ({count: state})
58 // 传递操作状态的方法,一般写法
59 // const mapDispatchToProps = (dispatch) => ({
60 // jia: number => dispatch(createIncrementAction(number)),
61 // jian: number => dispatch(createDecrementAction(number)),
62 // jiaAsync: (number,time) => dispatch(createIncrementAsyncAction(number,time))
63 // })
64
65 // 传递操作状态的方法,简写
66 const mapDispatchToProps = {
67 jia: createIncrementAction,
68 jian: createDecrementAction,
69 jiaAsync:createIncrementAsyncAction
70 }
71 export default connect(
72 mapStateToProps,
73 mapDispatchToProps
74 )(CountUI)
3、合并reducer
 1 // 从`src/redux/constant.js`引入常量
 2 import { ADD_PERSON } from '../constant'
 3
 4 // 定义初始值
 5 const initState = [{ id: '01', name: '张三', age: 18 }]
 6
 7 // 定义状态处理函数
 8 export default function personReducer(preState = initState, action) {
 9   const { type, data } = action
10   switch (type) {
11     case ADD_PERSON:
12       return [data, ...preState]
13     default:
14       return preState
15   }
16 }
1 // 从`src/redux/constant.js`引入常量
2 import { ADD_PERSON } from '../constant'
3
4 // 导出任务清单
5 export const createAddPersonAction = (personObj) => ({
6   type: ADD_PERSON, data: personObj
7 })
 1 // combineReducers用于合并多个reducer
 2 import { createStore, applyMiddleware, combineReducers } from 'redux'
 3 import thunk from 'redux-thunk'
 4
 5 import countReducer from './reducers/count_reducer'
 6 import personReducer from './reducers/person_reducer'
 7
 8 export default createStore(
 9   combineReducers({
10     he: countReducer,
11     rens: personReducer
12   }),
13   applyMiddleware(thunk)
14 )
 1 import React, { Component } from 'react'
 2 import { nanoid } from 'nanoid'
 3 import { connect } from 'react-redux'
 4 import {
 5   createAddPersonAction
 6 } from '@/redux/actions/person_action'
 7
 8 class Person extends Component {
 9
10   addPerson = () => {
11     const name = this.nameNode.value
12     const age = this.ageNode.value
13     const personObj = { id: nanoid(), name, age }
14     this.props.jiaYiRen(personObj)
15   }
16
17   render() {
18     return (
19       <div>
20         <h2>上方组件和为{ this.props.he }</h2>
21         <input ref={c => this.nameNode = c} type="text" placeholder="输入名字"/>
22         <input ref={c => this.ageNode = c} type="text" placeholder="输入年龄" />
23         <button onClick={this.addPerson}>填加</button>
24         <ul>
25           {
26             this.props.yiduiren.map((p) => {
27               return <li key={ p.id }>{ p.name }---{ p.age }</li>
28             })
29           }
30         </ul>
31       </div>
32     )
33   }
34 }
35
36 // mapStateToProps和mapDispatchToProps可以写成简写形式
37 export default connect(
38   state => ({
39     yiduiren: state.rens,
40     he: state.he
41   }),
42   {
43     jiaYiRen: createAddPersonAction
44   }
45 )(Person)
 1 /**
 2  * 1、combineReducers用于合并多个reducer
 3  * 2、compose用于redux调试工具
 4  */
 5 import {
 6   createStore, applyMiddleware, combineReducers, compose
 7 } from 'redux'
 8 import thunk from 'redux-thunk'
 9
10 // 引入reducer
11 import countReducer from './reducers/count_reducer'
12 import personReducer from './reducers/person_reducer'
13
14 // 使redux调试工具生效
15 const composeEnhancers =
16  (typeof window !== "undefined" && window.__REDUX_DEVTOOLS_EXTENSION_COMPOSE__) || compose;
17
18 export default createStore(
19   combineReducers({
20     he: countReducer,
21     rens: personReducer
22   }),
23   composeEnhancers(applyMiddleware(thunk))
24 )
八、redux代码封装
1、项目效果和文件路径
项目效果

文件路径

2、项目入口文件和根组件
 1 import React from 'react';
 2 import ReactDOM from 'react-dom';
 3 import App from './App';
 4 import store from './redux/store'
 5 import { Provider } from 'react-redux'
 6
 7 ReactDOM.render(
 8   <Provider store={store}>
 9     <App />
10   </Provider>,
11   document.getElementById('root')
12 );
App.js
 1 import React, { Component } from 'react'
 2 import Count from './containers/Count'
 3 import Person from './containers/Person'
 4
 5 export default class App extends Component {
 6   render() {
 7     return (
 8       <div>
 9         <Count />
10         <hr />
11         <Person/>
12       </div>
13     )
14   }
15 }
3、redux根文件
 1 /**
 2  * 1、combineReducers用于合并多个reducer
 3  * 2、compose用于redux调试工具
 4  */
 5 import {
 6   createStore, applyMiddleware, combineReducers, compose
 7 } from 'redux'
 8 import thunk from 'redux-thunk'
 9
10 // 引入reducer
11 import count from './reducers/count_reducer'
12 import persons from './reducers/person_reducer'
13
14 // 使redux调试工具生效
15 const composeEnhancers =
16  (typeof window !== "undefined" && window.__REDUX_DEVTOOLS_EXTENSION_COMPOSE__) || compose;
17
18 export default createStore(
19   combineReducers({
20     count,
21     persons
22   }),
23   composeEnhancers(applyMiddleware(thunk))
24 )
4、action对象的常量文件
1 /**
2  * 定义action对象中的type类型常量值
3  */
4 export const INCREMENT = 'increment'
5 export const DECREMENT = 'decrement'
6 export const ADD_PERSON = 'add_person'
5、reducer文件
 1 /**
 2  * count的reducer文件
 3  */
 4 import { INCREMENT, DECREMENT } from '../constant'
 5
 6 // 初始化状态
 7 const initState = 0
 8
 9 // 加工状态
10 export default function countReducer(preState = initState, action) {
11   //获取action里的type,data
12   const { type, data } = action
13   // 根据type决定如何加工数据
14   switch (type) {
15     case INCREMENT:
16       return preState + data
17     case DECREMENT:
18       return preState - data
19     default:
20       return preState
21   }
22 }
 1 import { ADD_PERSON } from '../constant'
 2
 3 const initState = [{ id: '01', name: '张三', age: 18 }]
 4
 5 export default function personReducer(preState = initState, action) {
 6   const { type, data } = action
 7   switch (type) {
 8     case ADD_PERSON:
 9       return [data, ...preState]
10     default:
11       return preState
12   }
13 }
6、action文件
 1 /**
 2  * action文件:为action生成action对象,定义修改规则
 3  */
 4 import { INCREMENT, DECREMENT } from '../constant'
 5
 6 export const increment = (data) => {
 7   return { type: INCREMENT, data }
 8 }
 9
10 export const decrement = (data) => {
11   return { type: DECREMENT, data }
12 }
13
14 // 异步action,就是指action的值为函数
15 // 异步action一般会调用同步action
16 export const incrementAsync = (data, time) => {
17   return (dispatch) => {
18     setTimeout(() => {
19       dispatch(increment(data))
20     }, time);
21   }
22 }
1 import { ADD_PERSON } from '../constant'
2
3 // 导出任务清单
4 export const addPerson = (personObj) => ({
5   type: ADD_PERSON, data: personObj
6 })
7、组件内使用
1 /**
2 * Count容器组件+UI组件
3 */
4 import React, { Component } from 'react'
5 // 引入action
6 import {
7 increment,
8 decrement,
9 incrementAsync
10 } from '@/redux/actions/count_action'
11
12 // 引入connect,连接容器组件与UI组件
13 import { connect } from 'react-redux'
14
15 // 定义UI组件
16 class CountUI extends Component {
17 state = {
18 carName: '组件自己的state'
19 }
20 increment = () => {
21 const { value } = this.selectNumber
22 this.props.increment(value*1)
23 }
24 decrement = () => {
25 const { value } = this.selectNumber
26 this.props.decrement(value*1)
27 }
28 incrementOdd = () => {
29 const { value } = this.selectNumber
30 if (this.props.count % 2 !== 0) {
31 this.props.increment(value*1)
32 }
33 }
34 incrementAsync = () => {
35 const { value } = this.selectNumber
36 this.props.incrementAsync(value*1, 1000)
37 }
38 render() {
39 return (
40 <div>
41 <h2>当前求和为:{this.props.count},下方总人数为{ this.props.personCount }</h2>
42 <select ref={c => this.selectNumber = c} name="" id="">
43 <option value="1">1</option>
44 <option value="2">2</option>
45 <option value="3">3</option>
46 </select>
47 <button onClick={this.increment}>+</button>
48 <button onClick={this.decrement}>-</button>
49 <button onClick={this.incrementOdd}>和为奇数加</button>
50 <button onClick={this.incrementAsync}>异步加</button>
51 </div>
52 )
53 }
54 }
55
56 export default connect(
57 // 传递状态
58 state => ({
59 count: state.count,
60 personCount: state.persons.length
61 }),
62 // 传递操作状态的方法
63 {
64 increment,
65 decrement,
66 incrementAsync
67 }
68 )(CountUI)
 1 import React, { Component } from 'react'
 2 import { nanoid } from 'nanoid'
 3 import { connect } from 'react-redux'
 4 import {
 5   addPerson
 6 } from '@/redux/actions/person_action'
 7
 8 class Person extends Component {
 9
10   addPerson = () => {
11     const name = this.nameNode.value
12     const age = this.ageNode.value*1
13     const personObj = { id: nanoid(), name, age }
14     this.props.addPerson(personObj)
15   }
16
17   render() {
18     return (
19       <div>
20         <h2>上方组件和为{ this.props.count }</h2>
21         <input ref={c => this.nameNode = c} type="text" placeholder="输入名字"/>
22         <input ref={c => this.ageNode = c} type="text" placeholder="输入年龄" />
23         <button onClick={this.addPerson}>填加</button>
24         <ul>
25           {
26             this.props.persons.map((p) => {
27               return <li key={ p.id }>{ p.name }---{ p.age }</li>
28             })
29           }
30         </ul>
31       </div>
32     )
33   }
34 }
35
36 export default connect(
37   state => ({
38     persons: state.persons,
39     count: state.count
40   }),
41   {
42     addPerson
43   }
44 )(Person)
十五、React路由
一、路由的使用
1 npm i -S react-router-dom
1、相关组件
-
-
-
- Route组件:指定路由展示组件相关信息(组件渲染)
- path属性:路由规则,这里需要跟Link组件里面to属性的值一致
- component属性:展示的组件
2、封装NavLink组件
1、NavLink标签是一个高亮显示的导航标签
2、NavLink标签体内容是一个特殊的标签属性,通过this.props.children属性可以获取标签体内容(即Home或About)
NavLink封装
 1 import React,{Component} from 'react'
 2 import {NavLink} from 'react-router-dom'
 3
 4 export default class MyNavLink extends Component{
 5   render(){
 6     return(
 7       <NavLink activeClassName="link-name" className="link-item" {...this.props}/>
 8     )
 9   }
10 }
使用
1 <MyNavLink to="/home">Home</MyNavLink>
2 <MyNavLink to="/about">About</MyNavLink>
3、Switch组件
1 <Switch>
2   {/*Switch只渲染第一个匹配的组件*/}
3   <Route path="/home" component={Home}></Route>
4   <Route path="/home" component={Test}></Route>
5   <Route path="/about" component={About}></Route>
6 </Switch>
二、路由导航方式
1、声明式导航
 1 import React from "react";
 2 import ReactDOM from "react-dom";
 3
 4 // 设置路由模式
 5 import {HashRouter as Router} from 'react-router-dom'
 6
 7 // 定义 provider
 8 import { Provider } from "react-redux";
 9 import store from "./Store/index";
10
11 import App from "./App";
12
13 ReactDOM.render(
14   <Provider store={store}>
15       // 使用Router包裹根组件
16     <Router>
17       <App></App>
18     </Router>
19   </Provider>,
20 document.getElementById("root")
21 );
 1 import React, { Component } from "react";
 2 import { HashRouter as Router, Route, Link } from "react-router-dom";
 3
 4 import Cmp10 from "./Components/Cmp10";
 5 import Cmp11 from "./Components/Cmp11";
 6
 7 class App extends Component {
 8   render() {
 9     return (
10       <Router>
11         <div>
12           <h1>导航区域</h1>
13           <div>
14             <ul>
15               <li>
16                 <Link to="/home">首页</Link>
17               </li>
18               <li>
19                 <Link to="/news">新闻</Link>
20               </li>
21             </ul>
22           </div>
23         </div>
24         <Route path="/home" component={Cmp10}></Route>
25         <Route path="/news" component={Cmp11}></Route>
26       </Router>
27     );
28   }
29 }
30 export default App;
需要注意:
1 <MyNavLink replace to="/home">Home</MyNavLink>
1 this.props.history.push({
2   pathname: "/home",
3   search: "from=404",    // 表示传递查询字符串
4   state: {                    // 隐式传参,地址栏不体现
5     username: "admin",
6   },
7 });
8
9 this.props.history.go(-1)
不要在根组件中使用编程式导航。
三、路由匹配
1、模糊匹配与严格匹配
模糊匹配(默认)
1 {/*MyNavLink中的/about/a/b匹配到Route中的/about"*/}
2 <MyNavLink to="/home">Home</MyNavLink>
3 <MyNavLink to="/about/a/b">About</MyNavLink>
4
5 <Switch>
6   <Route path="/home" component={Home}></Route>
7   <Route path="/home" component={Test}></Route>
8   <Route path="/about" component={About}></Route>
9 </Switch>
严格匹配:exact属性
1 <MyNavLink to="/home">Home</MyNavLink>
2 <MyNavLink to="/about/a/b">About</MyNavLink>
3
4 <Switch>
5   <Route exact path="/home" component={Home}></Route>
6   <Route exact path="/home" component={Test}></Route>
7   <Route exact path="/about" component={About}></Route>
8 </Switch>
2、重定向路由
React的重定向路由有以下两种写法:
方式一:推荐
1 import { Redirect } from "react-router-dom"
2
3 <Redirect from="/from" to="/to"></Redirect>
4 <Route path="/to" component={xxxx}></Route>
方式二 :不推荐
1 import { Route, Redirect } from "react-router-dom"
2
3 <Route path="/from">
4     <Cmp></Cmp>
5     <Redirect to="/to" />
6 </Route>
3、404路由
项目中少不了404页面的配置,在React里面配置404页面需要注意:
1 import NotFound from "./Components/404";
2
3 <Route>
4     <NotFound></NotFound>
5 </Route>
6 // 或
7  <Route component={NotFound}></Route>
- 并不会因为当前是404路由/重定向路由而改变状态码,因为当前写的是前端的内容,状态码是后端提供的,只有等后期上线以后才能有状态码。
1 <div>
2 <Link to="/home">家</Link>  
3 <Link to="/news">新闻</Link> 
4 <Link to="/about">关于</Link> 
5 <Redirect from="/" to="/home"></Redirect>
6 <Switch>
7 <Route path="/home" component={Cmp11}></Route>
8 <Route path="/news" component={Cmp12}></Route>
9 <Route path="/about" component={Cmp13}></Route>
10 <Route component={NotFound}></Route>
11 </Switch>
12 </div>
四、嵌套路由
在有一些功能中,往往请求地址的前缀是相同的,不同的只是后面一部份,此时就可以使用多级路由(路由嵌套)来实现此路由的定义实现。
例如,路由规则如下
1 admin/user
2 admin/goods
1 <Route path="/admin" component={Admin}></Route>
- 创建模块路由组件负责指定各个路由的去向
 1 render() {
 2   // 获取前缀,供后续地址做路由拼接
 3   let prefix = this.props.match.path;
 4   return (
 5     <div>
 6       <h1>欢迎使用后台管理程序</h1>
 7       <Route path={`${prefix}/user`} component={User}></Route>
 8       <Route path={`${prefix}/goods`} component={Goods}></Route>
 9     </div>
10   );
11 }
五、路由懒加载
优化性能,让路由按需加载
 1 import React, {Component, lazy, Suspense} from 'react'
 2 import {NavLink, Route} from 'react-router-dom'
 3
 4 // Loading用于懒加载组件未加载出来的展示
 5 import Loading from './Loading'
 6
 7 // import Home from './Home'
 8 // import News from './News'
 9
10 const Home = lazy(() => {import('./Home')})
11 const News = lazy(() => {import('./News')})
12
13 export default class Demo extends Component{
14   <div>
15     <h1>导航区域</h1>
16     <div>
17       <ul>
18         <li>
19           <Link to="/home">首页</Link>
20         </li>
21         <li>
22           <Link to="/news">新闻</Link>
23         </li>
24       </ul>
25     </div>
26     <Suspense fallback={<Loading/>}>
27       <Route path="/home" component={Home}></Route>
28       <Route path="/news" component={News}></Route>
29     </Suspense>
30   </div>
31 }
六、路由参数
路由参数:在Route定义渲染组件时给定动态绑定的参数。
React路由传参方式有三种:
1、动态路由参数(param)
1 <Link to={`/film/detail/${detailObj.id}`}></Link>
以/film/detail/:id接收
1 <Router path="/film/detail/:id" component={Detail}></Router>
3、
- 不适合写在声明式导航中,写在编程式导航中更加合适
1 <Link to={{pathname:`/film/detail`,state:{id:detailObj.id,title:detailObj.title}}}></Link>
- 埋点数据
 1 constructor(props){
 2   super(props)
 3   this.state = {
 4     // 接收动态路由参数
 5     news_id: this.props.match.params.id,
 6     // 接收查询字符串并处理
 7     query: querystring.parse(this.props.location.search.slice(1)),
 8     // 接收state
 9     state: this.props.location.state
10   };
11 }
七、路由三种渲染方式
1 <Route path="/home" component={Home} />
1 <Route path="/home" component={() => <Home />} />
2、render属性(函数)
1 <Route path="/home" render={props => <Home />} />
3、
1 <Route path="/about" children={props => {
2     if(props.match){
3         return <div>children渲染</div>
4     }
5 }} />
1 <Route path="/about" children={<About />} />
注意
- component可以使用组件类渲染或内联方式渲染,render只能使用函数,children使用函数或直接使用组件
- 当children的值是一个函数时,无论当前地址和path路径匹不匹配,都将会执行children对应的函数,当children的值为一个组件时,当前地址和path不匹配时,路由组件不渲染
- children函数方式渲染,会在形参中接受到一个对象,对象中match属性如果当前地址匹配成功返回对象,否则null
- children函数方式渲染,在自定义导航组件的上面会非常好用
八、withRouter高阶组件
作用:把不是通过路由切换过来的组件中,将react-router 的 history、location、match 三个对象传入props对象上
- 默认情况下,必须是经过路由匹配渲染的组件才存在this.props才拥有路由参数,才能使用编程式导航的写法,才能执行this.props.history.push('/uri')跳转到对应路由的页面
- 然而不是所有组件都直接与路由相连的,当这些组件需要路由参数时,使用withRouter就可以给此组件传入路由参数,此时就可以使用this.props
1 // 引入withRouter
2 import { withRouter} from 'react-router-dom'
3
4 // 执行一下withRouter
5 export default withRouter(Cmp)
该高阶组件是路由包自带的东西,因此只需要引入+使用就可以了,不需要自己定义。
九、自定义导航组件
 1 import React, { Component, Fragment } from "react";
 2 import { Route } from "react-router-dom"
 3 // 引入自定义导航组件
 4 import MyLink from "./Components/MyLink"
 5 import Cmp1 from "./Components/Cmp1";
 6 import Cmp2 from "./Components/Cmp2";
 7
 8 class App extends Component {
 9   render() {
10     return (
11       <Fragment>
12         <MyLink tag="h1" to="/cmp1">
13           去1
14         </MyLink>
15         <MyLink tag="h1" to="/cmp2">
16           去2
17         </MyLink>
18         <Route path="/cmp1" component={Cmp1}></Route>
19         <Route path="/cmp2" component={Cmp2}></Route>
20       </Fragment>
21     );
22   }
23 }
24 export default App;
自定义导航组件参考
 1 import React, { Component, Fragment } from "react";
 2 import { withRouter, Route } from "react-router-dom";
 3
 4 class MyLink extends Component {
 5   // 点击跳转动作
 6   goUrl = () => {
 7     this.props.history.push(this.props.to);
 8   };
 9   render() {
10     // 获取参数
11     var Tag = this.props.tag ? this.props.tag : "a";
12     return (
13       <Fragment>
14         <Route
15           path={this.props.to}
16           children={({ match }) => {
17             if (match) {
18               // 匹配
19               return (
20                 <Tag
21                   onClick={this.goUrl}
22                   style={{ color: "red" }}
23                   >
24                   {this.props.children}
25                 </Tag>
26               );
27             } else {
28               // 不匹配
29               return (
30                 <Tag onClick={this.goUrl}>
31                   {this.props.children}
32                 </Tag>
33               );
34             }
35           }}>
36         </Route>
37       </Fragment>
38     );
39   }
40 }
41
42 export default withRouter(MyLink);
十、样式引入问题
css样式引入:public文件下自定义样式引入
- 导航方式:BrowserRouter改成HashRouter
十六、React三方组件库
一、Ant-Design
1 npm i -S antd-mobile
使用:参考官网
1 npm i -D customize-cra react-app-rewired
- 修改package.json
1 "scripts": {
2   "start": "react-app-rewired start",
3   "build": "react-app-rewired build",
4   "test": "react-app-rewired test",
5   "eject": "react-scripts eject"
6 }
- 安装babel-plugin-import
1 npm i -S babel-plugin-import
 1 const {
 2   override,
 3   addDecoratorsLegacy,
 4   disableEsLint,
 5   addBundleVisualizer,
 6   addWebpackAlias,
 7   adjustWorkbox,
 8     // 新增fixBabelImports
 9   fixBabelImports
10 } = require("customize-cra");
11 const path = require("path");
12
13 module.exports = override(
14   // 在webpack中禁用eslint
15   disableEsLint(),
16
17   // 添加webpack别名
18   addWebpackAlias({
19     ["@"]: path.resolve("./src"),
20   }),
21
22   // 按需加载样式&组件代码
23   fixBabelImports("import", {
24     libraryName: "antd-mobile",
25     style: "css",
26   })
27 );
十七、Hooks
一、StateHook
 1 import React from 'react'
 2
 3 function Demo(){
 4   const [count, setCount] = React.useState(0)
 5
 6   function add(){
 7     // 第一种写法
 8     // setCount(count + 1)
 9
10     // 第二种写法:函数
11     setCount(count => count + 1)
12   }
13   return(
14       <div>
15         <h2>当前求和为:{count}</h2>
16       <button onClick={add}>点我+1</button>
17     </div>
18   )
19 }
20 export default Demo
二、EffectHook
1 React.useEffect(() => {
2   // 副作用操作:第一次挂载和之后更新都会执行
3   // return返回值:组件卸载前执行,做一些收尾工作,如清除定时器、取消订阅
4 },[]) // 如果指定的是[],回调函数只会在第一次render后调用
案例
 1 import React from 'react'
 2 import ReactDOM from 'react-dom'
 3
 4 function Demo(){
 5   const [count, setCount] = React.useState(0)
 6
 7   React.useEffect(() => {
 8     // 副作用操作
 9     let timer = setInterval(() => {
10       setCount(count => count + 1)
11     },1000)
12     // 返回值:组件卸载前执行,做一些收尾工作,如清除定时器、取消订阅
13     return ()=> {
14       clearInterval(timer)
15     }
16   },[]) // 如果指定的是[],回调函数只会在第一次render后调用
17
18   function add(){
19     setCount(count => count + 1)
20   }
21
22   // 卸载组件的回调
23   function unmount(){
24       ReactDOM.unmountComponentAtNode(
25       document.getElelmentBeId('root')
26     )
27   }
28   return(
29       <div>
30         <h2>当前求和为:{count}</h2>
31       <button onClick={add}>点我+1</button>
32       <button onClick={unmount}>卸载组件</button>
33     </div>
34   )
35 }
36 export default Demo
三、RefHook
标记节点,功能与createRef一样
 1 import React from 'react'
 2
 3 function Demo(){
 4   const [count, setCount] = React.useState(0)
 5   const myRef = React.useRef()
 6
 7   function add(){
 8     setCount(count => count + 1)
 9   }
10   function show(){
11     console.log(myRef.current.value)
12   }
13   return(
14       <div>
15       <input type="text" ref={myRef}/>
16         <h2>当前求和为:{count}</h2>
17       <button onClick={add}>点我+1</button>
18       <button onClick={show}>点我提示数据</button>
19     </div>
20   )
21 }
22 export default Demo

 浙公网安备 33010602011771号