
plist文件是将某些特定的类,通过XML文件的方式保存在目录中。
可以被序列化的类型只有如下几种:
NSArray;
NSMutableArray;
NSDictionary;
NSMutableDictionary;
NSData;
NSMutableData;
NSString;
NSMutableString;
NSNumber;
NSDate;
1.获得文件路径
NSString *path = NSSearchPathForDirectoriesInDomains(NSDocumentDirectory, NSUserDomainMask, YES).firstObject;
NSString *fileName = [path stringByAppendingPathComponent:@"123.plist"];
2.存储
NSArray *array = @[@"123", @"456", @"789"];
[array writeToFile:fileName atomically:YES];
3.读取
NSArray *result = [NSArray arrayWithContentsOfFile:fileName];
NSLog(@"%@", result);
4.注意
- 只有以上列出的类型才能使用plist文件存储。
- 存储时使用
writeToFile: atomically:方法。 其中atomically表示是否需要先写入一个辅助文件,再把辅助文件拷贝到目标文件地址。这是更安全的写入文件方法,一般都写YES。 - 读取时使用
arrayWithContentsOfFile:方法。
plist第一次看到这个后缀名文件的时候感觉怪怪的,不过接触久了也就习以为常了,plist是Property List的简称可以理解成属性列表文件,主要用来存储串行化后的对象的文件。扩展名为.plist,因此被称为 plist文件,xCode中默认的是一种树状的结构展现出来数据,可视化的动态增删改查,非常人性化,不过最终的结果是以XML形式存储的,Plist文件可以用于存储用户的一些设置信息,具体根据需求而定。
http://www.cnblogs.com/xiaofeixiang/p/4263498.html
简单创建文件
简单创建文件就是说可以直接从xCode创建,右击项目new File,可以添加一个plist文件:
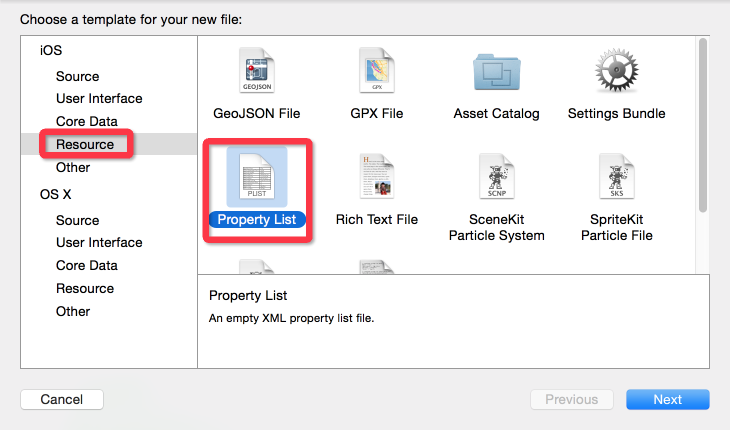
创建一个UserData.plist文件,之后的内容如下:

右击open as->source code,代码如下:
<?xml version="1.0" encoding="UTF-8"?>
<!DOCTYPE plist PUBLIC "-//Apple//DTD PLIST 1.0//EN" "http://www.apple.com/DTDs/PropertyList-1.0.dtd">
<plist version="1.0">
    <dict>

        <key>Login</key>
        <dict>
            <key>UserName</key>
            <string>FlyElephant</string>
            <key>UserPassWord</key>
            <string>123456</string>
        </dict>

    </dict>
</plist>
读取设置的信息:
//读取Property List文件
NSString *userDataPath = [[NSBundle mainBundle] pathForResource:@"UserData" ofType:@"plist"];
NSMutableDictionary *data = [[NSMutableDictionary alloc] initWithContentsOfFile:userDataPath];
NSLog(@"%@",data);
NSLog(@"用户名:%@ 密码:%@", data[@"Login"][@"UserName"],data[@"Login"][@"UserPassWord"]);
[data setObject:@"登录信息" forKey:@"Login"];
增删改查
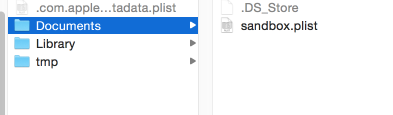
文件添加,上面是应用程序中添加文件,这个时候可以选择代码在沙盒中添加,代码如下:
NSArray *sandboxpath= NSSearchPathForDirectoriesInDomains(NSDocumentDirectory, NSUserDomainMask, YES);
//获取完整路径
NSString *documentsDirectory = [sandboxpath objectAtIndex:0];
NSString *plistPath = [documentsDirectory stringByAppendingPathComponent:@"sandbox.plist"];
//存储根数据
NSMutableDictionary *rootDic = [[NSMutableDictionary alloc ] init];
//字典中的详细数据
NSMutableDictionary *userDataDic = [[NSMutableDictionary alloc]init];
[userDataDic setObject:@"Flephant" forKey:@"UserName"];
[userDataDic setObject:@"http://www.cnblogs.com/xiaofeixiang/" forKey:@"UserPassWord"];

[rootDic setObject:userDataDic forKey:@"Login"];
//写入文件
[rootDic writeToFile:plistPath atomically:YES];
NSLog(@"%@",NSHomeDirectory());
NSLog(@"写入成功");
路径如下,具体路径获取上一篇文章已经可以看到:
读取数据:
//获取路径
NSArray *sandboxpath= NSSearchPathForDirectoriesInDomains(NSDocumentDirectory, NSUserDomainMask, YES);
NSString *filePath = [[sandboxpath objectAtIndex:0] stringByAppendingPathComponent:@"sandbox.plist"];
NSLog(@"%@",NSHomeDirectory());
//获取数据
NSMutableDictionary *searchdata = [[NSMutableDictionary alloc] initWithContentsOfFile:filePath];
NSLog(@"%@",searchdata);
修改文件:
//获取路径
NSString *filepath = [[NSSearchPathForDirectoriesInDomains(NSDocumentDirectory, NSUserDomainMask, YES)objectAtIndex:0]stringByAppendingPathComponent:@"sandbox.plist"];
//所有的数据列表
NSMutableDictionary *datalist= [[[NSMutableDictionary alloc]initWithContentsOfFile:filepath] mutableCopy];

//获取Login节点
NSMutableDictionary *loginData = [datalist objectForKey:@"Login"];

[loginData setValue: @"FlyElephant" forKey:@"UserName"];
[loginData setValue: @"123456" forKey:@"UserPassWord"];
[datalist setValue:loginData forKey:@"Login"];
[datalist writeToFile:filepath atomically:YES];
NSLog(@"修改成功");
删除文件:
NSFileManager *manager=[NSFileManager defaultManager];
//文件路径
  NSString *filepath = [[NSSearchPathForDirectoriesInDomains(NSDocumentDirectory, NSUserDomainMask, YES)objectAtIndex:0]stringByAppendingPathComponent:@"sandbox.plist"];
if ([manager removeItemAtPath:filepath error:nil]) {
    NSLog(@"文件删除成功");
}


1、读取plist文件中的Boolean类型的字段值时,要先把它转为NSNumber类型,然后通过NSNumber的boolValue方法来读取该值。例子如下:
bool IsTrue=[(NSNumber*)[dic objectForKey:@"IsTrue"]boolValue];

2、写入时也是类似:
Boolean setting =NO;
NSNumber *testBoolean =[[NSNumber alloc]initWithBool:setting];
然后,才进行 plist文件的读写

3、读写plist文件
//下面函数主要是 获取的UISwitch(即switchView,在IB中进行了关联)的值,将其当前的值保存到plist文件中,以便程序下次启动时使用;通过这种方式可以保存和读取程序的一些配 置信息
- (void)viewDidLoad
{
    [superviewDidLoad];
#if 0
   //1、创建plist文件

    //获取沙盒路径,创建plist文件,因为系统的list文件是只读属性,在沙盒中的文件才是可读和可写的,必须在沙盒中创建plist文件
    NSArray *paths=NSSearchPathForDirectoriesInDomains(NSDocumentDirectory,NSUserDomainMask,YES);
    NSString *path=[paths     objectAtIndex:0];
    NSString *filename=[path stringByAppendingPathComponent:@"personal.plist"];

   //创建一个NSDictionary
    NSMutableDictionary *dictionary =[[NSMutableDictionary alloc]init];

   //创建3个添加到dictionary中的变量,并对其赋值
    NSString *testString = [[NSString alloc]initWithString:@"fistValue1111"];
    NSNumber  *testInt = [[NSNumber alloc]initWithInt:5];
    NSNumber *testBoolean =[[NSNumber alloc]initWithBool:YES];

   //将3个变量添加到dictionary中
    [dictionary setValue:testString forKey:@"String test"];
    [dictionary setValue:testInt forKey:@"INteger test1"];
    [dictionary setValue:testBoolean forKey:@"Boolean test"];

   //将dictionary中的数据写入plist文件中
    [dictionary writeToFile:filename atomically:YES];
    NSLog(@"%@",filename);
#endif
 /******************************************************************/

   //2、读取plist文件*获取某一个key的对应的valuse

   //读取plist文件,获取UISwitch的值,根据值来设置UISwitvch的显示
    //获取沙盒路径,创建plist文件,因为系统的list文件是只读属性,在沙盒中的文件才是可读和可写的,必须在沙盒中创建plist文件
   NSArray *readPaths = NSSearchPathForDirectoriesInDomains(NSDocumentDirectory,NSUserDomainMask,YES);
   NSString *readPath=[readPaths objectAtIndex: 0];
   NSString *plistPath=[readPath stringByAppendingPathComponent:@"personal.plist"];

   //读取到一个NSDictionary
    NSDictionary *dictionary1 = [[NSDictionary alloc] initWithContentsOfFile: plistPath];

   //读取plist文件中的Boolean类型的字段值时,要先把它转为NSNumber类型,然后通过NSNumber的boolValue方法来读取该值。例子如下:
    bool switchFlag = [(NSNumber*)[dictionary1objectForKey:@"Boolean test"]boolValue];

   //Boolean switchFlag = [dictionary1 objectForKey:@"Boolean test"];
    [self.switchView addTarget: selfaction: @selector(switchViewChange:) forControlEvents: UIControlEventValueChanged];
    if(switchFlag)
    {
       NSLog(@"switch的值为 NO");
       switchView.on = YES;
       //switchView.on
    }
    else//switchFlag=NO
    {
       NSLog(@"switch的值为 YES");
       switchView.on = NO;
    }


   //读取到一个NSArray
  // NSArray *array = [[NSArray alloc] initWithContentsOfFile:plistPath];
   // Do any additional setup after loading the view from its nib.
}

- (void)viewDidUnload
{
    [superviewDidUnload];
   // Release any retained subviews of the main view.
   // e.g. self.myOutlet = nil;
}

- (BOOL)shouldAutorotateToInterfaceOrientation:(UIInterfaceOrientation)interfaceOrientation
{
   // Return YES for supported orientations
    return (interfaceOrientation == UIInterfaceOrientationPortrait);
}

-(void)switchViewChange:(id)sender
{
    UISwitch *theSwitch =(UISwitch *)sender;
   NSLog(@"switch do nothing");
    Boolean setting = theSwitch.on;
    if(setting == NO)
    {
       NSLog(@"current setting = NO");
    }
    else if(setting == YES)
    {
       NSLog(@"current setting = YES");
    }

    //获取沙盒路径,创建plist文件,因为系统的list文件是只读属性,在沙盒中的文件才是可读和可写的,必须在沙盒中创建plist文件
   NSArray  *paths = NSSearchPathForDirectoriesInDomains(NSDocumentDirectory,NSUserDomainMask,YES);
   NSString *path = [paths objectAtIndex:0];
   NSString *plistPath = [path stringByAppendingPathComponent: @"personal.plist"];

   NSMutableDictionary *dictionary =[[NSMutableDictionary alloc] initWithContentsOfFile: plistPath];
   NSNumber *testBoolean = [[NSNumber alloc] initWithBool:setting];
   [dictionary setValue:testBoolean forKey:@"Boolean test"];
   [dictionary writeToFile:plistPath atomically:YES];
}

 浙公网安备 33010602011771号