一步一步搭建基于ffmpeg和sdl2的流媒体播放器
一、 背景:
一步一步从资料收集、技术选型、代码编写、性能优化,动手搭建一款支持rtsp、rtmp等常用流媒体格式的视频播放器,ffmpeg用于流媒体解码,sdl2用于视频画面渲染和声音播放。
二、 实现思路:
技术选型:qt+ffmpeg+sdl2,qt基于c++运行效率高,跨平台兼容windows和linux;ffmpeg支持多种视频格式和流协议软解和硬解(目前主流的协议是rtmp和rtsp,视频编码主要是h264和h265);sdl2兼容性强,适应多个平台和硬件设备,同时支持简单的配置实现视频软渲染或显卡渲染。
实现流程:
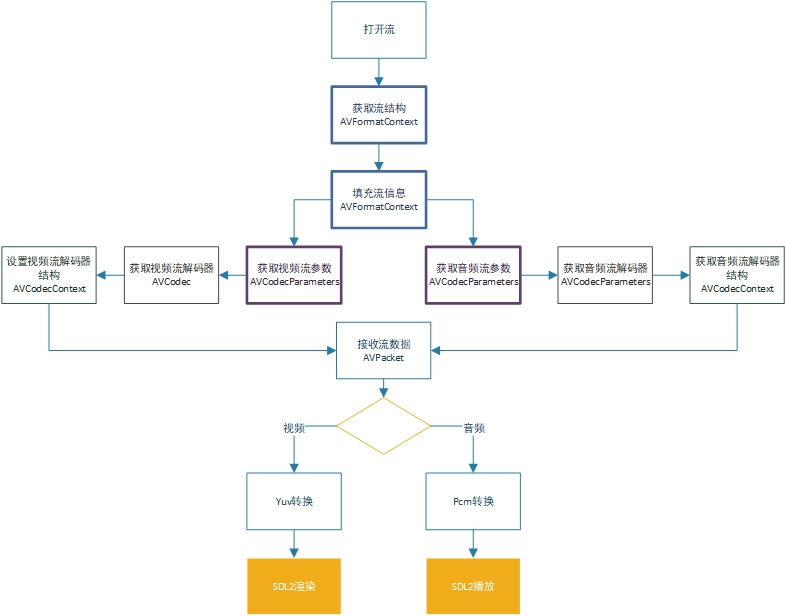
三、 FFMPEG流解析
FFMPEG的工作是流获取到流解析,其中涉及到几个重要的结构体做个简单的说明。
AVFormatContext:使用到的第一个结构体,通过avformat_alloc_context 、avformat_open_input 、avformat_find_stream_info 3个步骤完善这个结构体。
AVCodecParameters:音视频的流参数,这个参数可以从流信息直接获取。
AVCodec:音视频解码器,控制着解码类型和软/硬解码方式。
AVCodecContext:解码器重要结构体,解码帧需要用到。
1. 打开流和获取流信息
AVFormatContext avFormatCtx = avformat_alloc_context();
AVDictionary *options = NULL;
if (avformat_open_input(&avFormatCtx, filepath, NULL, &options) != 0){
        printf(打开流失败\n");
        return ;
}
    //获取音视频流数据信息
if (avformat_find_stream_info(avFormatCtx, NULL) < 0){
        errorCode+=1;
        renderFrame(NULL,errorCode);
        printf("无法获取流信息\n");
        return ;
}
打开流和获取流信息是关键的部分,两步骤中任何一个步骤的返回值<0就无法进行后续的解码。
这里有一个AVDictionary *options,这个参数的设置可以参考ffmpeg命令,可以使用参数的方式配置ffmpeg解码。以下的配置,可以减少流读取等待时间。
//设置链接超时时间3S
av_dict_set(&options, "stimeout", std::to_string( 3* 1000).c_str(), 0);
//设置rtsp拉流的方式tcp,默认udp。
av_dict_set(&options, "rtsp_transport",  "tcp", 0);
//不设置缓冲
av_dict_set(&options, "buffer_size", "0", 0);
2. 视频流信息获取/配置
//01 获取视频流序号
int videoIndex=av_find_best_stream(avFormatCtx, AVMEDIA_TYPE_VIDEO, -1, -1, nullptr, 0);
if(videoIndex<0)
    return;
//02 获取视频编解码信息
AVCodecParameters avCodecParameters=avFormatCtx->streams[videoIndex]->codecpar;
//03 获取解码器
AVCodec *videoCodec = avcodec_find_decoder_by_name("h264");
//AVCodec *videoCodec = avcodec_find_decoder_by_name("h264_cuvid");//nvida显卡硬解
//AVCodec *videoCodec = avcodec_find_decoder_by_name("h264_qsv");//intel显卡硬解
if (!videoCodec) {
        printf("不支持硬解码\n");
        videoCodec= avcodec_find_decoder(avCodecParameters->codec_id);
}else{
//调用硬解码需要设置pix_fmt格式,软解码不需要
if(nullptr!=videoCodec->pix_fmts){
avCodecParameters->format=videoCodec->pix_fmts[0];
}
}
//04 初始化视频解码器结构
AVCodecContext  videoCodecCtx= avcodec_alloc_context3(videoCodec);
if(videoCodecCtx==NULL){
        printf("无法分配解码结构内容\n");
        return;
}
avcodec_parameters_to_context(videoCodecCtx,avCodecParameters);
if(avcodec_open2(_videoCodecCtx,videoCodec,NULL)<0)
{
        //初始化解码器失败
        return;
}
3.音频流信息获取/配置
//01 获取音频流序号
int audioIndex=av_find_best_stream(avFormatCtx, AVMEDIA_TYPE_AUDIO, -1, -1, nullptr, 0);

if(audioIndex<0)
        return;

//02 获取音频编解码信息
AVCodecParameters avCodecParameters=avFormatCtx->streams[audioIndex]->codecpar;
//03 获取解码器
AVCodec *audioCodec= avcodec_find_decoder(_avCodecParameters->codec_id);
//04 设置解码器结构
AVCodecContext *audioCodecCtx= avcodec_alloc_context3(audioCodec);
if(audioCodecCtx==NULL){
    printf("无法分配解码器结构\n");
return;
}
avcodec_parameters_to_context(audioCodecCtx, avCodecParameters);
if(avcodec_open2(audioCodecCtx,audioCodec,NULL)<0){
printf("无法找到音频解码器\n");
    //avformat_free_context(avFormatCtx);
}else{
//05 配置PCM音频重采样
int inChannels= audioCodecCtx ->channels;
int outChannels =AV_CH_LAYOUT_MONO;

AVSampleFormat inFormat=audioCodecCtx ->sample_fmt;
AVSampleFormat outFormat=AV_SAMPLE_FMT_S16;

int inSampleRate=audioCodecCtx ->sample_rate;
int outSampleRate=audioCodecCtx ->sample_rate;

int inChannelLayout=av_get_channel_layout_nb_channels(inChannels);
    int outChannelLayout=av_get_channel_layout_nb_channels(outChannels);

      //重采样配置,说明参考https://blog.csdn.net/u011003120/article/details/81542347
      SwrContext *swrctx=swr_alloc();
      swrctx=swr_alloc_set_opts(swrctx,
                                   outChannels,
                                   outFormat,
                                   outSampleRate,
                                   inChannels,
                                   inFormat,
                                   inSampleRate,
                                   0, NULL);

      swr_init(swrctx);
}
4. 帧数据接收
AVPacket *packet=av_packet_alloc();
    while (true){
        //读取一帧未解码的数据
        if(av_read_frame(avFormatCtx, packet) >= 0){
            if (packet->stream_index == videoIndex){
                //视频数据

            }else if (packet->stream_index == audioIndex){
                //音频数据

            }
            av_packet_unref(packet);
        }
}
接收帧数据比较简单,每一帧是一个AVPacket,再根据stream_index 判断是视频帧还是音频帧分别对应解码即可。需要注意的是av_packet_unref和av_packet_free两个释放AVPacket的方法。
av_packet_unref 只是释放内容,结构还在,适合AVPacket 作为局部变量需要重复使用这个变量。
av_packet_free 释放内容和结构,调用后AVPacket为空,内存被清空无法重复使用。
5. 视频帧解码
ffmpeg推荐的帧解码使用了avcodec_send_packet和avcodec_receive_frame两个方法,相比于之前的avcodec_decode_video2来说感觉稳定性更好一点,异常的几率降低了,毕竟两个方法可以通过返回值来确定下一个方法是否需要执行。
AVFrame  *videoFrame=av_frame_alloc();
if(packet->size>0)
int ret= avcodec_send_packet(videoCodecCtx, packet);
while (ret>=0) {
        ret = avcodec_receive_frame(videoCodecCtx, videoFrame);
        if (ret == AVERROR(EAGAIN) || ret == AVERROR_EOF){
            //printf("视频解码错误.\n");
        }else if (ret < 0) {
            printf("视频解码错误.\n");
        }else{
    //videoFrame->extended_data //需要显示的图像数据,h264编码下为YUV图像
    //videoFrame->linesize //图像数据参数,代表了YUV的数据列的信息。For video, size in bytes of each picture line.

}
}
这里用到了AVFrame,可以理解为帧数据,之前的AVPacket可以理解为数据包,帧解码本质上是数据包转换为数据帧的过程。
解码出来的视频数据为YUV图像,得到了videoFrame->extended_data和videoFrame->linesize参数后,即可对YUV图像进行显示。
6. 音频帧解码
同样使用avcodec_send_packet和avcodec_receive_frame两个方法进行音频帧解码,相比于之前的avcodec_decode_audio4更能规避异常。
int ret =0;
if(packet->size>0)
    ret = avcodec_send_packet(_audioCodecCtx, packet);
while (ret>=0) {
    ret = avcodec_receive_frame(_audioCodecCtx, audioFrame);
    if (ret == AVERROR(EAGAIN) || ret == AVERROR_EOF){
                //printf("解码声音异常.\n");
    }else if (ret < 0) {
                printf("解码声音异常\n");
    }else{
    //进行音频重采样
    int len = swr_convert(_swrctx,
                                  &_outAudioBuffer,  19200 ,
                                  (const uint8_t **)audioFrame->data, audioFrame->nb_samples);
            if (len>0){
                int size=len*1*2;
                //播放音频
    }
}
四、 SDL2视频渲染和音频播放
1. SDL2简介
SDL2就我个人使用体验来讲是一款优秀简单的视频渲染组件,性能上比QPixmap高出了太多。对于音频播放,SDL2相对QIODevice使用要复杂点,但是好处在于兼容性好,无论在linux还是在windows都能有一样的编码和使用体验。
2. 视频渲染
视频渲染就是将ffmpeg解析出来的YUV数据一张一张按照顺序显示出来。SDL2渲染的流程为 初始化、绑定显示控件、设置渲染参数和渲染图形 4个步骤。
//01 初始化
if(SDL_Init(SDL_INIT_VIDEO|SDL_INIT_AUDIO|SDL_INIT_TIMER)){
        printf( "SDL2初始化失败 - %s\n", SDL_GetError());
}else{
    //02 绑定控件
    SDL_Window  sdlWindow=SDL_CreateWindowFrom((const void *)widget->winId());
    //03 设置软/硬渲染方式 SDL_RENDERER_SOFTWARE:CPU渲染 SDL_RENDERER_ACCELERATED:GPU渲染
    SDL_Renderer sdlRender=SDL_CreateRenderer(sdlWindow,-1,SDL_RENDERER_SOFTWARE);
    //04 设置渲染参数
    SDL_Texture sdlTexture=SDL_CreateTexture(sdlRender,SDL_PIXELFORMAT_IYUV,SDL_TEXTUREACCESS_STREAMING,w,h);
    SDL_Rect sdlRect;
    sdlRect.x=0;
    sdlRect.y=0;
    sdlRect.w=w;
    sdlRect.h=h;
}
上述代码中的w,h指SDL2渲染的范围,SDL2的新特征之一就是在一个控件上渲染不同的区域,比如要做个多屏显示只需要初始化一个SDL2就可以,渲染的位置和范围由sdlRect控制。
接下来就是接收视频YUV数据渲染显示。
int result=SDL_UpdateYUVTexture(sdlTexture,&sdlRect,data[0], linesize[0], data [1], linesize [1],data [2], linesize [2]);
result= SDL_RenderCopy(sdlRender,sdlTexture,nullptr,&sdlRect);
if(result>=0)
    SDL_RenderPresent(sdlRender);
3. 音频播放
使用SDL2进行音频播放是将ffmpeg解析出来的PCM音频数据播放出来的过程,涉及到SDL2音频参数设置、SDL2回调设置、SDL2填充声音3个步骤。
//01 SDL2音频参数设置
SDL_AudioSpec sdlAudioSpec;
SDL_memset(&sdlAudioSpec, 0, sizeof(sdlAudioSpec));
sdlAudioSpec.freq=sampleRate;//采样率
sdlAudioSpec.format=AUDIO_S16SYS;//声音格式
sdlAudioSpec.channels=channels;//声道数
sdlAudioSpec.silence=0;
//sdlAudioSpec.samples=1024;//
sdlAudioSpec.userdata = static_cast<void*>(this);
sdlAudioSpec.callback=sdlAudioCallback;

if(SDL_OpenAudio(&sdlAudioSpec,NULL)<0){
        printf("SDL 音频播放开启失败");
}else{
        //Play
}

//02 SDL2回调设置
Uint32 audioLen;
Uint8 *audioChunk;
Uint8 * audioPos;

void sdlAudioCallback (void *uData,Uint8 *stream,int length){
    SDL_memset(stream,0, static_cast<size_t>(length));
    if(audioLen<=0)
        return;

    length=(length>audioLen?audioLen:length);

    SDL_MixAudio(stream,audioPos,length,SDL_MIX_MAXVOLUME);

    audioPos+=static_cast<unsigned int>(length);
    audioLen-=static_cast<unsigned int>(length);
}

//03 填充声音
void  playPCM(const char *data, int length){
    audioChunk=(Uint8*)data;
    audioLen=length;
    audioPos=audioChunk;

//循环等待前面声音播放完成
    while(audioLen>0){
        SDL_Delay(1);
}
}
五、 QT界面搭建与兼容调优
1. QT界面搭建,SDL2渲染遮挡按钮问题
简单的播放器界面需要的组件很少,一个QWidget作为SDL2显示图像控件,一个QPushButton关闭按钮。然后使用中发现SDL2渲染图像时遮挡了关闭按钮。
原因可能是SDL2渲染图像不是直接在QWidget上渲染,而是内部建一个蒙版在QWidget上,因此渲染时候会遮挡掉QWidget上的QPushButton关闭按钮。
解决方法:
单独建一个窗体,窗体内放一个QPushButton关闭按钮,将窗体设置为无边框和背景透明,用窗体作为按钮放到播放器界面,设置关闭按钮窗体的父对象为setParent播放器窗体,点击窗体代替点击按钮。
CloseFrm  closeFrm=new CloseFrm(this);
closeFrm->setParent(this);
closeFrm->show();
可以在resizeEvent中实时更新closeFrm的位置,例如一直保持在右上角。
void resizeEvent(QResizeEvent *event)
{
    QSize size=this->size();
    int width=size.width();
    int height=size.height();

//修改图像显示区域大小
    ui->widget->resize(size);
    ui->widget->lower();
    ui->widget->update();
    int w=50;
    int x=width-w;
    int y=0;

//修改删除按钮位置
    if(nullptr!=closeFrm) {
        closeFrm->move(x,y);
        closeFrm->raise();
        closeFrm->update();
        closeFrm->activateWindow();
        closeFrm->isTopLevel();
}
//linux下加这句sdlwindow窗体尺寸才会变化
    SDL_SetWindowSize(sdlWindow,width,height);
//UI界面刷新
QCoreApplication::processEvents();
}
2. SDL2声音语速失真、延迟问题
SDL2播放声音类型是AAC和MP3类型的时候,偶尔会出现声音失真不正常的情况。这个是SDL2比较坑的一个地方。
原因是针对AAC和MP3,MP3,接收到的帧数据和流数据是不同的samples,需要重新初始化SDL音频。
if(sdlAudioSpec.samples!=audioFrame->nb_samples){
    SDL_CloseAudio();
    sdlAudioSpec.samples= audioFrame->nb_samples;
    SDL_OpenAudio(&sdlAudioSpec,NULL);
    SDL_PauseAudio(0);
}
至于音频延迟的问题,我在windows上遇到过,linux上略好一些暂时没有彻底解决,不过在windows上可以考虑用QIODevice代替SDL2播放音频,音频播放不再延迟,可以参考以下代码。
QAudioFormat audioFormat;
QAudioOutput *audioOutput;
QIODevice *outDevice;

    //设置采样率
    audioFormat.setSampleRate(sampleRate);
    //设置采样大小,8/16位
    audioFormat.setSampleSize(sampleSize);
    //设置通道数
    audioFormat.setChannelCount(channels);
    //设置编码方式
    audioFormat.setCodec("audio/pcm");
    //设置字节序
    audioFormat.setByteOrder(QAudioFormat::LittleEndian);
    //设置样本数据类型
    audioFormat.setSampleType(QAudioFormat::UnSignedInt);

    //获取默认声卡
    QList<QAudioDeviceInfo> ls= QAudioDeviceInfo::availableDevices(QAudio::AudioOutput);
    QAudioDeviceInfo deviceInfo=QAudioDeviceInfo::defaultOutputDevice();
    if(deviceInfo.isNull()){
        error=QString("没有找到可用声卡").toUtf8().data();
        printf(error);
    }
    qDebug() << "Device name: " << deviceInfo.deviceName();

    if(!deviceInfo.isFormatSupported(audioFormat))
    {
        error=QString("声卡不支持当前配置").toUtf8().data();
        printf(error);
    }

    if(result!=0){
        audioOutput=new QAudioOutput(deviceInfo,audioFormat);
        //audioOutput->setBufferSize(1024*1000000);
        outDevice= audioOutput->start();
    }else{
        outDevice=NULL;
}

//播放音频
void playPCM(const char *data, int length){
    if(outDevice!=NULL)
        outDevice ->write(data,length);
}
}
3. SDL2软渲染拖拽窗体画面卡住问题
窗口模式下,SDL2渲染图像过程中一旦修改了窗体尺寸,画面就会卡住不再渲染,网上很多方法都是说屏蔽SDL_WINDOWEVENT的,发现并没有用,最后解决方法在窗体尺寸改变后重新设置下SDLTexture。
void sdlResize(){
    int w,h;
    SDL_GetWindowSize(sdlWindow, &w, &h);
    if(sdlRect.w!=w||sdlRect.h!=h){
        SDL_DestroyTexture(sdlTexture);
        sdlTexture=SDL_CreateTexture(sdlRender,SDL_PIXELFORMAT_IYUV,SDL_TEXTUREACCESS_STREAMING,w,h);
        sdlRect.w=w;
        sdlRect.h=h;
        SDL_RenderSetViewport(sdlRender, &sdlRect);
    }
}
4. 更优化的图像缩放方案
ffmpeg提供了SwsContext方法对解析出来的图像进行分辨率调整,这种方法调整后的图像效果略差,尤其文字不太清晰。谷歌提供了libyuv库,可以根据显示控件范围在显示YUV图像前修改YUV尺寸达到拖拽缩放的目的,效率较高,有4种效率和清晰度调整参数。
int result=0;
int w=sdlRect.w;
int h=sdlRect.h;
uint8_t *outbuf[4];
outbuf[0] = (uint8_t*)malloc(w*h);
outbuf[1] =  (uint8_t*)malloc(w*h>>1);
outbuf[2] =  (uint8_t*)malloc(w*h>>1);
outbuf[3] = NULL;

int outlinesize[4] = {w,w/2, w/2, 0};

int videoWidth=linesize[0];
int videoHeight=linesize[3];
//转换yuv分辨率为窗体长宽
result= libyuv::I420Scale(
    data[0],linesize[0],data[1],linesize[1],data[2],linesize[2],videoWidth,videoHeight,
outbuf[0],outlinesize[0],outbuf[1],outlinesize[1],outbuf[2],outlinesize[2],w,h,
libyuv::FilterMode::kFilterBox);

if(result>=0){
    result=SDL_UpdateYUVTexture(sdlTexture,&sdlRect,outbuf[0],outlinesize[0],    outbuf[1],outlinesize[1],outbuf[2],outlinesize[2]);
    result= SDL_RenderCopy(sdlRender,sdlTexture,nullptr,&sdlRect);
    if(result>=0)
    SDL_RenderPresent(sdlRender);
    free(outbuf[0]);
    free(outbuf[1]);
    free(outbuf[2]);
    free(outbuf[3]);
    }
}
六、 写在最后
这么多年一直做C#、java和js的开发,有幸正好有个机会和时间去学习qt、C++,就拿这个基于ffmpeg的流媒体播放器来练习。本文从讲述了自己从选型到编码一步步探索的过程,从功能实现到稳定优化前后花费了1个月左右时间,过程中有幸得到公司陈xx高级工程师的指导,也参考了很多网上大神的博客,于是把这些记录下来希望能对有这方面需求或者像我一样也在探索学习的同行提供些许帮助。
windows播放器测试地址:https://download.csdn.net/download/jiangfei200809/79669341
windows播放器下载后 修改 test.bat 中 rtmp://media3.scctv.net/live/scctv_800 为 测试的rtmp或rtsp地址,保存后双击运行 test.bat即可。最后一位参数 0代表显示关闭按钮,1代表不显示关闭按钮。
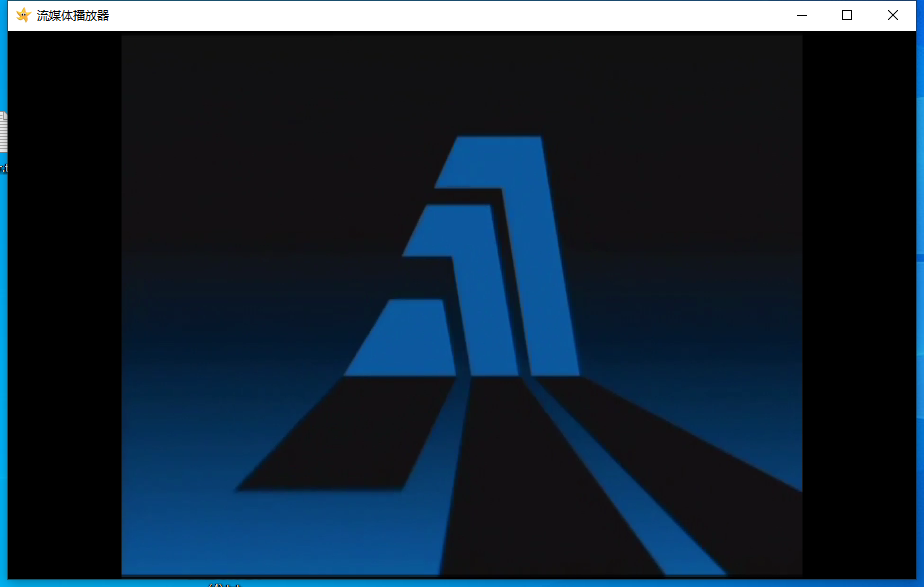
windows播放器效果

 浙公网安备 33010602011771号