3.Spring Boot 2.X 整合Elasticsearch
3.Spring Boot 2.X 整合Elasticsearch
Elasticsearch是一个基于Luncene、分布式、、通过Restful方式进行交互的近实时搜索平台框架。像百度、谷歌这种大数据全文搜索引擎的场景都可以使用Elasticsearch作为底层支持框架。我们目前可以通过使用该框架结合Spring Boot实现简单的搜索功能。
参考视频:狂神视频
1.基本概念
将Elasticsearch和关系型数据库对比:
| Relational DB | Elasticsearch |
|---|---|
| 数据库(database) | 索引(indices) |
| 表(tables) | 类型(types) |
| 行(rows) | 文档(documents) |
| 字段(columns) | fields |
2. Docker安装Elasticsearch
2.1.拉取Elasticsearch镜像
docker pull elasticsearch:7.10.1
2.2.启动Elasticsearch
docker run -d --name ES01 -p 9200:9200 -p 9300:9300 -e ES_JAVA_OPTS="-Xms512m -Xmx512m" -e "discovery.type=single-node" elasticsearch:7.10.1
注:这是要运行的镜像id,Elasticsearch7.X之后的版本启动需要携带discovery.type变量
2.3.修改Elasticsearch配置
-
进入容器
docker exec -it ES01 /bin/bash# 如果Docker容器没有vi命令(7.X版本有) # 安装vim命令 # 要先修改apt的国内镜像 mv /etc/apt/sources.list /etc/apt/sources.list.bak cat > /etc/apt/sources.list << EOF deb http://mirrors.aliyun.com/debian/ stretch main non-free contrib deb-src http://mirrors.aliyun.com/debian/ stretch main non-free contrib deb http://mirrors.aliyun.com/debian-security stretch/updates main deb-src http://mirrors.aliyun.com/debian-security stretch/updates main deb http://mirrors.aliyun.com/debian/ stretch-updates main non-free contrib deb-src http://mirrors.aliyun.com/debian/ stretch-updates main non-free contrib deb http://mirrors.aliyun.com/debian/ stretch-backports main non-free contrib deb-src http://mirrors.aliyun.com/debian/ stretch-backports main non-free contrib EOF apt-get update apt-get install vim # 显示文件 ls 结果如下: LICENSE.txt README.textile config lib modules NOTICE.txt bin data logs plugins # 进入配置文件夹 cd config # 显示文件 ls 结果如下: elasticsearch.keystore elasticsearch.yml jvm.options jvm.options.d log4j2.properties role_mapping.yml roles.yml users users_roles # 修改配置文件 vi elasticsearch.yml # 加入跨域配置 http.cors.enabled: true http.cors.allow-origin: "*" -
重启容器
docker restart ES01
2.4.部署ik中文分词器插件
-
进入
ES01容器内部,在plugins目录下新建ik文件夹docker exec -it ES01 /bin/bash cd plugins/ mkdir ik ls -
在CMD中使用Docker命令将文件发送到容器中
docker cp C:\Users\tadechen\Desktop\elasticsearch-analysis-ik-7.10.1.tar.gz ES01:/usr/share/elasticsearch/plugins/ik -
进入
ES01容器unzip elasticsearch-analysis-ik-7.10.1.tar.gz rm -rf elasticsearch-analysis-ik-7.10.1.tar.gz cd elasticsearch-analysis-ik-7.10.1/ mv * ../ cd .. rm -rf elasticsearch-analysis-ik-7.10.1 ls exit
2.5.Docker安装elasticsearch-head
-
在CMD中拉取
elasticsearch-head镜像docker pull mobz/elasticsearch-head:5 -
在CMD中启动
docker run -d --name es_admin -p 9100:9100 mobz/elasticsearch-head:5 -
连接
elasticsearch7.X时需要修改请求头-
进入容器
elasticsearch-head:5
docker exec -it es_admin /bin/bash -
安装vim,方法如上
-
修改文件
cd _site/ vim vendor.js # 打开行号 :set nu # 跳转到指定行 :6886 # 共有两处 1)6886行 contentType: "application/x-www-form-urlencoded 改成 contentType: "application/json;charset=UTF-8" 2)7573行 var inspectData = s.contentType === "application/x-www-form-urlencoded" && 改成 var inspectData = s.contentType === "application/json;charset=UTF-8" && -
直接刷新页面
-
-
使用浏览器访问http://localhost:9100/
3.Docker安装Kibana(注意版本适配)
- 拉取镜像
docker pull kibana:7.10.1 - 启动
docker run -d --name kibana -e "I18N_LOCALE=zh-CN" --link ES01:elasticsearch -p 5601:5601 kibana:7.10.1
--link:将当前容器链接到另外一个容器,前面写容器名,:后接镜像名 - 使用浏览器访问http://localhost:5601/
4.命令模式的使用
4.1.Rest风格使用
一种软件架构风格,而不是标准。更易于实现缓存等机制
| method | url地址 | 描述 |
|---|---|---|
| PUT | localhost:9200/索引名称/类型名称/文档id | 创建文档(指定文档id) |
| POST | localhost:9200/索引名称/类型名称 | 创建文档(随机文档id) |
| POST | localhost:9200/索引名称/类型名称/文档id/_update | 修改文档 |
| DELETE | localhost:9200/索引名称/类型名称/文档id | 删除文档 |
| GET | localhost:9200/索引名称/类型名称/文档id | 通过文档id查询文档 |
| POST | localhost:9200/索引名称/类型名称/_search | 查询所有的数据 |
4.2.测试索引
4.2.1.创建一个索引
PUT /索引名/~类型名~/文档id
{请求体}
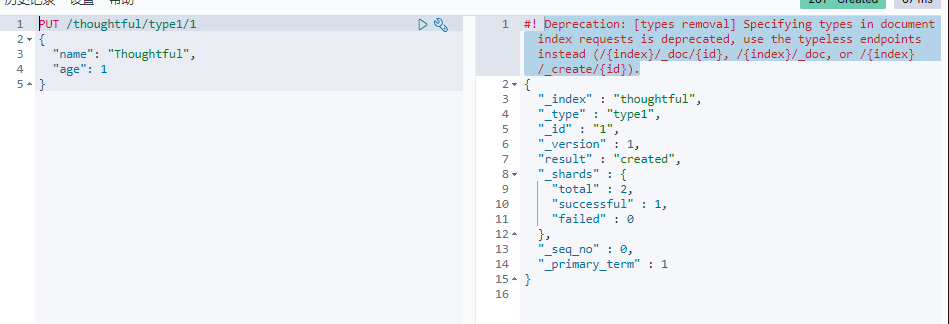
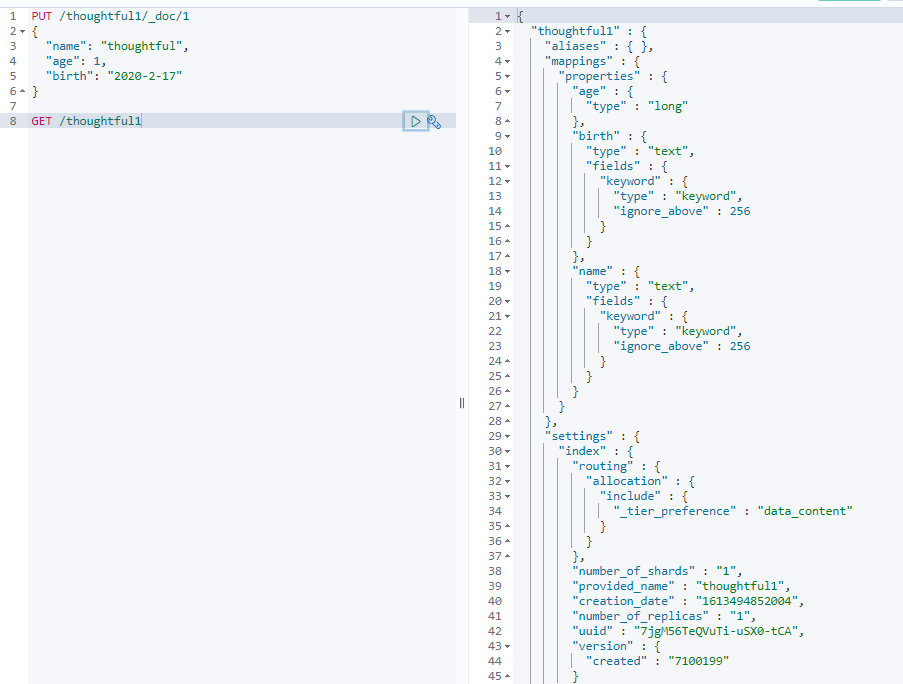
添加了一个索引同时添加了数据
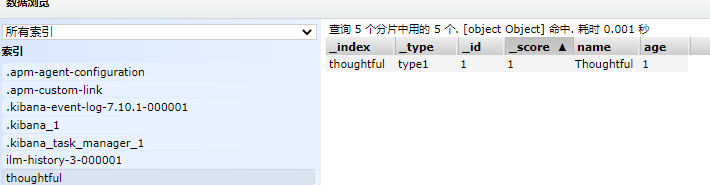
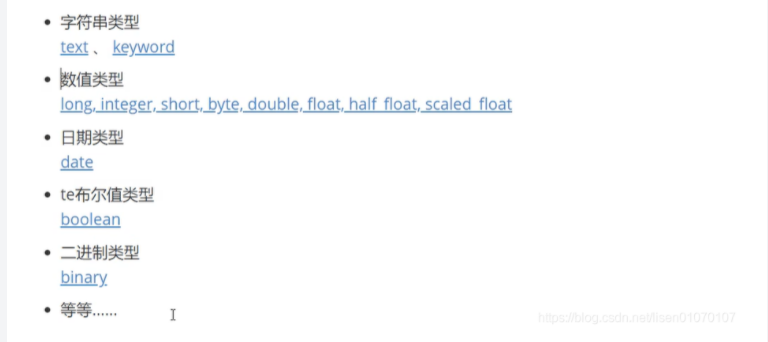
这里创建时并没有指定属性的类型,Elasticsearch给它一个默认的类型,Elasticsearch包含的数据类型有:
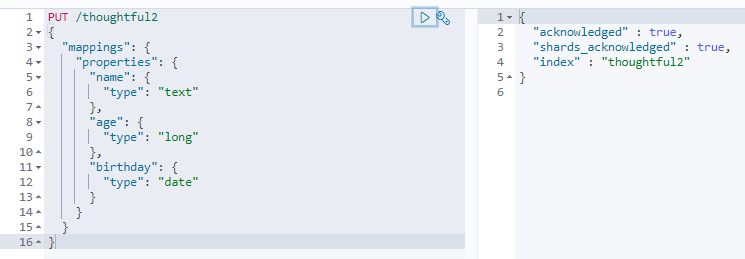
可以通过下面的方法指定规则,类似MYSQL中的建表:
PUT /thoughtful2
{
  "mappings": {
    "properties": {
      "name": {
        "type": "text"
      },
      "age": {
        "type": "long"
      },
      "birthday": {
        "type": "date"
      }
    }
  }
}
可以直接通过GET来获取索引的规则:
GET /thoughful2
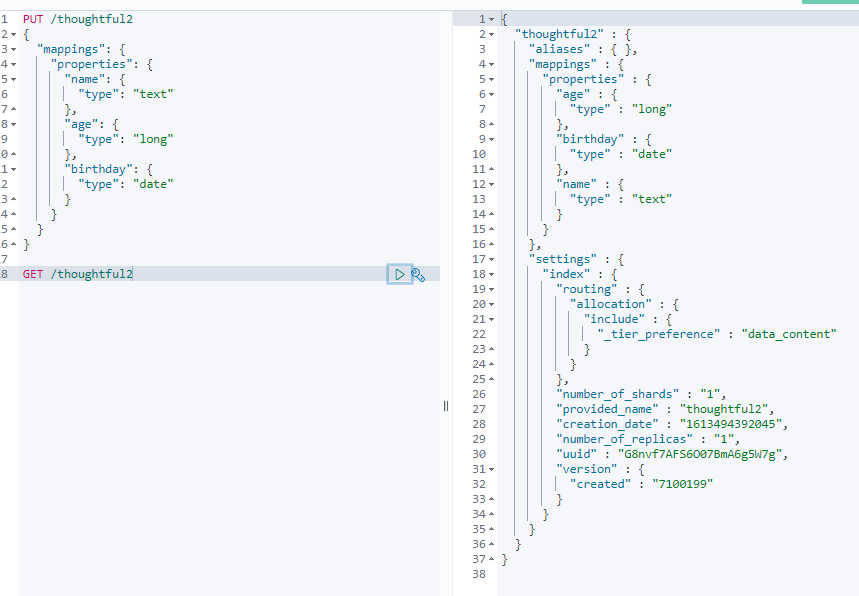
如果自己不指定文档字段类型,那么ES会自动给默认类型
4.2.2.修改索引
-
修改继续使用之前的PUT命令,根据id修改
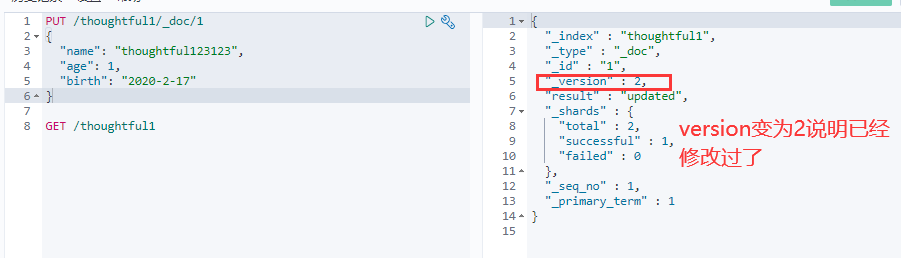
但是如果没有填写的字段会重置为空了 ,相当于java接口传对象修改,如果只是传id的某些字段,那其他没传的值都为空了。 -
第二种采用update方法,这种不设置某些值数据不会丢失
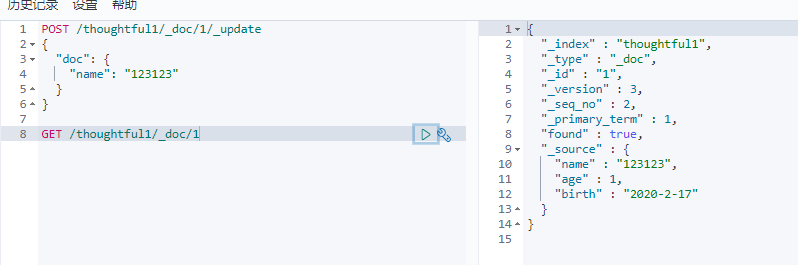
下面这俩种办法都会将不修改的值去除
POST /thoughtful1/_doc/1/
{
  "doc": {
    "name": "123123"
  }
}

POST /thoughtful1/_doc/1/
{
   "name": "123123"
}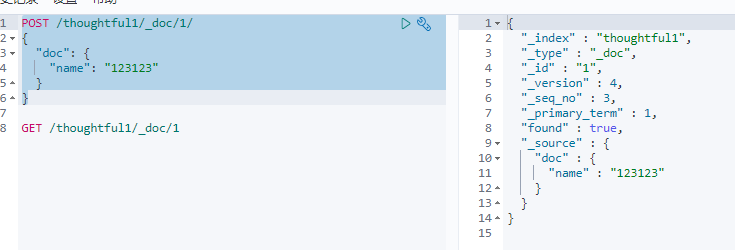
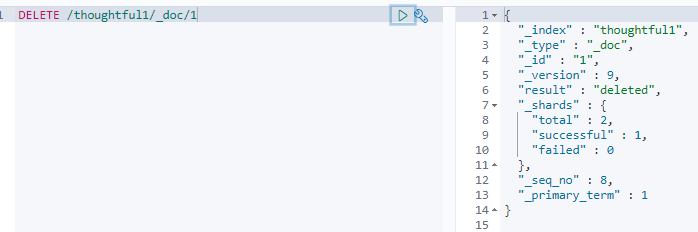
4.2.3.删除索引
通过DELETE命令实现删除,根据你的请求来判断是删除索引还是删除文档记录
4.3.测试文档
查询功能:
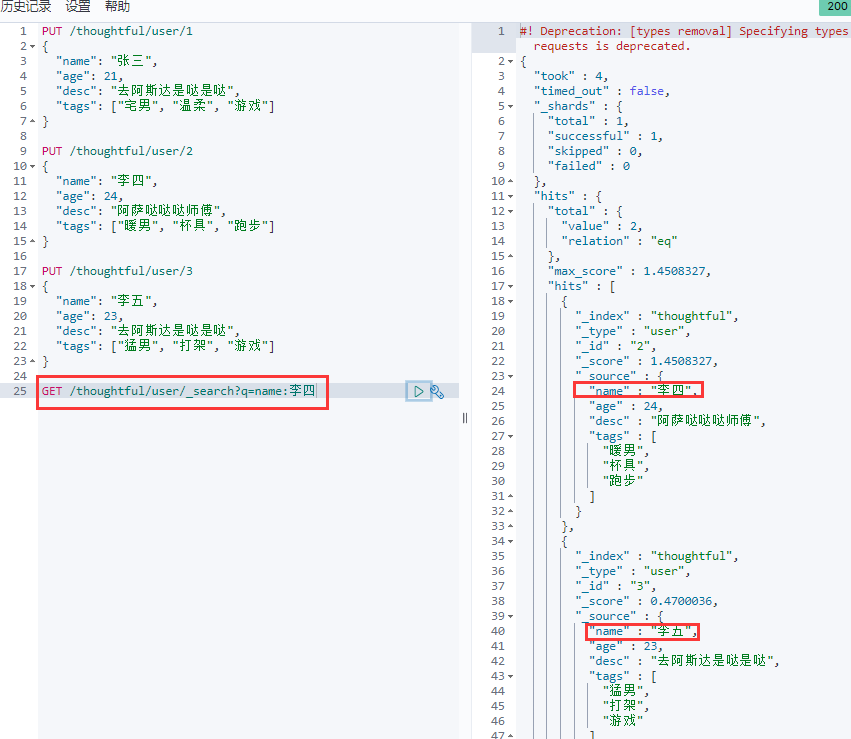
这边name是text类型,所以做了分词的查询。如果是keyword就不会分词搜索了
4.4.复杂的搜索(排序、分页、高亮、模糊查询、精准查询)
-
查询:

-
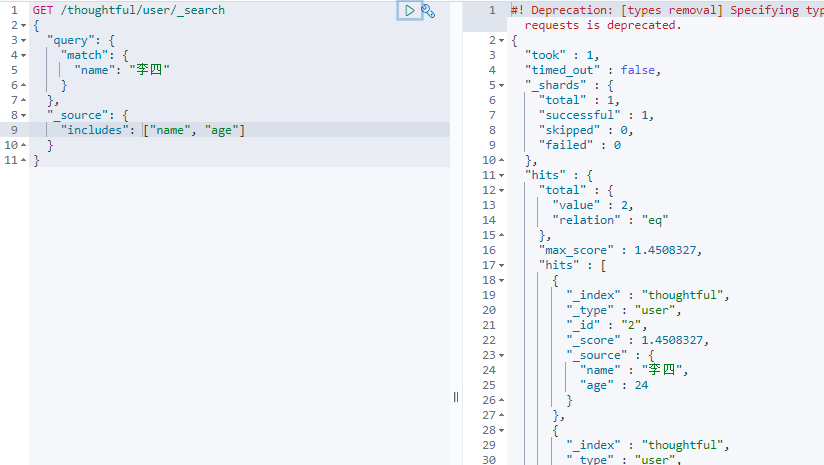
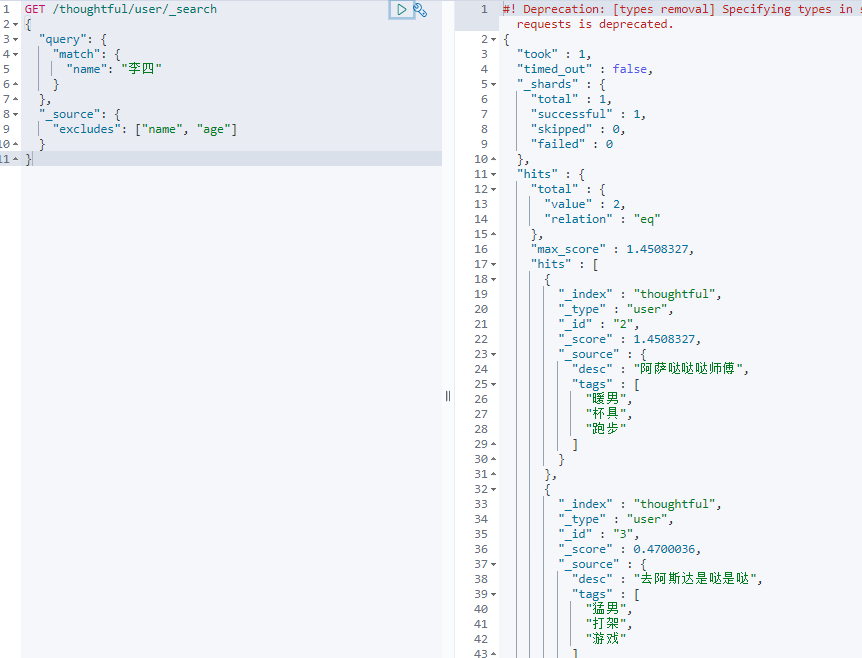
结果过滤,只显示指定的字段:
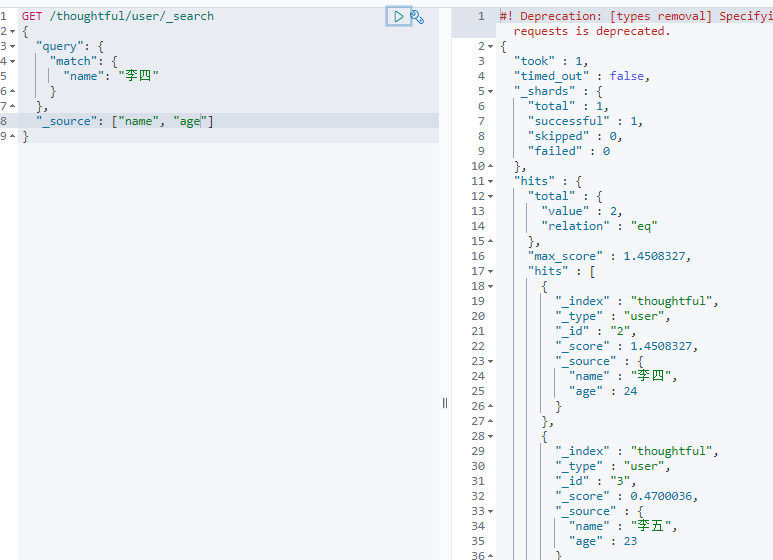
包含:
排除:
-
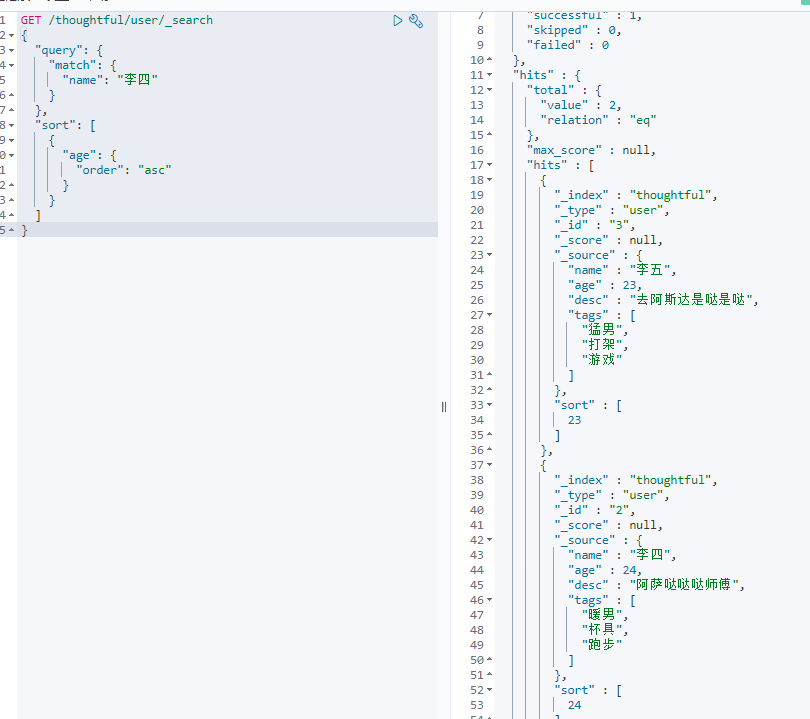
排序:
-
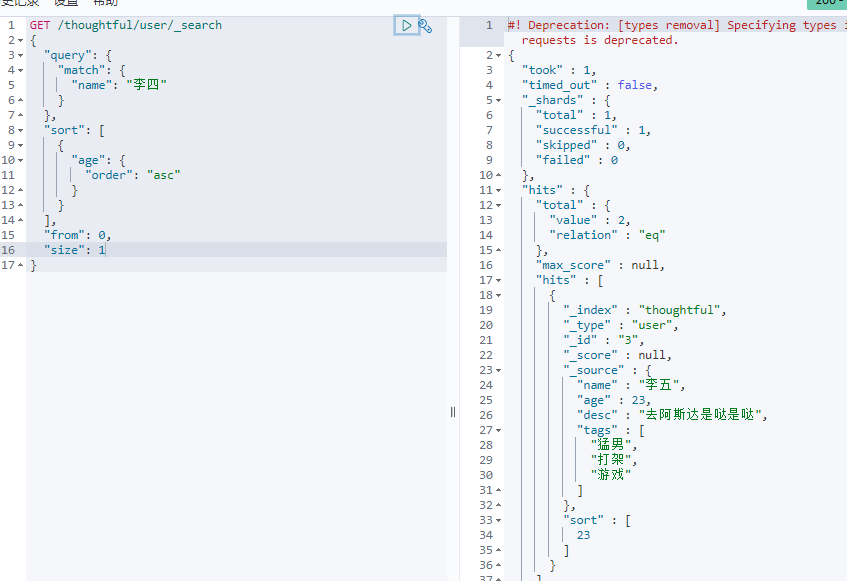
分页:
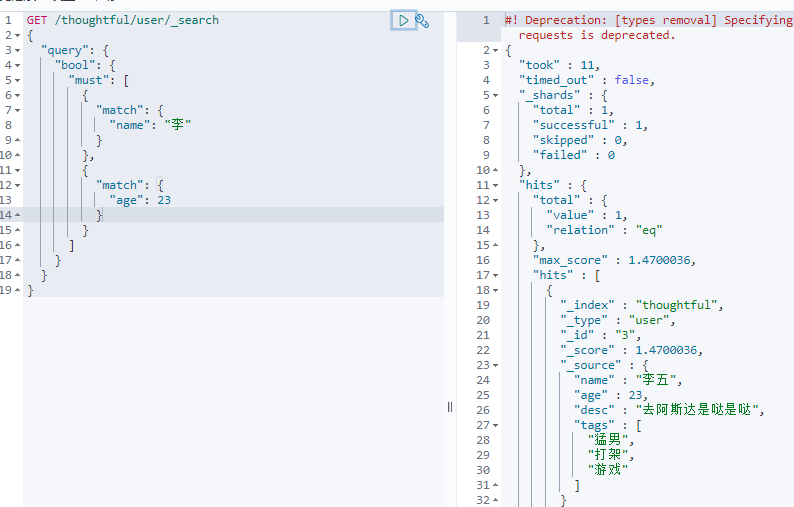
4.5.多条件查询
-
must/and,所有的条件都要符合
-
should/or或者
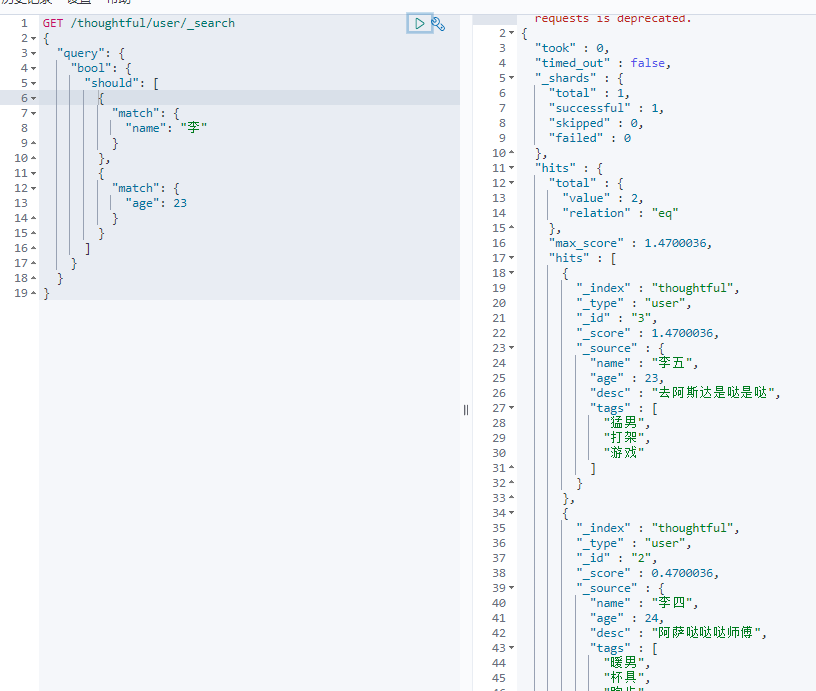
-
must_not/not排除
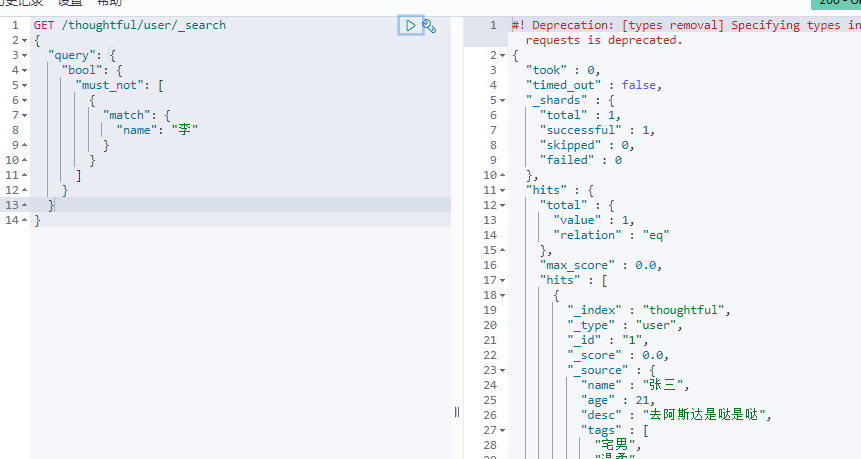
-
条件区间
命令 含义 gt 大于 gte 大于等于 lt 小于 lte 小于等于 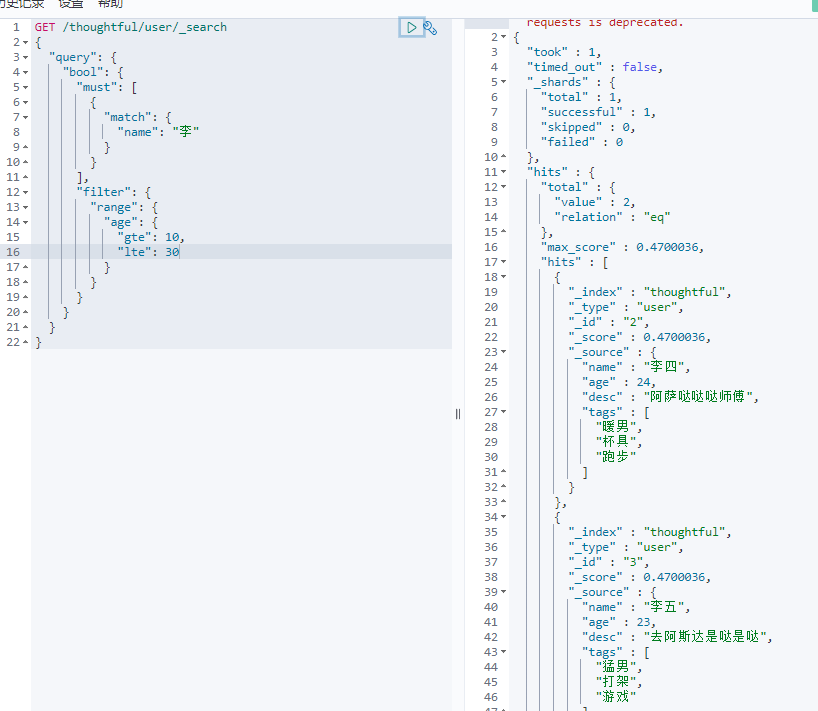
4.6.匹配多个条件(数组)
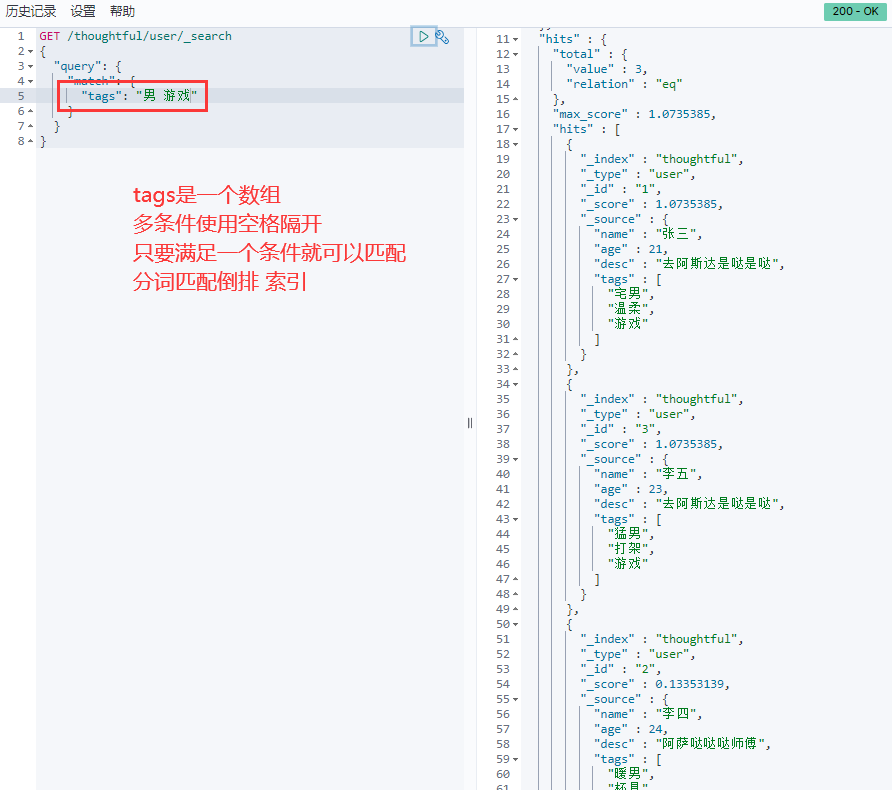
4.7.精确查找
term查询是直接通过倒排索引指定的词条进行精确查找
关于分词
- term,直接查询精确的
- match,会使用分词器解析!(先分析文档,然后通过分析的文档进行查询)

默认将text分词了
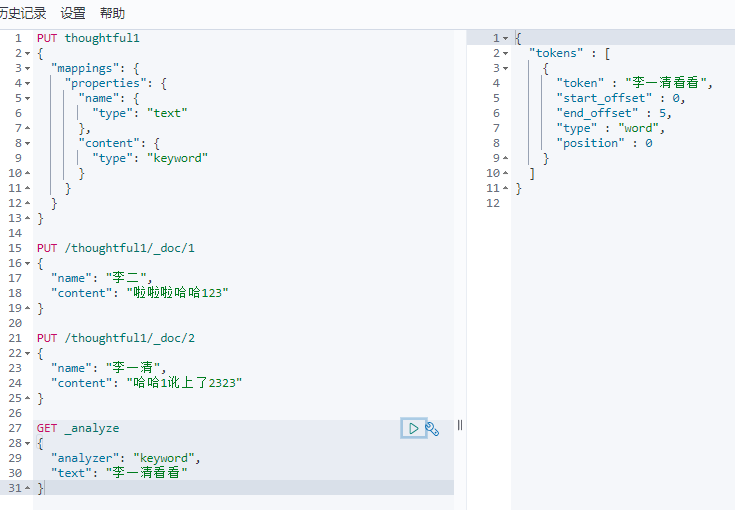
keyword后没有被分词
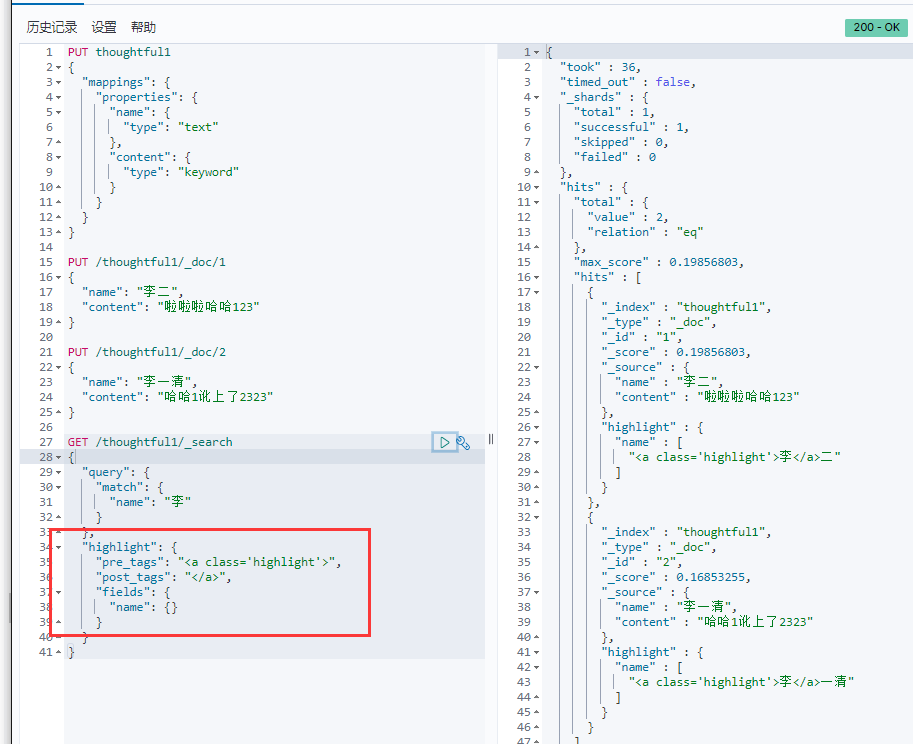
4.8.高亮(可自定义标签)
5.Spring Boot 集成
-
创建
Spring Boot工程时,选择web模块和NoSQL中的elasticsearch模块 -
修改
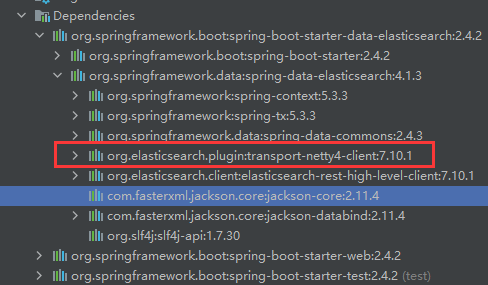
pom.xml文件,将版本修改为你的elasticsearch版本<properties> <java.version>1.8</java.version> <elasticsearch.version>7.10.1</elasticsearch.version> </properties>确定版本号:
-
注入
RestHighLevelClient客户端package com.thoughtful.springboot03elasticsearcch.config; import org.apache.http.HttpHost; import org.elasticsearch.client.RestClient; import org.elasticsearch.client.RestHighLevelClient; import org.springframework.context.annotation.Bean; import org.springframework.context.annotation.Configuration; /** * @ClassName: ElasticSearchClientConfig * @author: Thoughtful * @DATE: 2021/2/17 2:05 */ @Configuration public class ElasticSearchClientConfig { @Bean public RestHighLevelClient restHighLevelClient() { return new RestHighLevelClient( RestClient.builder(new HttpHost("127.0.0.1", 9200, "http")) ); } } -
测试索引的增、删、存在API
@Autowired RestHighLevelClient client; //测试索引的创建 @Test void testCreateIndex() throws IOException { //1.创建索引的请求 CreateIndexRequest request = new CreateIndexRequest("test_index"); //2客户端执行请求,请求后获得响应 CreateIndexResponse response = client.indices().create(request, RequestOptions.DEFAULT); System.out.println(response); } //测试索引是否存在 @Test void testExistIndex() throws IOException { //1.创建索引的请求 GetIndexRequest request = new GetIndexRequest("test_index"); //2客户端执行请求,请求后获得响应 boolean exist = client.indices().exists(request, RequestOptions.DEFAULT); System.out.println("测试索引是否存在-----"+exist); } //删除索引 @Test void testDeleteIndex() throws IOException { DeleteIndexRequest request = new DeleteIndexRequest("test_index"); AcknowledgedResponse delete = client.indices().delete(request,RequestOptions.DEFAULT); System.out.println("删除索引--------"+delete.isAcknowledged()); } -
文档的操作
// 测试添加文档
@Test
void testAddDocument() throws IOException {
    User user = new User("test1", 27);
    IndexRequest request = new IndexRequest("test_index");
    request.id("1");
    // 设置超时时间
    request.timeout("1s");
    // 将数据放到json字符串
    request.source(JSON.toJSONString(user), XContentType.JSON);
    // 发送请求
    IndexResponse response = client.index(request,RequestOptions.DEFAULT);
    System.out.println("添加文档-------"+response.toString());
    System.out.println("添加文档-------"+response.status());
    // 结果
    // 添加文档-------IndexResponse[index=test_index,type=_doc,id=1,version=1,result=created,seqNo=0,primaryTerm=1,shards={"total":2,"successful":1,"failed":0}]
    // 添加文档-------CREATED
}

// 测试文档是否存在
@Test
void testExistDocument() throws IOException {
    // 测试文档的 没有index
    GetRequest request= new GetRequest("test_index","1");
    // 没有indices()了
    boolean exist = client.exists(request, RequestOptions.DEFAULT);
    System.out.println("测试文档是否存在-----"+exist);
}

// 测试获取文档
@Test
void testGetDocument() throws IOException {
    GetRequest request= new GetRequest("test_index","1");
    GetResponse response = client.get(request, RequestOptions.DEFAULT);
    System.out.println("测试获取文档-----"+response.getSourceAsString());
    System.out.println("测试获取文档-----"+response);

    // 结果
    // 测试获取文档-----{"age":27,"username":"test1"}
    // 测试获取文档-----{"_index":"test_index","_type":"_doc","_id":"1","_version":1,"_seq_no":0,"_primary_term":1,"found":true,"_source":{"age":27,"username":"test1"}}
}

// 测试修改文档
@Test
void testUpdateDocument() throws IOException {
    User user = new User("李逍遥", 23);
    //修改是id为1的
    UpdateRequest request= new UpdateRequest("test_index","1");
    request.timeout("1s");
    request.doc(JSON.toJSONString(user), XContentType.JSON);

    UpdateResponse response = client.update(request, RequestOptions.DEFAULT);
    System.out.println("测试修改文档-----"+response);
    System.out.println("测试修改文档-----"+response.status());

    // 结果
    // 测试修改文档-----UpdateResponse[index=test_index,type=_doc,id=1,version=2,seqNo=1,primaryTerm=1,result=updated,shards=ShardInfo{total=2, successful=1, failures=[]}]
    // 测试修改文档-----OK
}


// 测试删除文档
@Test
void testDeleteDocument() throws IOException {
    DeleteRequest request= new DeleteRequest("test_index","1");
    request.timeout("1s");
    DeleteResponse response = client.delete(request, RequestOptions.DEFAULT);
    System.out.println("测试删除文档------"+response.status());
}

// 测试批量添加文档
@Test
void testBulkAddDocument() throws IOException {
    ArrayList<User> userlist=new ArrayList<User>();
    userlist.add(new User("test1",5));
    userlist.add(new User("test2",6));
    userlist.add(new User("test3",40));
    userlist.add(new User("test4",25));
    userlist.add(new User("test5",15));
    userlist.add(new User("test6",35));

    // 批量操作的Request
    BulkRequest request = new BulkRequest();
    request.timeout("1s");

    // 批量处理请求
    for (int i = 0; i < userlist.size(); i++) {
        request.add(
                new IndexRequest("test_index")
                        .id("" + ( i + 1 ) )
                        .source(JSON.toJSONString(userlist.get(i)),XContentType.JSON)
        );
    }
    BulkResponse response = client.bulk(request, RequestOptions.DEFAULT);
    // response.hasFailures()是否是失败的
    System.out.println("测试批量添加文档-----"+response.hasFailures());

    // 结果:false为成功 true为失败
    // 测试批量添加文档-----false
}


// 测试查询文档
@Test
void testSearchDocument() throws IOException {
    SearchRequest request = new SearchRequest("test_index");
    // 构建搜索条件
    SearchSourceBuilder sourceBuilder = new SearchSourceBuilder();
    // 设置了高亮
    sourceBuilder.highlighter();
    // term name为cyx1的
    TermQueryBuilder termQueryBuilder = QueryBuilders.termQuery("username", "test1");
    sourceBuilder.query(termQueryBuilder);
    sourceBuilder.timeout(new TimeValue(60, TimeUnit.SECONDS));

    request.source(sourceBuilder);
    SearchResponse response = client.search(request, RequestOptions.DEFAULT);

    System.out.println("测试查询文档-----"+JSON.toJSONString(response.getHits()));
    System.out.println("=====================");
    for (SearchHit documentFields : response.getHits().getHits()) {
        System.out.println("测试查询文档--遍历参数--"+documentFields.getSourceAsMap());
    }

    // 测试查询文档-----{"fragment":true,"hits":[{"fields":{},"fragment":false,"highlightFields":{},"id":"1","matchedQueries":[],"primaryTerm":0,"rawSortValues":[],"score":1.3950763,"seqNo":-2,"sortValues":[],"sourceAsMap":{"age":5,"username":"test1"},"sourceAsString":"{\"age\":5,\"username\":\"test1\"}","sourceRef":{"fragment":true},"type":"_doc","version":-1}],"maxScore":1.3950763,"totalHits":{"relation":"EQUAL_TO","value":1}}测试查询文档-----{"fragment":true,"hits":[{"fields":{},"fragment":false,"highlightFields":{},"id":"1","matchedQueries":[],"primaryTerm":0,"rawSortValues":[],"score":1.3950763,"seqNo":-2,"sortValues":[],"sourceAsMap":{"age":5,"username":"test1"},"sourceAsString":"{\"age\":5,\"username\":\"test1\"}","sourceRef":{"fragment":true},"type":"_doc","version":-1}],"maxScore":1.3950763,"totalHits":{"relation":"EQUAL_TO","value":1}}
    // =====================
    // 测试查询文档--遍历参数--{age=5, username=test1}
}

 浙公网安备 33010602011771号