
Spring MVC学习笔记——Welcome
1.SpringMVC概念

2.整个springmvc运行的流程

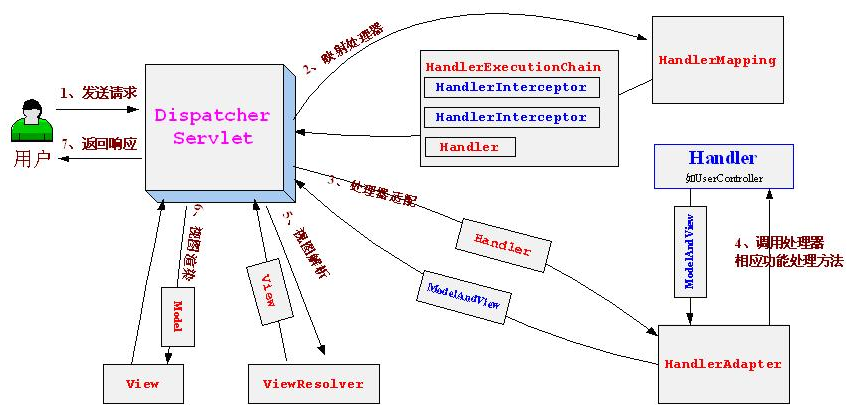
请求--><1>Dispatcher servlet(controller控制器)--><2>HandlerMapping(这个在配置文件中写,可以通过这个找到url该给哪个具体的controller来处理)
--><3>controller(具体的控制器)--><4>Model and logical viewname(具体的控制器再将值传给dispatcher servlet)
--><5>view resolver(通过这来找到对应的视图)
--><6>view

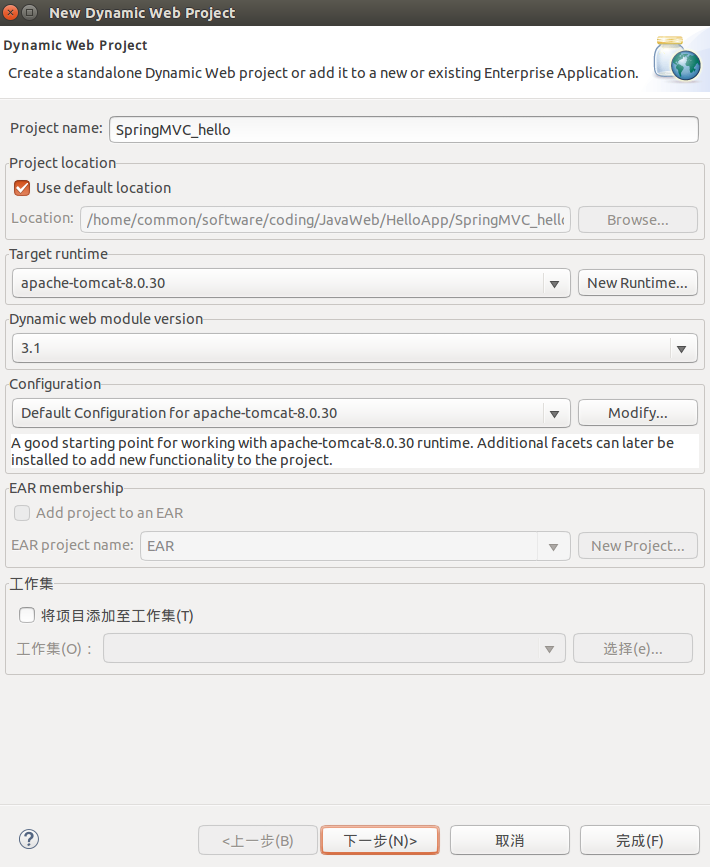
3.创建SpringMVC项目
在eclipse下建立一个动态web项目springmvc_hello,记得勾选web.xml的生成按钮


在生成的项目的WEB-INF的lib文件夹下面导jar包
要开发一个Welcome项目需要导两个包:
一个是springmvc的包,另一个是Apache的commonslogging的包
两个包的官方下载地址分别是
http://maven.springframework.org/release/org/springframework/spring/3.2.0.RELEASE/
和http://commons.apache.org/ (bin的那个包,不是源代码包)

1.在导包了之后,写web.xml,每一个应用有一个web.xml文件,发送请求之后,会在mapping里面寻找.html或者.jsp等,然后找到相应的hello,然后通过hello去Servlet的定义里面查找Servlet-name是hello的Servlet服务,即找到hello-servlet.xml(在配置文件web.xml写HandlerMapping)

web.xml启动Dispatcher Servlet,写web.xml的时候把生成时候里面的display-name和welcome-file-list删除后开始写
注意:<servlet-name>hello</servlet-name>和hello-servlet.xml的名字是对应的
<?xml version="1.0" encoding="UTF-8"?>
<web-app xmlns:xsi="http://www.w3.org/2001/XMLSchema-instance" xmlns="http://xmlns.jcp.org/xml/ns/javaee" xsi:schemaLocation="http://xmlns.jcp.org/xml/ns/javaee http://xmlns.jcp.org/xml/ns/javaee/web-app_3_1.xsd" id="WebApp_ID" version="3.1">
    <!-- 配置DispatchServlet,截获特定的URL请求 -->
    <!-- 默认自动加载/WEB-INF/simpleSpringMVC-servlet.xml -->
    <!-- (即<servlet-name>-servlet.xml)的Spring配置文件,启动web层的Spring容器 -->
  <servlet>
        <servlet-name>hello</servlet-name>
        <servlet-class>org.springframework.web.servlet.DispatcherServlet</servlet-class>
        <load-on-startup>1</load-on-startup>
    </servlet>
    <servlet-mapping>
        <servlet-name>hello</servlet-name>
        <url-pattern>/</url-pattern>
    </servlet-mapping>

</web-app>
2.然后写hello-servlet.xml,这个文件是写springmvc的配置文件,这个就是具体的控制器,在这里如果请求是/hello.html,则可以找到HelloController这个类,在这个类中处理过后,又向控制器返回视图,然后控制器
在WEB-INF文件夹下面新建Spring Bean Configuration File文件,要建立这个文件必须安装spring的插件,然后选中beans context和mvc这三个选项
没有spring插件的话,从spring framework reference.html这个帮助文档中寻找例子

<?xml version="1.0" encoding="UTF-8"?>
<beans xmlns="http://www.springframework.org/schema/beans"
    xmlns:xsi="http://www.w3.org/2001/XMLSchema-instance"
    xmlns:context="http://www.springframework.org/schema/context"
    xmlns:mvc="http://www.springframework.org/schema/mvc"
    xsi:schemaLocation="http://www.springframework.org/schema/mvc http://www.springframework.org/schema/mvc/spring-mvc-3.1.xsd
        http://www.springframework.org/schema/beans http://www.springframework.org/schema/beans/spring-beans.xsd
        http://www.springframework.org/schema/context http://www.springframework.org/schema/context/spring-context-3.1.xsd">

    <!-- /hello.html对应控制器HelloController -->
    <bean name="/hello.html" class="org.common.controller.HelloController"></bean>
    <!-- InternalResourceViewResolver视图的映射关系,还有其他很多视图 -->
    <bean class="org.springframework.web.servlet.view.InternalResourceViewResolver">
        <property name="prefix" value="/WEB-INF/jsp/"></property>
        <property name="suffix" value=".jsp"></property>
    </bean>


</beans>
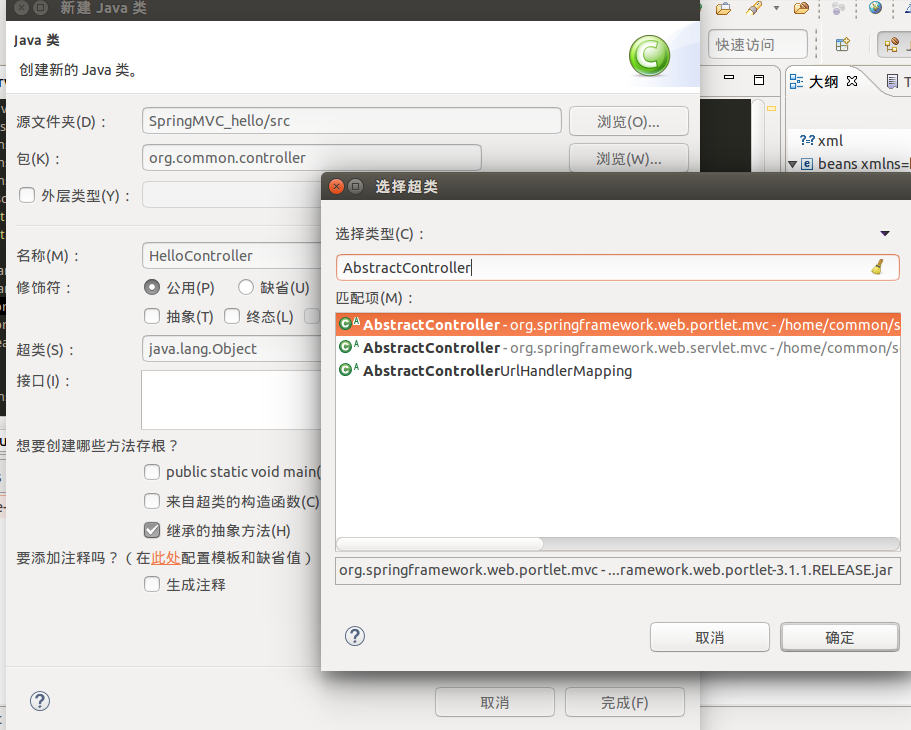
3.在src文件夹下建包org.common.controller,然后建HelloController类
这个类必须继承org.springframework.web.servlet.mvc.AbstractController(注意是第二个,不是Portlet)
在类中做处理,然后返回视图给控制器
package org.common.controller;

import javax.servlet.http.HttpServletRequest;
import javax.servlet.http.HttpServletResponse;

import org.springframework.web.servlet.ModelAndView;
import org.springframework.web.servlet.mvc.AbstractController;

public class HelloController extends AbstractController {

	@Override
	protected ModelAndView handleRequestInternal(HttpServletRequest arg0, HttpServletResponse arg1) throws Exception {
		// TODO 自动生成的方法存根
		System.out.println("hello");								//可以输出一句话
        return new ModelAndView("hello");			//返回一个视图hello,在hello-servelet.xml写对应的映射hello.jsp
	}

}
4.在WEB-INF文件夹下面的jsp文件夹里面的hello.jsp文件
<%@ page language="java" contentType="text/html; charset=UTF-8"
    pageEncoding="UTF-8"%>
<!DOCTYPE html PUBLIC "-//W3C//DTD HTML 4.01 Transitional//EN" "http://www.w3.org/TR/html4/loose.dtd">
<html>
<head>
<meta http-equiv="Content-Type" content="text/html; charset=UTF-8">
<title>Insert title here</title>
</head>
<body>
<h1>Welcome!!</h1>
</body>
</html>
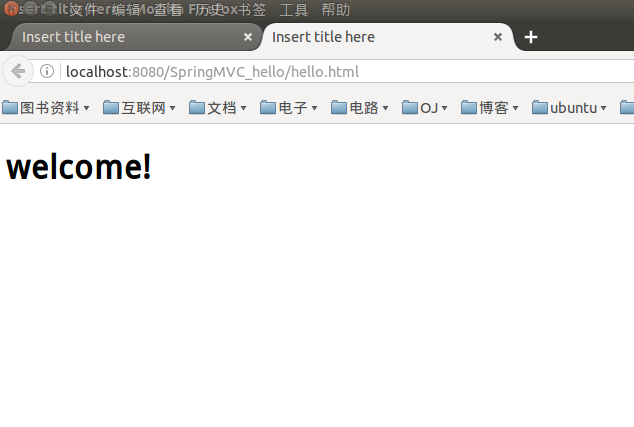
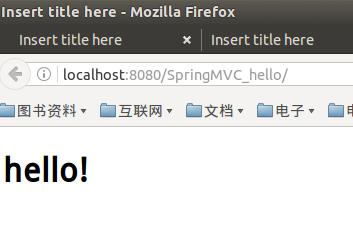
最后访问 http://localhost:8080/SpringMVC_hello/hello.html
但是,上面使用的java文件中的handler mapping一般都不用
protected ModelAndView handleRequestInternal(HttpServletRequest arg0, HttpServletResponse arg1) throws Exception {
一般使用的是defaultAnnotationHandleMapping
使用annotation的HelloWord,只需要在原来的hello-servlet.xml文件中加入
<context:component-scan base-package="org.common.controller"></context:component-scan>
<mvc:annotation-driven></mvc:annotation-driven>
去掉
<bean name="/hello.html" class="org.common.controller.HelloController"></bean>
1.hello-servlet.xml文件
<?xml version="1.0" encoding="UTF-8"?>
<beans xmlns="http://www.springframework.org/schema/beans"
    xmlns:xsi="http://www.w3.org/2001/XMLSchema-instance"
    xmlns:context="http://www.springframework.org/schema/context"
    xmlns:mvc="http://www.springframework.org/schema/mvc"
    xsi:schemaLocation="http://www.springframework.org/schema/mvc http://www.springframework.org/schema/mvc/spring-mvc-3.1.xsd
        http://www.springframework.org/schema/beans http://www.springframework.org/schema/beans/spring-beans.xsd
        http://www.springframework.org/schema/context http://www.springframework.org/schema/context/spring-context-3.1.xsd">

    <!-- 使用defaultAnnotationHandleMapping -->
    <context:component-scan base-package="org.common.controller"></context:component-scan>
	<mvc:annotation-driven></mvc:annotation-driven>
    <!-- /hello.html对应控制器HelloController -->
    <!--  <bean name="/hello.html" class="org.common.controller.HelloController"></bean>-->
    <!-- InternalResourceViewResolver视图的映射关系,还有其他很多视图 -->
    <bean class="org.springframework.web.servlet.view.InternalResourceViewResolver">
        <property name="prefix" value="/WEB-INF/jsp/"></property>
        <property name="suffix" value=".jsp"></property>
    </bean>


</beans>
接下来就能使用Annotation来配置控制器,完全修改HelloController.java文件,加上@Controller注入
2.HelloController.java文件
package org.common.controller;
import org.springframework.stereotype.Controller;
import org.springframework.web.bind.annotation.RequestMapping;
@Controller
public class HelloController {
//RequestMapping表示用哪一个url来对应
@RequestMapping({"/hello","/"})
public String hello(){
System.out.println("hello");
return "hello";
}
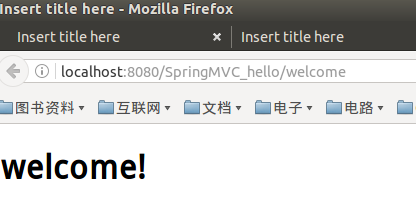
@RequestMapping("/welcome")
public String welcome(){
System.out.println("welcome");
return "welcome";
}
}
3.在jsp文件夹下面新建welcome.jsp文件

参考:
http://blog.csdn.net/hehexiaoyou/article/details/23747617
http://www.codingyun.com/article/47.html
本文只发表于博客园和tonglin0325的博客,作者:tonglin0325,转载请注明原文链接:https://www.cnblogs.com/tonglin0325/p/5504198.html

 浙公网安备 33010602011771号