
Ubuntu 22.04 LTS 使用 kubeadm 部署 k8s 1.26.3(containerd作为容器运行时)
Kubernetes 是什么?
Kubernetes 是一个可移植、可扩展的开源平台,用于管理容器化的工作负载和服务,可促进声明式配置和自动化。 Kubernetes 拥有一个庞大且快速增长的生态,其服务、支持和工具的使用范围相当广泛。
Kubernetes 这个名字源于希腊语,意为“舵手”或“飞行员”。k8s 这个缩写是因为 k 和 s 之间有八个字符的关系。 Google 在 2014 年开源了 Kubernetes 项目。 Kubernetes 建立在 Google 大规模运行生产工作负载十几年经验的基础上, 结合了社区中最优秀的想法和实践。
k8s 官方文档:https://kubernetes.io/zh-cn/docs/
为什么需要 Kubernetes,它能做什么?
容器是打包和运行应用程序的好方式。在生产环境中, 你需要管理运行着应用程序的容器,并确保服务不会下线。 例如,如果一个容器发生故障,则你需要启动另一个容器。 如果此行为交由给系统处理,是不是会更容易一些?
这就是 Kubernetes 要来做的事情! Kubernetes 为你提供了一个可弹性运行分布式系统的框架。 Kubernetes 会满足你的扩展要求、故障转移你的应用、提供部署模式等。 例如,Kubernetes 可以轻松管理系统的 Canary (金丝雀) 部署。
Kubernetes 为你提供:
- 服务发现和负载均衡
Kubernetes 可以使用 DNS 名称或自己的 IP 地址来暴露容器。 如果进入容器的流量很大, Kubernetes 可以负载均衡并分配网络流量,从而使部署稳定。
- 存储编排
Kubernetes 允许你自动挂载你选择的存储系统,例如本地存储、公共云提供商等。
- 自动部署和回滚
你可以使用 Kubernetes 描述已部署容器的所需状态, 它可以以受控的速率将实际状态更改为期望状态。 例如,你可以自动化 Kubernetes 来为你的部署创建新容器, 删除现有容器并将它们的所有资源用于新容器。
- 自动完成装箱计算
你为 Kubernetes 提供许多节点组成的集群,在这个集群上运行容器化的任务。 你告诉 Kubernetes 每个容器需要多少 CPU 和内存 (RAM)。 Kubernetes 可以将这些容器按实际情况调度到你的节点上,以最佳方式利用你的资源。
- 自我修复
Kubernetes 将重新启动失败的容器、替换容器、杀死不响应用户定义的运行状况检查的容器, 并且在准备好服务之前不将其通告给客户端。
- 密钥与配置管理
Kubernetes 允许你存储和管理敏感信息,例如密码、OAuth 令牌和 ssh 密钥。 你可以在不重建容器镜像的情况下部署和更新密钥和应用程序配置,也无需在堆栈配置中暴露密钥。
kubernetes 组件介绍
kubernetes 逻辑架构图
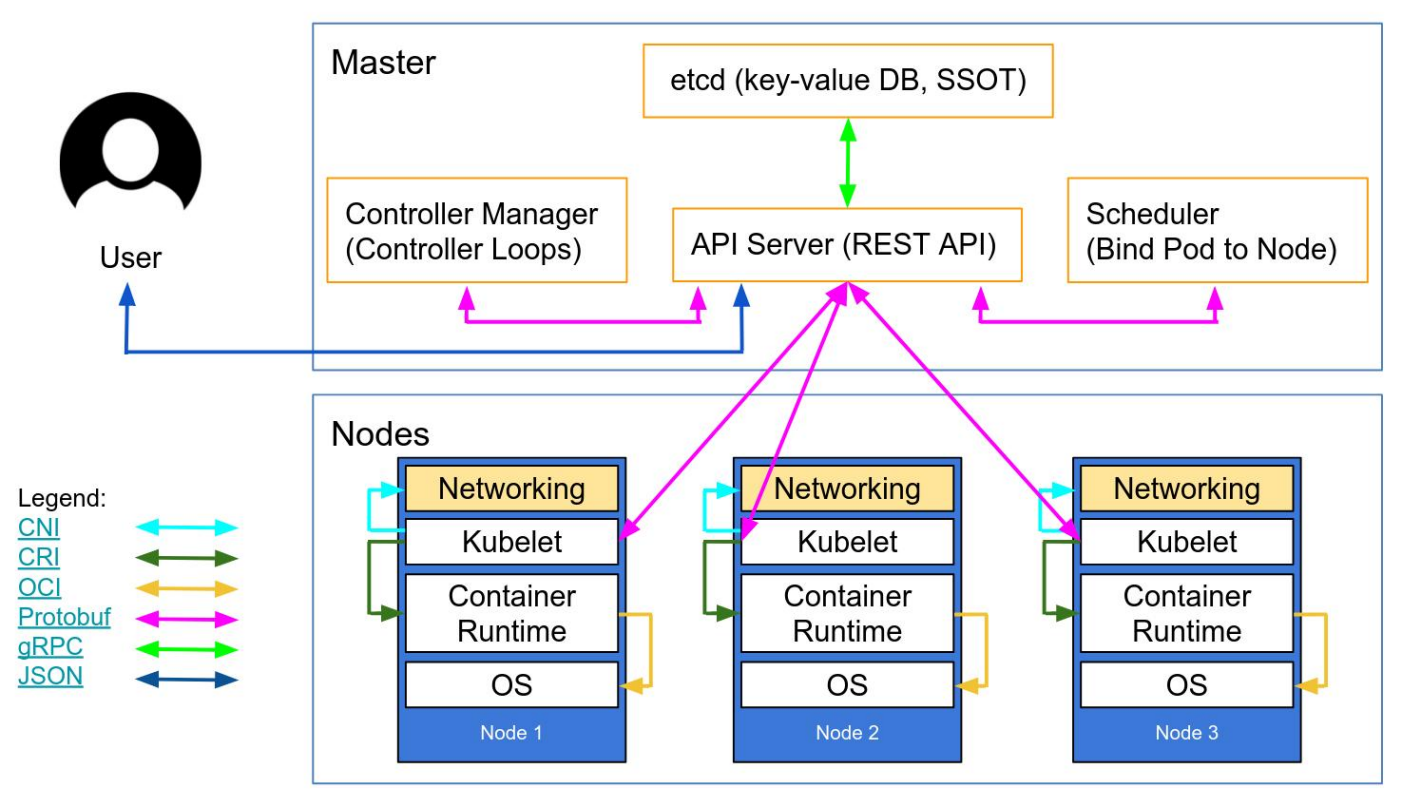
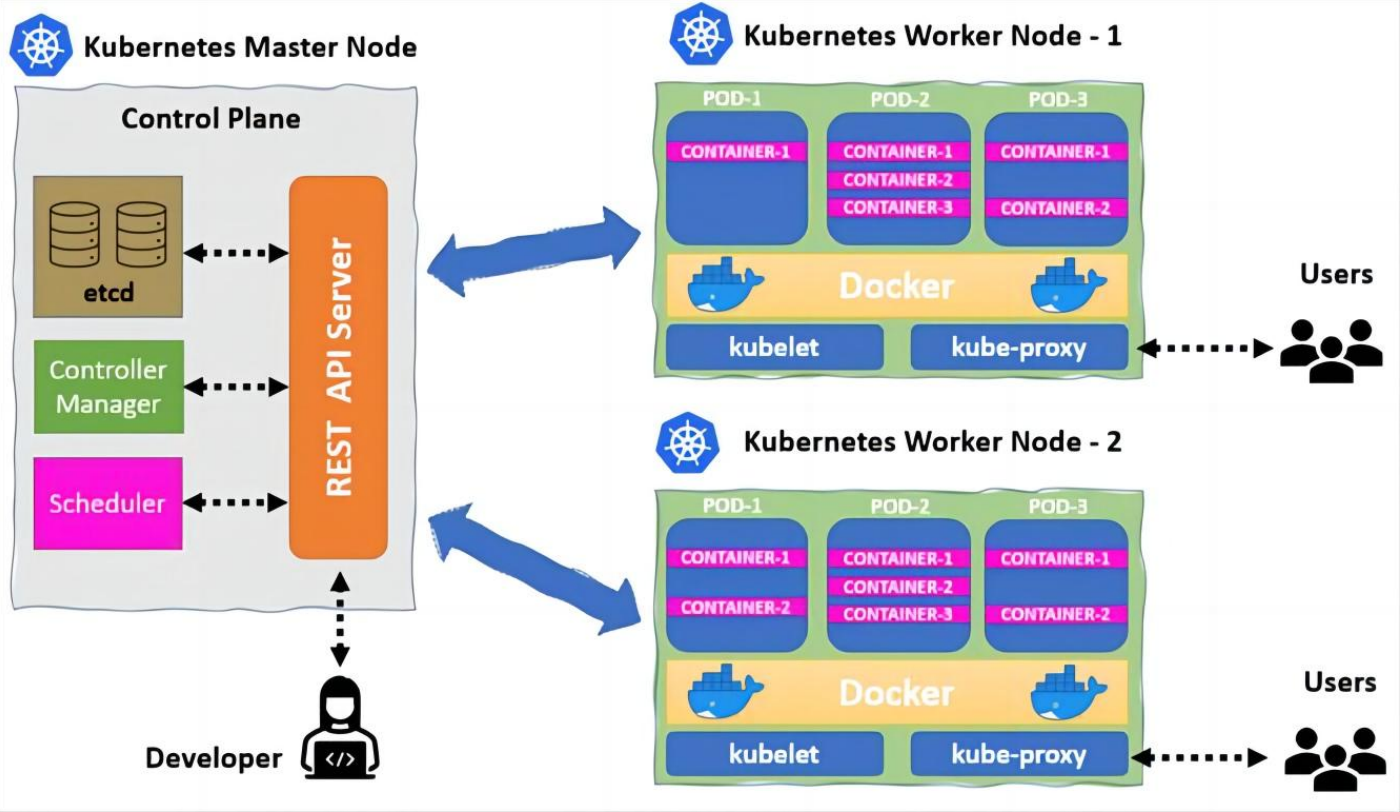
kubernetes master 节点组件
- kube-apiserver
Kubernetes API server 提供了 k8s 各类资源对象的增删改查及 watch 等 HTTP Rest 接口,这些对象包括 pods、services、replicationcontrollers 等,API Server 为 REST 操作提供服务,并为集群的共享状态提供前端,所有其他组件都通过该前端进行交互。
官方文档:https://kubernetes.io/zh-cn/docs/reference/command-line-tools-reference/kube-apiserver/
- etcd
etcd 是 CoreOS 公司开发,目前是 Kubernetes 默认使用的 key-value 数据存储系统,用于保存 kubernetes 的所有集群数据, etcd 支持分布式集群功能,生产环境使用时需要为 etcd 数据提供定期备份机制。
官方文档:https://kubernetes.io/zh-cn/docs/tasks/administer-cluster/configure-upgrade-etcd/
- kube-scheduler
kube-scheduler 是一个控制面(管理)进程,负责将 Pods 按照一定的调度策略指派到目的节点上。通过调度算法为待调度 Pod 列表的每个 Pod 从可用 Node 列表中选择一个最适合的 Node,并将信息写入 etcd 中。node 节点上的 kubelet 通过 API Server 监听到 Kubernetes Scheduler 产生的 Pod绑定信息,然后获取对应的Pod清单,下载 Image,
并启动容器。
官方文档:https://kubernetes.io/zh-cn/docs/reference/command-line-tools-reference/kube-scheduler/
- kube-controller-manager
kube-controller-manager:Controller Manager 还包括一些子控制器(副本控制器、节点控制器、命名空间控制器和服务账号控制器等),控制器作为集群内部的管理控制中心,负责集群内的 Node、Pod 副本、服务端点(Endpoint)、命名空间(Namespace)、服务账号(ServiceAccount)、资源定额(ResourceQuota)的管理,当某个 Node 意外宕机时,Controller Manager 会及时发现并执行自动化修复流程,确保集群中的 pod 副本始终处于预期的工作状态。
官方文档:https://kubernetes.io/zh-cn/docs/reference/command-line-tools-reference/kube-controller-manager/
kubernetes node 节点组件
- kubelet
kubelet 是运行在每个 worker 节点的代理组件,它会监视已分配给节点的 pod,具体功能如下:
向 master 节点汇报 node 节点的状态信息;
接受指令并在 pod 中创建容器;
准备 pod 所需的数据卷;
返回 pod 的运行状态;
在 node 节点执行容器健康检查。
官方文档:https://kubernetes.io/zh-cn/docs/reference/command-line-tools-reference/kubelet/
- kube-proxy
kube-proxy 运行在每个 node 节点上,它反映了 node 节点上 Kubernetes API 中定义的服务,并可以通过一组后端进行简单的 TCP、UDP和 SCTP 流转发或者在一组后端进行循环 TCP、UDP 和 SCTP 转发,用户必须使用 apiserver API 创建一个服务来配置代理,其实就是 kube-proxy 通过在主机上维护网络规则并执行连接转发来实现 Kubernetes 服务访问。kube-proxy 监听 API Server 中服务对象的变化,再通过管理 IPtables 或者 IPVS 规则 来实现网络的转发。
Kube-Proxy 不同的版本可支持三种工作模式:
UserSpace:k8s v1.1 之前使用,k8s v1.2 及以后就已经淘汰。
IPtables:k8s v1.1 版本开始支持,v1.2 开始为默认。
IPVS:k8s v1.9 引入,到 v1.11 为正式版本,需要安装 ipvsadm、ipset 工具包和加载 ip_vs 内核模块。
官方文档:https://kubernetes.io/zh-cn/docs/reference/command-line-tools-reference/kube-proxy/
- 容器运行时(Container Runtime)
容器运行环境是负责运行容器的软件。
Kubernetes 支持许多容器运行环境,例如 containerd、 CRI-O 以及 Kubernetes CRI (容器运行环境接口) 的其他任何实现。
containerd 简介
容器技术除了的 Docker 外,还有其它不同的容器技术,为了保证容器生态的机标准性和健康可持续发展,包括 Linux 基金会、Docker、微软、红帽谷歌和、IBM、华为等公司在 2015 年 6 月共同成立了一个叫 Open Container(OCI) 的组织,其目的就是制定开放的标准的容器规范,目前 OCI 发布了 runtime spec(运行时规范)、image format spec(镜像格式规范)、distribution-spec(镜像分发规范),这样不同的容器公司开发的容器只要兼容以上规范,就可以保证容器的可移植性和相互可操作性。
containerd 是从 Docker 项目中剥离出来的容器运行时,其形成开放容器接口(OCI)标准的一部分,之后 containerd 被捐赠给云原生计算基金会(CNCF)为容器社区提供创建新容器解决方案的基础。
containerd 通过其 CRI 插件实现了 Kubernetes 容器运行时接口(CRI),它可以管理容器的整个生命周期,包括从镜像的传输、存储到容器的执行、监控再到网络。
containerd 安装
操作系统:Ubuntu 22.04 LTS
1、apt 安装
1.1、查看 containerd 仓库版本
root@containerd-server:~# apt-cache madison containerd
containerd | 1.6.12-0ubuntu1~22.04.1 | https://mirrors.aliyun.com/ubuntu jammy-updates/main amd64 Packages
containerd | 1.5.9-0ubuntu3.1 | https://mirrors.aliyun.com/ubuntu jammy-security/main amd64 Packages
containerd | 1.5.9-0ubuntu3 | https://mirrors.aliyun.com/ubuntu jammy/main amd64 Packages
1.2、安装 containerd
root@containerd-server:~# apt install -y containerd=1.6.12-0ubuntu1~22.04.1
1.3、查看 containerd service 文件
root@containerd-server:~# cat /lib/systemd/system/containerd.service
# Copyright The containerd Authors.
#
# Licensed under the Apache License, Version 2.0 (the "License");
# you may not use this file except in compliance with the License.
# You may obtain a copy of the License at
#
#     http://www.apache.org/licenses/LICENSE-2.0
#
# Unless required by applicable law or agreed to in writing, software
# distributed under the License is distributed on an "AS IS" BASIS,
# WITHOUT WARRANTIES OR CONDITIONS OF ANY KIND, either express or implied.
# See the License for the specific language governing permissions and
# limitations under the License.

[Unit]
Description=containerd container runtime
Documentation=https://containerd.io
After=network.target local-fs.target

[Service]
ExecStartPre=-/sbin/modprobe overlay
ExecStart=/usr/bin/containerd

Type=notify
Delegate=yes
KillMode=process
Restart=always
RestartSec=5
# Having non-zero Limit*s causes performance problems due to accounting overhead
# in the kernel. We recommend using cgroups to do container-local accounting.
LimitNPROC=infinity
LimitCORE=infinity
LimitNOFILE=infinity
# Comment TasksMax if your systemd version does not supports it.
# Only systemd 226 and above support this version.
TasksMax=infinity
OOMScoreAdjust=-999

[Install]
WantedBy=multi-user.target
1.4、验证 runc 环境
root@containerd-server:~# whereis runc
runc: /usr/sbin/runc
root@containerd-server:~# whereis containerd
containerd: /usr/bin/containerd
root@containerd-server:~# runc -v
runc version 1.1.4-0ubuntu1~22.04.1
spec: 1.0.2-dev
go: go1.18.1
libseccomp: 2.5.3
root@containerd-server:~# containerd -v
containerd github.com/containerd/containerd 1.6.12-0ubuntu1~22.04.1
1.4、containerd 配置文件
#查看 containerd 默认配置
root@containerd-server:~# containerd config default
#创建 containerd 配置文件
root@containerd-server:~# mkdir /etc/containerd
root@containerd-server:~# containerd config default > /etc/containerd/config.toml
root@containerd-server:~# systemctl restart containerd.service
1.5、通过命令行测试下载镜像
containerd 的命令⾏客户端有 ctr、crictl、nerdctl 等,containerd 相⽐ docker 多了⼀个命名空间的逻辑概念,⾃身的命令⾏客户端 ctr 命令默认是在 default 命名空间⾥、nerdctl 也是在 default,当使⽤ crictl 命令的时候,是在 k8s.io 这个命名空间,⽽ k8s 的创建的 pod 也是在 k8s.io 命名空间,因此在使⽤ nerdctl 管理 kubernetes 环境的 pod 的时候要指定命名空间为 k8s.io,否则看不到 kubernetes 环境中的 pod。
root@containerd-server:~# ctr images pull docker.io/library/alpine:latest
docker.io/library/alpine:latest:                                                  resolved       |++++++++++++++++++++++++++++++++++++++|
index-sha256:124c7d2707904eea7431fffe91522a01e5a861a624ee31d03372cc1d138a3126:    done           |++++++++++++++++++++++++++++++++++++++|
manifest-sha256:b6ca290b6b4cdcca5b3db3ffa338ee0285c11744b4a6abaa9627746ee3291d8d: done           |++++++++++++++++++++++++++++++++++++++|
config-sha256:9ed4aefc74f6792b5a804d1d146fe4b4a2299147b0f50eaf2b08435d7b38c27e:   done           |++++++++++++++++++++++++++++++++++++++|
layer-sha256:f56be85fc22e46face30e2c3de3f7fe7c15f8fd7c4e5add29d7f64b87abdaa09:    done           |++++++++++++++++++++++++++++++++++++++|
elapsed: 11.7s                                                                    total:  3.0 Mi (262.8 KiB/s)
unpacking linux/amd64 sha256:124c7d2707904eea7431fffe91522a01e5a861a624ee31d03372cc1d138a3126...
done: 529.62011ms
1.7、验证下载的镜像
#查看 default 命名空间中的镜像
root@containerd-server:~# ctr images ls
REF                             TYPE                                                      DIGEST                                                                  SIZE    PLATFORMS                                                                                LABELS
docker.io/library/alpine:latest application/vnd.docker.distribution.manifest.list.v2+json sha256:124c7d2707904eea7431fffe91522a01e5a861a624ee31d03372cc1d138a3126 3.2 MiB linux/386,linux/amd64,linux/arm/v6,linux/arm/v7,linux/arm64/v8,linux/ppc64le,linux/s390x -
root@containerd-server:~#
#查看 k8s.io 命名空间中的镜像
root@containerd-server:~# ctr -n k8s.io images ls
REF TYPE DIGEST SIZE PLATFORMS LABELS
root@containerd-server:~#
1.8、ctr 客户端创建测试容器
#运行容器并使用宿主机的网络
root@containerd-server:~# ctr run -t --net-host docker.io/library/alpine:latest test-container sh
/ # ping www.aliyun.com
PING www.aliyun.com (125.72.141.220): 56 data bytes
64 bytes from 125.72.141.220: seq=0 ttl=56 time=20.351 ms
64 bytes from 125.72.141.220: seq=1 ttl=56 time=20.644 ms
64 bytes from 125.72.141.220: seq=2 ttl=56 time=20.934 ms
^C
--- www.aliyun.com ping statistics ---
3 packets transmitted, 3 packets received, 0% packet loss
round-trip min/avg/max = 20.351/20.643/20.934 ms
/ #
2、二进制安装 containerd
通过官⽅⼆进制安装 containerd、runc 及 CNI,kubernetes 从 v1.24.0 开始默认使⽤ containerd 作为容器运⾏时,因此需要提前安装好 containerd 之后在安装 v1.24 或更⾼版本的 kubernetes (如果要继续使⽤ docker,则需要单独安装 docker 及 cri-dockerd,https://github.com/Mirantis/cri-dockerd )
2.1、下载 containerd ⼆进制文件,并创建 service ⽂件
containerd v1.6.20 下载地址:https://github.com/containerd/containerd/releases/download/v1.6.20/containerd-1.6.20-linux-amd64.tar.gz
github 直接下载的速度比较慢,建议使用下载工具下载。
#下载 containerd v1.6.20 二进制文件包
root@containerd-server:~# wget https://github.com/containerd/containerd/releases/download/v1.6.20/containerd-1.6.20-linux-amd64.tar.gz
#解压 containerd 压缩包
root@k8s-master-1:~# tar xfv containerd-1.6.20-linux-amd64.tar.gz
bin/
bin/containerd-shim
bin/containerd-shim-runc-v1
bin/containerd-stress
bin/containerd
bin/ctr
bin/containerd-shim-runc-v2
#将解压后的 containerd 二进制文件拷贝到/usr/bin/
root@k8s-master-1:~# cp bin/* /usr/bin/
#验证 containerd 执行结果
root@k8s-master-1:~# containerd -v
containerd github.com/containerd/containerd v1.6.20 2806fc1057397dbaeefbea0e4e17bddfbd388f38
#创建 containerd service 文件
root@k8s-master-1:~# cat > /lib/systemd/system/containerd.service << EOF
# Copyright The containerd Authors.
#
# Licensed under the Apache License, Version 2.0 (the "License");
# you may not use this file except in compliance with the License.
# You may obtain a copy of the License at
#
#     http://www.apache.org/licenses/LICENSE-2.0
#
# Unless required by applicable law or agreed to in writing, software
# distributed under the License is distributed on an "AS IS" BASIS,
# WITHOUT WARRANTIES OR CONDITIONS OF ANY KIND, either express or implied.
# See the License for the specific language governing permissions and
# limitations under the License.

[Unit]
Description=containerd container runtime
Documentation=https://containerd.io
After=network.target local-fs.target

[Service]
ExecStartPre=-/sbin/modprobe overlay
ExecStart=/usr/bin/containerd

Type=notify
Delegate=yes
KillMode=process
Restart=always
RestartSec=5
# Having non-zero Limit*s causes performance problems due to accounting overhead
# in the kernel. We recommend using cgroups to do container-local accounting.
LimitNPROC=infinity
LimitCORE=infinity
LimitNOFILE=infinity
# Comment TasksMax if your systemd version does not supports it.
# Only systemd 226 and above support this version.
TasksMax=infinity
OOMScoreAdjust=-999

[Install]
WantedBy=multi-user.target
EOF
#编辑 containerd 配置文件
root@k8s-master-1:~# mkdir /etc/containerd
root@k8s-master-1:~# containerd config default > /etc/containerd/config.toml
#61行修改前:sandbox_image = "registry.k8s.io/pause:3.6"
#61行修改后:sandbox_image = "registry.aliyuncs.com/google_containers/pause:3.6"
#在153行下,新增两行配置
#153       [plugins."io.containerd.grpc.v1.cri".registry.mirrors]
#154         [plugins."io.containerd.grpc.v1.cri".registry.mirrors."docker.io"]
#155           endpoint = ["https://9916w1ow.mirror.aliyuncs.com"]
#运行 containerd 服务,并设置开机启动
root@k8s-master-1:~# systemctl start containerd && systemctl enable containerd.service
Created symlink /etc/systemd/system/multi-user.target.wants/containerd.service → /lib/systemd/system/containerd.service.
root@k8s-master-1:~# systemctl status containerd.service
● containerd.service - containerd container runtime
     Loaded: loaded (/lib/systemd/system/containerd.service; enabled; vendor preset: enabled)
     Active: active (running) since Mon 2023-04-24 13:04:45 UTC; 1min 33s ago
       Docs: https://containerd.io
   Main PID: 1552 (containerd)
      Tasks: 10
     Memory: 13.0M
        CPU: 703ms
     CGroup: /system.slice/containerd.service
             └─1552 /usr/bin/containerd

Apr 24 13:04:45 k8s-master-1 containerd[1552]: time="2023-04-24T13:04:45.929312878Z" level=info msg="Start subscribing containerd event"
Apr 24 13:04:45 k8s-master-1 containerd[1552]: time="2023-04-24T13:04:45.929595902Z" level=info msg="Start recovering state"
Apr 24 13:04:45 k8s-master-1 containerd[1552]: time="2023-04-24T13:04:45.929854091Z" level=info msg="Start event monitor"
Apr 24 13:04:45 k8s-master-1 containerd[1552]: time="2023-04-24T13:04:45.929933460Z" level=info msg="Start snapshots syncer"
Apr 24 13:04:45 k8s-master-1 containerd[1552]: time="2023-04-24T13:04:45.929976105Z" level=info msg="Start cni network conf syncer for default"
Apr 24 13:04:45 k8s-master-1 containerd[1552]: time="2023-04-24T13:04:45.930006395Z" level=info msg="Start streaming server"
Apr 24 13:04:45 k8s-master-1 containerd[1552]: time="2023-04-24T13:04:45.930609600Z" level=info msg=serving... address=/run/containerd/containerd.sock.ttrpc
Apr 24 13:04:45 k8s-master-1 containerd[1552]: time="2023-04-24T13:04:45.931048945Z" level=info msg=serving... address=/run/containerd/containerd.sock
Apr 24 13:04:45 k8s-master-1 containerd[1552]: time="2023-04-24T13:04:45.931503430Z" level=info msg="containerd successfully booted in 0.129564s"
Apr 24 13:04:45 k8s-master-1 systemd[1]: Started containerd container runtime.
root@k8s-master-1:~#
2.2、下载并部署 runc
runc v1.1.6 下载地址: https://github.com/opencontainers/runc/releases/download/v1.1.6/runc.amd64
root@k8s-master-1:~# wget https://github.com/opencontainers/runc/releases/download/v1.1.6/runc.amd64
root@k8s-master-1:~# chmod a+x runc.amd64
root@k8s-master-1:~# mv runc.amd64 /usr/bin/runc
root@k8s-master-1:~# runc -v
runc version 1.1.6
commit: v1.1.6-0-g0f48801a
spec: 1.0.2-dev
go: go1.20.3
libseccomp: 2.5.4
root@k8s-master-1:~#
2.3、下载测试镜像并验证
root@k8s-master-1:~# ctr images pull docker.io/library/alpine:latest
docker.io/library/alpine:latest:                                                  resolved       |++++++++++++++++++++++++++++++++++++++|
index-sha256:124c7d2707904eea7431fffe91522a01e5a861a624ee31d03372cc1d138a3126:    done           |++++++++++++++++++++++++++++++++++++++|
manifest-sha256:b6ca290b6b4cdcca5b3db3ffa338ee0285c11744b4a6abaa9627746ee3291d8d: done           |++++++++++++++++++++++++++++++++++++++|
layer-sha256:f56be85fc22e46face30e2c3de3f7fe7c15f8fd7c4e5add29d7f64b87abdaa09:    done           |++++++++++++++++++++++++++++++++++++++|
config-sha256:9ed4aefc74f6792b5a804d1d146fe4b4a2299147b0f50eaf2b08435d7b38c27e:   done           |++++++++++++++++++++++++++++++++++++++|
elapsed: 20.1s                                                                    total:  2.0 Ki (99.0 B/s)
unpacking linux/amd64 sha256:124c7d2707904eea7431fffe91522a01e5a861a624ee31d03372cc1d138a3126...
done: 665.645757ms
root@k8s-master-1:~# ctr images ls
REF                             TYPE                                                      DIGEST                                                                  SIZE    PLATFORMS                                                                                LABELS
docker.io/library/alpine:latest application/vnd.docker.distribution.manifest.list.v2+json sha256:124c7d2707904eea7431fffe91522a01e5a861a624ee31d03372cc1d138a3126 3.2 MiB linux/386,linux/amd64,linux/arm/v6,linux/arm/v7,linux/arm64/v8,linux/ppc64le,linux/s390x -
root@k8s-master-1:~# ctr -n k8s.io images ls
REF TYPE DIGEST SIZE PLATFORMS LABELS
root@k8s-master-1:~#
2.4、ctr客户端创建测试容器
root@k8s-master-1:~# ctr run -t --net-host docker.io/library/alpine:latest test-container sh
/ # ping www.jd.com
PING www.jd.com (182.140.218.3): 56 data bytes
64 bytes from 182.140.218.3: seq=0 ttl=58 time=2.976 ms
64 bytes from 182.140.218.3: seq=1 ttl=58 time=3.611 ms
64 bytes from 182.140.218.3: seq=2 ttl=58 time=3.827 ms
^C
--- www.jd.com ping statistics ---
3 packets transmitted, 3 packets received, 0% packet loss
round-trip min/avg/max = 2.976/3.471/3.827 ms
/ #
3、containerd 客户端工具扩展
3.1、crictl 介绍和使用
crictl 是 kubernetes-sigs(Special Interest Group,特别兴趣⼩组)中的⼀个项⽬,旨在提供⼀个调⽤kubelet 管理本机 pod 的命令⾏客户端。
crictl ⽀持以下的容器运⾏时,⽬前已经没有默认调⽤的后端运⾏时路径(Default is now deprecated and the endpoint should be set instead),因此需要单独设置使⽤的容器运⾏时:
- unix:///var/run/dockershim.sock
- unix:///run/containerd/containerd.sock
- unix:///run/crio/crio.sock
- unix:///var/run/cri-dockerd.sock
3.1.1、下载并安装 crictl
root@k8s-master-1:~# wget https://github.com/kubernetes-sigs/cri-tools/releases/download/v1.26.1/crictl-v1.26.1-linux-amd64.tar.gz
root@k8s-master-1:~# tar xfv crictl-v1.26.1-linux-amd64.tar.gz -C /usr/bin/
crictl
root@k8s-master-1:~# crictl -v
crictl version v1.26.1
root@k8s-master-1:~#
#####3.1.2、配置 crictl 运行时环境
root@k8s-master-1:~# cat > /etc/crictl.yaml <<EOF
runtime-endpoint: "unix:///run/containerd/containerd.sock"
image-endpoint: "unix:///run/containerd/containerd.sock"
timeout: 10
debug: false
EOF
3.1.3、下载并验证镜像
root@k8s-master-1:~# crictl pull nginx:1.20.2
Image is up to date for sha256:50fe74b50e0d0258922495297efbb9ebc3cbd5742103df1ca54dc21c07d24575
root@k8s-master-1:~# crictl pull busybox
Image is up to date for sha256:beae173ccac6ad749f76713cf4440fe3d21d1043fe616dfbe30775815d1d0f6a
root@k8s-master-1:~# crictl images
IMAGE                       TAG                 IMAGE ID            SIZE
docker.io/library/busybox   latest              beae173ccac6a       777kB
docker.io/library/nginx     1.20.2              50fe74b50e0d0       56.7MB
root@k8s-master-1:~#
3.2、nerdctl 推荐使用
官方地址:https://github.com/containerd/nerdctl
3.2.1、安装 nerdctl
root@k8s-master-1:~# wget https://github.com/containerd/nerdctl/releases/download/v1.3.0/nerdctl-1.3.0-linux-amd64.tar.gz
root@k8s-master-1:~# tar xfv nerdctl-1.3.0-linux-amd64.tar.gz -C /usr/bin/
nerdctl
containerd-rootless-setuptool.sh
containerd-rootless.sh
root@k8s-master-1:~# nerdctl version
WARN[0000] unable to determine buildctl version: exec: "buildctl": executable file not found in $PATH
Client:
 Version:	v1.3.0
 OS/Arch:	linux/amd64
 Git commit:	c6ddd63dea9aa438fdb0587c0d3d9ae61a60523e
 buildctl:
  Version:

Server:
 containerd:
  Version:	v1.6.20
  GitCommit:	2806fc1057397dbaeefbea0e4e17bddfbd388f38
 runc:
  Version:	1.1.6
  GitCommit:	v1.1.6-0-g0f48801a
root@k8s-master-1:~#
3.2.2、nerdctl 配置文件
root@k8s-master-1:~# cat > /etc/nerdctl/nerdctl.toml <<EOF
namespace = "k8s.io"
debug = false
debug_full = false
insecure_registry = true
EOF
3.2.3、安装 CNI
root@k8s-master-1:~# wget https://github.com/containernetworking/plugins/releases/download/v1.2.0/cni-plugins-linux-amd64-v1.2.0.tgz
root@k8s-master-1:~# mkdir /opt/cni/bin -p
root@k8s-master-1:~# tar xfv cni-plugins-linux-amd64-v1.2.0.tgz -C /opt/cni/bin/
./
./loopback
./bandwidth
./ptp
./vlan
./host-device
./tuning
./vrf
./sbr
./dhcp
./static
./firewall
./macvlan
./dummy
./bridge
./ipvlan
./portmap
./host-local
root@k8s-master-1:~#
3.2.4、nerdctl 下载 nginx 镜像
#下载镜像
root@k8s-master-1:~# nerdctl pull nginx
WARN[0000] skipping verifying HTTPS certs for "docker.io"
docker.io/library/nginx:latest:                                                   resolved       |++++++++++++++++++++++++++++++++++++++|
index-sha256:63b44e8ddb83d5dd8020327c1f40436e37a6fffd3ef2498a6204df23be6e7e94:    done           |++++++++++++++++++++++++++++++++++++++|
manifest-sha256:f2fee5c7194cbbfb9d2711fa5de094c797a42a51aa42b0c8ee8ca31547c872b1: done           |++++++++++++++++++++++++++++++++++++++|
config-sha256:6efc10a0510f143a90b69dc564a914574973223e88418d65c1f8809e08dc0a1f:   done           |++++++++++++++++++++++++++++++++++++++|
layer-sha256:75576236abf5959ff23b741ed8c4786e244155b9265db5e6ecda9d8261de529f:    done           |++++++++++++++++++++++++++++++++++++++|
layer-sha256:2019c71d56550b97ce01e0b6ef8e971fec705186f2927d2cb109ac3e18edb0ac:    done           |++++++++++++++++++++++++++++++++++++++|
layer-sha256:8c767bdbc9aedd4bbf276c6f28aad18251cceacb768967c5702974ae1eac23cd:    done           |++++++++++++++++++++++++++++++++++++++|
layer-sha256:26c5c85e47da3022f1bdb9a112103646c5c29517d757e95426f16e4bd9533405:    done           |++++++++++++++++++++++++++++++++++++++|
layer-sha256:4f3256bdf66bf00bcec08043e67a80981428f0e0de12f963eac3c753b14d101d:    done           |++++++++++++++++++++++++++++++++++++++|
layer-sha256:78e14bb05fd35b58587cd0c5ca2c2eb12b15031633ec30daa21c0ea3d2bb2a15:    done           |++++++++++++++++++++++++++++++++++++++|
elapsed: 24.4s                                                                    total:  54.4 M (2.2 MiB/s)
#删除镜像
root@k8s-master-1:~# nerdctl rmi nginx:latest
Untagged: docker.io/library/nginx:latest@sha256:63b44e8ddb83d5dd8020327c1f40436e37a6fffd3ef2498a6204df23be6e7e94
Deleted: sha256:ed7b0ef3bf5bbec74379c3ae3d5339e666a314223e863c70644f7522a7527461
Deleted: sha256:fb6d57d46ad57cbb50dfe16eba53a31d8808aa43e3a4a3ddd5c04d2d6ee0ecc5
Deleted: sha256:935b5bd454e1973eb283fbc76d5613def62c190c8c4cc621576ef32f7c7dcb56
Deleted: sha256:f12d4345b7f35505fc42fd613ae2c6749ddba30d6c9025e1a5b070c97c1ad2bb
Deleted: sha256:79974a1a12aa3a3876d8dbcf16b2eda15ba5372574d38dd94bac68d339b6e124
Deleted: sha256:9d907f11dc742442217bda25fde38f11851c7d495cacc6fc4e3869f4cd2c9ad9
root@k8s-master-1:~#
3.2.5、nerdctl 创建 nginx 容器
#nerdctl 创建 nginx 容器
root@k8s-master-1:~# nerdctl run -d -p 80:80 --name=nginx-web1 --restart=always nginx
6bdc7bf833e6df4c009bd08c69934ddbc4706dbe46c23f22e8d332b7b3ea0223
#验证 nginx 服务
root@k8s-master-1:~# curl 192.168.101.21
<!DOCTYPE html>
<html>
<head>
<title>Welcome to nginx!</title>
<style>
html { color-scheme: light dark; }
body { width: 35em; margin: 0 auto;
font-family: Tahoma, Verdana, Arial, sans-serif; }
</style>
</head>
<body>
<h1>Welcome to nginx!</h1>
<p>If you see this page, the nginx web server is successfully installed and
working. Further configuration is required.</p>

<p>For online documentation and support please refer to
<a href="http://nginx.org/">nginx.org</a>.<br/>
Commercial support is available at
<a href="http://nginx.com/">nginx.com</a>.</p>

<p><em>Thank you for using nginx.</em></p>
</body>
</html>
#nerdctl 删除 nginx 容器
root@k8s-master-1:~# nerdctl rm -f nginx-web1
nginx-web1
root@k8s-master-1:~#
3.2.6、nerdctl 查看 nginx 容器日志
root@k8s-master-1:~# nerdctl logs -f nginx-web1
/docker-entrypoint.sh: /docker-entrypoint.d/ is not empty, will attempt to perform configuration
/docker-entrypoint.sh: Looking for shell scripts in /docker-entrypoint.d/
/docker-entrypoint.sh: Launching /docker-entrypoint.d/10-listen-on-ipv6-by-default.sh
10-listen-on-ipv6-by-default.sh: info: Getting the checksum of /etc/nginx/conf.d/default.conf
10-listen-on-ipv6-by-default.sh: info: Enabled listen on IPv6 in /etc/nginx/conf.d/default.conf
/docker-entrypoint.sh: Launching /docker-entrypoint.d/20-envsubst-on-templates.sh
/docker-entrypoint.sh: Launching /docker-entrypoint.d/30-tune-worker-processes.sh
/docker-entrypoint.sh: Configuration complete; ready for start up
2023/04/24 14:14:16 [notice] 1#1: using the "epoll" event method
2023/04/24 14:14:16 [notice] 1#1: nginx/1.23.4
2023/04/24 14:14:16 [notice] 1#1: built by gcc 10.2.1 20210110 (Debian 10.2.1-6)
2023/04/24 14:14:16 [notice] 1#1: OS: Linux 5.15.0-70-generic
2023/04/24 14:14:16 [notice] 1#1: getrlimit(RLIMIT_NOFILE): 1024:1024
2023/04/24 14:14:16 [notice] 1#1: start worker processes
2023/04/24 14:14:16 [notice] 1#1: start worker process 30
2023/04/24 14:14:16 [notice] 1#1: start worker process 31
2023/04/24 14:14:16 [notice] 1#1: start worker process 32
2023/04/24 14:14:16 [notice] 1#1: start worker process 33
3.2.7、nerdctl 查看容器
root@k8s-master-1:~# nerdctl ps -a
CONTAINER ID    IMAGE                             COMMAND                   CREATED               STATUS    PORTS                 NAMES
e0162c9ed9ba    docker.io/library/nginx:latest    "/docker-entrypoint.…"    About a minute ago    Up        0.0.0.0:80->80/tcp    nginx-web1
root@k8s-master-1:~#
安装kubeadm基础环境
| 节点名称 | 操作系统 | IP地址 |
|---|---|---|
| k8s-master-1 | Ubuntu 22.04 LTS | 192.168.101.21 |
| k8s-node-1 | Ubuntu 22.04 LTS | 192.168.101.22 |
| k8s-node-2 | Ubuntu 22.04 LTS | 192.168.101.23 |
1、安装运行时
containerd下载地址:https://github.com/containerd/containerd/releases/download/v1.6.20/cri-containerd-cni-1.6.20-linux-amd64.tar.gz
nerdctl下载地址:https://github.com/containerd/nerdctl/releases/download/v1.3.1/nerdctl-1.3.1-linux-amd64.tar.gz
安装包目录结构:
root@k8s-master-1:/home/containerd# tree
.
├── cri-containerd-cni-1.6.20-linux-amd64.tar.gz
├── install.sh
└── nerdctl-1.3.1-linux-amd64.tar.gz
install.sh 安装脚本:
#!/bin/bash
#程序包名称
package_name=cri-containerd-cni-1.6.20-linux-amd64.tar.gz
#程序包解压目录
package_dir=./${package_name%%'.tar.gz'}
echo 正在创建程序包目录:${package_dir}
#创建程序包解压目录
mkdir -p ${package_dir}

echo 正在解压${package_name}到${package_dir}
#解压程序包
tar xf ${package_name} -C ${package_dir}

echo 正在安装 cri、containerd、cni、runc
#拷贝文件到指定目录
cp -r ${package_dir}/usr/local/bin /usr/local/
cp -r ${package_dir}/usr/local/sbin /usr/local/
cp -r ${package_dir}/opt/* /opt
cp -r ${package_dir}/etc/cni /etc/
cp -r ${package_dir}/etc/crictl.yaml /etc/
cp -r ${package_dir}/etc/systemd/system/containerd.service  /lib/systemd/system/

echo 正在初始化 containerd 配置
#创建 containerd 配置文件目录
mkdir -p /etc/containerd
#生成 containerd 默认配置文件
containerd config default > /etc/containerd/config.toml

#获取配置行号
num=`sed -n  '/\[plugins."io.containerd.grpc.v1.cri".registry.mirrors\]/=' /etc/containerd/config.toml`

#修改 pause 镜像下载地址
sed -i "s#registry.k8s.io/pause:3.6#registry.aliyuncs.com/google_containers/pause:3.7#g" /etc/containerd/config.toml
#添加镜像地址
sed -i "${num}  a\\        [plugins.\"io.containerd.grpc.v1.cri\".registry.mirrors.\"docker.io\"]" /etc/containerd/config.toml
let num=${num}+1
sed -i "${num}  a\\          endpoint = [\"https://9916w1ow.mirror.aliyuncs.com\"]" /etc/containerd/config.toml

echo 正在启动 containerd
#启动 containerd 并设置服务开机启动
systemctl daemon-reload
systemctl start containerd.service
systemctl enable containerd.service

echo 正在安装 nerdctl
package_name=nerdctl-1.3.1-linux-amd64.tar.gz
package_dir=./${package_name%%'.tar.gz'}

echo 正在创建程序包目录:${package_dir}
#创建程序包解压目录
mkdir -p ${package_dir}

echo 正在解压 ${package_name} 到 ${package_dir}
#解压程序包
tar xf ${package_name} -C ${package_dir}

echo 正在安装 nerdctl
#拷贝文件到指定目录
cp -r ${package_dir}/nerdctl /usr/local/bin/

echo 正在初始化 nerdctl 配置
mkdir -p /etc/nerdctl

cat > /etc/nerdctl/nerdctl.toml <<EOF
namespace = "k8s.io"
debug = false
debug_full = false
insecure_registry = true
EOF

echo 安装完成
分别在 k8s-master、k8s-node-1、k8s-node-2 服务器执行 install.sh 脚本安装 containerd
root@k8s-master-1:/home/containerd# ./install.sh
正在创建程序包目录:./cri-containerd-cni-1.6.20-linux-amd64
正在解压cri-containerd-cni-1.6.20-linux-amd64.tar.gz到./cri-containerd-cni-1.6.20-linux-amd64
正在安装 cri、containerd、cni、runc
正在初始化 containerd 配置
正在启动 containerd
正在安装 nerdctl
正在创建程序包目录:./nerdctl-1.3.1-linux-amd64
正在解压 nerdctl-1.3.1-linux-amd64.tar.gz 到 ./nerdctl-1.3.1-linux-amd64
正在安装 nerdctl
正在初始化 nerdctl 配置
安装完成
root@k8s-master-1:/home/containerd#
root@k8s-node-1:/home/containerd# ./install.sh
正在创建程序包目录:./cri-containerd-cni-1.6.20-linux-amd64
正在解压cri-containerd-cni-1.6.20-linux-amd64.tar.gz到./cri-containerd-cni-1.6.20-linux-amd64
正在安装 cri、containerd、cni、runc
正在初始化 containerd 配置
正在启动 containerd
正在安装 nerdctl
正在创建程序包目录:./nerdctl-1.3.1-linux-amd64
正在解压 nerdctl-1.3.1-linux-amd64.tar.gz 到 ./nerdctl-1.3.1-linux-amd64
正在安装 nerdctl
正在初始化 nerdctl 配置
安装完成
root@k8s-node-1:/home/containerd#
root@k8s-node-2:/home/containerd# ./install.sh
正在创建程序包目录:./cri-containerd-cni-1.6.20-linux-amd64
正在解压cri-containerd-cni-1.6.20-linux-amd64.tar.gz到./cri-containerd-cni-1.6.20-linux-amd64
正在安装 cri、containerd、cni、runc
正在初始化 containerd 配置
正在启动 containerd
正在安装 nerdctl
正在创建程序包目录:./nerdctl-1.3.1-linux-amd64
正在解压 nerdctl-1.3.1-linux-amd64.tar.gz 到 ./nerdctl-1.3.1-linux-amd64
正在安装 nerdctl
正在初始化 nerdctl 配置
安装完成
root@k8s-node-2:/home/containerd#
2、安装kubeadm、kubectl、kubelet
k8s-master 服务器:
root@k8s-master-1:/home# apt-get update && apt-get install -y apt-transport-https -y && curl https://mirrors.aliyun.com/kubernetes/apt/doc/apt-key.gpg | apt-key add -;
root@k8s-master-1:/home# cat <<EOF >/etc/apt/sources.list.d/kubernetes.list
deb https://mirrors.aliyun.com/kubernetes/apt/ kubernetes-xenial main
EOF
root@k8s-master-1:/home/containerd# apt-get update && apt-cache madison kubeadm && apt-get install -y kubeadm=1.26.3-00 kubectl=1.26.3-00 kubelet=1.26.3-00
k8s-node-1 服务器:
root@k8s-node-1:/home# apt-get update && apt-get install -y apt-transport-https -y && curl https://mirrors.aliyun.com/kubernetes/apt/doc/apt-key.gpg | apt-key add -;
root@k8s-node-1:/home# cat <<EOF >/etc/apt/sources.list.d/kubernetes.list
deb https://mirrors.aliyun.com/kubernetes/apt/ kubernetes-xenial main
EOF
root@k8s-node-1:/home/containerd# apt-get update && apt-cache madison kubeadm && apt-get install -y kubeadm=1.26.3-00 kubectl=1.26.3-00 kubelet=1.26.3-00
k8s-node-2 服务器:
root@k8s-node-2:/home# apt-get update && apt-get install -y apt-transport-https -y && curl https://mirrors.aliyun.com/kubernetes/apt/doc/apt-key.gpg | apt-key add -;
root@k8s-node-2:/home# cat <<EOF >/etc/apt/sources.list.d/kubernetes.list
deb https://mirrors.aliyun.com/kubernetes/apt/ kubernetes-xenial main
EOF
root@k8s-node-2:/home/containerd# apt-get update && apt-cache madison kubeadm && apt-get install -y kubeadm=1.26.3-00 kubectl=1.26.3-00 kubelet=1.26.3-00
3、下载 kubenetes 镜像
root@k8s-node-2:/home/containerd# kubeadm config images pull --image-repository="registry.cn-hangzhou.aliyuncs.com/google_containers" --kubernetes-version=v1.26.3
[config/images] Pulled registry.cn-hangzhou.aliyuncs.com/google_containers/kube-apiserver:v1.26.3
[config/images] Pulled registry.cn-hangzhou.aliyuncs.com/google_containers/kube-controller-manager:v1.26.3
[config/images] Pulled registry.cn-hangzhou.aliyuncs.com/google_containers/kube-scheduler:v1.26.3
[config/images] Pulled registry.cn-hangzhou.aliyuncs.com/google_containers/kube-proxy:v1.26.3
[config/images] Pulled registry.cn-hangzhou.aliyuncs.com/google_containers/pause:3.9
[config/images] Pulled registry.cn-hangzhou.aliyuncs.com/google_containers/etcd:3.5.6-0
[config/images] Pulled registry.cn-hangzhou.aliyuncs.com/google_containers/coredns:v1.9.3
root@k8s-node-2:/home/containerd#
4、内核参数优化
开启内核模块
root@k8s-master-1:/home# modprobe nf_conntrack && modprobe br_netfilter
如果未开启 nf_conntrack br_netfilter 模块,在设置内核参数时会报以下错误
sysctl: cannot stat /proc/sys/net/netfilter/nf_conntrack_max: No such file or directory
sysctl: cannot stat /proc/sys/net/bridge/bridge-nf-call-ip6tables: No such file or directory
sysctl: cannot stat /proc/sys/net/bridge/bridge-nf-call-iptables: No such file or directory
配置内核参数
root@k8s-master1:~# cat /etc/sysctl.conf
net.ipv4.ip_forward = 1
vm.max_map_count = 262144
kernel.pid_max = 4194303
fs.file-max = 1000000
net.ipv4.tcp_max_tw_buckets = 6000
net.netfilter.nf_conntrack_max = 2097152
net.bridge.bridge-nf-call-ip6tables = 1
net.bridge.bridge-nf-call-iptables = 1
vm.swappiness = 0
root@k8s-master-1:/home#
添加内核模块开机挂载
root@k8s-master-1:/home# vim /etc/modules-load.d/modules.conf
ip_vs
ip_vs_lc
ip_vs_lblc
ip_vs_lblcr
ip_vs_rr
ip_vs_wrr
ip_vs_sh
ip_vs_dh
ip_vs_fo
ip_vs_nq
ip_vs_sed
ip_vs_ftp
ip_vs_sh
ip_tables
ip_set
ipt_set
ipt_rpfilter
ipt_REJECT
ipip
xt_set
br_netfilter
nf_conntrack
overlay
重启后验证内核模块与内存参数
root@k8s-master-1:~# lsmod | grep br_netfilter
br_netfilter           28672  0
bridge                176128  1 br_netfilter
root@k8s-master-1:~# sysctl -a | grep bridge-nf-call-iptables
net.bridge.bridge-nf-call-iptables = 1
root@k8s-master-1:~#
5、kubernetes 集群初始化
cgroup介 绍地址:https://kubernetes.io/zh-cn/docs/tasks/administer-cluster/kubeadm/configure-cgroup-driver/
kubeadm ⽀持在执⾏ kubeadm init 时,传递⼀个 KubeletConfiguration 结构体。
KubeletConfiguration 包含 cgroupDriver 字段,可⽤于控制 kubelet 的 cgroup 驱动。
这是⼀个最⼩化的示例,其中显式的配置了此字段:
# kubeadm-config.yaml
kind: ClusterConfiguration
apiVersion: kubeadm.k8s.io/v1beta3
kubernetesVersion: v1.21.0
---
kind: KubeletConfiguration
apiVersion: kubelet.config.k8s.io/v1beta1
cgroupDriver: systemd
5.1、命令行方式初始化 k8s
# kubeadm init --apiserver-advertise-address=192.168.101.21 --control-plane-endpoint=192.168.101.18 --apiserver-bind-port=6443 --kubernetes-version=v1.26.3 --pod-network-cidr=10.200.0.0/16 --service-cidr=10.100.0.0/16 --service-dns-domain=cluster.local --image-repository=registry.cn-hangzhou.aliyuncs.com/google_containers --ignore-preflight-errors=swap
5.2、基于 init ⽂件初始化 k8s
将默认配置输出⾄⽂件
root@k8s-master-1:/home/containerd# kubeadm config print init-defaults > kubeadm-init.yaml
修改后的初始化⽂件内容
root@k8s-master-1:/home/containerd# cat kubeadm-init.yaml
apiVersion: kubeadm.k8s.io/v1beta3
bootstrapTokens:
- groups:
  - system:bootstrappers:kubeadm:default-node-token
  token: abcdef.0123456789abcdef
  ttl: 24h0m0s
  usages:
  - signing
  - authentication
kind: InitConfiguration
localAPIEndpoint:
  advertiseAddress: 192.168.101.21
  bindPort: 6443
nodeRegistration:
  criSocket: unix:///var/run/containerd/containerd.sock
  imagePullPolicy: IfNotPresent
  name: k8s-master
  taints: null
---
apiServer:
  timeoutForControlPlane: 4m0s
apiVersion: kubeadm.k8s.io/v1beta3
certificatesDir: /etc/kubernetes/pki
clusterName: kubernetes
controlPlaneEndpoint: 192.168.101.18:6443
controllerManager: {}
dns: {}
etcd:
  local:
    dataDir: /var/lib/etcd
imageRepository: registry.cn-hangzhou.aliyuncs.com/google_containers
kind: ClusterConfiguration
kubernetesVersion: 1.26.0
networking:
  dnsDomain: cluster.local
  podSubnet: 10.200.0.0/16
  serviceSubnet: 10.100.0.0/16
scheduler: {}
---
#指定 kubelet 使用systemd
kind: KubeletConfiguration
apiVersion: kubelet.config.k8s.io/v1beta1
cgroupDriver: systemd
---
#指定 KubeProxy 使用ipvs
apiVersion: kubeproxy.config.k8s.io/v1alpha1
kind: KubeProxyConfiguration
mode: ipvs
基于文件执行 k8s master 初始化
root@k8s-master-1:/home/containerd# kubeadm init --config kubeadm-init.yaml
[init] Using Kubernetes version: v1.26.3
[preflight] Running pre-flight checks
[preflight] Pulling images required for setting up a Kubernetes cluster
[preflight] This might take a minute or two, depending on the speed of your internet connection
[preflight] You can also perform this action in beforehand using 'kubeadm config images pull'
[certs] Using certificateDir folder "/etc/kubernetes/pki"
[certs] Generating "ca" certificate and key
[certs] Generating "apiserver" certificate and key
[certs] apiserver serving cert is signed for DNS names [k8s-master-1 kubernetes kubernetes.default kubernetes.default.svc kubernetes.default.svc.cluster.local] and IPs [10.100.0.1 192.168.101.21]
[certs] Generating "apiserver-kubelet-client" certificate and key
[certs] Generating "front-proxy-ca" certificate and key
[certs] Generating "front-proxy-client" certificate and key
[certs] Generating "etcd/ca" certificate and key
[certs] Generating "etcd/server" certificate and key
[certs] etcd/server serving cert is signed for DNS names [k8s-master-1 localhost] and IPs [192.168.101.21 127.0.0.1 ::1]
[certs] Generating "etcd/peer" certificate and key
[certs] etcd/peer serving cert is signed for DNS names [k8s-master-1 localhost] and IPs [192.168.101.21 127.0.0.1 ::1]
[certs] Generating "etcd/healthcheck-client" certificate and key
[certs] Generating "apiserver-etcd-client" certificate and key
[certs] Generating "sa" key and public key
[kubeconfig] Using kubeconfig folder "/etc/kubernetes"
[kubeconfig] Writing "admin.conf" kubeconfig file
[kubeconfig] Writing "kubelet.conf" kubeconfig file
[kubeconfig] Writing "controller-manager.conf" kubeconfig file
[kubeconfig] Writing "scheduler.conf" kubeconfig file
[kubelet-start] Writing kubelet environment file with flags to file "/var/lib/kubelet/kubeadm-flags.env"
[kubelet-start] Writing kubelet configuration to file "/var/lib/kubelet/config.yaml"
[kubelet-start] Starting the kubelet
[control-plane] Using manifest folder "/etc/kubernetes/manifests"
[control-plane] Creating static Pod manifest for "kube-apiserver"
[control-plane] Creating static Pod manifest for "kube-controller-manager"
[control-plane] Creating static Pod manifest for "kube-scheduler"
[etcd] Creating static Pod manifest for local etcd in "/etc/kubernetes/manifests"
[wait-control-plane] Waiting for the kubelet to boot up the control plane as static Pods from directory "/etc/kubernetes/manifests". This can take up to 4m0s
[apiclient] All control plane components are healthy after 8.003420 seconds
[upload-config] Storing the configuration used in ConfigMap "kubeadm-config" in the "kube-system" Namespace
[kubelet] Creating a ConfigMap "kubelet-config" in namespace kube-system with the configuration for the kubelets in the cluster
[upload-certs] Skipping phase. Please see --upload-certs
[mark-control-plane] Marking the node k8s-master-1 as control-plane by adding the labels: [node-role.kubernetes.io/control-plane node.kubernetes.io/exclude-from-external-load-balancers]
[mark-control-plane] Marking the node k8s-master-1 as control-plane by adding the taints [node-role.kubernetes.io/control-plane:NoSchedule]
[bootstrap-token] Using token: abcdef.0123456789abcdef
[bootstrap-token] Configuring bootstrap tokens, cluster-info ConfigMap, RBAC Roles
[bootstrap-token] Configured RBAC rules to allow Node Bootstrap tokens to get nodes
[bootstrap-token] Configured RBAC rules to allow Node Bootstrap tokens to post CSRs in order for nodes to get long term certificate credentials
[bootstrap-token] Configured RBAC rules to allow the csrapprover controller automatically approve CSRs from a Node Bootstrap Token
[bootstrap-token] Configured RBAC rules to allow certificate rotation for all node client certificates in the cluster
[bootstrap-token] Creating the "cluster-info" ConfigMap in the "kube-public" namespace
[kubelet-finalize] Updating "/etc/kubernetes/kubelet.conf" to point to a rotatable kubelet client certificate and key
[addons] Applied essential addon: CoreDNS
[addons] Applied essential addon: kube-proxy

Your Kubernetes control-plane has initialized successfully!

To start using your cluster, you need to run the following as a regular user:

  mkdir -p $HOME/.kube
  sudo cp -i /etc/kubernetes/admin.conf $HOME/.kube/config
  sudo chown $(id -u):$(id -g) $HOME/.kube/config

Alternatively, if you are the root user, you can run:

  export KUBECONFIG=/etc/kubernetes/admin.conf

You should now deploy a pod network to the cluster.
Run "kubectl apply -f [podnetwork].yaml" with one of the options listed at:
  https://kubernetes.io/docs/concepts/cluster-administration/addons/

You can now join any number of control-plane nodes by copying certificate authorities
and service account keys on each node and then running the following as root:

  kubeadm join 192.168.101.21:6443 --token abcdef.0123456789abcdef \
	--discovery-token-ca-cert-hash sha256:01e627a789fa18459ade21f8cf4c15c313e9c66b15da3a0dac1e1fe0aa6af29b \
	--control-plane

Then you can join any number of worker nodes by running the following on each as root:

kubeadm join 192.168.101.21:6443 --token abcdef.0123456789abcdef \
	--discovery-token-ca-cert-hash sha256:01e627a789fa18459ade21f8cf4c15c313e9c66b15da3a0dac1e1fe0aa6af29b
root@k8s-master-1:/home/containerd#
根据提示,使用集群需要执行以下操作
root@k8s-master-1:/home/containerd# mkdir -p $HOME/.kube
root@k8s-master-1:/home/containerd# sudo cp -i /etc/kubernetes/admin.conf $HOME/.kube/config
root@k8s-master-1:/home/containerd# sudo chown $(id -u):$(id -g) $HOME/.kube/config
6、添加节点
6.1、添加 node 节点
k8s-node1 服务器加入节点
root@k8s-node-1:~# kubeadm join 192.168.101.21:6443 --token abcdef.0123456789abcdef \
	--discovery-token-ca-cert-hash sha256:01e627a789fa18459ade21f8cf4c15c313e9c66b15da3a0dac1e1fe0aa6af29b
[preflight] Running pre-flight checks
[preflight] Reading configuration from the cluster...
[preflight] FYI: You can look at this config file with 'kubectl -n kube-system get cm kubeadm-config -o yaml'
[kubelet-start] Writing kubelet configuration to file "/var/lib/kubelet/config.yaml"
[kubelet-start] Writing kubelet environment file with flags to file "/var/lib/kubelet/kubeadm-flags.env"
[kubelet-start] Starting the kubelet
[kubelet-start] Waiting for the kubelet to perform the TLS Bootstrap...

This node has joined the cluster:
* Certificate signing request was sent to apiserver and a response was received.
* The Kubelet was informed of the new secure connection details.

Run 'kubectl get nodes' on the control-plane to see this node join the cluster.

root@k8s-node-1:~#
k8s-node2 服务器加入节点
root@k8s-node-2:~# kubeadm join 192.168.101.21:6443 --token abcdef.0123456789abcdef \
	--discovery-token-ca-cert-hash sha256:01e627a789fa18459ade21f8cf4c15c313e9c66b15da3a0dac1e1fe0aa6af29b
[preflight] Running pre-flight checks
[preflight] Reading configuration from the cluster...
[preflight] FYI: You can look at this config file with 'kubectl -n kube-system get cm kubeadm-config -o yaml'
[kubelet-start] Writing kubelet configuration to file "/var/lib/kubelet/config.yaml"
[kubelet-start] Writing kubelet environment file with flags to file "/var/lib/kubelet/kubeadm-flags.env"
[kubelet-start] Starting the kubelet
[kubelet-start] Waiting for the kubelet to perform the TLS Bootstrap...

This node has joined the cluster:
* Certificate signing request was sent to apiserver and a response was received.
* The Kubelet was informed of the new secure connection details.

Run 'kubectl get nodes' on the control-plane to see this node join the cluster.

root@k8s-node-2:~#
查看 node 节点
root@k8s-master-1:/home/containerd# kubectl get node
NAME           STATUS   ROLES           AGE     VERSION
k8s-master-1   Ready    control-plane   4m9s    v1.26.3
k8s-node-1     Ready    <none>          2m10s   v1.26.3
k8s-node-2     Ready    <none>          2m8s    v1.26.3
root@k8s-master-1:/home/containerd#
6.2添加 master 节点
当前maste⽣成证书⽤于添加新控制节点
root@k8s-master-1:/home/containerd# kubeadm init phase upload-certs --upload-certs
I0522 06:00:58.237876   69433 version.go:256] remote version is much newer: v1.27.2; falling back to: stable-1.26
[upload-certs] Storing the certificates in Secret "kubeadm-certs" in the "kube-system" Namespace
[upload-certs] Using certificate key:
de5239ce5841e475a0ec66561ae200a8ed24e5ec8a8d68ebda7a9c3e4a9f4354
root@k8s-master-1:/home/containerd#
root@k8s-master-2:~# kubeadm join 192.168.101.21:6443 --token abcdef.0123456789abcdef \
	--discovery-token-ca-cert-hash sha256:01e627a789fa18459ade21f8cf4c15c313e9c66b15da3a0dac1e1fe0aa6af29b \
	--control-plane --certificate-key de5239ce5841e475a0ec66561ae200a8ed24e5ec8a8d68ebda7a9c3e4a9f4354
[preflight] Running pre-flight checks
[preflight] Reading configuration from the cluster...
[preflight] FYI: You can look at this config file with 'kubectl -n kube-system get cm kubeadm-config -o yaml'
[preflight] Running pre-flight checks before initializing the new control plane instance
[preflight] Pulling images required for setting up a Kubernetes cluster
[preflight] This might take a minute or two, depending on the speed of your internet connection
[preflight] You can also perform this action in beforehand using 'kubeadm config images pull'
[download-certs] Downloading the certificates in Secret "kubeadm-certs" in the "kube-system" Namespace
[download-certs] Saving the certificates to the folder: "/etc/kubernetes/pki"
[certs] Using certificateDir folder "/etc/kubernetes/pki"
[certs] Generating "etcd/healthcheck-client" certificate and key
[certs] Generating "apiserver-etcd-client" certificate and key
[certs] Generating "etcd/server" certificate and key
[certs] etcd/server serving cert is signed for DNS names [k8s-master-2 localhost] and IPs [192.168.101.24 127.0.0.1 ::1]
[certs] Generating "etcd/peer" certificate and key
[certs] etcd/peer serving cert is signed for DNS names [k8s-master-2 localhost] and IPs [192.168.101.24 127.0.0.1 ::1]
[certs] Generating "apiserver-kubelet-client" certificate and key
[certs] Generating "apiserver" certificate and key
[certs] apiserver serving cert is signed for DNS names [k8s-master-2 kubernetes kubernetes.default kubernetes.default.svc kubernetes.default.svc.cluster.local] and IPs [10.96.0.1 192.168.101.24 192.168.101.21]
[certs] Generating "front-proxy-client" certificate and key
[certs] Valid certificates and keys now exist in "/etc/kubernetes/pki"
[certs] Using the existing "sa" key
[kubeconfig] Generating kubeconfig files
[kubeconfig] Using kubeconfig folder "/etc/kubernetes"
[kubeconfig] Writing "admin.conf" kubeconfig file
[kubeconfig] Writing "controller-manager.conf" kubeconfig file
[kubeconfig] Writing "scheduler.conf" kubeconfig file
[control-plane] Using manifest folder "/etc/kubernetes/manifests"
[control-plane] Creating static Pod manifest for "kube-apiserver"
[control-plane] Creating static Pod manifest for "kube-controller-manager"
[control-plane] Creating static Pod manifest for "kube-scheduler"
[check-etcd] Checking that the etcd cluster is healthy
[kubelet-start] Writing kubelet configuration to file "/var/lib/kubelet/config.yaml"
[kubelet-start] Writing kubelet environment file with flags to file "/var/lib/kubelet/kubeadm-flags.env"
[kubelet-start] Starting the kubelet
[kubelet-start] Waiting for the kubelet to perform the TLS Bootstrap...
[etcd] Announced new etcd member joining to the existing etcd cluster
[etcd] Creating static Pod manifest for "etcd"
[etcd] Waiting for the new etcd member to join the cluster. This can take up to 40s
The 'update-status' phase is deprecated and will be removed in a future release. Currently it performs no operation
[mark-control-plane] Marking the node k8s-master-2 as control-plane by adding the labels: [node-role.kubernetes.io/control-plane node.kubernetes.io/exclude-from-external-load-balancers]
[mark-control-plane] Marking the node k8s-master-2 as control-plane by adding the taints [node-role.kubernetes.io/control-plane:NoSchedule]

This node has joined the cluster and a new control plane instance was created:

* Certificate signing request was sent to apiserver and approval was received.
* The Kubelet was informed of the new secure connection details.
* Control plane label and taint were applied to the new node.
* The Kubernetes control plane instances scaled up.
* A new etcd member was added to the local/stacked etcd cluster.

To start administering your cluster from this node, you need to run the following as a regular user:

	mkdir -p $HOME/.kube
	sudo cp -i /etc/kubernetes/admin.conf $HOME/.kube/config
	sudo chown $(id -u):$(id -g) $HOME/.kube/config

Run 'kubectl get nodes' to see this node join the cluster.

root@k8s-master-2:~#
查看 node 节点
root@k8s-master-1:/home# kubectl get node
NAME           STATUS   ROLES           AGE   VERSION
k8s-master-1   Ready    control-plane   37m   v1.26.3
k8s-master-2   Ready    control-plane   44s   v1.26.3
k8s-node-1     Ready    <none>          31m   v1.26.3
k8s-node-2     Ready    <none>          31m   v1.26.3
root@k8s-master-1:/home#
7、部署网络组件
node-1 服务器创建 .kube 目录
root@k8s-node-1:~# mkdir /root/.kube -p
node-2 服务器创建 .kube 目录
root@k8s-node-2:~# mkdir /root/.kube -p
拷贝 master 节点 /root/.kube/config 文件到 node 服务器
root@k8s-master-1:/home# scp /root/.kube/config 192.168.101.22:/root/.kube/
root@192.168.101.22's password:
config                                                                                                               100% 5642     2.8MB/s   00:00
root@k8s-master-1:/home# scp /root/.kube/config 192.168.101.23:/root/.kube/
root@192.168.101.23's password:
config                                                                                                               100% 5642   876.9KB/s   00:00
root@k8s-master-1:/home#
部署 calico ⽹络组件
root@k8s-master-1:/home# kubectl apply -f calico-ipip_ubuntu2004-k8s-1.26.x.yaml
configmap/calico-config created
customresourcedefinition.apiextensions.k8s.io/bgpconfigurations.crd.projectcalico.org created
customresourcedefinition.apiextensions.k8s.io/bgppeers.crd.projectcalico.org created
customresourcedefinition.apiextensions.k8s.io/blockaffinities.crd.projectcalico.org created
customresourcedefinition.apiextensions.k8s.io/caliconodestatuses.crd.projectcalico.org created
customresourcedefinition.apiextensions.k8s.io/clusterinformations.crd.projectcalico.org created
customresourcedefinition.apiextensions.k8s.io/felixconfigurations.crd.projectcalico.org created
customresourcedefinition.apiextensions.k8s.io/globalnetworkpolicies.crd.projectcalico.org created
customresourcedefinition.apiextensions.k8s.io/globalnetworksets.crd.projectcalico.org created
customresourcedefinition.apiextensions.k8s.io/hostendpoints.crd.projectcalico.org created
customresourcedefinition.apiextensions.k8s.io/ipamblocks.crd.projectcalico.org created
customresourcedefinition.apiextensions.k8s.io/ipamconfigs.crd.projectcalico.org created
customresourcedefinition.apiextensions.k8s.io/ipamhandles.crd.projectcalico.org created
customresourcedefinition.apiextensions.k8s.io/ippools.crd.projectcalico.org created
customresourcedefinition.apiextensions.k8s.io/ipreservations.crd.projectcalico.org created
customresourcedefinition.apiextensions.k8s.io/kubecontrollersconfigurations.crd.projectcalico.org created
customresourcedefinition.apiextensions.k8s.io/networkpolicies.crd.projectcalico.org created
customresourcedefinition.apiextensions.k8s.io/networksets.crd.projectcalico.org created
clusterrole.rbac.authorization.k8s.io/calico-kube-controllers created
clusterrolebinding.rbac.authorization.k8s.io/calico-kube-controllers created
clusterrole.rbac.authorization.k8s.io/calico-node created
clusterrolebinding.rbac.authorization.k8s.io/calico-node created
daemonset.apps/calico-node created
serviceaccount/calico-node created
deployment.apps/calico-kube-controllers created
serviceaccount/calico-kube-controllers created
poddisruptionbudget.policy/calico-kube-controllers created
root@k8s-master-1:/home#
验证 node 与 pod 状态
root@k8s-master-1:/home/containerd# kubectl get pod -A
NAMESPACE     NAME                                       READY   STATUS    RESTARTS   AGE
kube-system   calico-kube-controllers-79bfdd4898-sr5xl   1/1     Running   0          3m56s
kube-system   calico-node-8frv8                          1/1     Running   0          3m56s
kube-system   calico-node-mh6cw                          1/1     Running   0          3m56s
kube-system   calico-node-r54rd                          1/1     Running   0          3m56s
kube-system   coredns-567c556887-j6tdc                   1/1     Running   0          4h35m
kube-system   coredns-567c556887-tg4d8                   1/1     Running   0          4h35m
kube-system   etcd-k8s-master-1                          1/1     Running   6          4h36m
kube-system   kube-apiserver-k8s-master-1                1/1     Running   1          4h36m
kube-system   kube-controller-manager-k8s-master-1       1/1     Running   1          4h36m
kube-system   kube-proxy-62lwr                           1/1     Running   0          4h34m
kube-system   kube-proxy-n99t8                           1/1     Running   0          4h35m
kube-system   kube-proxy-qczg5                           1/1     Running   0          4h34m
kube-system   kube-scheduler-k8s-master-1                1/1     Running   1          4h36m
root@k8s-master-1:/home/containerd#
8、部署 web 服务
创建一个 namespace
root@k8s-master-1:/home/containerd# kubectl create ns myserver
namespace/myserver created
root@k8s-master-1:/home/containerd#
创建 nginx.yaml 文件
kind: Deployment
apiVersion: apps/v1
metadata:
  labels:
    app: myserver-nginx-deployment-label
  name: myserver-nginx-deployment
  namespace: myserver
spec:
  replicas: 1
  selector:
    matchLabels:
      app: myserver-nginx-selector
  template:
    metadata:
      labels:
        app: myserver-nginx-selector
    spec:
      containers:
      - name: nginx
        image: nginx
        imagePullPolicy: Always
        ports:
        - containerPort: 80
          protocol: TCP
          name: http
        - containerPort: 443
          protocol: TCP
          name: https
        resources:
          limits:
            cpu: 1
            memory: 1Gi
          requests:
            cpu: 1
            memory: 1Gi
---
kind: Service
apiVersion: v1
metadata:
  labels:
    app: myserver-nginx-service-label
  name: myserver-nginx-service
  namespace: myserver
spec:
  type: NodePort
  ports:
  - name: http
    port: 80
    protocol: TCP
    targetPort: 80
    nodePort: 30004
  - name: https
    port: 443
    protocol: TCP
    targetPort: 443
    nodePort: 30443
  selector:
    app: myserver-nginx-selector
创建 nginx 服务
root@k8s-master-1:/home/containerd# kubectl apply -f nginx.yaml
deployment.apps/myserver-nginx-deployment created
service/myserver-nginx-service created
查看服务端口
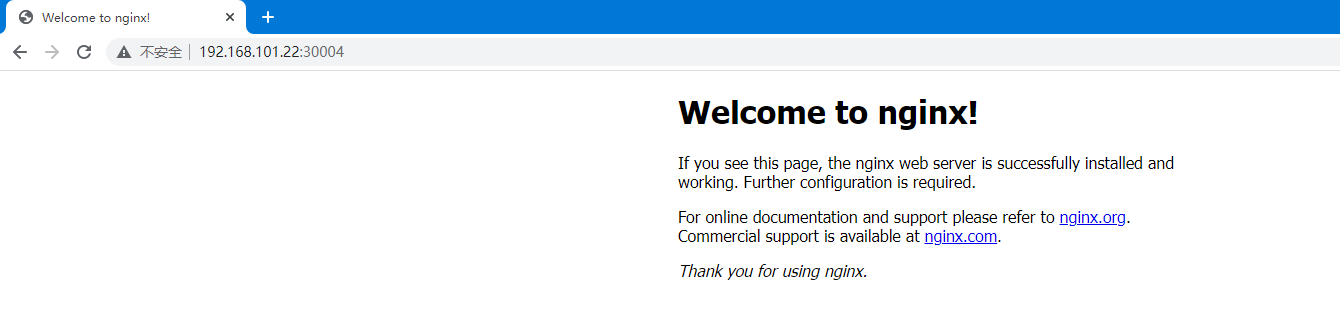
root@k8s-master-1:/home/containerd# kubectl get svc -n myserver -o wide
NAME                     TYPE       CLUSTER-IP       EXTERNAL-IP   PORT(S)                      AGE     SELECTOR
myserver-nginx-service   NodePort   10.100.139.154   <none>        80:30004/TCP,443:30443/TCP   7m54s   app=myserver-nginx-selector
查看 pod 所在 node 节点
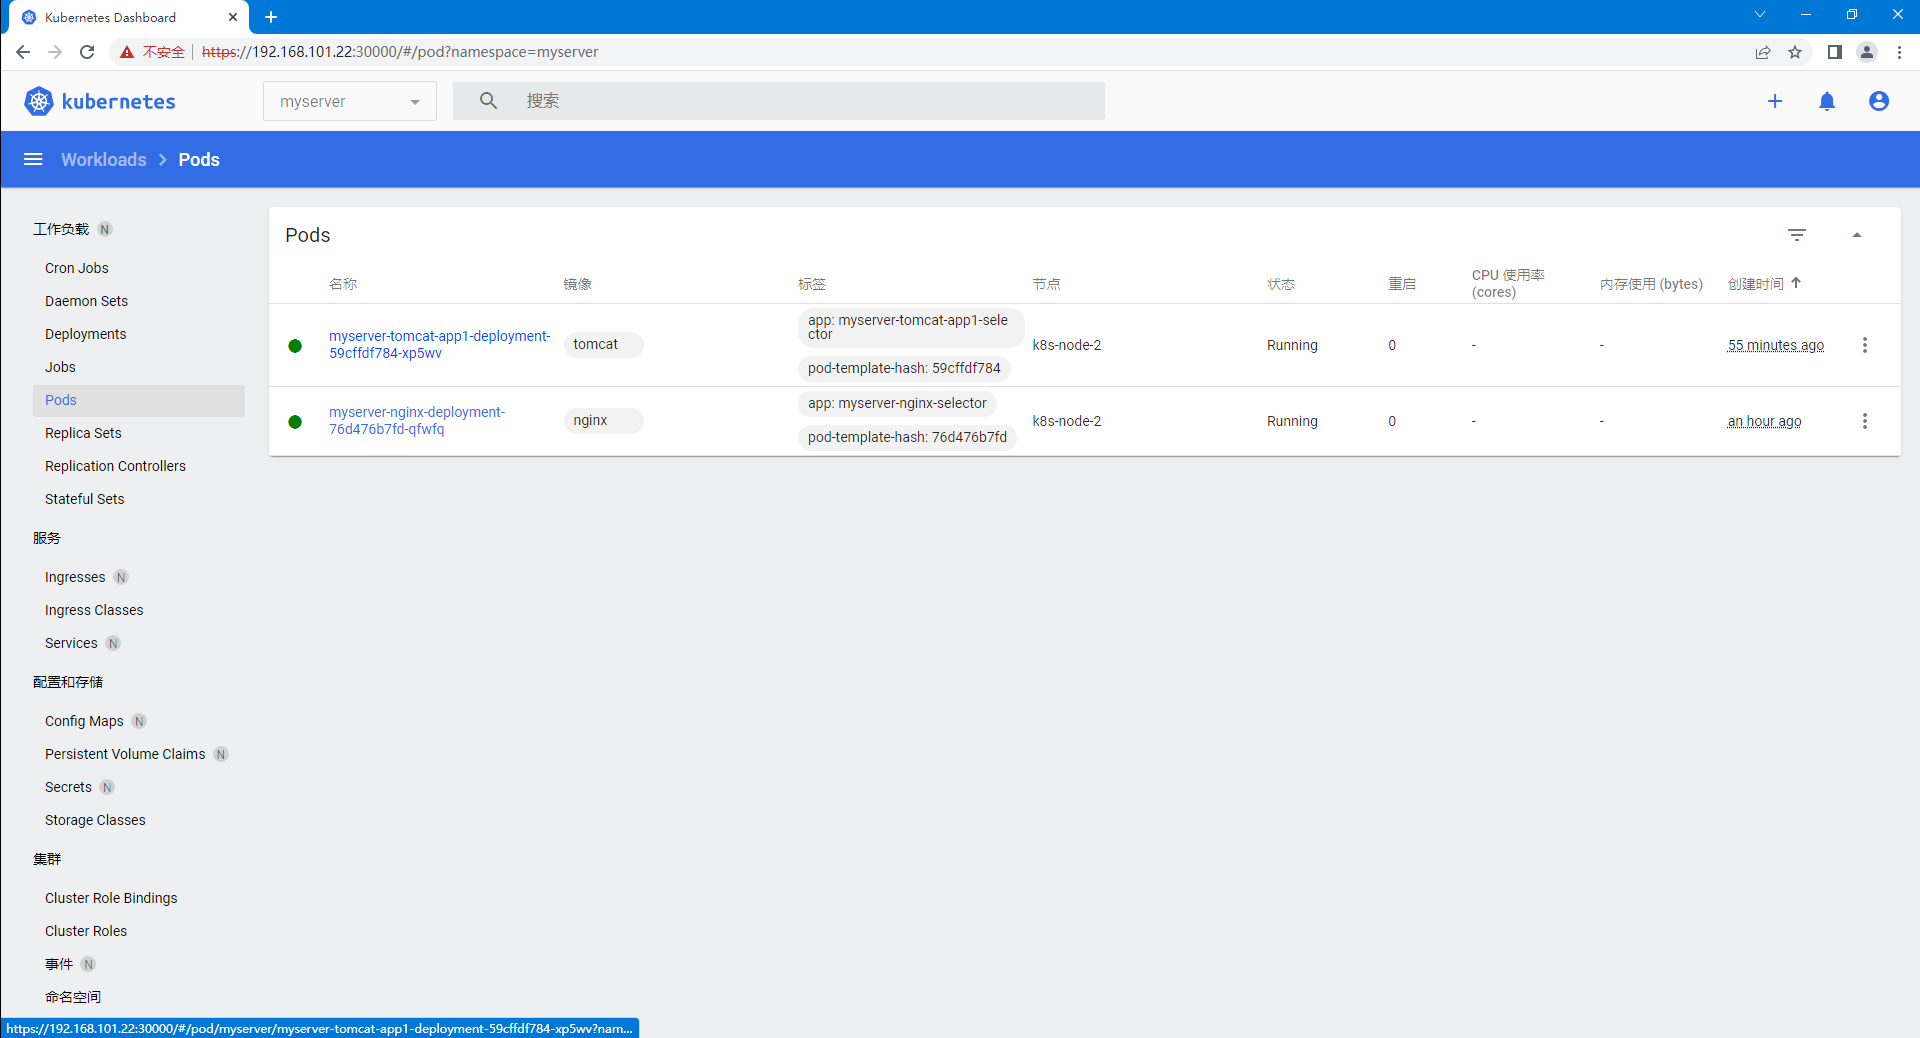
root@k8s-master-1:/home/containerd# kubectl get pod -n myserver -o wide
NAME                                         READY   STATUS    RESTARTS   AGE     IP            NODE         NOMINATED NODE   READINESS GATES
myserver-nginx-deployment-76d476b7fd-qfwfq   1/1     Running   0          8m14s   10.100.49.1   k8s-node-2   <none>           <none>
测试使用 node 节点地址访问
创建 tomcat.yaml 文件
kind: Deployment
apiVersion: apps/v1
metadata:
  labels:
    app: myserver-tomcat-app1-deployment-label
  name: myserver-tomcat-app1-deployment
  namespace: myserver
spec:
  replicas: 1
  selector:
    matchLabels:
      app: myserver-tomcat-app1-selector
  template:
    metadata:
      labels:
        app: myserver-tomcat-app1-selector
    spec:
      containers:
      - name: myserver-tomcat-app1-container
        image: tomcat
        imagePullPolicy: Always
        ports:
        - containerPort: 8080
          protocol: TCP
          name: http
        resources:
          limits:
            cpu: 1
            memory: 1Gi
          requests:
            cpu: 1
            memory: 1Gi
---
kind: Service
apiVersion: v1
metadata:
  labels:
    app: myserver-tomcat-app1-service-label
  name: myserver-tomcat-app1-service
  namespace: myserver
spec:
  type: NodePort
  ports:
  - name: http
    port: 80
    protocol: TCP
    targetPort: 8080
    nodePort: 30005
  selector:
    app: myserver-tomcat-app1-selector
创建 tomcat 服务
root@k8s-master-1:/home/containerd# kubectl apply -f tomcat.yaml
deployment.apps/myserver-tomcat-app1-deployment created
service/myserver-tomcat-app1-service created
root@k8s-master-1:/home/containerd# kubectl get pod -n myserver -o wide
NAME                                               READY   STATUS    RESTARTS   AGE     IP            NODE         NOMINATED NODE   READINESS GATES
myserver-nginx-deployment-76d476b7fd-qfwfq         1/1     Running   0          22m     10.100.49.1   k8s-node-2   <none>           <none>
myserver-tomcat-app1-deployment-59cffdf784-xp5wv   1/1     Running   0          2m31s   10.100.49.2   k8s-node-2   <none>           <none>
root@k8s-master-1:/home/containerd# kubectl get svc -n myserver -o wide
NAME                           TYPE       CLUSTER-IP       EXTERNAL-IP   PORT(S)                      AGE    SELECTOR
myserver-nginx-service         NodePort   10.100.139.154   <none>        80:30004/TCP,443:30443/TCP   21m    app=myserver-nginx-selector
myserver-tomcat-app1-service   NodePort   10.100.19.210    <none>        8080:30005/TCP               2m6s   app=myserver-tomcat-app1-selector
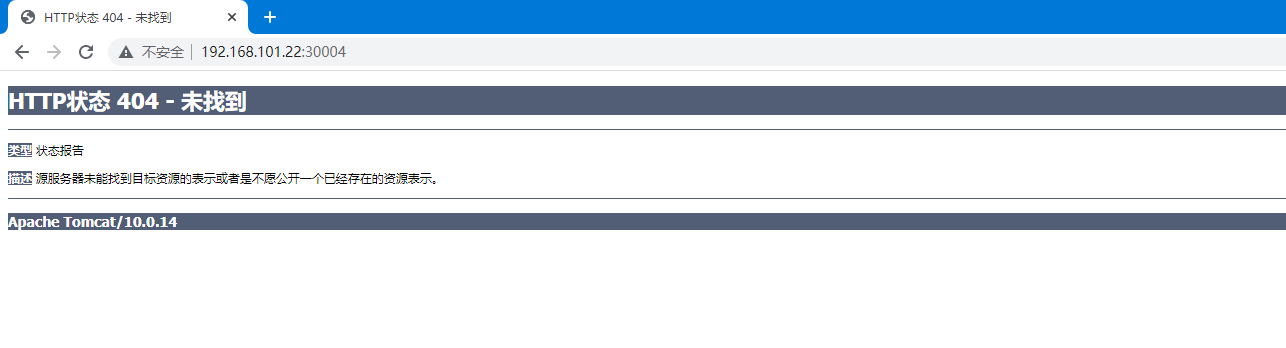
修改 nginx 服务默认配置,将请求转发到 tomcat 服务
server {
    listen       80;
    listen  [::]:80;
    server_name  localhost;

    #access_log  /var/log/nginx/host.access.log  main;

    location / {
        #root   /usr/share/nginx/html;
        #index  index.html index.htm;
        proxy_pass http://myserver-tomcat-app1-service:8080;
    }
}
测试访问 nginx 服务,请求将转发至 tomcat
9、部署官⽅ dashboard
9.1、部署dashboard并创建账户及授权
admin-secret.yaml、admin-user.yaml、dashboard-v2.7.0.yaml 配置文件内容。
root@k8s-master-1:/home/dashboard-v2.7.0# cat admin-secret.yaml
apiVersion: v1
kind: Secret
type: kubernetes.io/service-account-token
metadata:
  name: dashboard-admin-user
  namespace: kubernetes-dashboard
  annotations:
    kubernetes.io/service-account.name: "admin-user"
root@k8s-master-1:/home/dashboard-v2.7.0# cat admin-user.yaml
apiVersion: v1
kind: ServiceAccount
metadata:
  name: admin-user
  namespace: kubernetes-dashboard

---
apiVersion: rbac.authorization.k8s.io/v1
kind: ClusterRoleBinding
metadata:
  name: admin-user
roleRef:
  apiGroup: rbac.authorization.k8s.io
  kind: ClusterRole
  name: cluster-admin
subjects:
- kind: ServiceAccount
  name: admin-user
  namespace: kubernetes-dashboard
root@k8s-master-1:/home/dashboard-v2.7.0# cat dashboard-v2.7.0.yaml
# Copyright 2017 The Kubernetes Authors.
#
# Licensed under the Apache License, Version 2.0 (the "License");
# you may not use this file except in compliance with the License.
# You may obtain a copy of the License at
#
#     http://www.apache.org/licenses/LICENSE-2.0
#
# Unless required by applicable law or agreed to in writing, software
# distributed under the License is distributed on an "AS IS" BASIS,
# WITHOUT WARRANTIES OR CONDITIONS OF ANY KIND, either express or implied.
# See the License for the specific language governing permissions and
# limitations under the License.

apiVersion: v1
kind: Namespace
metadata:
  name: kubernetes-dashboard

---

apiVersion: v1
kind: ServiceAccount
metadata:
  labels:
    k8s-app: kubernetes-dashboard
  name: kubernetes-dashboard
  namespace: kubernetes-dashboard

---

kind: Service
apiVersion: v1
metadata:
  labels:
    k8s-app: kubernetes-dashboard
  name: kubernetes-dashboard
  namespace: kubernetes-dashboard
spec:
  type: NodePort
  ports:
    - port: 443
      targetPort: 8443
      nodePort: 30000
  selector:
    k8s-app: kubernetes-dashboard

---

apiVersion: v1
kind: Secret
metadata:
  labels:
    k8s-app: kubernetes-dashboard
  name: kubernetes-dashboard-certs
  namespace: kubernetes-dashboard
type: Opaque

---

apiVersion: v1
kind: Secret
metadata:
  labels:
    k8s-app: kubernetes-dashboard
  name: kubernetes-dashboard-csrf
  namespace: kubernetes-dashboard
type: Opaque
data:
  csrf: ""

---

apiVersion: v1
kind: Secret
metadata:
  labels:
    k8s-app: kubernetes-dashboard
  name: kubernetes-dashboard-key-holder
  namespace: kubernetes-dashboard
type: Opaque

---

kind: ConfigMap
apiVersion: v1
metadata:
  labels:
    k8s-app: kubernetes-dashboard
  name: kubernetes-dashboard-settings
  namespace: kubernetes-dashboard

---

kind: Role
apiVersion: rbac.authorization.k8s.io/v1
metadata:
  labels:
    k8s-app: kubernetes-dashboard
  name: kubernetes-dashboard
  namespace: kubernetes-dashboard
rules:
  # Allow Dashboard to get, update and delete Dashboard exclusive secrets.
  - apiGroups: [""]
    resources: ["secrets"]
    resourceNames: ["kubernetes-dashboard-key-holder", "kubernetes-dashboard-certs", "kubernetes-dashboard-csrf"]
    verbs: ["get", "update", "delete"]
    # Allow Dashboard to get and update 'kubernetes-dashboard-settings' config map.
  - apiGroups: [""]
    resources: ["configmaps"]
    resourceNames: ["kubernetes-dashboard-settings"]
    verbs: ["get", "update"]
    # Allow Dashboard to get metrics.
  - apiGroups: [""]
    resources: ["services"]
    resourceNames: ["heapster", "dashboard-metrics-scraper"]
    verbs: ["proxy"]
  - apiGroups: [""]
    resources: ["services/proxy"]
    resourceNames: ["heapster", "http:heapster:", "https:heapster:", "dashboard-metrics-scraper", "http:dashboard-metrics-scraper"]
    verbs: ["get"]

---

kind: ClusterRole
apiVersion: rbac.authorization.k8s.io/v1
metadata:
  labels:
    k8s-app: kubernetes-dashboard
  name: kubernetes-dashboard
rules:
  # Allow Metrics Scraper to get metrics from the Metrics server
  - apiGroups: ["metrics.k8s.io"]
    resources: ["pods", "nodes"]
    verbs: ["get", "list", "watch"]

---

apiVersion: rbac.authorization.k8s.io/v1
kind: RoleBinding
metadata:
  labels:
    k8s-app: kubernetes-dashboard
  name: kubernetes-dashboard
  namespace: kubernetes-dashboard
roleRef:
  apiGroup: rbac.authorization.k8s.io
  kind: Role
  name: kubernetes-dashboard
subjects:
  - kind: ServiceAccount
    name: kubernetes-dashboard
    namespace: kubernetes-dashboard

---

apiVersion: rbac.authorization.k8s.io/v1
kind: ClusterRoleBinding
metadata:
  name: kubernetes-dashboard
roleRef:
  apiGroup: rbac.authorization.k8s.io
  kind: ClusterRole
  name: kubernetes-dashboard
subjects:
  - kind: ServiceAccount
    name: kubernetes-dashboard
    namespace: kubernetes-dashboard

---

kind: Deployment
apiVersion: apps/v1
metadata:
  labels:
    k8s-app: kubernetes-dashboard
  name: kubernetes-dashboard
  namespace: kubernetes-dashboard
spec:
  replicas: 1
  revisionHistoryLimit: 10
  selector:
    matchLabels:
      k8s-app: kubernetes-dashboard
  template:
    metadata:
      labels:
        k8s-app: kubernetes-dashboard
    spec:
      securityContext:
        seccompProfile:
          type: RuntimeDefault
      containers:
        - name: kubernetes-dashboard
          image: kubernetesui/dashboard:v2.7.0
          imagePullPolicy: Always
          ports:
            - containerPort: 8443
              protocol: TCP
          args:
            - --auto-generate-certificates
            - --namespace=kubernetes-dashboard
            # Uncomment the following line to manually specify Kubernetes API server Host
            # If not specified, Dashboard will attempt to auto discover the API server and connect
            # to it. Uncomment only if the default does not work.
            # - --apiserver-host=http://my-address:port
          volumeMounts:
            - name: kubernetes-dashboard-certs
              mountPath: /certs
              # Create on-disk volume to store exec logs
            - mountPath: /tmp
              name: tmp-volume
          livenessProbe:
            httpGet:
              scheme: HTTPS
              path: /
              port: 8443
            initialDelaySeconds: 30
            timeoutSeconds: 30
          securityContext:
            allowPrivilegeEscalation: false
            readOnlyRootFilesystem: true
            runAsUser: 1001
            runAsGroup: 2001
      volumes:
        - name: kubernetes-dashboard-certs
          secret:
            secretName: kubernetes-dashboard-certs
        - name: tmp-volume
          emptyDir: {}
      serviceAccountName: kubernetes-dashboard
      nodeSelector:
        "kubernetes.io/os": linux
      # Comment the following tolerations if Dashboard must not be deployed on master
      tolerations:
        - key: node-role.kubernetes.io/master
          effect: NoSchedule

---

kind: Service
apiVersion: v1
metadata:
  labels:
    k8s-app: dashboard-metrics-scraper
  name: dashboard-metrics-scraper
  namespace: kubernetes-dashboard
spec:
  ports:
    - port: 8000
      targetPort: 8000
  selector:
    k8s-app: dashboard-metrics-scraper

---

kind: Deployment
apiVersion: apps/v1
metadata:
  labels:
    k8s-app: dashboard-metrics-scraper
  name: dashboard-metrics-scraper
  namespace: kubernetes-dashboard
spec:
  replicas: 1
  revisionHistoryLimit: 10
  selector:
    matchLabels:
      k8s-app: dashboard-metrics-scraper
  template:
    metadata:
      labels:
        k8s-app: dashboard-metrics-scraper
    spec:
      securityContext:
        seccompProfile:
          type: RuntimeDefault
      containers:
        - name: dashboard-metrics-scraper
          image: kubernetesui/metrics-scraper:v1.0.8
          ports:
            - containerPort: 8000
              protocol: TCP
          livenessProbe:
            httpGet:
              scheme: HTTP
              path: /
              port: 8000
            initialDelaySeconds: 30
            timeoutSeconds: 30
          volumeMounts:
          - mountPath: /tmp
            name: tmp-volume
          securityContext:
            allowPrivilegeEscalation: false
            readOnlyRootFilesystem: true
            runAsUser: 1001
            runAsGroup: 2001
      serviceAccountName: kubernetes-dashboard
      nodeSelector:
        "kubernetes.io/os": linux
      # Comment the following tolerations if Dashboard must not be deployed on master
      tolerations:
        - key: node-role.kubernetes.io/master
          effect: NoSchedule
      volumes:
        - name: tmp-volume
          emptyDir: {}
root@k8s-master-1:/home/dashboard-v2.7.0#
部署 dashboard
root@k8s-master-1:/home/dashboard-v2.7.0# kubectl apply -f dashboard-v2.7.0.yaml -f admin-user.yaml -f admin-secret.yaml
namespace/kubernetes-dashboard created
serviceaccount/kubernetes-dashboard created
service/kubernetes-dashboard created
secret/kubernetes-dashboard-certs created
secret/kubernetes-dashboard-csrf created
secret/kubernetes-dashboard-key-holder created
configmap/kubernetes-dashboard-settings created
role.rbac.authorization.k8s.io/kubernetes-dashboard created
clusterrole.rbac.authorization.k8s.io/kubernetes-dashboard created
rolebinding.rbac.authorization.k8s.io/kubernetes-dashboard created
clusterrolebinding.rbac.authorization.k8s.io/kubernetes-dashboard created
deployment.apps/kubernetes-dashboard created
service/dashboard-metrics-scraper created
deployment.apps/dashboard-metrics-scraper created
serviceaccount/admin-user created
clusterrolebinding.rbac.authorization.k8s.io/admin-user created
secret/dashboard-admin-user created
root@k8s-master-1:/home/dashboard-v2.7.0#
查看 pod 运行状态
root@k8s-master-1:/home/dashboard-v2.7.0# kubectl get pod -n kubernetes-dashboard
NAME                                        READY   STATUS    RESTARTS   AGE
dashboard-metrics-scraper-7bc864c59-w8l9c   1/1     Running   0          2m45s
kubernetes-dashboard-6c7ccbcf87-hfw4c       1/1     Running   0          2m45s
root@k8s-master-1:/home/dashboard-v2.7.0#
9.2、获取登录 token ,并查看 pod 所在 node 节点
root@k8s-master-1:/home/dashboard-v2.7.0# kubectl get secret -A | grep admin
kubernetes-dashboard   dashboard-admin-user              kubernetes.io/service-account-token   3      4m35s
root@k8s-master-1:/home/dashboard-v2.7.0# kubectl describe secret -n kubernetes-dashboard dashboard-admin-user
Name:         dashboard-admin-user
Namespace:    kubernetes-dashboard
Labels:       <none>
Annotations:  kubernetes.io/service-account.name: admin-user
              kubernetes.io/service-account.uid: c6abfa95-ab49-4307-af91-7166f836cae5

Type:  kubernetes.io/service-account-token

Data
====
token:      eyJhbGciOiJSUzI1NiIsImtpZCI6ImpvZEdFb2c1VDNUYnJENUpqbjBmOXFNX2dxRE9MV3RMR3hRZW9DaDhjZnMifQ.eyJpc3MiOiJrdWJlcm5ldGVzL3NlcnZpY2VhY2NvdW50Iiwia3ViZXJuZXRlcy5pby9zZXJ2aWNlYWNjb3VudC9uYW1lc3BhY2UiOiJrdWJlcm5ldGVzLWRhc2hib2FyZCIsImt1YmVybmV0ZXMuaW8vc2VydmljZWFjY291bnQvc2VjcmV0Lm5hbWUiOiJkYXNoYm9hcmQtYWRtaW4tdXNlciIsImt1YmVybmV0ZXMuaW8vc2VydmljZWFjY291bnQvc2VydmljZS1hY2NvdW50Lm5hbWUiOiJhZG1pbi11c2VyIiwia3ViZXJuZXRlcy5pby9zZXJ2aWNlYWNjb3VudC9zZXJ2aWNlLWFjY291bnQudWlkIjoiYzZhYmZhOTUtYWI0OS00MzA3LWFmOTEtNzE2NmY4MzZjYWU1Iiwic3ViIjoic3lzdGVtOnNlcnZpY2VhY2NvdW50Omt1YmVybmV0ZXMtZGFzaGJvYXJkOmFkbWluLXVzZXIifQ.cz-1OwjXNEtKlGRMZeW8Sav6mesxWhDalcaySPojBxiZ6HmmjfsMPt2sc5nGqqTSobhtudXl_xP-pzrwBertTNo8IaXdyszg9MEK04YDW4XMa7mRDCn8Ib2AxTV3_oo7QqDaC7giiqIW81p7vfwbp-z6ywlvJ9aBO858u-ZYFy5YxzpLfF9E1yLGrRbKPjSrr-aC8AoaOP6z3rT7Q0rFrprc1AN-PGGe37tOqM713mxU0JE1za74zuCNBcCvH5b8KK-W5u1ukLI9D7VxhQ0B_BU1t5c-6pTfqxk6ZUFBGN-mZZuihdWHI2OYcT3d1hhTmviBNDAKer7-DOKIDLnjyw
ca.crt:     1099 bytes
namespace:  20 bytes
root@k8s-master-1:/home/dashboard-v2.7.0# kubectl get pod -n kubernetes-dashboard -o wide
NAME                                        READY   STATUS    RESTARTS   AGE     IP            NODE         NOMINATED NODE   READINESS GATES
dashboard-metrics-scraper-7bc864c59-w8l9c   1/1     Running   0          5m34s   10.100.22.2   k8s-node-1   <none>           <none>
kubernetes-dashboard-6c7ccbcf87-hfw4c       1/1     Running   0          5m34s   10.100.22.3   k8s-node-1   <none>           <none>
root@k8s-master-1:/home/dashboard-v2.7.0#
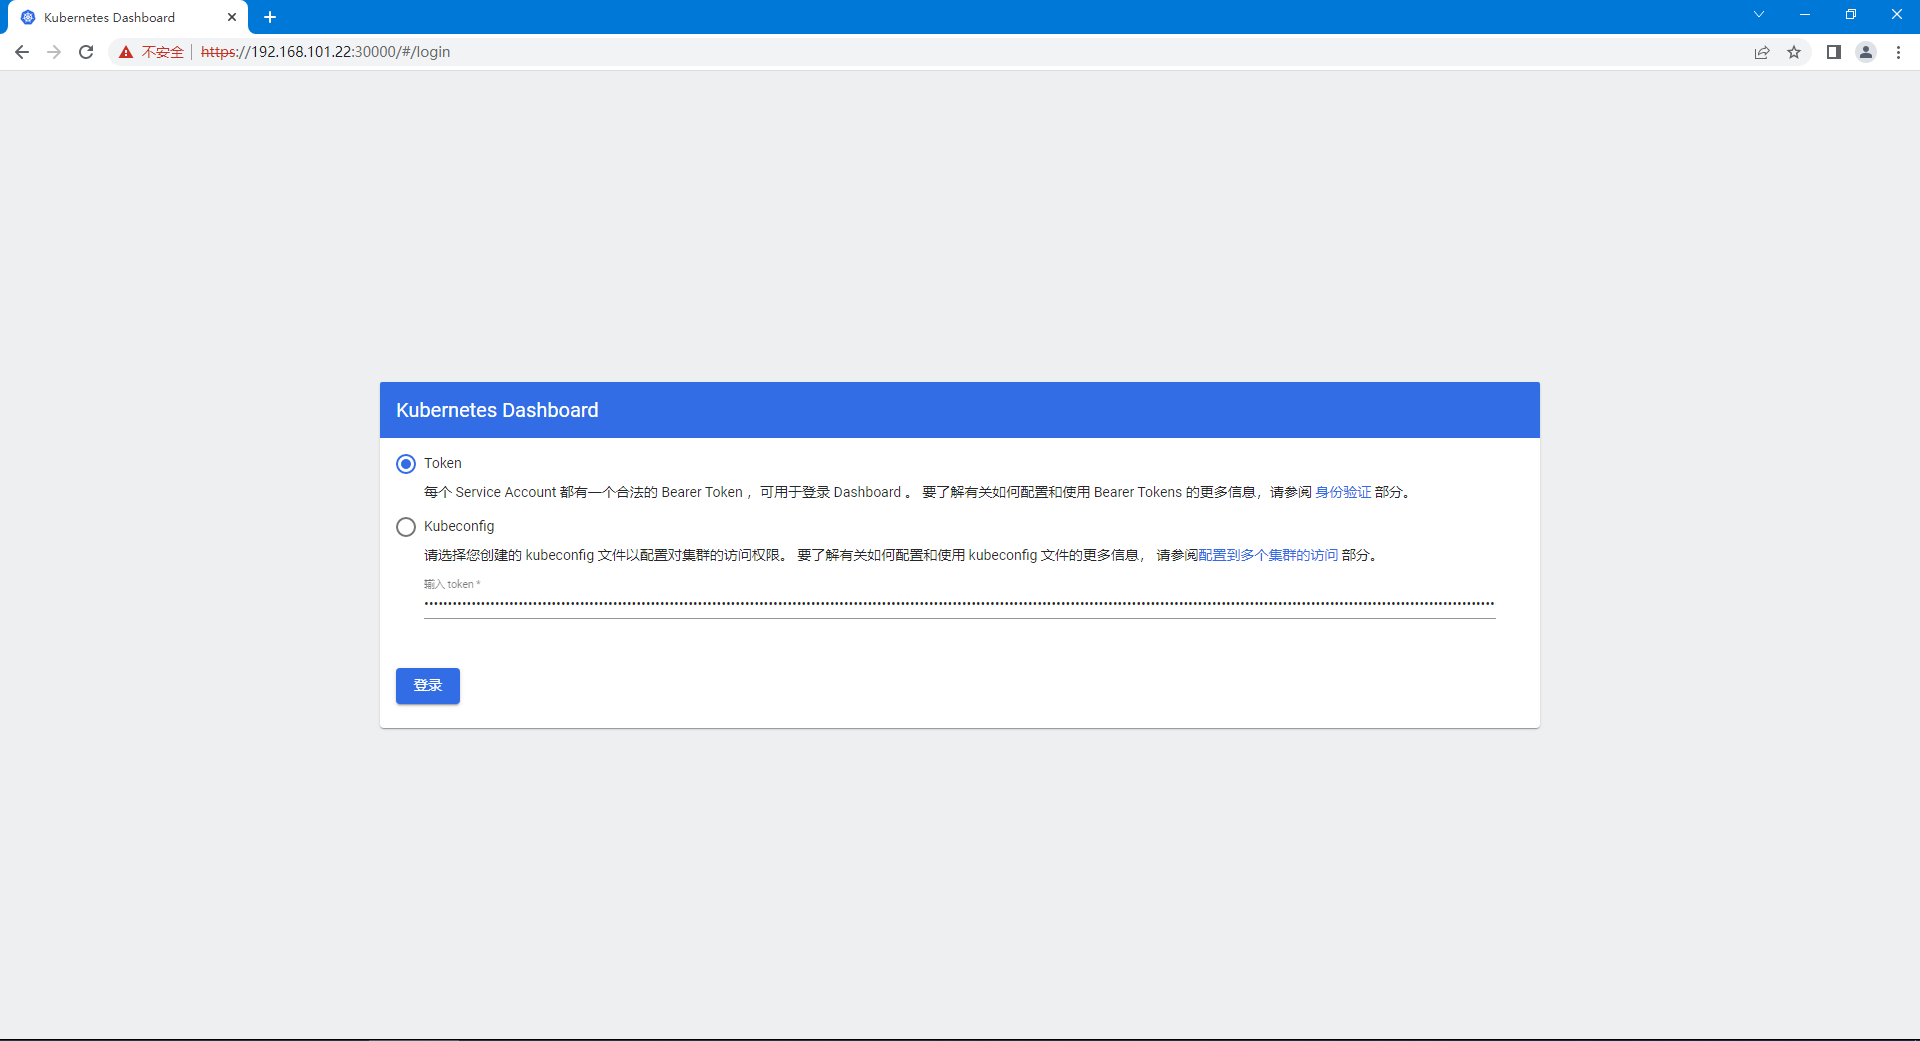
9.3、登录 dashboard

 浙公网安备 33010602011771号