
个人学习记录,仅供参观,请勿转载。
更多精彩欢迎看shiro的github:
Apache shiro 是Java的一个安全权限(框架)。
shiro可以非常容易的开发出足够好的应用,其不仅可以用在javase环境,还可以用在javaee环境。
shiro可以完成:认证、授权、加密、会话管理、与web集成、缓存等。
shiro的下载地址:
http://shiro.apache.org/

功能简介:
Authentication:身份认证/登陆,验证用户是不是拥有响应的身份;
Authorization:授权,即权限验证,验证莫格已认证的用户是否拥有某个权限;即判断用户是否能进行什么操作,如:验证莫格用户是否拥有某个角色。或者细粒度的验证莫格用户对莫格资源是否具有某个权限;
Session Manage:会话管理,即用户登陆之后就是一次会话,在没有退出之前,它的所有信息都在会话中;会话可以是普通的JavaSE环境,也可以是Web环境;
Cryptography:加密,保护数据的安全性,如密码加密存储到数据库,而不是铭文存储;
Web Support:Web支持,可以非常容易的集成到Web环境;
Caching:缓存,比如用户登陆后,其用户信息、拥有角色/权限不必每次去查,这样可以提高效率;
Concurrency;Shiro支持多线程应用的并发验证,即如在一个线程中开启另一个线程,能把权限自动传播出去;
Testing:提供测试支持;
Run As:允许一个用户假装为另一个用户(如果他们允许)的身份进行访问;
Remember Me:记住我,这是非常常见的一个功能,即一次登陆后,下次再来的话不用登陆了。
shiro官方架构:
High-Level Overview
Detailed Architecture
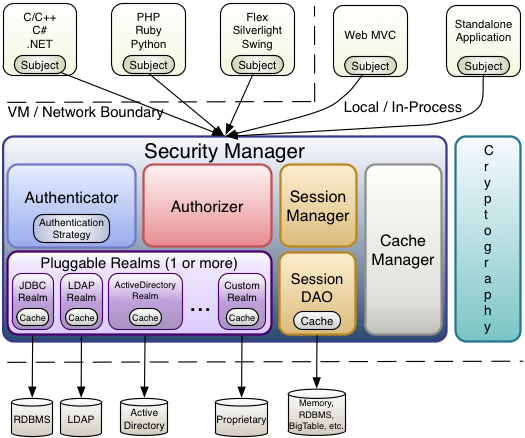
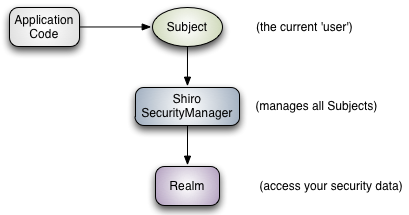
名词解释:
Subject:任何可以与应用交互的“用户”;
SecurityManager:相当于SpringMVC中的DispatherServlet;是Shiro的核心;
所有具体的交互都通过SecurityManager进行控制;它管理所有的Subject、且负责进行认证、授权、会话、及缓存的管理。
Authenticator:负责Subject认证,是一个扩展点,可以自定义实现;可以使用认证策略(Authentication Strategy),
即什么情况下算用户通过了;
Authorizer:授权器,即访问控制器,用来决定主体是否有权限进行相应的操作;即控制着用户的访问应用中的哪些功能;
Realm:可以有一个或多个Realm,可以认为是安全实体数据源,即用于获取安全实体;可以是JDBC实现,也可以是内存实现等;
由用户提供;所以一般在应用中都需要实现自己的Realm;
SessionManager:管理Session生命周期的组件;而Shiro并不仅仅可以用在Web环境,
也可以用在普通的javaSE环境。
CacheManager:缓存控制器,来管理如用户、角色、权限的缓存;因为这些数据基本上很少改变,
放到缓存中可以提高访问的性能。
Cryptography:密码模块,Shiro提高了一些常见的加密组件用于如密码加密/解密。
Latest Stable Release (1.5.2)
shiro各种依赖;
| shiro-all | Not Recommended(对于Maven构建,强烈建议根据需要指定下面列出的各个模块。) | Includes all binary functionality for Shiro (without dependencies), useful in certain build environments (e.g. Ant). However, this is NOT recommended in Maven builds as it does not retain correct dependency metadata, which can lead to Maven working incorrectly. For Maven builds, it is highly recommended to specify individual modules listed below as you require them. |
| shiro-core |
|
Required in all environments. Slf4j's slf4j-api jar and one of its binding jars is required. commons-beanutils is required only if using INI config. |
| shiro-web |
|
Enables support for web-based applications. |
| shiro-servlet-plugin |
|
Servlet Fragment which configures Shiro's servlet filter. |
| shiro-jaxrs |
|
Enables support for JAX-RS applications. |
| shiro-aspectj |
|
Enables AspectJ support for Shiro AOP and Annotations. |
| shiro-cas |
|
Enables Jasig CAS support.
NOTE:
Shiro-CAS support is deprecated, support has been moved to the Apache Shiro based buji-pac4j project. |
| shiro-ehcache |
|
Enables Ehcache-based famework caching. |
| shiro-hazelcast |
|
Enables Hazelcast-based famework caching. |
| shiro-features |
|
OSGi / Apache Karaf integration. |
| shiro-guice |
|
Enables Google Guice integration. |
| shiro-quartz |
|
Enables Quartz-based scheduling for Shiro native session validation. |
| shiro-spring |
|
Enables Spring Framework integration. |
| shiro-spring-boot-starter |
|
Spring Boot starter. |
| shiro-spring-boot-web-starter |
|
Spring Boot web starter. |
| shiro-tools-hasher | Not Relevant | A command-line program to perform hashing (MD5, SHA, etc) for files, streams and passwords. Note that this is a command line program and not intended to be used as a Maven/program dependency. It is intended to be downloaded and executed:
|
官方提供了源码包:
1.5.2 Git Source repository
The source can be cloned anonymously from Git with this command:(可以使用以下命令从Git匿名克隆源:)
git clone https://github.com/apache/shiro.git git checkout shiro-root-1.5.2 -b shiro-root-1.5.2
现在可以有两种方式获得源码一种是通过git克隆,一种是通过zip直接下载。
方式1:git获得源码方式:
现在在我的桌面建一个文件夹:

执行git命令:git clone https://github.com/apache/shiro.git
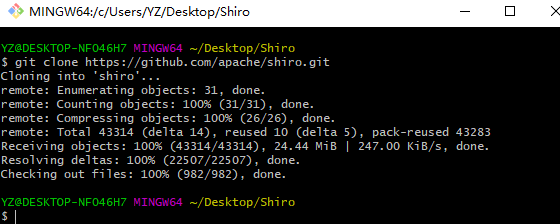
执行此命令后:

切换分支:git checkout shiro-root-1.5.2 -b shiro-root-1.5.2(克隆到本地之后可以通过此命令切换不同版本的源码包)

以上是git获得源码的方式,不过比较推荐直接下载zip,因为可以直接关联到eclipse上看源码。
下面是zip获得源码方式:
zip下载地址:
http://shiro.apache.org/download.html#latestBinary
1.5.2 Source Code Distribution
The source bundle requires JDK 1.8 and Maven 3.0.3+ to build:

完成我把它同样放在刚才的源码包里:

好了,开启shiro之旅.......
因为没有jar包,所以需要通过maven来获取。
首先新建一个java working set,
就叫ShiroDemo
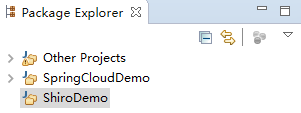
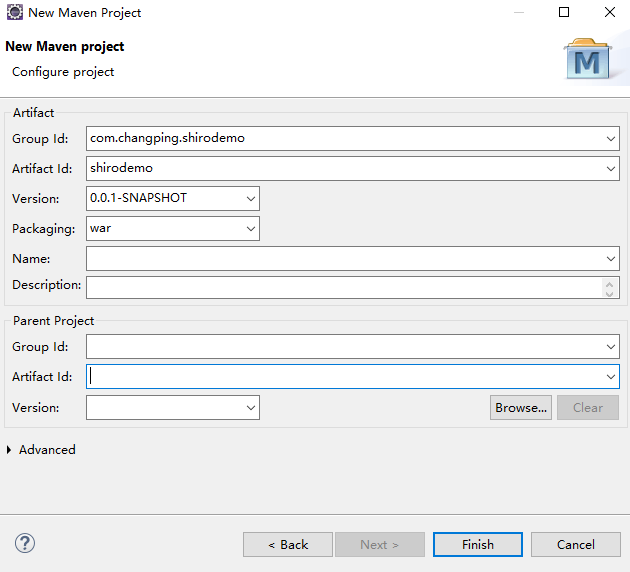
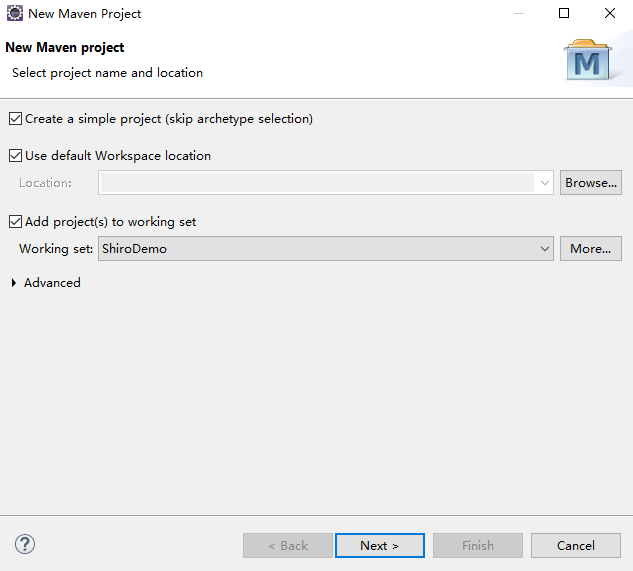
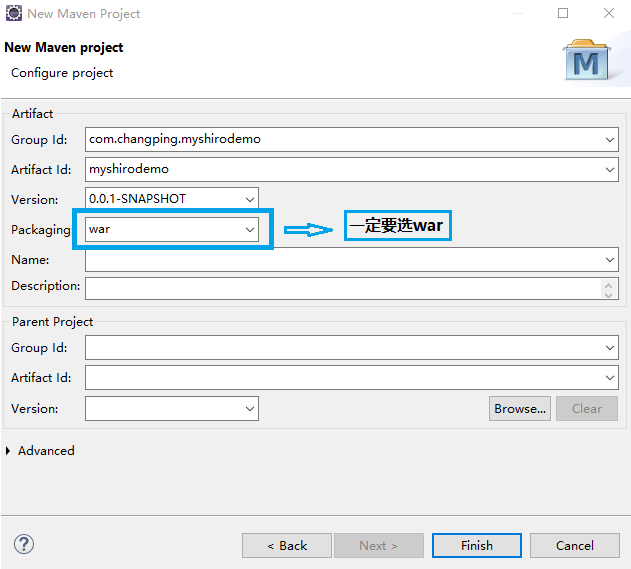
接着,新建一个maven项目:
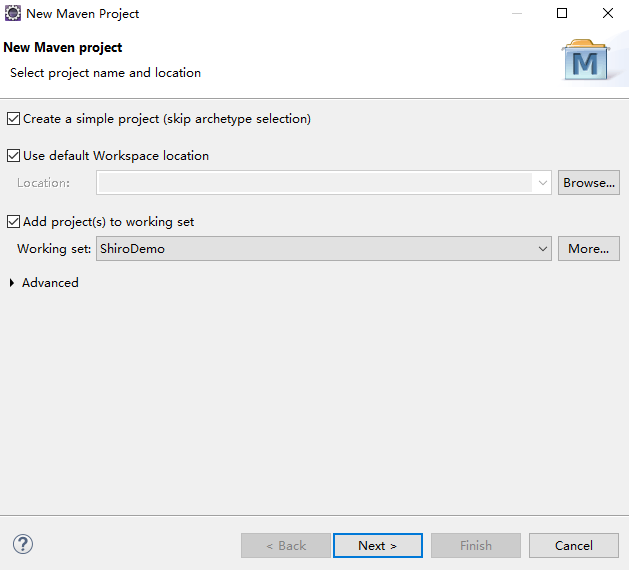
命名为shirodemo
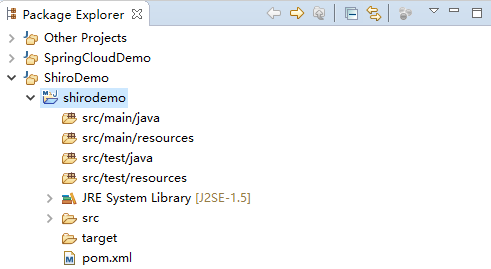
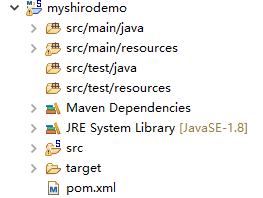
结构如下;
导入Quickstart的pom依赖(哪个版本都可以,选shiro-all或者分包倒视情况而定,用不到可以不倒):
<project xmlns="http://maven.apache.org/POM/4.0.0" xmlns:xsi="http://www.w3.org/2001/XMLSchema-instance" xsi:schemaLocation="http://maven.apache.org/POM/4.0.0 http://maven.apache.org/xsd/maven-4.0.0.xsd"> <modelVersion>4.0.0</modelVersion> <groupId>com.changping.shirodemo</groupId> <artifactId>shirodemo</artifactId> <version>0.0.1-SNAPSHOT</version> <packaging>war</packaging> <build> <plugins> <plugin> <groupId>org.apache.maven.plugins</groupId> <artifactId>maven-compiler-plugin</artifactId> <version>2.5.1</version> <configuration> <source>1.8</source> <target>1.8</target> </configuration> </plugin> </plugins> </build> <dependencies> <!-- shiro相关,先导三个即可,不够再说,不想细分可以直接导入shiro-all--> <dependency> <groupId>org.apache.shiro</groupId> <artifactId>shiro-core</artifactId> <version>1.5.2</version> </dependency> <dependency> <groupId>org.apache.shiro</groupId> <artifactId>shiro-ehcache</artifactId> <version>1.5.2</version> </dependency> <dependency> <groupId>org.apache.shiro</groupId> <artifactId>shiro-spring</artifactId> <version>1.5.2</version> </dependency> </dependencies> </project>
接着跟着源码开启helloworld
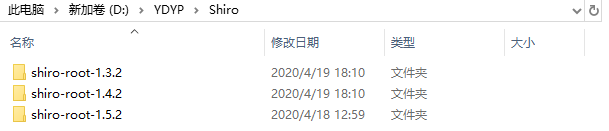
为了好管理,我就把源码都放到我的D盘。
打开如下路径:
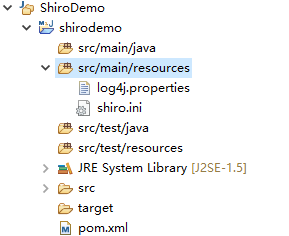
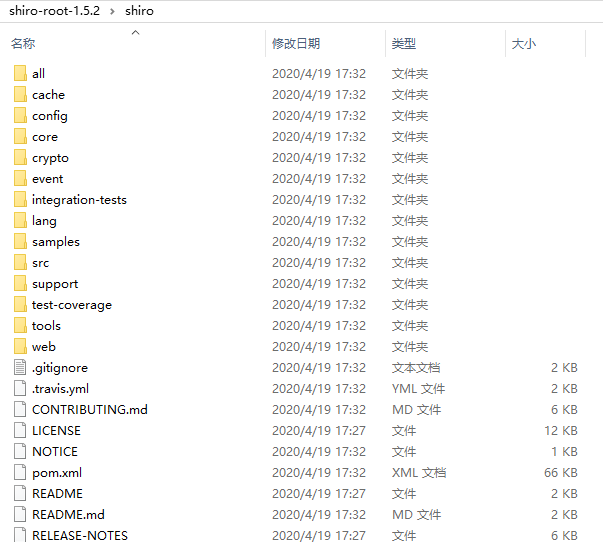
D:\YDYP\Shiro\shiro-root-1.5.2\samples\quickstart\src\main\resources

将以上路径里配置文件log4j、shiro.ini两个文件复制到shirodemo项目的resources中:
接着来到如下路径在shiro源码包里寻找Quickstart.java:
D:\YDYP\Shiro\shiro-root-1.5.2\samples\quickstart\src\main\java

在项目中新建包com.changping.shiro,将shiro源码包里的Quickstart.java复制到该包下:

接着打开Quickstart给它声明一个包名——package com.changping.shiro;


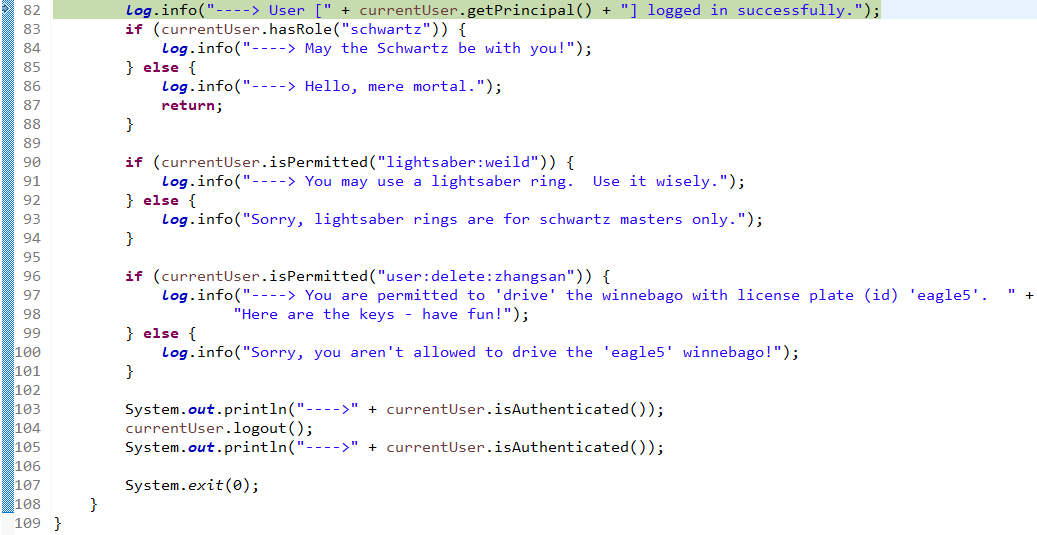
package com.changping.shiro; import org.apache.shiro.SecurityUtils; import org.apache.shiro.authc.*; import org.apache.shiro.mgt.SecurityManager; import org.apache.shiro.session.Session; import org.apache.shiro.subject.Subject; import org.apache.shiro.util.Factory; import org.slf4j.Logger; import org.slf4j.LoggerFactory; /** * Simple Quickstart application showing how to use Shiro's API. * * @since 0.9 RC2 */ public class Quickstart { private static final transient Logger log = LoggerFactory.getLogger(Quickstart.class); public static void main(String[] args) { // The easiest way to create a Shiro SecurityManager with configured // realms, users, roles and permissions is to use the simple INI config. // We'll do that by using a factory that can ingest a .ini file and // return a SecurityManager instance: // Use the shiro.ini file at the root of the classpath // (file: and url: prefixes load from files and urls respectively): Factory<SecurityManager> factory = new IniSecurityManagerFactory("classpath:shiro.ini"); SecurityManager securityManager = factory.getInstance(); // for this simple example quickstart, make the SecurityManager // accessible as a JVM singleton. Most applications wouldn't do this // and instead rely on their container configuration or web.xml for // webapps. That is outside the scope of this simple quickstart, so // we'll just do the bare minimum so you can continue to get a feel // for things. SecurityUtils.setSecurityManager(securityManager); // Now that a simple Shiro environment is set up, let's see what you can do: // get the currently executing user: Subject currentUser = SecurityUtils.getSubject(); // Do some stuff with a Session (no need for a web or EJB container!!!) Session session = currentUser.getSession(); session.setAttribute("someKey", "aValue"); String value = (String) session.getAttribute("someKey"); if (value.equals("aValue")) { log.info("Retrieved the correct value! [" + value + "]"); } // let's login the current user so we can check against roles and permissions: if (!currentUser.isAuthenticated()) { UsernamePasswordToken token = new UsernamePasswordToken("lonestarr", "vespa"); token.setRememberMe(true); try { currentUser.login(token); } catch (UnknownAccountException uae) { log.info("There is no user with username of " + token.getPrincipal()); } catch (IncorrectCredentialsException ice) { log.info("Password for account " + token.getPrincipal() + " was incorrect!"); } catch (LockedAccountException lae) { log.info("The account for username " + token.getPrincipal() + " is locked. " + "Please contact your administrator to unlock it."); } // ... catch more exceptions here (maybe custom ones specific to your application? catch (AuthenticationException ae) { //unexpected condition? error? } } //say who they are: //print their identifying principal (in this case, a username): log.info("User [" + currentUser.getPrincipal() + "] logged in successfully."); //test a role: if (currentUser.hasRole("schwartz")) { log.info("May the Schwartz be with you!"); } else { log.info("Hello, mere mortal."); } //test a typed permission (not instance-level) if (currentUser.isPermitted("lightsaber:wield")) { log.info("You may use a lightsaber ring. Use it wisely."); } else { log.info("Sorry, lightsaber rings are for schwartz masters only."); } //a (very powerful) Instance Level permission: if (currentUser.isPermitted("winnebago:drive:eagle5")) { log.info("You are permitted to 'drive' the winnebago with license plate (id) 'eagle5'. " + "Here are the keys - have fun!"); } else { log.info("Sorry, you aren't allowed to drive the 'eagle5' winnebago!"); } //all done - log out! currentUser.logout(); System.exit(0); } }
接着运行main方法即可。
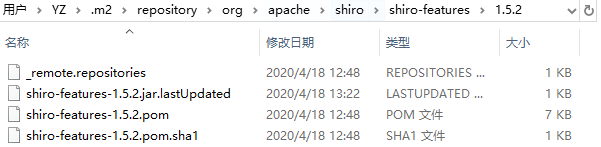
注:shiro最新版本中有一个shiro-features,运行阶段pom会出现些问题,貌似无法获得这个jar包,如果要导入这个包需要小心,现在用不到它:
重新运行即可,consol会打印如下信息:
2020-04-18 13:37:41,173 INFO [org.apache.shiro.session.mgt.AbstractValidatingSessionManager] - Enabling session validation scheduler... 2020-04-18 13:37:42,054 INFO [com.changping.shiro.Quickstart] - Retrieved the correct value! [aValue] 2020-04-18 13:37:42,056 INFO [com.changping.shiro.Quickstart] - User [lonestarr] logged in successfully. 2020-04-18 13:37:42,056 INFO [com.changping.shiro.Quickstart] - May the Schwartz be with you! 2020-04-18 13:37:42,057 INFO [com.changping.shiro.Quickstart] - You may use a lightsaber ring. Use it wisely. 2020-04-18 13:37:42,057 INFO [com.changping.shiro.Quickstart] - You are permitted to 'drive' the winnebago with license plate (id) 'eagle5'. Here are the keys - have fun!
consol(翻译):
正在启用会话验证计划程序。。。
用户[lonestarr]已成功登录。
愿施瓦茨和你在一起!
您可以使用光剑环。 明智地使用它。
您可以使用driver(id)“ eagle5”来“驾驶” winnebago。 这是钥匙-玩得开心!
打印出以上信息,说明shiro工作正常,其中的人名“施瓦茨”是shior给的用户名,没什么特别寓意,这些信息在shiro.ini可以找到。
研究一下quickstart里代码
UsernamePasswordToken token = new UsernamePasswordToken("lonestarr", "vespa");
这里配置用户名和密码,必须和shiro.ini里声明的一致否则无法登陆成功,刚才控制台打印的是登陆成功的消息。
现在假如说,改一下用户名,再来试一试:
UsernamePasswordToken token = new UsernamePasswordToken("123lonestarr", "vespa");
控制台打印(登陆失败)抛出异常:(UnknownAccountException)
2020-04-18 14:00:18,919 INFO [org.apache.shiro.session.mgt.AbstractValidatingSessionManager] - Enabling session validation scheduler... 2020-04-18 14:00:19,572 INFO [com.changping.shiro.Quickstart] - Retrieved the correct value! [aValue] 2020-04-18 14:00:19,573 INFO [com.changping.shiro.Quickstart] - There is no user with username of 123lonestarr 2020-04-18 14:00:19,573 INFO [com.changping.shiro.Quickstart] - User [null] logged in successfully. 2020-04-18 14:00:19,573 INFO [com.changping.shiro.Quickstart] - Hello, mere mortal. 2020-04-18 14:00:19,573 INFO [com.changping.shiro.Quickstart] - Sorry, lightsaber rings are for schwartz masters only. 2020-04-18 14:00:19,573 INFO [com.changping.shiro.Quickstart] - Sorry, you aren't allowed to drive the 'eagle5' winnebago!
在项目中寻找到刚才粘进来的shiro.ini,里面的配置对应着Quickstart,
在shiro.ini右键以文本编辑器打开,(不要用默认编辑器);
# # Licensed to the Apache Software Foundation (ASF) under one # or more contributor license agreements. See the NOTICE file # distributed with this work for additional information # regarding copyright ownership. The ASF licenses this file # to you under the Apache License, Version 2.0 (the # "License"); you may not use this file except in compliance # with the License. You may obtain a copy of the License at # # http://www.apache.org/licenses/LICENSE-2.0 # # Unless required by applicable law or agreed to in writing, # software distributed under the License is distributed on an # "AS IS" BASIS, WITHOUT WARRANTIES OR CONDITIONS OF ANY # KIND, either express or implied. See the License for the # specific language governing permissions and limitations # under the License. # # ============================================================================= # Quickstart INI Realm configuration # # For those that might not understand the references in this file, the # definitions are all based on the classic Mel Brooks' film "Spaceballs". ;) # ============================================================================= # ----------------------------------------------------------------------------- # Users and their assigned roles # # Each line conforms to the format defined in the # org.apache.shiro.realm.text.TextConfigurationRealm#setUserDefinitions JavaDoc # ----------------------------------------------------------------------------- [users] # user 'root' with password 'secret' and the 'admin' role root = secret, admin # user 'guest' with the password 'guest' and the 'guest' role guest = guest, guest # user 'presidentskroob' with password '12345' ("That's the same combination on # my luggage!!!" ;)), and role 'president' presidentskroob = 12345, president # user 'darkhelmet' with password 'ludicrousspeed' and roles 'darklord' and 'schwartz' darkhelmet = ludicrousspeed, darklord, schwartz # user 'lonestarr' with password 'vespa' and roles 'goodguy' and 'schwartz' lonestarr = vespa, goodguy, schwartz # ----------------------------------------------------------------------------- # Roles with assigned permissions # # Each line conforms to the format defined in the # org.apache.shiro.realm.text.TextConfigurationRealm#setRoleDefinitions JavaDoc # ----------------------------------------------------------------------------- [roles] # 'admin' role has all permissions, indicated by the wildcard '*' admin = * # The 'schwartz' role can do anything (*) with any lightsaber: schwartz = lightsaber:* # The 'goodguy' role is allowed to 'drive' (action) the winnebago (type) with # license plate 'eagle5' (instance specific id)//例如:允许类型winnebago(Cat),对实例eagle5(tom),进行driver(增删查改)允许Cat对tom进行增删查改 goodguy = winnebago:drive:eagle5
Quickstart解析:
package com.changping.shiro; import org.apache.shiro.SecurityUtils; import org.apache.shiro.authc.AuthenticationException; import org.apache.shiro.authc.IncorrectCredentialsException; import org.apache.shiro.authc.LockedAccountException; import org.apache.shiro.authc.UnknownAccountException; import org.apache.shiro.authc.UsernamePasswordToken; import org.apache.shiro.config.IniSecurityManagerFactory; import org.apache.shiro.mgt.SecurityManager; import org.apache.shiro.session.Session; import org.apache.shiro.subject.Subject; import org.apache.shiro.util.Factory; import org.slf4j.Logger; import org.slf4j.LoggerFactory; /** * Simple Quickstart application showing how to use Shiro's API. * * @since 0.9 RC2 */ public class Quickstart { private static final transient Logger log = LoggerFactory.getLogger(Quickstart.class); public static void main(String[] args) { // The easiest way to create a Shiro SecurityManager with configured // realms, users, roles and permissions is to use the simple INI config. // We'll do that by using a factory that can ingest a .ini file and // return a SecurityManager instance: // Use the shiro.ini file at the root of the classpath // (file: and url: prefixes load from files and urls respectively): Factory<SecurityManager> factory = new IniSecurityManagerFactory("classpath:shiro.ini");//声明配置文件 SecurityManager securityManager = factory.getInstance(); // for this simple example quickstart, make the SecurityManager // accessible as a JVM singleton. Most applications wouldn't do this // and instead rely on their container configuration or web.xml for // webapps. That is outside the scope of this simple quickstart, so // we'll just do the bare minimum so you can continue to get a feel // for things. SecurityUtils.setSecurityManager(securityManager); // Now that a simple Shiro environment is set up, let's see what you can do: // get the currently executing user: //获得当前的subject Subject currentUser = SecurityUtils.getSubject(); // Do some stuff with a Session (no need for a web or EJB container!!!) //获取session Session session = currentUser.getSession(); session.setAttribute("someKey", "aValue"); String value = (String) session.getAttribute("someKey"); if (value.equals("aValue")) { log.info("Retrieved the correct value! [" + value + "]");//刚才打印的那句话。 } // let's login the current user so we can check against roles and permissions: //测试当前用户是否已经被认证,即是否已经登陆。 //调用subject的isAuthenticated if (!currentUser.isAuthenticated()) { //把用户和密码封装为token对象。 UsernamePasswordToken token = new UsernamePasswordToken("lonestarr", "vespa"); token.setRememberMe(true);//记住我 try { //执行登陆,是否可以登陆成功取决于在shiro.ini里是否配置了用户和密码。 currentUser.login(token); } catch (UnknownAccountException uae) { log.info("There is no user with username of " + token.getPrincipal()); //密码错误异常 } catch (IncorrectCredentialsException ice) { log.info("Password for account " + token.getPrincipal() + " was incorrect!"); //用户被锁定异常 } catch (LockedAccountException lae) { log.info("The account for username " + token.getPrincipal() + " is locked. " + "Please contact your administrator to unlock it."); } // ... catch more exceptions here (maybe custom ones specific to your application? //总的认证异常,上述所有异常的父类 catch (AuthenticationException ae) { //unexpected condition? error? } } //say who they are: //print their identifying principal (in this case, a username): log.info("User [" + currentUser.getPrincipal() + "] logged in successfully."); //test a role: //测试是否有某一个角色 if (currentUser.hasRole("schwartz")) { log.info("May the Schwartz be with you!"); } else { log.info("Hello, mere mortal."); } //test a typed permission (not instance-level) //测试用户有哪些权限 if (currentUser.isPermitted("lightsaber:wield")) { log.info("You may use a lightsaber ring. Use it wisely."); } else { log.info("Sorry, lightsaber rings are for schwartz masters only."); } //a (very powerful) Instance Level permission: //比上面权限更加具体 if (currentUser.isPermitted("winnebago:drive:eagle5")) { log.info("You are permitted to 'drive' the winnebago with license plate (id) 'eagle5'. " + "Here are the keys - have fun!"); } else { log.info("Sorry, you aren't allowed to drive the 'eagle5' winnebago!"); } //all done - log out! //执行subject的logout方法——登出方法。 System.out.println("------>"+currentUser.isAuthenticated());//true currentUser.logout();//离开就不再认证了 System.out.println("------>"+currentUser.isAuthenticated());//false System.exit(0); } }
好了,这就是shiro基本的helloworld,Quickstart里一部分代码,比如登陆和登出方法等,在项目里可以拿来直接用。
测试角色的功能在helloworld里也有体现,但在项目里多半是利用配置文件的方式,或者是注解直接声明,而不是使用代码。
shiro集成Spring
1、加入Spring和Shiro的jar包
2、配置Spring及SpringMVC
3、参照:D:\YDYP\Shiro\shiro-root-1.3.2\samples\spring配置web.xml和Spring配置文件 (1.3.2使用配置文件的方式,1.5.2使用注解方式,这里选1.3.2)。
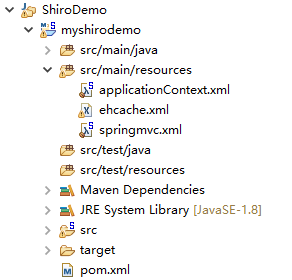
新建一个maven项目,命名为myshirodemo:
next:
基本结构:
导入Spring和SpringMVC的依赖、还有其它辅助依赖,导入1.8编译插件:
pom.xml(注:shiro不同版本之间存在微小差异,请衡量该选用哪个版本)
<project xmlns="http://maven.apache.org/POM/4.0.0" xmlns:xsi="http://www.w3.org/2001/XMLSchema-instance" xsi:schemaLocation="http://maven.apache.org/POM/4.0.0 http://maven.apache.org/xsd/maven-4.0.0.xsd"> <modelVersion>4.0.0</modelVersion> <groupId>com.changping.myshirodemo</groupId> <artifactId>myshirodemo</artifactId> <version>0.0.1-SNAPSHOT</version> <packaging>war</packaging> <build> <plugins> <plugin> <groupId>org.apache.maven.plugins</groupId> <artifactId>maven-compiler-plugin</artifactId> <version>2.5.1</version> <configuration> <source>1.8</source> <target>1.8</target> </configuration> </plugin> </plugins> </build> <dependencies> <!-- shiro相关 --> <dependency> <groupId>org.apache.shiro</groupId> <artifactId>shiro-core</artifactId> <version>1.5.2</version> </dependency> <dependency> <groupId>org.apache.shiro</groupId> <artifactId>shiro-spring</artifactId> <version>1.5.2</version> </dependency> <dependency> <groupId>org.apache.shiro</groupId> <artifactId>shiro-ehcache</artifactId> <version>1.5.2</version> </dependency> <!-- 添加ehcache的相关依赖,用于application.xml的配置 --> <dependency> <groupId>net.sf.ehcache</groupId> <artifactId>ehcache-core</artifactId> <version>2.1.0</version> </dependency>
<!-- log4j相关三重奏 --> <dependency> <groupId>org.slf4j</groupId> <artifactId>slf4j-log4j12</artifactId> <version>1.7.12</version> <scope>test</scope> </dependency> <dependency> <groupId>org.slf4j</groupId> <artifactId>slf4j-api</artifactId> <version>1.7.21</version> </dependency> <dependency> <groupId>log4j</groupId> <artifactId>log4j</artifactId> <version>1.2.17</version> </dependency> <!-- Spring相关,其实不需要这么多 --> <dependency> <groupId>org.springframework</groupId> <artifactId>spring-core</artifactId> <version>4.0.0.RELEASE</version> </dependency> <dependency> <groupId>org.springframework</groupId> <artifactId>spring-beans</artifactId> <version>4.0.0.RELEASE</version> </dependency> <dependency> <groupId>org.springframework</groupId> <artifactId>spring-context</artifactId> <version>4.0.0.RELEASE</version> </dependency> <dependency> <groupId>org.springframework</groupId> <artifactId>spring-jdbc</artifactId> <version>4.0.0.RELEASE</version> </dependency> <dependency> <groupId>org.springframework</groupId> <artifactId>spring-orm</artifactId> <version>4.0.0.RELEASE</version> </dependency> <dependency> <groupId>org.springframework</groupId> <artifactId>spring-context-support</artifactId> <version>4.0.0.RELEASE</version> </dependency> <dependency> <groupId>org.springframework</groupId> <artifactId>spring-aop</artifactId> <version>4.0.0.RELEASE</version> </dependency> <dependency> <groupId>org.springframework</groupId> <artifactId>spring-aspects</artifactId> <version>4.0.0.RELEASE</version> </dependency> <dependency> <groupId>org.springframework</groupId> <artifactId>spring-expression</artifactId> <version>4.0.0.RELEASE</version> </dependency> <dependency> <groupId>commons-logging</groupId> <artifactId>commons-logging</artifactId> <version>1.1.3</version> </dependency> <!-- spring容器事务 --> <dependency> <groupId>org.springframework</groupId> <artifactId>spring-tx</artifactId> <version>4.0.0.RELEASE</version> </dependency> <dependency> <groupId>org.springframework</groupId> <artifactId>spring-aspects</artifactId> <version>4.0.0.RELEASE</version> </dependency> <dependency> <groupId>org.aspectj</groupId> <artifactId>aspectjweaver</artifactId> <version>1.6.8</version> </dependency> <dependency> <groupId>aopalliance</groupId> <artifactId>aopalliance</artifactId> <version>1.0</version> </dependency> <!-- SpringMVC --> <dependency> <groupId>org.springframework</groupId> <artifactId>spring-web</artifactId> <version>4.0.0.RELEASE</version> </dependency> <dependency> <groupId>org.springframework</groupId> <artifactId>spring-webmvc</artifactId> <version>4.0.0.RELEASE</version> </dependency> <!--辅助 --> <dependency> <groupId>jstl</groupId> <artifactId>jstl</artifactId> <version>1.2</version> </dependency> <dependency> <groupId>javax.servlet</groupId> <artifactId>servlet-api</artifactId> <version>2.5</version> <scope>provided</scope> </dependency> <dependency> <groupId>javax.servlet.jsp</groupId> <artifactId>jsp-api</artifactId> <version>2.1.3-b06</version> <scope>provided</scope> </dependency> <dependency> <groupId>cglib</groupId> <artifactId>cglib</artifactId> <version>2.2</version> </dependency> <!-- json相关--> <dependency> <groupId>org.codehaus.jackson</groupId> <artifactId>jackson-mapper-asl</artifactId> <version>1.9.11</version> </dependency> <dependency> <groupId>com.google.code.gson</groupId> <artifactId>gson</artifactId> <version>2.2.4</version> </dependency> </dependencies> </project>
给项目添加一个web.xml
在项目上右键,properties->project Facets
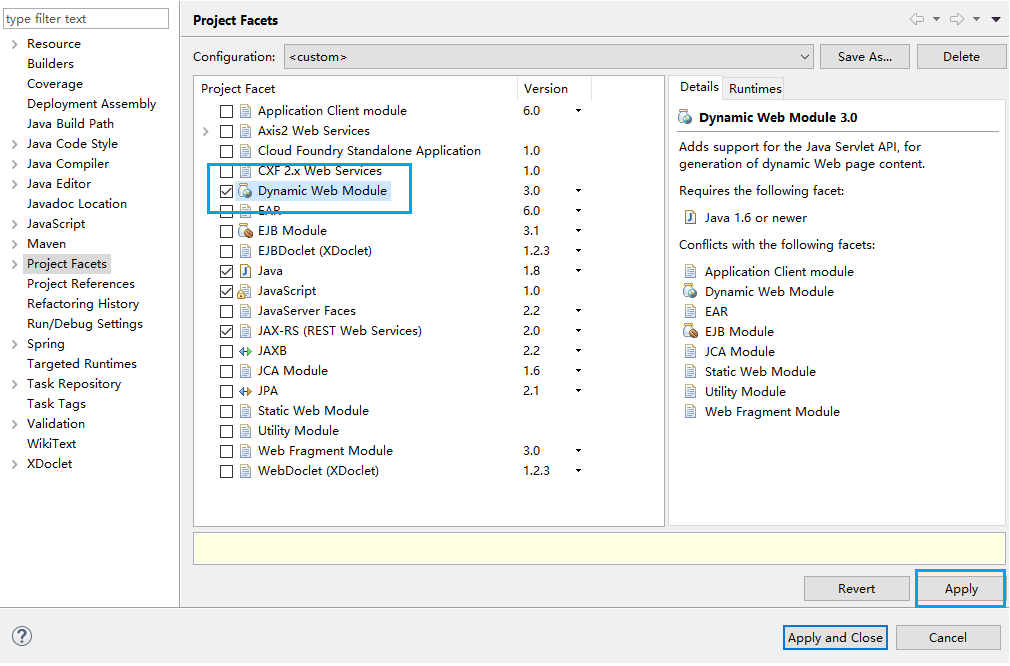
激活一个配置:需要首先去掉Dynamic Web Services,点击Apply。
接着再次给Dynamic Web Services打上对勾,点击Apply,可以看到Further configuration avaliable:
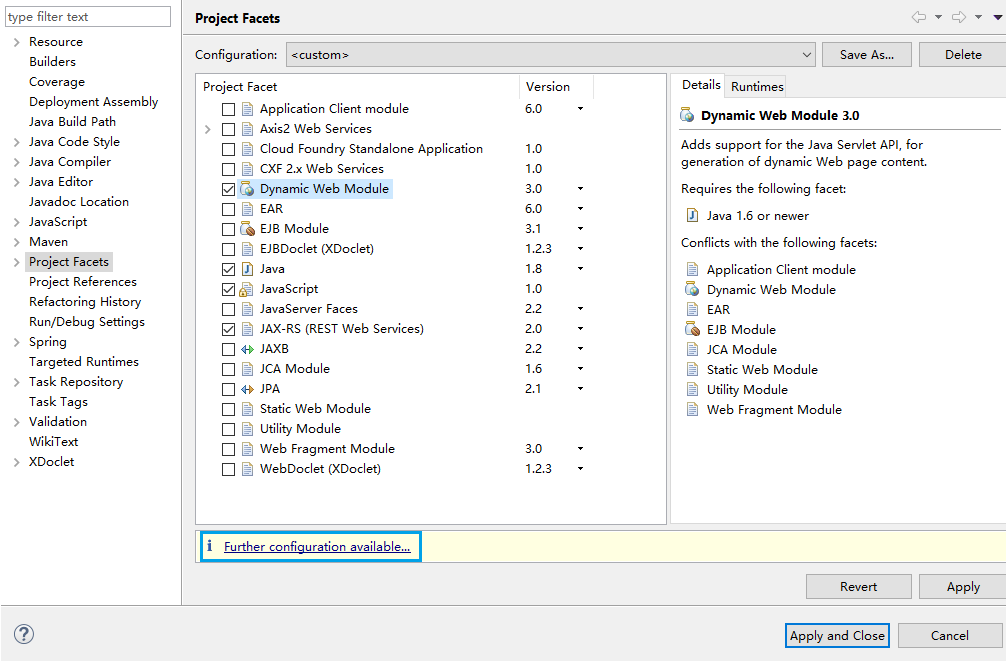
点击Further configuration avaliable,
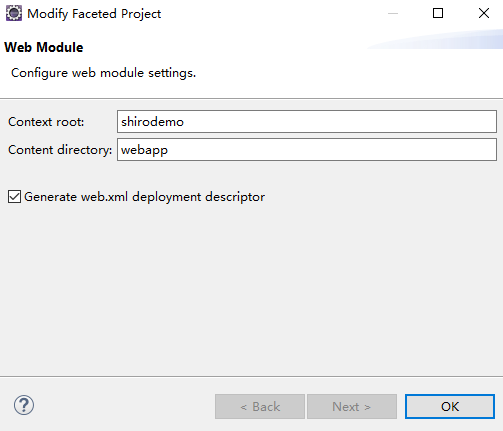
将WebContent改成webapp,并打对勾,点击OK并Apply,例如:
将生成的webapp复制到main文件夹下,替换原有的webapp,例如:
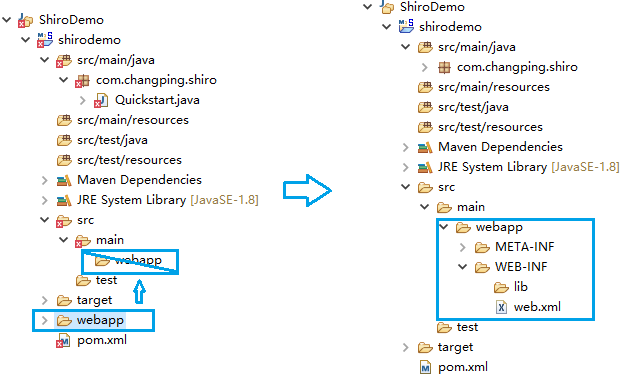
或者以上步骤省略,去别的项目直接粘一个webapp也可以。
好了当前项目已经有web.xml:
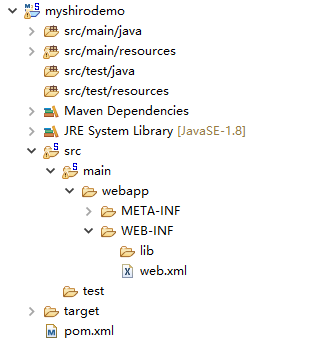
新建一个欢迎页面index.jsp。
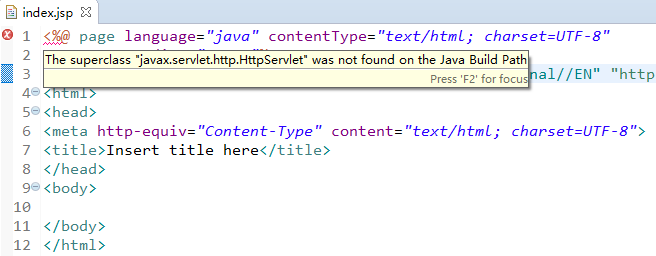
确保有这几个pom依赖:
<!--辅助 --> <dependency> <groupId>jstl</groupId> <artifactId>jstl</artifactId> <version>1.2</version> </dependency> <dependency> <groupId>javax.servlet</groupId> <artifactId>servlet-api</artifactId> <version>2.5</version> <scope>provided</scope> </dependency> <dependency> <groupId>javax.servlet.jsp</groupId> <artifactId>jsp-api</artifactId> <version>2.1.3-b06</version> <scope>provided</scope> </dependency>
如果缺少这几个依赖中的某个,index.jsp里会报错:
编辑index.jsp提供欢迎页面:
<%@ page language="java" contentType="text/html; charset=UTF-8" pageEncoding="UTF-8"%> <!DOCTYPE html PUBLIC "-//W3C//DTD HTML 4.01 Transitional//EN" "http://www.w3.org/TR/html4/loose.dtd"> <html> <head> <meta http-equiv="Content-Type" content="text/html; charset=UTF-8"> <title>Insert title here</title> </head> <body> <h1>Index_Page</h1> </body> </html>
编辑web.xml,设置欢迎页面:
<?xml version="1.0" encoding="UTF-8"?> <web-app id="WebApp_ID" version="3.0" xmlns="http://java.sun.com/xml/ns/javaee" xmlns:xsi="http://www.w3.org/2001/XMLSchema-instance" xsi:schemaLocation="http://java.sun.com/xml/ns/javaee http://java.sun.com/xml/ns/javaee/web-app_3_0.xsd"> <welcome-file-list> <welcome-file>index.jsp</welcome-file> </welcome-file-list> </web-app>
接着启动项目:
浏览器启动欢迎页面:

由于种种原因,这里省略一天内心独白...
好了接着就是真正的shiro+spring的整合
编辑web.xml:这里不得不说,shiro官方给的源码包各个版本有很大的区别;
这里仅以1.3.2、1.5.2进行对照:
1.3.2比较精简:

1.5.2的更加多了:
由于shiro-root-1.5.2里的spring源码结构变化很多,这里按照shiro-root-1.3.2的源码来进行配置。
因为,从1.4.2开始给的例子貌似开始使用注解的方式,所以现在参考1.3.2源码来进行配置。
github提供源码:
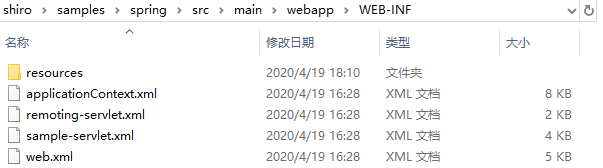
首先找到shiro源码包:
D:\YDYP\Shiro\shiro-root-1.3.2\shiro\samples\spring\src\main\webapp\WEB-INFeb\src\main\webapp\WEB-INF

打开里面的web.xml
<?xml version="1.0" encoding="UTF-8"?> <!-- ~ Licensed to the Apache Software Foundation (ASF) under one ~ or more contributor license agreements. See the NOTICE file ~ distributed with this work for additional information ~ regarding copyright ownership. The ASF licenses this file ~ to you under the Apache License, Version 2.0 (the ~ "License"); you may not use this file except in compliance ~ with the License. You may obtain a copy of the License at ~ ~ http://www.apache.org/licenses/LICENSE-2.0 ~ ~ Unless required by applicable law or agreed to in writing, ~ software distributed under the License is distributed on an ~ "AS IS" BASIS, WITHOUT WARRANTIES OR CONDITIONS OF ANY ~ KIND, either express or implied. See the License for the ~ specific language governing permissions and limitations ~ under the License. --> <web-app xmlns="http://java.sun.com/xml/ns/javaee" xmlns:xsi="http://www.w3.org/2001/XMLSchema-instance" xsi:schemaLocation="http://java.sun.com/xml/ns/javaee http://java.sun.com/xml/ns/javaee/web-app_2_5.xsd" version="2.5"> <!-- ================================================================== Context parameters ================================================================== --> <context-param> <param-name>contextConfigLocation</param-name> <param-value>/WEB-INF/applicationContext.xml</param-value> </context-param> <!-- - Key of the system property that should specify the root directory of this - web app. Applied by WebAppRootListener or Log4jConfigListener. --> <context-param> <param-name>webAppRootKey</param-name> <param-value>spring-sample.webapp.root</param-value> </context-param> <!-- ================================================================== Servlet listeners ================================================================== --> <listener> <listener-class>org.springframework.web.util.Log4jConfigListener</listener-class> </listener> <listener> <listener-class>org.springframework.web.context.ContextLoaderListener</listener-class> </listener> <!-- ================================================================== Filters ===============================shiro过滤=================================== --> <!-- Shiro Filter is defined in the spring application context: --> <filter> <filter-name>shiroFilter</filter-name> <filter-class>org.springframework.web.filter.DelegatingFilterProxy</filter-class> <init-param> <param-name>targetFilterLifecycle</param-name> <param-value>true</param-value> </init-param> </filter> <filter-mapping> <filter-name>shiroFilter</filter-name> <url-pattern>/*</url-pattern> </filter-mapping> <!-- ================================================================== Servlets ================================================================== --> <servlet> <servlet-name>sample</servlet-name> <servlet-class>org.springframework.web.servlet.DispatcherServlet</servlet-class> <load-on-startup>1</load-on-startup> </servlet> <servlet-mapping> <servlet-name>sample</servlet-name> <url-pattern>/s/*</url-pattern> </servlet-mapping> <servlet> <servlet-name>remoting</servlet-name> <servlet-class>org.springframework.web.servlet.DispatcherServlet</servlet-class> <load-on-startup>1</load-on-startup> </servlet> <servlet-mapping> <servlet-name>remoting</servlet-name> <url-pattern>/remoting/*</url-pattern> </servlet-mapping> <!-- ================================================================== Welcome file list ================================================================== --> <welcome-file-list> <welcome-file>index.jsp</welcome-file> </welcome-file-list> </web-app>
把源码web.xml里面过滤部分,粘到项目里web.xml中:
<!-- Shiro Filter is defined in the spring application context: --> <filter> <filter-name>shiroFilter</filter-name> <filter-class>org.springframework.web.filter.DelegatingFilterProxy</filter-class> <init-param> <param-name>targetFilterLifecycle</param-name> <param-value>true</param-value> </init-param> </filter> <filter-mapping> <filter-name>shiroFilter</filter-name> <url-pattern>/*</url-pattern> </filter-mapping>
看一下粘贴之后,当前项目中的web.xml:
<?xml version="1.0" encoding="UTF-8"?> <web-app xmlns:xsi="http://www.w3.org/2001/XMLSchema-instance" xmlns="http://java.sun.com/xml/ns/javaee" xsi:schemaLocation="http://java.sun.com/xml/ns/javaee http://java.sun.com/xml/ns/javaee/web-app_3_0.xsd" id="WebApp_ID" version="3.0"> <display-name>myshirodemo</display-name> <welcome-file-list> <welcome-file>index.jsp</welcome-file> </welcome-file-list> <!-- needed for ContextLoaderListener --> <context-param> <param-name>contextConfigLocation</param-name> <param-value>classpath:applicationContext.xml</param-value> </context-param> <!-- Bootstraps the root web application context before servlet initialization --> <listener> <listener-class>org.springframework.web.context.ContextLoaderListener</listener-class> </listener> <!-- The front controller of this Spring Web application, responsible for handling all application requests --> <servlet> <servlet-name>springmvc</servlet-name> <servlet-class>org.springframework.web.servlet.DispatcherServlet</servlet-class> <init-param> <param-name>contextConfigLocation</param-name> <param-value>classpath:springmvc.xml</param-value> </init-param> </servlet> <!-- Map all requests to the DispatcherServlet for handling --> <servlet-mapping> <servlet-name>springmvc</servlet-name> <url-pattern>/</url-pattern> </servlet-mapping> <filter> <filter-name>ShiroFilter</filter-name> <filter-class>org.springframework.web.filter.DelegatingFilterProxy</filter-class> <init-param> <param-name>targetFilterLifecycle</param-name> <param-value>true</param-value> </init-param> </filter> <filter-mapping> <filter-name>ShiroFilter</filter-name> <url-pattern>/*</url-pattern> </filter-mapping> </web-app>
新建springmvc.xml:
<?xml version="1.0" encoding="UTF-8"?> <beans xmlns="http://www.springframework.org/schema/beans" xmlns:xsi="http://www.w3.org/2001/XMLSchema-instance" xmlns:mvc="http://www.springframework.org/schema/mvc" xmlns:context="http://www.springframework.org/schema/context" xsi:schemaLocation="http://www.springframework.org/schema/mvc http://www.springframework.org/schema/mvc/spring-mvc-4.0.xsd http://www.springframework.org/schema/beans http://www.springframework.org/schema/beans/spring-beans.xsd http://www.springframework.org/schema/context http://www.springframework.org/schema/context/spring-context-4.0.xsd">
<!-- 1、包扫描,false为放弃扫描全部注解。开启过滤子标签,只扫描指定包下的@Controller注解。--> <context:component-scan base-package="com.changping.shiro"></context:component-scan> <!-- 2、视图解析器,解析到指定文件夾--> <bean class="org.springframework.web.servlet.view.InternalResourceViewResolver"> <property name="prefix" value="/WEB-INF/"></property> <property name="suffix" value=".jsp"></property> </bean> <!-- 3、启动注解 --> <mvc:annotation-driven></mvc:annotation-driven> <mvc:default-servlet-handler/> </beans>
接着打开源码包中的路径:D:\YDYP\Shiro\shiro-root-1.3.2\shiro\samples\spring\src\main\webapp\WEB-INF(还是刚才的文件夹)
打开源码示例applicationContext.xml:
<?xml version="1.0" encoding="UTF-8"?> <!-- ~ Licensed to the Apache Software Foundation (ASF) under one ~ or more contributor license agreements. See the NOTICE file ~ distributed with this work for additional information ~ regarding copyright ownership. The ASF licenses this file ~ to you under the Apache License, Version 2.0 (the ~ "License"); you may not use this file except in compliance ~ with the License. You may obtain a copy of the License at ~ ~ http://www.apache.org/licenses/LICENSE-2.0 ~ ~ Unless required by applicable law or agreed to in writing, ~ software distributed under the License is distributed on an ~ "AS IS" BASIS, WITHOUT WARRANTIES OR CONDITIONS OF ANY ~ KIND, either express or implied. See the License for the ~ specific language governing permissions and limitations ~ under the License. --> <beans xmlns="http://www.springframework.org/schema/beans" xmlns:xsi="http://www.w3.org/2001/XMLSchema-instance" xsi:schemaLocation=" http://www.springframework.org/schema/beans http://www.springframework.org/schema/beans/spring-beans-3.0.xsd"> <!-- Sample RDBMS data source that would exist in any application - not Shiro related. --> <!--1.数据源--> <bean id="dataSource" class="org.springframework.jdbc.datasource.DriverManagerDataSource"> <property name="driverClassName" value="org.hsqldb.jdbcDriver"/> <property name="url" value="jdbc:hsqldb:mem:shiro-spring"/> <property name="username" value="sa"/> </bean> <!-- Populates the sample database with sample users and roles. --> <bean id="bootstrapDataPopulator" class="org.apache.shiro.samples.spring.BootstrapDataPopulator"> <property name="dataSource" ref="dataSource"/> </bean> <!-- Simulated business-tier "Manager", not Shiro related, just an example --> <bean id="sampleManager" class="org.apache.shiro.samples.spring.DefaultSampleManager"/> <!-- ========================================================= Shiro Core Components - Not Spring Specific ========================================================= --> <!-- Shiro's main business-tier object for web-enabled applications (use DefaultSecurityManager instead when there is no web environment)--> <bean id="securityManager" class="org.apache.shiro.web.mgt.DefaultWebSecurityManager"> <property name="cacheManager" ref="cacheManager"/> <!-- Single realm app. If you have multiple realms, use the 'realms' property instead. --> <property name="sessionMode" value="native"/> <property name="realm" ref="jdbcRealm"/> </bean> <!-- Let's use some enterprise caching support for better performance. You can replace this with any enterprise caching framework implementation that you like (Terracotta+Ehcache, Coherence, GigaSpaces, etc --> <bean id="cacheManager" class="org.apache.shiro.cache.ehcache.EhCacheManager"> <!-- Set a net.sf.ehcache.CacheManager instance here if you already have one. If not, a new one will be creaed with a default config: <property name="cacheManager" ref="ehCacheManager"/> --> <!-- If you don't have a pre-built net.sf.ehcache.CacheManager instance to inject, but you want a specific Ehcache configuration to be used, specify that here. If you don't, a default will be used.: <property name="cacheManagerConfigFile" value="classpath:some/path/to/ehcache.xml"/> --> </bean> <!-- Used by the SecurityManager to access security data (users, roles, etc). Many other realm implementations can be used too (PropertiesRealm, LdapRealm, etc. --> <bean id="jdbcRealm" class="org.apache.shiro.samples.spring.realm.SaltAwareJdbcRealm"> <property name="name" value="jdbcRealm"/> <property name="dataSource" ref="dataSource"/> <property name="credentialsMatcher"> <!-- The 'bootstrapDataPopulator' Sha256 hashes the password (using the username as the salt) then base64 encodes it: --> <bean class="org.apache.shiro.authc.credential.HashedCredentialsMatcher"> <property name="hashAlgorithmName" value="SHA-256"/> <!-- true means hex encoded, false means base64 encoded --> <property name="storedCredentialsHexEncoded" value="false"/> </bean> </property> </bean> <!-- ========================================================= Shiro Spring-specific integration ========================================================= --> <!-- Post processor that automatically invokes init() and destroy() methods for Spring-configured Shiro objects so you don't have to 1) specify an init-method and destroy-method attributes for every bean definition and 2) even know which Shiro objects require these methods to be called. --> <bean id="lifecycleBeanPostProcessor" class="org.apache.shiro.spring.LifecycleBeanPostProcessor"/> <!-- Enable Shiro Annotations for Spring-configured beans. Only run after the lifecycleBeanProcessor has run: --> <bean class="org.springframework.aop.framework.autoproxy.DefaultAdvisorAutoProxyCreator" depends-on="lifecycleBeanPostProcessor"/> <bean class="org.apache.shiro.spring.security.interceptor.AuthorizationAttributeSourceAdvisor"> <property name="securityManager" ref="securityManager"/> </bean> <!-- Secure Spring remoting: Ensure any Spring Remoting method invocations can be associated with a Subject for security checks. --> <bean id="secureRemoteInvocationExecutor" class="org.apache.shiro.spring.remoting.SecureRemoteInvocationExecutor"> <property name="securityManager" ref="securityManager"/> </bean> <!-- Define the Shiro Filter here (as a FactoryBean) instead of directly in web.xml - web.xml uses the DelegatingFilterProxy to access this bean. This allows us to wire things with more control as well utilize nice Spring things such as PropertiesPlaceholderConfigurer and abstract beans or anything else we might need: --> <bean id="shiroFilter" class="org.apache.shiro.spring.web.ShiroFilterFactoryBean"> <property name="securityManager" ref="securityManager"/> <property name="loginUrl" value="/s/login"/> <property name="successUrl" value="/s/index"/> <property name="unauthorizedUrl" value="/s/unauthorized"/> <!-- The 'filters' property is not necessary since any declared javax.servlet.Filter bean defined will be automatically acquired and available via its beanName in chain definitions, but you can perform overrides or parent/child consolidated configuration here if you like: --> <!-- <property name="filters"> <util:map> <entry key="aName" value-ref="someFilterPojo"/> </util:map> </property> --> <property name="filterChainDefinitions"> <value> /favicon.ico = anon /logo.png = anon /shiro.css = anon /s/login = anon # allow WebStart to pull the jars for the swing app: /*.jar = anon # everything else requires authentication: /** = authc </value> </property> </bean> </beans
github上快速入门辅助理解:
applicationContext.xml
<?xml version="1.0" encoding="UTF-8"?> <beans xmlns="http://www.springframework.org/schema/beans" xmlns:xsi="http://www.w3.org/2001/XMLSchema-instance" xmlns:context="http://www.springframework.org/schema/context" xmlns:jdbc="http://www.springframework.org/schema/jdbc" xmlns:aop="http://www.springframework.org/schema/aop" xmlns:tx="http://www.springframework.org/schema/tx" xsi:schemaLocation=" http://www.springframework.org/schema/beans http://www.springframework.org/schema/beans/spring-beans.xsd http://www.springframework.org/schema/context http://www.springframework.org/schema/context/spring-context.xsd http://www.springframework.org/schema/jdbc http://www.springframework.org/schema/jdbc/spring-jdbc.xsd http://www.springframework.org/schema/aop http://www.springframework.org/schema/aop/spring-aop.xsd http://www.springframework.org/schema/tx http://www.springframework.org/schema/tx/spring-tx.xsd "> <!-- ========================================================= Shiro Core Components - Not Spring Specific ========================================================= --> <!-- Shiro's main business-tier object for web-enabled applications (use DefaultSecurityManager instead when there is no web environment)--> <!-- 配置securityManager,需要配置2个属性 --> <bean id="securityManager" class="org.apache.shiro.web.mgt.DefaultWebSecurityManager"> <property name="cacheManager" ref="cacheManager"/> <!-- Single realm app. If you have multiple realms, use the 'realms' property instead. --> <property name="realm" ref="jdbcRealm"/> </bean> <!-- Let's use some enterprise caching support for better performance. You can replace this with any enterprise caching framework implementation that you like (Terracotta+Ehcache, Coherence, GigaSpaces, etc --> <!--1.配置cacheManager 需要配置ehcache的pom依赖、配置文件--> <bean id="cacheManager" class="org.apache.shiro.cache.ehcache.EhCacheManager"> <!-- Set a net.sf.ehcache.CacheManager instance here if you already have one. If not, a new one will be creaed with a default config: <property name="cacheManager" ref="ehCacheManager"/> --> <!-- If you don't have a pre-built net.sf.ehcache.CacheManager instance to inject, but you want a specific Ehcache configuration to be used, specify that here. If you don't, a default will be used.:--> <property name="cacheManagerConfigFile" value="classpath:ehcache.xml"/> </bean> <!-- 2.配置Realm,需要自己写一个类,来实现Realm这个接口--> <!-- 实现了org.apache.shiro.realm.Realm接口的bean--> <bean id="jdbcRealm" class="com.changping.shiro.realm.MyShiroRealm"> </bean> <!-- ========================================================= Shiro Spring-specific integration ========================================================= --> <!-- Post processor that automatically invokes init() and destroy() methods for Spring-configured Shiro objects so you don't have to 1) specify an init-method and destroy-method attributes for every bean definition and 2) even know which Shiro objects require these methods to be called. --> <!--3.配置LifecycleBeanPostProcessor可以自动的调用配置在Spring Ioc容器中shiro bean的生命周期方法--> <bean id="lifecycleBeanPostProcessor" class="org.apache.shiro.spring.LifecycleBeanPostProcessor"/> <!-- Enable Shiro Annotations for Spring-configured beans. Only run after the lifecycleBeanProcessor has run: --> <!--4.启用Ioc容器中使用shiro的注解,但必须在配置了LifecycleBeanPostProcessor之后才能使用。 --> <bean class="org.springframework.aop.framework.autoproxy.DefaultAdvisorAutoProxyCreator" depends-on="lifecycleBeanPostProcessor"/> <bean class="org.apache.shiro.spring.security.interceptor.AuthorizationAttributeSourceAdvisor"> <property name="securityManager" ref="securityManager"/> </bean> <!-- Define the Shiro Filter here (as a FactoryBean) instead of directly in web.xml - web.xml uses the DelegatingFilterProxy to access this bean. This allows us to wire things with more control as well utilize nice Spring things such as PropertiesPlaceholderConfigurer and abstract beans or anything else we might need: --> <!--5.配置ShiroFilter(对url进行拦截,后期需要将url,和拦截信息配置数据库中) id必须和web.xml文件中配置的DelegatingFilterProxy的<filter-name>一致。 anon:只允许匿名访问,login.jsp配置之后,项目启动,默认加载这个页面,访问其它页面都需要认证。 authc:必须被认证之后才能访问即登陆之后才能访问的页面。 --> <bean id="ShiroFilter" class="org.apache.shiro.spring.web.ShiroFilterFactoryBean"> <property name="securityManager" ref="securityManager"/> <property name="loginUrl" value="/login.jsp"/> <property name="successUrl" value="/list.jsp"/> <property name="unauthorizedUrl" value="/unauthorized.jsp"/> <property name="filterChainDefinitions"> <value> /login.jsp = anon # allow WebStart to pull the jars for the swing app: /*.jar = anon # everything else requires authentication: /** = authc </value> </property> </bean> </beans>
确保pom中添加ehcache的相关依赖,用于applicationContext.xml的配置:
<!--(开启ehcache的注解,暂时用不到)<dependency> <groupId>com.googlecode.ehcache-spring-annotations</groupId> <artifactId>ehcache-spring-annotations</artifactId> <version>1.1.2</version> <type>jar</type> <scope>compile</scope> </dependency>-->
<!--ehcache依赖--> <dependency> <groupId>net.sf.ehcache</groupId> <artifactId>ehcache-core</artifactId> <version>2.1.0</version> </dependency>
接着需要ehcache的配置文件,这个文件可以去hibernate的源代码里找:
D:\Framework\hibernate\源代码\hibernate-distribution-3.5.0-Final\project\etc
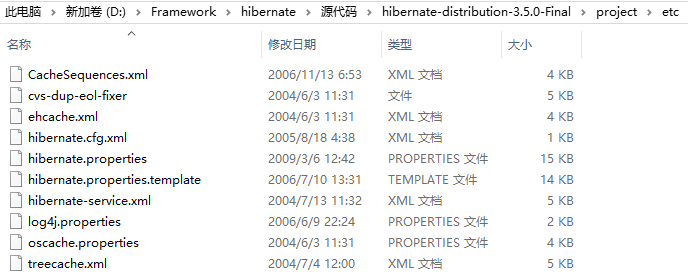
etc文件下ehcache.xml:
<ehcache>
<!-- Sets the path to the directory where cache .data files are created.
If the path is a Java System Property it is replaced by
its value in the running VM.
The following properties are translated:
user.home - User's home directory
user.dir - User's current working directory
java.io.tmpdir - Default temp file path -->
<diskStore path="java.io.tmpdir"/>
<!--Default Cache configuration. These will applied to caches programmatically created through
the CacheManager.
The following attributes are required for defaultCache:
maxInMemory - Sets the maximum number of objects that will be created in memory
eternal - Sets whether elements are eternal. If eternal, timeouts are ignored and the element
is never expired.
timeToIdleSeconds - Sets the time to idle for an element before it expires. Is only used
if the element is not eternal. Idle time is now - last accessed time
timeToLiveSeconds - Sets the time to live for an element before it expires. Is only used
if the element is not eternal. TTL is now - creation time
overflowToDisk - Sets whether elements can overflow to disk when the in-memory cache
has reached the maxInMemory limit.
-->
<defaultCache
maxElementsInMemory="10000"
eternal="false"
timeToIdleSeconds="120"
timeToLiveSeconds="120"
overflowToDisk="true"
/>
<!--Predefined caches. Add your cache configuration settings here.
If you do not have a configuration for your cache a WARNING will be issued when the
CacheManager starts
The following attributes are required for defaultCache:
name - Sets the name of the cache. This is used to identify the cache. It must be unique.
maxInMemory - Sets the maximum number of objects that will be created in memory
eternal - Sets whether elements are eternal. If eternal, timeouts are ignored and the element
is never expired.
timeToIdleSeconds - Sets the time to idle for an element before it expires. Is only used
if the element is not eternal. Idle time is now - last accessed time
timeToLiveSeconds - Sets the time to live for an element before it expires. Is only used
if the element is not eternal. TTL is now - creation time
overflowToDisk - Sets whether elements can overflow to disk when the in-memory cache
has reached the maxInMemory limit.
-->
<!-- Sample cache named sampleCache1
This cache contains a maximum in memory of 10000 elements, and will expire
an element if it is idle for more than 5 minutes and lives for more than
10 minutes.
If there are more than 10000 elements it will overflow to the
disk cache, which in this configuration will go to wherever java.io.tmp is
defined on your system. On a standard Linux system this will be /tmp"
-->
<cache name="sampleCache1"
maxElementsInMemory="10000"
eternal="false"
timeToIdleSeconds="300"
timeToLiveSeconds="600"
overflowToDisk="true"
/>
<!-- Sample cache named sampleCache2
This cache contains 1000 elements. Elements will always be held in memory.
They are not expired. -->
<cache name="sampleCache2"
maxElementsInMemory="1000"
eternal="true"
timeToIdleSeconds="0"
timeToLiveSeconds="0"
overflowToDisk="false"
/> -->
<!-- Place configuration for your caches following -->
</ehcache>
先不需要管它,直接把ehcache.xml复制到resource里:
接着在com.changping.shiro.realm包下新建一个类:
package com.changping.shiro.realm; import org.apache.shiro.authc.AuthenticationException; import org.apache.shiro.authc.AuthenticationInfo; import org.apache.shiro.authc.AuthenticationToken; import org.apache.shiro.realm.Realm; public class MyShiroRealm implements Realm{ @Override public String getName() { // TODO Auto-generated method stub return null; } @Override public boolean supports(AuthenticationToken token) { // TODO Auto-generated method stub return false; } @Override public AuthenticationInfo getAuthenticationInfo(AuthenticationToken token) throws AuthenticationException { // TODO Auto-generated method stub return null; } }
之后需要在webapp下,
新建一个登陆页面:
login.jsp
<%@ page language="java" contentType="text/html; charset=UTF-8" pageEncoding="UTF-8"%> <!DOCTYPE html PUBLIC "-//W3C//DTD HTML 4.01 Transitional//EN" "http://www.w3.org/TR/html4/loose.dtd"> <html> <head> <meta http-equiv="Content-Type" content="text/html; charset=UTF-8"> <title>Insert title here</title> </head> <body> <h1>Shiro_Login_Page</h1> </body> </html>
再写一个登陆成功页面:
list.jsp
<%@ page language="java" contentType="text/html; charset=UTF-8" pageEncoding="UTF-8"%> <!DOCTYPE html PUBLIC "-//W3C//DTD HTML 4.01 Transitional//EN" "http://www.w3.org/TR/html4/loose.dtd"> <html> <head> <meta http-equiv="Content-Type" content="text/html; charset=UTF-8"> <title>Insert title here</title> </head> <body> <h1>Shiro_List_Page</h1> </body> </html>
再写一个没有权限的页面:
unauthorized.jsp
<%@ page language="java" contentType="text/html; charset=UTF-8" pageEncoding="UTF-8"%> <!DOCTYPE html PUBLIC "-//W3C//DTD HTML 4.01 Transitional//EN" "http://www.w3.org/TR/html4/loose.dtd"> <html> <head> <meta http-equiv="Content-Type" content="text/html; charset=UTF-8"> <title>Insert title here</title> </head> <body> <h1>Shiro_Unauthorized_Page</h1> </body> </html>

好了,现在运行项目,启动服务tomcat服务器:
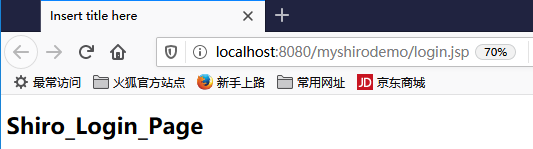
可以进行验证:只有login.jsp能够被访问就对了,目前实现了shiro与spring+springmvc的整合,并实现了过滤功能。
shiiro官方架构:
http://shiro.apache.org/architecture.html
过滤原理:

DelegatingFilterProxy实际上是Filter的一个代理对象,
默认情况下,Spring会到IOC容器中查找和<filter-name>对应的filter bean,
也可以通过targetBeanName的初始化参数来配置filter的bean的id。
接着做个实验,如下:
所以web.xml里ShiroFilter也可以这样配置:
<filter>
<filter-name>ShiroFilter</filter-name>
<filter-class>org.springframework.web.filter.DelegatingFilterProxy</filter-class>
<init-param>
<param-name>targetFilterLifecycle</param-name>
<param-value>true</param-value>
</init-param>
<init-param>
<param-name>targetBeanName</param-name>
<param-value>shiro-1</param-value>
</init-param>
</filter>
<filter-mapping>
<filter-name>ShiroFilter</filter-name>
<url-pattern>/*</url-pattern>
</filter-mapping>
此时applicationContext.xml里需要这样改,可以添加一个bean:
<bean id="ShiroFilter" class="org.apache.shiro.spring.web.ShiroFilterFactoryBean"> <property name="securityManager" ref="securityManager"/> <property name="loginUrl" value="/login.jsp"/> <property name="successUrl" value="/list.jsp"/> <property name="unauthorizedUrl" value="/unauthorized.jsp"/> <property name="filterChainDefinitions"> <value> /login.jsp = anon # allow WebStart to pull the jars for the swing app: /*.jar = anon # everything else requires authentication: /** = authc </value> </property> </bean>
<!--添加一个bean-->
<bean id="shiro-1" class="org.apache.shiro.spring.web.ShiroFilterFactoryBean"> <property name="securityManager" ref="securityManager"/> <property name="loginUrl" value="/login-1.jsp"/> <property name="successUrl" value="/list.jsp"/> <property name="unauthorizedUrl" value="/unauthorized.jsp"/> <property name="filterChainDefinitions"> <value> /login-1.jsp = anon # allow WebStart to pull the jars for the swing app: /*.jar = anon # everything else requires authentication: /** = authc </value> </property> </bean> </beans>
项目里再添加一个login-1.jsp(内容同login.jsp),再次启动服务器,效果和刚才一样:

这样好处在application里可以配置多个bean,应对不同情景。
如果此时删除web.xml中shiro-1对应的applicationContext.xml里的bean,则重启项目会报错;
org.springframework.beans.factory.NoSuchBeanDefinitionException:
No bean named 'shiro-1' is defined
实验结束。
filterChainDefinitions属性解析:
1、[url]部分的配置,格式:“url=拦截器[参数],拦截器[参数]”
2、如果当前请求的url匹配[urls]部分的某个url模式,将会执行配置的拦截器。
3、anon(anonymous)拦截器:表示匿名访问(即不需登陆即可访问)
4、authc(authentication)拦截器:表示需要身份认证通过后才能访问。
补充:除了anon,其它都需要拦截(authc),即anon相当于火车站托运行李时开的绿色通道。
url模式使用模式使用Ant风格模式
Ant路径通配符支持?、*、**,然而通配符匹配不包括目录分隔符“/”:
?:匹配一个字符,如/admin?将匹配/admin1,但不匹配/admin或/admin/;
* :匹配零个或多个字符串,如/admin*将匹配/admin、/admin123,但不匹配/admin/1;
**:匹配路径中的零个或多个路径,如/admin/**将匹配/admin/a或/admin/a/b
url匹配顺序
URL权限采取第一次匹配优先的方式,即从头开始使用第一个匹配的url模式对应的拦截器。
如:
/aa/** = filter1
/aa/bb = filter2
/** = filter3
如果请求的url是“/aa/bb”,因为按照声明顺序进行匹配,那么将使用filter1进行拦截。
shiro认证流程:
1.获取当前的Subject,调用SecurityUtils.getSubject();
2.测试当前的用户是否已经被认证,即是否已经登陆,调用Subject的isAuthenticated()
3.若还没有被认证,则把用户名和密码封装为UsernamePasswordToken对象。
1).创建一个表单页面
2).把请求提交到SpringMVC的Handler
3).获取用户名和密码
4.执行登陆:调用Subject的login(AuthenticationToken)方法。
5.自定义Realm的方法,从数据库中获取对应的记录,返回Shiro。
1).实际上需要继承org.apache.shiro.realm.AuthenticatingRealm类
2).实现doGetAuthenticationInfo(AuthenticationToken)方法。
6.由shiro完成对密码的比对。
现在来进行简单的debug
从之前的Quickstart.java开始,
在起点打个断点,得到subject(获得当前用户):
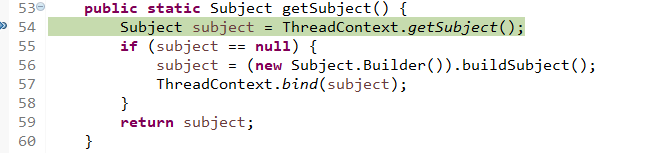
用会话做些事情,不需要web或EJB容器:

如果还没有认证,即没有登陆成功(lonestarr是用户名,vespa是用户密码,这都是源码,不是我写的):

查看login方法:
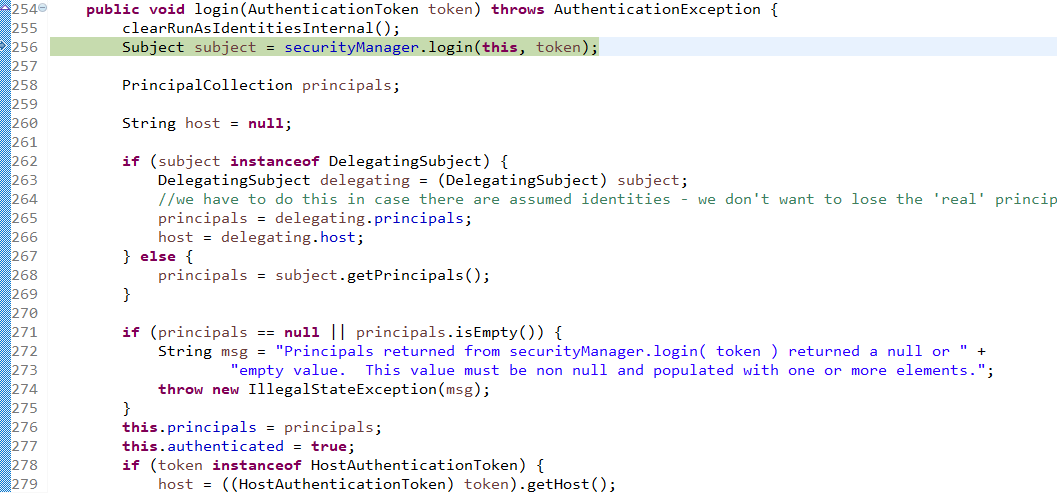
接着查看login方法有个认证方法:
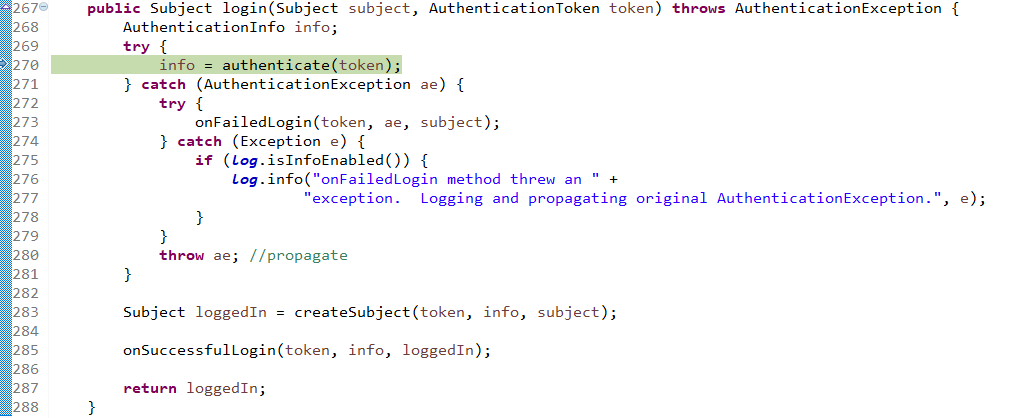
查看认证方法:

找到doAuthenticate方法:
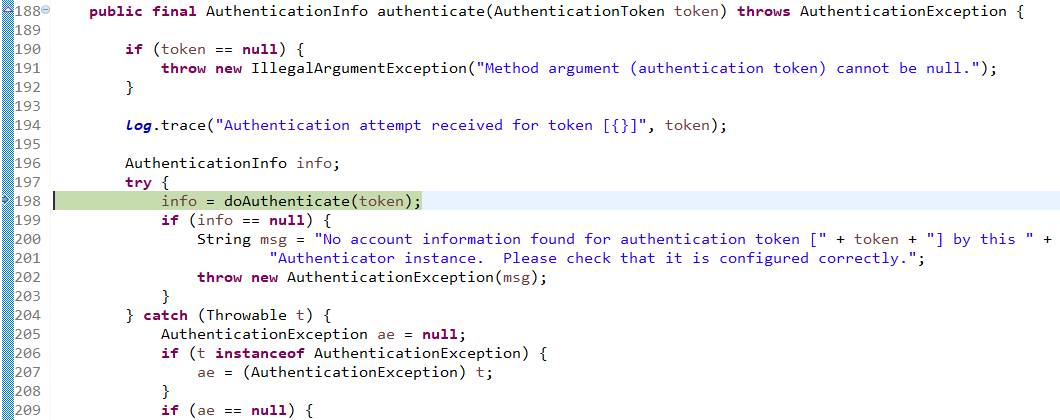
查看realms进行认证,当前只有一个realm,点击doSingleRealmAuthentication方法:

单realm获得认证信息:
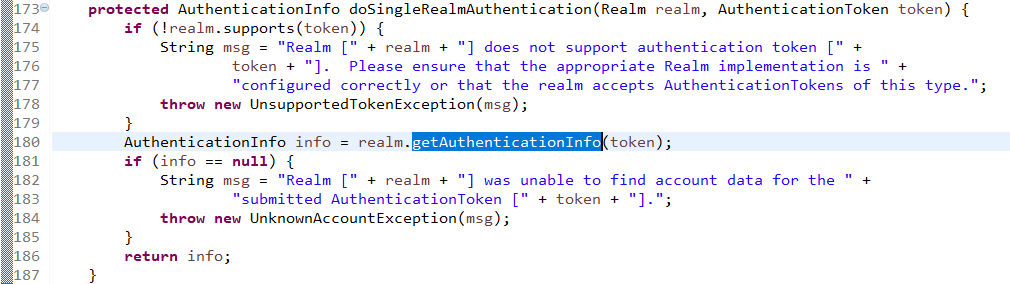
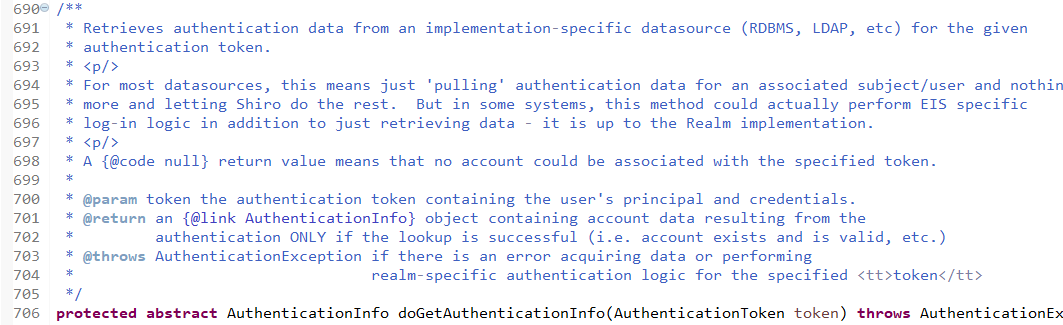
获得认证信息方法,进入此方法doGetAuthenticationInfo:

顺便查看该方法的信息:
已经认证完成:

修改状态:
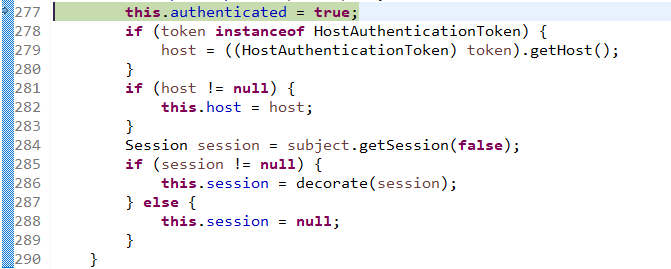
打印日志:
debug结束。
接下来实现认证,实现quickstart示例,首先编辑一个表单:
login.jsp
<%@ page language="java" contentType="text/html; charset=UTF-8" pageEncoding="UTF-8"%> <!DOCTYPE html PUBLIC "-//W3C//DTD HTML 4.01 Transitional//EN" "http://www.w3.org/TR/html4/loose.dtd"> <html> <head> <meta http-equiv="Content-Type" content="text/html; charset=UTF-8"> <title>Insert title here</title> </head> <script type="text/javascript" src="js/jquery-1.7.2.min.js"></script> <body> <h1>Shiro_Login_Page</h1> <br> <br> <form action="Shiro_Login" method="post"> <table border="1px" width="400px" height="100px" align="center"> <tr> <td><input type="text" name="username" style="width:200px"/></td> <tr /> <tr> <td><input type="password" name="password" style="width:200px"/></td> </tr> <tr> <td> <input type="submit" value="submit" /></td> </tr> </table> </form> </body> </html>
接下来,在控制层写一个类用于接收list.jsp提交的参数,并处理请求:
ShiroController.java
package com.changping.shiro.controller; import org.apache.shiro.SecurityUtils; import org.apache.shiro.authc.AuthenticationException; import org.apache.shiro.authc.UsernamePasswordToken; import org.apache.shiro.subject.Subject; import org.springframework.stereotype.Controller; import org.springframework.web.bind.annotation.RequestMapping; import org.springframework.web.bind.annotation.RequestParam; @Controller public class ShiroController { @RequestMapping("shiro_login") public String shiro_login(@RequestParam("username") String username,@RequestParam("password") String password) { //获得对象 Subject currentUser = SecurityUtils.getSubject(); //判断是否被认证 if (!currentUser.isAuthenticated()) { UsernamePasswordToken token = new UsernamePasswordToken("lonestarr", "vespa"); token.setRememberMe(true); try { System.out.println("1 "+token.hashCode());//这里的token传入MyShiroRealm里,所以二者hashcode相同。 currentUser.login(token); } catch (AuthenticationException ae) { System.out.println("认证失败..."+ae.getMessage()); } } return "redirect:/list.jsp"; } }
接下来编辑com.changping.shiro.realm.MyShiroRealm.java,由于现在只需要认证功能,所以只继承AuthenticatingRealm即可:
MyShiroRealm:
package com.changping.shiro.realm; import org.apache.shiro.authc.AuthenticationException; import org.apache.shiro.authc.AuthenticationInfo; import org.apache.shiro.authc.AuthenticationToken; import org.apache.shiro.realm.AuthenticatingRealm; public class MyShiroRealm extends AuthenticatingRealm{ @Override protected AuthenticationInfo doGetAuthenticationInfo( AuthenticationToken token) throws AuthenticationException { System.out.print("MyShiroRealm,doGetAuthenticationInfo认证token"+token.hashCode()); return null; } }
还不算完,因为需要给重定向 /shiro_login放行——设置为anon,允许表单可以匿名访问此url。
applicationContext.xml:
<?xml version="1.0" encoding="UTF-8"?> <beans xmlns="http://www.springframework.org/schema/beans" xmlns:xsi="http://www.w3.org/2001/XMLSchema-instance" xmlns:context="http://www.springframework.org/schema/context" xmlns:jdbc="http://www.springframework.org/schema/jdbc" xmlns:aop="http://www.springframework.org/schema/aop" xmlns:tx="http://www.springframework.org/schema/tx" xsi:schemaLocation=" http://www.springframework.org/schema/beans http://www.springframework.org/schema/beans/spring-beans.xsd http://www.springframework.org/schema/context http://www.springframework.org/schema/context/spring-context.xsd http://www.springframework.org/schema/jdbc http://www.springframework.org/schema/jdbc/spring-jdbc.xsd http://www.springframework.org/schema/aop http://www.springframework.org/schema/aop/spring-aop.xsd http://www.springframework.org/schema/tx http://www.springframework.org/schema/tx/spring-tx.xsd "> <!-- ========================================================= Shiro Core Components - Not Spring Specific ========================================================= --> <!-- Shiro's main business-tier object for web-enabled applications (use DefaultSecurityManager instead when there is no web environment)--> <!-- 配置securityManager,需要配置2个属性 --> <bean id="securityManager" class="org.apache.shiro.web.mgt.DefaultWebSecurityManager"> <property name="cacheManager" ref="cacheManager"/> <!-- Single realm app. If you have multiple realms, use the 'realms' property instead. --> <property name="realm" ref="jdbcRealm"/> </bean> <!-- Let's use some enterprise caching support for better performance. You can replace this with any enterprise caching framework implementation that you like (Terracotta+Ehcache, Coherence, GigaSpaces, etc --> <!--1.配置cacheManager 需要配置ehcache的pom依赖、配置文件--> <bean id="cacheManager" class="org.apache.shiro.cache.ehcache.EhCacheManager"> <!-- Set a net.sf.ehcache.CacheManager instance here if you already have one. If not, a new one will be creaed with a default config: <property name="cacheManager" ref="ehCacheManager"/> --> <!-- If you don't have a pre-built net.sf.ehcache.CacheManager instance to inject, but you want a specific Ehcache configuration to be used, specify that here. If you don't, a default will be used.:--> <property name="cacheManagerConfigFile" value="classpath:ehcache.xml"/> </bean> <!-- 2.配置Realm,需要自己写一个类,来实现Realm这个接口--> <!-- 实现了org.apache.shiro.realm.Realm接口的bean--> <bean id="jdbcRealm" class="com.changping.shiro.realm.MyShiroRealm"> </bean> <!-- Post processor that automatically invokes init() and destroy() methods for Spring-configured Shiro objects so you don't have to 1) specify an init-method and destroy-method attributes for every bean definition and 2) even know which Shiro objects require these methods to be called. --> <!--3.配置LifecycleBeanPostProcessor可以自动的调用配置在Spring Ioc容器中shiro bean的生命周期方法--> <bean id="lifecycleBeanPostProcessor" class="org.apache.shiro.spring.LifecycleBeanPostProcessor"/> <!-- Enable Shiro Annotations for Spring-configured beans. Only run after the lifecycleBeanProcessor has run: --> <!--4.启用Ioc容器中使用shiro的注解,但必须在配置了LifecycleBeanPostProcessor之后才能使用。 --> <bean class="org.springframework.aop.framework.autoproxy.DefaultAdvisorAutoProxyCreator" depends-on="lifecycleBeanPostProcessor"/> <bean class="org.apache.shiro.spring.security.interceptor.AuthorizationAttributeSourceAdvisor"> <property name="securityManager" ref="securityManager"/> </bean> <!-- Define the Shiro Filter here (as a FactoryBean) instead of directly in web.xml - web.xml uses the DelegatingFilterProxy to access this bean. This allows us to wire things with more control as well utilize nice Spring things such as PropertiesPlaceholderConfigurer and abstract beans or anything else we might need: --> <!--5.配置ShiroFilter, id必须和web.xml文件中配置的DelegatingFilterProxy的<filter-name>一致。 anon允许匿名访问, authc必须被认证之后才能访问即登陆之后才能访问的页面。 --> <bean id="ShiroFilter" class="org.apache.shiro.spring.web.ShiroFilterFactoryBean"> <property name="securityManager" ref="securityManager"/> <property name="loginUrl" value="/login.jsp"/> <property name="successUrl" value="/list.jsp"/> <property name="unauthorizedUrl" value="/unauthorized.jsp"/> <property name="filterChainDefinitions"> <value> /login.jsp = anon /shiro_login = anon # everything else requires authentication: /** = authc </value> </property> </bean> </beans>
好了现在启动项目,浏览器启动:

输入tom、123
然后点击提交,看看后台打印:
四月 21, 2020 9:56:17 下午 org.apache.catalina.startup.VersionLoggerListener log 信息: Server version: Apache Tomcat/8.5.30 四月 21, 2020 9:56:17 下午 org.apache.catalina.startup.VersionLoggerListener log 信息: Server built: Apr 3 2018 20:04:09 UTC 四月 21, 2020 9:56:17 下午 org.apache.catalina.startup.VersionLoggerListener log 信息: Server number: 8.5.30.0 四月 21, 2020 9:56:17 下午 org.apache.catalina.startup.VersionLoggerListener log 信息: OS Name: Windows 10 四月 21, 2020 9:56:17 下午 org.apache.catalina.startup.VersionLoggerListener log 信息: OS Version: 10.0 四月 21, 2020 9:56:17 下午 org.apache.catalina.startup.VersionLoggerListener log 信息: Architecture: amd64 四月 21, 2020 9:56:17 下午 org.apache.catalina.startup.VersionLoggerListener log 信息: Java Home: C:\Program Files\Java\jdk1.8.0_172\jre 四月 21, 2020 9:56:17 下午 org.apache.catalina.startup.VersionLoggerListener log 信息: JVM Version: 1.8.0_172-b11 四月 21, 2020 9:56:17 下午 org.apache.catalina.startup.VersionLoggerListener log 信息: JVM Vendor: Oracle Corporation 四月 21, 2020 9:56:17 下午 org.apache.catalina.startup.VersionLoggerListener log 信息: CATALINA_BASE: D:\workspace\springboot\.metadata\.plugins\org.eclipse.wst.server.core\tmp0 四月 21, 2020 9:56:17 下午 org.apache.catalina.startup.VersionLoggerListener log 信息: CATALINA_HOME: C:\Program Files (x86)\Apache Software Foundation\Tomcat 8.5_Tomcat8.5 四月 21, 2020 9:56:17 下午 org.apache.catalina.startup.VersionLoggerListener log 信息: Command line argument: -Dmaven.multiModuleProjectDirectory=$M2_HOME 四月 21, 2020 9:56:17 下午 org.apache.catalina.startup.VersionLoggerListener log 信息: Command line argument: -Dcatalina.base=D:\workspace\springboot\.metadata\.plugins\org.eclipse.wst.server.core\tmp0 四月 21, 2020 9:56:17 下午 org.apache.catalina.startup.VersionLoggerListener log 信息: Command line argument: -Dcatalina.home=C:\Program Files (x86)\Apache Software Foundation\Tomcat 8.5_Tomcat8.5 四月 21, 2020 9:56:17 下午 org.apache.catalina.startup.VersionLoggerListener log 信息: Command line argument: -Dwtp.deploy=D:\workspace\springboot\.metadata\.plugins\org.eclipse.wst.server.core\tmp0\wtpwebapps 四月 21, 2020 9:56:17 下午 org.apache.catalina.startup.VersionLoggerListener log 信息: Command line argument: -Djava.endorsed.dirs=C:\Program Files (x86)\Apache Software Foundation\Tomcat 8.5_Tomcat8.5\endorsed 四月 21, 2020 9:56:17 下午 org.apache.catalina.startup.VersionLoggerListener log 信息: Command line argument: -Dfile.encoding=UTF-8 四月 21, 2020 9:56:17 下午 org.apache.catalina.core.AprLifecycleListener lifecycleEvent 信息: The APR based Apache Tomcat Native library which allows optimal performance in production environments was not found on the java.library.path: [C:\Program Files\Java\jdk1.8.0_172\bin;C:\WINDOWS\Sun\Java\bin;C:\WINDOWS\system32;C:\WINDOWS;C:/Program Files/Java/jdk1.8.0_172/bin/../jre/bin/server;C:/Program Files/Java/jdk1.8.0_172/bin/../jre/bin;C:/Program Files/Java/jdk1.8.0_172/bin/../jre/lib/amd64;C:\Program Files (x86)\Apache Software Foundation\Tomcat 8.5_Tomcat8.5\bin;C:\Program Files (x86)\mysql-5.5.48-winx64\bin;C:\Program Files\Java\jdk1.8.0_172\bin;D:\oracle\product\10.2.0\db_1\bin;C:\Program Files (x86)\Intel\Intel(R) Management Engine Components\iCLS\;C:\Program Files\Intel\Intel(R) Management Engine Components\iCLS\;C:\WINDOWS\system32;C:\WINDOWS;C:\WINDOWS\System32\Wbem;C:\WINDOWS\System32\WindowsPowerShell\v1.0\;C:\Program Files (x86)\Intel\Intel(R) Management Engine Components\DAL;C:\Program Files\Intel\Intel(R) Management Engine Components\DAL;C:\Program Files (x86)\Intel\Intel(R) Management Engine Components\IPT;C:\Program Files\Intel\Intel(R) Management Engine Components\IPT;D:\maven\apache-maven-3.3.9\bin;D:\maven\apache-maven-3.3.9\bin;D:\Devinstall\Subversion\bin;C:\Program Files\nodejs\;D:\Program Files\nodejs\node_global;C:\Program Files\Git\cmd;C:\Program Files\TortoiseGit\bin;C:\Program Files\Sybase\PowerDesigner;C:\Users\YZ\AppData\Local\Microsoft\WindowsApps;C:\Users\YZ\AppData\Roaming\npm;D:\YDYP\eclipse_new\eclipse_jee_oxygen_win_64;;.] 四月 21, 2020 9:56:17 下午 org.apache.coyote.AbstractProtocol init 信息: Initializing ProtocolHandler ["http-nio-8080"] 四月 21, 2020 9:56:18 下午 org.apache.tomcat.util.net.NioSelectorPool getSharedSelector 信息: Using a shared selector for servlet write/read 四月 21, 2020 9:56:18 下午 org.apache.coyote.AbstractProtocol init 信息: Initializing ProtocolHandler ["ajp-nio-8009"] 四月 21, 2020 9:56:18 下午 org.apache.tomcat.util.net.NioSelectorPool getSharedSelector 信息: Using a shared selector for servlet write/read 四月 21, 2020 9:56:18 下午 org.apache.catalina.startup.Catalina load 信息: Initialization processed in 2064 ms 四月 21, 2020 9:56:18 下午 org.apache.catalina.core.StandardService startInternal 信息: Starting service [Catalina] 四月 21, 2020 9:56:18 下午 org.apache.catalina.core.StandardEngine startInternal 信息: Starting Servlet Engine: Apache Tomcat/8.5.30 四月 21, 2020 9:56:23 下午 org.apache.jasper.servlet.TldScanner scanJars 信息: At least one JAR was scanned for TLDs yet contained no TLDs. Enable debug logging for this logger for a complete list of JARs that were scanned but no TLDs were found in them. Skipping unneeded JARs during scanning can improve startup time and JSP compilation time. 四月 21, 2020 9:56:24 下午 org.apache.catalina.startup.HostConfig deployDescriptor 信息: Deploying configuration descriptor [D:\workspace\springboot\.metadata\.plugins\org.eclipse.wst.server.core\tmp0\conf\Catalina\localhost\myshirodemo.xml] 四月 21, 2020 9:56:24 下午 org.apache.catalina.startup.SetContextPropertiesRule begin 警告: [SetContextPropertiesRule]{Context} Setting property 'source' to 'org.eclipse.jst.jee.server:myshirodemo' did not find a matching property. 四月 21, 2020 9:56:31 下午 org.apache.jasper.servlet.TldScanner scanJars 信息: At least one JAR was scanned for TLDs yet contained no TLDs. Enable debug logging for this logger for a complete list of JARs that were scanned but no TLDs were found in them. Skipping unneeded JARs during scanning can improve startup time and JSP compilation time. 四月 21, 2020 9:56:31 下午 org.apache.catalina.core.ApplicationContext log 信息: No Spring WebApplicationInitializer types detected on classpath 四月 21, 2020 9:56:32 下午 org.apache.catalina.core.ApplicationContext log 信息: Initializing Spring root WebApplicationContext log4j:WARN No appenders could be found for logger (org.springframework.web.context.ContextLoader). log4j:WARN Please initialize the log4j system properly. log4j:WARN See http://logging.apache.org/log4j/1.2/faq.html#noconfig for more info. SLF4J: Failed to load class "org.slf4j.impl.StaticLoggerBinder". SLF4J: Defaulting to no-operation (NOP) logger implementation SLF4J: See http://www.slf4j.org/codes.html#StaticLoggerBinder for further details. 四月 21, 2020 9:56:34 下午 org.apache.catalina.startup.HostConfig deployDescriptor 信息: Deployment of configuration descriptor [D:\workspace\springboot\.metadata\.plugins\org.eclipse.wst.server.core\tmp0\conf\Catalina\localhost\myshirodemo.xml] has finished in [10,412] ms 四月 21, 2020 9:56:34 下午 org.apache.coyote.AbstractProtocol start 信息: Starting ProtocolHandler ["http-nio-8080"] 四月 21, 2020 9:56:34 下午 org.apache.coyote.AbstractProtocol start 信息: Starting ProtocolHandler ["ajp-nio-8009"] 四月 21, 2020 9:56:34 下午 org.apache.catalina.startup.Catalina start 信息: Server startup in 16315 ms 四月 21, 2020 9:56:36 下午 org.apache.catalina.core.ApplicationContext log 信息: Initializing Spring FrameworkServlet 'springmvc' 1 752922866 MyShiroRealm,doGetAuthenticationInfo认证token752922866认证失败...
Realm [com.changping.shiro.realm.MyShiroRealm@5421a884] was unable to find account data for the submitted AuthenticationToken
[org.apache.shiro.authc.UsernamePasswordToken - lonestarr, rememberMe=true].
可以看到ShiroController里产生的token已经传到MyShiroRealm里了,因为二者有相同的hashcode,至于认证失败,是因为MyShiroRealm还没写有关用户的代码呢。
以上是shiro的基本认证策略。
接下来需要对用户进行认证
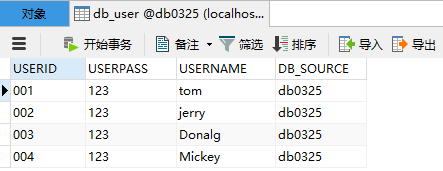
首先去数据库进行建表:db_user全都是varchar,(现在先不管注册和MD5加密,现在的密码还是明文)
此时需要导入,与数据库交互相关的pom文件:
<!--数据库相关-->
<dependency>
<groupId>mysql</groupId>
<artifactId>mysql-connector-java</artifactId>
<version>5.1.37</version>
</dependency>
<dependency>
<groupId>com.mchange</groupId>
<artifactId>c3p0</artifactId>
<version>0.9.2</version>
</dependency>
<dependency>
<groupId>commons-dbcp</groupId>
<artifactId>commons-dbcp</artifactId>
<version>1.4</version>
</dependency>
<!-- MyBatis相关-->
<dependency>
<groupId>org.mybatis</groupId>
<artifactId>mybatis</artifactId>
<version>3.2.8</version>
</dependency>
<dependency>
<groupId>org.mybatis</groupId>
<artifactId>mybatis-spring</artifactId>
<version>1.2.2</version>
</dependency>
现在准备查db_user表,查表不是重点,重点是MyShiroRealm.java中对用户认证的流程。
项目准备:

User.java
package com.changping.shiro.pojo; public class User { private String userid; private String userpass; private String username; private String db_source; public String getUserid() { return userid; } public void setUserid(String userid) { this.userid = userid; } public String getUserpass() { return userpass; } public void setUserpass(String userpass) { this.userpass = userpass; } public String getUsername() { return username; } public void setUsername(String username) { this.username = username; } public String getDb_source() { return db_source; } public void setDb_source(String db_source) { this.db_source = db_source; } public User(String userid, String userpass, String username, String db_source) { super(); this.userid = userid; this.userpass = userpass; this.username = username; this.db_source = db_source; } public User() { super(); } @Override public String toString() { return "User [userid=" + userid + ", userpass=" + userpass + ", username=" + username + ", db_source=" + db_source + "]"; } }
ShiroController.java:
package com.changping.shiro.controller; import org.apache.shiro.SecurityUtils; import org.apache.shiro.authc.AuthenticationException; import org.apache.shiro.authc.UsernamePasswordToken; import org.apache.shiro.subject.Subject; import org.springframework.beans.factory.annotation.Autowired; import org.springframework.stereotype.Controller; import org.springframework.web.bind.annotation.RequestMapping; import org.springframework.web.bind.annotation.RequestParam; import com.changping.shiro.pojo.User; import com.changping.shiro.service.UserServiceInf; @Controller public class ShiroController { @Autowired UserServiceInf userService; @RequestMapping("shiro_login") public String shiro_login(@RequestParam("username") String username,@RequestParam("password") String password) { /**先在此处测试查询用户能查到,再把代码搬到MyShiroRealm.java里。 User db_user = userService.find_user_by_username(username); System.out.println(db_user.toString());*/ //获得对象 Subject currentUser = SecurityUtils.getSubject(); //判断是否被认证 if (!currentUser.isAuthenticated()) { UsernamePasswordToken token = new UsernamePasswordToken(username, password); token.setRememberMe(true); try { System.out.println("1"+token.hashCode());//这里的token传入MyShiroRealm里,所以二者hashcode相同。 currentUser.login(token); } catch (AuthenticationException ae) { System.out.println("登陆失败..."+ae.getMessage()); } } return "redirect:/list.jsp"; } }
UserServiceInf.java
package com.changping.shiro.service; import com.changping.shiro.pojo.User; public interface UserServiceInf { public User find_user_by_username(String username); }
UserServiceImp.java
package com.changping.shiro.service; import org.springframework.beans.factory.annotation.Autowired; import org.springframework.stereotype.Service; import com.changping.shiro.dao.UserMapper; import com.changping.shiro.pojo.User; @Service public class UserServiceImp implements UserServiceInf { @Autowired UserMapper userMapper; @Override public User find_user_by_username(String username) { User user = userMapper.select_user_by_username(username); return user; } }
UserMapper.java
package com.changping.shiro.dao; import com.changping.shiro.pojo.User; //Spring中不需要这个注解:@Mapper public interface UserMapper { public User select_user_by_username(String username); }
UserMapper.xml
<?xml version="1.0" encoding="UTF-8"?> <!DOCTYPE mapper SYSTEM "http://mybatis.org/dtd/mybatis-3-mapper.dtd" > <mapper namespace="com.changping.shiro.dao.UserMapper"> <select id="select_user_by_username" parameterType="String" resultType="com.changping.shiro.pojo.User"> select * from db_user where username = #{username} </select> </mapper>
applicationContext.xml
<?xml version="1.0" encoding="UTF-8"?> <beans xmlns="http://www.springframework.org/schema/beans" xmlns:xsi="http://www.w3.org/2001/XMLSchema-instance" xmlns:context="http://www.springframework.org/schema/context" xmlns:jdbc="http://www.springframework.org/schema/jdbc" xmlns:aop="http://www.springframework.org/schema/aop" xmlns:tx="http://www.springframework.org/schema/tx" xsi:schemaLocation=" http://www.springframework.org/schema/beans http://www.springframework.org/schema/beans/spring-beans.xsd http://www.springframework.org/schema/context http://www.springframework.org/schema/context/spring-context.xsd http://www.springframework.org/schema/jdbc http://www.springframework.org/schema/jdbc/spring-jdbc.xsd http://www.springframework.org/schema/aop http://www.springframework.org/schema/aop/spring-aop.xsd http://www.springframework.org/schema/tx http://www.springframework.org/schema/tx/spring-tx.xsd "> <!-- ========================================================= Shiro Core Components - Not Spring Specific ========================================================= --> <!-- Shiro's main business-tier object for web-enabled applications (use DefaultSecurityManager instead when there is no web environment)--> <!-- 配置securityManager,需要配置2个属性 --> <bean id="securityManager" class="org.apache.shiro.web.mgt.DefaultWebSecurityManager"> <property name="cacheManager" ref="cacheManager"/> <!-- Single realm app. If you have multiple realms, use the 'realms' property instead. --> <property name="realm" ref="jdbcRealm"/> </bean> <!-- Let's use some enterprise caching support for better performance. You can replace this with any enterprise caching framework implementation that you like (Terracotta+Ehcache, Coherence, GigaSpaces, etc --> <!--1.配置cacheManager 需要配置ehcache的pom依赖、配置文件--> <bean id="cacheManager" class="org.apache.shiro.cache.ehcache.EhCacheManager"> <!-- Set a net.sf.ehcache.CacheManager instance here if you already have one. If not, a new one will be creaed with a default config: <property name="cacheManager" ref="ehCacheManager"/> --> <!-- If you don't have a pre-built net.sf.ehcache.CacheManager instance to inject, but you want a specific Ehcache configuration to be used, specify that here. If you don't, a default will be used.:--> <property name="cacheManagerConfigFile" value="classpath:ehcache.xml"/> </bean> <!-- 2.配置Realm,需要自己写一个类,来实现Realm这个接口--> <!-- 实现了org.apache.shiro.realm.Realm接口的bean--> <bean id="jdbcRealm" class="com.changping.shiro.realm.MyShiroRealm"> </bean> <!-- Post processor that automatically invokes init() and destroy() methods for Spring-configured Shiro objects so you don't have to 1) specify an init-method and destroy-method attributes for every bean definition and 2) even know which Shiro objects require these methods to be called. --> <!--3.配置LifecycleBeanPostProcessor可以自动的调用配置在Spring Ioc容器中shiro bean的生命周期方法--> <bean id="lifecycleBeanPostProcessor" class="org.apache.shiro.spring.LifecycleBeanPostProcessor"/> <!-- Enable Shiro Annotations for Spring-configured beans. Only run after the lifecycleBeanProcessor has run: --> <!--4.启用Ioc容器中使用shiro的注解,但必须在配置了LifecycleBeanPostProcessor之后才能使用。 --> <bean class="org.springframework.aop.framework.autoproxy.DefaultAdvisorAutoProxyCreator" depends-on="lifecycleBeanPostProcessor"/> <bean class="org.apache.shiro.spring.security.interceptor.AuthorizationAttributeSourceAdvisor"> <property name="securityManager" ref="securityManager"/> </bean> <!-- Define the Shiro Filter here (as a FactoryBean) instead of directly in web.xml - web.xml uses the DelegatingFilterProxy to access this bean. This allows us to wire things with more control as well utilize nice Spring things such as PropertiesPlaceholderConfigurer and abstract beans or anything else we might need: --> <!--5.配置ShiroFilter, id必须和web.xml文件中配置的DelegatingFilterProxy的<filter-name>一致。 anon允许匿名访问, authc必须被认证之后才能访问即登陆之后才能访问的页面。 --> <bean id="ShiroFilter" class="org.apache.shiro.spring.web.ShiroFilterFactoryBean"> <property name="securityManager" ref="securityManager"/> <property name="loginUrl" value="/login.jsp"/> <property name="successUrl" value="/list.jsp"/> <property name="unauthorizedUrl" value="/unauthorized.jsp"/> <property name="filterChainDefinitions"> <value> /login.jsp = anon /shiro_login = anon # everything else requires authentication: /** = authc </value> </property> </bean>
<context:component-scan base-package="com.changping.shiro.service"></context:component-scan>
<context:property-placeholder location="classpath:dbConfig.properties" />
<bean id="dataSource" class="org.apache.commons.dbcp.BasicDataSource"> <property name="driverClassName" value="${driverClassName}" /> <property name="url" value="${url}" /> <property name="username" value="${jdbc.username}" /> <property name="password" value="${jdbc.password}" /> </bean> <bean id="sqlSessionFactoryBean" class="org.mybatis.spring.SqlSessionFactoryBean"> <property name="dataSource" ref="dataSource" /> <property name="configLocation" value="classpath:mybatis-config.xml" /> </bean> <bean class="org.mybatis.spring.mapper.MapperScannerConfigurer"> <property name="basePackage" value="com.changping.shiro.dao" /> <property name="sqlSessionFactoryBeanName" value="sqlSessionFactoryBean" /> </bean> </beans>
dbConfig.properties
#oracle.jdbc.driver.OracleDriver #jdbc:oracle:thin:@localhost:1521:v6orcl driverClassName=com.mysql.jdbc.Driver url=jdbc:mysql://localhost:3306/db0325?useUnicode=true&characterEncoding=UTF8 jdbc.username=root jdbc.password= #my password is default by the "Yes",so now it is none,you need fill in your own password;
ehcache.xml(暂时什么都不需要改,最后一行会留给开发人员自定义)
<ehcache>
<!-- Sets the path to the directory where cache .data files are created.
If the path is a Java System Property it is replaced by
its value in the running VM.
The following properties are translated:
user.home - User's home directory
user.dir - User's current working directory
java.io.tmpdir - Default temp file path -->
<diskStore path="java.io.tmpdir"/>
<!--Default Cache configuration. These will applied to caches programmatically created through
the CacheManager.
The following attributes are required for defaultCache:
maxInMemory - Sets the maximum number of objects that will be created in memory
eternal - Sets whether elements are eternal. If eternal, timeouts are ignored and the element
is never expired.
timeToIdleSeconds - Sets the time to idle for an element before it expires. Is only used
if the element is not eternal. Idle time is now - last accessed time
timeToLiveSeconds - Sets the time to live for an element before it expires. Is only used
if the element is not eternal. TTL is now - creation time
overflowToDisk - Sets whether elements can overflow to disk when the in-memory cache
has reached the maxInMemory limit.
-->
<defaultCache
maxElementsInMemory="10000"
eternal="false"
timeToIdleSeconds="120"
timeToLiveSeconds="120"
overflowToDisk="true"
/>
<!--Predefined caches. Add your cache configuration settings here.
If you do not have a configuration for your cache a WARNING will be issued when the
CacheManager starts
The following attributes are required for defaultCache:
name - Sets the name of the cache. This is used to identify the cache. It must be unique.
maxInMemory - Sets the maximum number of objects that will be created in memory
eternal - Sets whether elements are eternal. If eternal, timeouts are ignored and the element
is never expired.
timeToIdleSeconds - Sets the time to idle for an element before it expires. Is only used
if the element is not eternal. Idle time is now - last accessed time
timeToLiveSeconds - Sets the time to live for an element before it expires. Is only used
if the element is not eternal. TTL is now - creation time
overflowToDisk - Sets whether elements can overflow to disk when the in-memory cache
has reached the maxInMemory limit.
-->
<!-- Sample cache named sampleCache1
This cache contains a maximum in memory of 10000 elements, and will expire
an element if it is idle for more than 5 minutes and lives for more than
10 minutes.
If there are more than 10000 elements it will overflow to the
disk cache, which in this configuration will go to wherever java.io.tmp is
defined on your system. On a standard Linux system this will be /tmp"
-->
<cache name="sampleCache1"
maxElementsInMemory="10000"
eternal="false"
timeToIdleSeconds="300"
timeToLiveSeconds="600"
overflowToDisk="true"
/>
<!-- Sample cache named sampleCache2
This cache contains 1000 elements. Elements will always be held in memory.
They are not expired. -->
<cache name="sampleCache2"
maxElementsInMemory="1000"
eternal="true"
timeToIdleSeconds="0"
timeToLiveSeconds="0"
overflowToDisk="false"
/> -->
<!-- Place configuration for your caches following -->
</ehcache>
log4j.properties
log4j.rootLogger=DEBUG, b log4j.appender.b=org.apache.log4j.ConsoleAppender log4j.appender.b.layout=org.apache.log4j.PatternLayout log4j.appender.b.layout.ConversionPattern=%5p %m%n # log4j.logger.org.mybatis=DEBUG #log4j.logger.org.apache.struts2=on #log4j.logger.com.opensymphony.xwork2=off log4j.logger.com.ibatis=on log4j.logger.org.apache.cxf=off #log4j.logger.org.hibernate=OFF log4j.logger.org.springframework=off #log4j.logger.com.opensymphony.xwork2=ERROR
mybatis-config.xml
<?xml version="1.0" encoding="UTF-8" ?> <!DOCTYPE configuration PUBLIC "-//mybatis.org//DTD Config 3.0//EN" "http://mybatis.org/dtd/mybatis-3-config.dtd"> <configuration> <mappers> </mappers> </configuration>
springmvc.xml
<?xml version="1.0" encoding="UTF-8"?> <beans xmlns="http://www.springframework.org/schema/beans" xmlns:xsi="http://www.w3.org/2001/XMLSchema-instance" xmlns:mvc="http://www.springframework.org/schema/mvc" xmlns:context="http://www.springframework.org/schema/context" xsi:schemaLocation="http://www.springframework.org/schema/mvc http://www.springframework.org/schema/mvc/spring-mvc-4.0.xsd http://www.springframework.org/schema/beans http://www.springframework.org/schema/beans/spring-beans.xsd http://www.springframework.org/schema/context http://www.springframework.org/schema/context/spring-context-4.0.xsd"> <!-- 1、包扫描,false为放弃扫描全部注解。开启过滤子标签,只扫描指定包下的@Controller注解。--> <context:component-scan base-package="com.changping.shiro"></context:component-scan> <!-- 2、视图解析器,解析到指定文件夾--> <bean class="org.springframework.web.servlet.view.InternalResourceViewResolver"> <property name="prefix" value="/WEB-INF/"></property> <property name="suffix" value=".jsp"></property> </bean> <!-- 3、启动注解 --> <mvc:annotation-driven></mvc:annotation-driven> <mvc:default-servlet-handler/> </beans>
index.jsp
<%@ page language="java" contentType="text/html; charset=UTF-8" pageEncoding="UTF-8"%> <!DOCTYPE html PUBLIC "-//W3C//DTD HTML 4.01 Transitional//EN" "http://www.w3.org/TR/html4/loose.dtd"> <html> <head> <meta http-equiv="Content-Type" content="text/html; charset=UTF-8"> <title>Insert title here</title> </head> <body> <h1>Index_Page</h1> </body> </html>
list.jsp
<%@ page language="java" contentType="text/html; charset=UTF-8" pageEncoding="UTF-8"%> <!DOCTYPE html PUBLIC "-//W3C//DTD HTML 4.01 Transitional//EN" "http://www.w3.org/TR/html4/loose.dtd"> <html> <head> <meta http-equiv="Content-Type" content="text/html; charset=UTF-8"> <title>Insert title here</title> </head> <body> <h1>Shiro_List_Page</h1> </body> </html>
login.jsp
<%@ page language="java" contentType="text/html; charset=UTF-8" pageEncoding="UTF-8"%> <!DOCTYPE html PUBLIC "-//W3C//DTD HTML 4.01 Transitional//EN" "http://www.w3.org/TR/html4/loose.dtd"> <html> <head> <meta http-equiv="Content-Type" content="text/html; charset=UTF-8"> <title>Insert title here</title> </head> <script type="text/javascript" src="js/jquery-1.7.2.min.js"></script> <body> <h1>Shiro_Login_Page</h1> <br> <br> <form action="shiro_login" method="post"> <table border="1px" width="400px" height="100px" align="center"> <tr> <td><input type="text" name="username" style="width:200px"/></td> <tr /> <tr> <td><input type="password" name="userpass" style="width:200px"/></td> </tr> <tr> <td> <input type="submit" value="submit" /></td> </tr> </table> </form> </body> </html>
unauthorized.jsp
<%@ page language="java" contentType="text/html; charset=UTF-8" pageEncoding="UTF-8"%> <!DOCTYPE html PUBLIC "-//W3C//DTD HTML 4.01 Transitional//EN" "http://www.w3.org/TR/html4/loose.dtd"> <html> <head> <meta http-equiv="Content-Type" content="text/html; charset=UTF-8"> <title>Insert title here</title> </head> <body> <h1>Shiro_Unauthorized_Page</h1> </body> </html>
pom.xml
<project xmlns="http://maven.apache.org/POM/4.0.0" xmlns:xsi="http://www.w3.org/2001/XMLSchema-instance" xsi:schemaLocation="http://maven.apache.org/POM/4.0.0 http://maven.apache.org/xsd/maven-4.0.0.xsd"> <modelVersion>4.0.0</modelVersion> <groupId>com.changping.myshirodemo</groupId> <artifactId>myshirodemo</artifactId> <version>0.0.1-SNAPSHOT</version> <packaging>war</packaging> <build> <plugins> <plugin> <groupId>org.apache.maven.plugins</groupId> <artifactId>maven-compiler-plugin</artifactId> <version>2.5.1</version> <configuration> <source>1.8</source> <target>1.8</target> </configuration> </plugin> </plugins> </build> <dependencies> <!-- shiro相关 --> <dependency> <groupId>org.apache.shiro</groupId> <artifactId>shiro-core</artifactId> <version>1.5.2</version> </dependency> <dependency> <groupId>org.apache.shiro</groupId> <artifactId>shiro-spring</artifactId> <version>1.5.2</version> </dependency> <dependency> <groupId>org.apache.shiro</groupId> <artifactId>shiro-ehcache</artifactId> <version>1.5.2</version> </dependency> <!-- 添加ehcache的相关依赖,用于application.xml的配置 --> <dependency> <groupId>net.sf.ehcache</groupId> <artifactId>ehcache-core</artifactId> <version>2.1.0</version> </dependency> <!-- log4j相关三重奏 --> <dependency> <groupId>org.slf4j</groupId> <artifactId>slf4j-log4j12</artifactId> <version>1.7.12</version> <scope>test</scope> </dependency> <dependency> <groupId>org.slf4j</groupId> <artifactId>slf4j-api</artifactId> <version>1.7.21</version> </dependency> <dependency> <groupId>log4j</groupId> <artifactId>log4j</artifactId> <version>1.2.17</version> </dependency> <!-- Spring相关,其实不需要这么多 --> <dependency> <groupId>org.springframework</groupId> <artifactId>spring-core</artifactId> <version>4.0.0.RELEASE</version> </dependency> <dependency> <groupId>org.springframework</groupId> <artifactId>spring-beans</artifactId> <version>4.0.0.RELEASE</version> </dependency> <dependency> <groupId>org.springframework</groupId> <artifactId>spring-context</artifactId> <version>4.0.0.RELEASE</version> </dependency> <dependency> <groupId>org.springframework</groupId> <artifactId>spring-jdbc</artifactId> <version>4.0.0.RELEASE</version> </dependency> <dependency> <groupId>org.springframework</groupId> <artifactId>spring-orm</artifactId> <version>4.0.0.RELEASE</version> </dependency> <dependency> <groupId>org.springframework</groupId> <artifactId>spring-context-support</artifactId> <version>4.0.0.RELEASE</version> </dependency> <dependency> <groupId>org.springframework</groupId> <artifactId>spring-aop</artifactId> <version>4.0.0.RELEASE</version> </dependency> <dependency> <groupId>org.springframework</groupId> <artifactId>spring-aspects</artifactId> <version>4.0.0.RELEASE</version> </dependency> <dependency> <groupId>org.springframework</groupId> <artifactId>spring-expression</artifactId> <version>4.0.0.RELEASE</version> </dependency> <dependency> <groupId>commons-logging</groupId> <artifactId>commons-logging</artifactId> <version>1.1.3</version> </dependency> <!-- spring容器事务 --> <dependency> <groupId>org.springframework</groupId> <artifactId>spring-tx</artifactId> <version>4.0.0.RELEASE</version> </dependency> <dependency> <groupId>org.springframework</groupId> <artifactId>spring-aspects</artifactId> <version>4.0.0.RELEASE</version> </dependency> <dependency> <groupId>org.aspectj</groupId> <artifactId>aspectjweaver</artifactId> <version>1.6.8</version> </dependency> <dependency> <groupId>aopalliance</groupId> <artifactId>aopalliance</artifactId> <version>1.0</version> </dependency> <!-- SpringMVC --> <dependency> <groupId>org.springframework</groupId> <artifactId>spring-web</artifactId> <version>4.0.0.RELEASE</version> </dependency> <dependency> <groupId>org.springframework</groupId> <artifactId>spring-webmvc</artifactId> <version>4.0.0.RELEASE</version> </dependency> <!--辅助 --> <dependency> <groupId>jstl</groupId> <artifactId>jstl</artifactId> <version>1.2</version> </dependency> <dependency> <groupId>javax.servlet</groupId> <artifactId>servlet-api</artifactId> <version>2.5</version> <scope>provided</scope> </dependency> <dependency> <groupId>javax.servlet.jsp</groupId> <artifactId>jsp-api</artifactId> <version>2.1.3-b06</version> <scope>provided</scope> </dependency> <dependency> <groupId>cglib</groupId> <artifactId>cglib</artifactId> <version>2.2</version> </dependency> <!-- json相关--> <dependency> <groupId>org.codehaus.jackson</groupId> <artifactId>jackson-mapper-asl</artifactId> <version>1.9.11</version> </dependency> <dependency> <groupId>com.google.code.gson</groupId> <artifactId>gson</artifactId> <version>2.2.4</version> </dependency> <!--数据库相关--> <dependency> <groupId>mysql</groupId> <artifactId>mysql-connector-java</artifactId> <version>5.1.37</version> </dependency> <dependency> <groupId>com.mchange</groupId> <artifactId>c3p0</artifactId> <version>0.9.2</version> </dependency> <dependency> <groupId>commons-dbcp</groupId> <artifactId>commons-dbcp</artifactId> <version>1.4</version> </dependency> <!-- MyBatis相关--> <dependency> <groupId>org.mybatis</groupId> <artifactId>mybatis</artifactId> <version>3.2.8</version> </dependency> <dependency> <groupId>org.mybatis</groupId> <artifactId>mybatis-spring</artifactId> <version>1.2.2</version> </dependency> </dependencies> </project>
接下来在MyShiroRealm.java中对用户认证
流程:
1.把AuthenticationToken转换为UsernamePasswordToken
2.从UsernamePasswordToken中获取username
3.调用数据库方法,从数据库中查询username对应的用户记录
4.若用户不存在,则可以抛出UnknowAccountException异常
5.根据用户信息的情况,决定是否需要抛出其他的AuthenticationException异常。
6.根据用户的情况,来构建AuthenticationInfo对象并返回
MyShiroRealm.java
package com.changping.shiro.realm; import org.apache.shiro.authc.AuthenticationException; import org.apache.shiro.authc.AuthenticationInfo; import org.apache.shiro.authc.AuthenticationToken; import org.apache.shiro.authc.LockedAccountException; import org.apache.shiro.authc.SimpleAuthenticationInfo; import org.apache.shiro.authc.UnknownAccountException; import org.apache.shiro.authc.UsernamePasswordToken; import org.apache.shiro.realm.AuthenticatingRealm; import org.springframework.beans.factory.annotation.Autowired; import com.changping.shiro.pojo.User; import com.changping.shiro.service.UserServiceInf; public class MyShiroRealm extends AuthenticatingRealm{ @Autowired UserServiceInf userService; @Override protected AuthenticationInfo doGetAuthenticationInfo( AuthenticationToken token) throws AuthenticationException { System.out.println("代码已经来到了:MyShiroRealm授权区域----->"); // 1.把AuthenticationToken 转换为UsernamePasswordToken UsernamePasswordToken usernamePasswordToken = (UsernamePasswordToken)token; // 2.从UsernamePasswordToken中获取username String shiro_Username = usernamePasswordToken.getUsername(); // 3.调用数据库方法,从数据库中查询username对应的用户记录 User db_user = userService.find_user_by_username(shiro_Username); // 4.若用户不存在,则可以抛出UnknowAccountException异常 if(db_user==null) { throw new UnknownAccountException("用户不存在!"); } // 5.根据用户信息的情况,决定是否需要抛出其他的AuthenticationException异常。 if("002".equals(db_user.getUserid())) { System.out.println("LockedAccountException:"+db_user.getUserid()); throw new LockedAccountException("用户已被锁定!"); } else { System.out.println("通过realm-----没有异常!"); } /*6.根据用户的情况,来构建AuthenticationInfo对象并返回,通常使用的方法为:SimpleAuthenticationInfo 以下信息是从数据库中获取:*/ //认证的实体信息,可以是username,也可以是数据表对应的用户的实体类对象。 Object principal = db_user.getUsername(); //密码 Object credentials = db_user.getUserpass(); //当前realm对象的name,调用父类的getName()方法即可。 String realmName = getName(); SimpleAuthenticationInfo info = new SimpleAuthenticationInfo(principal, credentials, realmName); return info; } }
现在可以运行一下:
运行之前再次看一下数据库:

情景1:通过正确的用户名登陆(其实这里不需要填确切的密码)
浏览器启动,可以看到没有走欢迎页面index.jsp,而是shiro设置的登陆页面:
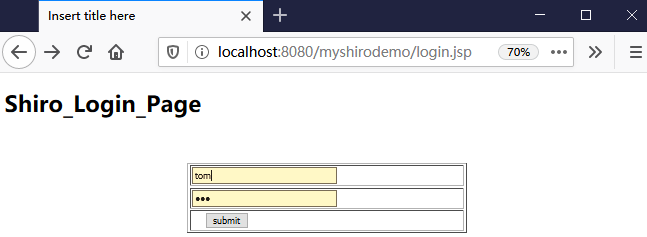
通过tom,123进行登陆,之后跳转到控制层里设置的目标页面list.jsp:

同时后台打印如下:
1747840405 代码已经来到了:MyShiroRealm授权区域-----> 通过realm-----没有异常!
这说明,用户名与数据库匹配,同时通过了realm的验证,没有发生异常。
如果此时重新启动服务器,那么再次run on server,浏览器里显示的会是欢迎页面:
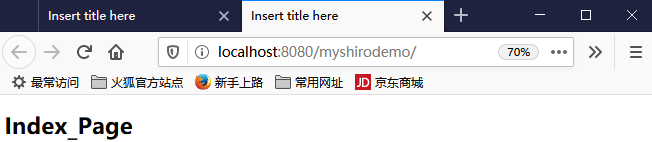
为很么不再是login.jsp了呢,因为一旦real通过了验证(通过用户名可以查的到用户信息),代码就不会再走MyShiroRealm了。
此时后台不会打印MyShiroRealm里的任何信息。除非设置登出(logout),这个登出待会再说。
既然不会再走MyShiroRealm就相当于,任何用户都不需要验证了,无论是不存在的用户,还是被锁定的用户都可以访问目标页面list.jsp。
情景2:通过MyShiroRealm来设置被锁定的用户条件,比如锁定jerry用户:
关闭服务器通过jerry,123登陆:
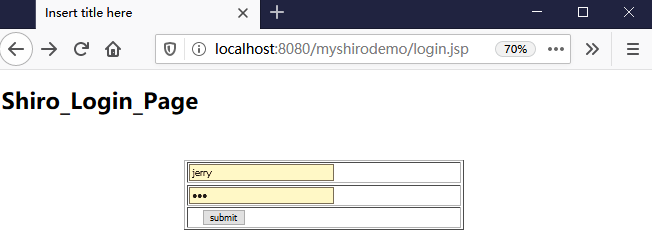
此时点击提交,会发现并没有跳转到list.jsp页面,因为MyShiroReal里有抛出了锁定异常LockedAccountException(),这个异常自己设置。
一旦有异常就不会接着执行了,所以无法跳转。此时后台打印如下:
1984410933 代码已经来到了:MyShiroRealm授权区域-----> LockedAccountException:002 登陆失败...用户已被锁定!
情景3:用户名不存在
用不存在的用户名"tom123"来登陆:
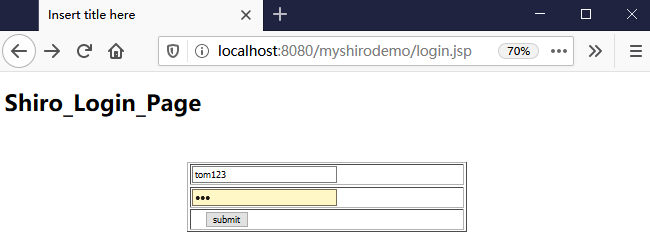
此时还是哪里也不跳转,因为此时会抛出用户不存在异常。
后台打印如下:
11940009520 代码已经来到了:MyShiroRealm授权区域-----> 登陆失败...用户不存在!
好了以上就是realm的能力。(注:其中我并没有提供密码的校验,因此密码可以是任意值)
所以一切的校验都写在MyShiroRealm里即可,一旦合乎抛出异常的标准,页面就不会继续跳转。
但是一旦经过realm的校验,那么以后都不需要校验,除非设置登出。
在list.jsp里或者index.jsp里设置登出
其实在哪里设置都一样,一旦走过logout这个路径,就会登出,登出意味着需要重新走MyShiroRealm进行校验。
现在在index.jsp里设置登出链接:
index.jsp
<%@ page language="java" contentType="text/html; charset=UTF-8" pageEncoding="UTF-8"%> <!DOCTYPE html PUBLIC "-//W3C//DTD HTML 4.01 Transitional//EN" "http://www.w3.org/TR/html4/loose.dtd"> <html> <head> <meta http-equiv="Content-Type" content="text/html; charset=UTF-8"> <title>Insert title here</title> </head> <body> <h1>Index_Page</h1> <button onclick="logout()">shiro_logout</button> </body>
<script type="text/javascript"> function logout() { window.location.href="shiro_logout"; } </script> </html>
一旦点击按钮,就会跳转到shiro/out路径,现在对此路径进行设置权限:
applicationContext.xml节选:
设置登出路径,权限为登出——logout
<bean id="ShiroFilter" class="org.apache.shiro.spring.web.ShiroFilterFactoryBean"> <property name="securityManager" ref="securityManager"/> <property name="loginUrl" value="/login.jsp"/> <property name="successUrl" value="/list.jsp"/> <property name="unauthorizedUrl" value="/unauthorized.jsp"/> <property name="filterChainDefinitions"> <value> /login.jsp = anon /shiro_login = anon /shiro_logout = logout
# everything else requires authentication: /** = authc </value> </property> </bean>
好现在关闭服务器,重启,再次使用tom,123来访问浏览器:
后台打印登陆成功:
11934108267 代码已经来到了:MyShiroRealm授权区域-----> 通过realm-----没有异常!
可以访问到list.jsp

接着重新run on server,可以看到不需要登陆:
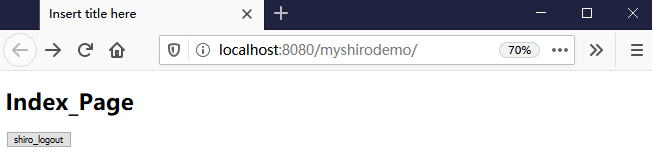
但就是想重新登陆,可以点shiro_logout按钮,如图登出后又可以登陆了:
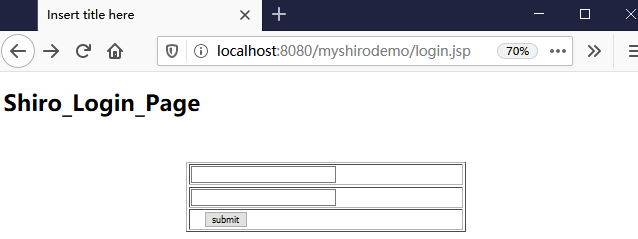
以上就是logout的功能,当然也可以像Quickstart.java那样调用logout()登出。
在项目里还可以在控制层写一个logout()方法来控制登出,这样就不需要在applicationContext里配置logout拦截,两种方法都可以。
密码的比对
现在MyShiroRealm里已经有两个关键对象了,
UsernamePasswordToken的对象——token——来自浏览器
SimpleAuthenticationInfo的对象——info——来自数据库
它们彼此之间会比对密码。
debug查看密码的比对过程
UsernamePasswordToke获得密码的方法:
点进去:

打个断点,从浏览器debug进来,查看debug窗口:

可以看到一个SimpleCredentialsMather.doCredentialsMatch()方法,从Debug点进去:
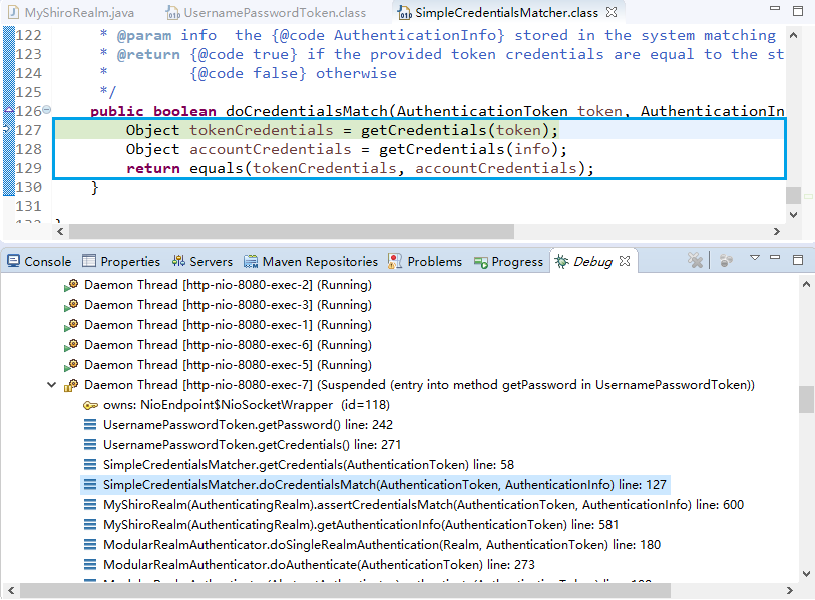
在对象上onmouseover时可以看到:

最后一步比的就是这两个对象。

MyShiroRealm继承了AuthenticatingRealm,所以它有个assertCredentialsMatch,里面有个接口CredentialsMatcher,密码就是通过它来比对。
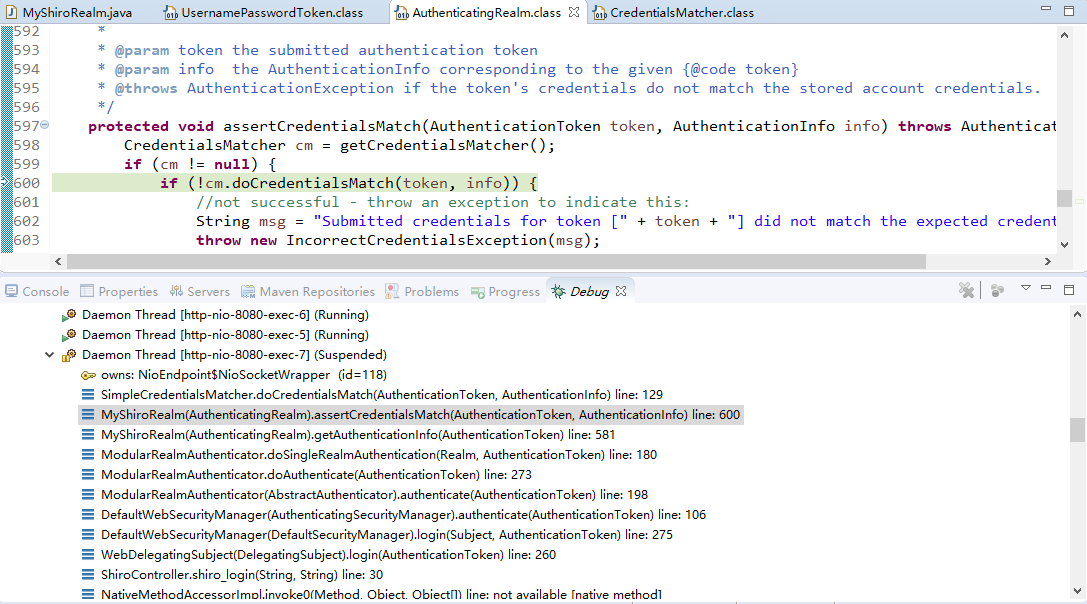
AuthenticationgRealm里有个属性credentialsMatcher,通过调用getCredentialsMatcher()方法来获得这个属性。

通过AuthenticatingRealm 的credentialsMathcher属性来比对密码。
现在的密码并没有加密,所以现在需要对密码加密。
Md5加密
需要思考几个问题:
1.如何把一个字符串加密成md5格式。
2.替换当前Realm的credentialsMatcher属性,直接使用HashedCredentialsMatcher对象,并设置加密算法即可。
3.md5加密涉及到两方面,一个是将前台传过来的密码加密,一个是将后台数据库密码加密,然后将二者进行比对。
现在需要继续添加一个insert方法,给数据库增加一条通过md5加密的属性。
首先需要在list.jsp写一个普通的添加用户方法,实现添加用户功能。
(虽然这一步相当于注册,但是它现在是跳过shiro的拦截,因为它写在了list.jsp里。如果现在写在login.jsp里那么就会被shiro拦截,我就需要多考虑写配置,但是现在不想考虑那么多。
所以它只是起到临时添加用户的作用,之后我会在login.jsp里另添加一个注册按钮)
list.jsp
<%@ page language="java" contentType="text/html; charset=UTF-8" pageEncoding="UTF-8"%> <!DOCTYPE html PUBLIC "-//W3C//DTD HTML 4.01 Transitional//EN" "http://www.w3.org/TR/html4/loose.dtd"> <html> <head> <meta http-equiv="Content-Type" content="text/html; charset=UTF-8"> <title>Insert title here</title> </head> <body> <h1>Shiro_List_Page</h1> <button onclick="add_user()">add_user</button> <button onclick="get_user_list()">get_user_list</button> </body> <script type="text/javascript"> function add_user() { window.location.href="add_user.jsp"; } </script> </html>
添加一个add_user.jsp
<%@ page language="java" contentType="text/html; charset=UTF-8" pageEncoding="UTF-8"%> <!DOCTYPE html PUBLIC "-//W3C//DTD HTML 4.01 Transitional//EN" "http://www.w3.org/TR/html4/loose.dtd"> <html> <head> <meta http-equiv="Content-Type" content="text/html; charset=UTF-8"> <title>Insert title here</title> </head> <body> <h1>add_user_Page</h1> <br> <br> <form action="add_user" method="post"> <table border="1px" width="400px" height="100px" align="center"> <tr> <td><input type="text" name="userid" style="width:200px"/></td> <tr /> <tr> <td><input type="text" name="username" style="width:200px"/></td> <tr /> <tr> <td><input type="password" name="userpass" style="width:200px"/></td> </tr> <tr> <td> <input type="submit" value="submit" /></td> </tr> </table> </form> </body> </html>
ShiroController.java添加一个方法:
//添加一个用户,需要userid、username、userpass三个参数 @RequestMapping("add_user") public String add_user( @RequestParam("userid") String userid, @RequestParam("username") String username, @RequestParam("userpass") String userpass){ User adduser = new User(userid,userpass,username); int addresult = userService.add_user(adduser); return "redirect:/list.jsp"; }
UserServiceInf.java
public int add_user(User add_user);
UserServiceImp.java
@Override public int add_user(User add_user) { int insert_result = userMapper.insert_user(add_user); return insert_result; }
UserMapper.java
public int insert_user(User add_user);
UserMapper.xml
<insert id="insert_user" parameterType="com.changping.shiro.pojo.User"> insert into db_user (userid,userpass,username,db_source) values (#{userid},#{userpass},#{username},DATABASE()); </insert>
重新启动服务器:
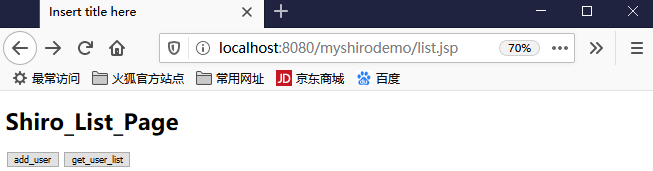
接着点击add_user按钮,添加一个用户userid=005,username=tony,userpass=123;
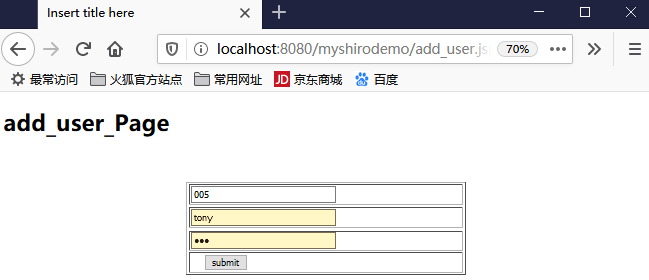
点击提交,页面跳转到list.jsp,同时数据库会增加一条数据——tony:
好了,普通的增加不是目的,是为了给它添加一个md5加密功能,md5属于非对称加密。
看一下shiro的强大之处
首先需要给前端浏览器传过来的参数进行加密:
1、原理:Shiro 提供了用于加密密码和验证密码服务的 CredentialsMatcher 接口,HashedCredentialsMatcher是CredentialsMatcher 的一个实现类,它允许自定义算法和盐(salt)。
2、配置:可以在shiro.ini里配置,或者在spring的bean里配置,当前通过bean进行配置。
具体实现:
applicationContext.xml(在MyShiroRealm所在bean添加一个bean,指定md5加密5000次):
<!-- md5加密:替换当前realm的credentialsMatcher属性,直接使用HashedCredentialsMatcher对象。 --> <bean id="jdbcRealm" class="com.changping.shiro.realm.MyShiroRealm"> <property name="credentialsMatcher"> <bean class="org.apache.shiro.authc.credential.HashedCredentialsMatcher"> <property name="hashAlgorithmName" value="MD5"></property> <property name="hashIterations" value="5000"></property> </bean> </property> </bean>
添加后的效果:前端传过来的密码进行了加密,并和后端数据库里密码进行比对。
现在通过debug跑一下看看效果,可以像之前一样在UsernamePasswordToken的getPassWord()方法上打个断点,然后一步步执行到要观察的方法里:
不过现在已经不用这么找了,既然已经知道本次走的是这个类,就可以直接找到这个类的这个方法,如图点ctrl进去:
找到方法,点进去:
在这里打个断点:
好了执行debug:
断点执行到此处之后,在Debug中找到:
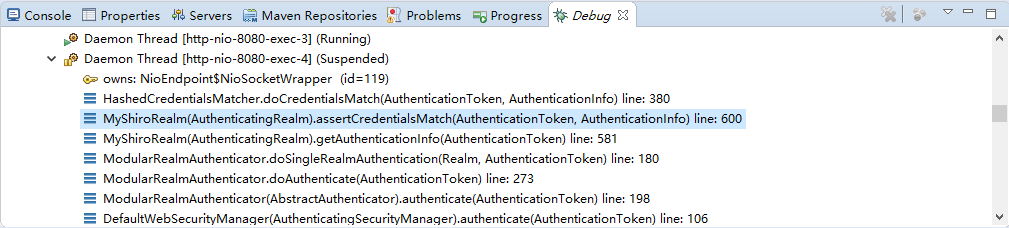
点开,查看cm, 可以看到匹配器已经改变:

再在Debug里点击:
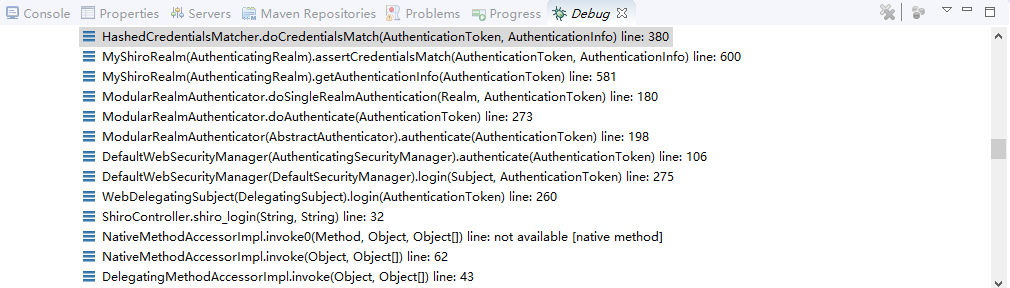
可以看到,tokenHashedCredentials里的值,已经加密:
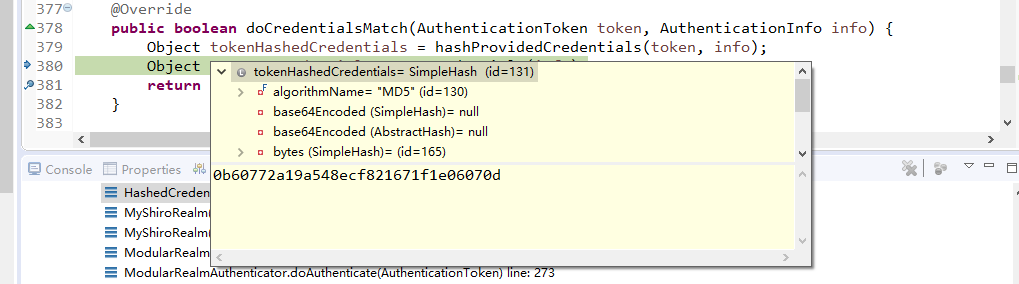
但是我遇到了一个奇怪现象:
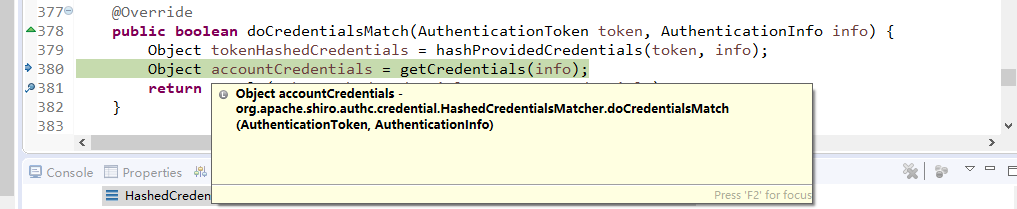
之前,debug都可以到return这行,但是现在不可以到return,而是直接跳过return,所以看不到accountCredentials里的值了。
无奈,只能通过info来看到数据库的密码是123:
(注:后来我才知道原来只要是密码不匹配,就会跳过return,现在的123根本就没加密,而token里的密码已经加密了,
从这点看来,我get到一个新技能——debug时只要断点可以到达return这行,说明密码匹配无误,否则就是不匹配)
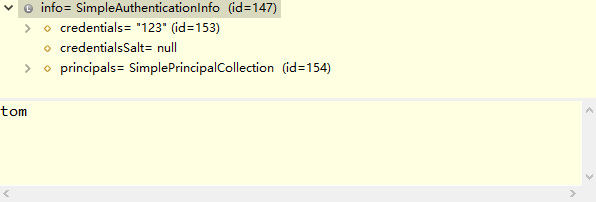
再来看getCredentials()方法作用:
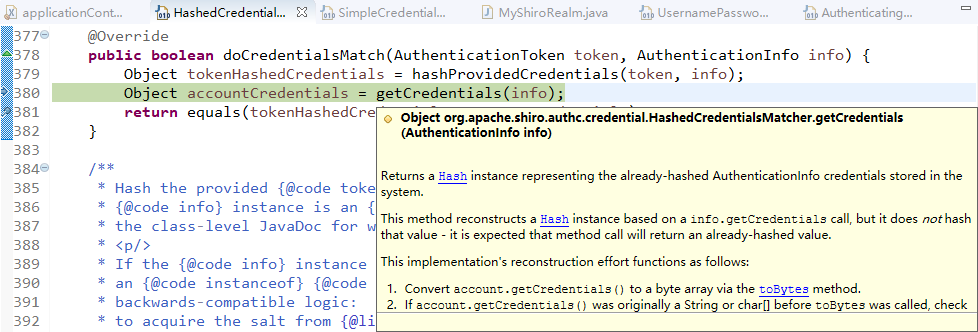
好了,debug先到这里。
可以看一下最终控制台结果,一定是无法登陆,因为数据库里密码还没加密:
11356807772 代码已经来到了:MyShiroRealm授权区域-----> 通过realm-----没有异常! 登陆失败...
Authentication failed for token submission [org.apache.shiro.authc.UsernamePasswordToken - tom, rememberMe=true].
Possible unexpected error? (Typical or expected login exceptions should extend from AuthenticationException).
好,现在给数据库里的密码加密,以后新增加的用户的密码都加密:
那shiro刚才是怎么给浏览器传过来的参数加密的呢?
debug时,可以看到hashProvideCredentials(...)方法,里面有个return点进去:
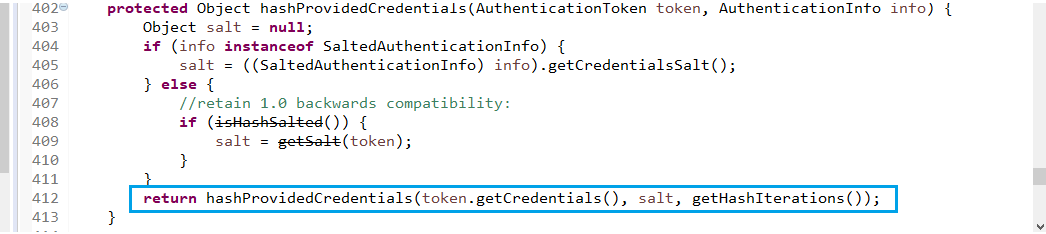
可以看到一个hashProvidedCredentials(...)就是它提供了加密。
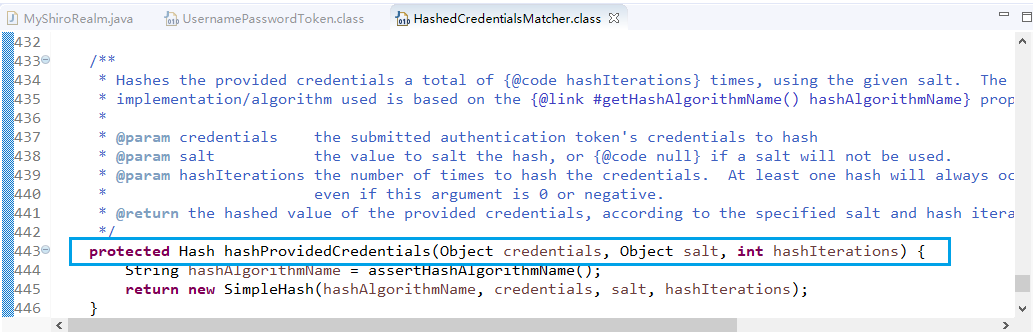
加密方法构造方法:hashProvidedCredentials(...)
protected Hash hashProvidedCredentials(Object credentials, Object salt, int hashIterations) { String hashAlgorithmName = assertHashAlgorithmName(); return new SimpleHash(hashAlgorithmName, credentials, salt, hashIterations); }
各参数的情况:
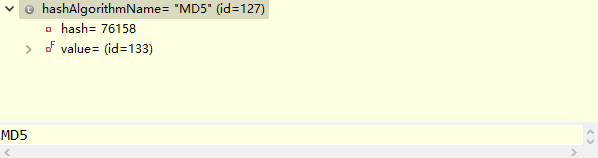
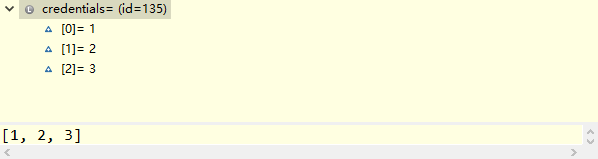

返回时的这个构造方法hashProvidedCredentials(...),提供了加密。
可以看到里面有一个salt,只要方法里有这个参数,而且不为null就都是盐加密。
盐加密的特点:
可以使两个相同的密码通过加salt之后,存到数据库里时两个密码看起来不一样。即自定义salt,加密的程度自己说了算。
那么用什么作为salt呢?
特点是唯一,通常可以将用户id作为salt,有的人也采用随机数来作为salt。
不过无论是用户id也好,随机数也好,都需要保存到数据库里,因为登陆的时候还需要这个salt。
盐的计算方法,所有的salt都是这样算:
ByteSource.Util.bytes(...);
bytes里的参数可以是以下多种形式,这些类型参数都可以作为盐:
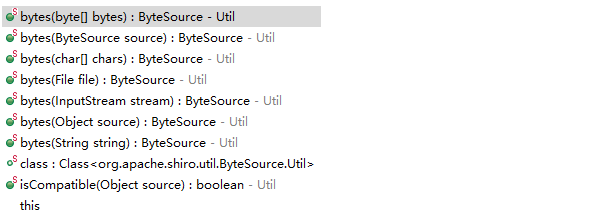
好了现在就向数据库里添加数据,并将密码用加密构造方法加密。
首先在登陆页面添加一个注册按钮:(注:这样之前list.jsp里,添加用户的按钮,就不需要了,不过我并没有删)
<%@ page language="java" contentType="text/html; charset=UTF-8" pageEncoding="UTF-8"%> <!DOCTYPE html PUBLIC "-//W3C//DTD HTML 4.01 Transitional//EN" "http://www.w3.org/TR/html4/loose.dtd"> <html> <head> <meta http-equiv="Content-Type" content="text/html; charset=UTF-8"> <title>Insert title here</title> </head> <body> <h1>Shiro_Login_Page</h1> <br> <br> <form action="shiro_login" method="post"> <table border="1px" width="400px" height="100px" align="center"> <tr> <td><input type="text" name="username" style="width:200px"/></td> <tr /> <tr> <td><input type="password" name="password" style="width:200px"/></td> </tr> <tr> <td> <input type="submit" value="submit" /></td> </tr> </table> </form> <button onclick="user_reg()">user_reg</button> </body> <script type="text/javascript"> function user_reg() { window.location.href="add_user.jsp"; } </script> </html>
接着在applicationContext.xml修改add_user.jsp的拦截状态为anon。
<property name="filterChainDefinitions"> <value> /login.jsp = anon /shiro_login = anon /add_user.jsp = anon /shiro_logout = logout # everything else requires authentication: /** = authc </value> </property>
接着ShiroController里对数据库里的密码进行加密:
package com.changping.shiro.controller; import org.apache.shiro.SecurityUtils; import org.apache.shiro.authc.AuthenticationException; import org.apache.shiro.authc.UsernamePasswordToken; import org.apache.shiro.crypto.hash.SimpleHash; import org.apache.shiro.subject.Subject; import org.apache.shiro.util.ByteSource; import org.springframework.beans.factory.annotation.Autowired; import org.springframework.stereotype.Controller; import org.springframework.web.bind.annotation.RequestMapping; import org.springframework.web.bind.annotation.RequestParam; import com.changping.shiro.pojo.User; import com.changping.shiro.service.UserServiceInf; @Controller public class ShiroController { @Autowired UserServiceInf userService; //用过用户名、密码来获得认证的token @RequestMapping("shiro_login") public String shiro_login(@RequestParam("username") String username,@RequestParam("password") String password) { /**现在此处测试查询用户能查到,在把代码搬到MyShiroRealm.java里。 User db_user = userService.find_user_by_username(username); System.out.println(db_user.toString());*/ //获得对象 Subject currentUser = SecurityUtils.getSubject(); //判断是否被认证 if (!currentUser.isAuthenticated()) { UsernamePasswordToken token = new UsernamePasswordToken(username, password); token.setRememberMe(true); try { System.out.println("1"+token.hashCode());//这里的token传入MyShiroRealm里,所以二者hashcode相同。 currentUser.login(token); } catch (AuthenticationException ae) { System.out.println("登陆失败..."+ae.getMessage()); } } return "redirect:/list.jsp"; } //添加一个用户,需要userid、username、userpass三个参数 @RequestMapping("add_user") public String add_user( @RequestParam("userid") String userid, @RequestParam("username") String username, @RequestParam("userpass") String userpass){ <!--数据库密码加密--> String hashAlgorithmName = "MD5";//选用MD5加密方式 Object credentials = userpass;//加密对象是密码 Object salt = ByteSource.Util.bytes(userid);//获得盐的计算结果 int hashIterations = 5000;//加密次数 //开始对密码加密 Object md5Pass = new SimpleHash(hashAlgorithmName, credentials, salt, hashIterations); userpass = md5Pass.toString();//Object转String User adduser = new User(userid,userpass,username); int addresult = userService.add_user(adduser); return "redirect:/list.jsp"; } }
接着在MyShiroRealm里对浏览器传过来的密码加密:
package com.changping.shiro.realm; import org.apache.shiro.authc.AuthenticationException; import org.apache.shiro.authc.AuthenticationInfo; import org.apache.shiro.authc.AuthenticationToken; import org.apache.shiro.authc.LockedAccountException; import org.apache.shiro.authc.SimpleAuthenticationInfo; import org.apache.shiro.authc.UnknownAccountException; import org.apache.shiro.authc.UsernamePasswordToken; import org.apache.shiro.realm.AuthenticatingRealm; import org.apache.shiro.util.ByteSource; import org.springframework.beans.factory.annotation.Autowired; import com.changping.shiro.pojo.User; import com.changping.shiro.service.UserServiceInf; public class MyShiroRealm extends AuthenticatingRealm{ @Autowired UserServiceInf userService; @Override protected AuthenticationInfo doGetAuthenticationInfo( AuthenticationToken token) throws AuthenticationException { System.out.println("代码已经来到了:MyShiroRealm授权区域----->"); // 1.把AuthenticationToken 转换为UsernamePasswordToken UsernamePasswordToken usernamePasswordToken = (UsernamePasswordToken)token; // 2.从UsernamePasswordToken中获取username String shiro_Username = usernamePasswordToken.getUsername(); // 3.调用数据库方法,从数据库中查询username对应的用户记录 User db_user = userService.find_user_by_username(shiro_Username); // 4.若用户不存在,则可以抛出UnknowAccountException异常 if(db_user==null) { throw new UnknownAccountException("用户不存在!"); } // 5.根据用户信息的情况,决定是否需要抛出其他的AuthenticationException异常。 if("002".equals(db_user.getUserid())) { System.out.println("LockedAccountException:"+db_user.getUserid()); throw new LockedAccountException("用户已被锁定!"); } else { System.out.println("通过realm-----没有异常!"); }
<!--对浏览器里的密码进行加密,用于和数据库密码比对--> /*6.根据用户的情况,来构建AuthenticationInfo对象(info)并返回,通常使用的方法为:SimpleAuthenticationInfo以下信息是从数据库中获取:*/ //1、认证的实体信息,可以是username,也可以是数据表对应的用户的实体类对象——User(主要用于后期授权)。 //2、密码 //3、盐的计算结果,使用接口ByteSource的内部类Util里的bytes方法。所以说接口里可以有内部类,这个内部类是个final类。 //4、当前realm对象的name,调用父类的getName()方法即可。 Object principal = db_user.getUsername(); Object hashedCredentials = db_user.getUserpass(); ByteSource credentialsSalt = ByteSource.Util.bytes(db_user.getUserid());//用数据库中userid作为盐。 String realmName = getName(); SimpleAuthenticationInfo info =null; /* new SimpleAuthenticationInfo(principal, credentials, realmName);*/ info = new SimpleAuthenticationInfo(principal, hashedCredentials, credentialsSalt, realmName); return info; } }
好了,可以运行一下项目,注册新用户,新用户的密码将会经过盐加密。
浏览器启动,点击user_reg按钮:
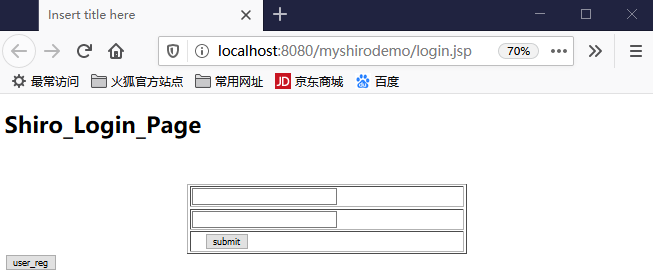
跳转页面:
添加用户信息:userid:006、username:Sophie、userpass:123
点击提交:
结果发现数据库里没有新增一条,通过debug发现没走后台,这说明添加用户的url被拦截了,需要设置url的状态为anon(允许匿名):
<property name="filterChainDefinitions"> <value> /login.jsp = anon /shiro_login = anon /add_user.jsp = anon /add_user =anon /shiro_logout = logout # everything else requires authentication: /** = authc </value> </property>
接着报了个异常,一切都在意料之中,因为我的数据库密码长度不够只有10,现在我调成100,如果密码长度不够会报异常:
org.springframework.dao.DataIntegrityViolationException: Error updating database. Cause: com.mysql.jdbc.MysqlDataTruncation:
Data truncation: Data too long for column 'USERPASS' at row 1

重新注册提交,数据库已经添加了一条数据:
11611962806 代码已经来到了:MyShiroRealm授权区域-----> 通过realm-----没有异常!
可以看到最后一行Sophie:
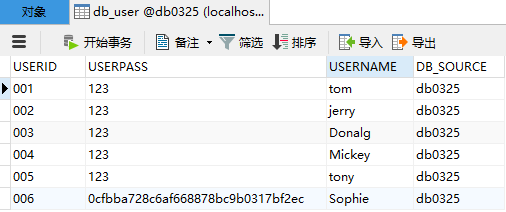
现在接着登陆,用006、Sophie、123登陆:
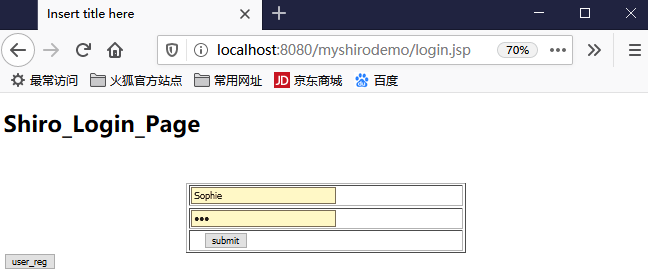
页面跳转到:

再看后台打印:
11611962806 代码已经来到了:MyShiroRealm授权区域-----> 通过realm-----没有异常!
不过不是很直观,debug一下,可以看到浏览器传过来被加密的密码也是0cfbba728c6af668878bc9b0317bf2ec,和数据库一样没有问题:

好了,以上就是盐加密与MD5结合,通常是将得到的salt保存到数据库里,单独一个字段,但是这次我偷个懒,直接用userid来当作盐值。
普遍情况下,数据库里的salt是通过随机数算出来,然后保存到数据库里。登陆的时候再通过数据库里的salt对浏览器的密码加密,最后比对密码即可。
oracle、mysql多数据源、多realm认证
在某种特殊情况下需要多个数据库同时对用户进行提供验证数据,并且每个数据库加密算法可以不一致。
比如同时使用两种数据库、一个是MySql用MD5加密,一个是Oracle用SHA1加密,
当用户登陆的时候,需要同时从以上两种数据库中取出用户数据,那么就需要两种不同的realm进行用户验证。
下面就来做这件事。
当前已经有mysql数据库,需要oracle数据库:
首先,oracle新建一张表db_user:

接着导入ojdbc6的pom文件(个人版):
<project xmlns="http://maven.apache.org/POM/4.0.0" xmlns:xsi="http://www.w3.org/2001/XMLSchema-instance" xsi:schemaLocation="http://maven.apache.org/POM/4.0.0 http://maven.apache.org/xsd/maven-4.0.0.xsd"> <modelVersion>4.0.0</modelVersion> <groupId>com.changping.jdbcdemo</groupId> <artifactId>jdbcdemo</artifactId> <version>0.0.1-SNAPSHOT</version> <dependencies> <dependency> <groupId>oracle</groupId> <artifactId>ojdbc6-connector-java</artifactId> <version>10.2.0.1.0</version> </dependency> </dependencies> </project>
配置双数据源
当前项目结构:
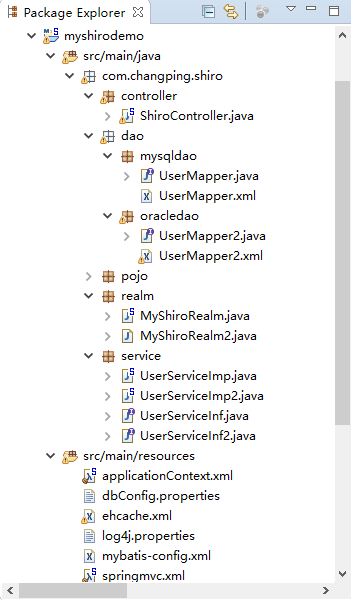
组成成分:
1.dbConfig.properties
mysql.driverClassName=com.mysql.jdbc.Driver mysql.url=jdbc:mysql://localhost:3306/db0325?useUnicode=true&characterEncoding=UTF8 mysql.jdbc.username=root mysql.jdbc.password= #my password is default by the "Yes",so now it is none,you need fill in your own password; oracle.driverClassName=oracle.jdbc.driver.OracleDriver oracle.url=jdbc:oracle:thin:@localhost:1521:ORCL oracle.jdbc.username=scott oracle.jdbc.password=tiger
2.applicationContext.xml
<?xml version="1.0" encoding="UTF-8"?> <beans xmlns="http://www.springframework.org/schema/beans" xmlns:xsi="http://www.w3.org/2001/XMLSchema-instance" xmlns:context="http://www.springframework.org/schema/context" xmlns:jdbc="http://www.springframework.org/schema/jdbc" xmlns:aop="http://www.springframework.org/schema/aop" xmlns:tx="http://www.springframework.org/schema/tx" xsi:schemaLocation=" http://www.springframework.org/schema/beans http://www.springframework.org/schema/beans/spring-beans.xsd http://www.springframework.org/schema/context http://www.springframework.org/schema/context/spring-context.xsd http://www.springframework.org/schema/jdbc http://www.springframework.org/schema/jdbc/spring-jdbc.xsd http://www.springframework.org/schema/aop http://www.springframework.org/schema/aop/spring-aop.xsd http://www.springframework.org/schema/tx http://www.springframework.org/schema/tx/spring-tx.xsd "> <!-- ========================================================= Shiro Core Components - Not Spring Specific ========================================================= --> <!-- Shiro's main business-tier object for web-enabled applications (use DefaultSecurityManager instead when there is no web environment)--> <!--配置securityManager,需要配置2个属性--> <bean id="securityManager" class="org.apache.shiro.web.mgt.DefaultWebSecurityManager"> <property name="cacheManager" ref="cacheManager"/> <!-- Single realm app. If you have multiple realms, use the 'realms' property instead. --> <property name="realm" ref="jdbcRealm"/> </bean> <!-- Let's use some enterprise caching support for better performance. You can replace this with any enterprise caching framework implementation that you like (Terracotta+Ehcache, Coherence, GigaSpaces, etc --> <!--1.配置cacheManager 需要配置ehcache的pom依赖、配置文件--> <bean id="cacheManager" class="org.apache.shiro.cache.ehcache.EhCacheManager"> <!-- Set a net.sf.ehcache.CacheManager instance here if you already have one. If not, a new one will be creaed with a default config: <property name="cacheManager" ref="ehCacheManager"/> --> <!-- If you don't have a pre-built net.sf.ehcache.CacheManager instance to inject, but you want a specific Ehcache configuration to be used, specify that here. If you don't, a default will be used.:--> <property name="cacheManagerConfigFile" value="classpath:ehcache.xml"/> </bean> <!-- 2.配置Realm,需要自己写一个类,来实现Realm这个接口--> <!-- 实现了org.apache.shiro.realm.Realm接口的bean--> <!-- md5加密:替换当前realm的credentialsMatcher属性,直接使用HashedCredentialsMatcher对象。 --> <bean id="jdbcRealm" class="com.changping.shiro.realm.MyShiroRealm"> <property name="credentialsMatcher"> <bean class="org.apache.shiro.authc.credential.HashedCredentialsMatcher"> <property name="hashAlgorithmName" value="MD5"></property> <property name="hashIterations" value="5000"></property> </bean> </property> </bean> <!-- Post processor that automatically invokes init() and destroy() methods for Spring-configured Shiro objects so you don't have to 1) specify an init-method and destroy-method attributes for every bean definition and 2) even know which Shiro objects require these methods to be called. --> <!--3.配置LifecycleBeanPostProcessor可以自动的调用配置在Spring Ioc容器中shiro bean的生命周期方法--> <bean id="lifecycleBeanPostProcessor" class="org.apache.shiro.spring.LifecycleBeanPostProcessor"/> <!-- Enable Shiro Annotations for Spring-configured beans. Only run after the lifecycleBeanProcessor has run: --> <!--4.启用Ioc容器中使用shiro的注解,但必须在配置了LifecycleBeanPostProcessor之后才能使用。 --> <bean class="org.springframework.aop.framework.autoproxy.DefaultAdvisorAutoProxyCreator" depends-on="lifecycleBeanPostProcessor"/> <bean class="org.apache.shiro.spring.security.interceptor.AuthorizationAttributeSourceAdvisor"> <property name="securityManager" ref="securityManager"/> </bean> <!-- Define the Shiro Filter here (as a FactoryBean) instead of directly in web.xml - web.xml uses the DelegatingFilterProxy to access this bean. This allows us to wire things with more control as well utilize nice Spring things such as PropertiesPlaceholderConfigurer and abstract beans or anything else we might need: --> <!--5.配置ShiroFilter, id必须和web.xml文件中配置的DelegatingFilterProxy的<filter-name>一致。 anon允许匿名访问, authc必须被认证之后才能访问即登陆之后才能访问的页面。 --> <bean id="ShiroFilter" class="org.apache.shiro.spring.web.ShiroFilterFactoryBean"> <property name="securityManager" ref="securityManager"/> <property name="loginUrl" value="/login.jsp"/> <property name="successUrl" value="/list.jsp"/> <property name="unauthorizedUrl" value="/unauthorized.jsp"/> <property name="filterChainDefinitions"> <value> /login.jsp = anon /shiro_login = anon /add_user.jsp = anon /add_user =anon /shiro_logout = logout # everything else requires authentication: /** = authc </value> </property> </bean> <context:component-scan base-package="com.changping.shiro.service"></context:component-scan> <context:property-placeholder location="classpath:dbConfig.properties" /> <!-- mysql配置 --> <bean id="dataSource_mysql" class="org.apache.commons.dbcp.BasicDataSource"> <property name="driverClassName" value="${mysql.driverClassName}" /> <property name="url" value="${mysql.url}" /> <property name="username" value="${mysql.jdbc.username}" /> <property name="password" value="${mysql.jdbc.password}" /> </bean> <bean id="sqlSessionFactory_mysql" class="org.mybatis.spring.SqlSessionFactoryBean"> <property name="dataSource" ref="dataSource_mysql" /> <property name="configLocation" value="classpath:mybatis-config.xml" /> </bean> <bean class="org.mybatis.spring.mapper.MapperScannerConfigurer"> <property name="basePackage" value="com.changping.shiro.dao.mysqldao" /> <property name="sqlSessionFactoryBeanName" value="sqlSessionFactory_mysql" /> </bean> <!-- oracle配置 --> <bean id="sqlSessionFactory_oracle" class="org.mybatis.spring.SqlSessionFactoryBean"> <property name="dataSource" ref="dataSource_oracle" /> <property name="configLocation" value="classpath:mybatis-config.xml" /> </bean> <bean id="dataSource_oracle" class="org.apache.commons.dbcp.BasicDataSource"> <property name="driverClassName" value="${oracle.driverClassName}" /> <property name="url" value="${oracle.url}" /> <property name="username" value="${oracle.jdbc.username}" /> <property name="password" value="${oracle.jdbc.password}" /> </bean> <bean class="org.mybatis.spring.mapper.MapperScannerConfigurer"> <property name="basePackage" value="com.changping.shiro.dao.oracledao" /> <property name="sqlSessionFactoryBeanName" value="sqlSessionFactory_oracle" /> </bean> </beans>
ShiroController.java(同时控制两个数据库)
package com.changping.shiro.controller; import org.apache.shiro.SecurityUtils; import org.apache.shiro.authc.AuthenticationException; import org.apache.shiro.authc.UsernamePasswordToken; import org.apache.shiro.crypto.hash.SimpleHash; import org.apache.shiro.subject.Subject; import org.apache.shiro.util.ByteSource; import org.springframework.beans.factory.annotation.Autowired; import org.springframework.stereotype.Controller; import org.springframework.web.bind.annotation.RequestMapping; import org.springframework.web.bind.annotation.RequestParam; import com.changping.shiro.pojo.User; import com.changping.shiro.service.UserServiceInf; import com.changping.shiro.service.UserServiceInf2; @Controller public class ShiroController { @Autowired UserServiceInf userService_mysql; @Autowired UserServiceInf2 userService_oracle; //通过用户名、密码来获得认证的token,之后传入MyShiroRealm里,在那里完成密码的比对,相当于从控制层里解耦化。 //the authentication token containing the user's principal and credentials. //token实现了序列化 @RequestMapping("shiro_login") public String shiro_login(@RequestParam("username") String username,@RequestParam("password") String password) { /* //先在此处测试确保查询用户能查到,再把代码搬到MyShiroRealm.java里。 User db_user_msyql = userService_mysql.find_user_by_username(username); System.out.println(db_user_msyql.toString()); //先在此处测试确保查询用户能查到,再把代码搬到MyShiroRealm2.java里。 User db_user_oracle = userService_oracle.find_user_by_username(username); System.out.println(db_user_oracle.toString()); */ //获得对象 Subject currentUser = SecurityUtils.getSubject(); //判断是否被认证 if (!currentUser.isAuthenticated()) { /** * 这里的token同时传入MyShiroRealm和MyShiroRealm2 **/ UsernamePasswordToken token = new UsernamePasswordToken(username, password); token.setRememberMe(true); try { System.out.println("token_hash:"+token.hashCode()); currentUser.login(token); } catch (AuthenticationException ae) { System.out.println("登陆失败..."+ae.getMessage()); } } return "redirect:/list.jsp"; } @RequestMapping("add_user") public String add_user( @RequestParam("userid") String userid, @RequestParam("username") String username, @RequestParam("userpass") String userpass){ //mysql、oracle共用参数 Object credentials = userpass;//加密对象是密码 Object salt = ByteSource.Util.bytes(userid);//获得盐的计算结果 int hashIterations = 5000;//加密次数 //mysql密码加密通过MD5 String hashAlgorithmName_msyql = "MD5"; Object md5Pass = new SimpleHash(hashAlgorithmName_msyql, credentials, salt, hashIterations); userpass = md5Pass.toString();//Object转String User adduser = new User(userid,userpass,username); int addresult1 = userService_mysql.add_user(adduser); //oracle密码加密通过SHA1 String hashAlgorithmName_oracle = "SHA1"; Object SHA1Pass = new SimpleHash(hashAlgorithmName_oracle, credentials, salt, hashIterations); userpass = SHA1Pass.toString();//Object转String User adduser2 = new User(userid,userpass,username); int addresult2= userService_oracle.add_user(adduser2); return "redirect:/list.jsp"; } }
UserServiceInf2.java
package com.changping.shiro.service; import com.changping.shiro.pojo.User; public interface UserServiceInf2 { public User find_user_by_username(String username); public int add_user(User add_user); }
UserServiceImp2.java
package com.changping.shiro.service; import org.springframework.beans.factory.annotation.Autowired; import org.springframework.stereotype.Service; import com.changping.shiro.dao.oracledao.UserMapper2; import com.changping.shiro.pojo.User; @Service public class UserServiceImp2 implements UserServiceInf2 { @Autowired UserMapper2 userMapper; @Override public User find_user_by_username(String username) { User user = userMapper.select_user_by_username(username); return user; } @Override public int add_user(User add_user) { //给字段db_source赋值,因为oracle好像不能mysql那样通过database()方法获得数据库名。 add_user.setDb_source("db_oracle_0424"); int insert_result = userMapper.insert_user(add_user); return insert_result; } }
UserMapper2.java
package com.changping.shiro.dao.oracledao; import com.changping.shiro.pojo.User; public interface UserMapper2 { public User select_user_by_username(String username); public int insert_user(User add_user); }
UserMapper2.xml
<?xml version="1.0" encoding="UTF-8"?> <!DOCTYPE mapper SYSTEM "http://mybatis.org/dtd/mybatis-3-mapper.dtd" > <mapper namespace="com.changping.shiro.dao.oracledao.UserMapper2"> <select id="select_user_by_username" parameterType="String" resultType="com.changping.shiro.pojo.User"> select * from db_user where username = #{username} </select> <insert id="insert_user" parameterType="com.changping.shiro.pojo.User"> insert into db_user (userid,userpass,username,db_source) values (#{userid},#{userpass},#{username},#{db_source}) </insert> </mapper>
login.jsp(添加了一个注册按钮,同样可以添加用户)
<%@ page language="java" contentType="text/html; charset=UTF-8" pageEncoding="UTF-8"%> <!DOCTYPE html PUBLIC "-//W3C//DTD HTML 4.01 Transitional//EN" "http://www.w3.org/TR/html4/loose.dtd"> <html> <head> <meta http-equiv="Content-Type" content="text/html; charset=UTF-8"> <title>Insert title here</title> </head> <body> <h1>Shiro_Login_Page</h1> <br> <br> <form action="shiro_login" method="post"> <table border="1px" width="400px" height="100px" align="center"> <tr> <td><input type="text" name="username" style="width:200px"/></td> <tr /> <tr> <td><input type="password" name="password" style="width:200px"/></td> </tr> <tr> <td> <input type="submit" value="submit" /></td> </tr> </table> </form> <button onclick="user_reg()">user_reg</button> </body> <script type="text/javascript"> function user_reg() { window.location.href="add_user.jsp"; } </script> </html>
注意applicationContext.xml里将add_user.jsp设置为anon,这样可以在一开始的时候就添加用户:
<property name="filterChainDefinitions"> <value> /login.jsp = anon /shiro_login = anon /add_user.jsp = anon /add_user =anon /shiro_logout = logout # everything else requires authentication: /** = authc </value> </property>
接下来,可以同时向oracle和mysql添加用户信息,其中mysql的userpass用md5加密,oracle的userpass用sha1加密。
启动服务器,可以看到注册按钮:
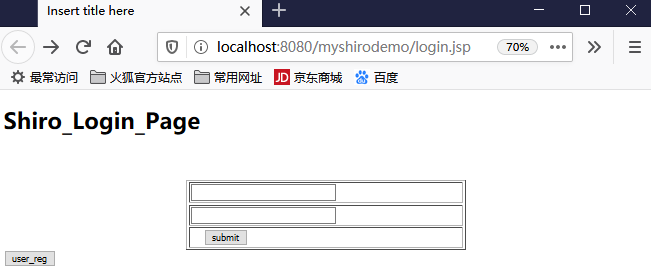
点击注册按钮进行注册,输入007、Truman、123进行注册:

提交后mysql和oracle数据库里就都有新值:
mysql:

oracle:
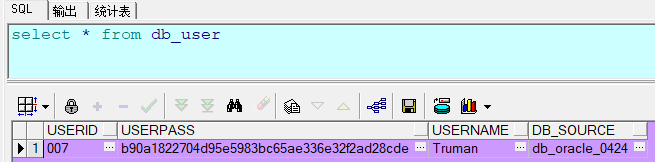
以上数据,可以看到同一个用户,密码被加密成两种形式,并保存在不同数据库。
双数据源密码加密功能到这里就实现了,这不是目的,目的是对多个realm的验证。
多个realm验证
之前都是单个realm进行验证,现在由于加入了oracle数据库,所以变成多个realm在登陆是同时验证。
下面就来做这件事:
编辑MyShiroRealm.java
package com.changping.shiro.realm; import org.apache.shiro.authc.AuthenticationException; import org.apache.shiro.authc.AuthenticationInfo; import org.apache.shiro.authc.AuthenticationToken; import org.apache.shiro.authc.LockedAccountException; import org.apache.shiro.authc.SimpleAuthenticationInfo; import org.apache.shiro.authc.UnknownAccountException; import org.apache.shiro.authc.UsernamePasswordToken; import org.apache.shiro.realm.AuthenticatingRealm; import org.apache.shiro.util.ByteSource; import org.springframework.beans.factory.annotation.Autowired; import com.changping.shiro.pojo.User; import com.changping.shiro.service.UserServiceInf; public class MyShiroRealm extends AuthenticatingRealm{ @Autowired UserServiceInf userService; @Override protected AuthenticationInfo doGetAuthenticationInfo( AuthenticationToken token) throws AuthenticationException { System.out.println("代码已经来到了:MyShiroRealm授权区域1----->"); // 1.把AuthenticationToken 转换为UsernamePasswordToken UsernamePasswordToken usernamePasswordToken = (UsernamePasswordToken)token; // 2.从UsernamePasswordToken中获取username String shiro_Username = usernamePasswordToken.getUsername(); // 3.调用数据库方法,从数据库中查询username对应的用户记录 User db_user_mysql = userService.find_user_by_username(shiro_Username); // 4.若用户不存在,则可以抛出UnknowAccountException异常 if(db_user_mysql==null) { throw new UnknownAccountException("用户不存在!"); } // 5.根据用户信息的情况,决定是否需要抛出其他的AuthenticationException异常。 if("002".equals(db_user_mysql.getUserid())) { System.out.println("LockedAccountException:"+db_user_mysql.getUserid()); throw new LockedAccountException("用户已被锁定!"); } else { System.out.println("通过realm-----没有异常!"); } /*6.根据用户的情况,来构建AuthenticationInfo对象并返回,通常使用的方法为:SimpleAuthenticationInfo以下信息是从数据库中获取:*/ //1、认证的实体信息,可以是username,也可以是数据表对应的用户的实体类对象User。 //2、密码 //3、盐的计算结果,使用接口ByteSource的内部类Util里的bytes方法。所以说接口里可以有内部类,这个内部类是个final类。 //4、当前realm对象的name,调用父类的getName()方法即可。 Object principal = db_user_mysql.getUsername(); Object hashedCredentials = db_user_mysql.getUserpass(); ByteSource credentialsSalt = ByteSource.Util.bytes(db_user_mysql.getUserid());//用数据库中userid作为盐。 String realmName = getName(); SimpleAuthenticationInfo info =null; /* new SimpleAuthenticationInfo(principal, credentials, realmName);*/ info = new SimpleAuthenticationInfo(principal, hashedCredentials, credentialsSalt, realmName); return info; } }
新建MyShiroRealm2.java
package com.changping.shiro.realm; import org.apache.shiro.authc.AuthenticationException; import org.apache.shiro.authc.AuthenticationInfo; import org.apache.shiro.authc.AuthenticationToken; import org.apache.shiro.authc.LockedAccountException; import org.apache.shiro.authc.SimpleAuthenticationInfo; import org.apache.shiro.authc.UnknownAccountException; import org.apache.shiro.authc.UsernamePasswordToken; import org.apache.shiro.realm.AuthenticatingRealm; import org.apache.shiro.util.ByteSource; import org.springframework.beans.factory.annotation.Autowired; import com.changping.shiro.pojo.User; import com.changping.shiro.service.UserServiceInf2; public class MyShiroRealm2 extends AuthenticatingRealm{ @Autowired UserServiceInf2 userService; @Override protected AuthenticationInfo doGetAuthenticationInfo( AuthenticationToken token) throws AuthenticationException { System.out.println("代码已经来到了:MyShiroRealm授权区域2----->"); // 1.把AuthenticationToken 转换为UsernamePasswordToken UsernamePasswordToken usernamePasswordToken = (UsernamePasswordToken)token; // 2.从UsernamePasswordToken中获取username String shiro_Username = usernamePasswordToken.getUsername(); // 3.调用数据库方法,从数据库中查询username对应的用户记录 User db_user_oracle = userService.find_user_by_username(shiro_Username); // 4.若用户不存在,则可以抛出UnknowAccountException异常 if(db_user_oracle==null) { throw new UnknownAccountException("用户不存在!"); } // 5.根据用户信息的情况,决定是否需要抛出其他的AuthenticationException异常。 if("002".equals(db_user_oracle.getUserid())) { System.out.println("LockedAccountException:"+db_user_oracle.getUserid()); throw new LockedAccountException("用户已被锁定!"); } else { System.out.println("通过realm-----没有异常!"); } /*6.根据用户的情况,来构建AuthenticationInfo对象并返回,通常使用的方法为:SimpleAuthenticationInfo以下信息是从数据库中获取:*/ //1、认证的实体信息,可以是username,也可以是数据表对应的用户的实体类对象User。 //2、密码 //3、盐的计算结果,使用接口ByteSource的内部类Util里的bytes方法。所以说接口里可以有内部类,这个内部类是个final类。 //4、当前realm对象的name,调用父类的getName()方法即可。 Object principal = db_user_oracle.getUsername(); Object hashedCredentials = db_user_oracle.getUserpass(); ByteSource credentialsSalt = ByteSource.Util.bytes(db_user_oracle.getUserid());//用数据库中userid作为盐。 String realmName = getName(); SimpleAuthenticationInfo info =null; /* new SimpleAuthenticationInfo(principal, credentials, realmName);*/ info = new SimpleAuthenticationInfo(principal, hashedCredentials, credentialsSalt, realmName); return info; } }
接着修改applicationContext.xml,使之可以匹配多个realm情景:
<?xml version="1.0" encoding="UTF-8"?> <beans xmlns="http://www.springframework.org/schema/beans" xmlns:xsi="http://www.w3.org/2001/XMLSchema-instance" xmlns:context="http://www.springframework.org/schema/context" xmlns:jdbc="http://www.springframework.org/schema/jdbc" xmlns:aop="http://www.springframework.org/schema/aop" xmlns:tx="http://www.springframework.org/schema/tx" xsi:schemaLocation=" http://www.springframework.org/schema/beans http://www.springframework.org/schema/beans/spring-beans.xsd http://www.springframework.org/schema/context http://www.springframework.org/schema/context/spring-context.xsd http://www.springframework.org/schema/jdbc http://www.springframework.org/schema/jdbc/spring-jdbc.xsd http://www.springframework.org/schema/aop http://www.springframework.org/schema/aop/spring-aop.xsd http://www.springframework.org/schema/tx http://www.springframework.org/schema/tx/spring-tx.xsd "> <!-- 配置securityManager--> <bean id="securityManager" class="org.apache.shiro.web.mgt.DefaultWebSecurityManager"> <property name="cacheManager" ref="cacheManager" /> <property name="authenticator" ref="authenticator" /> <!--property name="realm" ref="jdbcRealm" /--> </bean> <!-- 多个realm时需要配置——ModularRealmAuthenticator--> <bean id ="authenticator" class="org.apache.shiro.authc.pam.ModularRealmAuthenticator"> <property name="realms"> <list> <ref bean="jdbcRealm"/> <ref bean="jdbcRealm2"/> </list> </property> </bean> <!--1.配置cacheManager 需要配置ehcache的pom依赖、配置文件 --> <bean id="cacheManager" class="org.apache.shiro.cache.ehcache.EhCacheManager"> <property name="cacheManagerConfigFile" value="classpath:ehcache.xml" /> </bean> <!-- 2.配置Realm,需要自己写一个类,来实现Realm这个接口,现在有两个realm --> <!-- md5加密:替换当前realm的credentialsMatcher属性,直接使用HashedCredentialsMatcher对象。 --> <bean id="jdbcRealm" class="com.changping.shiro.realm.MyShiroRealm"> <property name="credentialsMatcher"> <bean class="org.apache.shiro.authc.credential.HashedCredentialsMatcher"> <property name="hashAlgorithmName" value="MD5"></property> <property name="hashIterations" value="5000"></property> </bean> </property> </bean> <bean id="jdbcRealm2" class="com.changping.shiro.realm.MyShiroRealm2"> <property name="credentialsMatcher"> <bean class="org.apache.shiro.authc.credential.HashedCredentialsMatcher"> <property name="hashAlgorithmName" value="SHA1"></property> <property name="hashIterations" value="5000"></property> </bean> </property> </bean> <!--3.配置LifecycleBeanPostProcessor可以自动的调用配置在Spring Ioc容器中shiro bean的生命周期方法 --> <bean id="lifecycleBeanPostProcessor" class="org.apache.shiro.spring.LifecycleBeanPostProcessor" /> <!--4.启用Ioc容器中使用shiro的注解,但必须在配置了LifecycleBeanPostProcessor之后才能使用。 --> <bean class="org.springframework.aop.framework.autoproxy.DefaultAdvisorAutoProxyCreator" depends-on="lifecycleBeanPostProcessor" /> <bean class="org.apache.shiro.spring.security.interceptor.AuthorizationAttributeSourceAdvisor"> <property name="securityManager" ref="securityManager" /> </bean> <!--5.配置ShiroFilter, id必须和web.xml文件中配置的DelegatingFilterProxy的<filter-name>一致。 anon允许匿名访问, authc必须被认证之后才能访问即登陆之后才能访问的页面。 --> <bean id="ShiroFilter" class="org.apache.shiro.spring.web.ShiroFilterFactoryBean"> <property name="securityManager" ref="securityManager" /> <property name="loginUrl" value="/login.jsp" /> <property name="successUrl" value="/list.jsp" /> <property name="unauthorizedUrl" value="/unauthorized.jsp" /> <property name="filterChainDefinitions"> <value> /login.jsp = anon /shiro_login = anon /add_user.jsp = anon /add_user =anon /shiro_logout = logout # everything else requires authentication: /** = authc </value> </property> </bean> <context:component-scan base-package="com.changping.shiro.service"></context:component-scan> <context:property-placeholder location="classpath:dbConfig.properties" /> <!-- mysql配置 --> <bean id="dataSource_mysql" class="org.apache.commons.dbcp.BasicDataSource"> <property name="driverClassName" value="${mysql.driverClassName}" /> <property name="url" value="${mysql.url}" /> <property name="username" value="${mysql.jdbc.username}" /> <property name="password" value="${mysql.jdbc.password}" /> </bean> <bean id="sqlSessionFactory_mysql" class="org.mybatis.spring.SqlSessionFactoryBean"> <property name="dataSource" ref="dataSource_mysql" /> <property name="configLocation" value="classpath:mybatis-config.xml" /> </bean> <bean class="org.mybatis.spring.mapper.MapperScannerConfigurer"> <property name="basePackage" value="com.changping.shiro.dao.mysqldao" /> <property name="sqlSessionFactoryBeanName" value="sqlSessionFactory_mysql" /> </bean> <!-- oracle配置 --> <bean id="sqlSessionFactory_oracle" class="org.mybatis.spring.SqlSessionFactoryBean"> <property name="dataSource" ref="dataSource_oracle" /> <property name="configLocation" value="classpath:mybatis-config.xml" /> </bean> <bean id="dataSource_oracle" class="org.apache.commons.dbcp.BasicDataSource"> <property name="driverClassName" value="${oracle.driverClassName}" /> <property name="url" value="${oracle.url}" /> <property name="username" value="${oracle.jdbc.username}" /> <property name="password" value="${oracle.jdbc.password}" /> </bean> <bean class="org.mybatis.spring.mapper.MapperScannerConfigurer"> <property name="basePackage" value="com.changping.shiro.dao.oracledao" /> <property name="sqlSessionFactoryBeanName" value="sqlSessionFactory_oracle" /> </bean> </beans>
接着启动服务器,进行登陆测试:
浏览器登陆输入之前注册的用户信息:Truman、123

提交之后,可以正常跳转到list.jsp:

再看后台console打印信息:
token_hash:1145747370 代码已经来到了:MyShiroRealm授权区域1-----> 通过realm-----没有异常! 代码已经来到了:MyShiroRealm授权区域2-----> 通过realm-----没有异常!
从打印结果来看,没有问题,至此,多数据源中的多realm情形已经实现。
debug查看多realm个情形密码的比对流程
之前已经有结果,但不够直观,现在debug运行,来看看具体的比对流程。
多个Realm的认证器还是通过debug来找,可以在控制层找到这个类,在这个方法上打个断点:
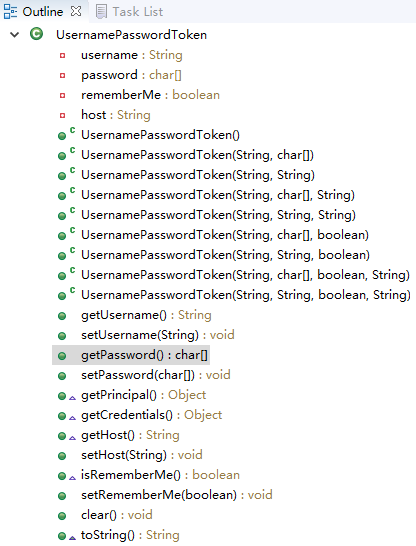
接着通过debug来启动服务器,通过Truman、123来登陆,因为这个用户在两个数据库中都有数据:

在提交之后,断点会落到此处:
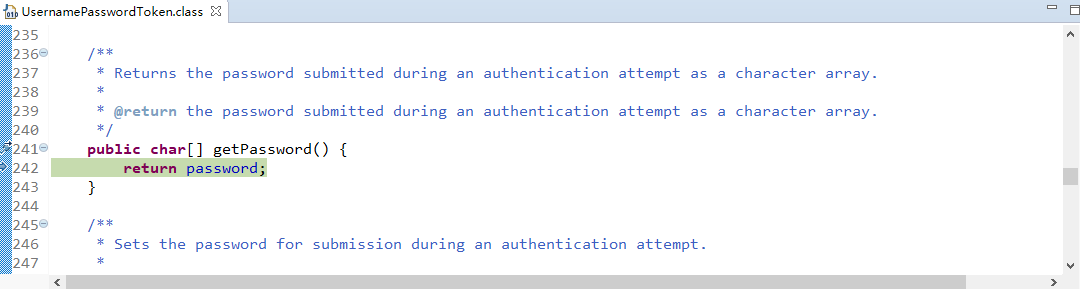
下一步:
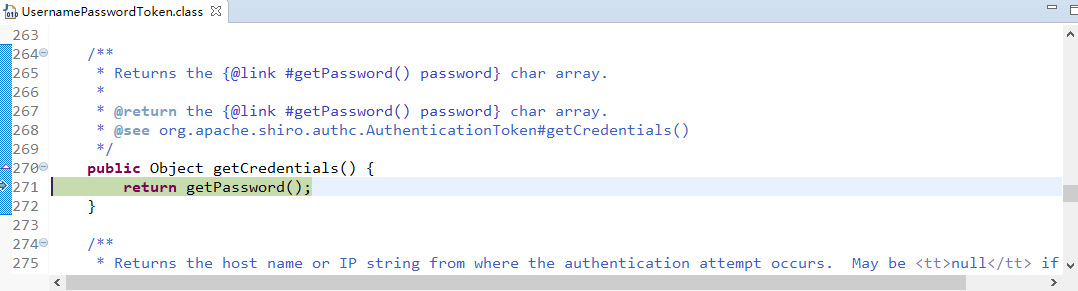
下一步:
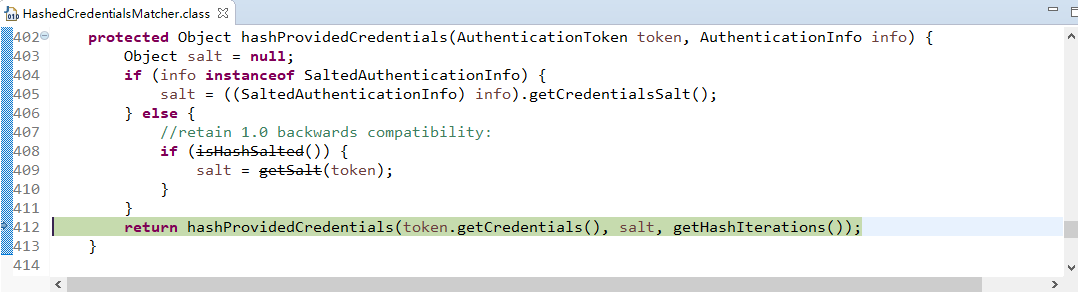
下一步:
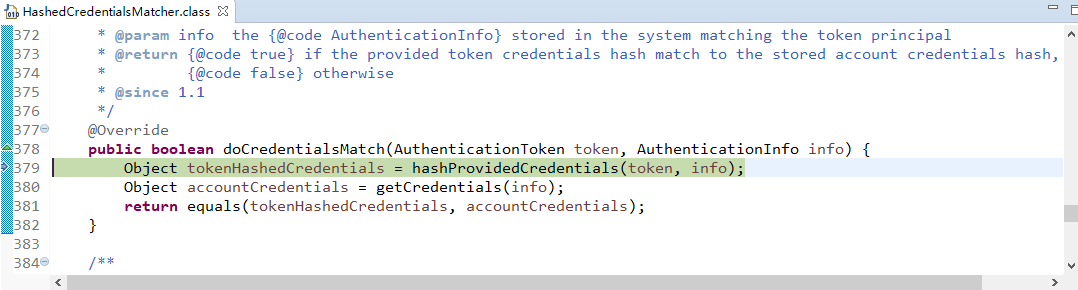
下一步:

下一步,可以看到tokenHashedCredentials和accountCredentials加密后密码相同:
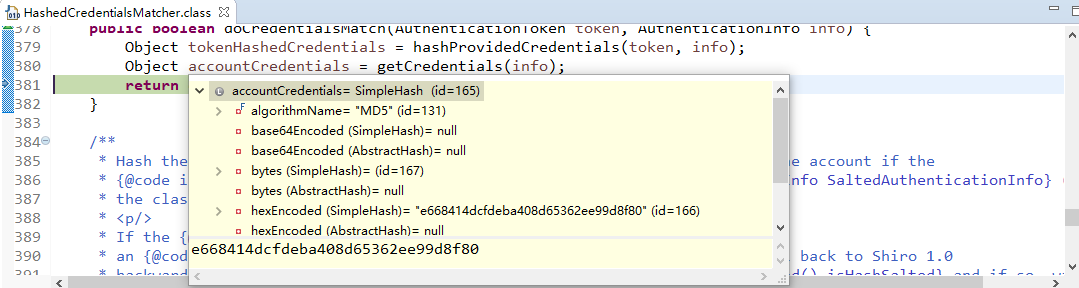
下一步:(断点到了这里一开始我还以为抛异常了呢,让我很费解,想了三个小时也没想清楚,不过我坚信的是密码的确匹配,我看过msg里没有值。感觉问题不大,因为后来我测试过...)
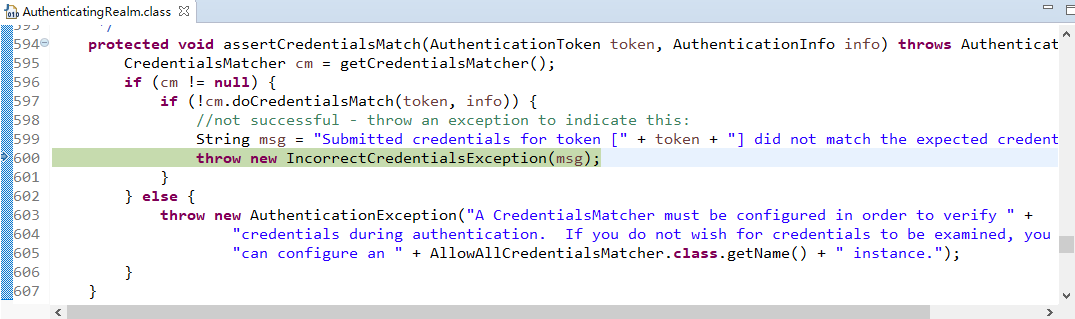
下一步:(其间省略几处非关键点)
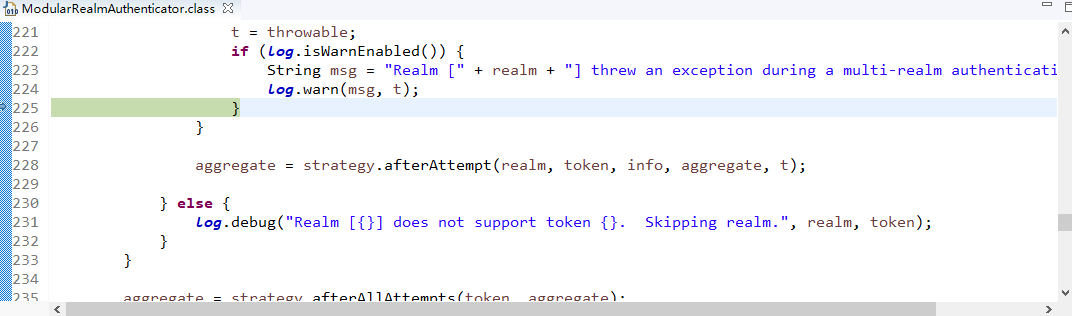
下一步:(现在这一步很关键,这个类遍历了多个realm,也就是说验证一个realm后会遍历执行下一个realm,即MyShiroRealm2)
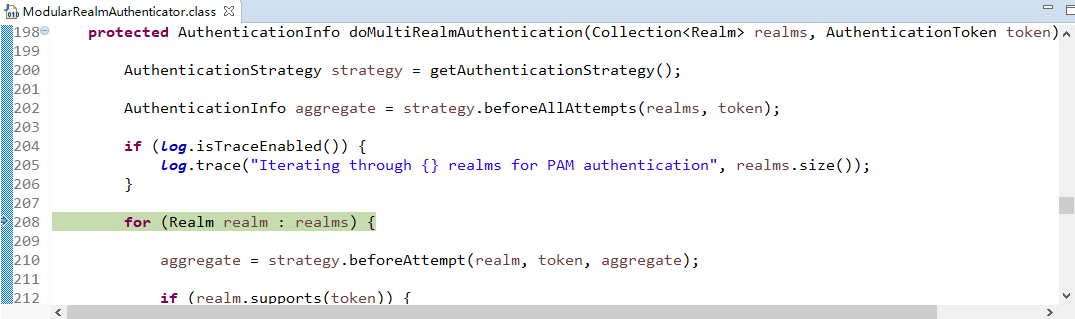
下一步:(t为null)
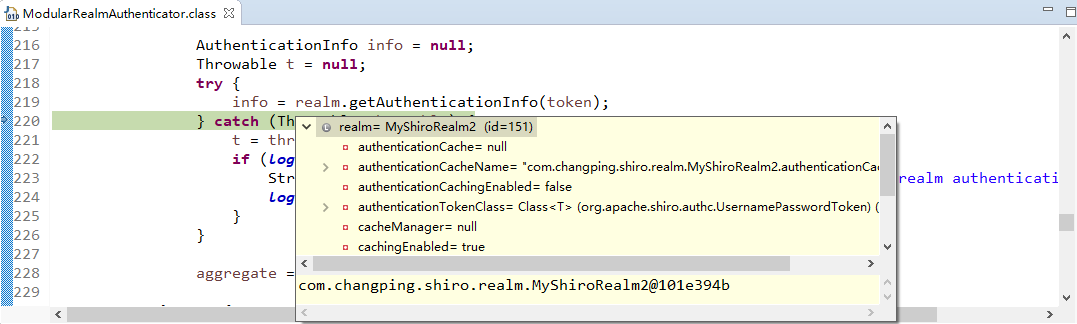
下一步:新的起点,现在是MyShiroRealm2的时代,为什么它后进行校验呢?因为配置文件里的list有序:
下一步:

下一步:

下一步:(不多说了,现在的加密已经变化——SHA1)

下一步:
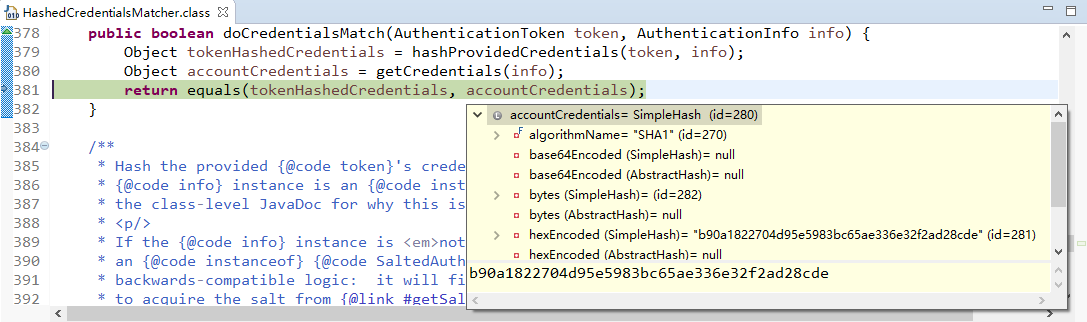
下一步:
下一步:
下一步:
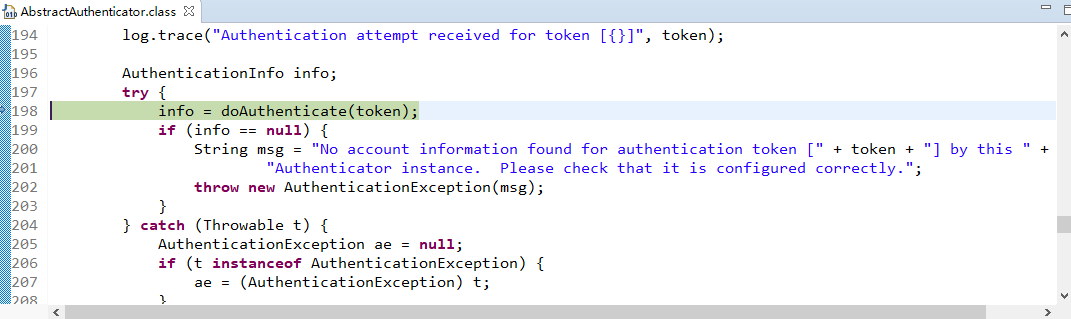
下一步:
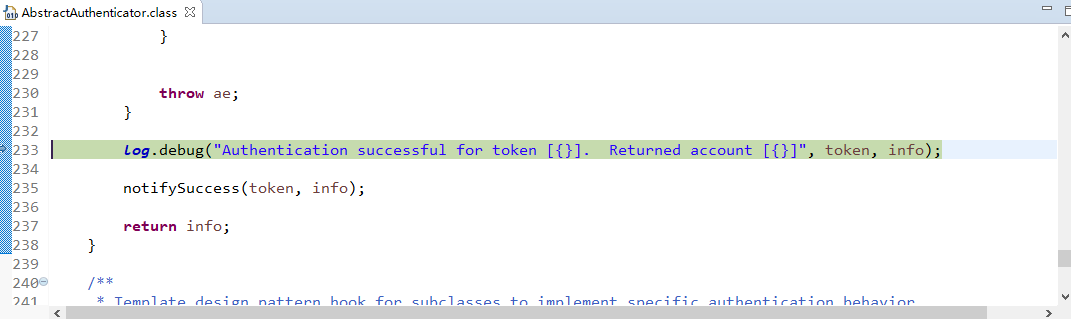
下一步:
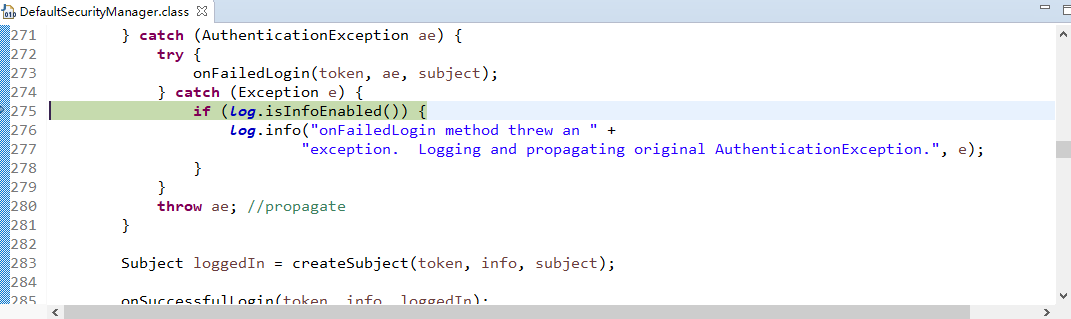
下一步:
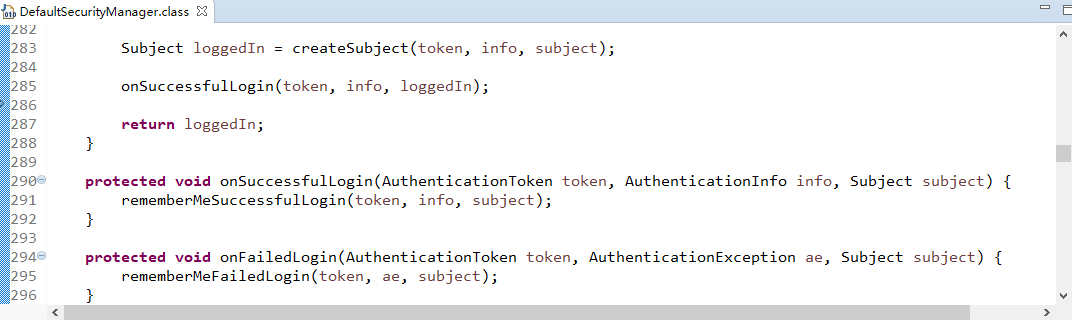
下一步:

下一步:

debug结束,登陆成功。(登陆失败那行没执行)。
下面做个实验,就是,这两个数据库,只要有一个数据库的密码正确就可以正常登陆
首先修改oracle数据库里的密码:(提供一个错误密码)
原密码:

修改密码后,确认、提交事务:

现在启动服务器重新登陆:
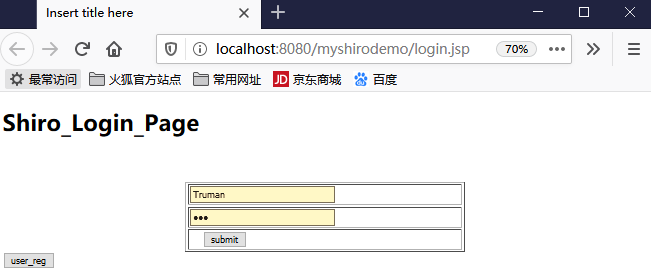
页面可以正常跳转:

看看后台打印:(说明只要还有一个数据库密码正确,就可以正常登陆。)
token_hash:605051412 代码已经来到了:MyShiroRealm授权区域1-----> 通过realm-----没有异常! 代码已经来到了:MyShiroRealm授权区域2-----> 通过realm-----没有异常!
(注:这里得出一个小结论:每次token的hash值都不一样)
再修改mysql数据库密码:
原密码:
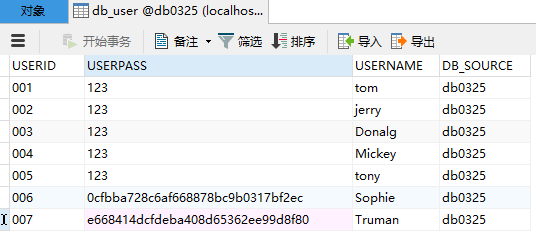
修改后:(一定要保存数据,直接改,记得把对勾勾上)
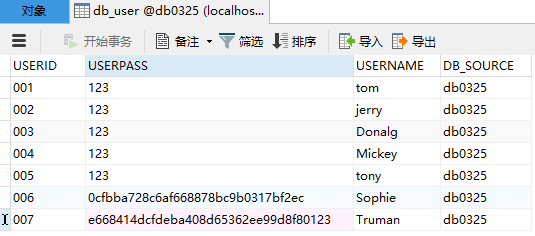
现在重新启动服务器
登陆,需要先登出:
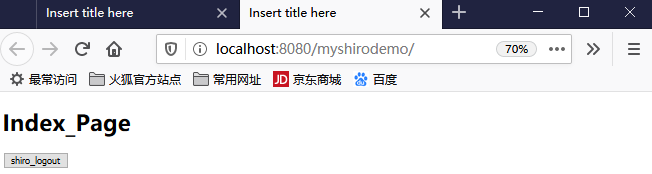
登出后可以接着登陆:

此时提交页面没有跳转:

看一下console:(登陆失败,提示信息很明确)
token_hash:93638115 代码已经来到了:MyShiroRealm授权区域1-----> 通过realm-----没有异常! 代码已经来到了:MyShiroRealm授权区域2-----> 通过realm-----没有异常! 登陆失败...Authentication token of type [class org.apache.shiro.authc.UsernamePasswordToken]
could not be authenticated by any configured realms.
Please ensure that at least one realm can authenticate these tokens.
至此,多个realm的验证结束。
认证策略
AuthenticationStrategy接口的实现类: FirstSuccessfulStrategy:只要有一个Realm验证成功即可,只返回第一个Realm身份验证成功的认证信息,其他的忽略; AtLeastOneSuccessfulStrategy:只要有一个Realm验证成功即可,和FirstSuccessfulStrategy不同,将返回所有Realm身份验证成功的认证信息; AllSuccessfulStrategy:所有Realm验证成功过才算成功,且返回所有Realm身份验证的认证信息,如果有一个失败就失败。
(注:ModularRealmAuthenticator默认使用的是AtLeastOneSuccessfulStrategy策略)
AuthenticationStrategy接口有三个实现类:

认证策略是ModularRealmAuthenticator类的一个属性:

这里之前已经见识过AtLeastOneSuccessfulStrategy策略,AllSuccessfulStrategy也比较容易理解,现在就尝试一下FirstSuccessfulStrategy,看看是什么效果:
在applicationContext.xml里配置:
<!-- 多个realm时需要配置——ModularRealmAuthenticator-->
<bean id ="authenticator" class="org.apache.shiro.authc.pam.ModularRealmAuthenticator">
<property name="realms">
<list>
<ref bean="jdbcRealm"/>
<ref bean="jdbcRealm2"/>
</list>
</property>
<property name="authenticationStrategy">
<bean class="org.apache.shiro.authc.pam.FirstSuccessfulStrategy">
</bean>
</property>
</bean>
情景一:第一个realm不能通过认证,第二个realm可以通过认证:
现在将Oracle的密码修改回正确值(mysql的密码还保持错误):

修改后:

提交事务,重新启动服务器,登陆:
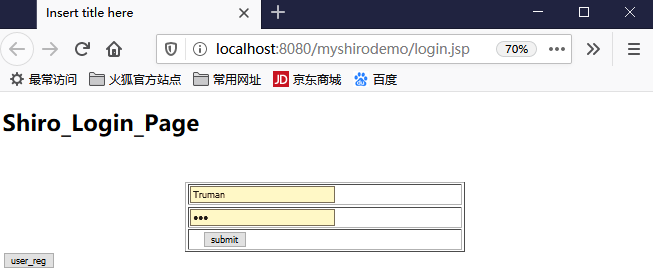
接下来提交,看看跳转及后台的打印情况:

没有问题,第二个realm匹配成功。
再看后台打印:
token_hash:876207976 代码已经来到了:MyShiroRealm授权区域1-----> 通过realm-----没有异常! 代码已经来到了:MyShiroRealm授权区域2-----> 通过realm-----没有异常!
再通过debug看一下认证策略的确改变了:
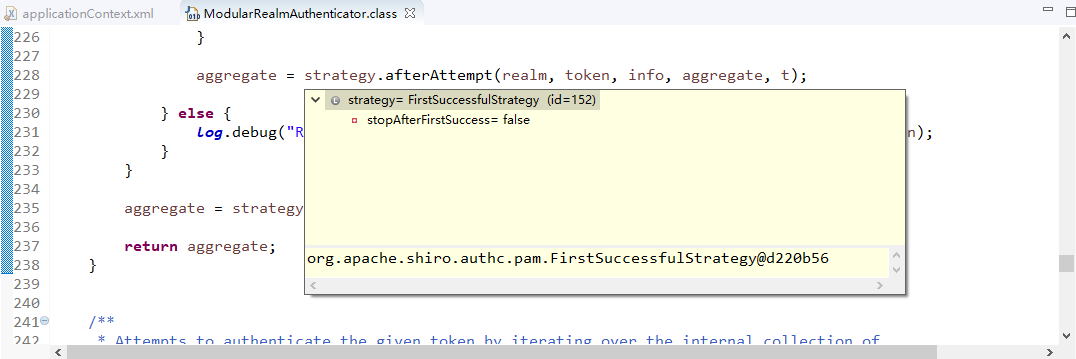
再来看看两个数据库密码都正确的情况:
mysql密码正确:
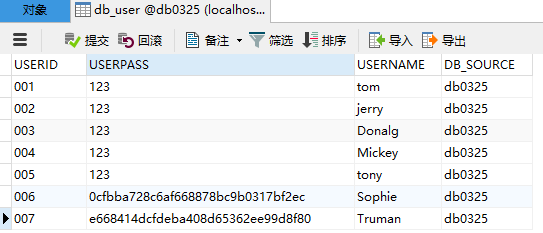
oracle密码正确:

启动服务器:

页面可以正常跳转:

后台打印:(这就有问题了,这不符合FirstSuccessfulStrategy定义,应该第一个认证成功就停才对,不是吗)
token_hash:728085939 代码已经来到了:MyShiroRealm授权区域1-----> 通过realm-----没有异常! 代码已经来到了:MyShiroRealm授权区域2-----> 通过realm-----没有异常!
后台通过反复debug总算得到了答案:
答案在这里,它有个属性这里被默认为false(shiro新版本添加的属性),所以第一次认证realm即使成功还是会接着去认证第二个realm:
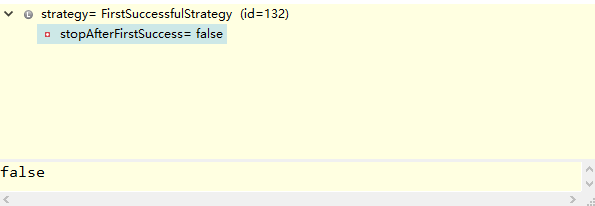
所以这里修改配置文件:
<!-- 多个realm时需要配置——ModularRealmAuthenticator-->
<bean id ="authenticator" class="org.apache.shiro.authc.pam.ModularRealmAuthenticator">
<property name="realms">
<list>
<ref bean="jdbcRealm"/>
<ref bean="jdbcRealm2"/>
</list>
</property>
<property name="authenticationStrategy">
<bean class="org.apache.shiro.authc.pam.FirstSuccessfulStrategy">
<property name="stopAfterFirstSuccess" value="true"></property>
</bean>
</property>
</bean>
通过debug再来看一下改变之后的值:

接着重新登陆,后台打印:(第一次认证成功后就不会接着认证,这才符合定义)
token_hash:583959638 代码已经来到了:MyShiroRealm授权区域1-----> 通过realm-----没有异常!
好啦,至此shiro认证策略的配置切换就完成了。
改变——shiro将realms属性配置给securityManager
之前在applicationContext.xml里是这样配置的:
<!-- 配置securityManager-->
<bean id="securityManager" class="org.apache.shiro.web.mgt.DefaultWebSecurityManager">
<property name="cacheManager" ref="cacheManager" />
<property name="authenticator" ref="authenticator" />
</bean>
<!-- 多个realm时需要配置——ModularRealmAuthenticator-->
<bean id ="authenticator" class="org.apache.shiro.authc.pam.ModularRealmAuthenticator">
<property name="realms">
<list>
<ref bean="jdbcRealm"/>
<ref bean="jdbcRealm2"/>
</list>
</property>
<property name="authenticationStrategy">
<bean class="org.apache.shiro.authc.pam.FirstSuccessfulStrategy">
<property name="stopAfterFirstSuccess" value="true"></property>
</bean>
</property>
</bean>
<!--声明realm-->
<bean id="jdbcRealm" class="com.changping.shiro.realm.MyShiroRealm">
<property name="credentialsMatcher">
<bean
class="org.apache.shiro.authc.credential.HashedCredentialsMatcher">
<property name="hashAlgorithmName" value="MD5"></property>
<property name="hashIterations" value="5000"></property>
</bean>
</property>
</bean>
<bean id="jdbcRealm2" class="com.changping.shiro.realm.MyShiroRealm2">
<property name="credentialsMatcher">
<bean
class="org.apache.shiro.authc.credential.HashedCredentialsMatcher">
<property name="hashAlgorithmName" value="SHA1"></property>
<property name="hashIterations" value="5000"></property>
</bean>
</property>
</bean>
现在需要这样配置:
<!-- 配置securityManager-->
<bean id="securityManager" class="org.apache.shiro.web.mgt.DefaultWebSecurityManager">
<property name="cacheManager" ref="cacheManager" />
<property name="authenticator" ref="authenticator" />
<property name="realms">
<list>
<ref bean="jdbcRealm"/>
<ref bean="jdbcRealm2"/>
</list>
</property>
</bean>
<!-- 多个realm时需要配置——ModularRealmAuthenticator-->
<bean id ="authenticator" class="org.apache.shiro.authc.pam.ModularRealmAuthenticator">
<property name="authenticationStrategy">
<bean class="org.apache.shiro.authc.pam.FirstSuccessfulStrategy">
<property name="stopAfterFirstSuccess" value="true"></property>
</bean>
</property>
</bean>
<!--声明realm-->
<bean id="jdbcRealm" class="com.changping.shiro.realm.MyShiroRealm">
<property name="credentialsMatcher">
<bean
class="org.apache.shiro.authc.credential.HashedCredentialsMatcher">
<property name="hashAlgorithmName" value="MD5"></property>
<property name="hashIterations" value="5000"></property>
</bean>
</property>
</bean>
<bean id="jdbcRealm2" class="com.changping.shiro.realm.MyShiroRealm2">
<property name="credentialsMatcher">
<bean
class="org.apache.shiro.authc.credential.HashedCredentialsMatcher">
<property name="hashAlgorithmName" value="SHA1"></property>
<property name="hashIterations" value="5000"></property>
</bean>
</property>
</bean>
之后重新启动服务器,看一下后台打印:
token_hash:1756812690 代码已经来到了:MyShiroRealm授权区域1-----> 通过realm-----没有异常!
看来效果一样,这样配置有什么好处呢?
因为接下来的操作和securityManager有关,需要从securityManager里获得realms属性。
那么为什么这样配置也可以起到效果呢?
debug走起
在这里打一个断点(从现在开始都是FirstSuccessfulStrategy策略了):
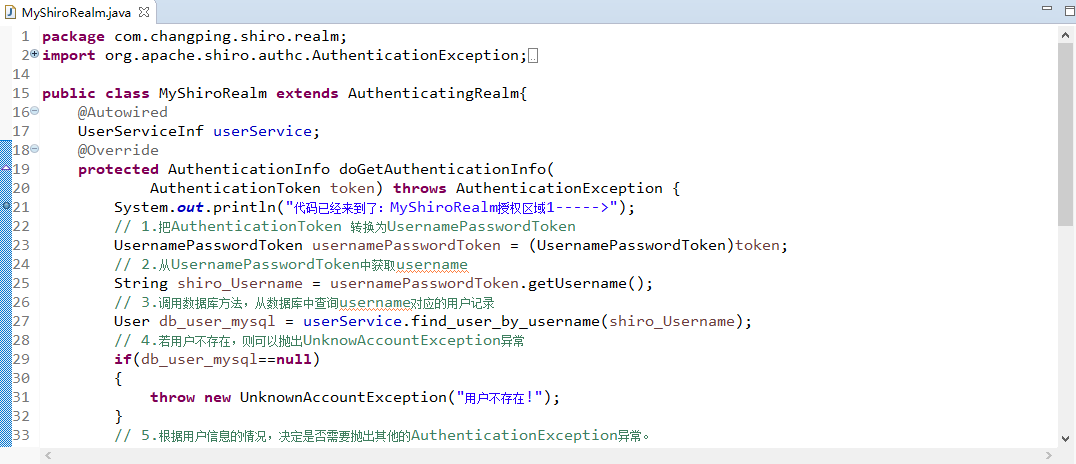
在Debug中点击高亮,可以看到SecurityManager里的确用到了authenticator里的方法:
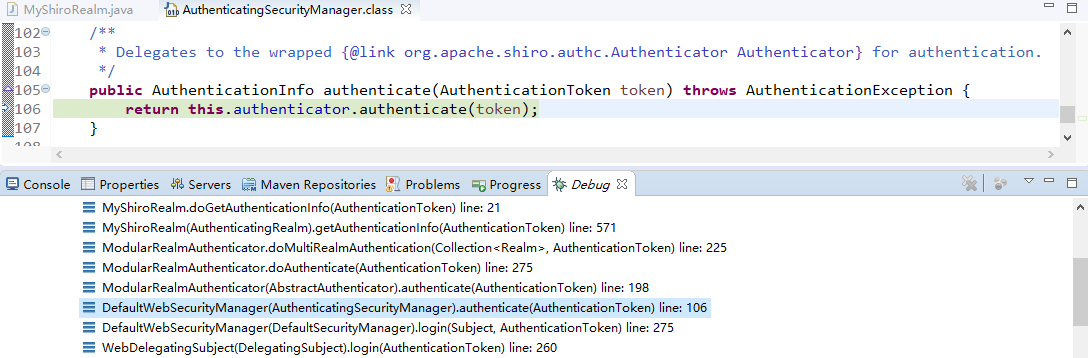
再点击高亮部分,可以看到getRealms方法:
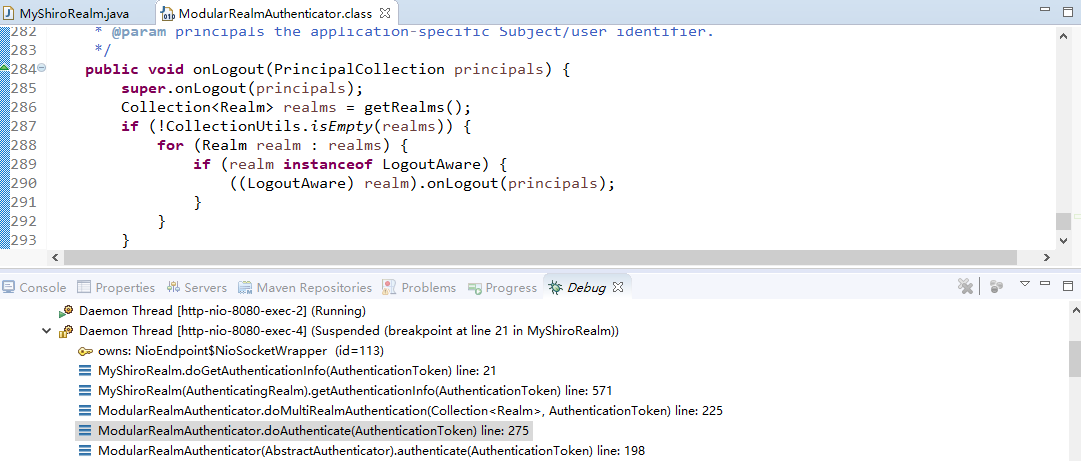
再点击这个方法,看它属于ModularRealmAuthenticator类:

既然这个getRealms方法属于ModularRealmAuthenticator,而realms分明配置在SecurityManager里,那么ModularRealmAuthenticator又是怎么获得realms,然后交给SecurityManager呢?
在这里加上一个断点,看看realms从哪来:
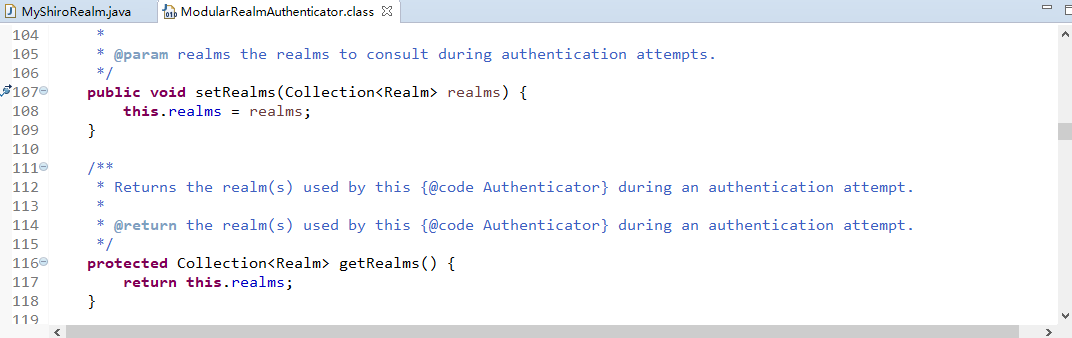
就是这里SecurityManager里有一个方法afterRealmsSet(),这个方法可以获得authenticator里的realms。(authenticator是ModularRealmAuthenticator实例)

debug结束。
其中大体过程:

以上就是realms是如何传递给SecurityManager的具体分析。
shiro授权
授权: 又叫访问控制,即在应用中控制谁可以访问哪些资源(如访问页面/编辑数据/页面操作等)。 在授权中需要了解的几个关键对象:主体(Subject)、资源(Resource)、权限(Permissio)、角色(Role)。 主体(Subject): 访问应用的用户,在Shiro中使用Subject代表该用户,用户只有授权后才允许访问相应的资源。 资源(Resource): 在应用中用户可以访问的URL,比如访问JSP页面、查看/编辑某些数据、访问某些业务方法、打印文本等都是资源,用户只有授权之后才可以访问。 权限(Permission): 安全策略中的原子授权单位,通过权限我们可以表示在应用中用户有没有操作某个资源的权力。即权限表示在应用中用户能不能访问某额资源, 如访问用户列表页面查看/新增/修改/删除用户数据(即很多时候都是CRUD式的权限控制)等。权限代表了用户有没有操作某个资源的权力, 即反应在某个资源上的操作允不允许。Shiro支持粗粒度权限(如用户模块的所有权限)和细粒度权限(操作某个用户的权限,即实例级别)。 角色(Role): 权限的集合,一般情况下会赋予用户角色而不是权限,即这样用户可以拥有一组权限,赋予权限时比较方便,典型的如: 项目经理、技术总监、CTO、开发工程师等都是角色,不同的角色拥有一组不同的权限。
shiro支持三种授权方式
编程式:通过写if/esle授权代码块完成 if(subject.hasRole("admin"))
{//有权限}
else{//无权限}
注解式:通过在执行的java方法上放置相应的注解完成(controller、service层),没有权限将抛出相应的异常
@RequiresRoles(”admin“) public void hello(){//有权限}
jsp/gsp标签:在页面用相应的标签完成 <shiro:hasRole name="admin"> <!--有权限--> </shiro:hasRole>
Shiro里默认拦截器
package org.apache.shiro.web.filter.mgt; import org.apache.shiro.util.ClassUtils; import org.apache.shiro.web.filter.authc.*; import org.apache.shiro.web.filter.authz.*; import org.apache.shiro.web.filter.session.NoSessionCreationFilter; import javax.servlet.Filter; import javax.servlet.FilterConfig; import javax.servlet.ServletException; import java.util.LinkedHashMap; import java.util.Map; /** * Enum representing all of the default Shiro Filter instances available to web applications. Each filter instance is * typically accessible in configuration the {@link #name() name} of the enum constant. * @since 1.0 */ public enum DefaultFilter { anon(AnonymousFilter.class), authc(FormAuthenticationFilter.class), authcBasic(BasicHttpAuthenticationFilter.class), authcBearer(BearerHttpAuthenticationFilter.class), logout(LogoutFilter.class), noSessionCreation(NoSessionCreationFilter.class), perms(PermissionsAuthorizationFilter.class), port(PortFilter.class), rest(HttpMethodPermissionFilter.class), roles(RolesAuthorizationFilter.class), ssl(SslFilter.class), user(UserFilter.class);
private final Class<? extends Filter> filterClass; private DefaultFilter(Class<? extends Filter> filterClass) { this.filterClass = filterClass; } public Filter newInstance() { return (Filter) ClassUtils.newInstance(this.filterClass); } public Class<? extends Filter> getFilterClass() { return this.filterClass; } public static Map<String, Filter> createInstanceMap(FilterConfig config) { Map<String, Filter> filters = new LinkedHashMap<String, Filter>(values().length); for (DefaultFilter defaultFilter : values()) { Filter filter = defaultFilter.newInstance(); if (config != null) { try { filter.init(config); } catch (ServletException e) { String msg = "Unable to correctly init default filter instance of type " + filter.getClass().getName(); throw new IllegalStateException(msg, e); } } filters.put(defaultFilter.name(), filter); } return filters; } }
身份验证相关
authc: 基于表单的拦截器:如/**=authc,如果没有登陆会跳到相应的登陆页面登陆;
主要属性: usernameParam:表单提交的用户名参数名(username); passwordParam:表单提交的密码参数名(password); rememberMeParam:表单提交的密码参数名(rememberMe); loginUrl:登陆页面地址(/login.jsp); successUrl:登陆成功后的默认重定向地址; failureKeyAttribute:登陆失败后错误信息存储key(shiroLoginFailure); authcBasic Basic HTTP身份验证拦截器,
主要属性: applicationName:弹出登陆框显示的信息(application); logout 退出拦截器,
主要属性:redirectUrl:退出成功后重定向的地址(/);示例:/logout=logout user
用户拦截器,
用户已经身份验证/记住我登陆;示例:/**=user anon
匿名拦截器即不需要登陆即可访问;一般用于静态资源过滤;示例:/static/**=anon
授权相关
roles角色授权拦截器,验证用户是否拥有所有角色; 主要属性: loginUrl:登陆页面地址(/login.jsp); unauthorizedUrl:未授权后重定向的地址; 示例:/admin/**=role[admin] perms权限授权拦截器,验证用户是否拥有所有权限;
属性和roles一样:
示例:/user/**=perms["user:create"] port端口拦截器,
主要属性:port(80):可以通过的端口;示例:/test=port[80],如果用户访问该页面不是80端口,将自动把请求端口改为80并重定向到该80端口,其他路径/参数也一样。
rest风格拦截器,自动根据请求方法构建权限字符串。(GET=read,POST=create,PUT=update,DELETE=delete,HEAD=read,TRACE=read,OPTIONS=read,MKCOL=creat); 示例:/users=rest[uster],会自动拼出"user:read,user:create,user:update,user:delete" ,权限字符串进行权限匹配(所有都需要匹配,isPermittedAll); ssl拦截器,
只有请求协议式https才能通过;否则自动跳转为https端口(443);其它和port拦截器一样。
好啦,授权行动正式开始
回到项目里在webapp里新建admin_Unique.jsp(管理员)和user_Unique.jsp(用户):
目的是只有管理员权限得人才能访问admin_Unique.jsp,拥有用户权限的人才能够访问user_Unique.jsp
admin_Unique.jsp
<%@ page language="java" contentType="text/html; charset=UTF-8" pageEncoding="UTF-8"%> <!DOCTYPE html PUBLIC "-//W3C//DTD HTML 4.01 Transitional//EN" "http://www.w3.org/TR/html4/loose.dtd"> <html> <head> <meta http-equiv="Content-Type" content="text/html; charset=UTF-8"> <title>Insert title here</title> </head> <body> <h1>Admin_Unique_Page</h1> </body> </html>
user_Unique.jsp
<%@ page language="java" contentType="text/html; charset=UTF-8" pageEncoding="UTF-8"%> <!DOCTYPE html PUBLIC "-//W3C//DTD HTML 4.01 Transitional//EN" "http://www.w3.org/TR/html4/loose.dtd"> <html> <head> <meta http-equiv="Content-Type" content="text/html; charset=UTF-8"> <title>Insert title here</title> </head> <body> <h1>User_Unique_Page</h1> </body> </html>
接着在list.jsp里添加两个按钮,可以到达这个两个页面。
list.jsp
<%@ page language="java" contentType="text/html; charset=UTF-8" pageEncoding="UTF-8"%> <!DOCTYPE html PUBLIC "-//W3C//DTD HTML 4.01 Transitional//EN" "http://www.w3.org/TR/html4/loose.dtd"> <html> <head> <meta http-equiv="Content-Type" content="text/html; charset=UTF-8"> <title>Insert title here</title> </head> <body> <h1>Shiro_List_Page</h1> <button onclick="add_user()">add_user</button> <button onclick="goto_user_Unique()">goto_user_Unique</button> <button onclick="goto_admin_Unique()">goto_admin_Unique</button> </body> <script type="text/javascript"> function add_user() { window.location.href="add_user.jsp"; } function goto_user_Unique() { window.location.href="user_Unique.jsp"; } function goto_admin_Unique() { window.location.href="admin_Unique.jsp"; } </script> </html>
现在重新启动服务器,在登陆之后,这两个页面可以直接访问。
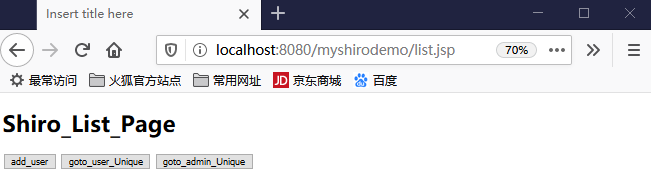
点击中间goto_user_Unique按钮:
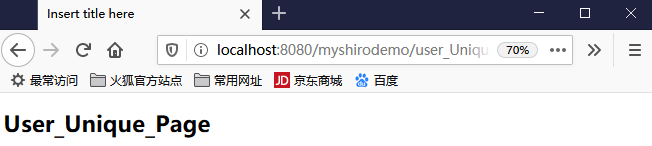
点击右边goto_admin_Unique按钮:
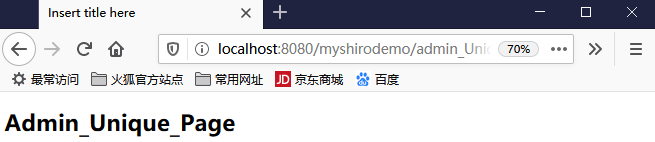
好,基础代码没有问题,现在给它们加一个权限控制。
applicationContext.xml(节选)
<bean id="ShiroFilter" class="org.apache.shiro.spring.web.ShiroFilterFactoryBean"> <property name="securityManager" ref="securityManager" /> <property name="loginUrl" value="/login.jsp" /> <property name="successUrl" value="/list.jsp" /> <property name="unauthorizedUrl" value="/unauthorized.jsp" /> <property name="filterChainDefinitions"> <value> /login.jsp = anon /shiro_login = anon /add_user.jsp = anon /add_user =anon /shiro_logout = logout /user_Unique.jsp= roles[user] /admin_Unique.jsp = roles[admin] # everything else requires authentication: /** = authc </value> </property> </bean>
权限控制:就是如果没有满足某种要求就去访问这两个页面,那么就是没有权限,没有权限就会跳到unauthorizedUrl.jsp
修改后刷新页面即可,不需要重启服务器,然后访问这两个页面:

点击submit:
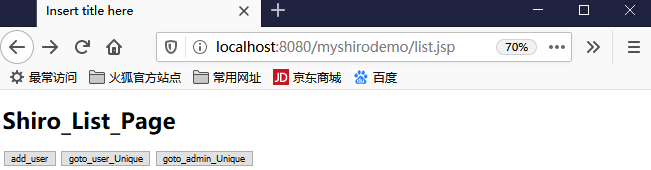
点击中间goto_user_Unique按钮:
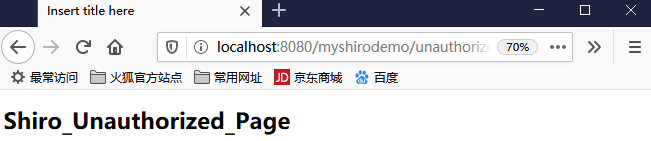
点击右边goto_admin_Unique按钮:

可以看到,在加入权限校验之后,这两个页面都暂无权限访问,因为这个用户没有授权。
所以接下来需要给访问者授权
1.授权需要继承AuthorizingRealm抽象类,并实现其doGetAuthorizationInfo方法 2.AuthorizingRealm抽象类继承自AuthenticatingRealm,但没有实现AuthenticatingRealm中的doGetAuthenticationInfo, 所以认证和授权只需要继承AuthorizingRealm,并同时实现两个抽象方法即可。
接着就建一个类看一下这两个抽象方法:
AuthorizingRealm_Sub.java
package com.changping.shiro.realm; import org.apache.shiro.authc.AuthenticationException; import org.apache.shiro.authc.AuthenticationInfo; import org.apache.shiro.authc.AuthenticationToken; import org.apache.shiro.authz.AuthorizationInfo; import org.apache.shiro.realm.AuthorizingRealm; import org.apache.shiro.subject.PrincipalCollection; public class AuthorizingRealm_Sub extends AuthorizingRealm{ /** * 该方法用于授权 */ @Override protected AuthorizationInfo doGetAuthorizationInfo(PrincipalCollection principals) { return null; } /** * 该方法用于认证 */ @Override protected AuthenticationInfo doGetAuthenticationInfo(AuthenticationToken token) throws AuthenticationException { return null; } }
接着看一个示例,就是最初的Quickstark.java,里面有一个hasRole方法用于授权:
点进去:
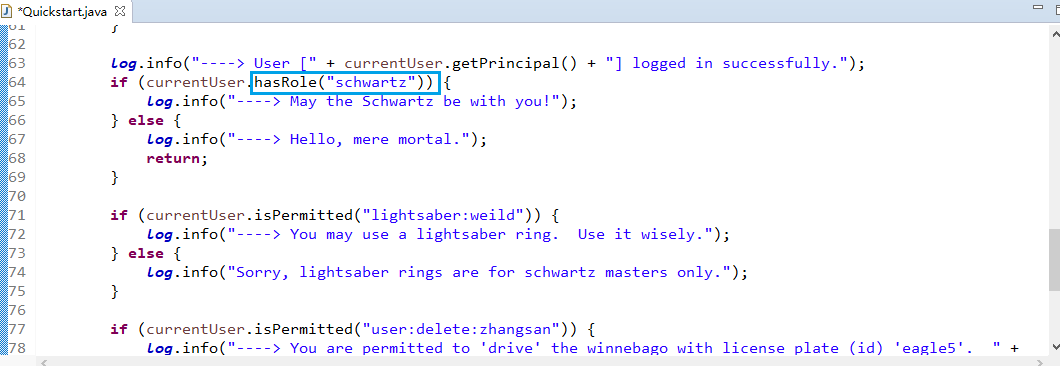
ctrl来看它所属的实现体系:

这里可以查看它所属体系:
可以看到ModularRealmAuthorizer里,对realms进行遍历,然后判断,如果有一个realm授权成功就返回true。
最后,虽然会经过ModularRealmAuthorizer,但最终还是会来到AuthorizingRealm里,然后调用getAuthorizationInfo方法:
现在需要,将MyShiroRealm的父类换成AuthorizingRealm抽象类:
package com.changping.shiro.realm; import org.apache.shiro.authc.AuthenticationException; import org.apache.shiro.authc.AuthenticationInfo; import org.apache.shiro.authc.AuthenticationToken; import org.apache.shiro.authc.LockedAccountException; import org.apache.shiro.authc.SimpleAuthenticationInfo; import org.apache.shiro.authc.UnknownAccountException; import org.apache.shiro.authc.UsernamePasswordToken; import org.apache.shiro.authz.AuthorizationInfo; import org.apache.shiro.realm.AuthorizingRealm; import org.apache.shiro.subject.PrincipalCollection; import org.apache.shiro.util.ByteSource; import org.springframework.beans.factory.annotation.Autowired; import com.changping.shiro.pojo.User; import com.changping.shiro.service.UserServiceInf; public class MyShiroRealm extends AuthorizingRealm {//替换原来的AuthenticatingRealm @Autowired UserServiceInf userService; @Override protected AuthenticationInfo doGetAuthenticationInfo(AuthenticationToken token) throws AuthenticationException { System.out.println("代码已经来到了:MyShiroRealm授权区域1----->"); // 1.把AuthenticationToken 转换为UsernamePasswordToken UsernamePasswordToken usernamePasswordToken = (UsernamePasswordToken) token; // 2.从UsernamePasswordToken中获取username String shiro_Username = usernamePasswordToken.getUsername(); // 3.调用数据库方法,从数据库中查询username对应的用户记录 User db_user_mysql = userService.find_user_by_username(shiro_Username); // 4.若用户不存在,则可以抛出UnknowAccountException异常 if (db_user_mysql == null) { throw new UnknownAccountException("用户不存在!"); } // 5.根据用户信息的情况,决定是否需要抛出其他的AuthenticationException异常。 if ("002".equals(db_user_mysql.getUserid())) { System.out.println("LockedAccountException:" + db_user_mysql.getUserid()); throw new LockedAccountException("用户已被锁定!"); } else { System.out.println("通过realm-----没有异常!"); } /* * 6.根据用户的情况,来构建AuthenticationInfo对象并返回,通常使用的方法为: * SimpleAuthenticationInfo以下信息是从数据库中获取: */ // 1、认证的实体信息,可以是username,也可以是数据表对应的用户的实体类对象User。 // 2、密码 // 3、盐的计算结果,使用接口ByteSource的内部类Util里的bytes方法。所以说接口里可以有内部类,这个内部类是个final类。 // 4、当前realm对象的name,调用父类的getName()方法即可。 Object principal = db_user_mysql.getUsername(); Object hashedCredentials = db_user_mysql.getUserpass(); ByteSource credentialsSalt = ByteSource.Util.bytes(db_user_mysql.getUserid());// 用数据库中userid作为盐。 String realmName = getName(); SimpleAuthenticationInfo info = null; /* new SimpleAuthenticationInfo(principal, credentials, realmName); */ info = new SimpleAuthenticationInfo(principal, hashedCredentials, credentialsSalt, realmName); return info; } /** * 授权时,可以继承AuthorizingRealm抽象类 */ @Override protected AuthorizationInfo doGetAuthorizationInfo(PrincipalCollection principals) { System.out.println("访问了需要授权的页面,开始授权......"); // 1.从PrincipalCollection中来获取登陆用户的信息 // 2.利用登陆的用户的信息来获取当前用户的角色或权限(可能需要查询数据库) // 3.创建SimpleAuthorizationInfo,并设置其realms属性 // 4.返回SimpleAuthorizationInfo对象 return null; } }
在上面的方法中可以写一个输出,然后看看通过浏览器访问的时候,会不会走这个方法:
现在刷新浏览器访问之前的jsp看看是否走授权的方法:

然后点击中间按钮:
可以看到页面跳转:

可以看一下后台打印:
token_hash:1153456082 代码已经来到了:MyShiroRealm授权区域1-----> 通过realm-----没有异常! 访问了需要授权的页面,开始授权......
说明的确走了这个方法。
接下来接着写授权里的代码:
第一步获得principal,可以从这个方法点进去:
Object principal = principals.getPrimaryPrincipal();
可以看到这个方法,ctr+t
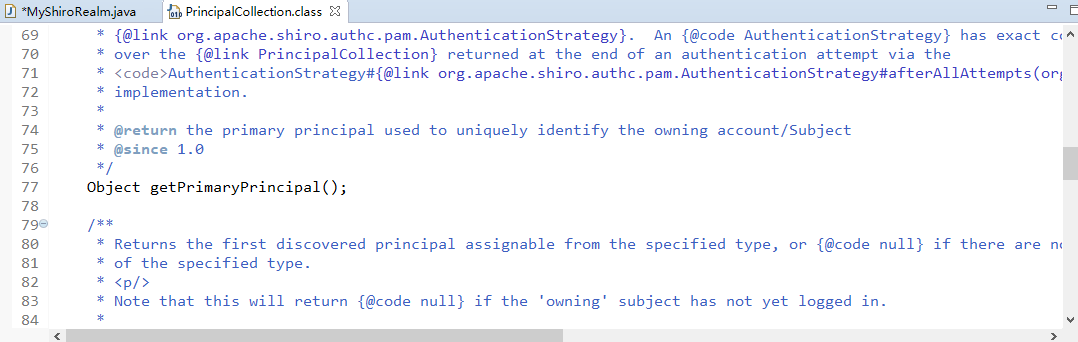
看它的实现:

然后点击中间的类:
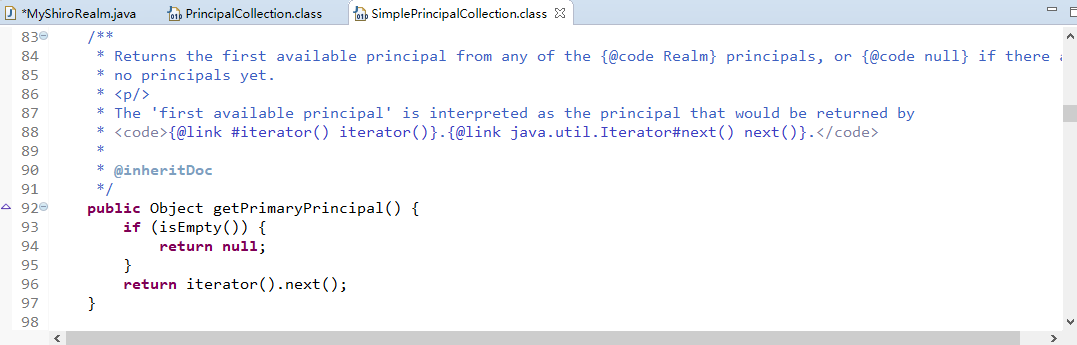
然后点击iterator方法:
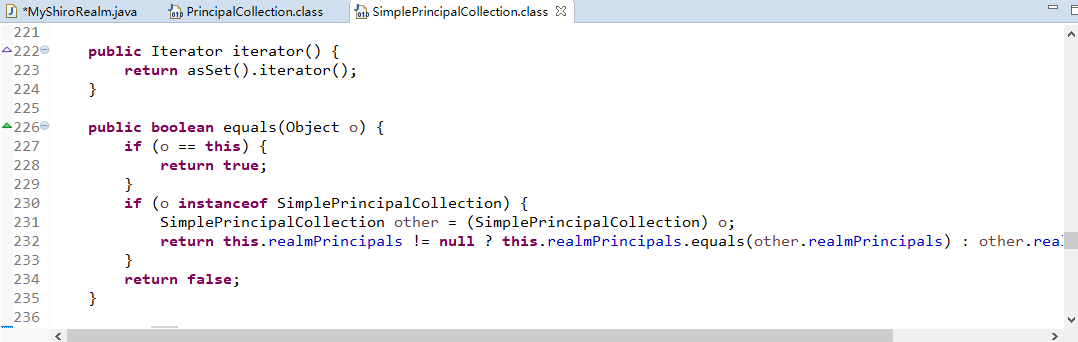
点击asSet():
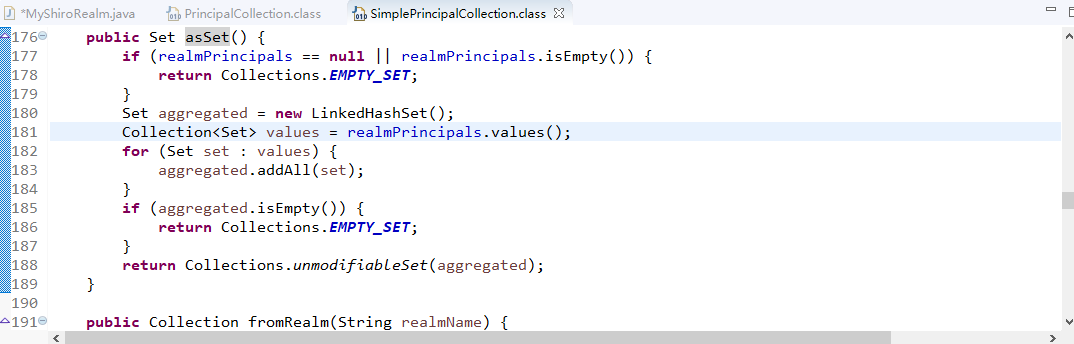
可以看到Collection<Set> values = realmPrincipals.values();
这里可以看看realmPrincipals结构,在第177行加一个断点:
debug:

以上过程可以得出结论,就是肯定获得的principal是有一定顺序,也一定是获得第一个principal。
接下来,需要在数据库里添加一个角色——role
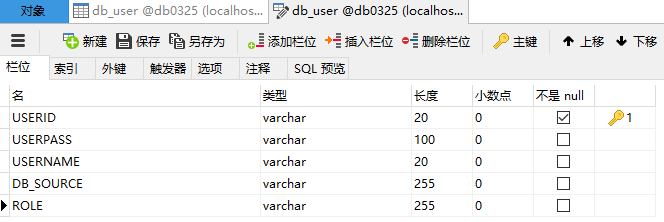
修改User
package com.changping.shiro.pojo; public class User { private String userid; private String userpass; private String username; private String db_source; private String role; public String getUserid() { return userid; } public void setUserid(String userid) { this.userid = userid; } public String getUserpass() { return userpass; } public void setUserpass(String userpass) { this.userpass = userpass; } public String getUsername() { return username; } public void setUsername(String username) { this.username = username; } public String getDb_source() { return db_source; } public void setDb_source(String db_source) { this.db_source = db_source; } public String getRole() { return role; } public void setRole(String role) { this.role = role; } public User(String userid, String userpass, String username, String db_source,String role) { super(); this.userid = userid; this.userpass = userpass; this.username = username; this.db_source = db_source; this.role = role; } //三参构造器,用于增加用户 public User(String userid, String userpass, String username) { super(); this.userid = userid; this.userpass = userpass; this.username = username; } public User() { super(); } @Override public String toString() { return "User [userid=" + userid + ", userpass=" + userpass + ", username=" + username + ", db_source=" + db_source + ", role=" + role + "]"; } }
接着修改UserServiceImp,给mysql数据库里的用户随机插入角色:
package com.changping.shiro.service; import org.springframework.beans.factory.annotation.Autowired; import org.springframework.stereotype.Service; import com.changping.shiro.dao.mysqldao.UserMapper; import com.changping.shiro.pojo.User; @Service public class UserServiceImp implements UserServiceInf { @Autowired UserMapper userMapper; @Override public User find_user_by_username(String username) { User user = userMapper.select_user_by_username(username); return user; } @Override public int add_user(User add_user) { //声明随机数[1,3),如果是1就是admin,如果是2就user。 int a = 1; int b = 3; int num = (int)(Math.random()*(b-a))+a; String random_role = null; if(num == 1) { random_role = "admin"; } else { random_role = "user"; } add_user.setRole(random_role); int insert_result = userMapper.insert_user(add_user); return insert_result; } }
不需要管oracle,因为认证策略是FirstSuccessfulStrategy,所以这里不需要考虑oracle,认证也不需要考虑,因为只要有一个认证成功即可。
修改:
UserMapper.xml
<?xml version="1.0" encoding="UTF-8"?> <!DOCTYPE mapper SYSTEM "http://mybatis.org/dtd/mybatis-3-mapper.dtd" > <mapper namespace="com.changping.shiro.dao.mysqldao.UserMapper"> <select id="select_user_by_username" parameterType="String" resultType="com.changping.shiro.pojo.User"> select * from db_user where username = #{username} </select> <insert id="insert_user" parameterType="com.changping.shiro.pojo.User"> insert into db_user (userid,userpass,username,db_source,role) values (#{userid},#{userpass},#{username},DATABASE(),#{role}); </insert> </mapper>
接下来修改授权代码(从数据库中获得role进行校验,普通用户默认向role对象里添加user,如果判断数据库里的字段role是admin,则向对象role再添加一个admin):
/** * 授权时,可以继承AuthorizingRealm抽象类 */ @Override protected AuthorizationInfo doGetAuthorizationInfo(PrincipalCollection principals) { System.out.println("访问了需要授权的页面,开始授权......"); // 1.从PrincipalCollection中来获取登陆用户的用户名 Object principal = principals.getPrimaryPrincipal(); // 2.利登陆的用户的信息来获取当前用户的角色或权限(需要查询数据库) User db_user_mysql = userService.find_user_by_username((String)principal); Set<String> role = new HashSet<String>(); role.add("user"); if("admin".equals(db_user_mysql.getRole())) { role.add("admin"); } // 3.创建SimpleAuthorizationInfo,并设置其realms属性 SimpleAuthorizationInfo info = new SimpleAuthorizationInfo(role); // 4.返回SimpleAuthorizationInfo对象 return info; }
现在可以向数据库里添加一条用户数据008、paul、123:
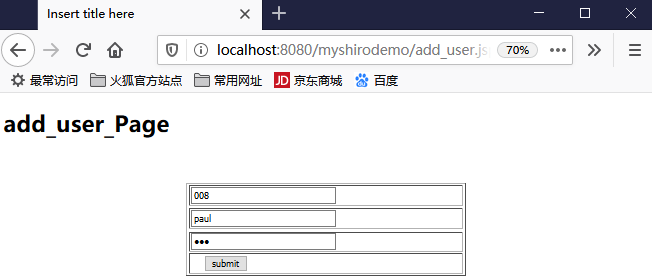
可以看到数据库里已经有值了(我同时修改了其它两个role):
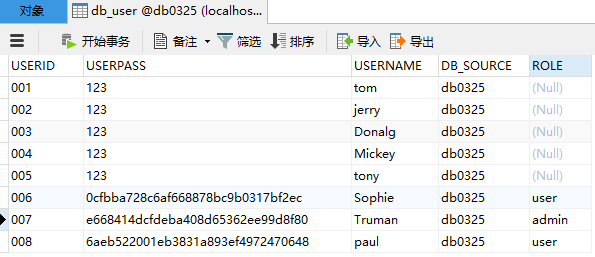
oracle数据库:(不给角色也可以,mysql即可提供角色)

现在可以通过paul来进行登陆:

然后跳转,点击中间按钮:

现在可以debug看一下,我要向hashset是否可以看到某个角色:
首先看principal里的值:
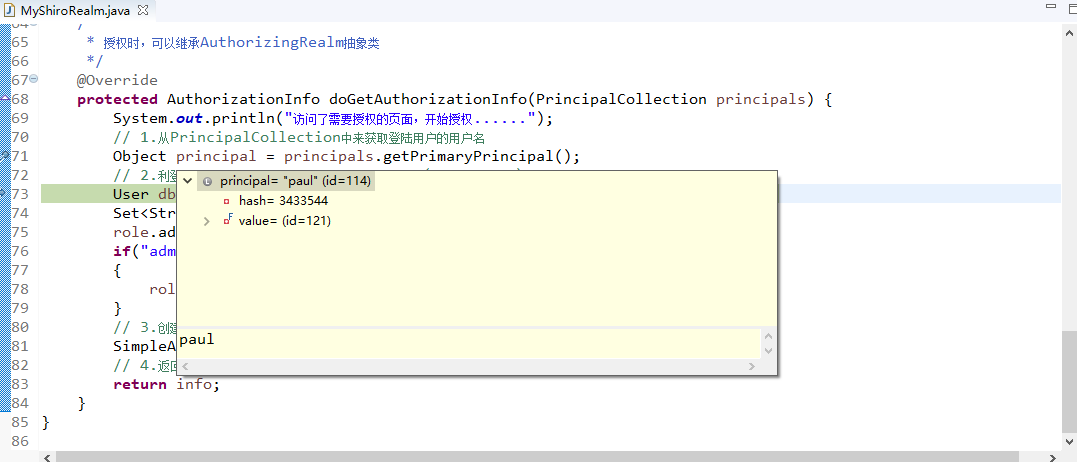
接着看一下hahset里的值:
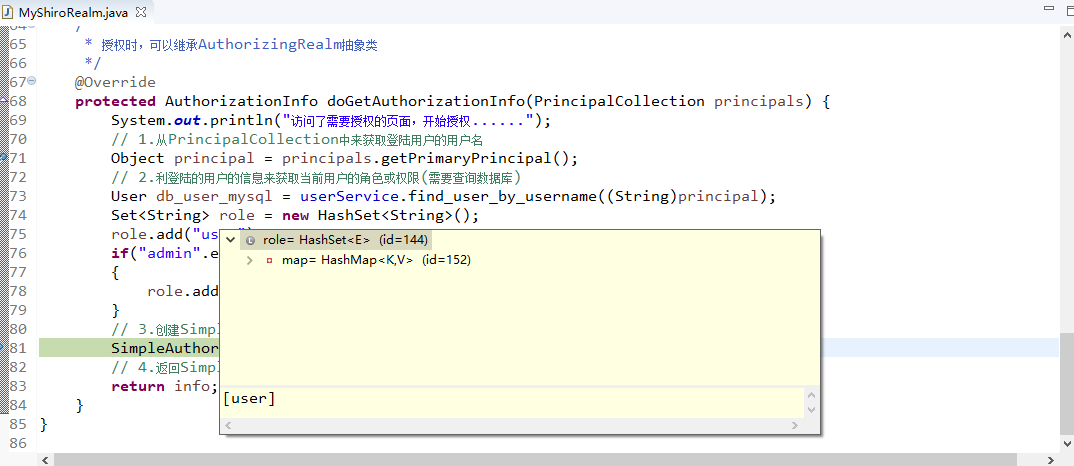
可以看一下:
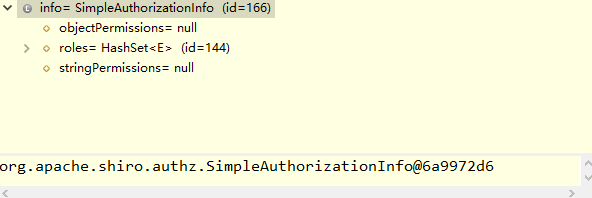
接着可以给debug放行,看看是否可以到user页面(可以):
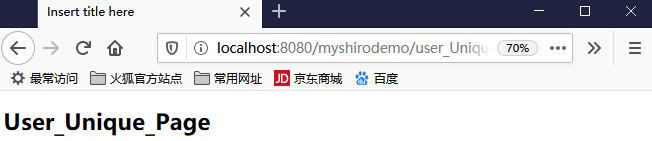
再回头点击右边按钮:

可以看到,没有访问权限:
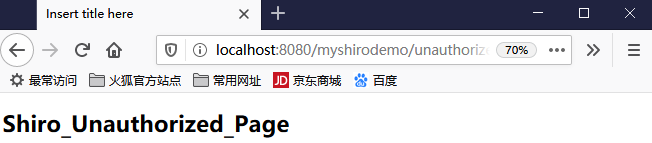
没有问题,如果是带有admin角色的用户访问呢?
现在用Truman来登陆,他是admin:

现在点击中间按钮:

可以debug看看:
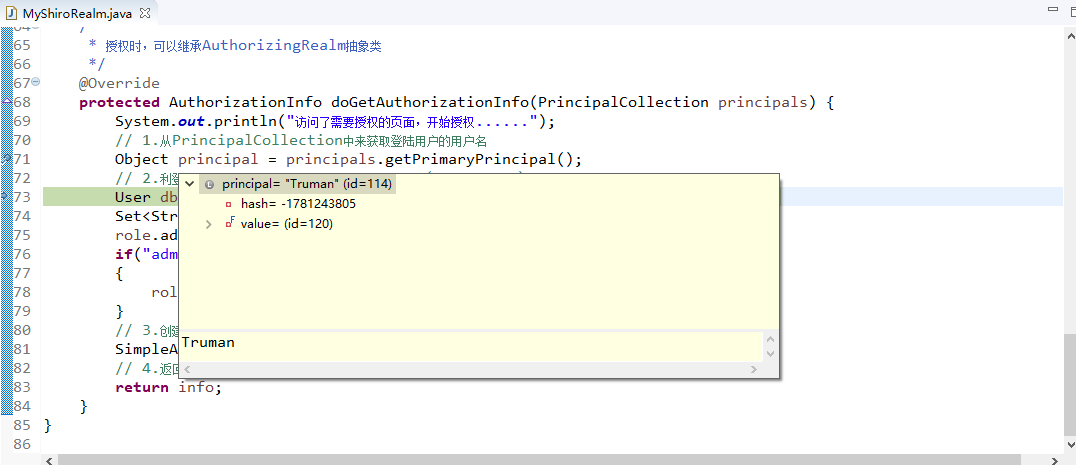
再看一下有哪些角色:
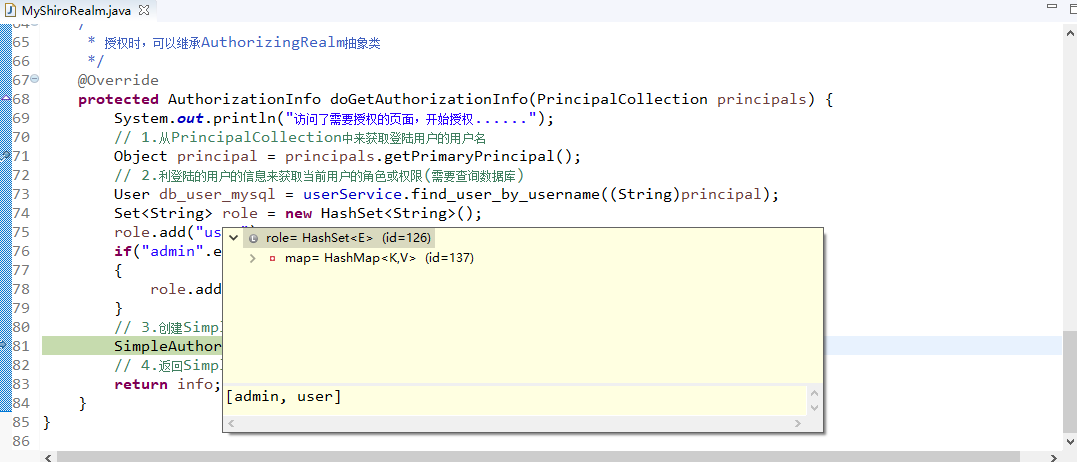
好啦,给断点放行看看能不能跳转到用户页面(可以):

再回来点击右边按钮:
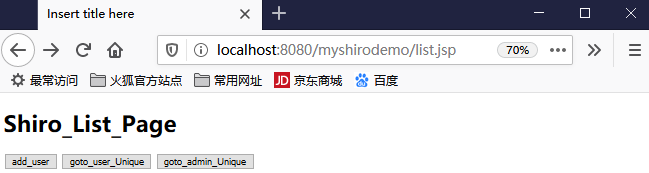
可以看到,也能够跳转到admin页:
说明admin可以同时跳转到两种页面,user只能访问user页面。
好啦以上就是授权过程。
shiro标签——显示对应权限的页面
shiro提供了JSTL标签用于再JSP页面进行权限控制,如根据登陆用户信息显示相应的页面按钮。
guest标签:用户没有身份验证时显示的相应信息,即游客访问信息:
<shiro:guest> 欢迎游客访问,<a href = "login.jsp">登陆</a> <shiro:guest>
user标签:用户已经经过认证/记住我登陆后显示相应的信息。
<shiro:user> 欢迎[<shiro:principal/>]登陆,<a href = "logout">退出</a> <shiro:user>
authenticated标签:用户已经身份验证通过,即Subject.login登陆成功,不是记住我登陆
<shiro:authenticated> 用户[<shiro:principal/>]已身份验证通过 </shiro:authenticated>
notAuthenticated标签:用户未进行身份验证,即没有调用Subject.login进行登陆(包括记住我登陆也属于未进行身份验证)。
<shiro:notAuthenticated>
未身份验证(包括记住我)
</shiro:notAuthenticated>
principal标签:显示用户身份信息,默认调用Subject.getPrincipal()获取,即Primary Principal。
<shiro:principal property = "username"/>
hasRole标签:如果当前Subject有角色将显示body体内容:
<shiro:hasRole name="admin"> 用户[<shiro:principal/>]拥有角色admin </shiro:hasRole>
hasAnyRoles标签:如果当前Subject有任意一个角色(或关系)将显示body体内容。
<shiro:hasAnyRoles name ="admin,user"> 用户[<shiro:principal/>]拥有角色admin或user </shiro:hasAnyRoles>
lacksRole:如果当前Subject没有角色将显示body体内容
<shiro:lacksRole name="admin">
用户[<shiro:principal/>] 没有角色admin
</shiro:lacksRole>
hasPermission:如果当前Subject有权限将显示body体内容
<shiro:hasPermission name="user:create"> 用户[<shiro:principal/>]拥有权限user:create </shiro:hasPermission>
lacksPermission:如果当前Subject没有权限将显示body体内容。
<shiro:lacksPermission name="org:create"> 用户[<shiro:principal/>]没有权限org:create </shiro:lacksPermission>
接下来使用shiro标签
首先需要去list.jsp导入标签:
有必要先看一下最原始的list.jsp
<%@ page language="java" contentType="text/html; charset=UTF-8" pageEncoding="UTF-8"%> <!DOCTYPE html PUBLIC "-//W3C//DTD HTML 4.01 Transitional//EN" "http://www.w3.org/TR/html4/loose.dtd"> <html> <head> <meta http-equiv="Content-Type" content="text/html; charset=UTF-8"> <title>Insert title here</title> </head> <body> <h1>Shiro_List_Page</h1> <button onclick="add_user()">add_user</button> <button onclick="goto_user_Unique()">goto_user_Unique</button> <button onclick="goto_admin_Unique()">goto_admin_Unique</button> </body> <script type="text/javascript"> function add_user() { window.location.href="add_user.jsp"; } function goto_user_Unique() { window.location.href="user_Unique.jsp"; } function goto_admin_Unique() { window.location.href="admin_Unique.jsp"; } </script> </html>
再做修改:
<%@ page language="java" contentType="text/html; charset=UTF-8" pageEncoding="UTF-8"%> <%@ taglib uri="http://shiro.apache.org/tags" prefix="shiro" %> <!DOCTYPE html PUBLIC "-//W3C//DTD HTML 4.01 Transitional//EN" "http://www.w3.org/TR/html4/loose.dtd"> <html> <head> <meta http-equiv="Content-Type" content="text/html; charset=UTF-8"> <title>Insert title here</title> </head> <body> <h1>Shiro_List_Page</h1> Welcome:<shiro:principal></shiro:principal> <button onclick="add_user()">add_user</button> <shiro:hasRole name="user"> <button onclick="goto_user_Unique()">goto_user_Unique</button> </shiro:hasRole> <shiro:hasRole name="admin"> <button onclick="goto_admin_Unique()">goto_admin_Unique</button> </shiro:hasRole> </body> <script type="text/javascript"> function add_user() { window.location.href="add_user.jsp"; } function goto_user_Unique() { window.location.href="user_Unique.jsp"; } function goto_admin_Unique() { window.location.href="admin_Unique.jsp"; } </script> </html>
现在启动服务器/刷新浏览器:
先用Truman登陆,看看有什么效果:

看一下都会显示哪些按钮,这里显示Truman可以同时访问admin、user:
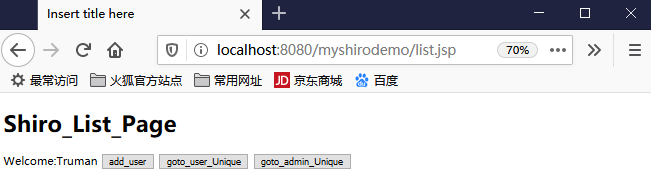
重启服务器,再用paul登陆看看
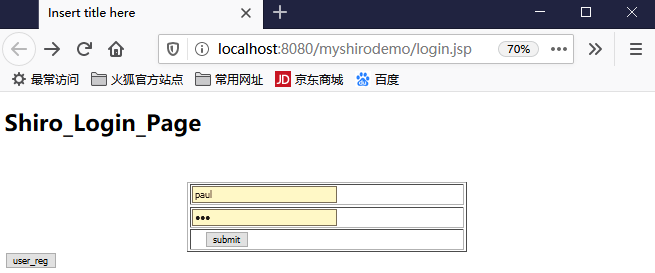
显示paul只能看user页面,很神奇吧:

好啦,以上就是shiro标签的基本使用,感兴趣的话可以再试试其它几个标签吧。
shiro权限注解
@RequiresAuthentication:表示当前Subject已经通过login进行了身份验证:即Subject.isAuthenticated()返回true
@RequiresUser:表示当前Subject已经身份验证或者通过记住我登陆。
@RequiresGuest:表示当前Subject没有身份验证或通过记住我登陆过,即使游客身份。
@RequiresRoles(value={"admin","user"},logical=Logical.AND):表示当前Subject需要角色admin和user
@RequiresPermissions(value={"user:a","user:b"},logical=Logical.OR):表示当前Subject需要权限user:a或user:b。
以上注解可以放到Controller和Service层都可以。
接下来实际操作一下:
在控制层里添加一个方法,还有权限注解:
ShiroController.java(节选)
@RequiresRoles({"admin"})
@RequestMapping("only_admin_can_visit")
public String only_admin_can_visit()
{
System.out.println("only_admin_can_visit<-----test----->");
return "redirect:/list.jsp";
}
然后在list.jsp里添加一个按钮:
<%@ page language="java" contentType="text/html; charset=UTF-8" pageEncoding="UTF-8"%> <%@ taglib uri="http://shiro.apache.org/tags" prefix="shiro" %> <!DOCTYPE html PUBLIC "-//W3C//DTD HTML 4.01 Transitional//EN" "http://www.w3.org/TR/html4/loose.dtd"> <html> <head> <meta http-equiv="Content-Type" content="text/html; charset=UTF-8"> <title>Insert title here</title> </head> <body> <h1>Shiro_List_Page</h1> Welcome:<shiro:principal></shiro:principal> <button onclick="add_user()">add_user</button> <shiro:hasRole name="user"> <button onclick="goto_user_Unique()">goto_user_Unique</button> </shiro:hasRole> <shiro:hasRole name="admin"> <button onclick="goto_admin_Unique()">goto_admin_Unique</button> </shiro:hasRole> <button onclick="only_admin_can_visit()">only_admin_can_visit</button> </body> <script type="text/javascript"> function add_user() { window.location.href="add_user.jsp"; } function goto_user_Unique() { window.location.href="user_Unique.jsp"; } function goto_admin_Unique() { window.location.href="admin_Unique.jsp"; } function only_admin_can_visit() { window.location.href="only_admin_can_visit"; } </script> </html>
接下来启动服务器,然后用paul(user)登陆:

接着点击:only_admin_can_visit按钮

结果依然可以访问,这就不对了。(注:不过有解决的方法:把紫色部分从applicationContext.xml里复制一份到springmvc.xml里即可(不需要剪切)):
<?xml version="1.0" encoding="UTF-8"?> <beans xmlns="http://www.springframework.org/schema/beans" xmlns:xsi="http://www.w3.org/2001/XMLSchema-instance" xmlns:mvc="http://www.springframework.org/schema/mvc" xmlns:context="http://www.springframework.org/schema/context" xsi:schemaLocation="http://www.springframework.org/schema/mvc http://www.springframework.org/schema/mvc/spring-mvc-4.0.xsd http://www.springframework.org/schema/beans http://www.springframework.org/schema/beans/spring-beans.xsd http://www.springframework.org/schema/context http://www.springframework.org/schema/context/spring-context-4.0.xsd"> <!-- 1、包扫描,false为放弃扫描全部注解。开启过滤子标签,只扫描指定包下的@Controller注解。--> <context:component-scan base-package="com.changping.shiro"></context:component-scan> <!-- 2、视图解析器,解析到指定文件夾--> <bean class="org.springframework.web.servlet.view.InternalResourceViewResolver"> <property name="prefix" value="/WEB-INF/"></property> <property name="suffix" value=".jsp"></property> </bean> <!-- 3、启动注解 --> <mvc:annotation-driven></mvc:annotation-driven> <mvc:default-servlet-handler/> <!--3.配置LifecycleBeanPostProcessor可以自动的调用配置在Spring Ioc容器中shiro bean的生命周期方法 --> <bean id="lifecycleBeanPostProcessor" class="org.apache.shiro.spring.LifecycleBeanPostProcessor" /> <!--4.启用Ioc容器中使用shiro的注解,但必须在配置了LifecycleBeanPostProcessor之后才能使用。 --> <bean class="org.springframework.aop.framework.autoproxy.DefaultAdvisorAutoProxyCreator" depends-on="lifecycleBeanPostProcessor" /> <bean class="org.apache.shiro.spring.security.interceptor.AuthorizationAttributeSourceAdvisor"> <property name="securityManager" ref="securityManager" /> </bean> </beans>
这样配置的确有效果:
接着用paul、123登陆,之后跳转页面:

点击only_admin_can_visit按钮,报500异常,这就对了:

当然项目中需要对这个异常进行处理:
springmvc的异常处理:
-
方式一. @ExceptionHandler
-
方式二. 实现HandlerExceptionResolver接口
-
方式三. @ControllerAdvice+@ExceptionHandler
还是不处理吧,以后再来补充。至于springmvc.xml,它被我恢复成之前的样子了。
从数据库中取到权限和资源
就是说把之前的用于过滤的url,和拦截定义anon、authe都放到数据库中。
就是它们了:
<property name="filterChainDefinitions"> <value> /login.jsp = anon /shiro_login = anon /add_user.jsp = anon /add_user =anon /shiro_logout = logout /user_Unique.jsp= roles[user] /admin_Unique.jsp = roles[admin] # everything else requires authentication: /** = authc </value> </property>
首先看一下这个filterChainDefinitions类:
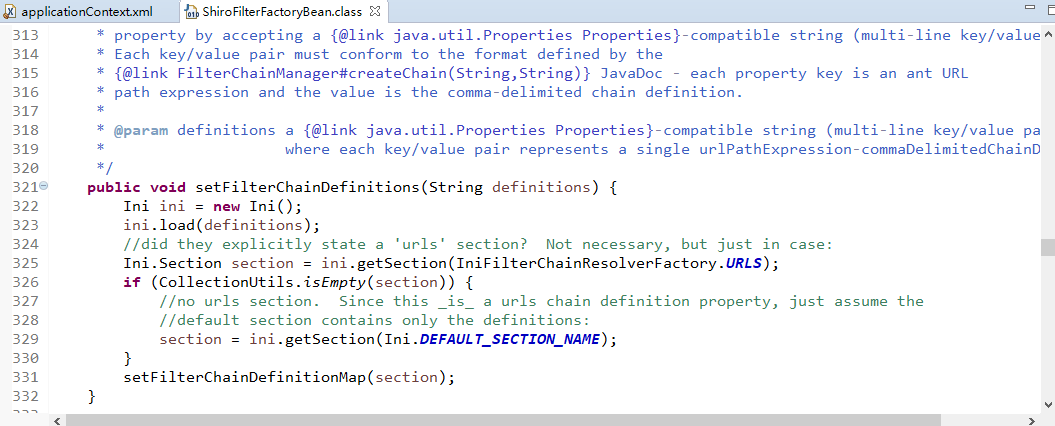
接着单击上图最后一行——setFilterChainDefinitionMap(section):
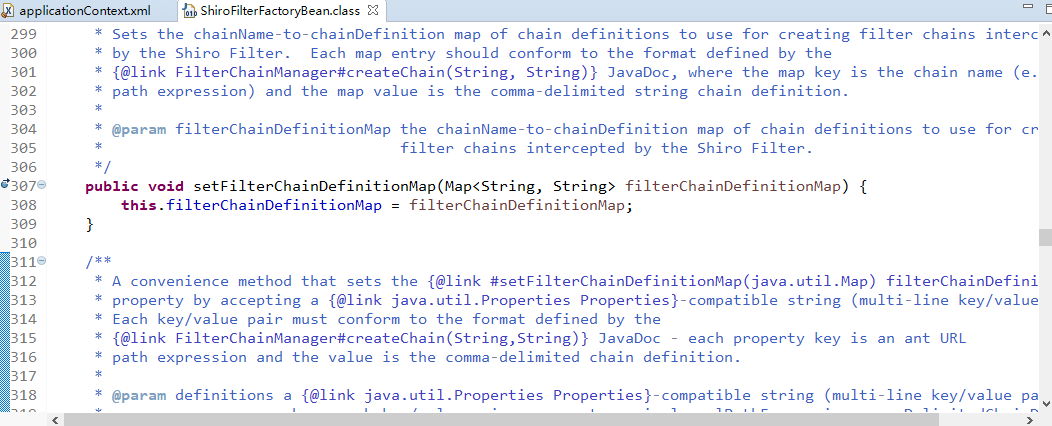
在307行打个断点:
debug走起,从这里还可以看到这个对象就是Map<String,Object>
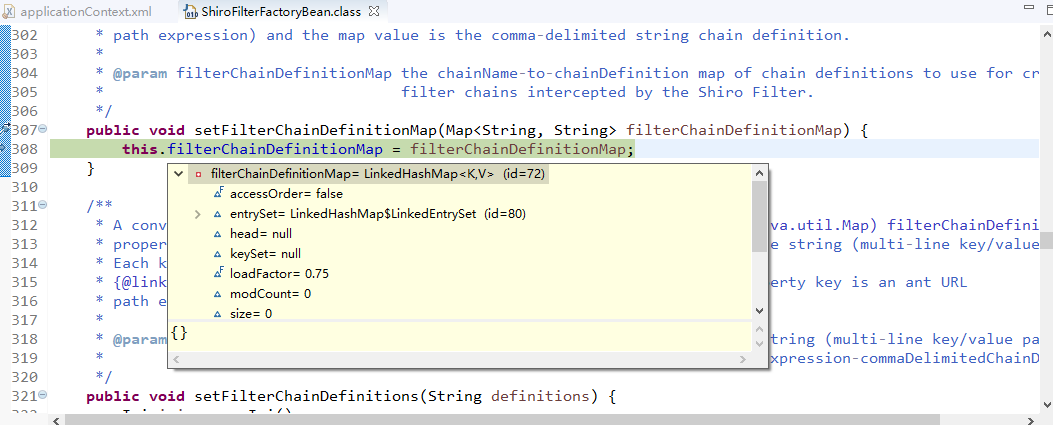
可以看到它的实现类是LinkedHashMap:
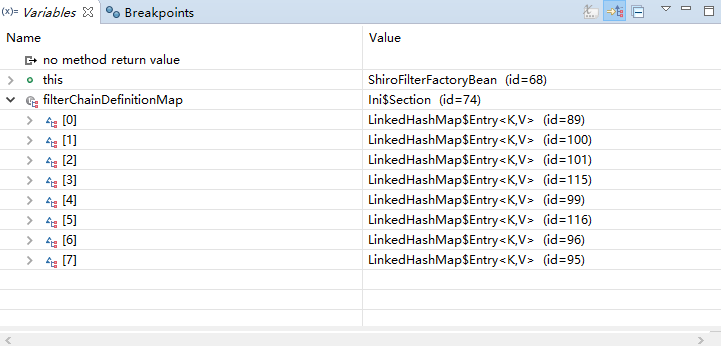
那这里面装着什么?

好吧,现在我们需要自己来装这些数据:
新建一个类:
package com.changping.shiro.factory; import java.util.LinkedHashMap; public class FilterChainDefinitionMapBuilder { public LinkedHashMap<String,String> buildFilterChainDefinitionMap() { LinkedHashMap<String,String> map = new LinkedHashMap<>(); map.put("/login.jsp", "anon"); map.put("/shiro_login", "anon"); map.put("/add_user.jsp", "anon"); map.put("/add_user", "anon"); map.put("/shiro_logout", "logout"); map.put("/user_Unique.jsp", "roles[user]"); map.put("/admin_Unique.jsp", "roles[admin]"); map.put("/**", "authc"); return map; } }
记得上面一定要返回map,否则404。
<bean id="ShiroFilter" class="org.apache.shiro.spring.web.ShiroFilterFactoryBean"> <property name="securityManager" ref="securityManager" /> <property name="loginUrl" value="/login.jsp" /> <property name="successUrl" value="/list.jsp" /> <property name="unauthorizedUrl" value="/unauthorized.jsp" /> <property name="filterChainDefinitionMap" ref="filterChainDefinitionMap"></property> <!-- <property name="filterChainDefinitions"> <value> /login.jsp = anon /shiro_login = anon /add_user.jsp = anon /add_user =anon /shiro_logout = logout /user_Unique.jsp= roles[user] /admin_Unique.jsp = roles[admin] # everything else requires authentication: /** = authc </value> </property> --> </bean> <!-- 配置一个bean,实际上是一个Map,通过实例工厂方法 --> <bean id="filterChainDefinitionMap" factory-bean="filterChainDefinitionMapBuilder" factory-method="buildFilterChainDefinitionMap"></bean> <bean id="filterChainDefinitionMapBuilder" class="com.changping.shiro.factory.FilterChainDefinitionMapBuilder"></bean>
经过我的验证,上面的代码和之前的效果一样。
不过还是写死在代码里,不是从数据库里查出来的。
下面就把这些配置放到数据库里
首先在mysql数据库里新建一张表,oracle数据库就不管了,貌似只需要一个数据源即可:
create table filter_Chain_Definition ( chain_Id int(20) PRIMARY key not null auto_increment, chain_Name varchar(20) , chain_Definition varchar(20) ) insert into filter_Chain_Definition (chain_Name,chain_Definition) values ('/login.jsp','anon'); insert into filter_Chain_Definition (chain_Name,chain_Definition) values ('/shiro_login','anon'); insert into filter_Chain_Definition (chain_Name,chain_Definition) values ('/add_user.jsp','anon'); insert into filter_Chain_Definition (chain_Name,chain_Definition) values ('/add_user','anon'); insert into filter_Chain_Definition (chain_Name,chain_Definition) values ('/shiro_logout','logout'); insert into filter_Chain_Definition (chain_Name,chain_Definition) values ('/user_Unique.jsp','roles[user]'); insert into filter_Chain_Definition (chain_Name,chain_Definition) values ('/admin_Unique.jsp','roles[admin]'); insert into filter_Chain_Definition (chain_Name,chain_Definition) values ('/**','authc');
该表信息如图:
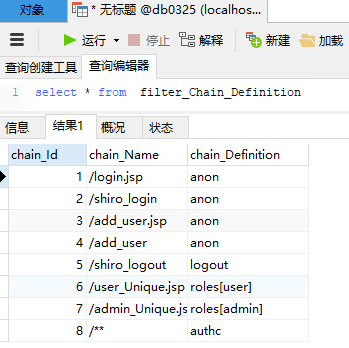
接着在pojo里建一个Filter_Chain_Definition类:
package com.changping.shiro.pojo; public class Filter_Chain_Definition { private int chain_Id; private String chain_Name; private String chain_Definition; public int getChain_Id() { return chain_Id; } public void setChain_Id(int chain_Id) { this.chain_Id = chain_Id; } public String getChain_Name() { return chain_Name; } public void setChain_Name(String chain_Name) { this.chain_Name = chain_Name; } public String getChain_Definition() { return chain_Definition; } public void setChain_Definition(String chain_Definition) { this.chain_Definition = chain_Definition; } public Filter_Chain_Definition(String chain_Name, String chain_Definition) { super(); this.chain_Name = chain_Name; this.chain_Definition = chain_Definition; } public Filter_Chain_Definition(int chain_Id, String chain_Name, String chain_Definition) { super(); this.chain_Id = chain_Id; this.chain_Name = chain_Name; this.chain_Definition = chain_Definition; } public Filter_Chain_Definition() { super(); } @Override public String toString() { return "Filter_Chain_Definition [chain_Id=" + chain_Id + ", chain_Name=" + chain_Name + ", chain_Definition=" + chain_Definition + "]"; } }
好啦,现在数据表,和对应的数据结构都有了。
接着,需要在FilterChainDefinitionMapBuilder里写一个查询方法:
package com.changping.shiro.factory; import java.util.LinkedHashMap; import java.util.List; import org.springframework.beans.factory.annotation.Autowired; import com.changping.shiro.pojo.Filter_Chain_Definition; import com.changping.shiro.service.UserServiceInf; public class FilterChainDefinitionMapBuilder { @Autowired UserServiceInf userServiceInf; public LinkedHashMap<String,String> buildFilterChainDefinitionMap() { LinkedHashMap<String,String> map = new LinkedHashMap<>(); List<Filter_Chain_Definition> filter_Chain_Definition_List = userServiceInf.get_filter_chain_definition_list(); for(Filter_Chain_Definition fcd:filter_Chain_Definition_List) { String chain_Name =fcd.getChain_Name().toString(); String chain_Definition = fcd.getChain_Definition().toString(); map.put(chain_Name,chain_Definition); } return map; } } /*map.put("/login.jsp", "anon"); map.put("/shiro_login", "anon"); map.put("/add_user.jsp", "anon"); map.put("/add_user", "anon"); map.put("/shiro_logout", "logout"); map.put("/user_Unique.jsp", "roles[user]"); map.put("/admin_Unique.jsp", "roles[admin]"); map.put("/**", "authc");*/
UserServiceInf.java
public List<Filter_Chain_Definition> get_filter_chain_definition_list();
UserServiceImp.java
@Override public List<Filter_Chain_Definition> get_filter_chain_definition_list() { List<Filter_Chain_Definition> filter_chain_definition_List = userMapper.select_filter_chain_definition_list(); return filter_chain_definition_List; }
UserMapper.java
public List<Filter_Chain_Definition> select_filter_chain_definition_list();
UserMapper.xml
<select id="select_filter_chain_definition_list" resultType="com.changping.shiro.pojo.Filter_Chain_Definition"> select * from filter_chain_definition </select>
接着可以debug看一下是否可以接到值:
chain_Name
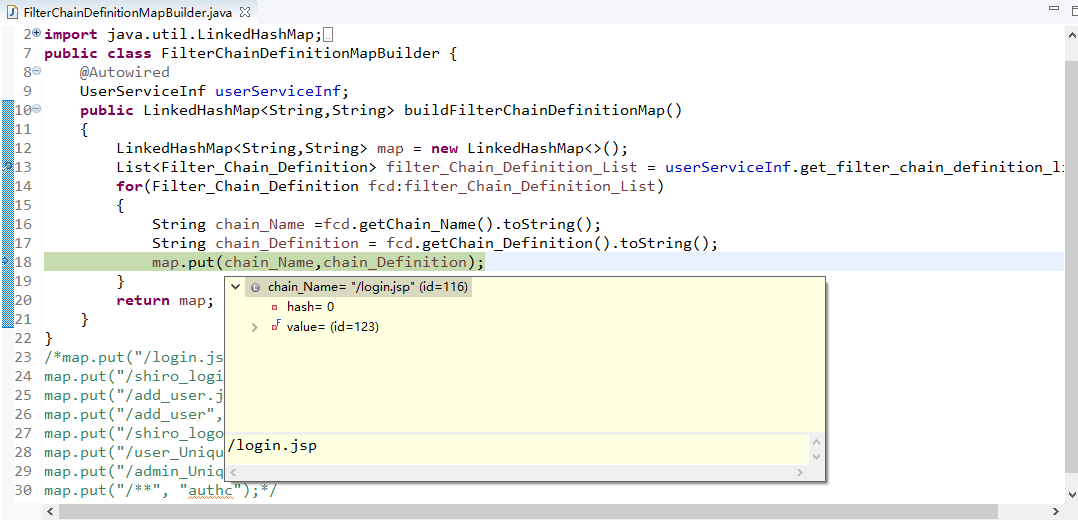
chain_Definition
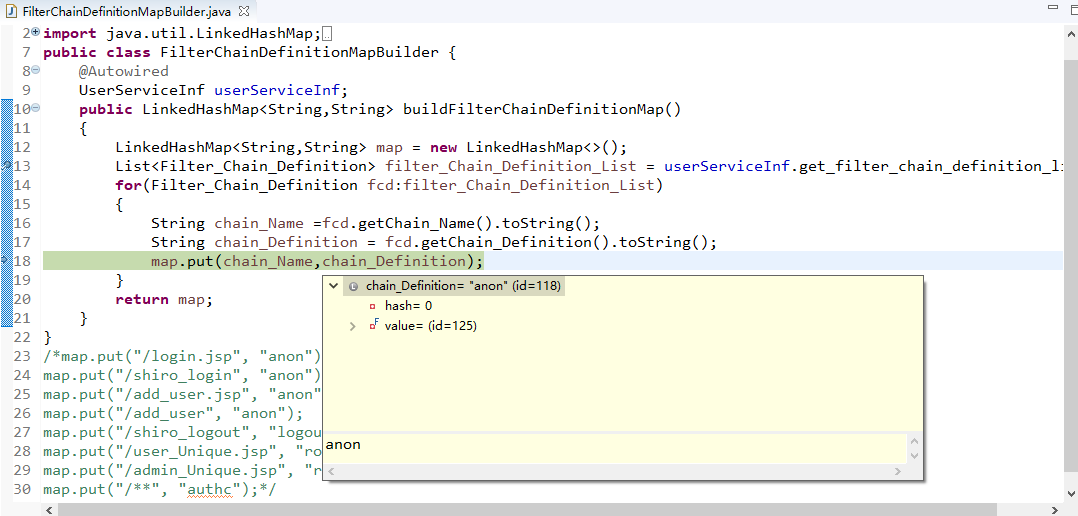
看来接值没有问题。
接着启动服务器,看是否可以正常登陆:
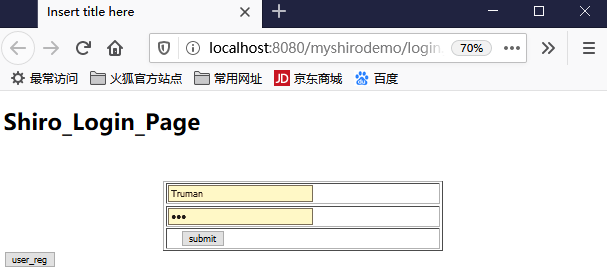
提交没有问题,其它跳转也正常:
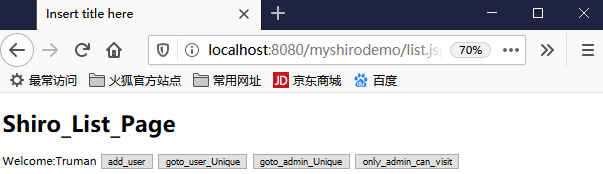
好啦,以上就是从数据库中动态取到url、拦截定义——filter_chain_definition,实现了过滤。
会话管理
Shiro提供了完整的企业级会话管理功能,不依赖于底层容器(如web容器tomcat),不管JavaSE还是JavaEE环境都可以使用。
提供了会话管理、会话时间监听、会话存储/持久化、容器无关的集群、失效/过期支持、对web的透明支持、SSO单点登陆的支持等特性。
会话相关的API
Subject.getSession():即可获取会话;其等价于Subject.getSession(true),即如果当前没有创建Session对象会创建一个。
Subject.getSession(false),如果当前没有创建Session则返回null。 session.getId():获得当前会话的唯一标识。 session.getHost():获取当前Subject的主机地址。 session.getTimeout()&session.setTimeout()(毫秒):获取/设置当前Session的过期时间。 session.getStartTimestamp()&session.getLastAccessTime():获取会话的启动时间及最后访问时间;
如果是JavaSE应用需要自己定期调用session.touch()去更新最后访问时间; 如果是Web应用,每次进入ShiroFilter都会自动调用session.touch()来更新最后访问的时间。 session.touch()&session.stop():跟新会话最后访问时间及销毁会话。
如果在web中,调用HttpSession.invalidate()也会自动调用Shiro Session.stop方法进行销毁Shiro的会话。 session.setAttribute(key,val)& session.getAttribute(key)& session.removeAttribute(key):设置/获取/删除会话属性;在整个会话范围内都可以对这些属性进行操作。
会话监听器概念
例:SessionListener
会话监听器用于监听会话创建、过期及停止事件:
public interface SessionListener
{ void onStart(Session session); void onStop(Session session); void onExpiration(Session session);
}
下面是实操——测试Session
在ShiroController中接着写一段代码:
在shiro中,Session可以放到Service层,看看可以取到值吗:
ShiroController.java
@RequestMapping("only_admin_can_visit") public String only_admin_can_visit(HttpSession session) { session.setAttribute("一点了", "还早..."); String annotation = userService_mysql.testAnnotation(); System.out.println("only_admin_can_visit<-----test----->"); System.out.println(annotation); return "redirect:/list.jsp"; }
UserServiceImp.java
@RequiresRoles({"admin"})
@Override
public String testAnnotation() {
String print = "annotation------>service";
Session session = SecurityUtils.getSubject().getSession();
return print;
}
启动服务器,前台登陆、访问、提交:

点击最右侧按钮:
debug后台获得的值:

以上,就是shiro的session最奇妙的地方,service以另一种途径来接值。
在SessionDAO中操作Session,在数据库中添加一个Session,对Session进行增删查改
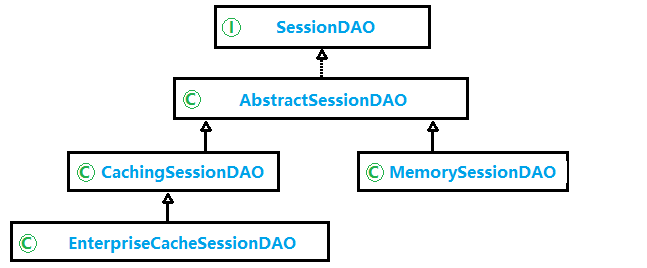
SessionDAO实现类是AbstractSessionDAO,
AbstractSessionDAO提供了SessionDAO的基础实现,如生成会话ID等;
CachingSessionDAO提供了对开发者透明的会话缓存功能,需要设置相应的CacheManager;
MemorySessionDAO直接在内存中进行会话维护;
EnterpriseCacheSessionDAO提供了缓存功能的会话维护,默认情况下使用MapCache实现,内部使用ConcurrentHashMap保存缓存的会话;
开发的时候用的最多的是EnterpriseCacheSessionDAO。
接下来就看一下这个类:
package org.apache.shiro.session.mgt.eis; import org.apache.shiro.cache.AbstractCacheManager; import org.apache.shiro.cache.Cache; import org.apache.shiro.cache.CacheException; import org.apache.shiro.cache.MapCache; import org.apache.shiro.session.Session; import java.io.Serializable; import java.util.concurrent.ConcurrentHashMap; /** * SessionDAO implementation that relies on an enterprise caching product as the EIS system of record for all sessions. * It is expected that an injected {@link org.apache.shiro.cache.Cache Cache} or * {@link org.apache.shiro.cache.CacheManager CacheManager} is backed by an enterprise caching product that can support * all application sessions and/or provide disk paging for resilient data storage. * <h2>Production Note</h2> * This implementation defaults to using an in-memory map-based {@code CacheManager}, which is great for testing but * will typically not scale for production environments and could easily cause {@code OutOfMemoryException}s. Just * don't forget to configure<b>*</b> an instance of this class with a production-grade {@code CacheManager} that can * handle disk paging for large numbers of sessions and you'll be fine. * <p/> * <b>*</b>If you configure Shiro's {@code SecurityManager} instance with such a {@code CacheManager}, it will be * automatically applied to an instance of this class and you won't need to explicitly set it in configuration. * <h3>Implementation Details</h3> * This implementation relies heavily on the {@link CachingSessionDAO parent class}'s transparent caching behavior for * all storage operations with the enterprise caching product. Because the parent class uses a {@code Cache} or * {@code CacheManager} to perform caching, and the cache is considered the system of record, nothing further needs to * be done for the {@link #doReadSession}, {@link #doUpdate} and {@link #doDelete} method implementations. This class * implements those methods as required by the parent class, but they essentially do nothing. * * @since 1.0 */ public class EnterpriseCacheSessionDAO extends CachingSessionDAO { public EnterpriseCacheSessionDAO() { setCacheManager(new AbstractCacheManager() { @Override protected Cache<Serializable, Session> createCache(String name) throws CacheException { return new MapCache<Serializable, Session>(name, new ConcurrentHashMap<Serializable, Session>()); } }); } //创建的时候会调用这个方法 protected Serializable doCreate(Session session) { Serializable sessionId = generateSessionId(session); assignSessionId(session, sessionId); return sessionId; } protected Session doReadSession(Serializable sessionId) { return null; //should never execute because this implementation relies on parent class to access cache, which //is where all sessions reside - it is the cache implementation that determines if the //cache is memory only or disk-persistent, etc. } protected void doUpdate(Session session) { //does nothing - parent class persists to cache. } protected void doDelete(Session session) { //does nothing - parent class removes from cache. } }
可以看一下里面获得sessionId的方法:
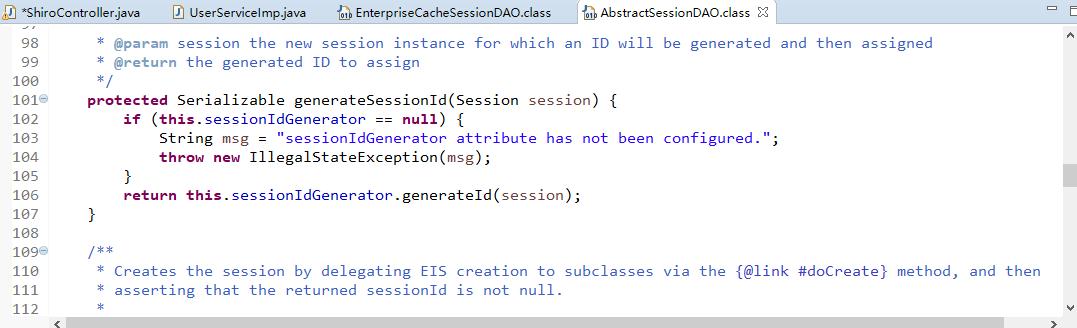
查看SessionIdGenerator属性
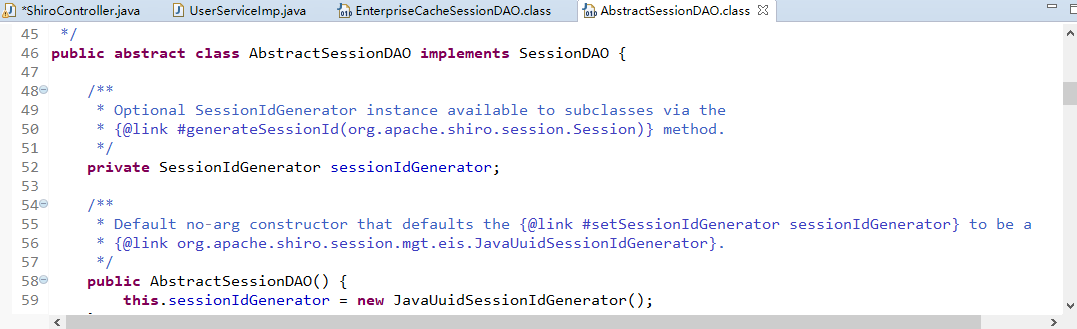
它有两个实现类:

重点说JavaUuidSessionIdGenerator,下面是这个类源码。
package org.apache.shiro.session.mgt.eis; import org.apache.shiro.session.Session; import java.io.Serializable; import java.util.UUID; /** * {@link SessionIdGenerator} that generates String values of JDK {@link java.util.UUID}'s as the session IDs. * * @since 1.0 */ public class JavaUuidSessionIdGenerator implements SessionIdGenerator { /** * Ignores the method argument and simply returns * {@code UUID}.{@link java.util.UUID#randomUUID() randomUUID()}.{@code toString()}. * * @param session the {@link Session} instance to which the ID will be applied. * @return the String value of the JDK's next {@link UUID#randomUUID() randomUUID()}. */ public Serializable generateId(Session session) { return UUID.randomUUID().toString(); } }
会话验证
Shiro提供了会话验证调度器,用于定期的验证会话是否已过期,如果过期将停止会话。
出于性能考虑,一般情况下都是获取会话时来验证是否过期并停止会话;但是如果在web环境中,
如果用户不主动退出则不知道会话是否过期,因此需要定期的检测会话是否过期,Shiiro提供了会话验证调度器:
SessionValidationScheduler,它的实现类是QuartzSessionValidationScheduler。
向数据库中写入session功能的实现
接下来需要在数据库里建个表sessions,可以对这个表进行增删查改:
create table sessions( id varchar(200), session varchar(2000), CONSTRAINT pk_sessions primary key(id) )CHARSET=utf-8 ENGINE=INNODB
接着在控制层层理新建一个类MySessionDAO,需要实现EnterpriseCacheSessionDao:
package com.changping.shiro.controller; import java.io.Serializable; import java.util.List; import org.apache.shiro.session.Session; import org.apache.shiro.session.mgt.ValidatingSession; import org.apache.shiro.session.mgt.eis.EnterpriseCacheSessionDAO; import org.springframework.beans.factory.annotation.Autowired; import org.springframework.jdbc.core.JdbcTemplate; import org.springframework.stereotype.Controller; import com.changping.shiro.util.SerializableUtils; public class MySessionDAO extends EnterpriseCacheSessionDAO { @Autowired JdbcTemplate jdbcTemplate; //向数据库添加一个session protected Serializable doCreate(Session session) { Serializable sessionId = generateSessionId(session); assignSessionId(session, sessionId);// 分配 String sql = "insert into sessions (id,session) values (?,?)"; // 把id和被序列化后的sessioin存入数据库 jdbcTemplate.update(sql, sessionId, SerializableUtils.serialize(session)); return session.getId(); } //条件查询session protected Session doReadSession(Serializable sessionId) { String sql = "select session from sessions where id=?"; List<String> sessionStrList = jdbcTemplate.queryForList(sql, String.class, sessionId); if (sessionStrList.size() == 0) return null; return SerializableUtils.deserialize(sessionStrList.get(0)); } protected void doUpdate(Session session) { if(session instanceof ValidatingSession&&!((ValidatingSession) session).isValid()) return; String sql ="update sessions set sessin=? where id=?"; jdbcTemplate.update(sql,SerializableUtils.serialize(session),session.getId()); } protected void doDelete(Session session) { String sql ="delete from sessions where id=?"; jdbcTemplate.update(sql,session.getId()); } }
接着建一个Utils类:
package com.changping.shiro.util; import java.io.ByteArrayInputStream; import java.io.ByteArrayOutputStream; import java.io.ObjectInputStream; import java.io.ObjectOutputStream; import org.apache.shiro.codec.Base64; import org.apache.shiro.session.Session; /** * Session 对象的序列化和反序列化工具类 * */ public class SerializableUtils { public static String serialize(Session session) { try { ByteArrayOutputStream bos = new ByteArrayOutputStream(); ObjectOutputStream oos = new ObjectOutputStream(bos); oos.writeObject(session); return Base64.encodeToString(bos.toByteArray()); } catch (Exception e) { throw new RuntimeException("serialize session error", e); } } public static Session deserialize(String sessionStr) { try { ByteArrayInputStream bis = new ByteArrayInputStream(Base64.decode(sessionStr)); ObjectInputStream ois = new ObjectInputStream(bis); return (Session) ois.readObject(); } catch (Exception e) { throw new RuntimeException("deserialize session error", e); } } }
之后需要配置一下applicationContext.xml,在此之前还需要再导入一个依赖,依赖包里面有QuartzSessionValidationScheduler:
<dependency>
  <groupId>org.apache.shiro</groupId>
  <artifactId>shiro-quartz</artifactId>
  <version>1.5.2</version>
</dependency>
此处在DefaultWebSecurityManager中需要配置cookie,否则点击登陆无法跳转:
<!-- 配置session -->
<!-- sessionId生成 -->
<bean id="sessionIdGenerator" class="org.apache.shiro.session.mgt.eis.JavaUuidSessionIdGenerator"></bean>
<bean id="sessionDAO" class="com.changping.shiro.controller.MySessionDAO">
<property name="activeSessionsCacheName" value="shiro-activeSessionCache"></property>
<property name="sessionIdGenerator" ref="sessionIdGenerator"></property>
</bean>
<!-- 会话Cookie模板 -->
<bean id="sessionIdCookie" class="org.apache.shiro.web.servlet.SimpleCookie">
<constructor-arg value="sid"/>
<property name="httpOnly" value="true"/>
<property name="maxAge" value="-1"/>
</bean>
<!--设定检查sesion过期事件-->
<bean id="sessionValidationScheduler" class="org.apache.shiro.session.mgt.quartz.QuartzSessionValidationScheduler">
<property name="sessionValidationInterval" value="1800000" />
<property name="sessionManager" ref="sessionManager" />
</bean>
<bean id="sessionManager" class="org.apache.shiro.web.session.mgt.DefaultWebSessionManager">
<property name="sessionDAO" ref="sessionDAO"></property>
<property name="deleteInvalidSessions" value="true"></property>
<property name="sessionValidationSchedulerEnabled" value="true"></property>
<property name="globalSessionTimeout" value="1800000"></property>
<property name="sessionIdCookieEnabled" value="true"/>
<property name="sessionValidationScheduler" ref="sessionValidationScheduler" />
<property name="sessionIdCookie" ref="sessionIdCookie"/>
</bean>
<!--植入JDBCTemplate-->
<bean id="jdbcTemplate" class="org.springframework.jdbc.core.JdbcTemplate">
<property name="dataSource" ref="dataSource_mysql"/>
</bean>
ehcache.xml
<!-- 第一次自定义加入了这个标签,配置了session -->
<cache name="shiro-activeSessiononCache"
maxElementsInMemory="10000"
eternal="false"
timeToIdleSeconds="0"
timeToLiveSeconds="0"
overflowToDisk="false"
diskPersistent="false"
statistics="true"
/>
好啦,现在启动服务器,不需要登陆:

可以查看一下数据库,可以发现数据库里已经有session了,
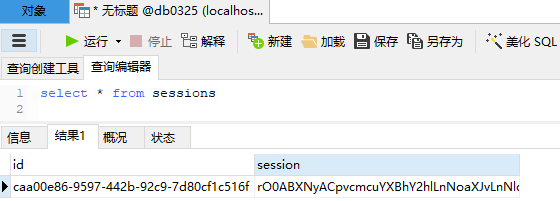
至此向数据库中写入session完成。
Shiro缓存
Shiro内部相应的组件(DefaultSecurityManager)会自动检测相应的对象(如Realm)是否实现了
CacheManagerAware并自动注入相应的CacheManager。
realm缓存——认证一次之后不需要再次认证
Shiro提供了CachingRealm,其实现了CacheManagerAware接口,提供了缓存的一些基础实现;
AuthenticatingRealm及AuthorizingRealm也分别提供了对AuthenticationInfoh和AuthorizationInfo信息的缓存。
下面就看一下MyShiroRealm:

它的父类AuthorizingRealm:
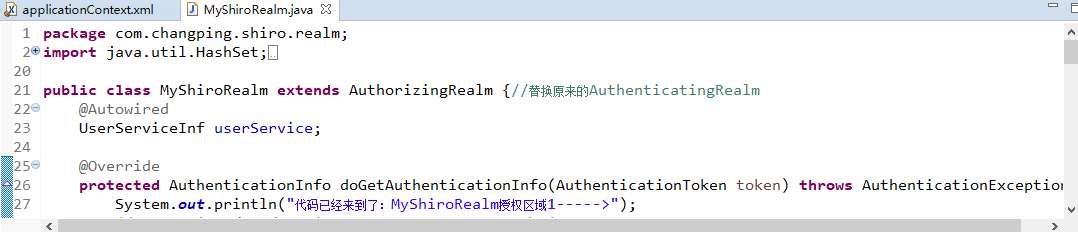
AuthorizingRealm父类AuthenticatingRealm:

AuthenticatingRealm父类是CachingRealm :
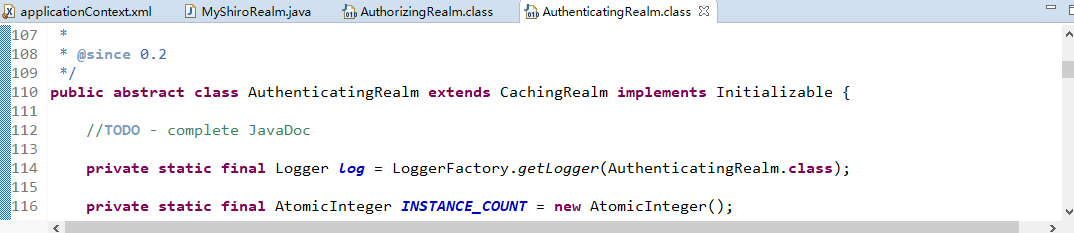
CachingRealm 实现了CacheManagerAware:
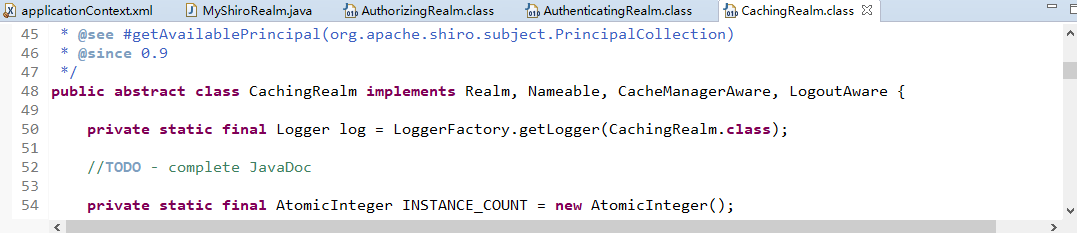
所以MyShiroRealm有缓存:
验证方式,在MyShiroRealm中打断点:

现在启动服务器:
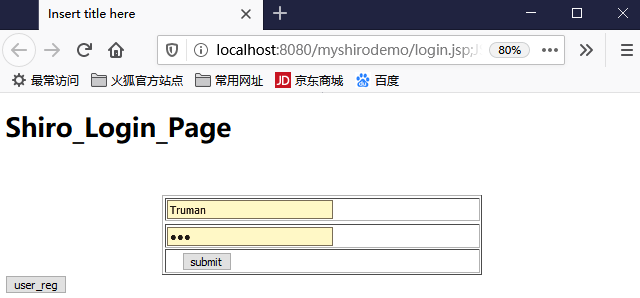
登陆之后,看一下后台打印,然后放行:
token_hash:1670654513 代码已经来到了:MyShiroRealm授权区域1-----> 通过realm-----没有异常!
访问了需要授权的页面,开始授权......
接着将浏览器回退:

再次访问,可以发现没走断点,而且不会有新的打印。
这是缓存起的作用,
主要是这里的配置在起作用:
<bean id="cacheManager" class="org.apache.shiro.cache.ehcache.EhCacheManager"> <property name="cacheManagerConfigFile" value="classpath:ehcache.xml" /> </bean>
如果去掉这部分,就不会有缓存了。
验证:把以上从代码去掉,然后重新启动项目,项目需要clean一下。
之后重复上述操作,会发现,当重复点击提交的时候,会每次都走断点,并且每次debug放行后台都有打印:
token_hash:418165082 代码已经来到了:MyShiroRealm授权区域1-----> 通过realm-----没有异常! 访问了需要授权的页面,开始授权...... 访问了需要授权的页面,开始授权...... 访问了需要授权的页面,开始授权......
即每次都打印访问了需要授权的页面,开始授权......
当然这些都可以在ehcache.xml里自定义配置:(注:以下我没有配置)
例:
<cache name="authorizationCache" eternal="false" timeToIdleSeconds="3600" timeToLiveSeconds="0" overflowToDisk="false" statistics="true" /> <cache name="authenticationCache" eternal="false" timeToIdleSeconds="3600" timeToLiveSeconds="0" overflowToDisk="false" statistics="true" />
类似的有个Session缓存
如SecurityManager实现了SessionSecurityManager,它会判断SessionManager是否实现了CacheManagerAware接口,如果实现了会把CacheManager设置给它。
SessionManager也会判断相应的SessionDAO(如继承自CachingSessionDAO)是否实现了CacheManagerAware,如果实现了会把CacheManager设置给它。
设置了缓存的SessionManager,查询时会先查缓存,如果找不到才查数据库。
接下来看以看一个功能:RememberMe(记住我)
Shiro提供了记住我(RemenberMe)的功能,比如在某些网站上,登陆后点记住我,当关闭了浏览器,下次再次打开时还是可以记住我,不需要再次登陆。
基本流程如下:
1、首先在登陆页面选中RememberMe然后登陆成功;如果是浏览器登陆,一般会把RememberMe的Cookie写到客户端并保存下来;
2、关闭浏览器重新打开;会发现浏览器会记住我;
3、访问一般的网页服务器端还是知道我是谁,并且可以正常访问;
4、但是访问某宝时,如果要查看订单或进行支付时,此时还是需要再进行身份认证,以确保当前用户安全。
认证和记住我区别:
subject.isAuthenticated()表示用户进行了身份验证登陆,即由Subject.login进行登陆。
subject.isRemembered():表示用户是通过记住我登陆,此时可能并不是真正的主人。
以上二者状态只能相反,即subject.isAuthenticated()==true,则subject.isRemembered()==false;反之一样。
所以:
一般网页:如个人在主页,可以使用user拦截器即可,user拦截器只要用户登陆(isRemembered()||isAuthenticated())通过即可访问成功;
特殊页面:订单,可以使用authc拦截器,authc拦截器会判断用户是否通过Subject.login(isAuthenticate()==true)登陆,如果是才通过,
否则需要跳转到登陆页面重新登陆。
再次看一下身份验证相关:
authc:
基于表单的拦截器:如/**=authc,如果没有登陆会跳到相应的登陆页面登陆;
主要属性:
usernameParam:表单提交的用户名参数名(username);
passwordParam:表单提交的密码参数名(password);
rememberMeParam:表单提交的密码参数名(rememberMe);
loginUrl:登陆页面地址(/login.jsp);
successUrl:登陆成功后的默认重定向地址;
failureKeyAttribute:登陆失败后错误信息存储key(shiroLoginFailure);

authcBasic
Basic HTTP身份验证拦截器,
主要属性:
applicationName:弹出登陆框显示的信息(application);

logout
退出拦截器,
主要属性:redirectUrl:退出成功后重定向的地址(/);示例:/logout=logout

user
用户拦截器,
用户已经身份验证/记住我登陆;示例:/**=user

anon
匿名拦截器即不需要登陆即可访问;一般用于静态资源过滤;示例:/static/**=anon
其中user拦截器代表具允许有“记住我”功能,记住我的页面,下次访问不需要登陆认证;
user拦截器修饰的url允许记住我,否则如authic拦截器修饰的url,则代表需要认证。
好啦,现在开始,实现记住我功能:
首先看一下ShiroController,已经开启了记住我功能,
(注:这个功能可以通过前端的checkbox复选框来传参数,通过参数来控制是否开启rememberme功能,如果开启用true,否则用false。)
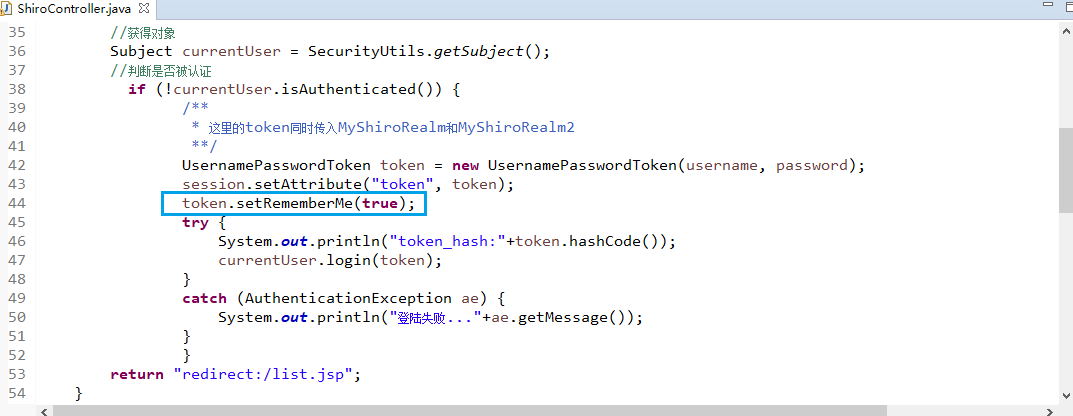
接着可以在applicationContext.xml里配置cookie,可以给它设置时间,也就是给记住我设置时间:
    <!--记住我Cookie -->
        <bean id="rememberMeCookie" class="org.apache.shiro.web.servlet.SimpleCookie">
            <!-- rememberMe 是cookie的名字 -->
            <constructor-arg value="remenberMe"/>
            <!-- cookie的缓存时间 -->
            <property name="maxAge" value="2592000"/>
        </bean>

    <!--rememberManager管理器,写入cookie,最后配置到securityManager中-->
        <bean id="rememberMeManager" class="org.apache.shiro.web.mgt.CookieRememberMeManager">
            <property name="cookie" ref="rememberMeCookie"></property>
        </bean>
    <!-- 配置到securityManager-->
    <bean id="securityManager" class="org.apache.shiro.web.mgt.DefaultWebSecurityManager">
        <property name="cacheManager" ref="cacheManager" />
        <property name="authenticator" ref="authenticator" />
        <property name="sessionManager" ref ="sessionManager" />
        <property name="rememberMeManager" ref ="rememberMeManager"></property>
        <property name="realms">
            <list>
                <ref bean="jdbcRealm"/>
                <ref bean="jdbcRealm2"/>
            </list>
        </property>
    </bean>
修改权限,在记住我状态下登录,关闭浏览器后,再次访问浏览量可以不需要登陆就访问list.jsp:
看一下之前的数据库里的权限配置:
接下来可以去数据库修改list.jsp权限(注:这样改就不对):
update filter_chain_definition set chain_definition='authc,roles[user]' where chain_name='/user_Unique.jsp';  #修改之前的用户按钮权限,使之在记住我状态下需要登陆认证。
update filter_chain_definition set chain_definition='authc,roles[admin]' where chain_name='/admin_Unique.jsp';#修改之前admin按钮权限,使之在记住我状态下需要登陆认证。
insert into filter_chain_definition (chain_name,chain_definition) values ('/list.jsp','user');#允许list.jsp处于“记住我”状态,下次访问浏览器不需要登陆,可以访问。
执行了修改语句之后是这样:(注:这是个错误的修改示例,由于这么修改,造成了我在这里卡了一天,你看出是那里错了吗?)

这才是正确的配置:
其实是顺序错了,authc放到最后就对了,之前的错误示例造成rememberme失效了,失效的这段时间,我就差怀疑自己的人品了。
下面进入正轨:
在FilterChainDefinitionMapBuilder类里,打个断点进行debug,看map里的值是不是和数据库一样:
向右滑动,可以看到和数据库一样,已经有变化了:
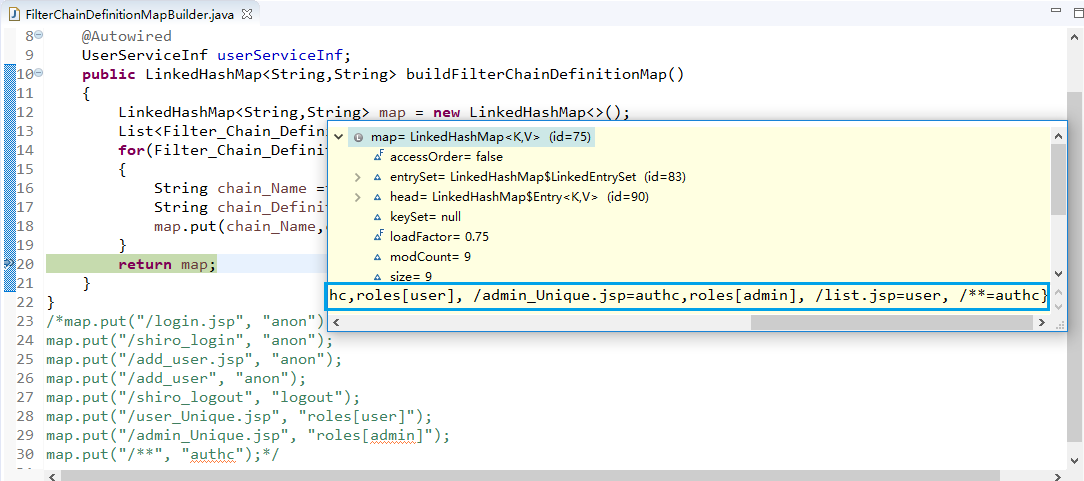
好啦,接下来登陆,Truman、123:

点击提交后页面会跳转:
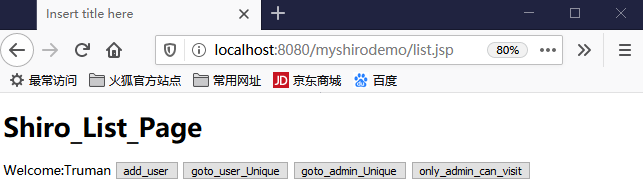
点击goto_user_Unique或者goto_admin_Unique,此时可以直接访问,并不需要登陆,因为已经登陆过。
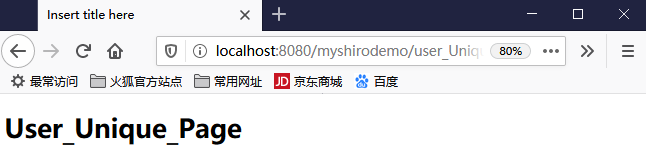
重点来了:
此时关闭浏览器然后重新启动服务器,不登陆,直接访问list.jsp(rememberme状态下):
http://localhost:8080/myshirodemo/list.jsp
如图,直接在地址栏访问list.jsp,因为记住我起到了作用,所以可以直接访问到list.jsp:
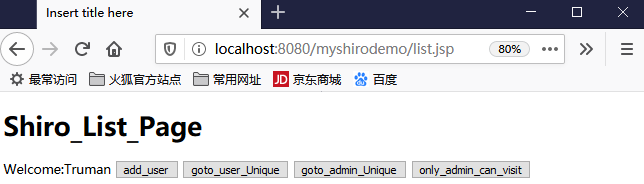
接着,再点击上图goto_user_Unique或者goto_admin_Unique按钮,由于拦截器的作用,就会提示你登陆:(注:其中这两个按钮,只要其中一个登陆了,那么另外一个就不需要登陆)
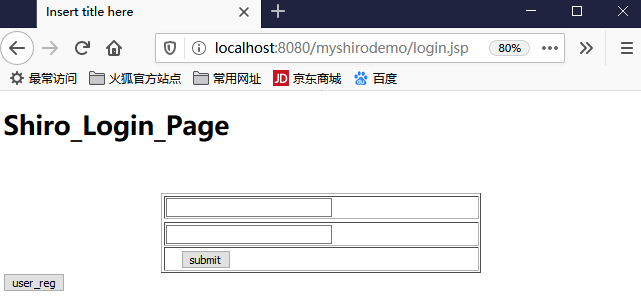
好啦,以上就是rememberme的简单配置。
尾声
shiro的基本使用,到这里结束,虽然还有许多有待完善的地方,但是作为入门小项目已经足够了。
该项目历时10天,原计划是想5天之内完成,但是没想到,探索之路出乎意料的曲折。
不过最后还是小有收获,期间了解到了不同版本的微小差异,还有shiro的强大之处。

 浙公网安备 33010602011771号