


用开源项目RangBar来实现有范围的SeekBar
RangeBar是一个可以有选择范围的Seekbar,用这个项目其实是很简单的。就是一个自定义控件~
一、布局文件
这里可以看到有很多属性可以定制,除了通过xml来定义也可以再java代码中进行定义。
说明:
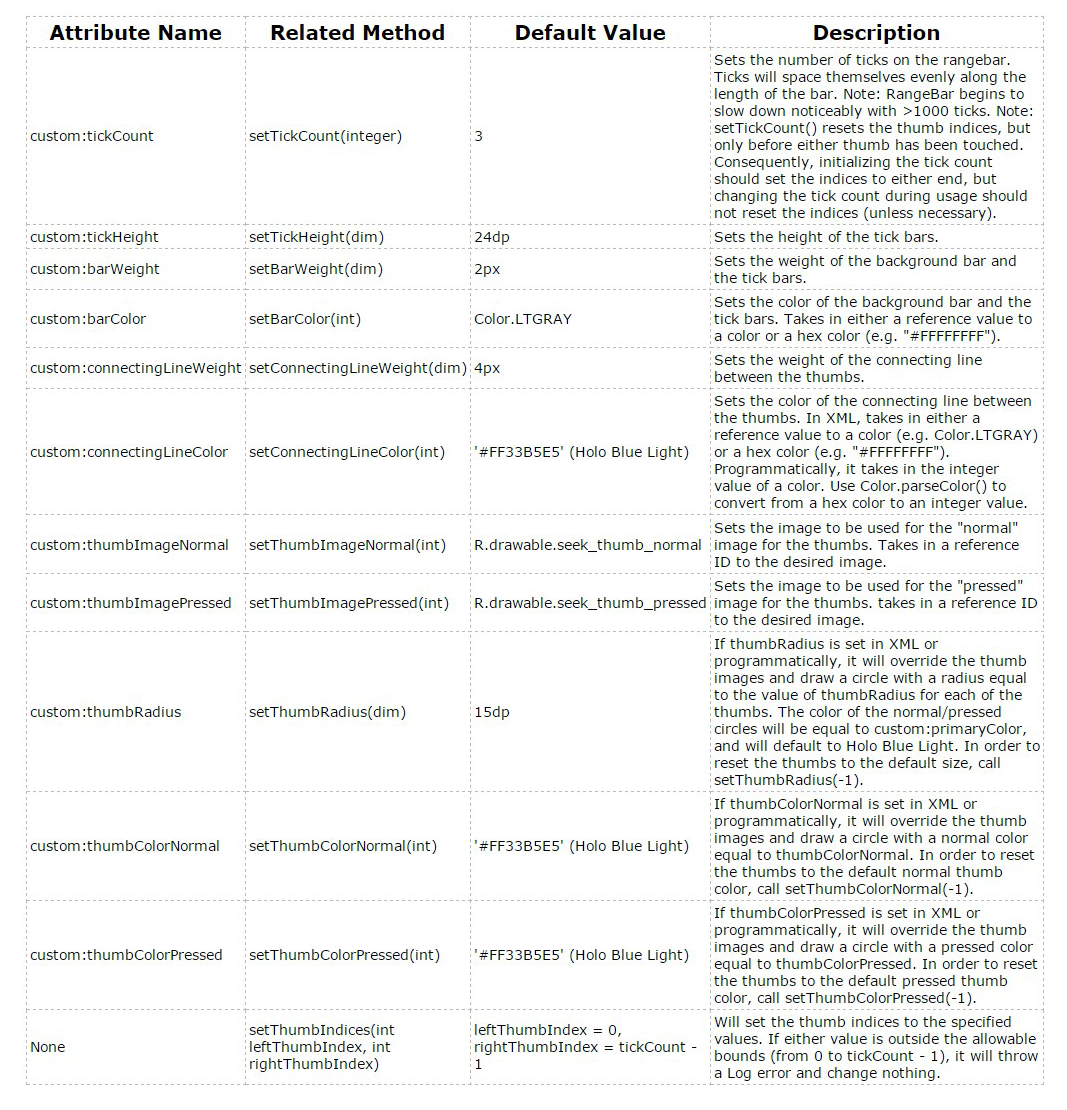
<declare-styleable name="RangeBar">

tickCount:有多少个分割线
tickHeight:分割线的高度
barWeight:分割线和滑动条的粗细
barColor:分割线和滑动条的颜色
connectingLineWeight:已经选中区域的滑动条宽度
connectingLineColor:已经选中区域的滑动条颜色(不包括滑块)
thumbRadius:滑块的半径,其实就是改变滑块的大小
thumbImageNormal:滑块普通状态的图片
thumbImagePressed:滑块按下时的图片
thumbColorNormal:滑块普通状态的颜色
thumbColorPressed:滑块按下时的颜色

<attr name="tickCount" format="integer" />
<attr name="tickHeight" format="dimension" />
<attr name="barWeight" format="dimension" />
<attr name="barColor" format="reference|color" />
<attr name="connectingLineWeight" format="dimension" />
<attr name="connectingLineColor" format="reference|color" />
<attr name="thumbRadius" format="dimension" />
<attr name="thumbImageNormal" format="reference" />
<attr name="thumbImagePressed" format="reference" />
<attr name="thumbColorNormal" format="reference|color"/>
<attr name="thumbColorPressed" format="reference|color"/>
</declare-styleable>
activity_main.xml
<RelativeLayout xmlns:android="http://schemas.android.com/apk/res/android"
    xmlns:tools="http://schemas.android.com/tools"
    android:layout_width="match_parent"
    android:layout_height="match_parent"
    tools:context="${relativePackage}.${activityClass}" >

    <!-- 这里可以通过xml进行配置,用到了自定义的命名空间custom,具体的配置属性可以在最下面看到 -->
    <com.edmodo.rangebar.RangeBar
        xmlns:custom="http://schemas.android.com/apk/res-auto"
        android:id="@+id/rangebar"
        android:layout_width="match_parent"
        android:layout_height="wrap_content"
        android:layout_marginBottom="50dp"
        android:layout_marginTop="50dp"
        custom:tickCount="7" />

</RelativeLayout>
java代码:
package com.kale.rangbartest;

import com.edmodo.rangebar.RangeBar;
import com.edmodo.rangebar.RangeBar.OnRangeBarChangeListener;

import android.app.Activity;
import android.graphics.Color;
import android.os.Bundle;

public class MainActivity extends Activity {

    RangeBar rangeBar;

    @Override
    protected void onCreate(Bundle savedInstanceState) {
        super.onCreate(savedInstanceState);
        setContentView(R.layout.activity_main);

        rangeBar = (RangeBar)findViewById(R.id.rangebar);

        rangeBar.setTickCount(7);//有多少分割线
        rangeBar.setTickHeight(25);//分割线的高度

        rangeBar.setBarWeight(6);//分割线和滑动杆的粗细
        rangeBar.setBarColor(0xff000000);//分割线和滑动杆的颜色,

        rangeBar.setConnectingLineWeight(5);//设置被选中的区域的宽度
        rangeBar.setConnectingLineColor(Color.parseColor("#ff0000"));//选中区域的颜色

        rangeBar.setThumbImageNormal(R.drawable.thumb);//滑块普通状态时显示的图片
        rangeBar.setThumbImagePressed(R.drawable.ic_launcher);//滑块按下时显示的图片

        /**
         * 如果setThumbRadius(),setThumbColorNormal(),setThumbColorPressed()其中的一个或多个
         * 进行了设置那么rangbar会自动忽略已经设置好的滑块图片,这是需要注意的!!!
         */

        //rangeBar.setThumbRadius(20);//滑块的半径(>0),也就是设置滑块的大小。可以用setThumbRadius(-1)让其回到默认状态

        //设置滑块普通状态的颜色,这里会覆盖setThumbImageNormal的设置,如果想要恢复最原始的样子可以setThumbColorNormal(-1)
        //rangeBar.setThumbColorNormal(Color.parseColor("#0000ff"));
        //设置滑块普通状态的颜色,这里会覆盖setThumbImagePressed的设置,如果想要恢复最原始的样子可以setThumbColorPressed(-1)
        //rangeBar.setThumbColorPressed(Color.parseColor("#00ff00"));

        rangeBar.setThumbIndices(1, 5);//设置滑块距离左端的位置。这里设置为左滑块距离左边一个格子,右滑块距离左边5个格子


        //设置监听器
        rangeBar.setOnRangeBarChangeListener(new MyRangBarListener());
    }

    /**
     * @author:Jack Tony
     * @tips  :监听滑块选择的监听器
     * @date  :2014-10-22
     */
    private class MyRangBarListener implements OnRangeBarChangeListener{

        /**
         * 三个参数:
         * 1.rangbar对象
         * 2.左边的滑块距离左边的距离,这里的距离用每一格来代替
         * 3.右边滑块距离左边的距离,距离用滑块的格数来代替
         * 还需要注意的是:设置left = 2,表示左边滑块处于第三个分割线的位置。
         *
         * example:
         * leftThumbIndex = 2;rightThumbIndex = 5;
         *
         *            thumb          thumb     ← 这是左右滑块
         * |————|————|————|————|————|————|     ← 这里是分割线
         */
        @Override
        public void onIndexChangeListener(RangeBar rangeBar,
                int leftThumbIndex, int rightThumbIndex) {
            System.out.println("leftThumbIndex = "+ leftThumbIndex +
                    " rightThumbIndex = " + rightThumbIndex);
        }

    }

}
注意:如果setThumbRadius(),setThumbColorNormal(),setThumbColorPressed()其中的一个或多个进行了设置那么rangbar会自动忽略已经设置好的滑块图片,这是需要注意的!!!
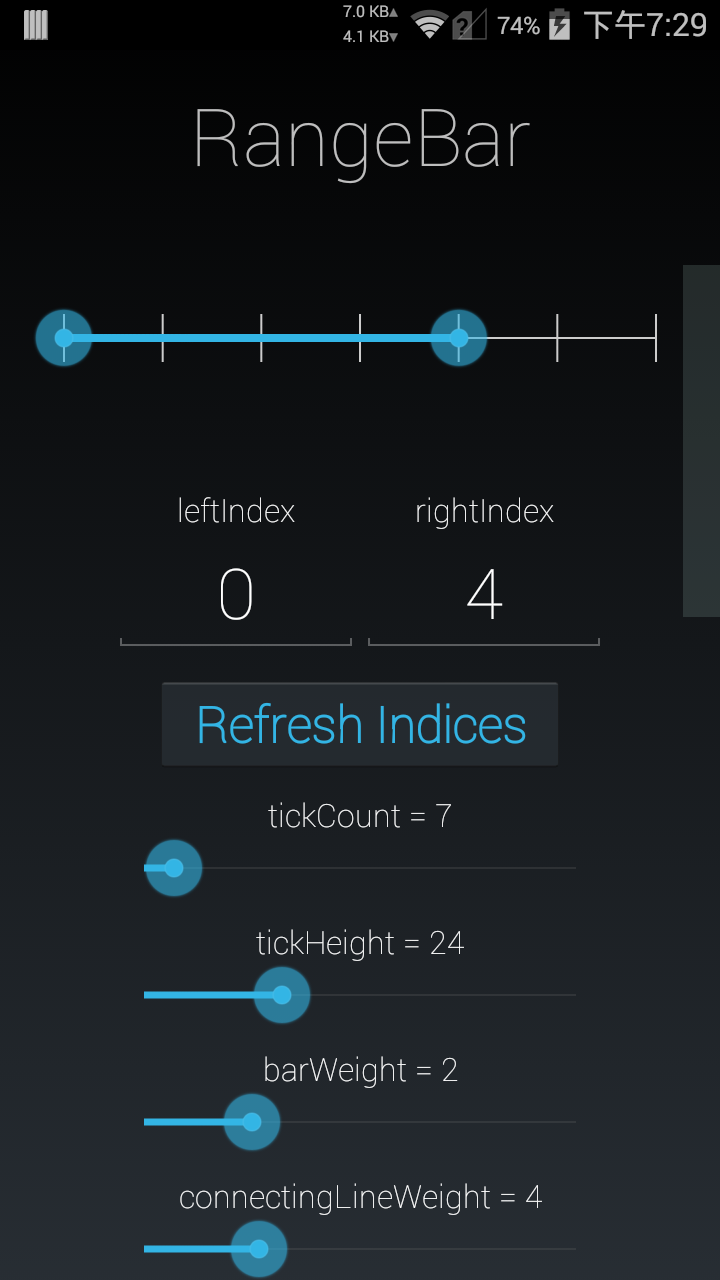
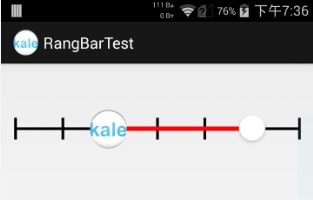
效果图:
属性对比表格:
来源:https://github.com/edmodo/range-bar/wiki
源码下载:http://download.csdn.net/detail/shark0017/8069581

 浙公网安备 33010602011771号