


eShopOnContainers 看微服务③:Identity Service
引言
通常,服务所公开的资源和 API 必须仅限受信任的特定用户和客户端访问。那进行 API 级别信任决策的第一步就是身份认证——确定用户身份是否可靠。
在微服务场景中,身份认证通常统一处理。一般有两种实现形式:
-
基于API 网关中心化认证:要求客户端必须都通过网关访问微服务。(这就要求提供一种安全机制来认证请求是来自于网关。)

-
基于安全令牌服务(STS)认证:所有的客户端先从STS获取令牌,然后请求时携带令牌完成认证。
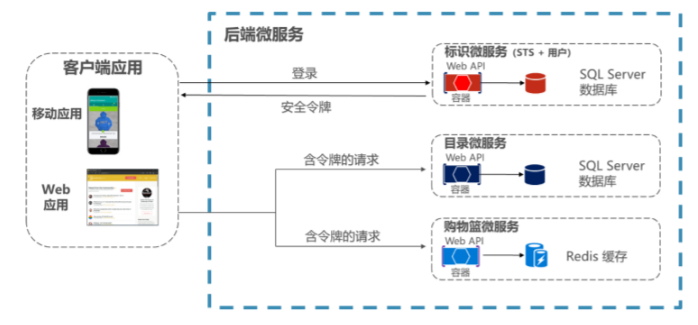
Identity Service就是使用第二种身份认证方式。
服务简介
Identity microservice 主要用于统一的身份认证和授权,为其他服务提供支撑。
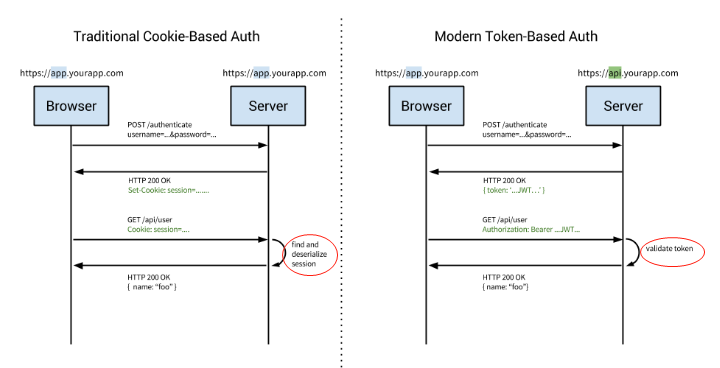
提到认证,大家最熟悉不过的当属Cookie认证了,它也是目前使用最多的认证方式。但Cookie认证也有其局限性:不支持跨域、移动端不友好等。而从当前的架构来看,需要支持移动端、Web端、微服务间的交叉认证授权,所以传统的基于Cookie的本地认证方案就行不通了。我们就需要使用远程认证的方式来提供统一的认证授权机制。
而远程认证方式当属:OAuth2.0和OpenID Connect了。借助OAuth2.0和OpenID Connect即可实现类似下图的认证体系:

而如何实现呢,借助:
- ASP.NET Core Identity
- IdentityServer4
基于Cookie的认证和基于Token的认证的差别如下所示:
架构模式
从目录结构可以看出它是一套MVC单层架构的网站。我们可以单独进行运行和调试,也可以把它放进自己的项目中。

主要依赖:
1、HealthCheck 健康检查
2、WebHost
3、Entity Framework
4、Autofac
6、其中IdentityServer4.AspNetIdentity又用到了ASP.NET Core Identity
启动流程
Program.cs
Main函数:


 1 public static void Main(string[] args)
 2         {
 3             BuildWebHost(args)
 4                 .MigrateDbContext<PersistedGrantDbContext>((_, __) => { })
 5                 .MigrateDbContext<ApplicationDbContext>((context, services) =>
 6                 {
 7                     var env = services.GetService<IHostingEnvironment>();
 8                     var logger = services.GetService<ILogger<ApplicationDbContextSeed>>();
 9                     var settings = services.GetService<IOptions<AppSettings>>();
10
11                     new ApplicationDbContextSeed()
12                         .SeedAsync(context, env, logger, settings)//初始化默认登录用户种子数据
13                         .Wait();
14                 })
15                 .MigrateDbContext<ConfigurationDbContext>((context, services) =>
16                 {
17                     var configuration = services.GetService<IConfiguration>();
18
19                     new ConfigurationDbContextSeed()
20                         .SeedAsync(context, configuration)//初始化identity server种子数据
21                         .Wait();
22                 }).Run();
23         }
BuildWebHost函数:
public static IWebHost BuildWebHost(string[] args) =>
            WebHost.CreateDefaultBuilder(args)
                .UseKestrel()//使用Kestrel作为的web服务器
                .UseHealthChecks("/hc")//健康检查
                .UseContentRoot(Directory.GetCurrentDirectory())//将当前项目的根目录作为ContentRoot目录
                .UseIISIntegration()//使用IIS
                .UseStartup<Startup>()//使用startup类
                .ConfigureAppConfiguration((builderContext, config) =>
                {
                    var builtConfig = config.Build();

                    var configurationBuilder = new ConfigurationBuilder();

                    if (Convert.ToBoolean(builtConfig["UseVault"]))
                    {
                        configurationBuilder.AddAzureKeyVault(
                            $"https://{builtConfig["Vault:Name"]}.vault.azure.net/",
                            builtConfig["Vault:ClientId"],
                            builtConfig["Vault:ClientSecret"]);
                    }

                    configurationBuilder.AddEnvironmentVariables();

                    config.AddConfiguration(configurationBuilder.Build());
                })
                .ConfigureLogging((hostingContext, builder) =>
                {
                    builder.AddConfiguration(hostingContext.Configuration.GetSection("Logging"));
                    builder.AddConsole();
                    builder.AddDebug();
                })
                .UseApplicationInsights()
                .Build();
其中有一个UseHealthChecks,这是一个对项目健康的检查。
   健康检查,其实这个名称已经很明确了,它是检查你的应用程序是否健康运行的一种方式。随着当前各类项目越来越多的应用程序正在转向微
服务式架构,健康检查就变得尤为关键。虽然微服务体系结构具有许多好处,但其中一个缺点就是为了确保所有这些服务都正常运行的操作开销
更高。你不在是监视一个庞大的整体项目的健康状况,而是需要监控许多不同服务的状态,甚至这些服务通常只负责一件事情。健康检查(Heatlh
 Checks)通常与一些服务发现工具结合使用,如Consul  ,来监控您的微服务器,来观测您的服务是否健康运行。

   健康检查有很多种不同的方法,但最常见的方法是将HTTP端点暴露给专门用于健康检查的应用程序。一般来说,如果一切情况都很好,你的服
务将返回200的状态码,然而任何非200的代码则意味着出现问题。例如,如果发生错误,你可能会返回500以及一些出错的JSON信息。
Startup.cs
  1     public class Startup
  2     {
  3         public Startup(IConfiguration configuration)
  4         {
  5             Configuration = configuration;
  6         }
  7
  8         public IConfiguration Configuration { get; }
  9
 10         /// <summary>
 11         /// 来配置我们应用程序中的各种服务,
 12         /// 它通过参数获取一个IServiceCollection 实例 。
 13         /// </summary>
 14         /// <param name="services"></param>
 15         /// <returns>IServiceProvider</returns>
 16         public IServiceProvider ConfigureServices(IServiceCollection services)
 17         {
 18             RegisterAppInsights(services);
 19
 20             // Add framework services.
 21             //注册EF使用的DbContext
 22             services.AddDbContext<ApplicationDbContext>(options =>
 23             //使用mysql
 24              options.UseSqlServer(Configuration["ConnectionString"],//数据库连接字符串
 25                                      sqlServerOptionsAction: sqlOptions =>
 26                                      {
 27                                          sqlOptions.MigrationsAssembly(typeof(Startup).GetTypeInfo().Assembly.GetName().Name);
 28                                          //Configuring Connection Resiliency: https://docs.microsoft.com/en-us/ef/core/miscellaneous/connection-resiliency
 29                                          sqlOptions.EnableRetryOnFailure(maxRetryCount: 15, maxRetryDelay: TimeSpan.FromSeconds(30), errorNumbersToAdd: null);
 30                                      }));
 31             //使用Microsoft asp.net identity系统
 32             services.AddIdentity<ApplicationUser, IdentityRole>()
 33                 .AddEntityFrameworkStores<ApplicationDbContext>()//使用EF
 34                 .AddDefaultTokenProviders();
 35
 36             services.Configure<AppSettings>(Configuration);
 37
 38             services.AddMvc();//使用MVC
 39
 40             //对集群对配置
 41             if (Configuration.GetValue<string>("IsClusterEnv") == bool.TrueString)
 42             {
 43                 services.AddDataProtection(opts =>
 44                 {
 45                     //在集群环境中,如果不被具体的硬件机器环境所限制,就要排除运行机器的一些差异,
 46                     //就需要抽象出来一些特定的标识,来标识应用程序本身并且使用该标识来区分不同的应用程序。
 47                     //这个时候,我们可以指定ApplicationDiscriminator。
 48                     opts.ApplicationDiscriminator = "eshop.identity";
 49                     //集群环境下同一应用程序他们需要设定为相同的值(ApplicationName or ApplicationDiscriminator)。
 50                 })
 51                 .PersistKeysToRedis(ConnectionMultiplexer.Connect(Configuration["DPConnectionString"]), "DataProtection-Keys");
 52             }
 53
 54             //注册健康检查
 55             services.AddHealthChecks(checks =>
 56             {
 57                 var minutes = 1;
 58                 if (int.TryParse(Configuration["HealthCheck:Timeout"], out var minutesParsed))
 59                 {
 60                     minutes = minutesParsed;
 61                 }
 62                 //数据库健康检查
 63                 checks.AddSqlCheck("Identity_Db", Configuration["ConnectionString"], TimeSpan.FromMinutes(minutes));
 64             });
 65
 66             //注册登陆注册的应用服务(ApplicationService)
 67             services.AddTransient<ILoginService<ApplicationUser>, EFLoginService>();
 68             services.AddTransient<IRedirectService, RedirectService>();
 69
 70             var connectionString = Configuration["ConnectionString"];
 71             var migrationsAssembly = typeof(Startup).GetTypeInfo().Assembly.GetName().Name;
 72
 73             // 注册 IdentityServer
 74             services.AddIdentityServer(x =>
 75             {
 76                 x.IssuerUri = "null";
 77                 x.Authentication.CookieLifetime = TimeSpan.FromHours(2);//cookie有效期两小时
 78             })
 79             .AddSigningCredential(Certificate.Get())//设置加密证书
 80             //配置IdentityServer。IUserClaimsPrincipalFactory、IResourceOwnerPasswordValidator和IProfileService的网络标识实现。
 81             .AddAspNetIdentity<ApplicationUser>()
 82             .AddConfigurationStore(options => //使用IdentityServer配置IClientStore、IResourceStore和ICorsPolicyService的EF实现。
 83             {
 84                 options.ConfigureDbContext = builder => builder.UseSqlServer(connectionString,
 85                                     sqlServerOptionsAction: sqlOptions =>
 86                                     {
 87                                         sqlOptions.MigrationsAssembly(migrationsAssembly);
 88                                         //Configuring Connection Resiliency: https://docs.microsoft.com/en-us/ef/core/miscellaneous/connection-resiliency
 89                                         sqlOptions.EnableRetryOnFailure(maxRetryCount: 15, maxRetryDelay: TimeSpan.FromSeconds(30), errorNumbersToAdd: null);
 90                                     });
 91             })
 92             //注册IPersistedGrantStore的实现,用于存储AuthorizationCode和RefreshToken等等,默认实现是存储在内存中,
 93             //如果服务重启那么这些数据就会被清空了,因此实现IPersistedGrantStore将这些数据写入到数据库中
 94             .AddOperationalStore(options =>
 95                 {
 96                     options.ConfigureDbContext = builder => builder.UseSqlServer(connectionString,
 97                                     sqlServerOptionsAction: sqlOptions =>
 98                                     {
 99                                         sqlOptions.MigrationsAssembly(migrationsAssembly);
100                                         //Configuring Connection Resiliency: https://docs.microsoft.com/en-us/ef/core/miscellaneous/connection-resiliency
101                                         sqlOptions.EnableRetryOnFailure(maxRetryCount: 15, maxRetryDelay: TimeSpan.FromSeconds(30), errorNumbersToAdd: null);
102                                     });
103                 })
104             //注册IProfileService,该接口允许IdentityServer连接到用户。
105             .Services.AddTransient<IProfileService, ProfileService>();
106
107             //使用autofac
108             var container = new ContainerBuilder();
109             container.Populate(services);
110
111             return new AutofacServiceProvider(container.Build());
112         }
113
114         // This method gets called by the runtime. Use this method to configure the HTTP request pipeline.
115         public void Configure(IApplicationBuilder app, IHostingEnvironment env, ILoggerFactory loggerFactory)
116         {
117             //配置日志
118             loggerFactory.AddConsole(Configuration.GetSection("Logging"));
119             loggerFactory.AddDebug();
120             loggerFactory.AddAzureWebAppDiagnostics();
121             loggerFactory.AddApplicationInsights(app.ApplicationServices, LogLevel.Trace);
122
123             if (env.IsDevelopment())
124             {
125                 app.UseDeveloperExceptionPage();
126                 app.UseDatabaseErrorPage();
127             }
128             else
129             {
130                 app.UseExceptionHandler("/Home/Error");
131             }
132
133             var pathBase = Configuration["PATH_BASE"];
134             if (!string.IsNullOrEmpty(pathBase))
135             {
136                 loggerFactory.CreateLogger("init").LogDebug($"Using PATH BASE '{pathBase}'");
137                 app.UsePathBase(pathBase);
138             }
139
140
141 #pragma warning disable CS1998 // Async method lacks 'await' operators and will run synchronously
142             app.Map("/liveness", lapp => lapp.Run(async ctx => ctx.Response.StatusCode = 200));
143 #pragma warning restore CS1998 // Async method lacks 'await' operators and will run synchronously
144
145             //使用StaticFiles,等于启动了静态文件服务器功能。wwwroot 就是靠这个中间件读取的。
146             //也可以不使用wwwroot,并且制定自己对目录。传入参数就可以了。
147             app.UseStaticFiles();
148
149
150             // Make work identity server redirections in Edge and lastest versions of browers. WARN: Not valid in a production environment.
151             app.Use(async (context, next) =>
152             {
153                 context.Response.Headers.Add("Content-Security-Policy", "script-src 'unsafe-inline'");
154                 await next();
155             });
156
157             //处理代理服务器和负载均衡对解决方案,
158             //详情 https://docs.microsoft.com/zh-cn/aspnet/core/host-and-deploy/proxy-load-balancer?view=aspnetcore-2.1
159             app.UseForwardedHeaders();
160             //使用IdentityServer4
161             app.UseIdentityServer();
162
163             //配置MVC
164             app.UseMvc(routes =>
165             {
166                 routes.MapRoute(
167                     name: "default",
168                     template: "{controller=Home}/{action=Index}/{id?}");
169             });
170         }
171
172         /// <summary>
173         /// 应用监控
174         /// </summary>
175         /// <param name="services"></param>
176         private void RegisterAppInsights(IServiceCollection services)
177         {
178             services.AddApplicationInsightsTelemetry(Configuration);
179             var orchestratorType = Configuration.GetValue<string>("OrchestratorType");
180
181             if (orchestratorType?.ToUpper() == "K8S")
182             {
183                 // Enable K8s telemetry initializer
184                 services.EnableKubernetes();
185             }
186             if (orchestratorType?.ToUpper() == "SF")
187             {
188                 // Enable SF telemetry initializer
189                 services.AddSingleton<ITelemetryInitializer>((serviceProvider) =>
190                     new FabricTelemetryInitializer());
191             }
192         }
193     }
ASP.NET Core Identity && IdentityServer4简介
ASP.NET Core Identity用于构建ASP.NET Core Web应用程序的成员资格系统,包括成员资格,登录和用户数据(包括登录信息、角色和声明)。
ASP.NET Core Identity封装了User、Role、Claim等身份信息,便于我们快速完成登录功能的实现,并且支持第三方登录(Google、Facebook、QQ、Weixin等,支持开箱即用[第三方身份提供商列表]),以及双重验证,同时内置支持Bearer 认证(令牌认证)。
虽然ASP.NET Core Identity已经完成了绝大多数的功能,且支持第三方登录(第三方为其用户颁发令牌),但若要为本地用户颁发令牌,则需要自己实现令牌的颁发和验证逻辑。换句话说,我们需要自行实现OpenId Connect协议。
OpenID Connect 1.0 是基于OAuth 2.0协议之上的简单身份层,它允许客户端根据授权服务器的认证结果最终确认终端用户的身份,以及获取基本的用户信息。
而IdentityServer4就是为ASP.NET Core量身定制的实现了OpenId Connect和OAuth2.0协议的认证授权中间件。IdentityServer4在ASP.NET Core Identity的基础上,提供令牌的颁发验证等。
相关知识:
认证流程
在ASP.NET Core中使用的是基于申明(Claim)的认证,而什么是申明(Cliam)呢?
Claim 是关于一个人或组织的某个主题的陈述,比如:一个人的名称,角色,个人喜好,种族,特权,社团,能力等等。它本质上就是一个键值对,是一种非常通用的保存用户信息的方式,可以很容易的将认证和授权分离开来,前者用来表示用户是/不是什么,后者用来表示用户能/不能做什么。在认证阶段我们通过用户信息获取到用户的Claims,而授权便是对这些的Claims的验证,如:是否拥有Admin的角色,姓名是否叫XXX等等。
认证主要与以下几个核心对象打交道:
- Claim(身份信息)
- ClaimsIdentity(身份证)
- ClaimsPrincipal (身份证持有者)
- AuthorizationToken (授权令牌)
- IAuthenticationScheme(认证方案)
- IAuthenticationHandler(与认证方案对应的认证处理器)
- IAuthenticationService (向外提供统一的认证服务接口)
那其认证流程是怎样的呢?
1、用户打开登录界面,输入用户名密码先行登录,服务端先行校验用户名密码是否有效,有效则返回用户实例(User)。
2、这时进入认证准备阶段,根据用户实例携带的身份信息(Claim),创建身份证(ClaimsIdentity),然后将身份证交给身份证持有者(ClaimsPrincipal)持有。
3、接下来进入真正的认证阶段,根据配置的认证方案(IAuthenticationScheme),使用相对应的认证处理器(IAuthenticationHandler)进行认证 。认证成功后发放授权令牌(AuthorizationToken)。该授权令牌包含后续授权阶段需要的全部信息。
授权流程
授权就是对于用户身份信息(Claims)的验证,,授权又分以下几种种:
- 基于Role的授权
- 基于Scheme的授权
- 基于Policy的授权
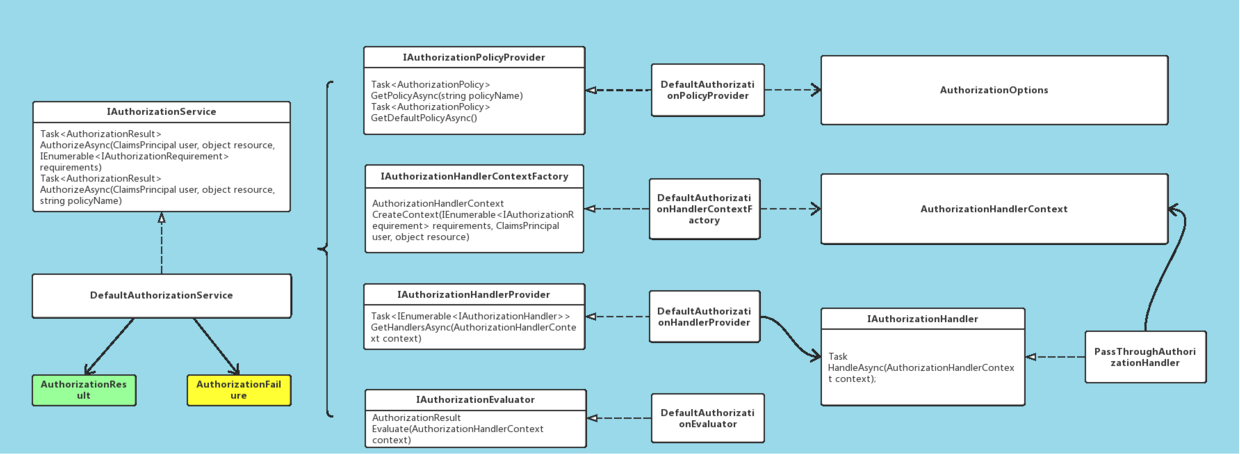
授权主要与以下几个核心对象打交道:
- IAuthorizationRequirement(授权条件)
- IAuthorizationService(授权服务)
- AuthorizationPolicy(授权策略)
- IAuthorizationHandler (授权处理器)
- AuthorizationResult(授权结果)
那授权流程是怎样的呢?
当收到授权请求后,由授权服务(IAuthorizationService)根据资源上指定的授权策略(AuthorizationPolicy)中包含的授权条件(IAuthorizationRequirement),找到相对应的授权处理器(IAuthorizationHandler )来判断授权令牌中包含的身份信息是否满足授权条件,并返回授权结果。
中间件集成
回过头来我们再来刷一遍startup代码中是怎么集成进Identity service的。
1. 首先是映射自定义扩展的User和Role
// 映射自定义的User,Role
services.AddIdentity<ApplicationUser, IdentityRole>()
    .AddEntityFrameworkStores<ApplicationDbContext>()//配置使用EF持久化存储
    .AddDefaultTokenProviders();//配置默认的TokenProvider用于变更密码和修改email时生成Token
2. 配置IdentityServer服务
services.AddIdentityServer(x =>
{
  ...
})
.AddSigningCredential(Certificate.Get())
.AddAspNetIdentity<ApplicationUser>()
.AddConfigurationStore(options =>
{
    ...
})
.AddOperationalStore(options =>
{
    ...
})
.Services.AddTransient<IProfileService, ProfileService>();
使用AddConfigurationStore和AddOperationalStore扩展方法就是用来来指定配置数据和操作数据基于EF进行持久化。
3. 添加IdentityServer中间件
app.UseIdentityServer();
4. 预置种子数据
需要预置Client和Resource写在Config.cs文件中,他们又是中main函数中被MigrateDbContext使用的。
- GetClients
public static IEnumerable<Client> GetClients(Dictionary<string,string> clientsUrl)
{
    return new List<Client>
    {
     //通过不同对ClientId设置不同客户端参数
        new Client
        ... ...        new Client
    };
}
- IdentityResources
身份资源是用户ID、姓名或电子邮件地址等数据
public static IEnumerable<IdentityResource> GetResources()
{
    return new List<IdentityResource>
    {
        new IdentityResources.OpenId(),
        new IdentityResources.Profile()
    };
}
- ApiResources
public static IEnumerable<ApiResource> GetApis()
{
    return new List<ApiResource>
    {
        new ApiResource("orders", "Orders Service"),
        new ApiResource("basket", "Basket Service"),
        new ApiResource("marketing", "Marketing Service"),
        new ApiResource("locations", "Locations Service"),
        new ApiResource("mobileshoppingagg", "Mobile Shopping Aggregator"),
        new ApiResource("webshoppingagg", "Web Shopping Aggregator"),
        new ApiResource("orders.signalrhub", "Ordering Signalr Hub")
    };
}
5、迁移数据库上下文
IdentityServer为配置数据和操作数据分别定义了DBContext用于持久化,配置数据对应ConfigurationDbContext,操作数据对应PersistedGrantDbContext。详细看main函数。
这篇文章使用了园子里『___知多少』文章对不少内容,表示感谢,原文链接eShopOnContainers 知多少[3]:Identity microservice。

 浙公网安备 33010602011771号