介绍一款网站前台图片滚动插件之"switchable"
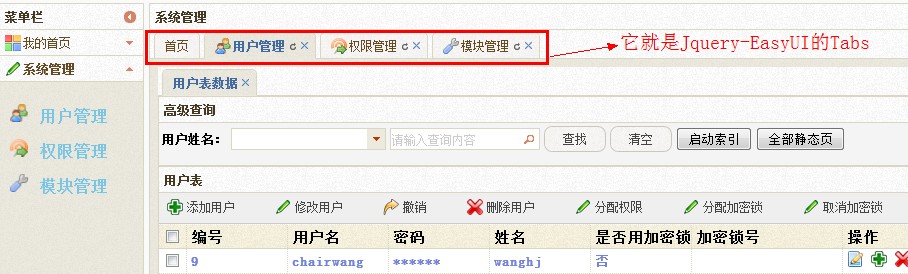
一、简单介绍:jQuery.Switchable是一款整合了Tabs、Slide、Scrollable等常见UI组件的jQuery插件,在这里,简答说说他的Slide。像Tabs,在Jquery-UI和Jquery-EasyUI中也有Tabs。在我的博客中也使用到了,请看完整“信息发布系统”系列,下面就是Jquery-EasyUI的Tabs。
下面 这些是使用Switchable实现的效果:
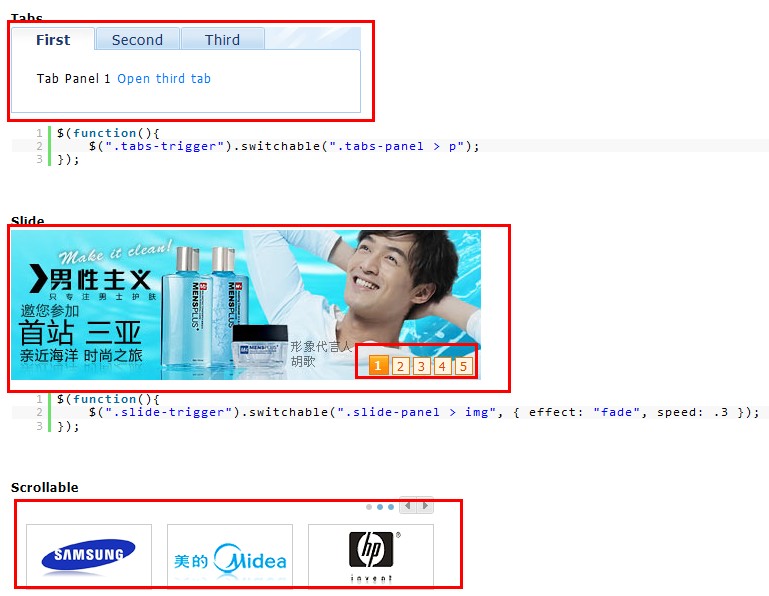
1、今天就说说前台图片滚动的“Slide”,大家应该并不陌生,因为大部分网站都用到了这种效果。如下:官方地址下载

2、今天就带着大家完成如上图的功能,包括添加完图片后,自动添加数字(1、2、3、4),导向相应的页面。
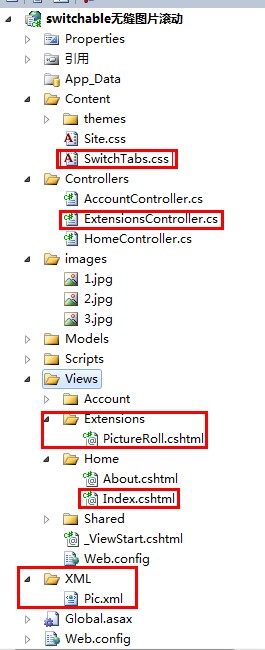
(1)项目结构如下:
(2)、首先得在Scripts文件夹下加入jquery.switchable[all].min.js。如果没有的话,请留言。
(3)、在Home/Index中View中:
1、$("#trigger1").switchable("#slide1 > div > img", { effect: "scroll", speed: .2 }).autoplay(2).carousel();
属性的简单介绍:
effect:切换效果。内置效果有:default":最简单的显/隐效果"还有“fade”,也可以自己手动添加效果。
speed:动画的速度,单位是秒。默认值即700毫秒。
delay:触发延迟,单位是秒。默认值即100毫秒。
easing:"swing":动画的效果。
circular:false,是否循环。
vertical:是否纵向切换。
方法的简答介绍:
autoplay:是否自动播放。
interval:自动播放间隔,单位是秒。默认值即3000毫秒。当插件的参数是数字时,就是配置这个属性。例如:
$("trigger-container-selector").switchable("panel-selector").autoplay(1.8);
autopause:通过该属性可以控制鼠标 mouseenter 进 panel 区域是否暂停动画。mouseleave 后将自动恢复动画。


@{
    ViewBag.Title = "主页";
}
<link href="@Url.Content("~/Content/SwitchTabs.css")" rel="stylesheet" type="text/css" />
<script src="@Url.Content("~/Scripts/jquery-1.4.4.min.js")" type="text/javascript"></script>
<script src="@Url.Content("~/Scripts/jquery.switchable[all].min.js")" type="text/javascript"></script>

<script type="text/javascript">
    $(document).ready(function () {
        $("#trigger1").switchable("#slide1 > div > img", { effect: "scroll", speed: .2 }).autoplay(2).carousel(); //图片滚动
    });
    function SetVisable(index) {
        $(".nav_content li").eq(index).addClass("current").siblings().removeClass("current");
    }
</script>

<div id="slide1" class="slide-panel" style="border-style: none; width: 680px;">
    <div>
        @Html.Raw(Server.HtmlDecode(Html.Action("PictureRoll", "Extensions").ToHtmlString()))
    </div>
</div>
<div id="trigger1" class="slide-trigger" align="center">
    <!-- 自动创建 triggers -->
</div>


@using (Html.BeginForm("AddImage", "Home", FormMethod.Post, new { enctype = "multipart/form-data" }))
{
    <input type="file" name="photo" />
    <input type="submit" value="添加" />
}


<div>

</div>
2、因为有一个<input type="file" />上传文件。所以得添加这种格式:{enctype = "multipart/form-data" },简单解释一下:是设置表单的MIME编码。默认情况,这个编码格式是application/x-www-form-urlencoded,不能用于文件上传;只有使用了multipart/form-data,才能完整的传递文件数据,进行下面的操作。
3、 @Html.Raw(Server.HtmlDecode(Html.Action("PictureRoll", "Extensions").ToHtmlString())),图片这部分是在Extensions中添加了一个Action,渲染出来图片。下面看看Extensions/PictureRoll中的内容,使用的是:XElement,进行XML的操作。读取XML的数据,不介绍它的使用了,都能看懂。使用System.Xml.Linq.最后ViewBag.picture=picture。把图片渲染出来。前台进行接收。
        private const string picturePath = "~/XML/Pic.xml";
        public ActionResult PictureRoll()
        {
            string picture = string.Empty;
            XElement xe = XElement.Load(Server.MapPath(picturePath));
            var query = from value in xe.Elements("img")
                        select value;
            foreach (var item in query)
            {
                picture += "<img src=\"" + item.Element("path").Value + "\" title=\"" + item.Element("title").Value + "\" alt=\"" + item.Element("title").Value + "\" />";
            }
            ViewBag.picture = picture;
            return View();
        }
@{
    Layout = null;
}
@ViewBag.picture
4、还得添加一个CSS。改变图片和1234链接的样式。
/* SwichTab图片滚动 */

.slide-trigger{position:relative;top:-25px;width:465px;padding-right:5px;}.slide-trigger a{display:inline-block;margin-right:3px;width:16px;height:16px;line-height:16px;text-align:center;color:#d94b01;background-color:#fff5e1;border:1px solid #f47500;outline:none;overflow:hidden;text-decoration:none;}.slide-trigger a:hover{text-decoration:none;}.slide-trigger a.current{width:18px;height:18px;line-height:18px;font-weight:700;color:#FFF;background:url(/images/t-bg.png) repeat-x;}.slide-panel{position:relative;width:950px;height:240px;overflow:hidden;border:1px solid #B6D1E6;}.slide-panel div{position:absolute;}.slide-panel div img{display:block;width:950px;height:240px;}
#slide1 div { width:2010em; /* 设置足够的宽度 */ }
#slide1 div img { float:left; }
/* SwichTab图片滚动 */
5、现在运行代码:出现之前介绍的效果了吧。

(4)添加:上传图片的功能。
1、遍历上传上来的文件,使用HttpPostedFileBase进行接收。注意:参数 photo得和前台的name得一致。
2、判断上传文件的类型,防止一些恶意用户,上传木马。
3、item.SaveAs(Server.MapPath("~/images/" + Path.GetFileName(item.FileName)));进行保存文件。
4、接下来又是XElement的使用,SetElementValue,为节点进行赋值。最后也得保存!Save();
5、出现上图效果!
 private const string picturePath = "~/XML/Pic.xml";
        [HttpPost]
        public ActionResult AddImage(HttpPostedFileBase[] photo)
        {
            foreach (var item in photo)
            {
                if (item!=null)
                {
                    var extention = Path.GetExtension(item.FileName);
                    if (extention == ".aspx" || extention == ".html" || extention == ".exe" || extention == ".asp" || extention == ".jsp" || extention == ".js" || extention == ".htm" || extention == ".php")
                    {
                        return Content("<script>alert('不能上传这类型文件')</script>");
                    }

                    item.SaveAs(Server.MapPath("~/images/" + Path.GetFileName(item.FileName)));
                    XElement xe = XElement.Load(Server.MapPath(picturePath));
                    XElement element = new XElement(XName.Get("img"));
                    element.SetElementValue("id", DateTime.Now.ToString("yyyyMMddhhmmssfff"));
                    element.SetElementValue("title", Path.GetFileName(item.FileName));
                    element.SetElementValue("path", "/images/" + Path.GetFileName(item.FileName));
                    xe.Add(element);
                    xe.Save(Server.MapPath(picturePath));
                }
            }
            return RedirectToAction("Index","Home");
        }
二、总结:一个图片焦点轮换的效果的实现,如果对您有一点点帮助的话,右下角”推荐“支持一下,让更多的朋友来交流学习!如有问题,请留言! 今天下午有中国男篮亚锦赛,得赶快回家看了。支持一下中国男篮吧。

 浙公网安备 33010602011771号